Release Notes
1/23/2025
V2025.1.22.0
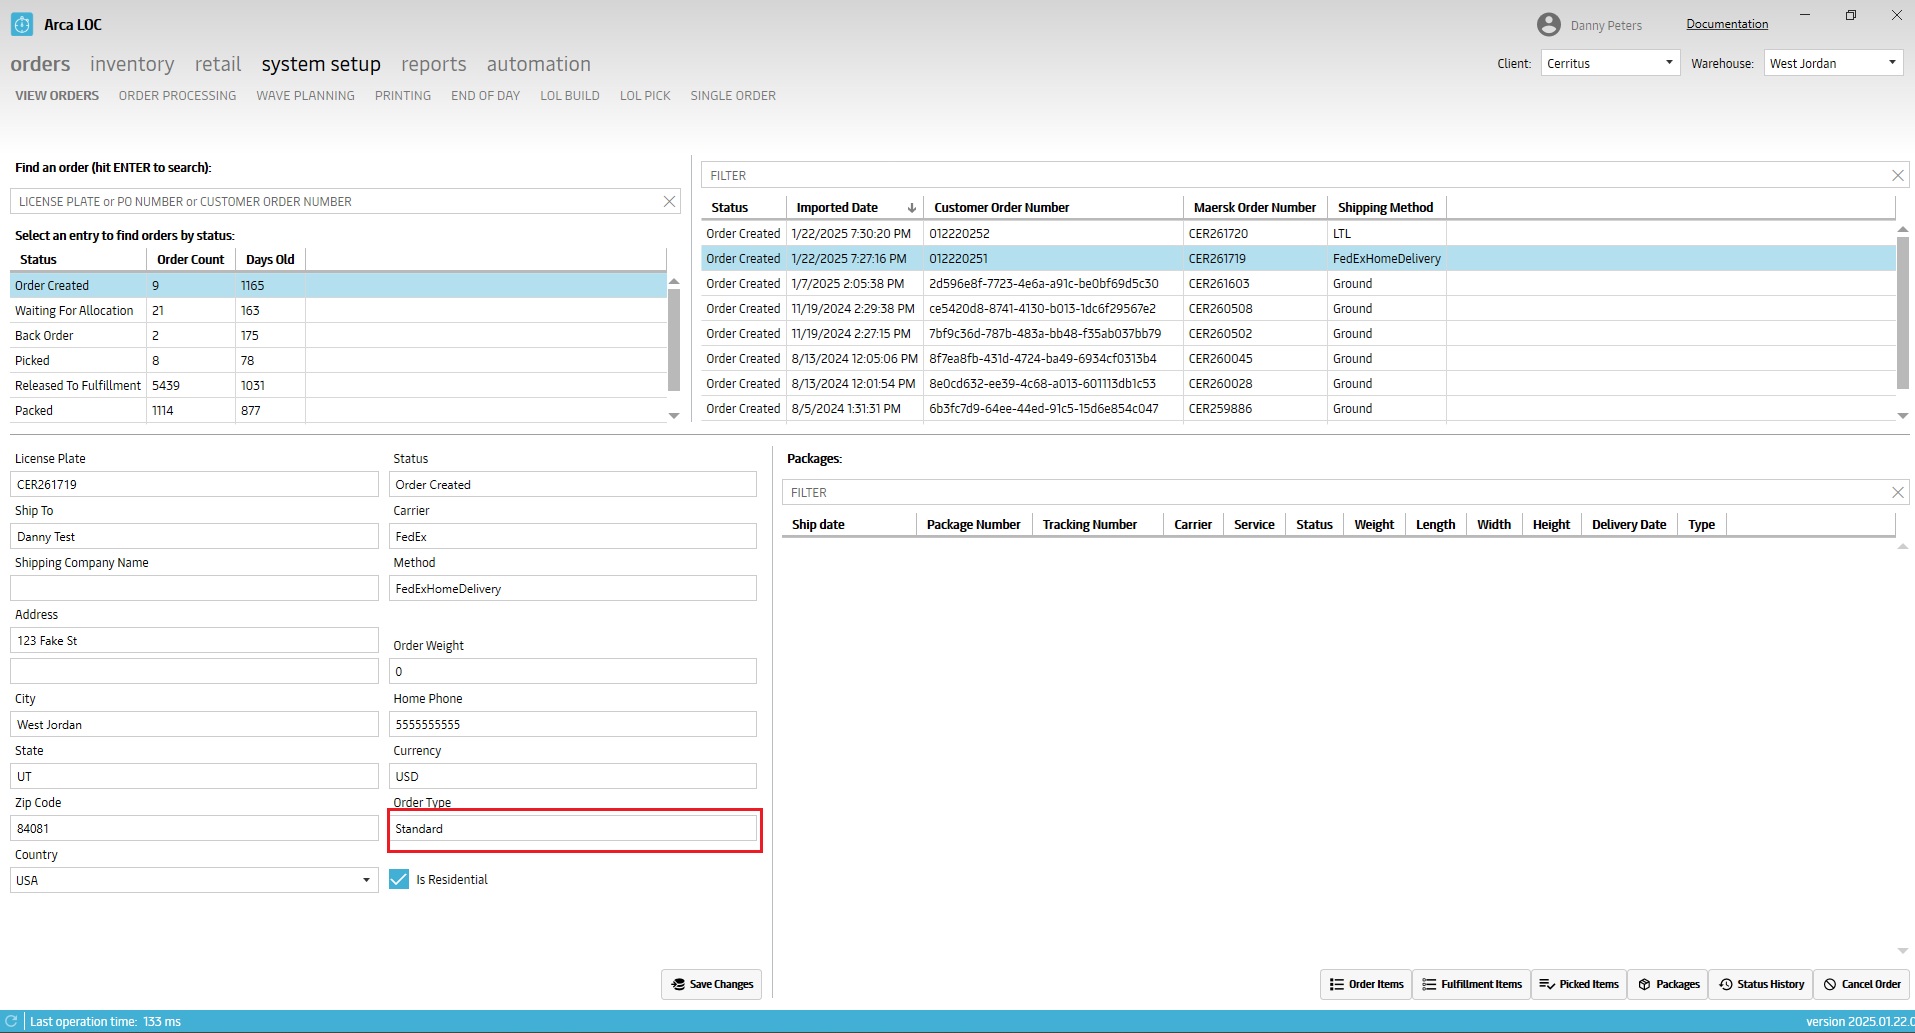
- Orders/View Orders – Order Type is no longer a drop-down selectable menu. It is read only, changing order types is not allowed on this screen. Backend update for mapping of bulk/transfer order types.
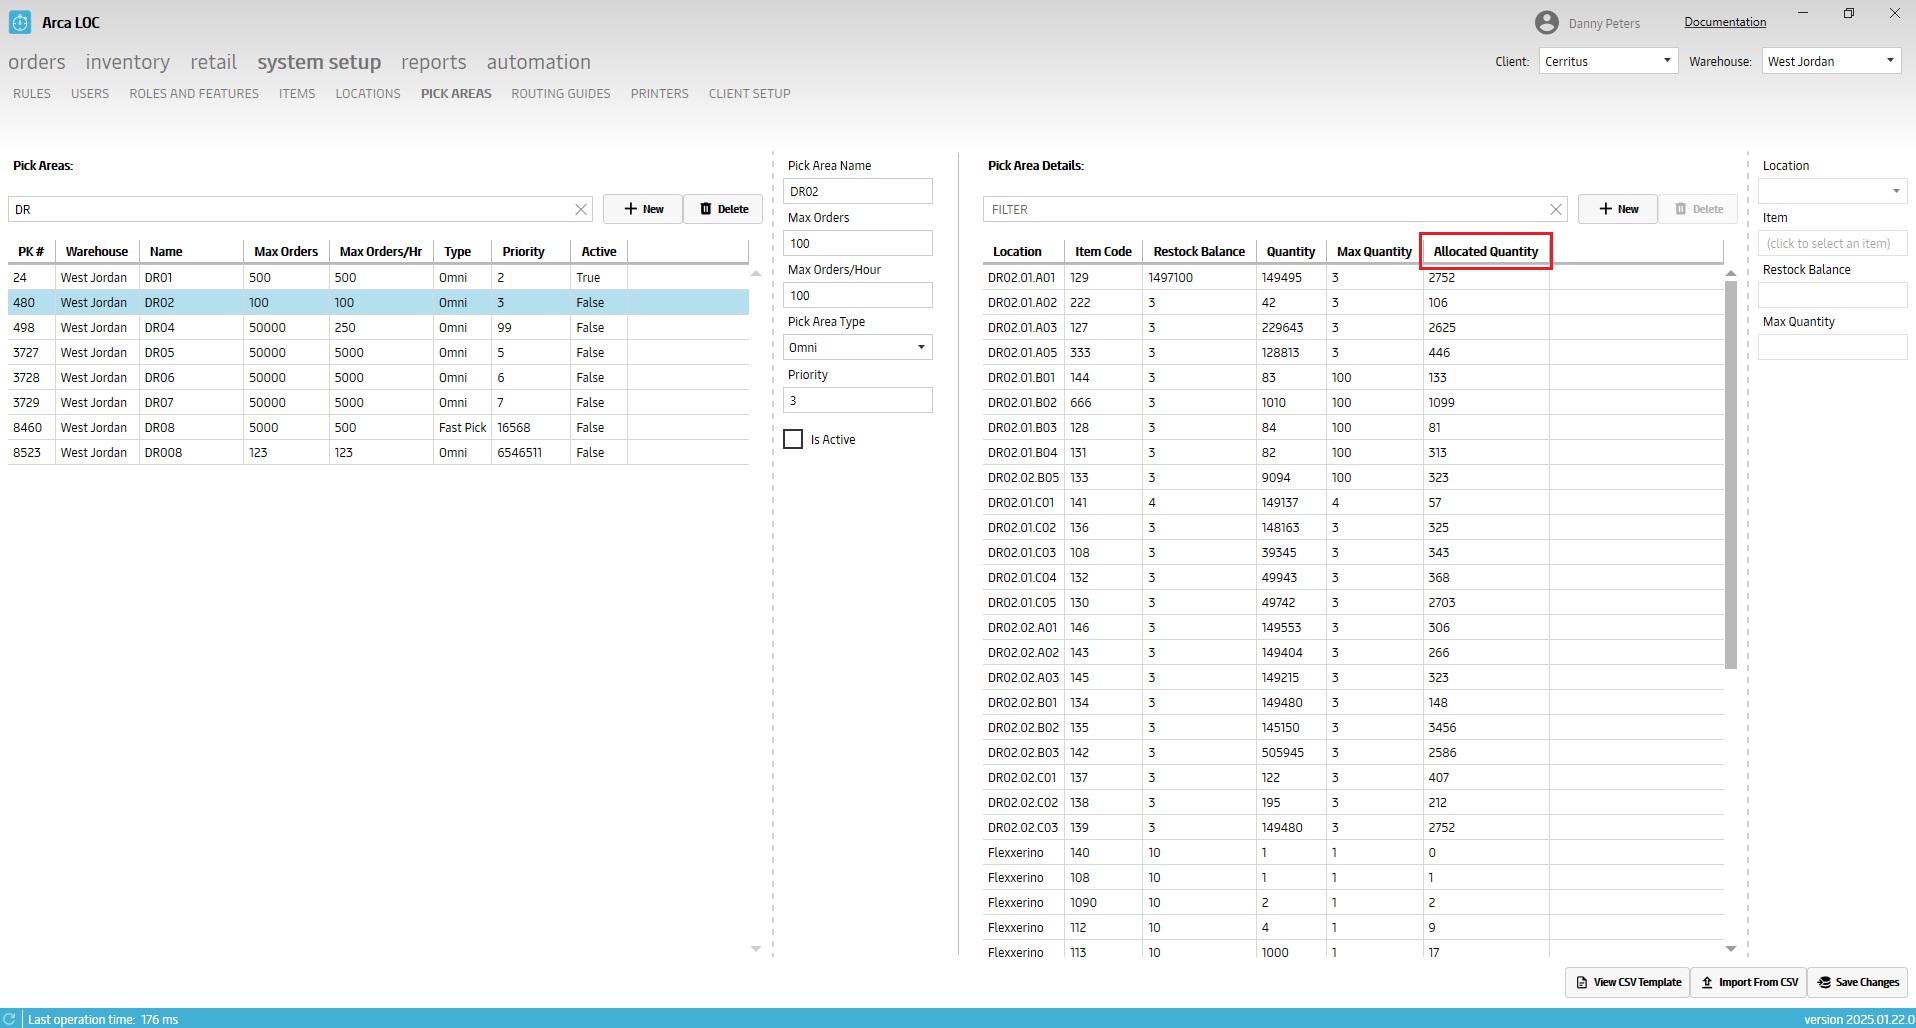
- System Setup/Pick Areas – Added column to display Allocated Quantity in Pick Area Details grid.
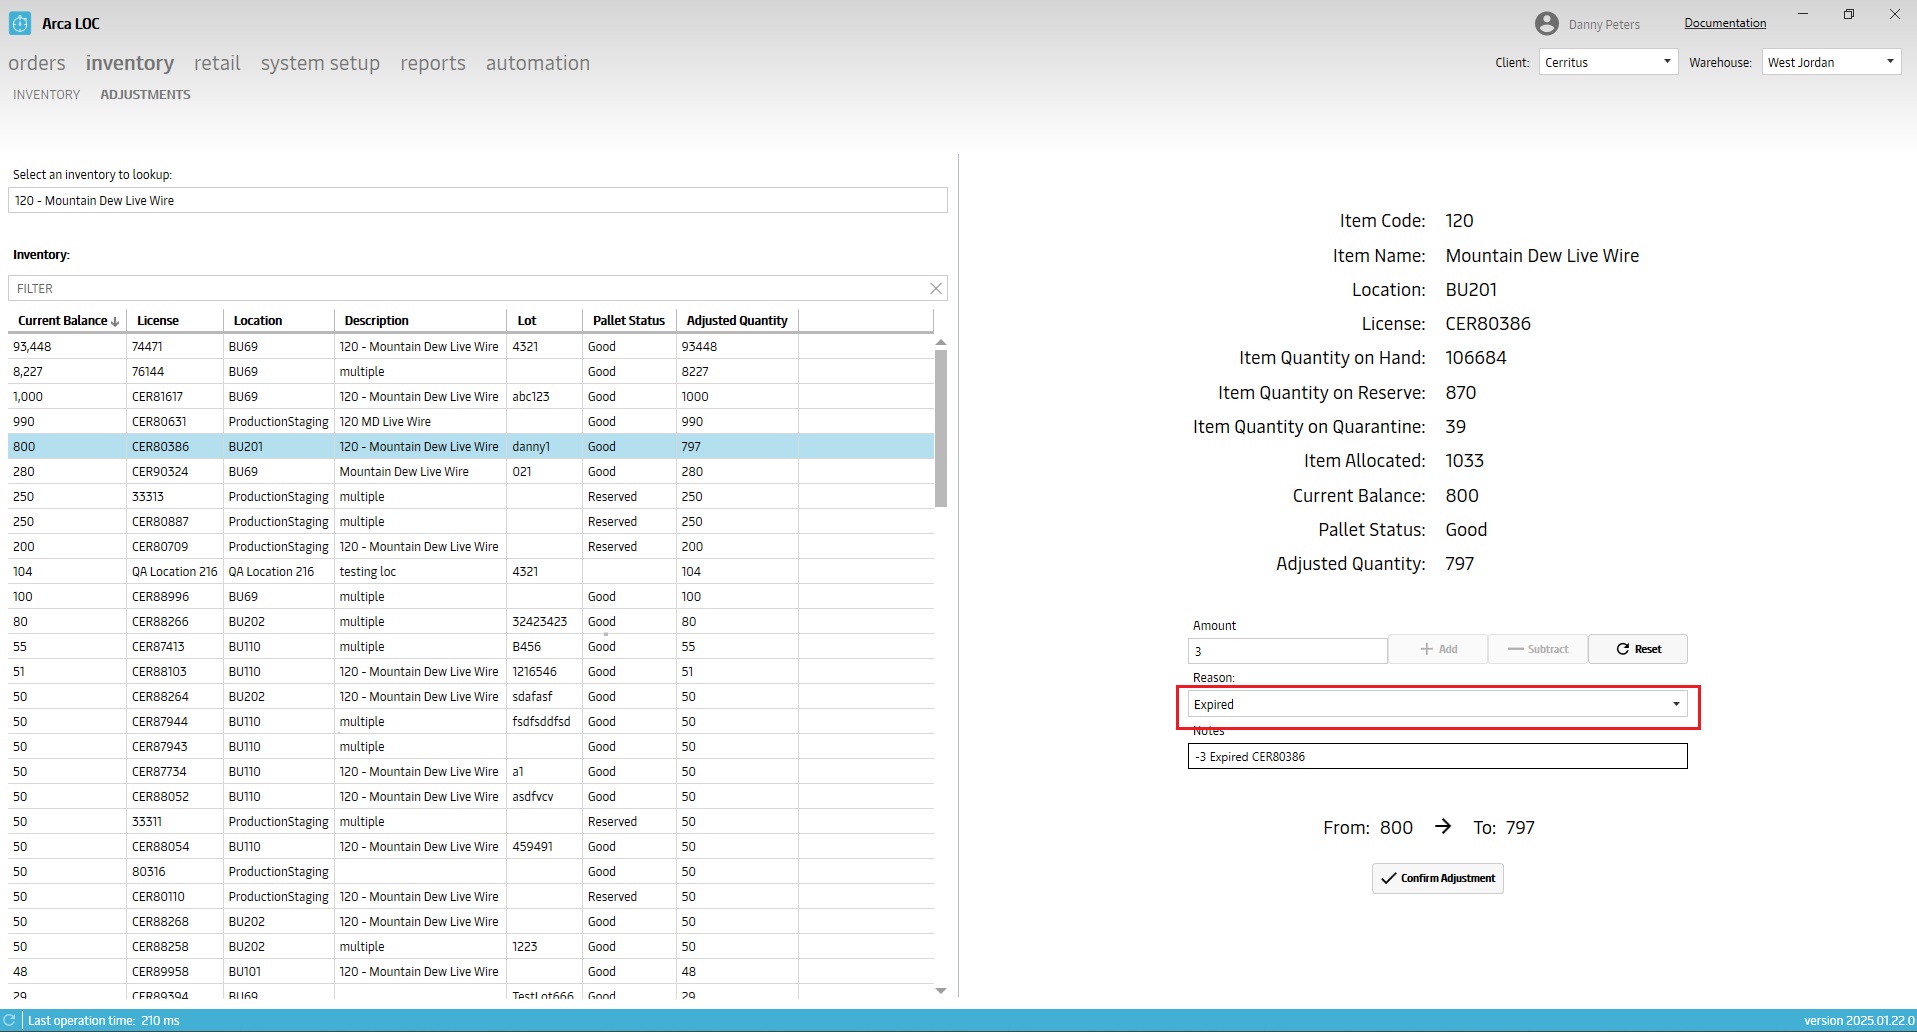
- Inventory/Adjustments – Added new Expired reason to the drop-down list.
Previous Release Notes
11/7/2024
V2024.11.7.0
General - Backend code updates for new order types
General – Backend code updates to log username on item save/update.
Orders/Wave Planning – Updates to work with new Bulk and Transfer order types.
9/5/2024
V2024.9.5.0
- Inventory/Inventory – mapped new security feature to edit and add new pallet buttons. Access is restricted to those with this feature attached to their user role.
8/8//2024
V2024.8.8.0
Orders/Wave Planning – bug fixes. Click on column header to sort list in all modes. Populated missing quantity fields when changing Mode to Items view.
Inventory/Inventory – Item Ledger tab. Internal code updates to make ledger adjustment reasons load dynamically. This improves app performance and lists all the ledger entries.
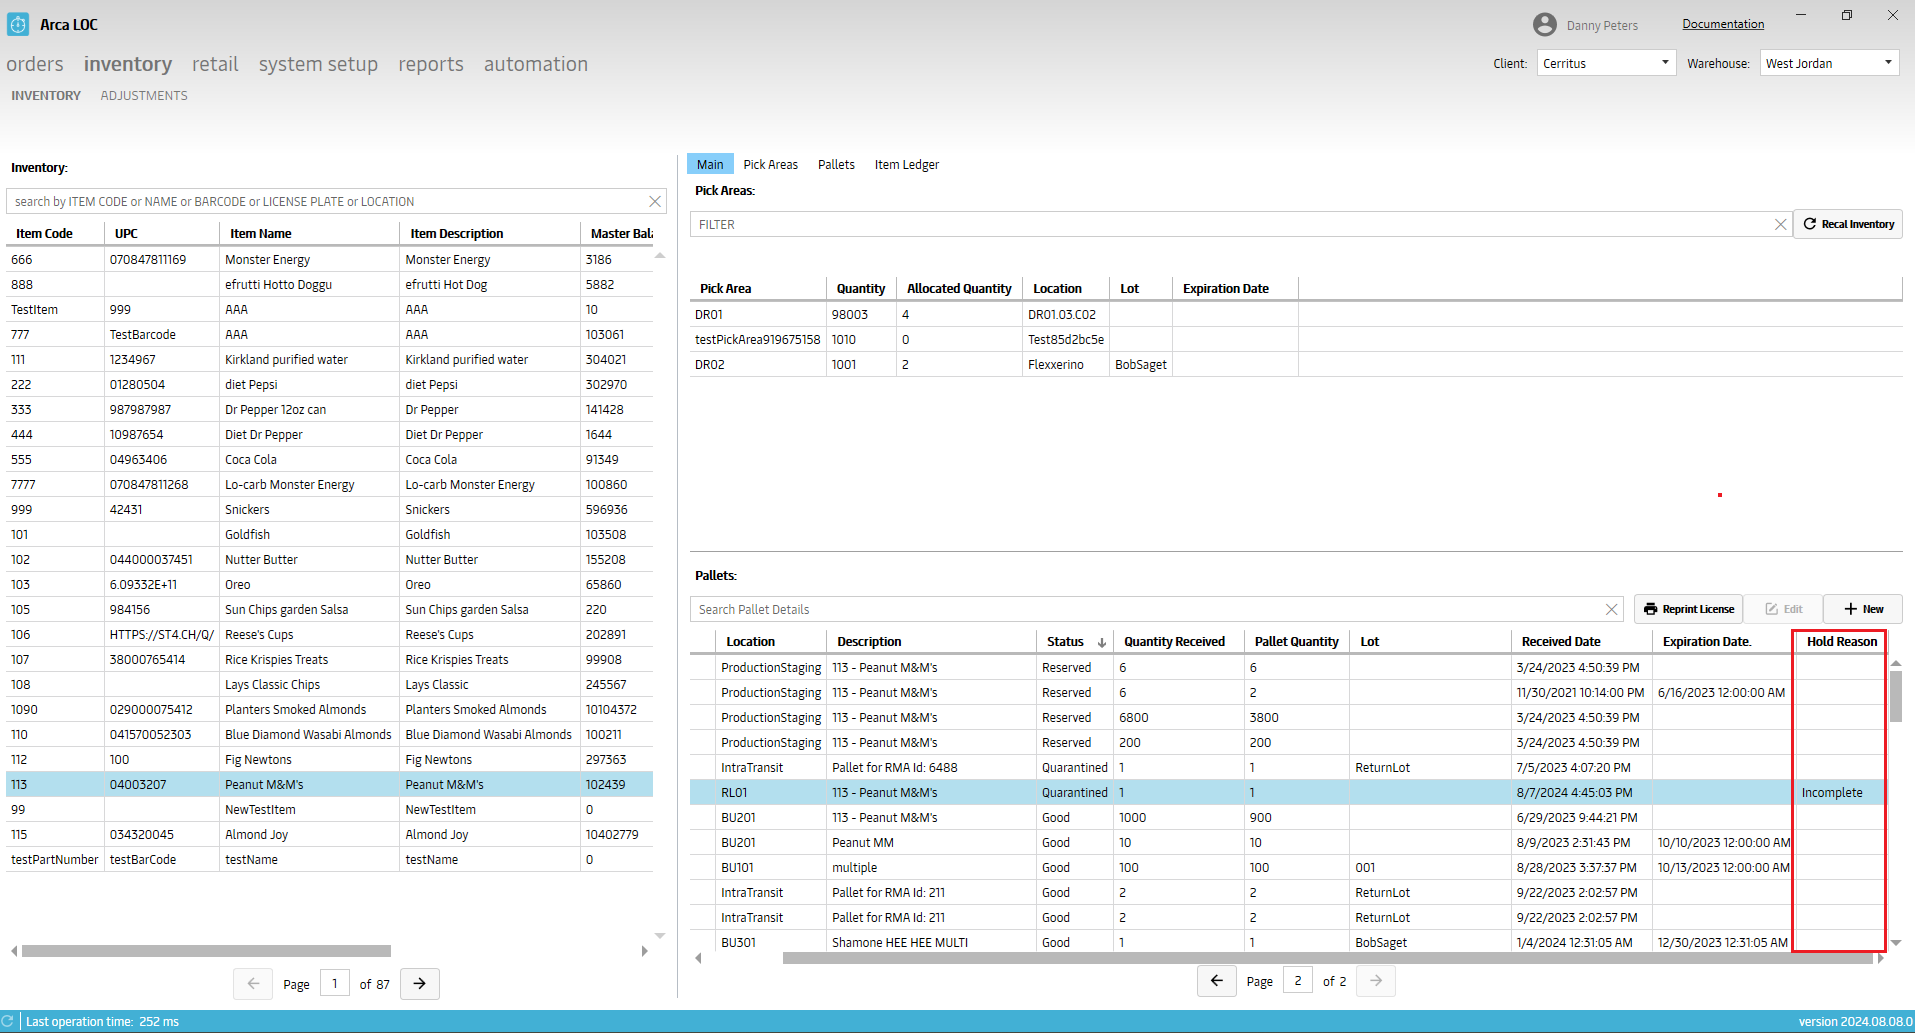
Inventory/Inventory – New Hold Reason display columns in Main and Pallets tabs.
7/24/2024
V2024.7.22.0
General – Internal code refresh to map USPS, Ground Advantage and other recently added shipping carrier services.
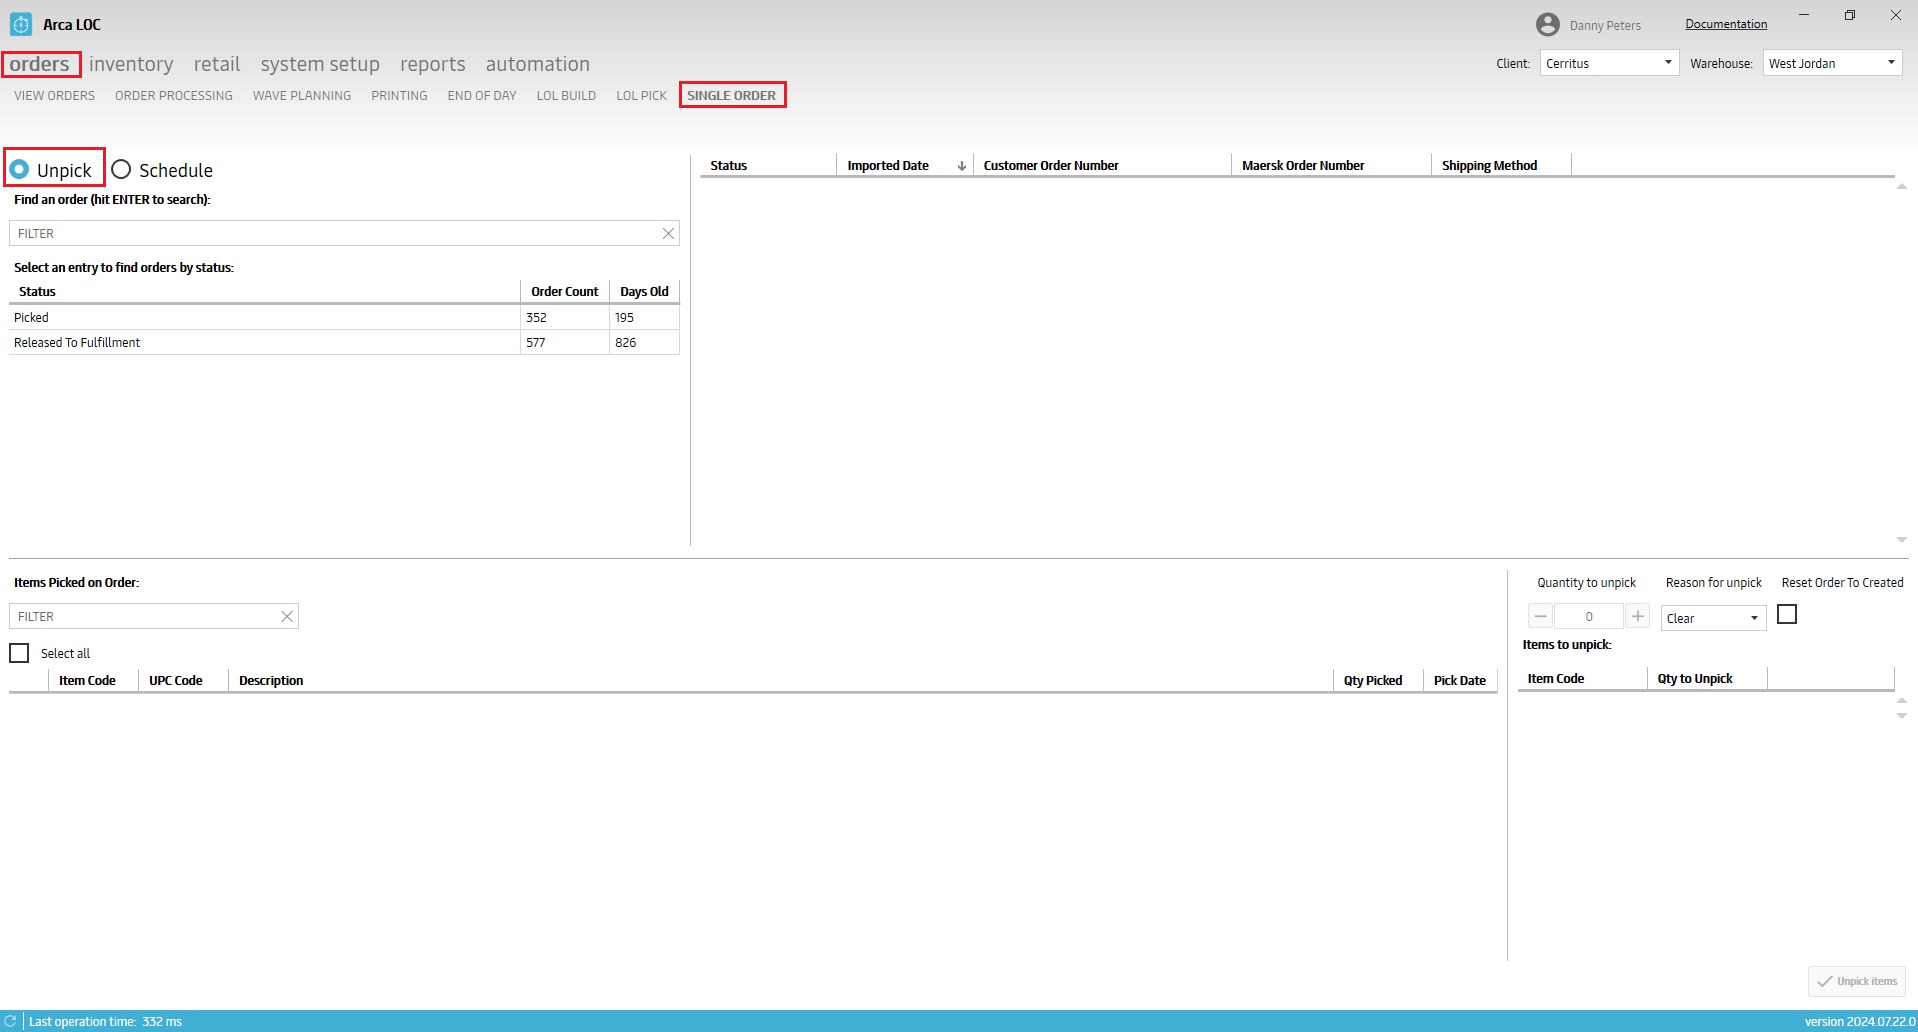
Orders/Single Order/Unpick – New feature release. Allows users to unpick items on an order and return inventory to where it was picked from.
6/27/2024
V2024.6.27.0
- General – Bug fix for when the app is running in dark mode and text color didn’t update.
6/21/2024
V2024.6.20.0
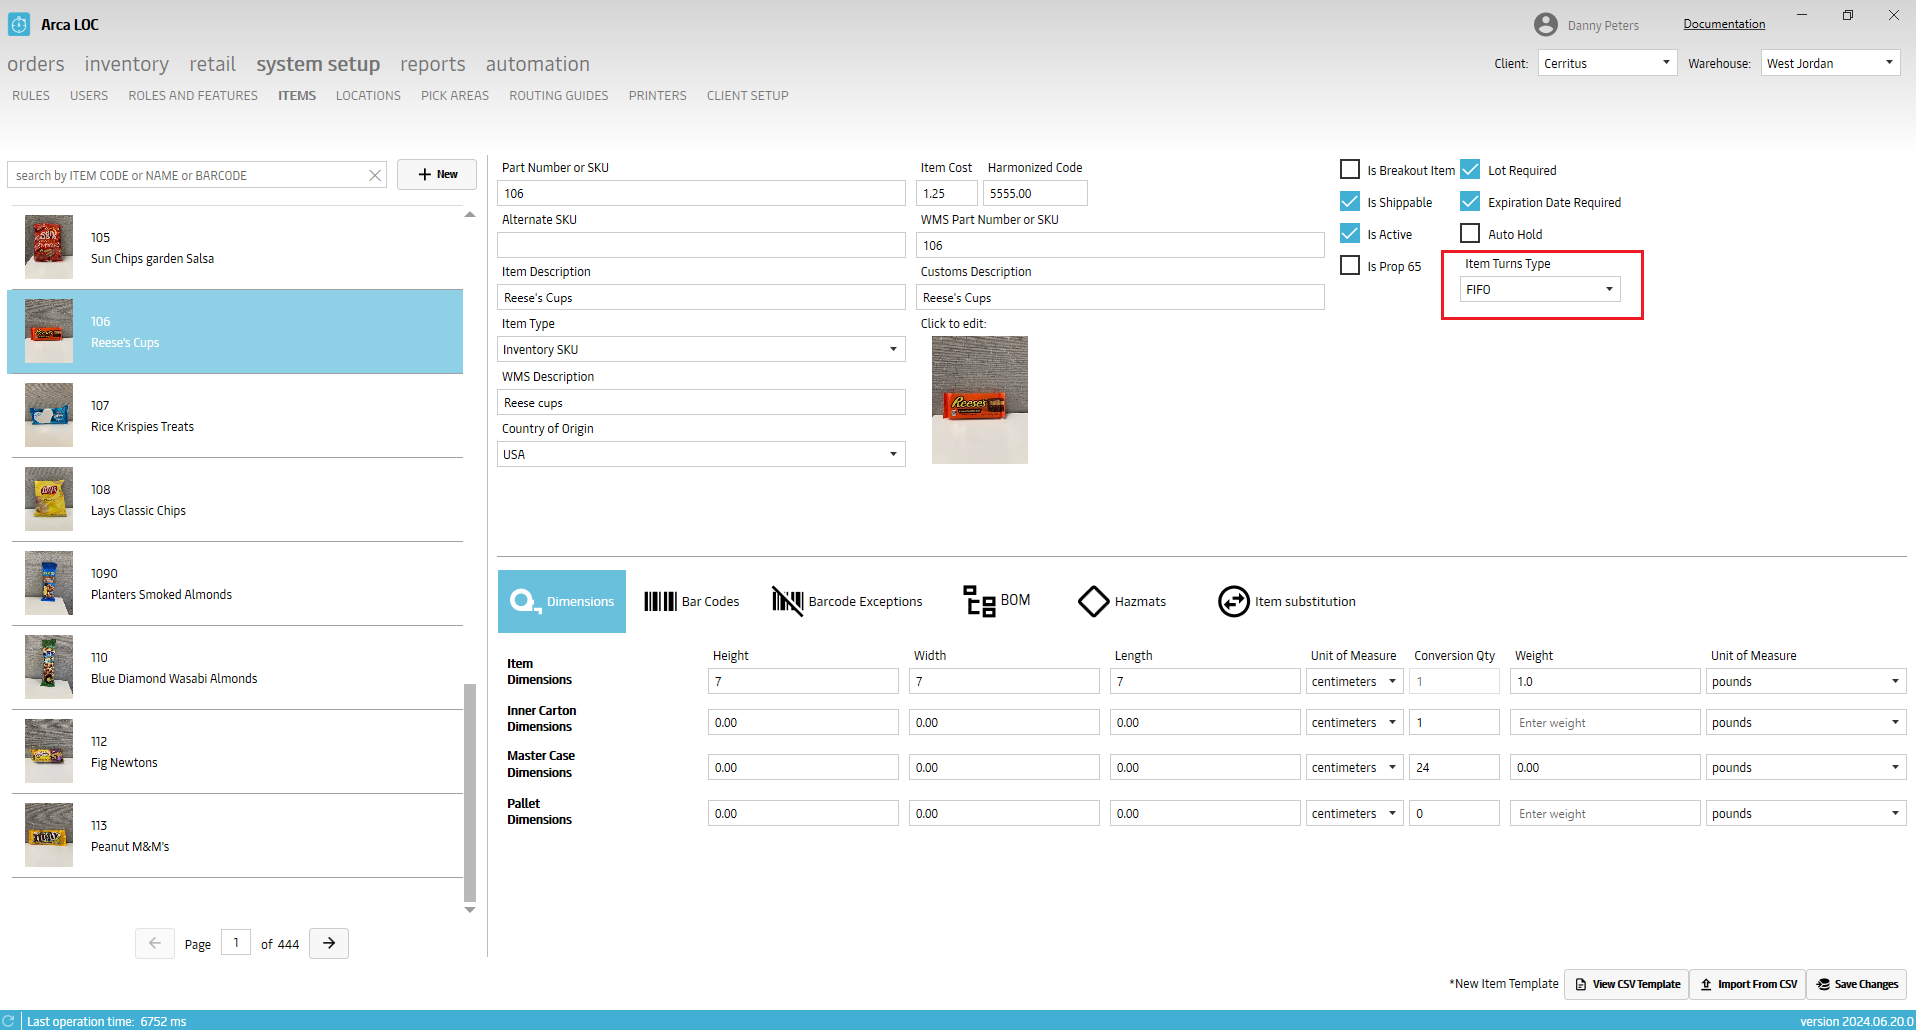
- Setup/Item - New feature release. Added new Item Turns Type menu for the user to specify FEFO/FIFO settings on an item.
5/16/2024
V2024.5.15.0
Setup/Items – New template for item .csv upload. Added existing barcode exceptions tab from Arca Warehouse.
Inventory/Inventory – fixed paging load for pallets.
Orders/Wave Planning – fixed filtering by carrier service and country. Backend updates for wave creation and printing.
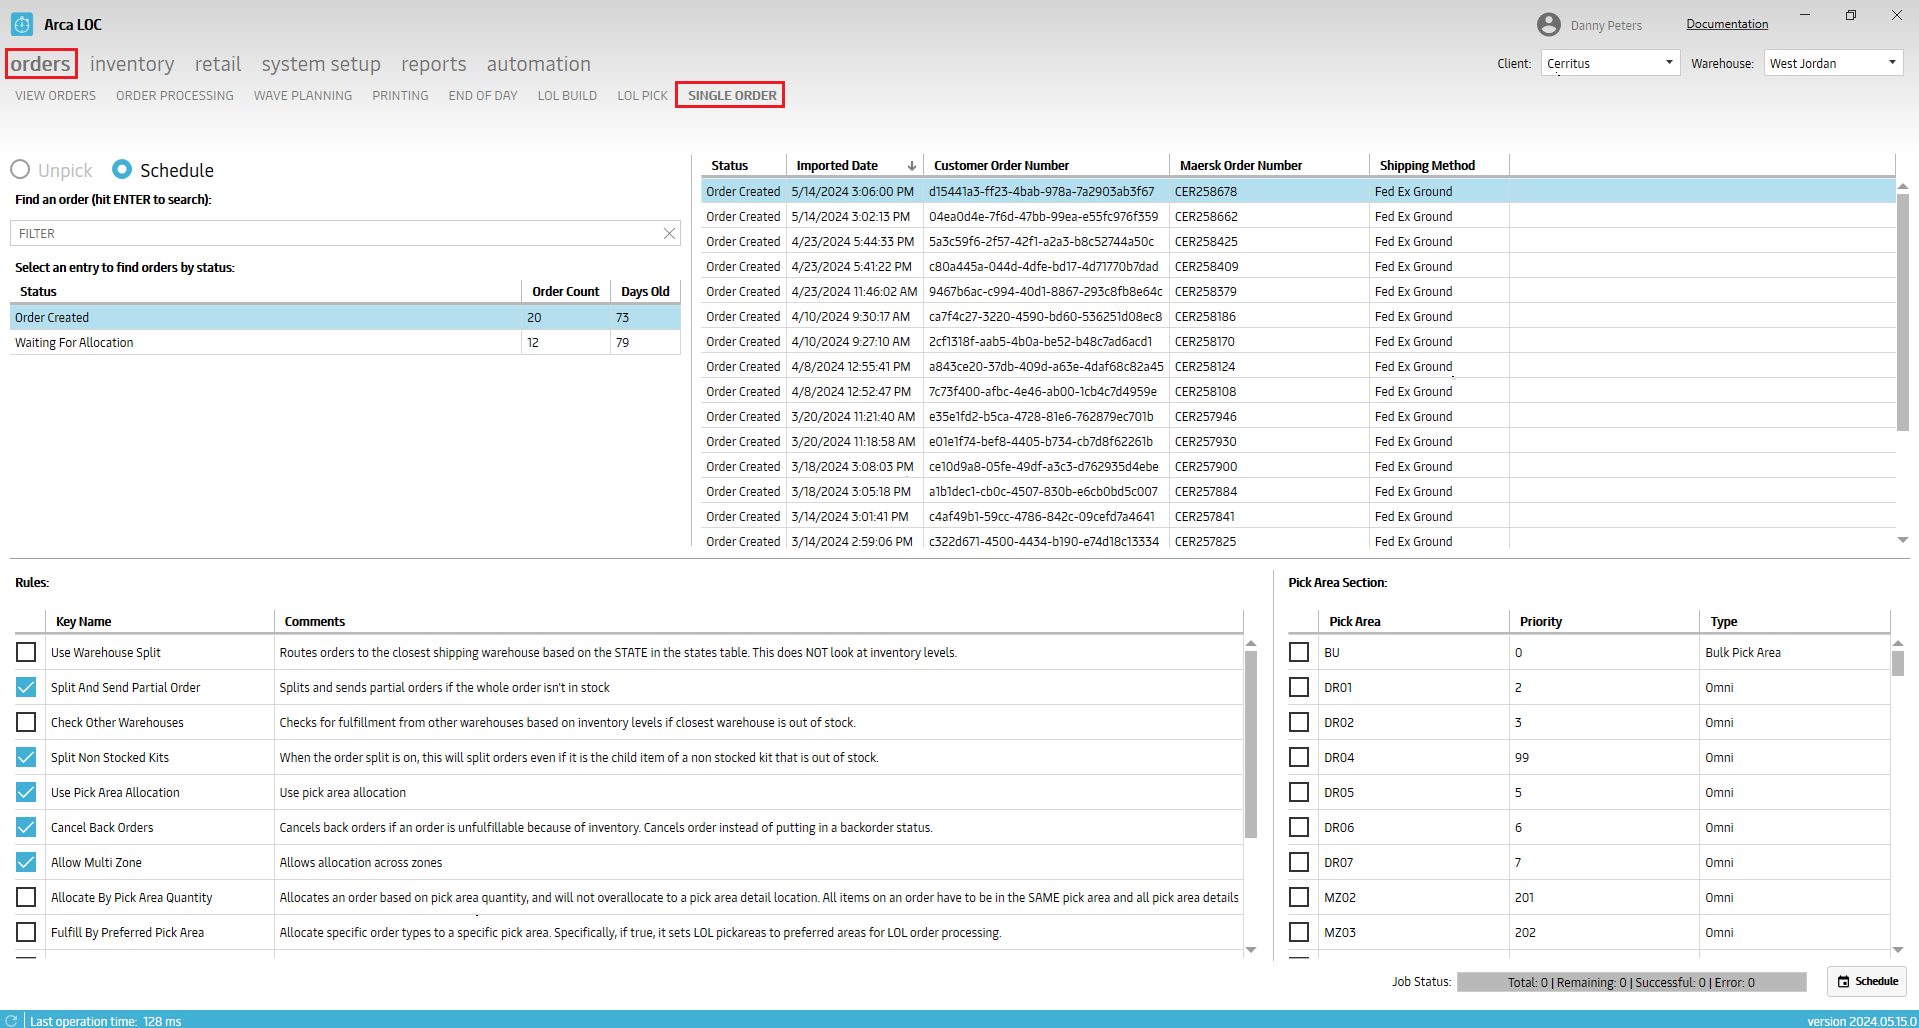
Orders/Single Order – New screen for single order scheduling. *Note the Unpick option on this screen is under development and is not currently available.
- General - Internal updates for PDF printing.
3/20/2024
V2024.3.14.0
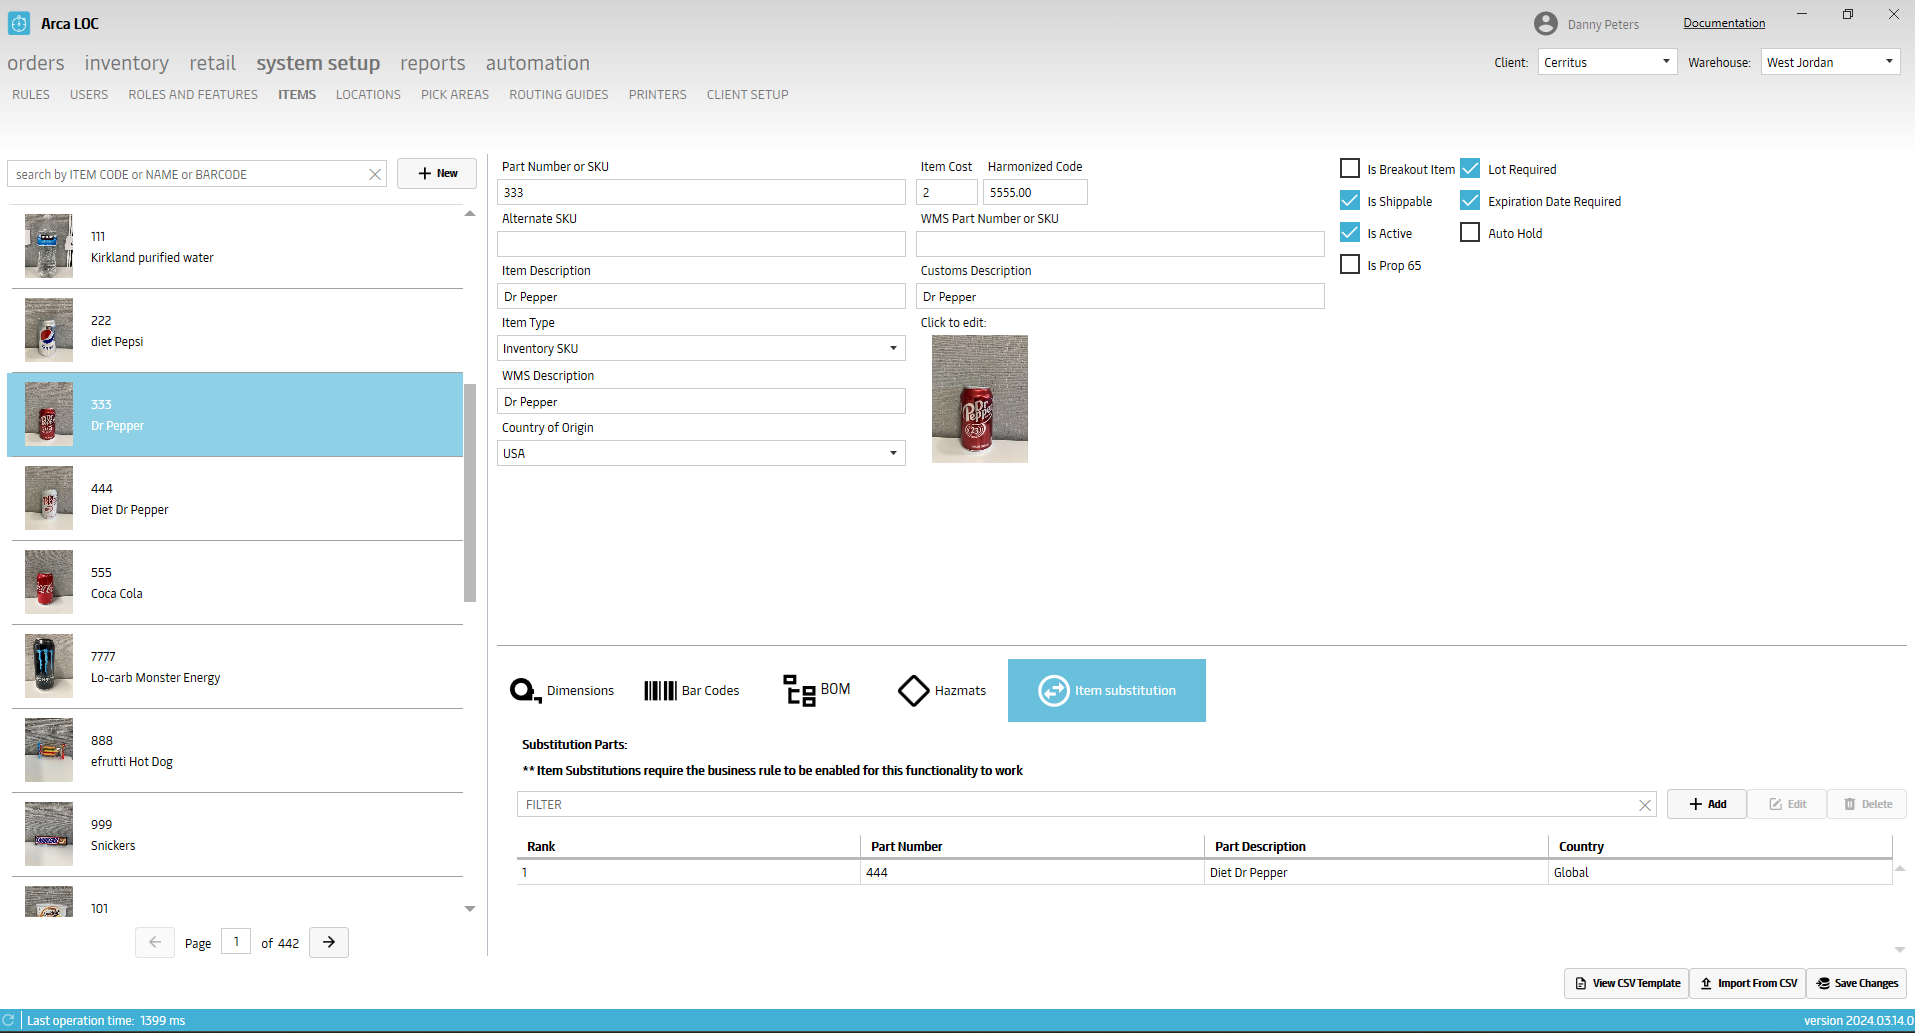
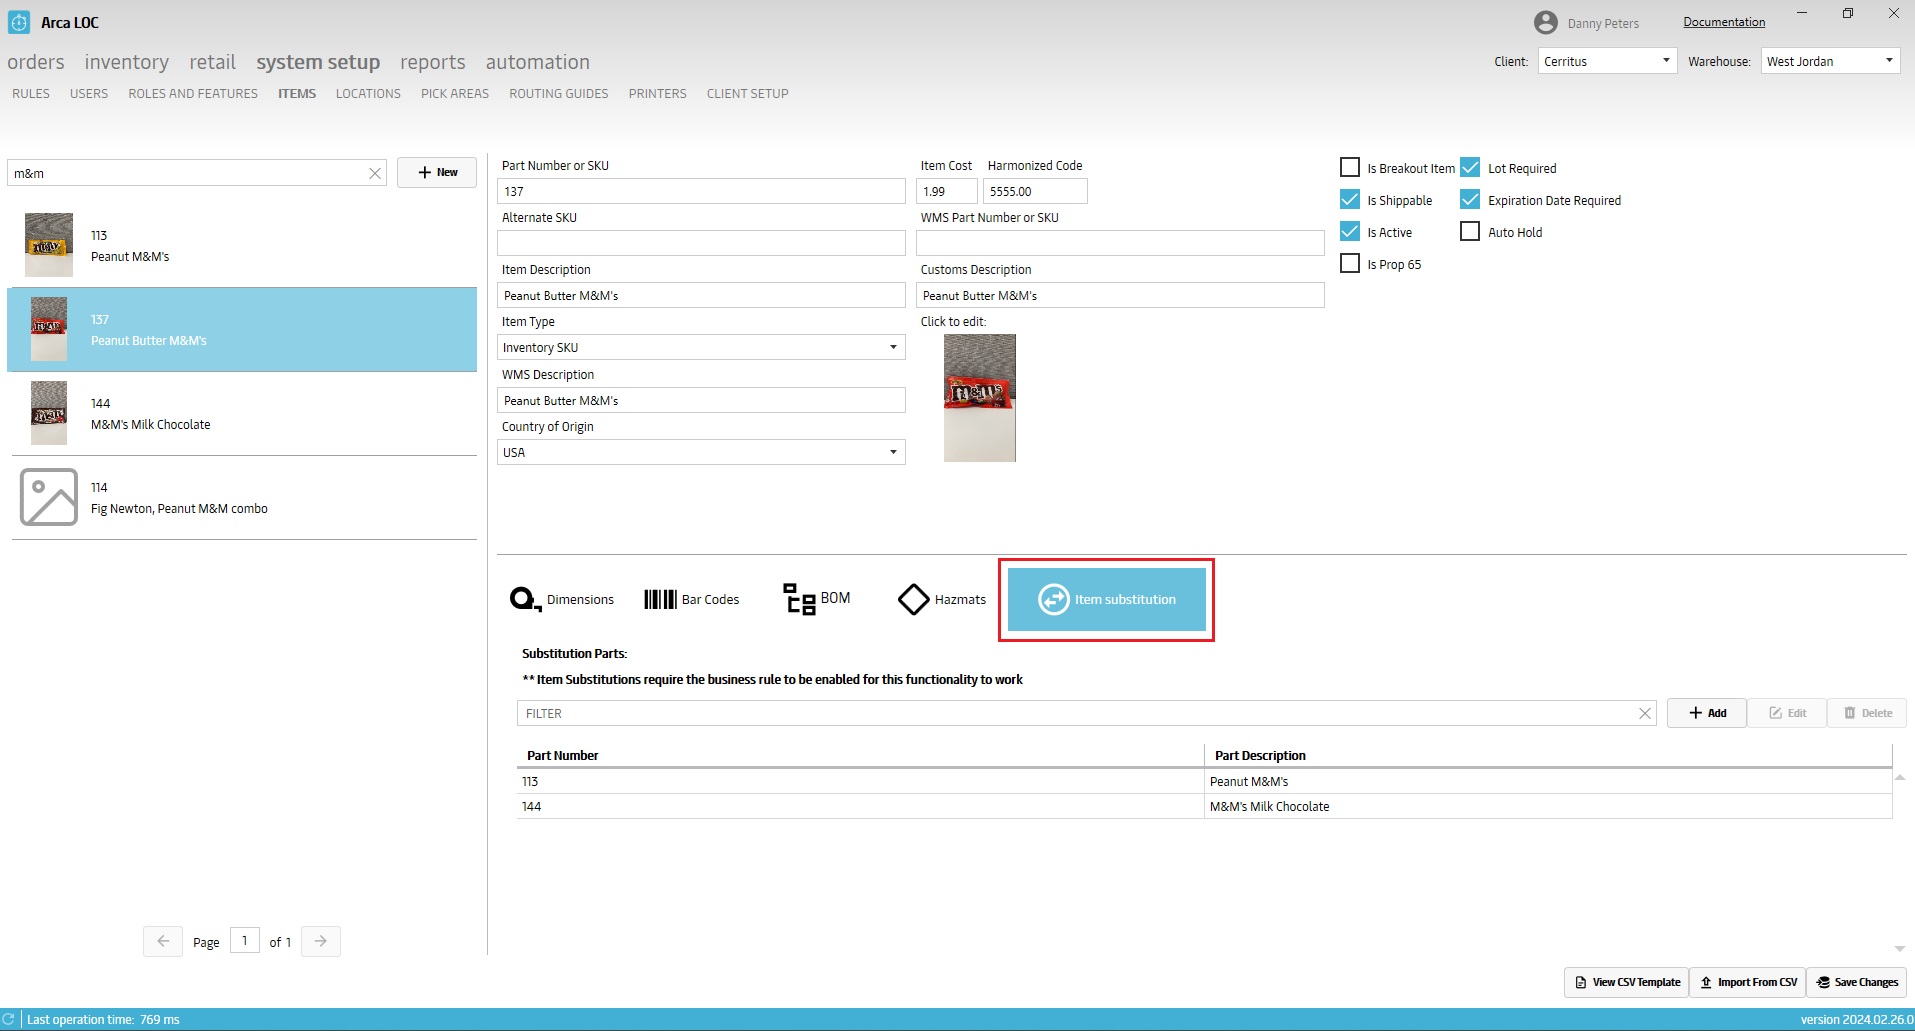
- Setup/Items – Item Substitution changes. Added new columns to display Rank and Country.
3/7/2024
V2024.3.6.0
- Internal bug fixes and screen restrictions
2/27/2024
V2024.2.26.0
Orders/Order Processing – Added Item substitution logic.
Setup/Items – Added Item substitution tab.
1/3/2024
V2023.11.9.0
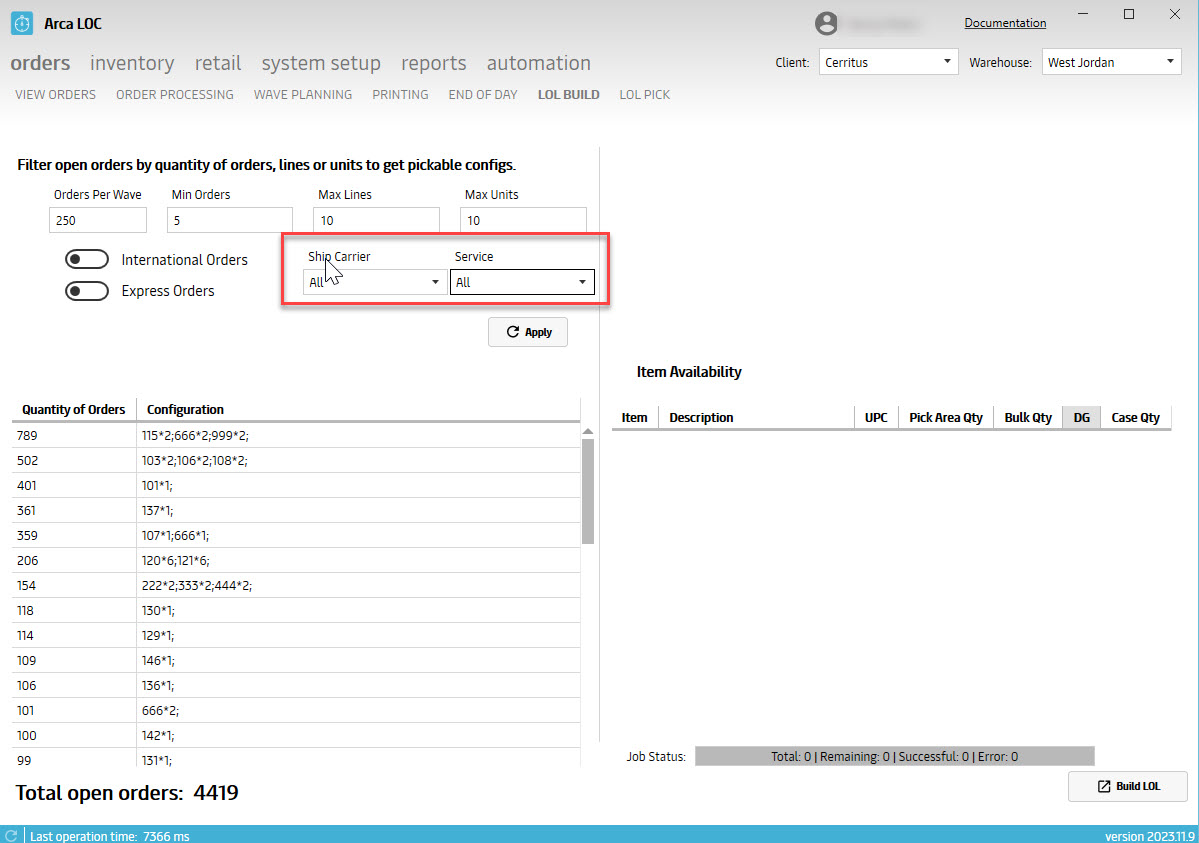
- Orders/LOL - Build screen - add filter by ship carrier and service
Orders/Wave Planning - remove carrier enums
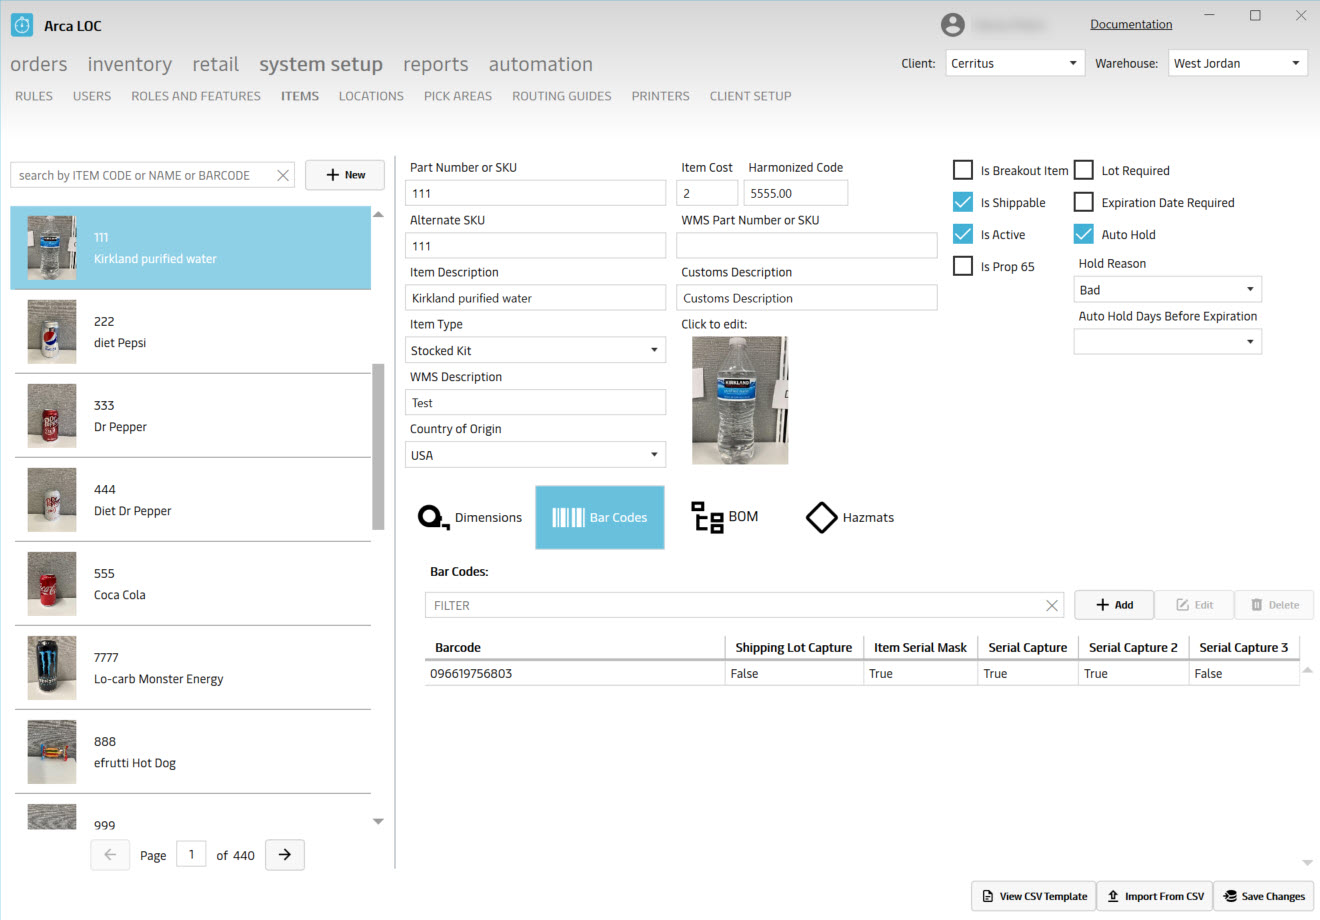
System Setup/Items - Bar Codes - add item serial mask and additional serial captures to include serial 1, 2 and 3 captures.
9/28/2023
V2023.9.24.0
Hot fix for the System Setup/Items - saving object reference error.
9/25/2023
V2023.9.22.0
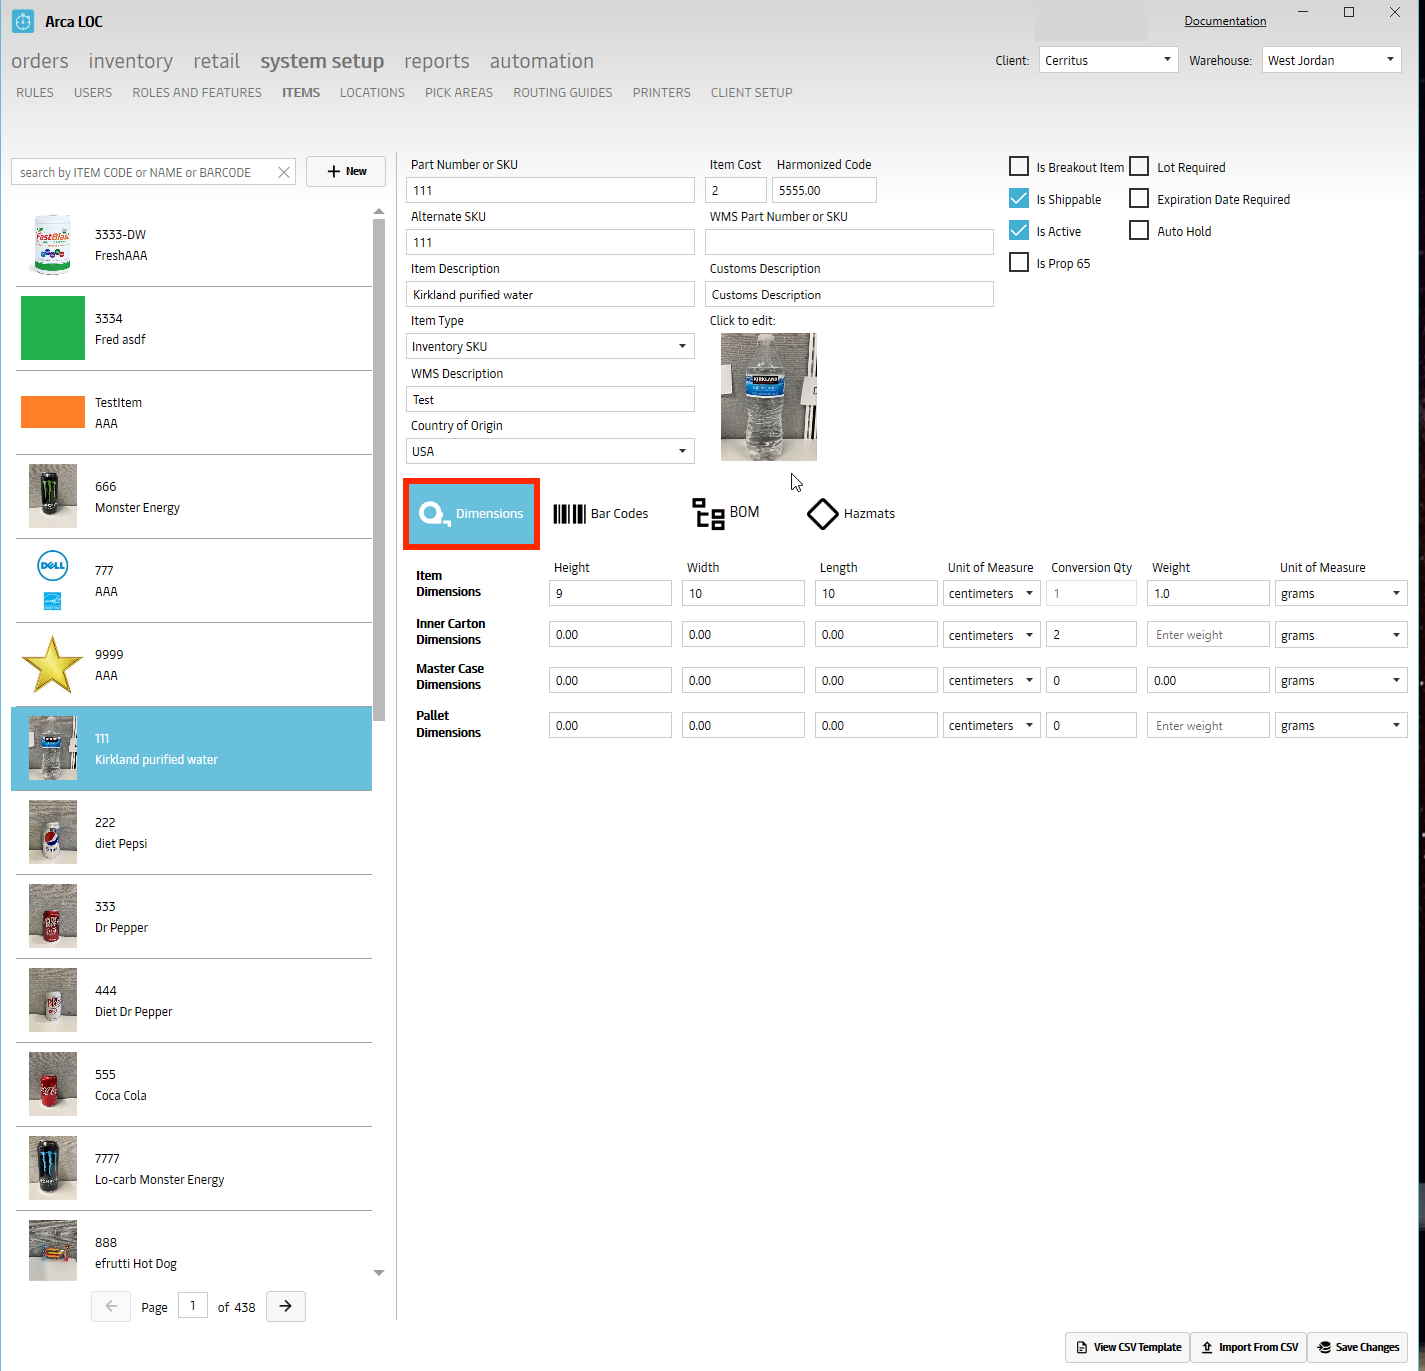
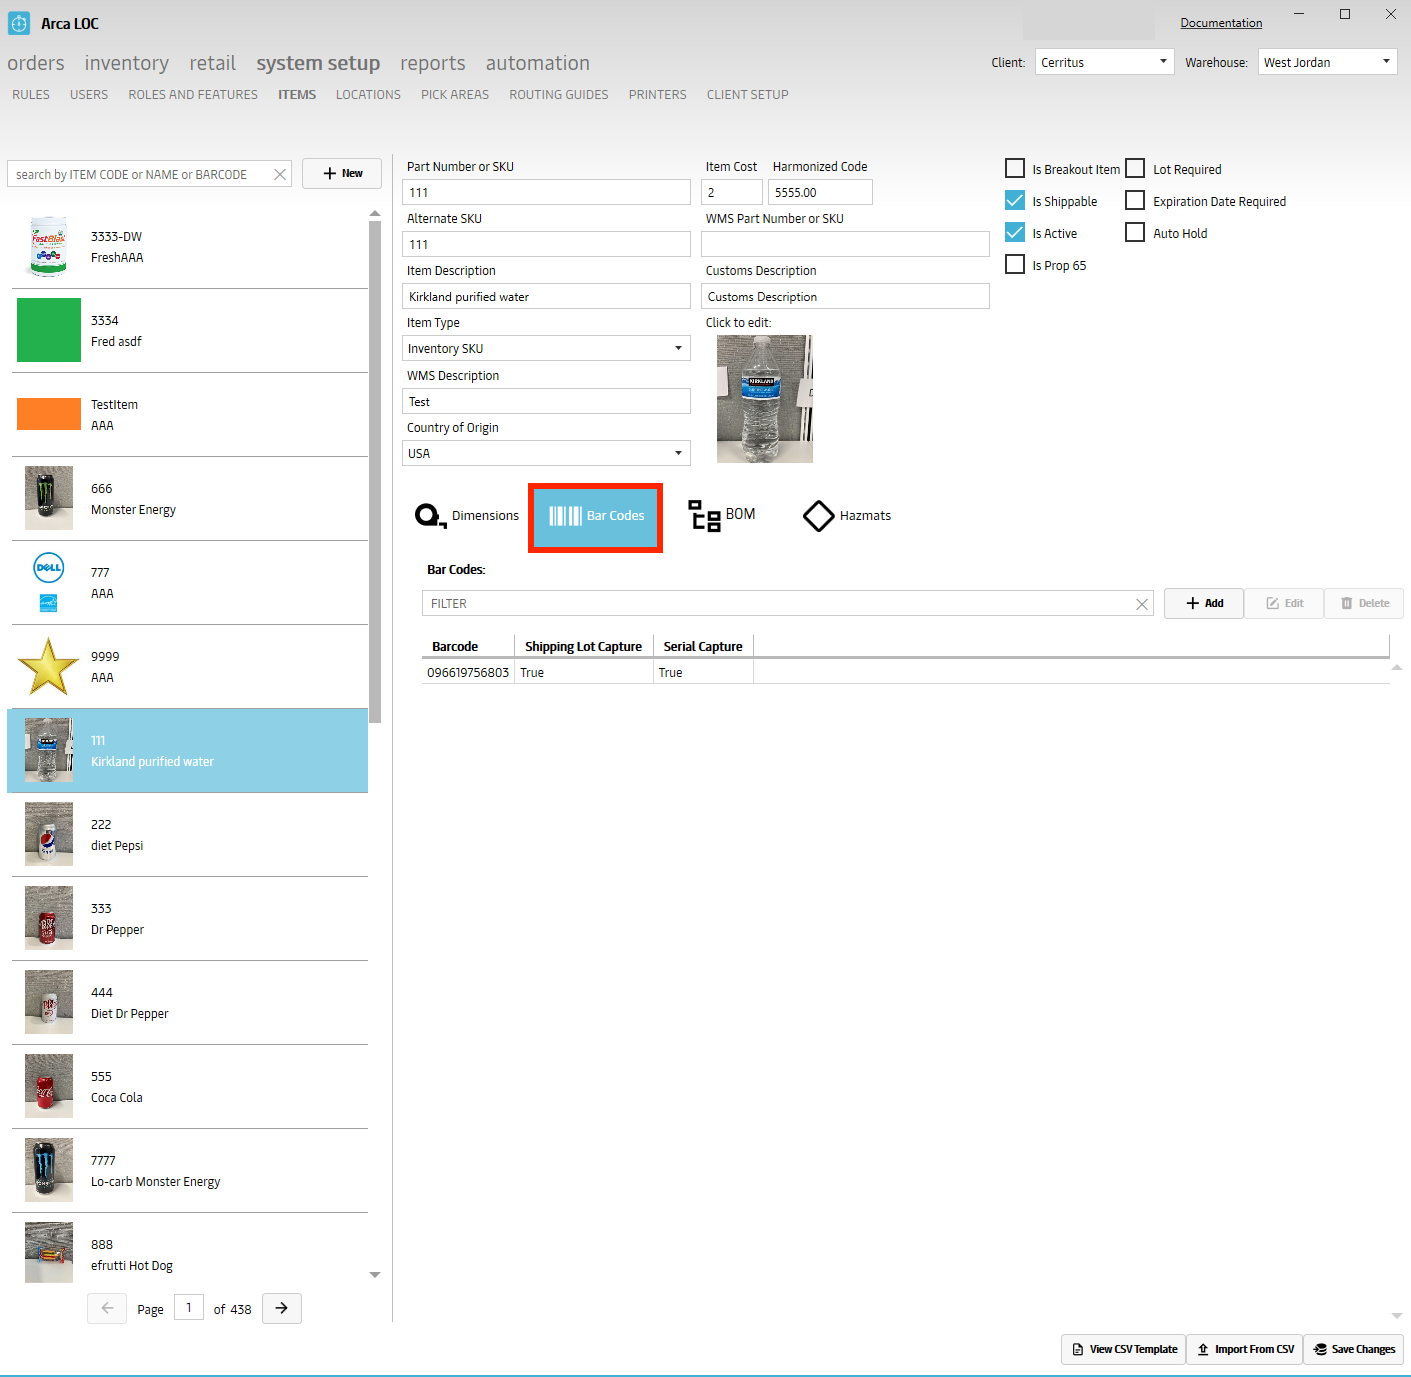
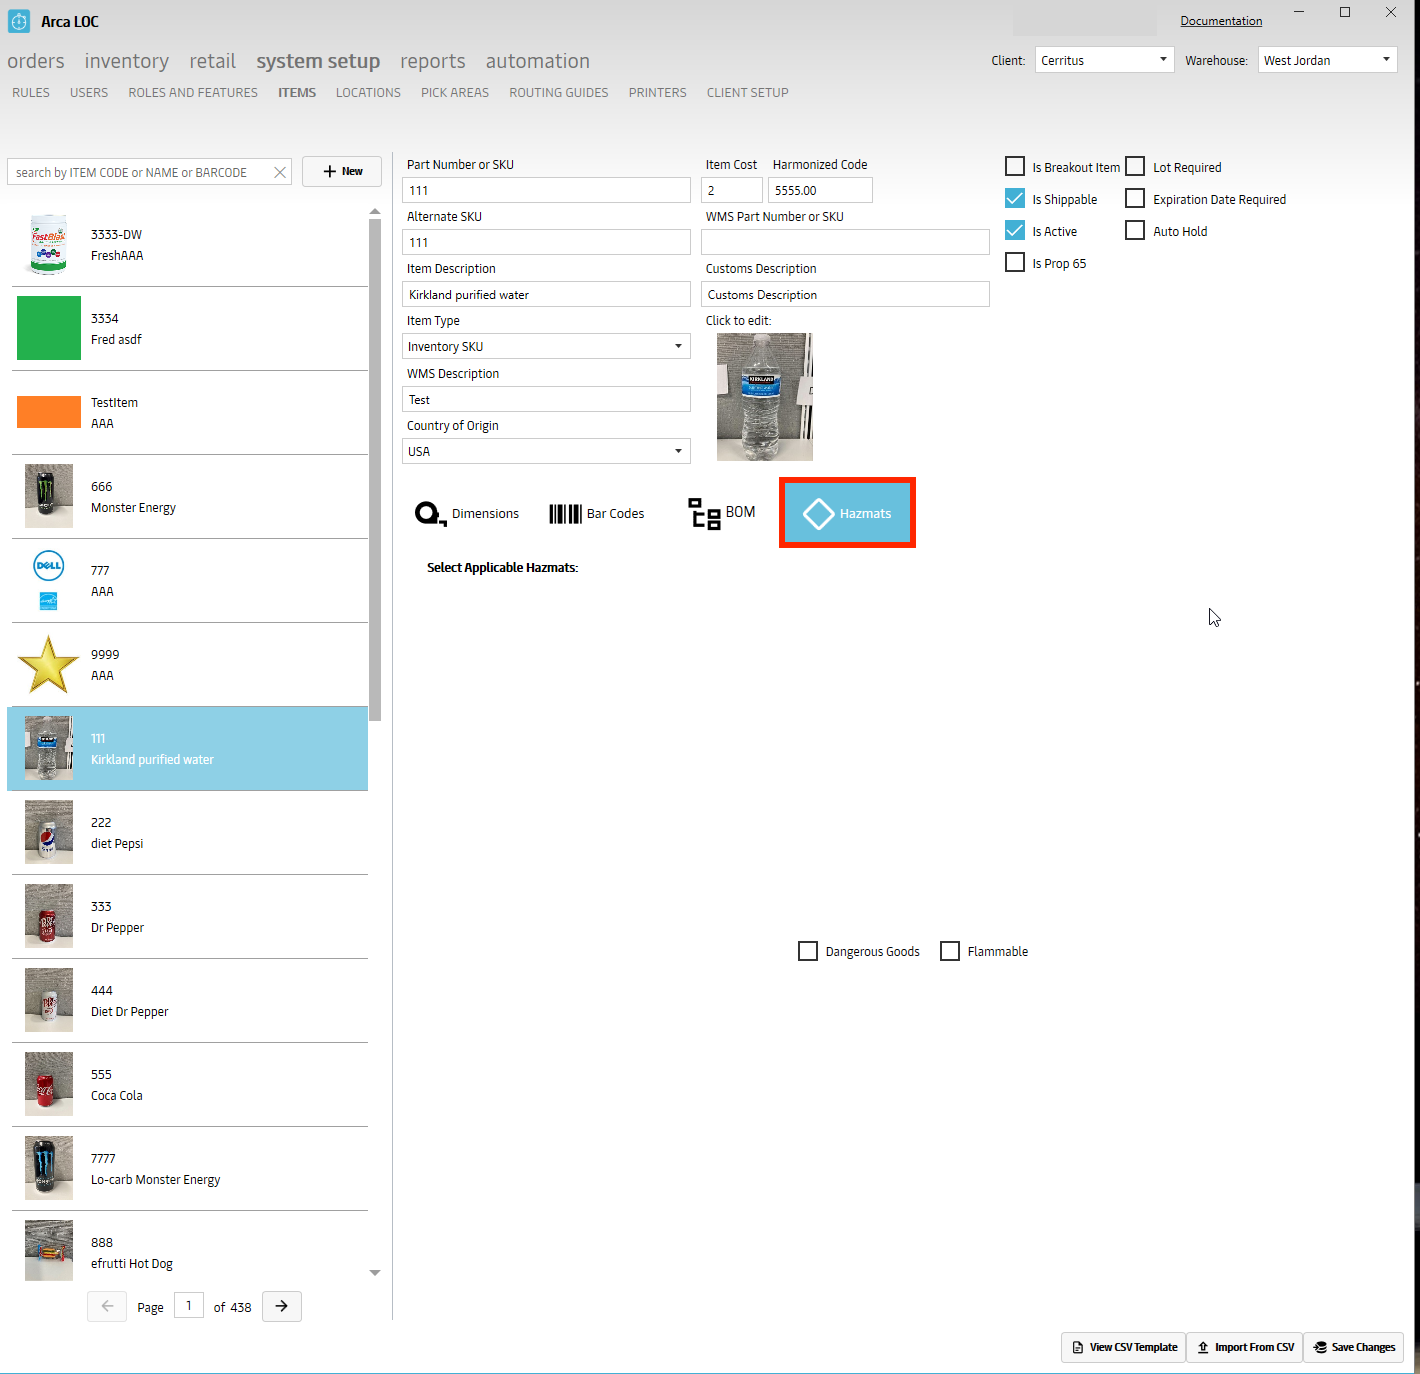
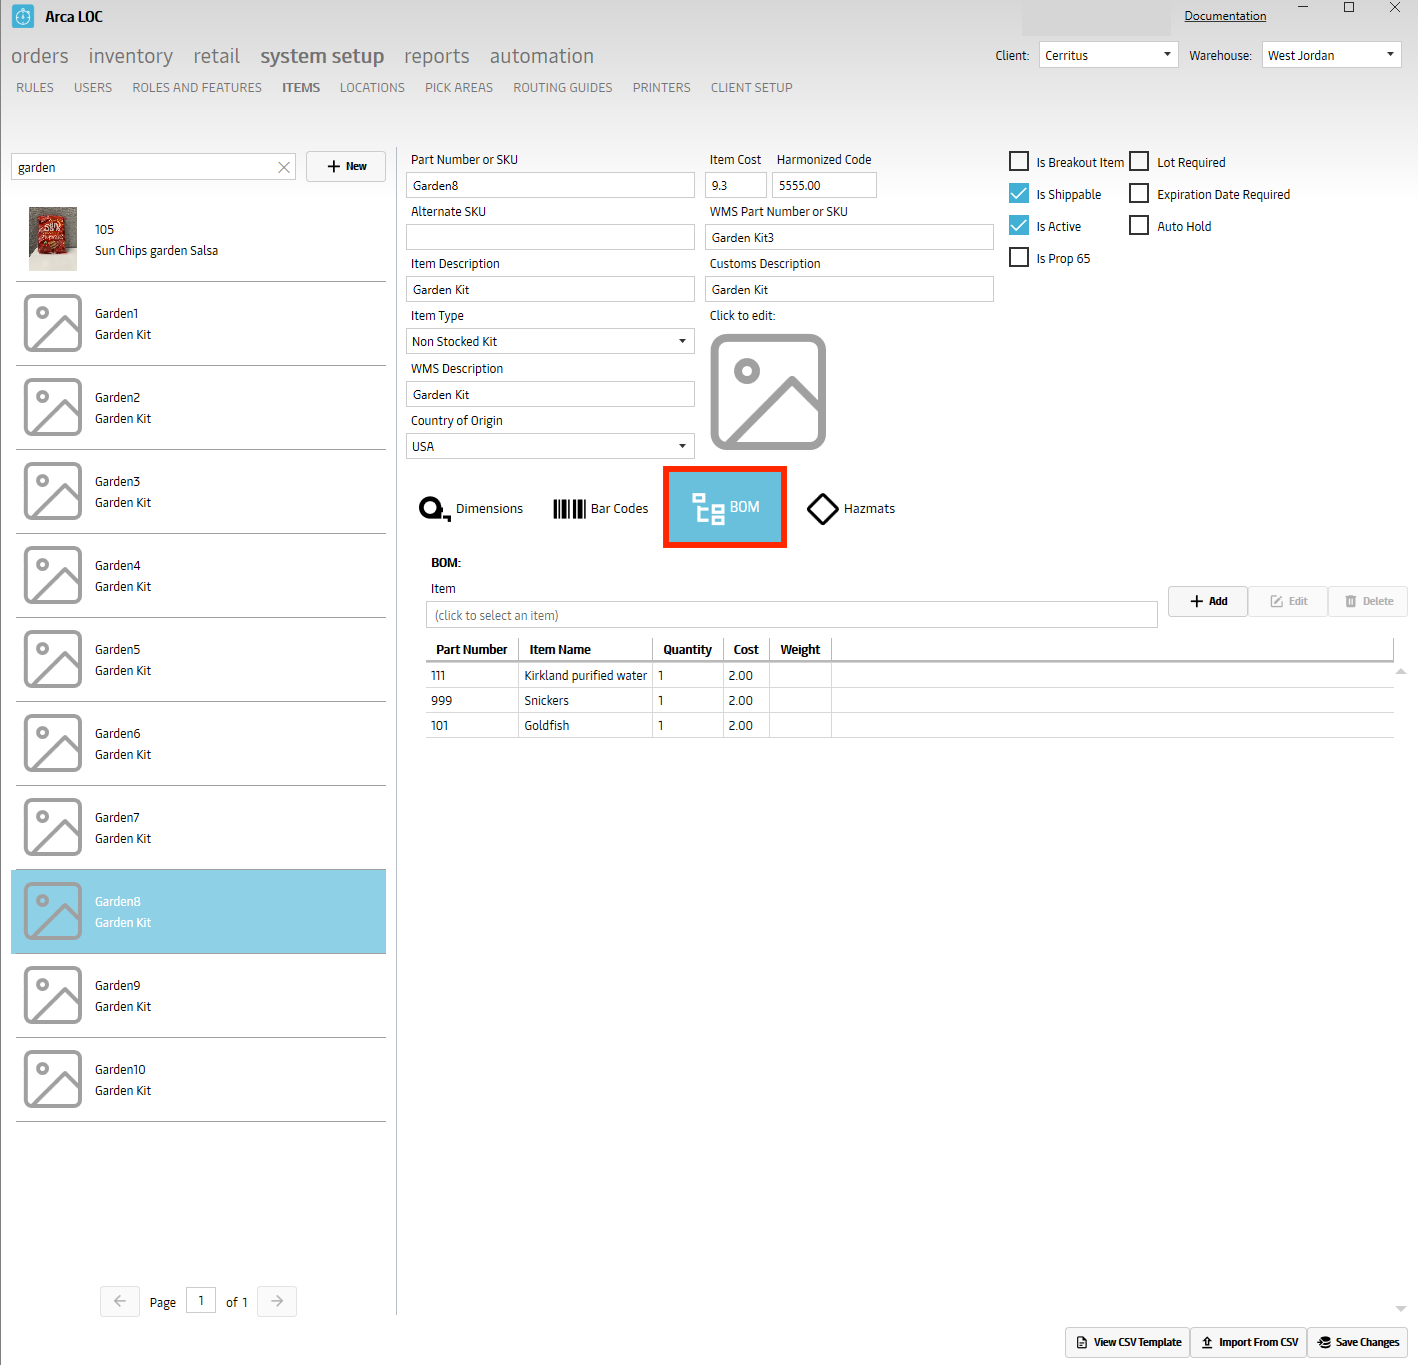
Item Screen - New Design
Added a new design look to the screen. The dimensions, bar codes, BOM and Hazmat options are now displayed from left to right. The dimensions for item, inner carton, master case and pallet are now displayed up and down. The fields that were added are height, weight, length, unit of measure, and conversion qty. Conversion quantity is how many items in carton, master case or pallet. Conversion quantity for items will always be 1. These were added due to clients being billed by master case or pallet instead of each. As far as the dimensions, Maersk keeps track of cubic feet of product in each warehouse and within each pallet location.
8/10/2023
V2023.08.10
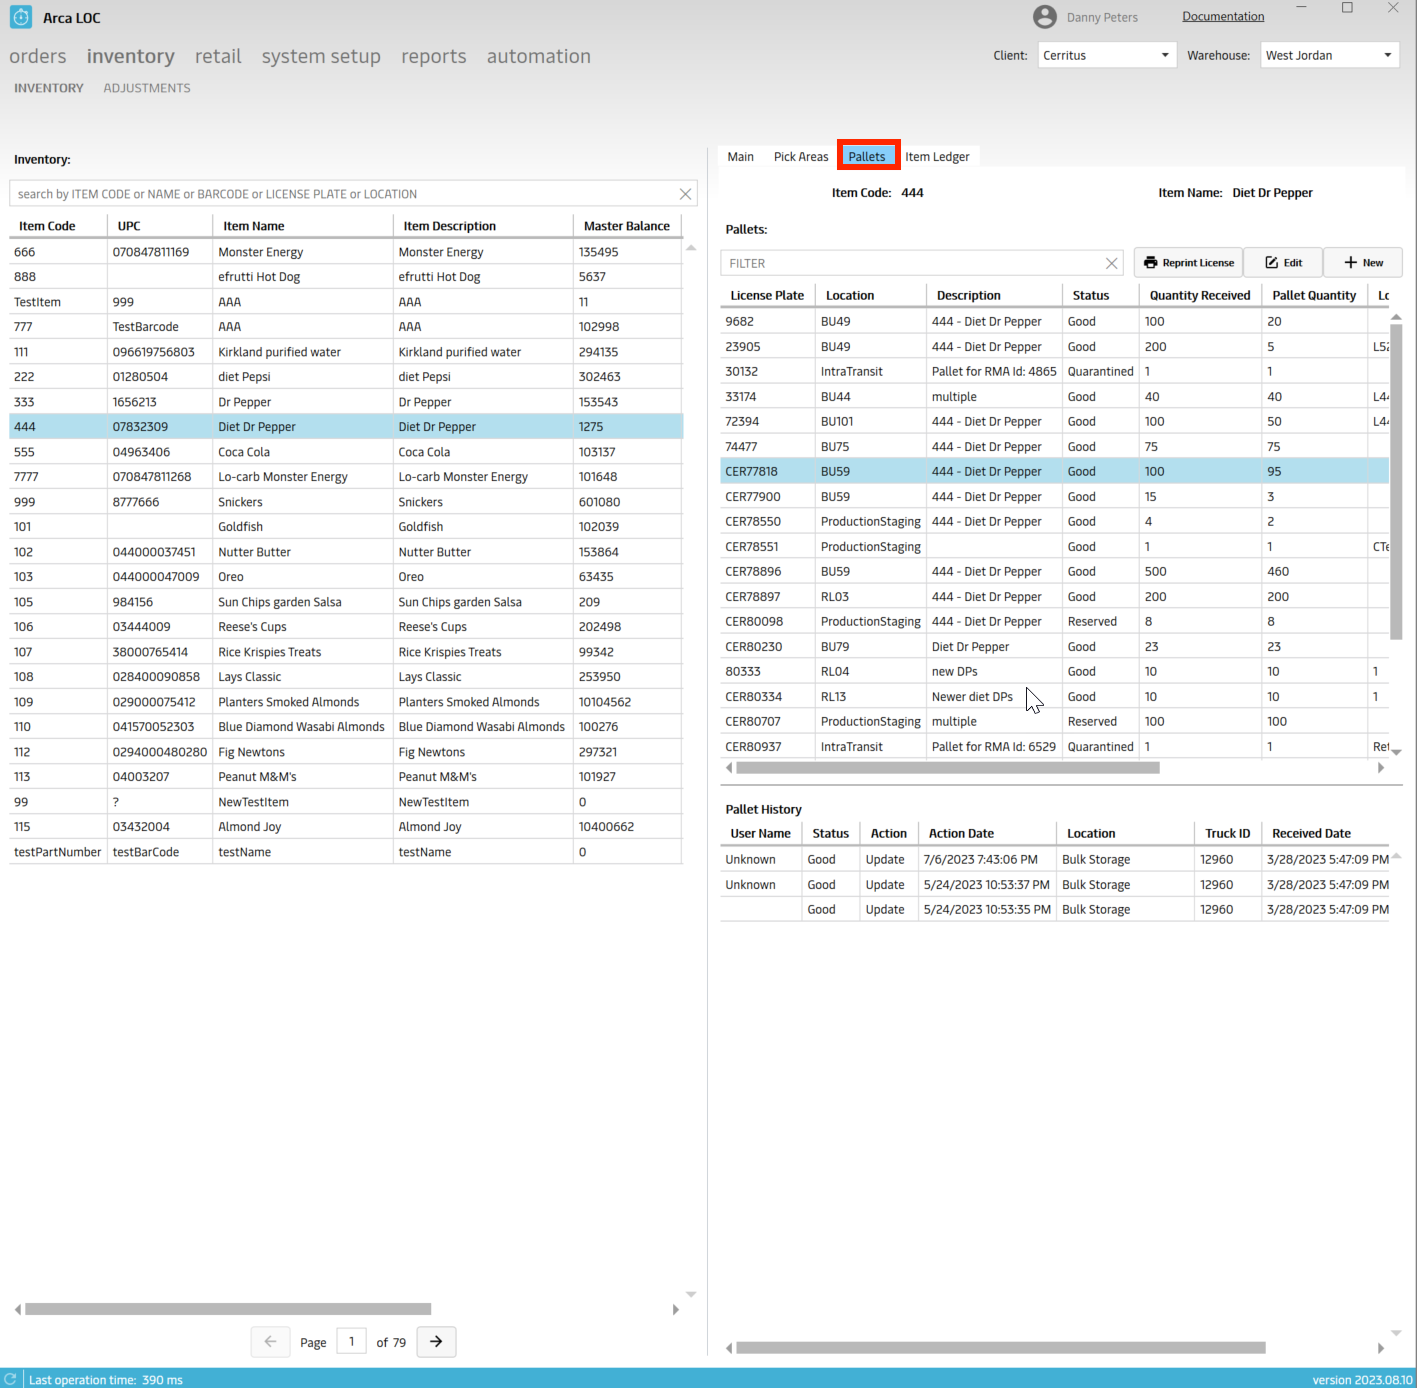
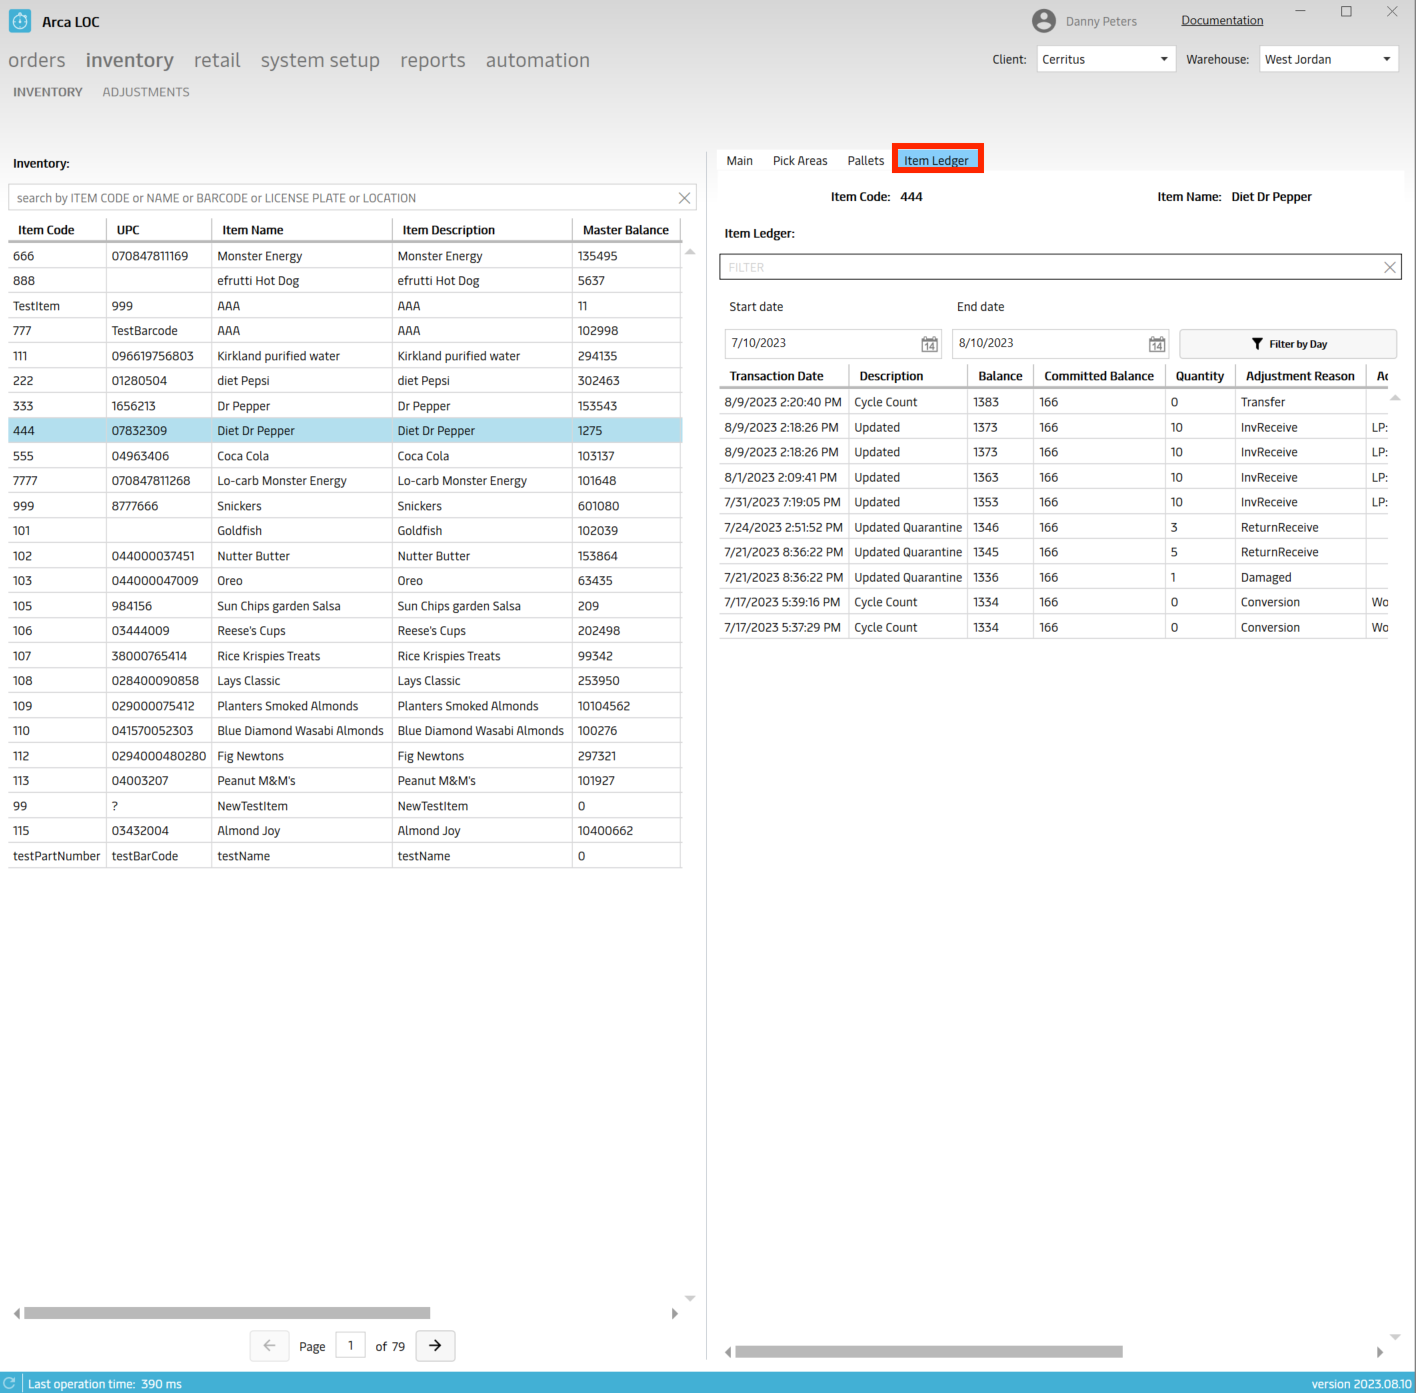
1. Added Main, Pick Areas, Pallets and Item Ledger tab to Inventory Screen.
The Main tab will display the Pick Areas and Pallets.

In the Pick Areas tab, this will display all of the pick areas and the pick area history.
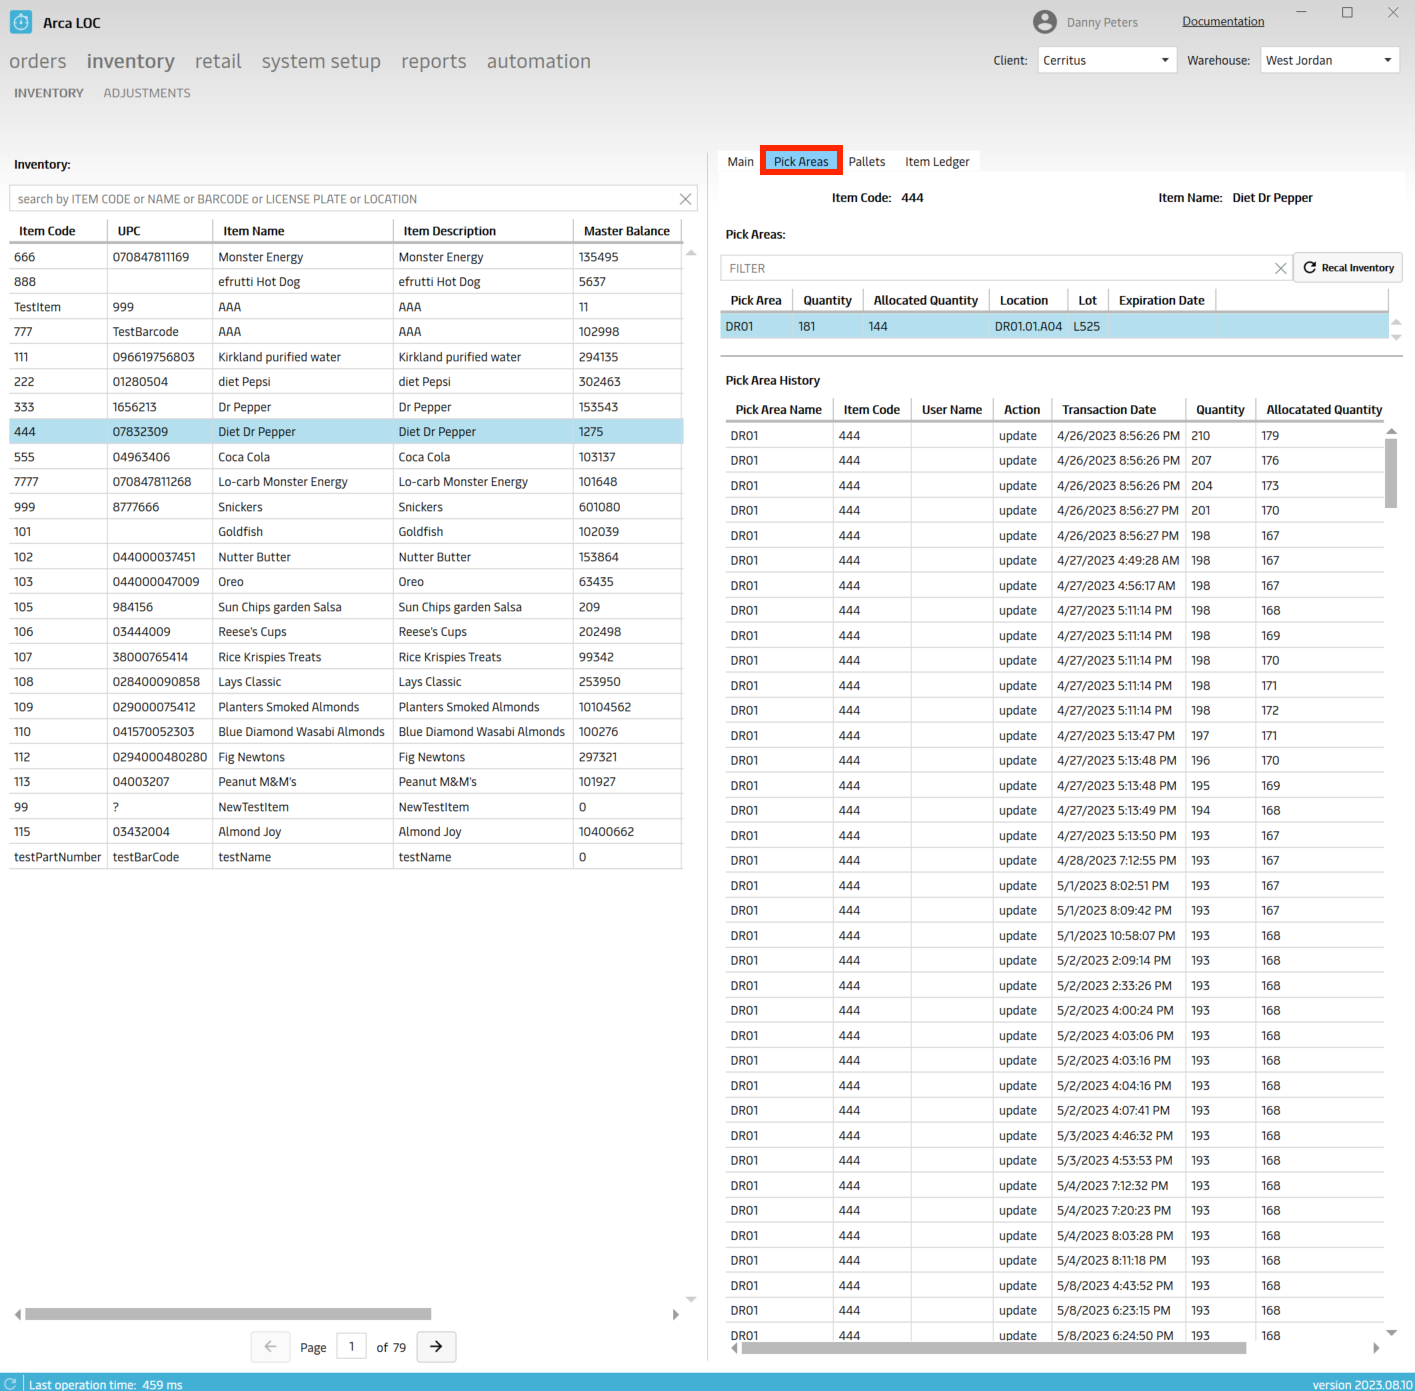
In the Pallets tab, this will display the pallets and the pallet history.
For the Item Ledger tab, this will display all details from the item ledger.
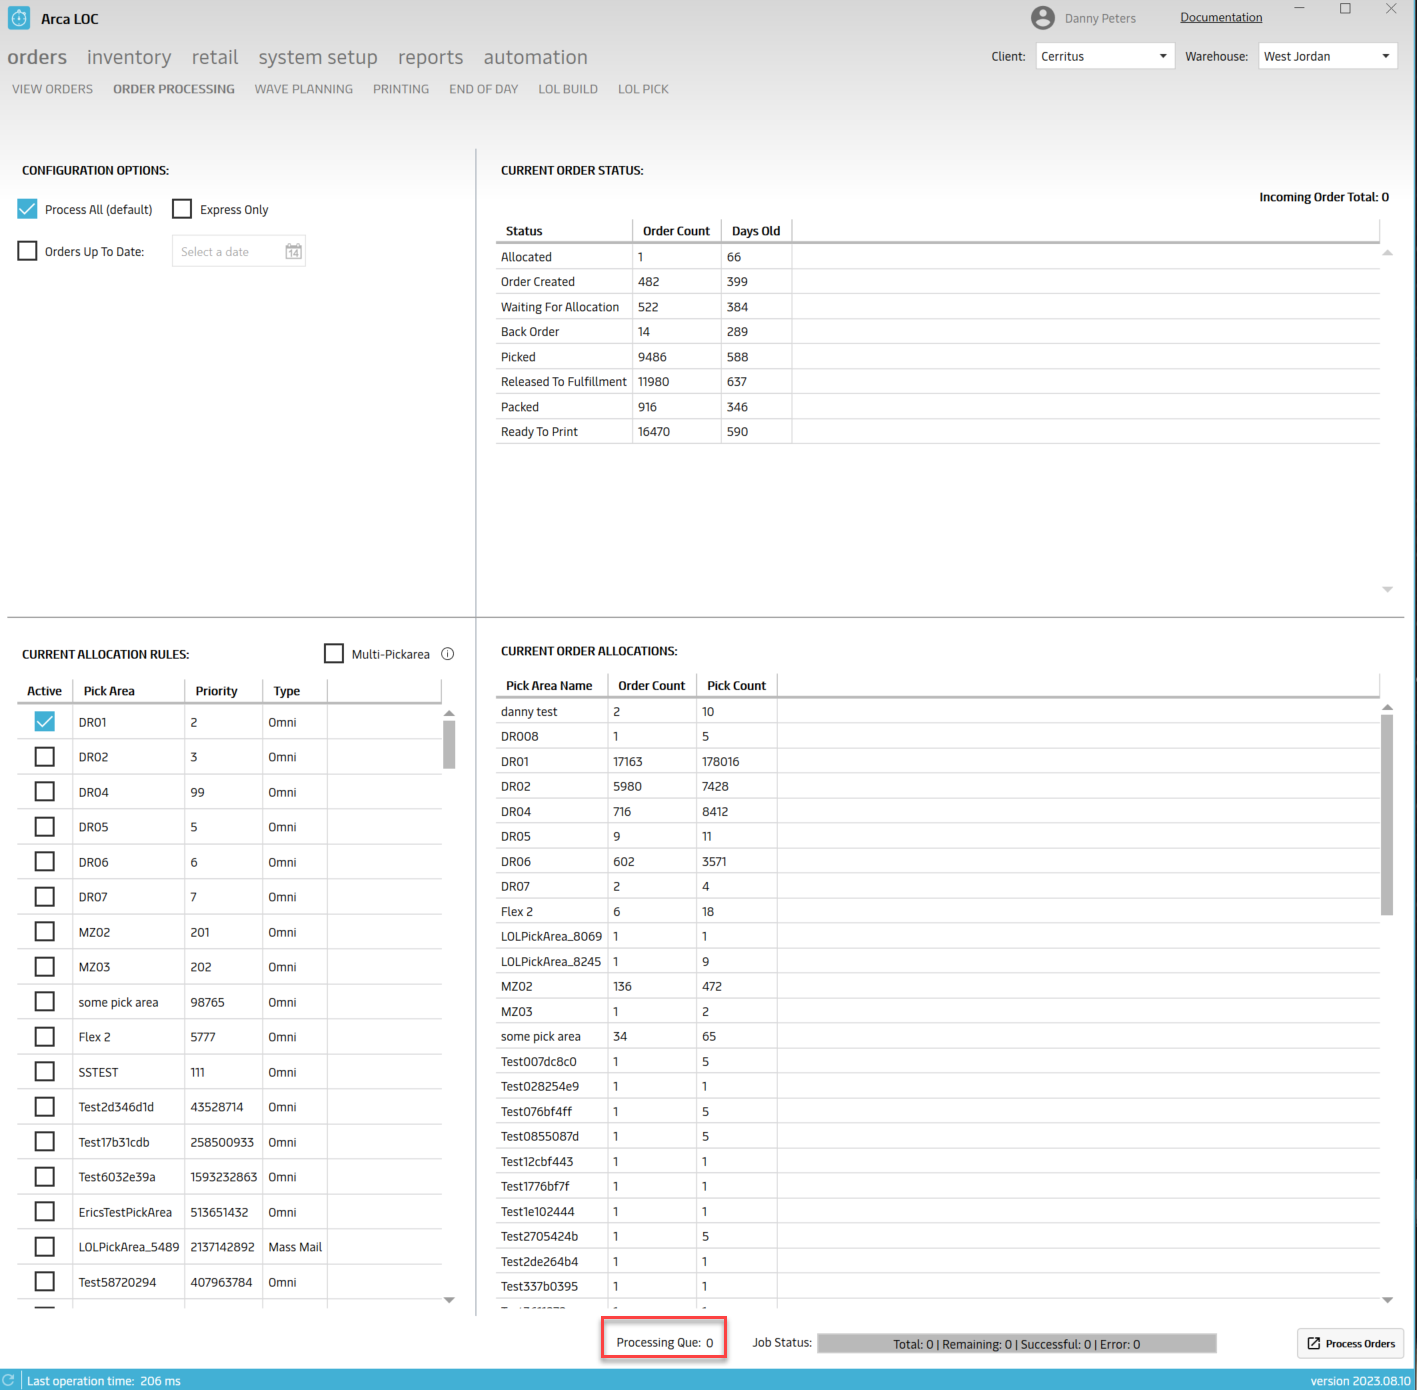
2. Processing Queue Totals to the Order Processing screen – sum of all orders for all clients and warehouses that are currently processing in the service fabric queue at that time
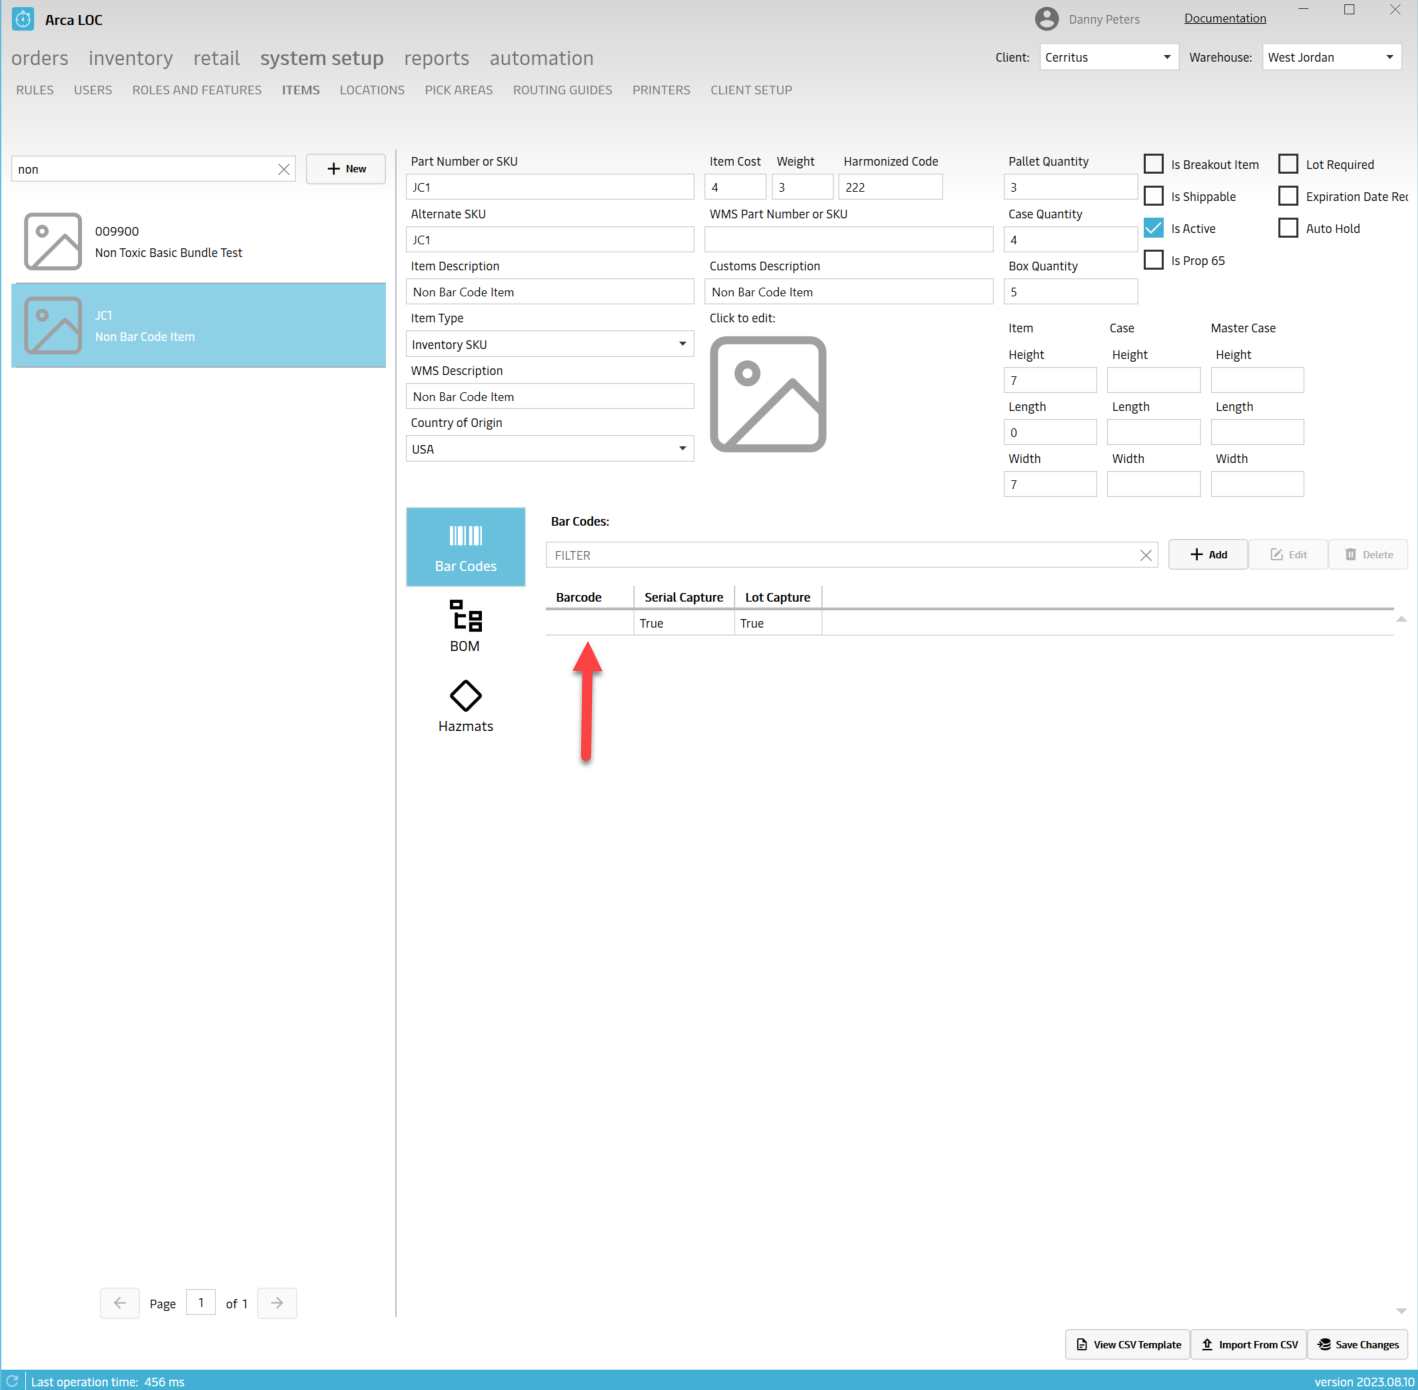
3. Items - Non bar code ability to add serial and lot capture
6/22/2023
V2023.6.22.0
System Setup/Roles and Features
Various roles can be created in this screen. Depending on a person's responsibilities in their job description a role can be setup with the appropriate access needed. A new role can be created by adding various features from different apps like Warehouse and LOC (currently, we are still working on features for Pick and Pack). Each feature depending on if the user has access or not will be enabled/disabled when the user logs into the app with their credentials. At any time, features can be added or removed. You just need to click on the add or remove buttons then save the changes once the desired options have been selected. Also any new role that has been created can be edited or deleted.
To start off, everyone will be given admin rights. So, managers probably should make the adjustments as needed in order to remove access from users that do not require all admin access.
- Click on Create Role
- Add Name and Description then click on Add feature button
- Will need to select the application then select the feature
- Save the changes

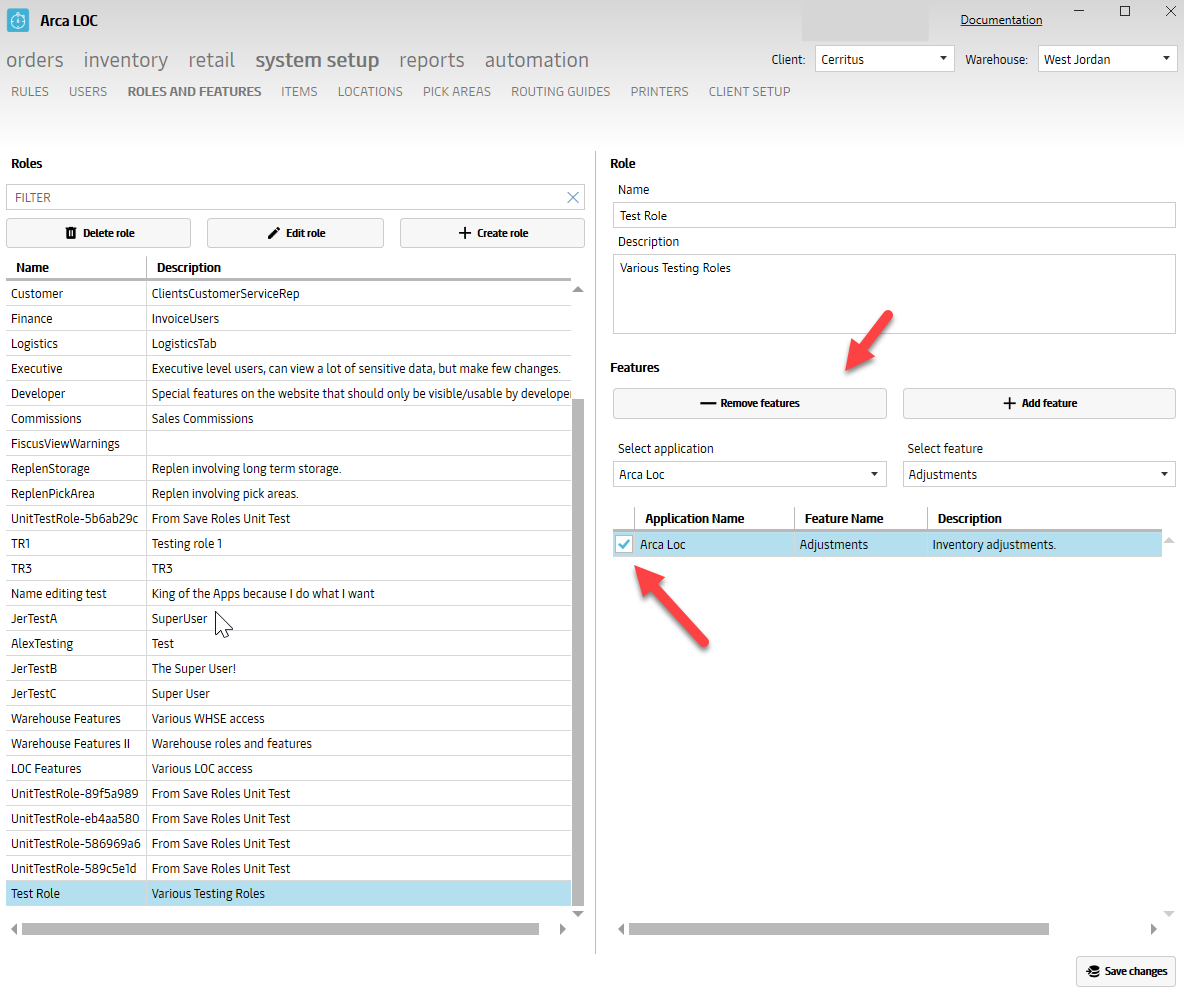
Remove Features
Select the check box under the application name then click on remove features.
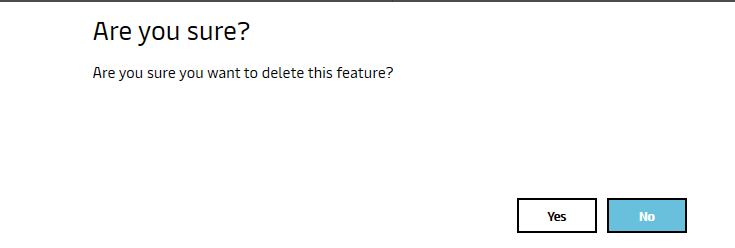
A message will display to verify that the user wants to delete the feature, click yes.
Feature will be removed, then user has to click save changes.
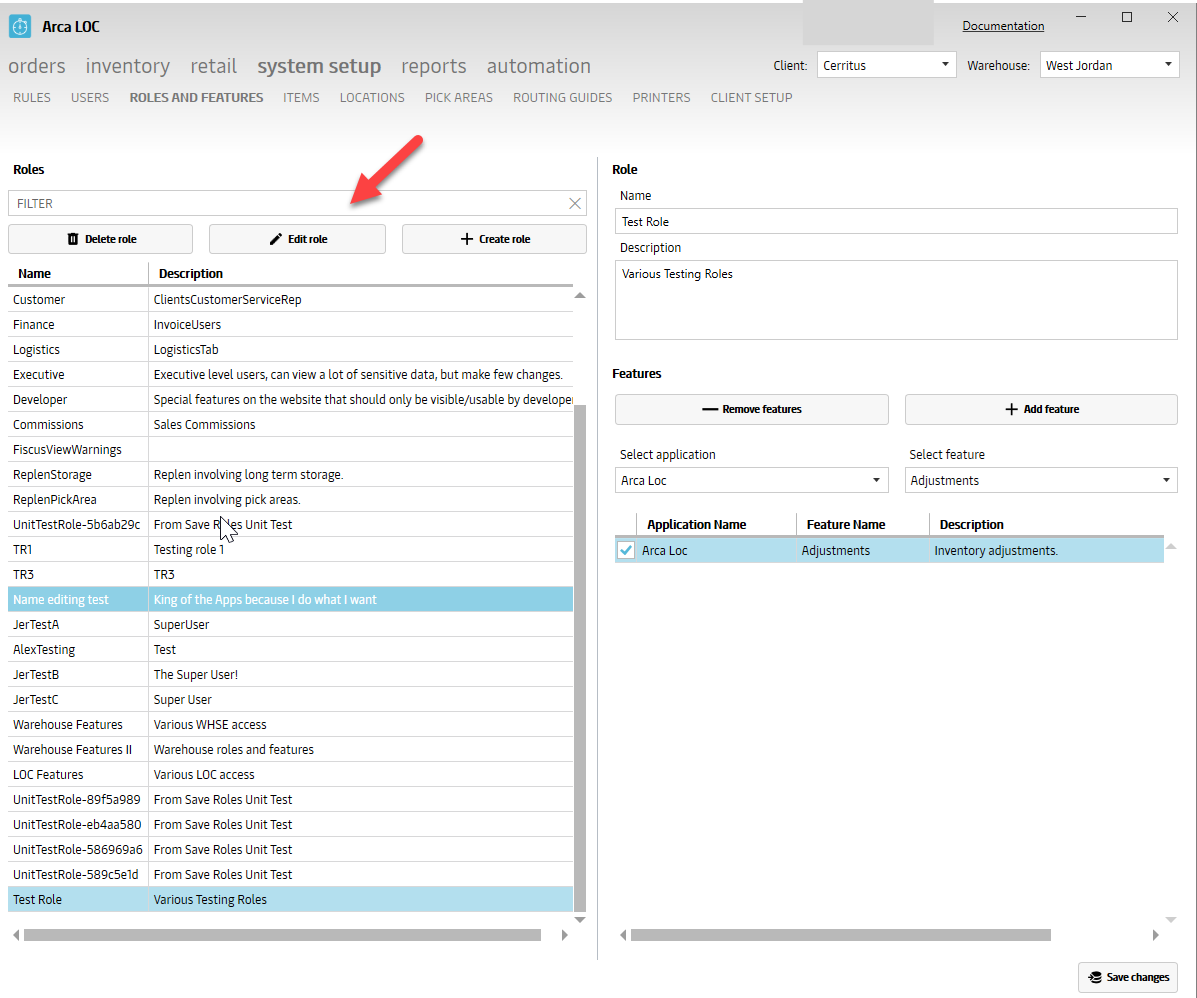
Edit Role
Click on Edit Role button, make the changes then save changes.
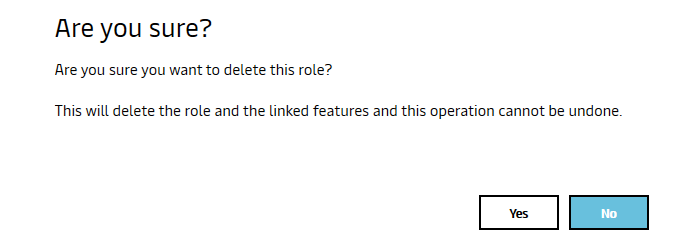
Delete Role
Click on Delete Role, message will be displayed if you would like to proceed with this removal, click yes Role will be removed
System Setup/Users
After the new roles have been created, a new user can be added to fit the appropriate role. We have various users in the warehouse where we would like to add/restrict access to certain features depending on their role. Here is where we set them up with a login name, password, client, default warehouse along with active status. Multiple roles can be set up for a user. New roles can be added and removed at any time. You are also able to edit a user by making the changes then saving.
There is also a Show All toggle to display all users or just active users.
System Setup/Users
After the new roles have been created, a new user can be added to fit the appropriate role. We have various users in the warehouse where we would like to add/restrict access to certain features depending on their role.
Here is where we set them up with a login name, password, client, default warehouse along with active status. Multiple roles can be set up for a user. New roles can be added and removed at any time. You are also able to edit a user by making the changes then saving.
There is also a Show All toggle to display all users or just active users.

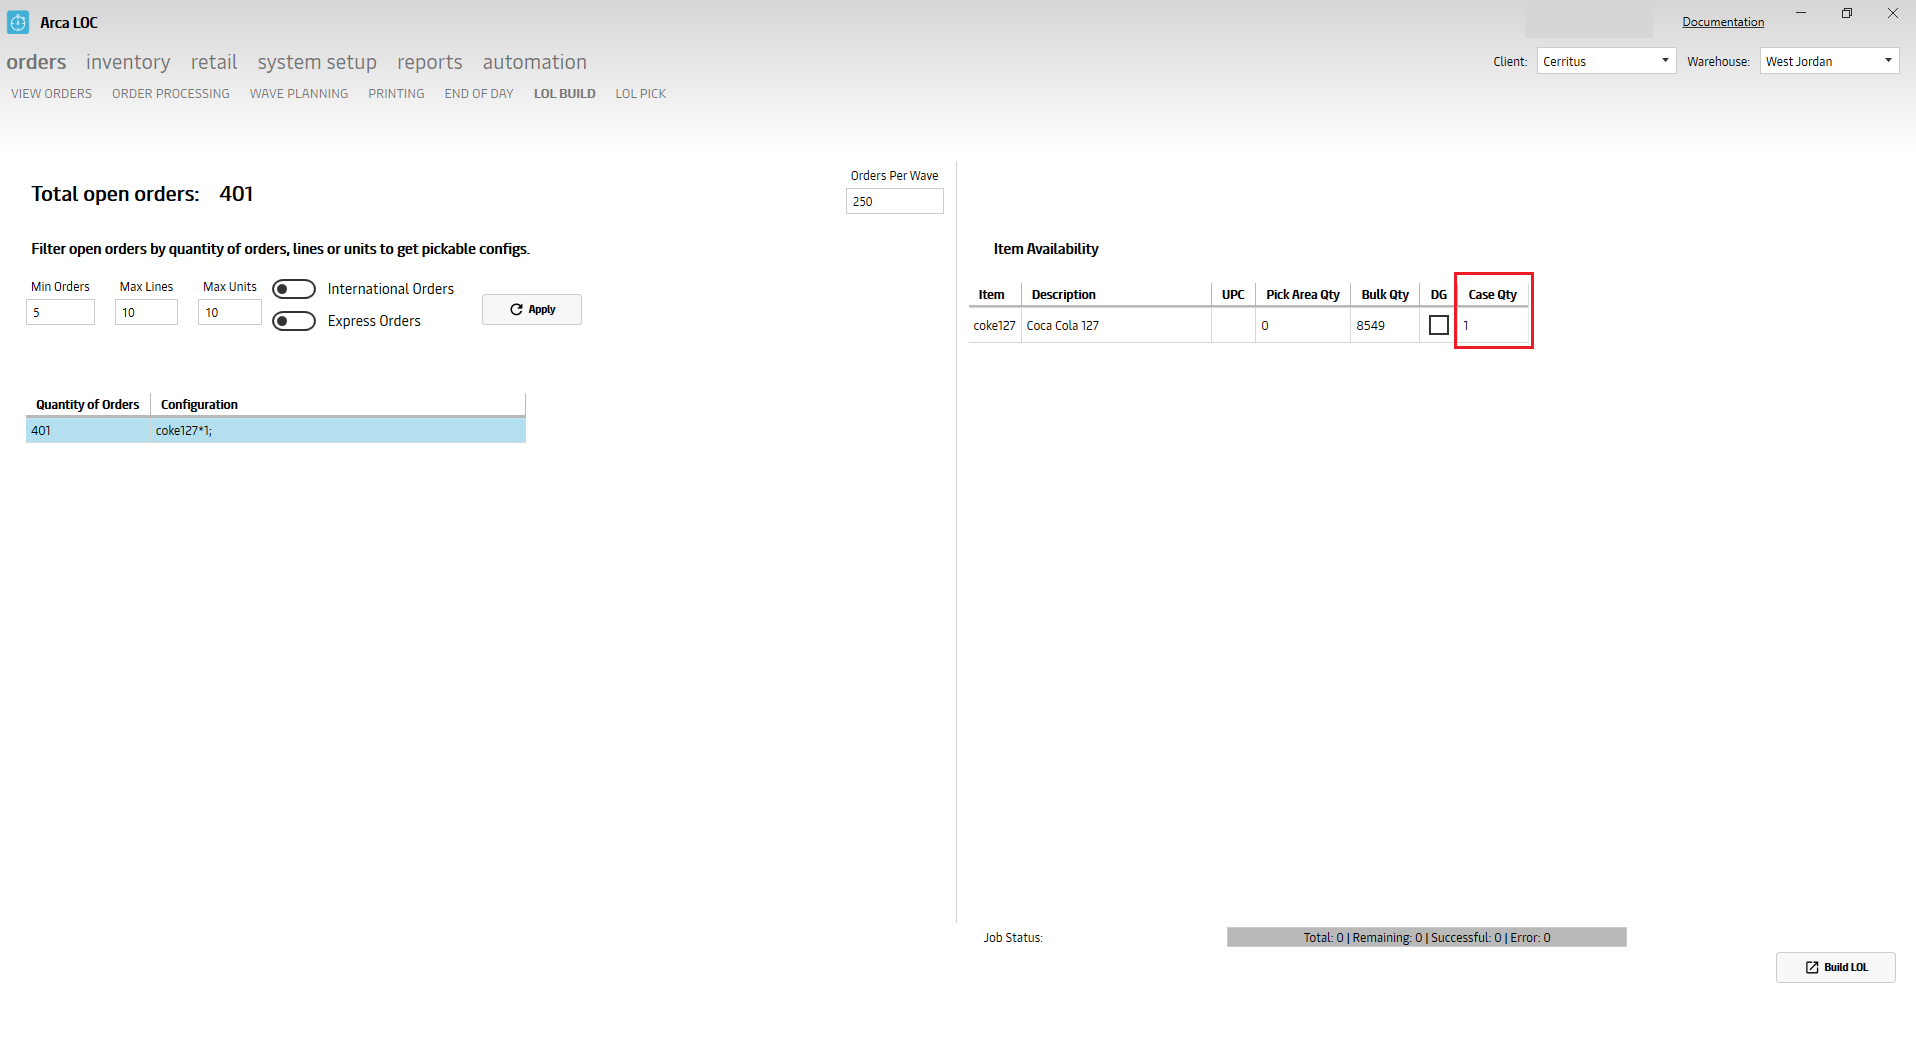
Added the Item's case qty in the grid on the LOL Build screen:
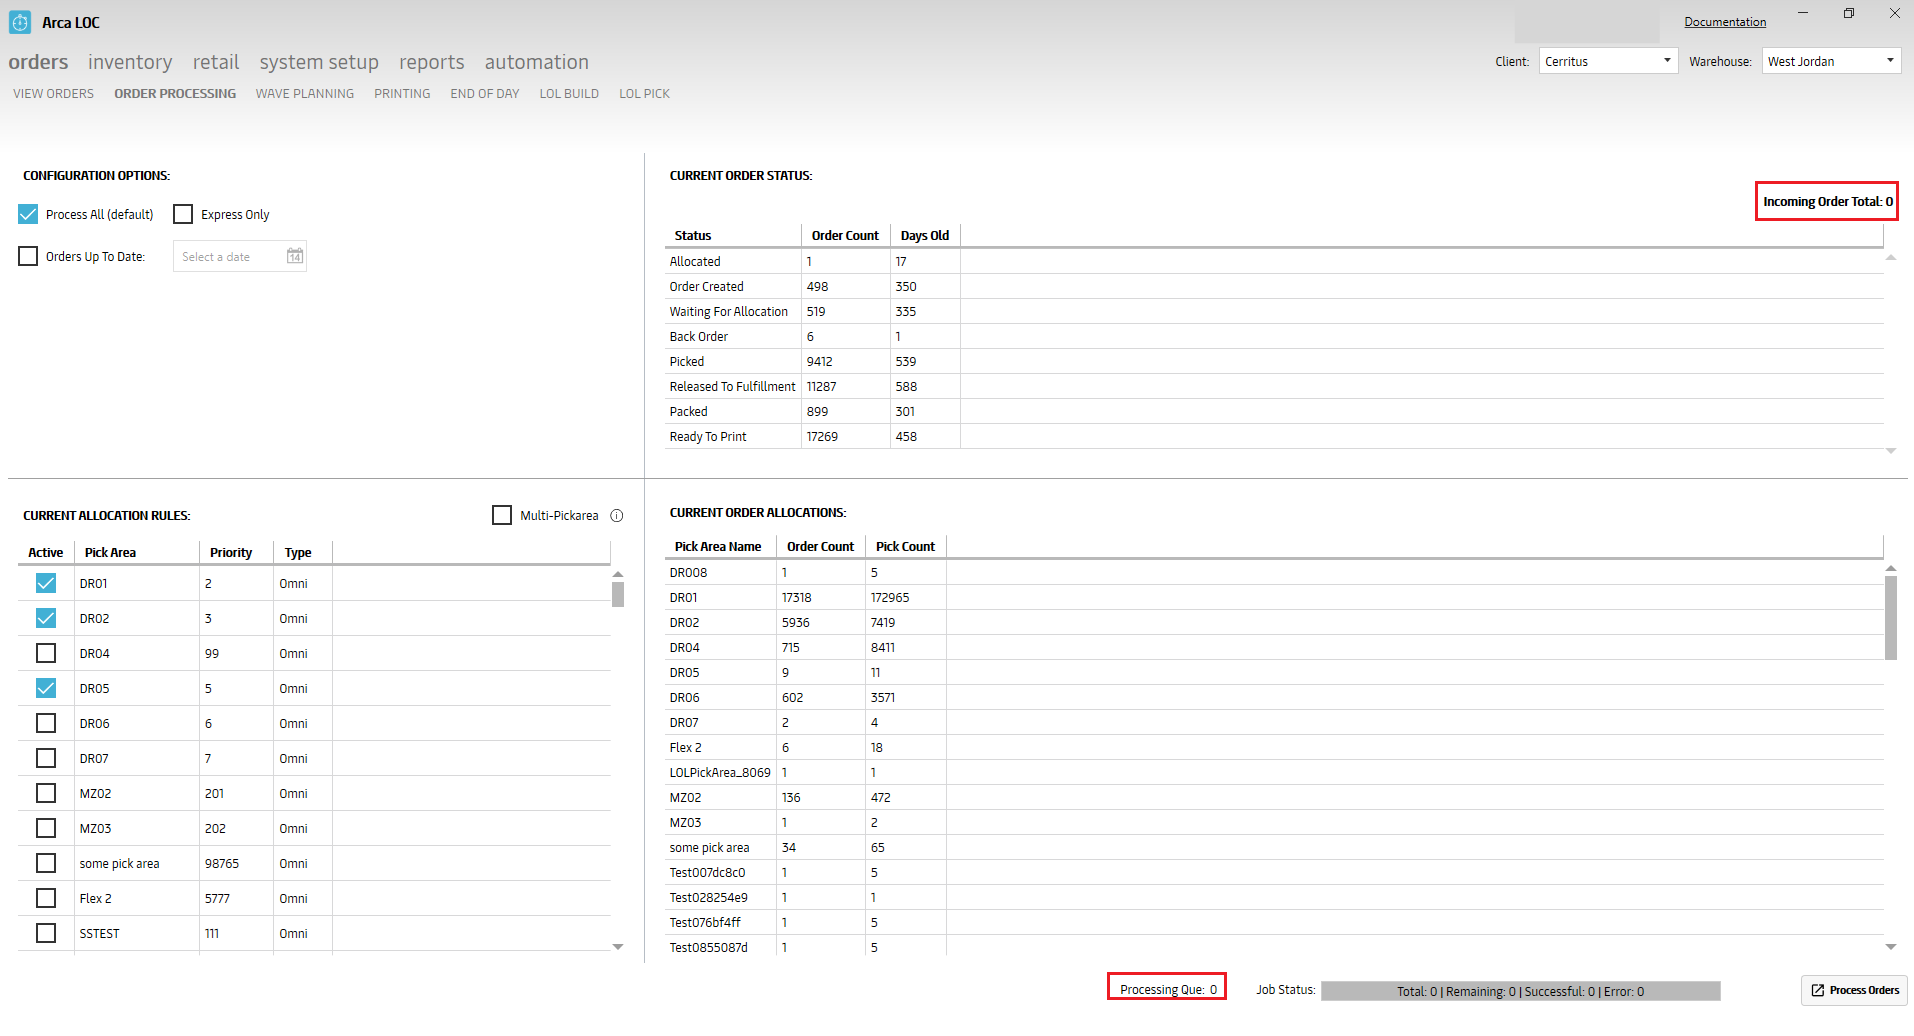
Added order processing queue totals and incoming order totals to the order processing screen:
The incoming total will represent new orders being imported from viprs into Arca for that selected client, and the processing total will represent the total number of orders that are in the processing queue in service bus. This processing total is for all clients and all warehouses, the goal is just to give a visual representation of the amount of orders being processed at that time.
Wave Planning
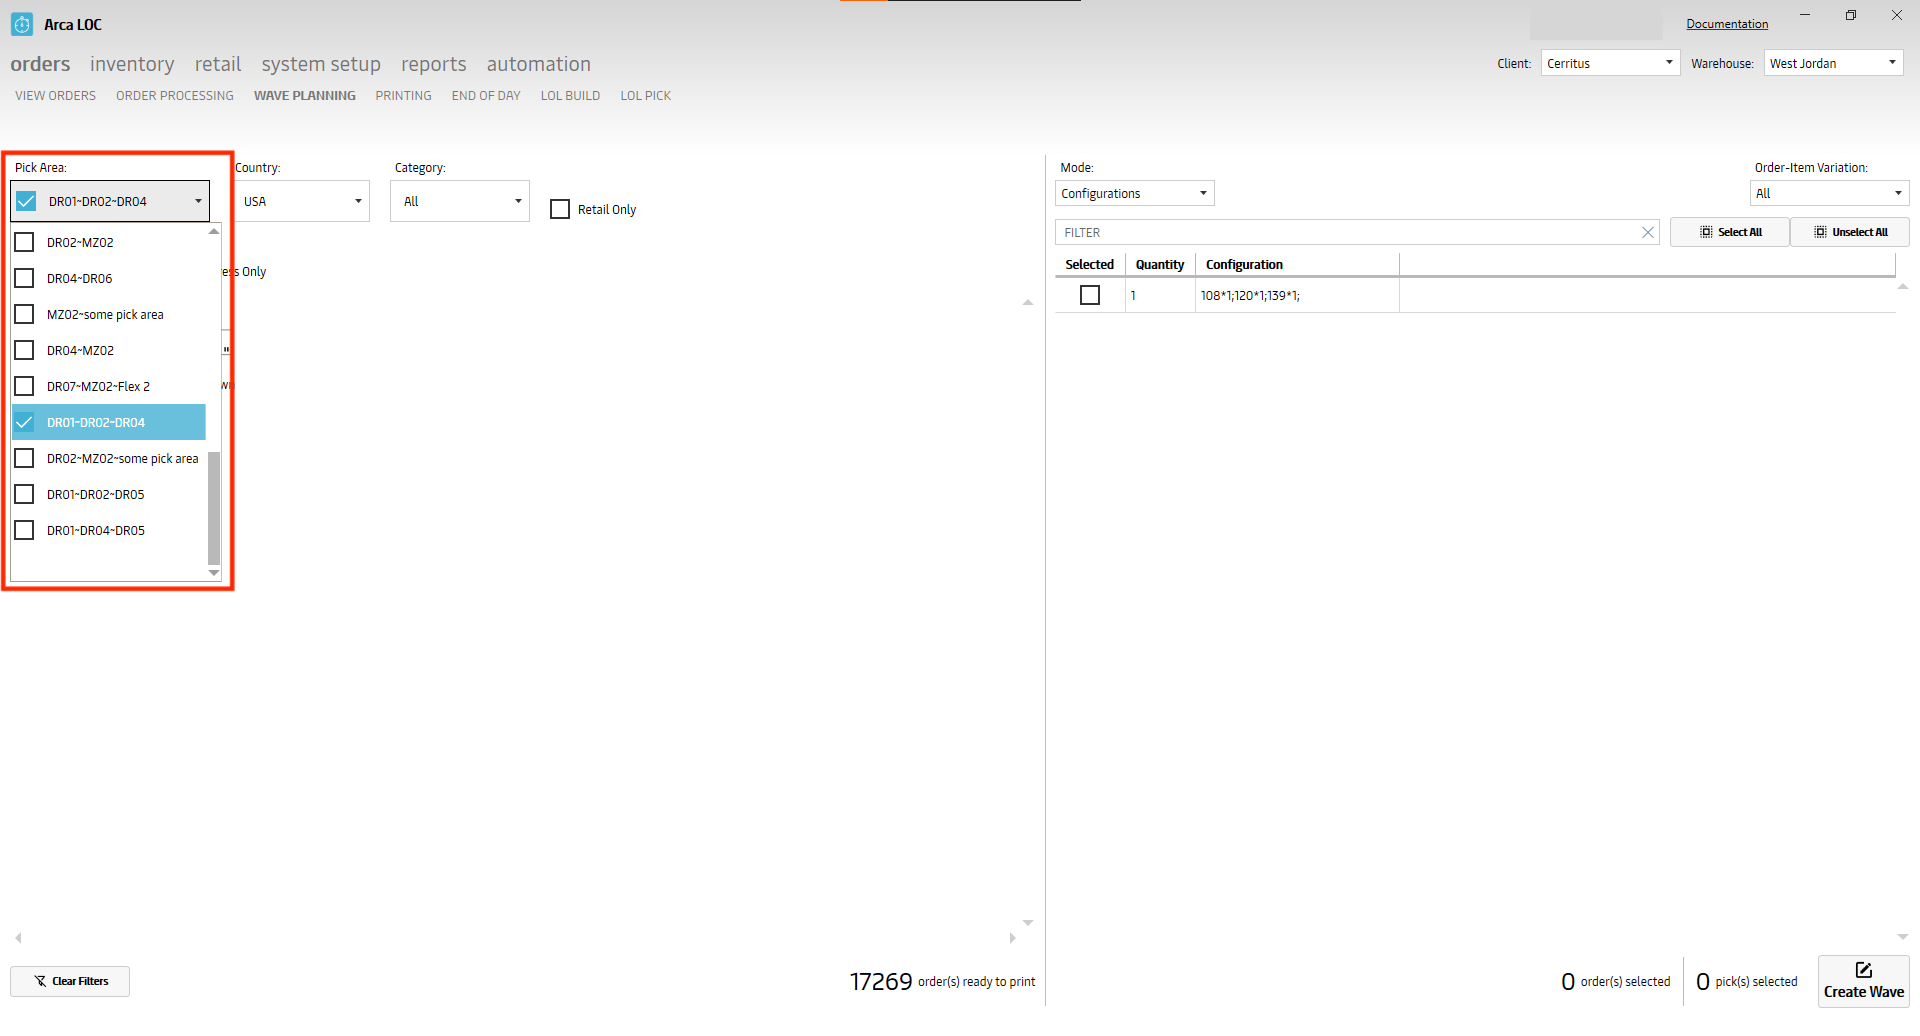
On the wave planning screen, we've changed the pick area selection from a drop-down list to a new check box system. You'll be able to select multiple pick areas at once to see orders in the grid on the right hand screen. The order filtering for changing configurations should remain the same. We will no longer display the pick area category 'Mixed', instead, if you have orders that are allocated across multiple pick areas, we will display the names of the pick areas together, such as DR01 ~ DR02, that will be one option that you can select in the check box list.
New Screen - Setup/Printers
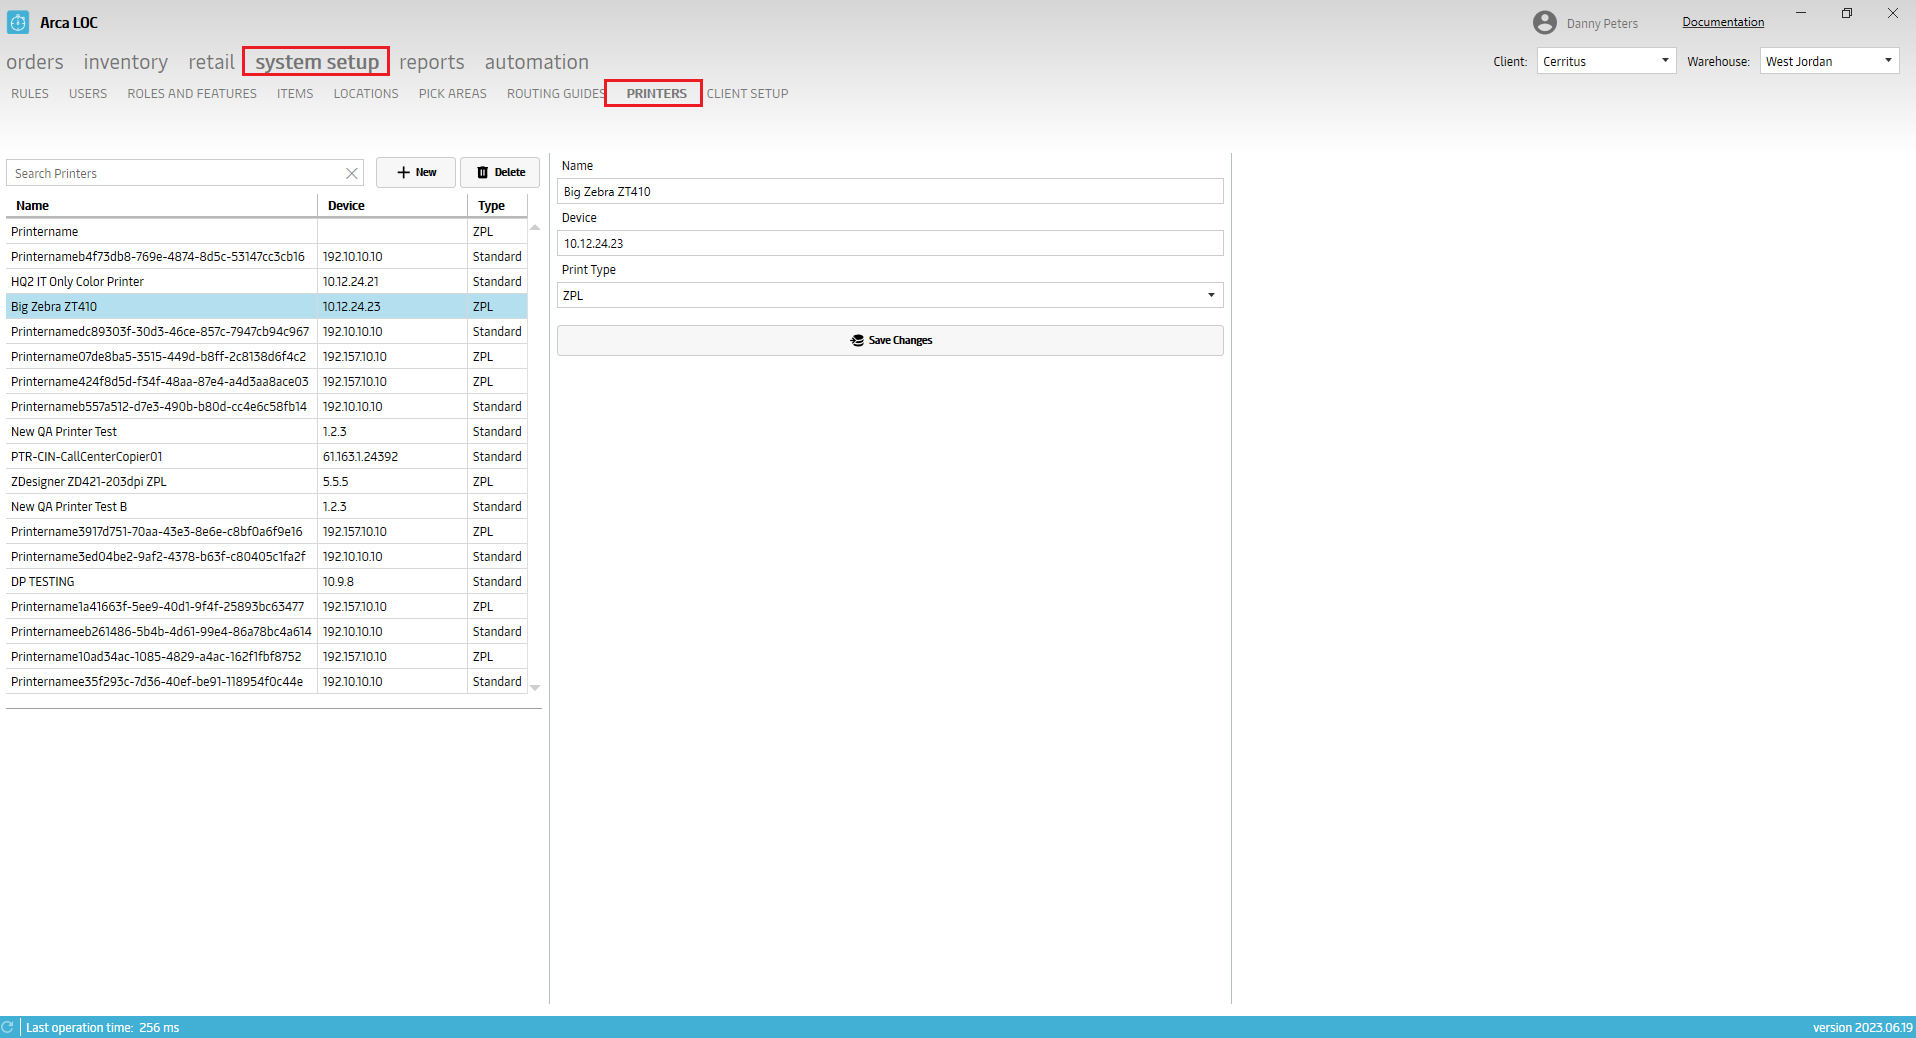
Here you can add network printers into the database. You will give it a name, under Device you enter the printer's IP address, under Type it can be a standard printer or a ZPL printer for shipping labels. You can add a new printer, edit or delete an existing one and save changes.
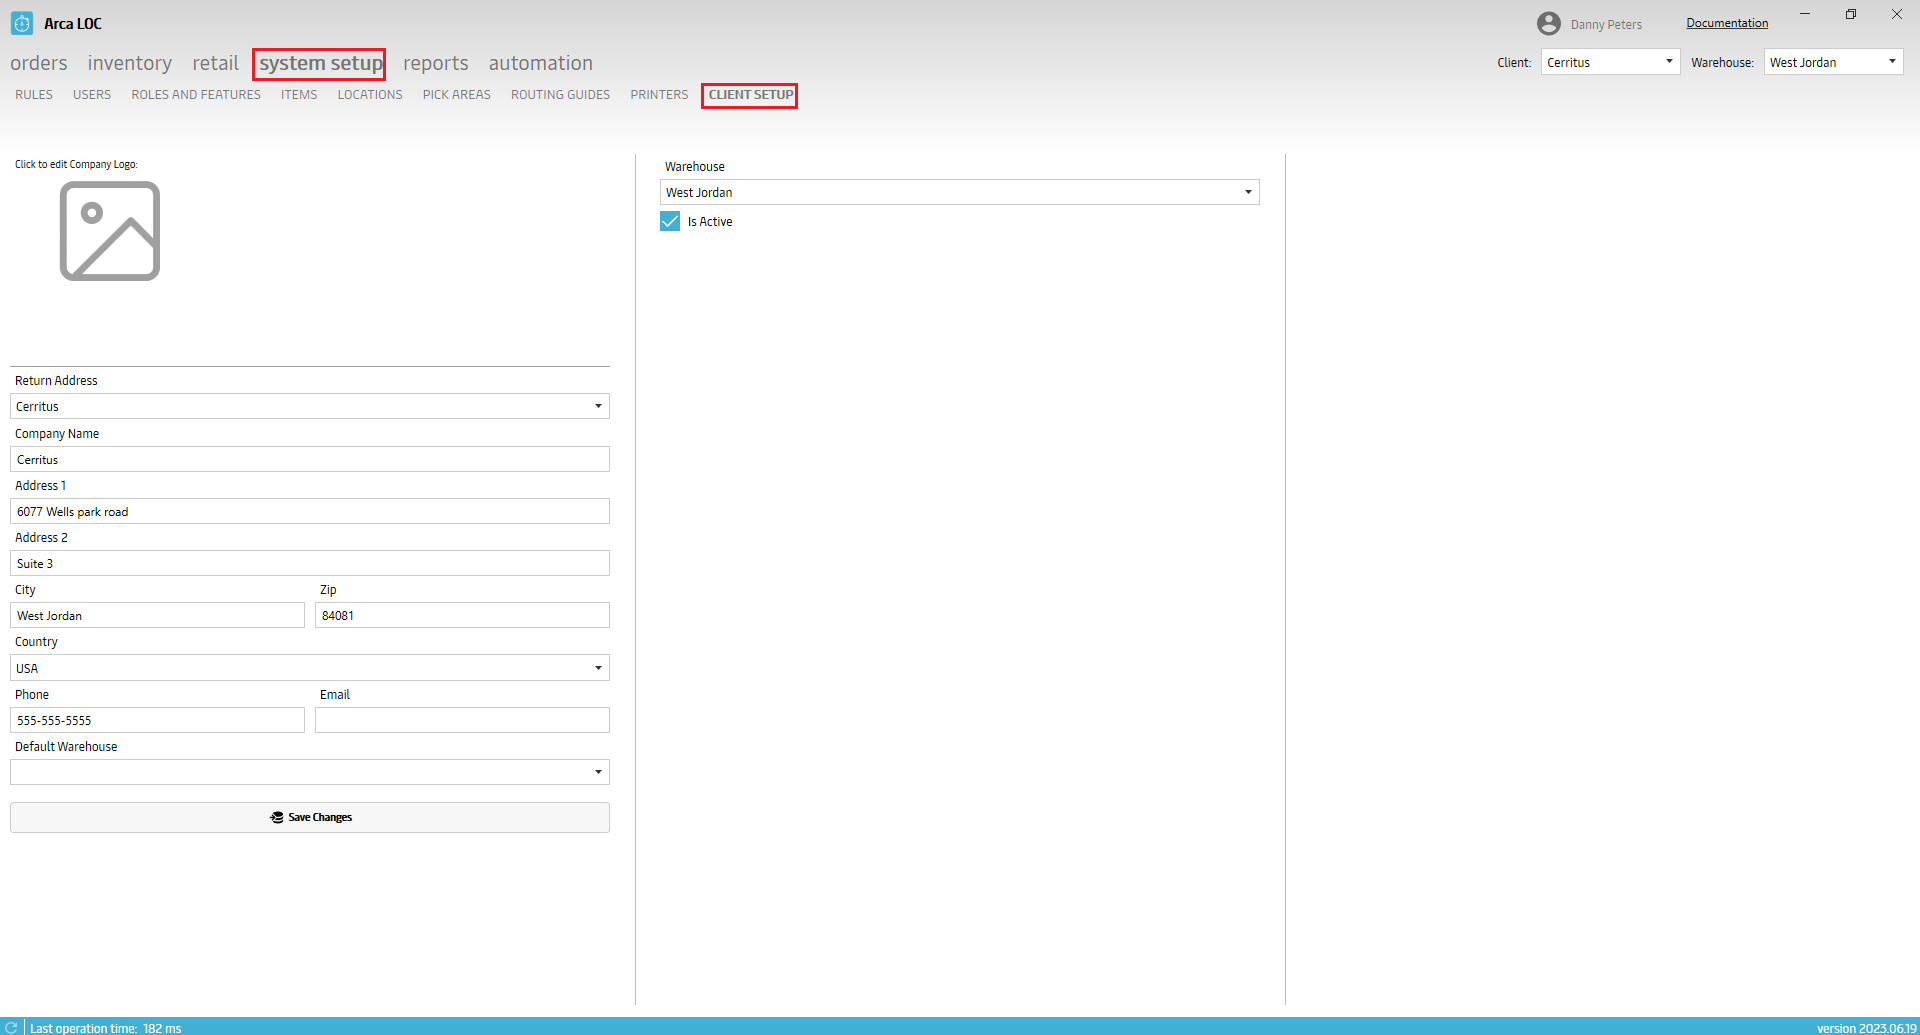
Client Setup
Under System setup, its called Client Setup. On the left side of the screen is where you can add a company logo that appears on their packslips and edit the return address information for the warehouse. This would be the warehouse that the package has shipped from. In the middle column, it displays the active warehouses for a client and a drop-down menu. You can select an inactive warehouse and activate it or deactivate one. If you deactivate a client's warehouse, it won't show up as an option in the Warehouse drop-down menu in the top right corner of the app.
6/1/2023
This push is just an update to the current test ring build 5.1.0. We've added a new ship carrier for the Manscaped go live. No UI changes.
5/8/2023
V2023.5.1.0
This version will fix the bug that didn't allow you to wave orders that used the new Amazon ShipCarrier. You will now have the ability to do so.
4/13/2023
V2023.04.13.0
Item BOM and bar code fix
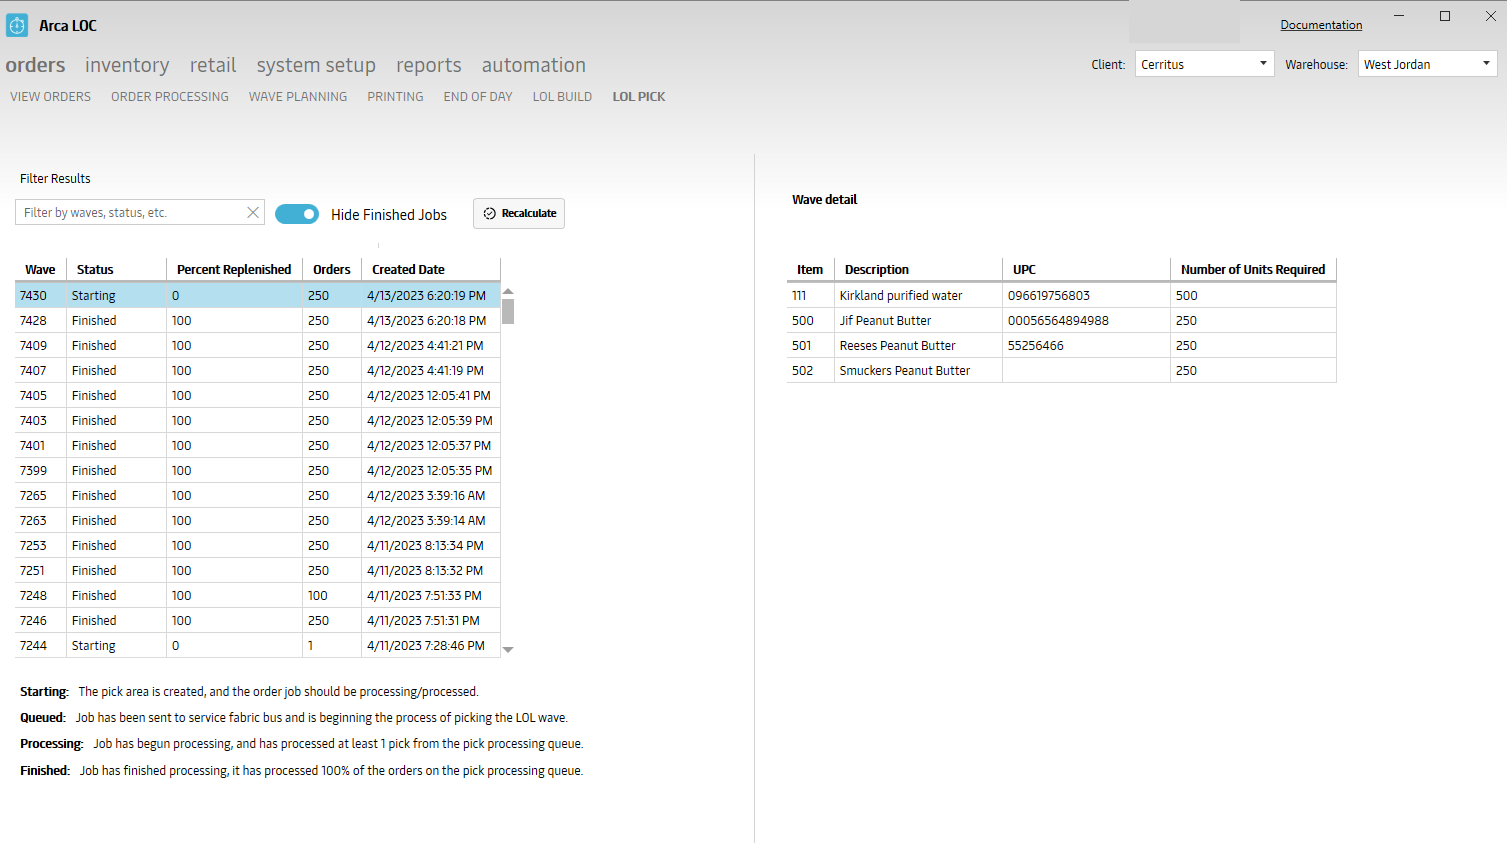
LOL - (1) Recalculate button (2) Allow print pack slips on any status (3) Hide Model Dialog after create pick click (4) progress bar
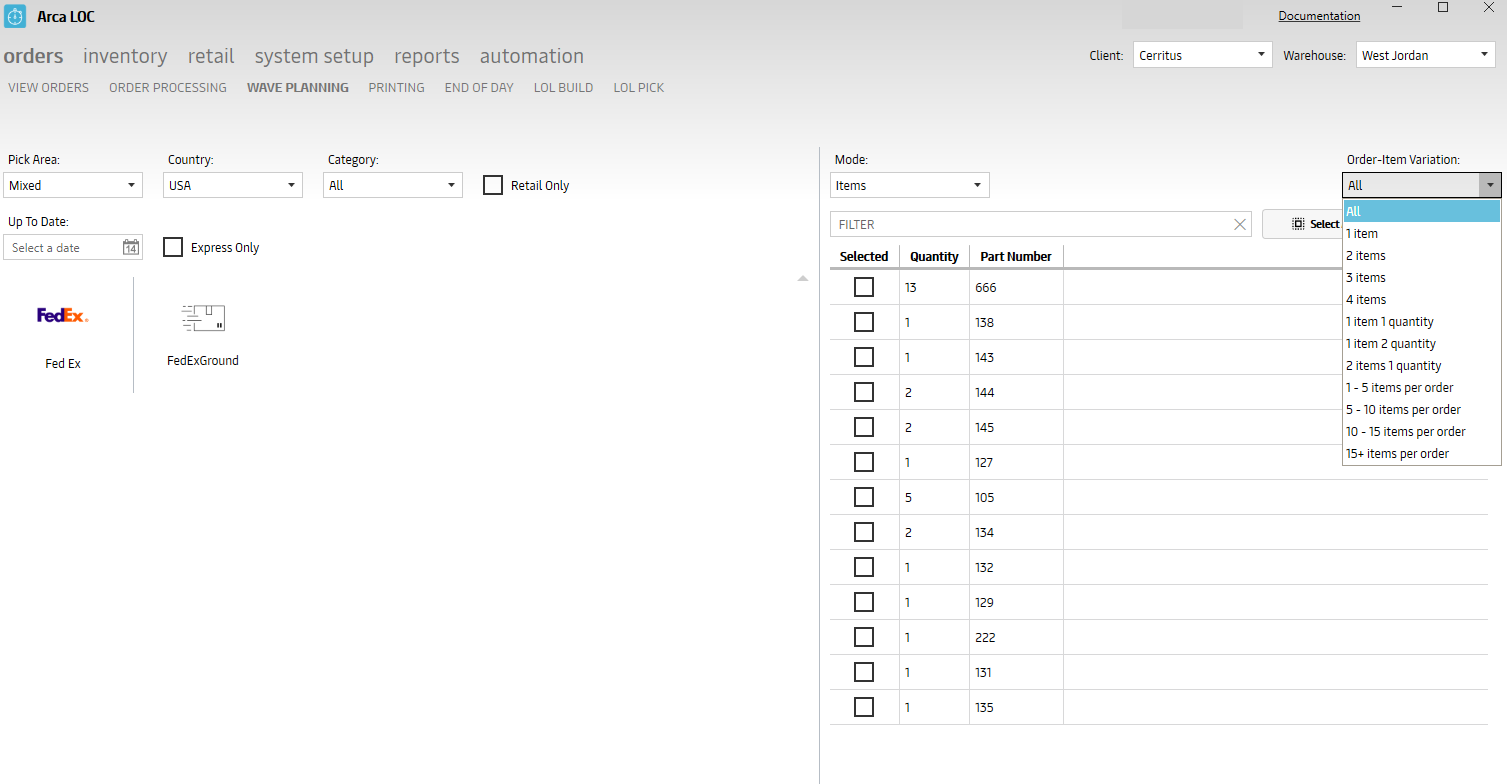
Wave planning screen order item dropdown
Location saving fix
4/11/2023
V2023.03.17.5
Bug fixing update to 3.17.0. This will fix the barcode save issues from Purehaven.
3/21/2023
V2023.3.17.0
- Bug Fixes for Item Saves
- Bug fixes for duplicate pallets on the receiving screen
2/23/2023
V2023.02.22.0
LOL Build Screen
There have been new filters added for International and Express shipping.
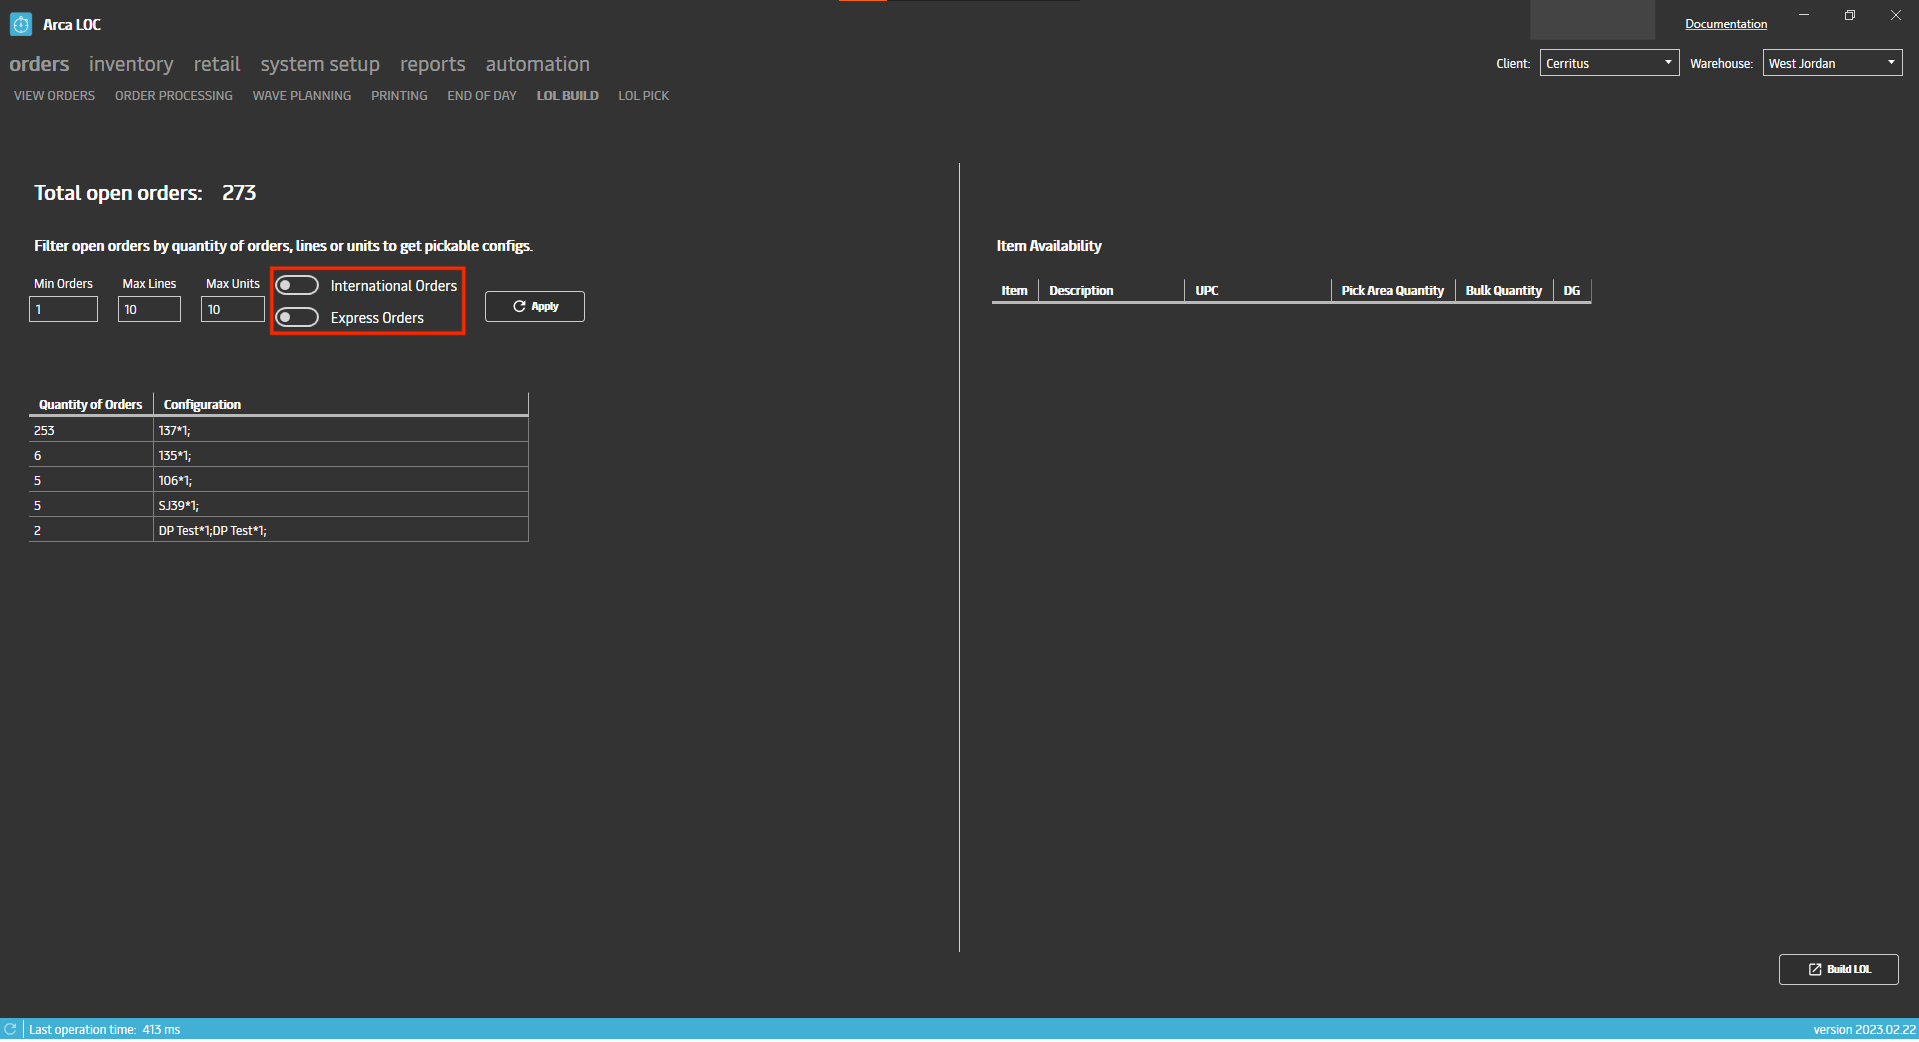
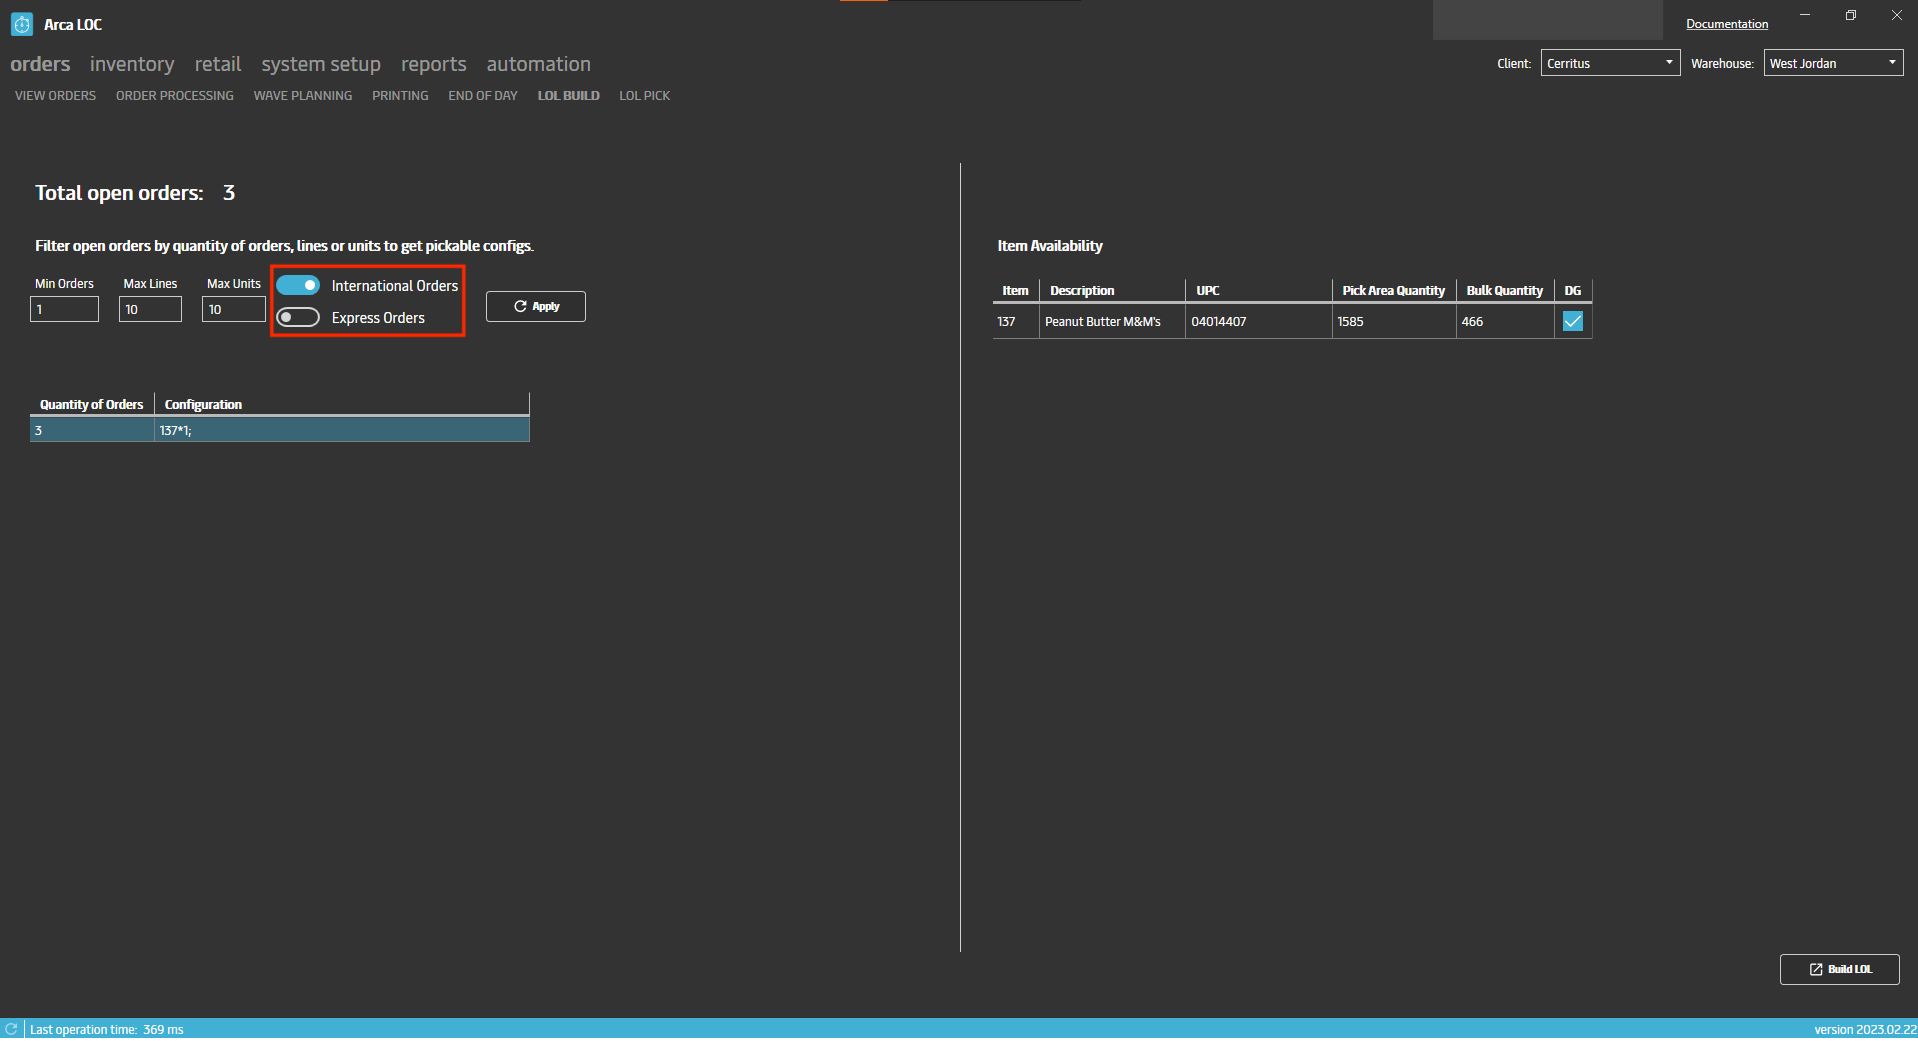
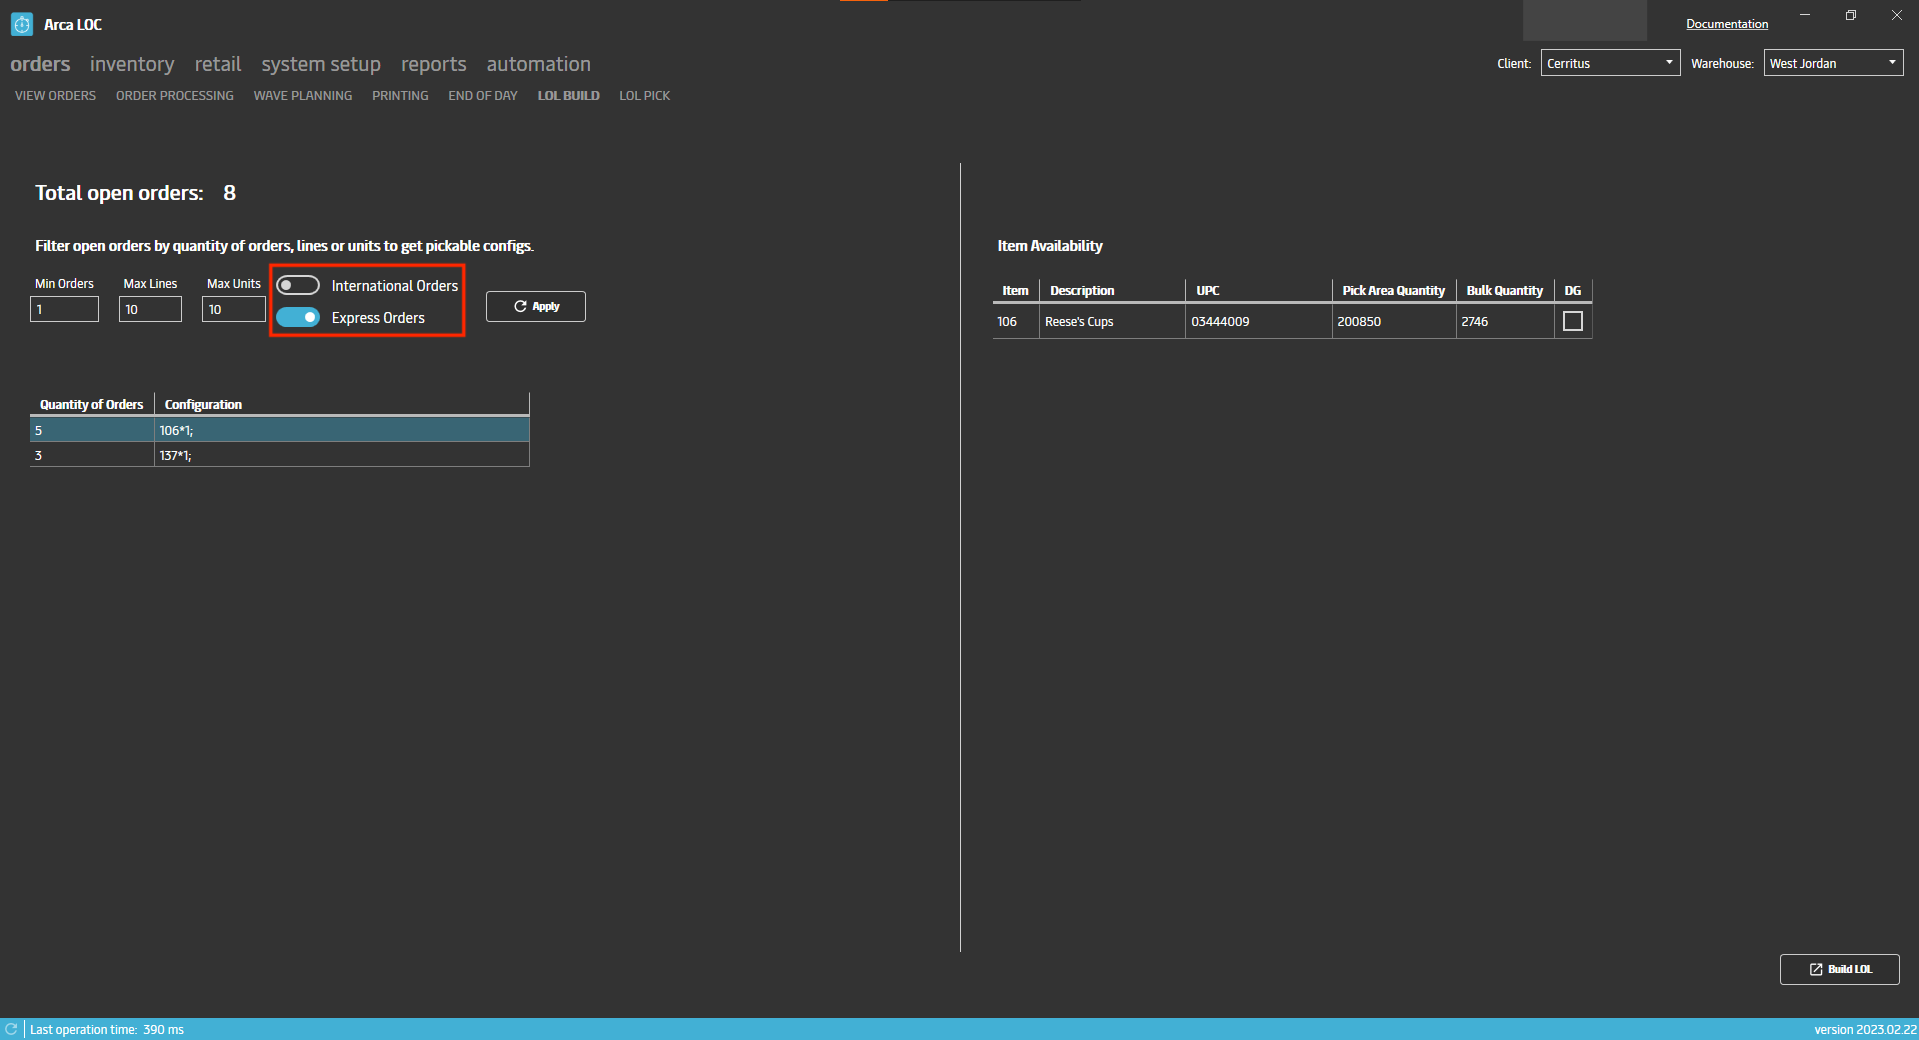
Also in the item grid on the right side it will now display DG (dangerous goods), if that has been applied to the item during set up.
V2023.1.31.0
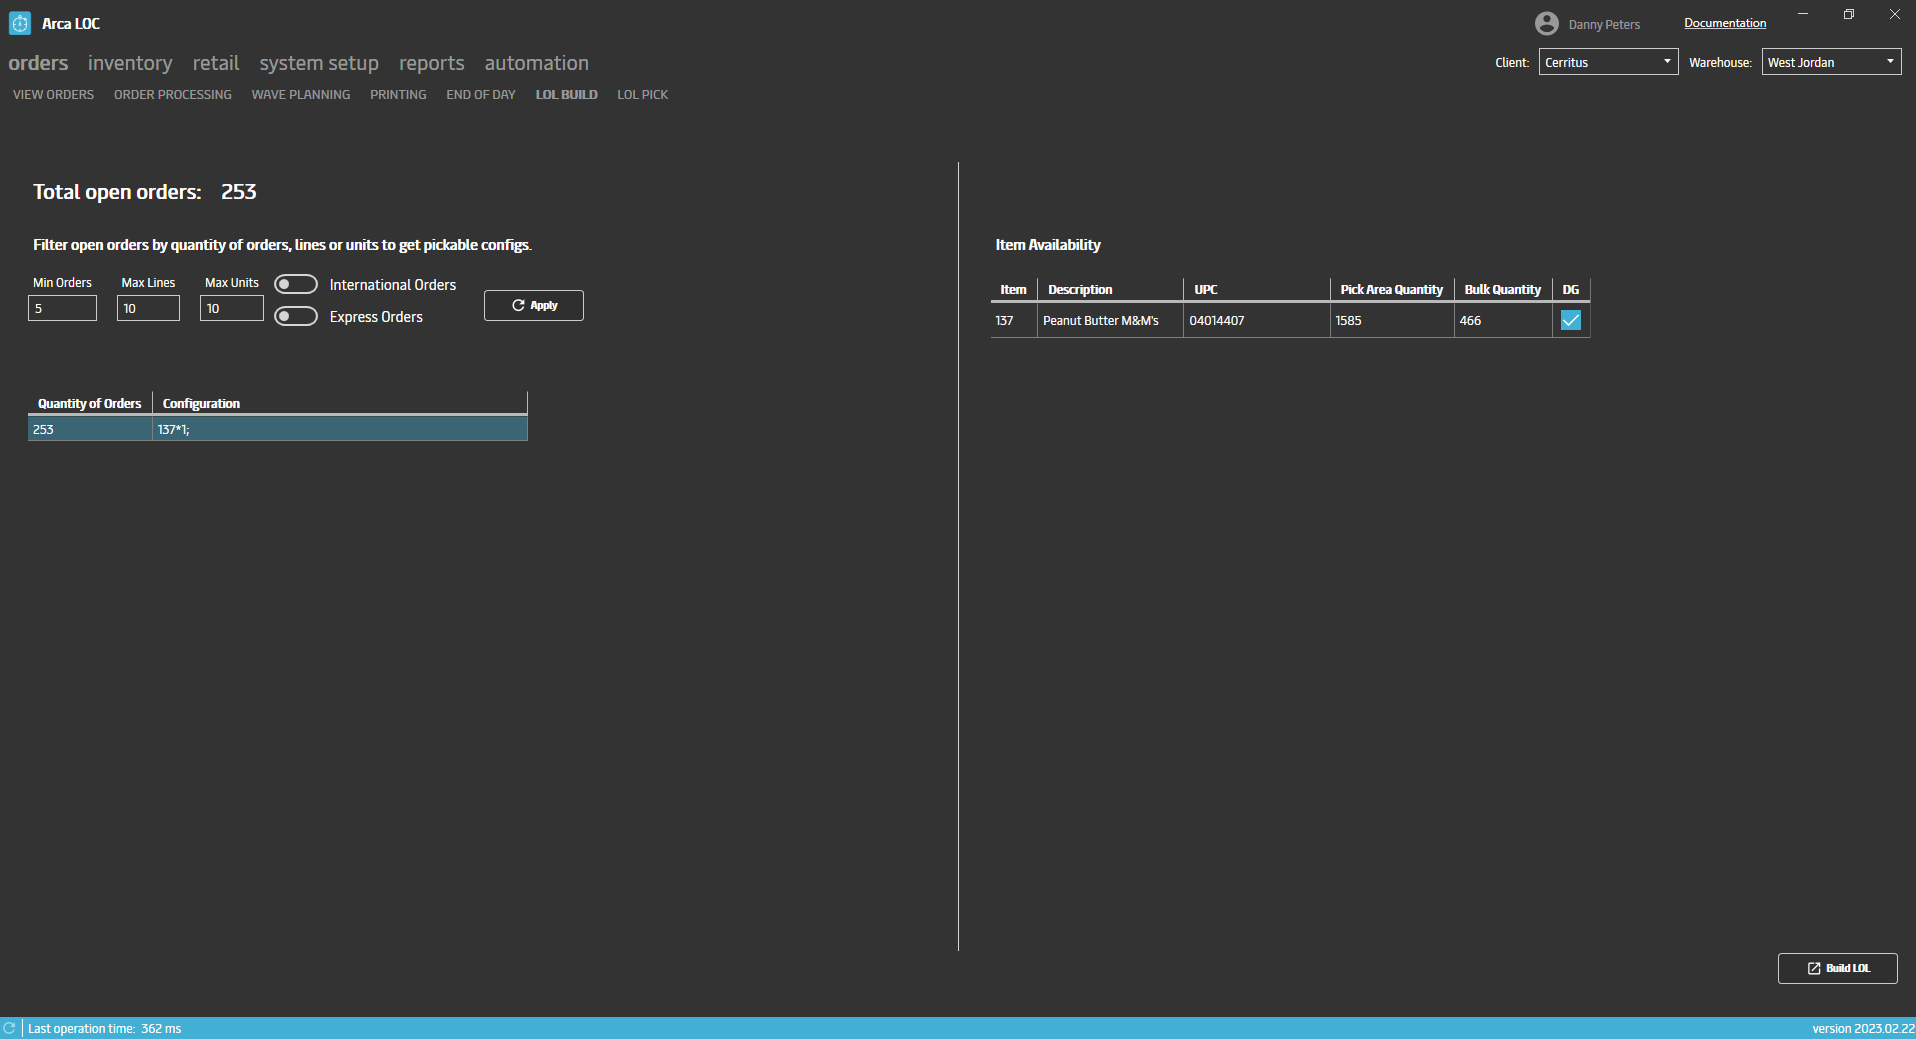
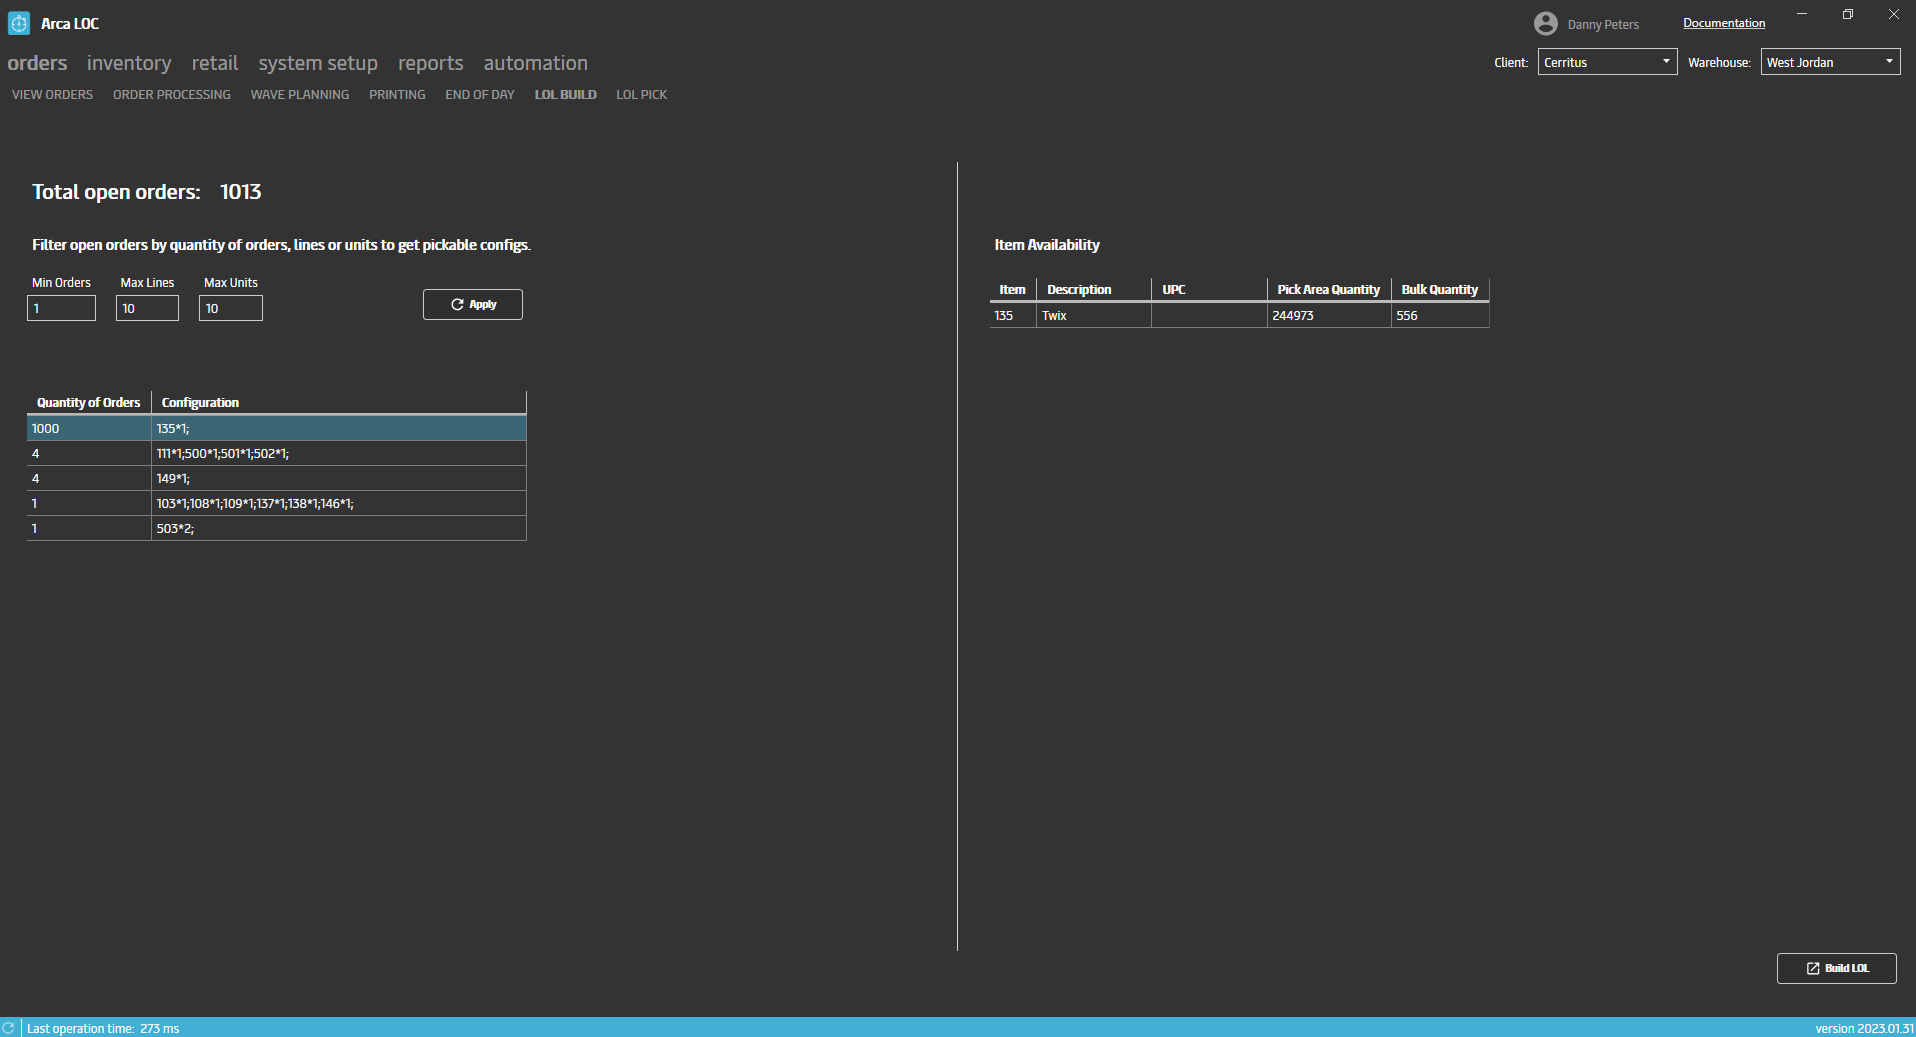
New Screens for LOL picking. LOL or Like Order Lines is designed to process large quantities of orders that all share the same item configurations. Like the Wave Planning screen, you can select the item configuration that you want and build an LOL wave which will group all the orders together and then pick all the items. There are two new screens added to Arca LOC under the orders tab, LOL Build and LOL Pick.
LOL Build:
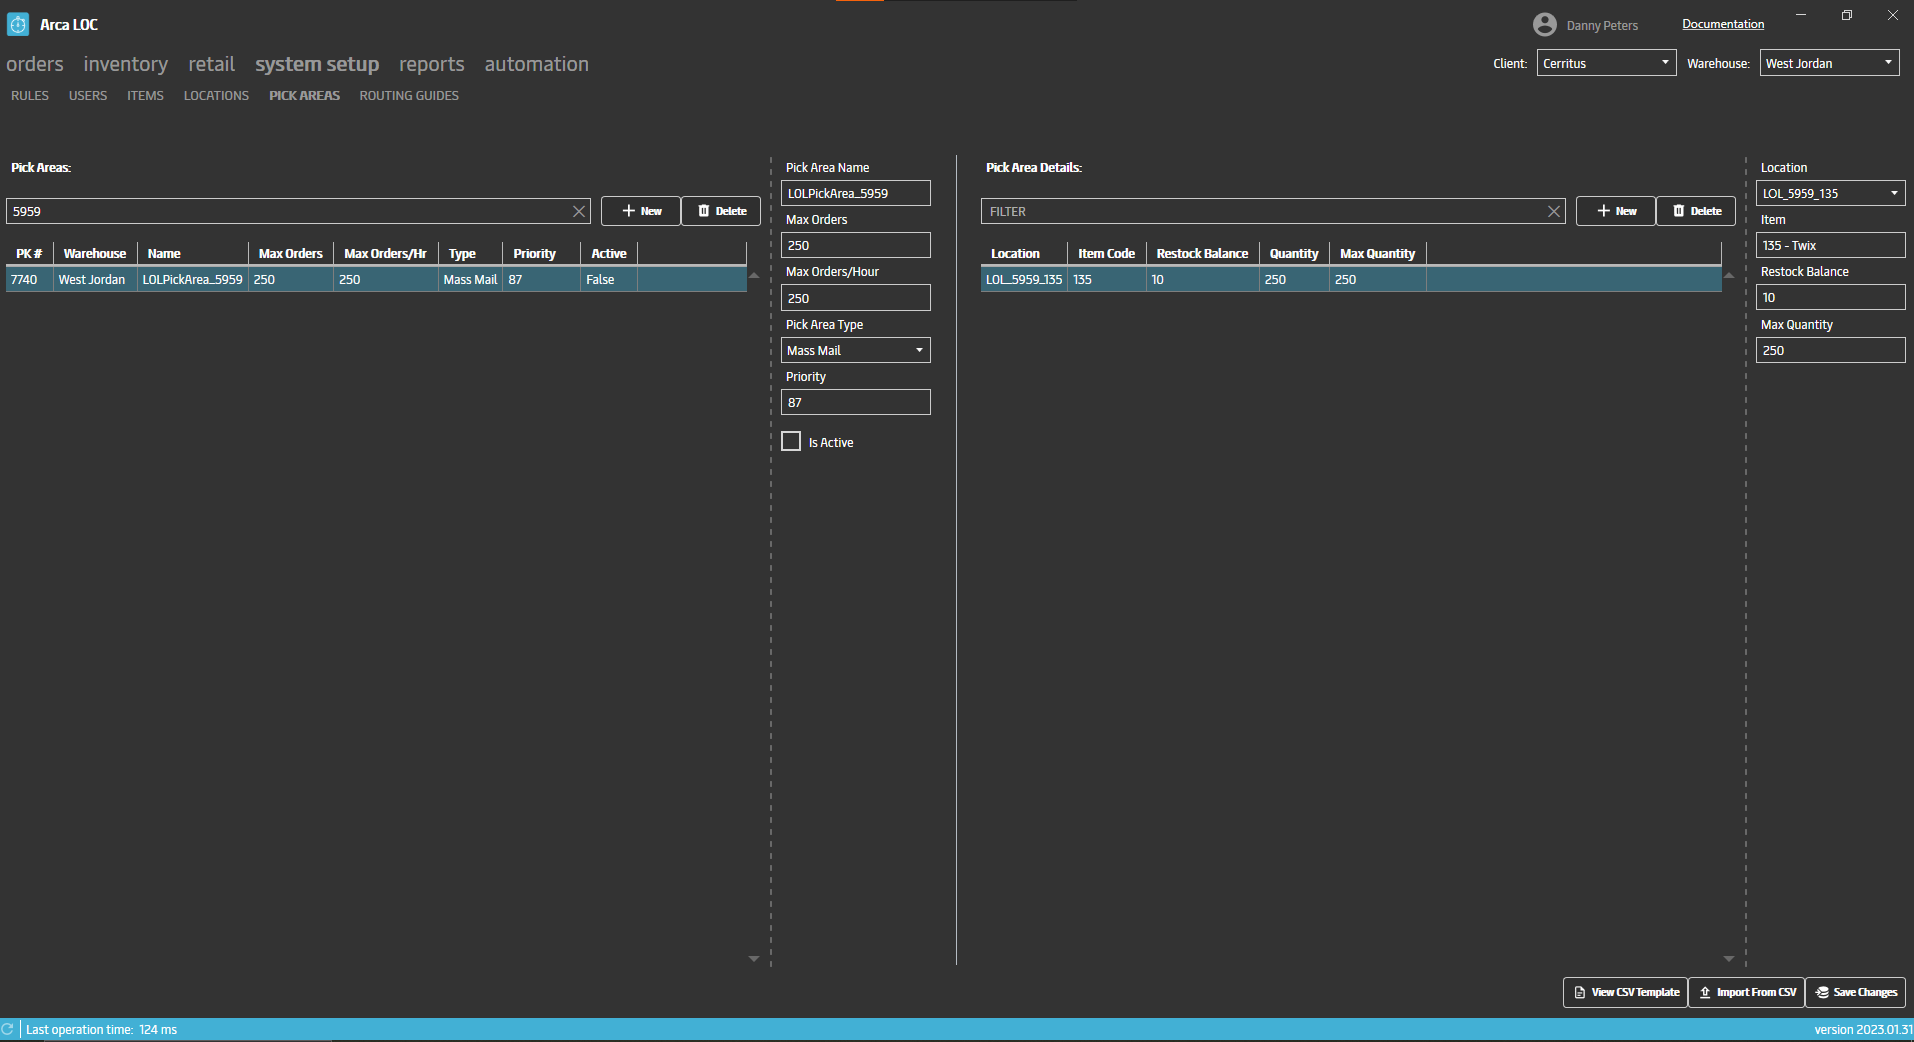
On the build screen you will select a group of orders by item configuration in the grid on the left, it will display the item information for the selected group in the grid on the right. The right grid will show the total quantity of the item in all pick areas (Pick Area Quantity) and the total quantity of the item being stored on any pallets (Bulk Quantity). You can filter the left grid by Min Orders; how many orders are in the group, Max Lines; how many items are there per order, and Max Units; total item quantity on each order. These filters will determine what group of orders are shown in the grid. You will need to click on the Apply button to refresh the gid using your filters. Select one of the groups that you want to build and click on Build LOL button in the bottom right of the screen. The build action does a few things, first it will group the orders together and create a wave (batch) just like the wave planning screen. This will move all the orders statuses into the state of Released for Fulfillment so that they can be picked. Second it will create a new Pick area and Pick area details for all the items in the orders. You can view the pick area that was created on the Pick areas screen, it will be named LOLPickArea_Wave numer. Example: LOLPickArea_5959. The pick area detail will be named LOL_Wave number_Item code. Example: LOL_5959_135. Once building the wave is complete it will show a message next to the Build LOL button that says, “Build created successfully” and your new wave will be shown on the next screen LOL Pick.
There are limits set for the number of orders that we can build on this screen, we break them up to allow sufficient time for each wave to be created. You can only send a maximum of 2,500 orders to the build job at once. If the order group has 5,000 orders of the same item configuration, then the first 2,500 orders will be built when you click the build LOL button the first time and you will have to refresh the build screen and then select the remaining 2,500 orders and click on build LOL a second time. When you click build, it will break up the 2,500 (or less) orders into waves, each containing 250 orders. On the next screen, LOL Pick, you will see 10 new waves (or less) of 250 orders.
LOL Pick
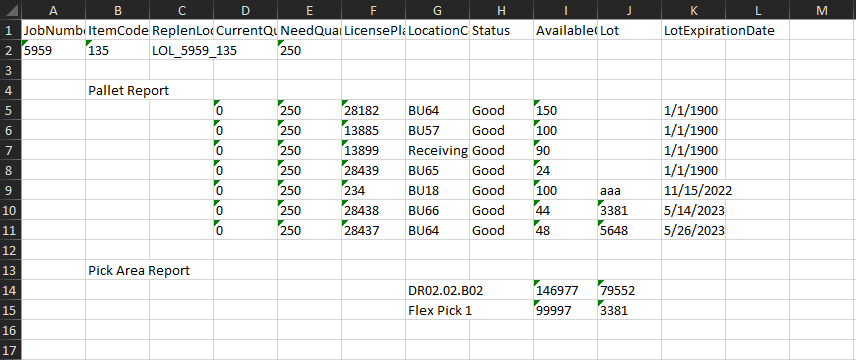
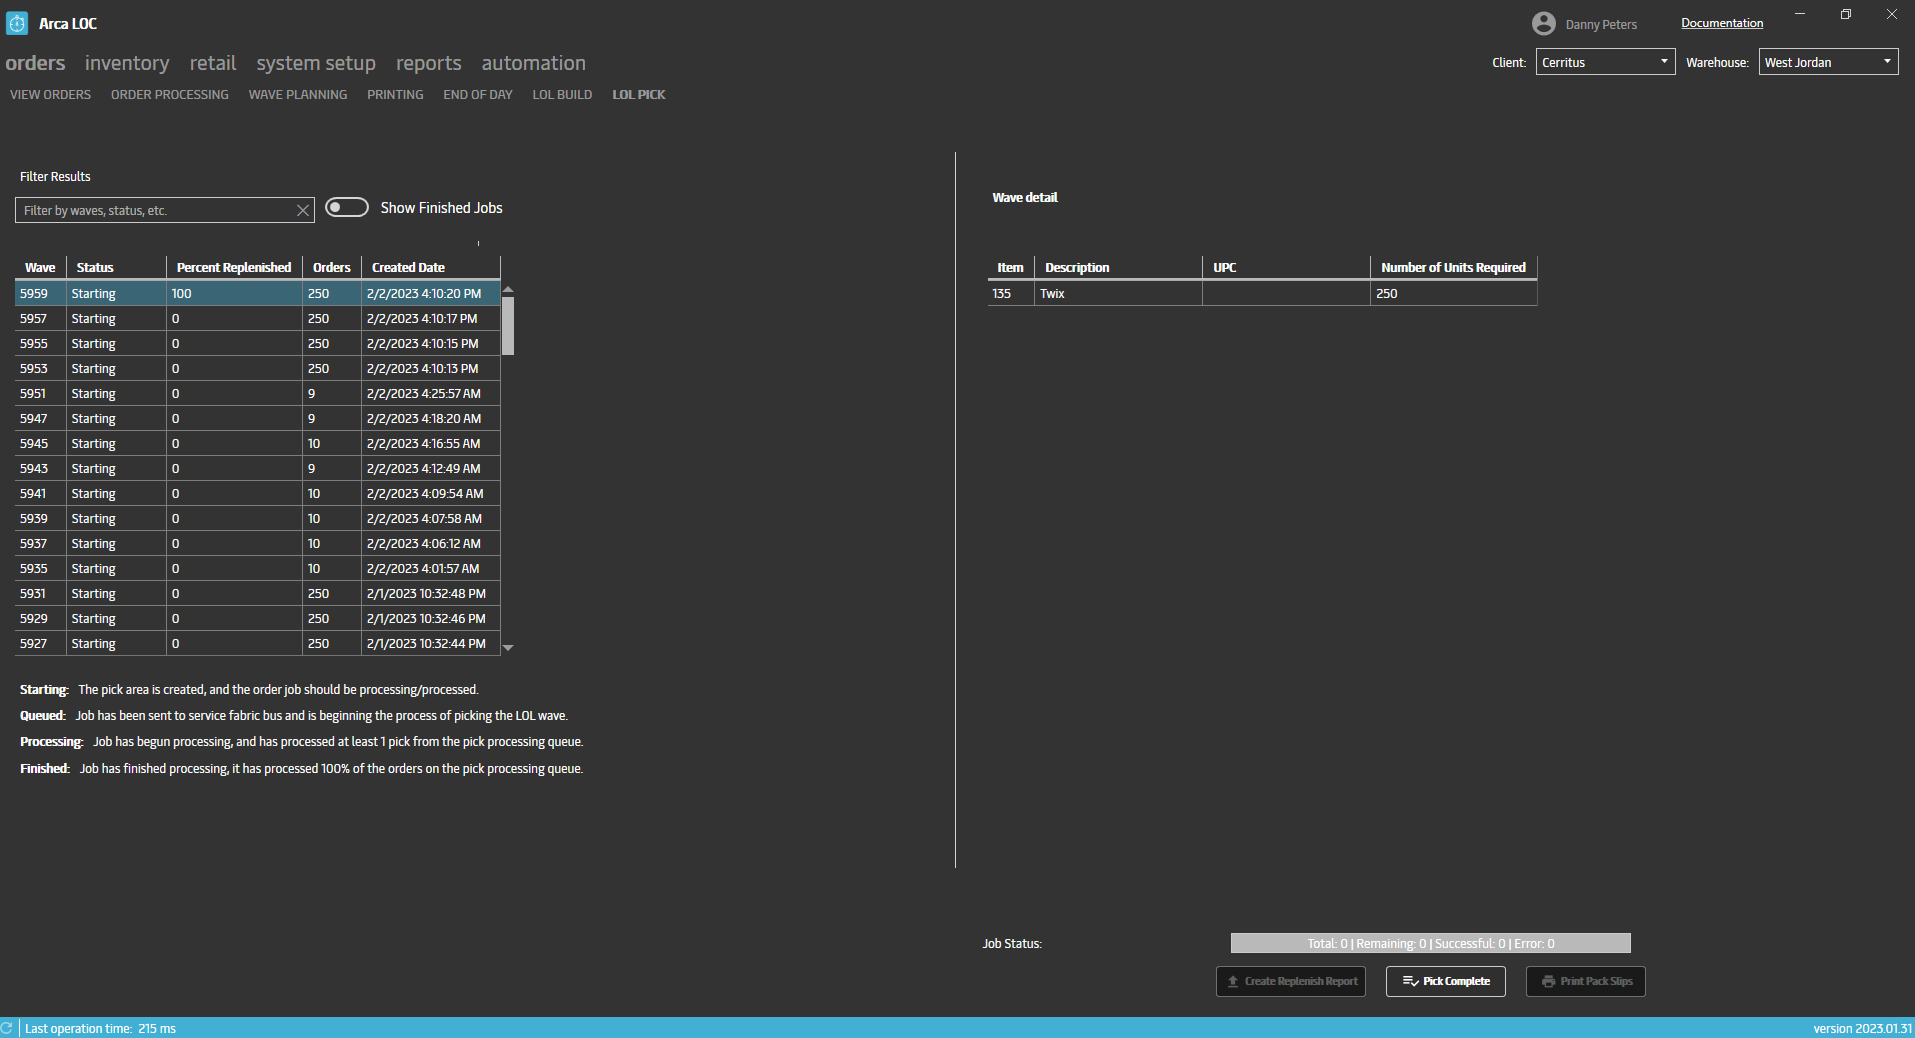
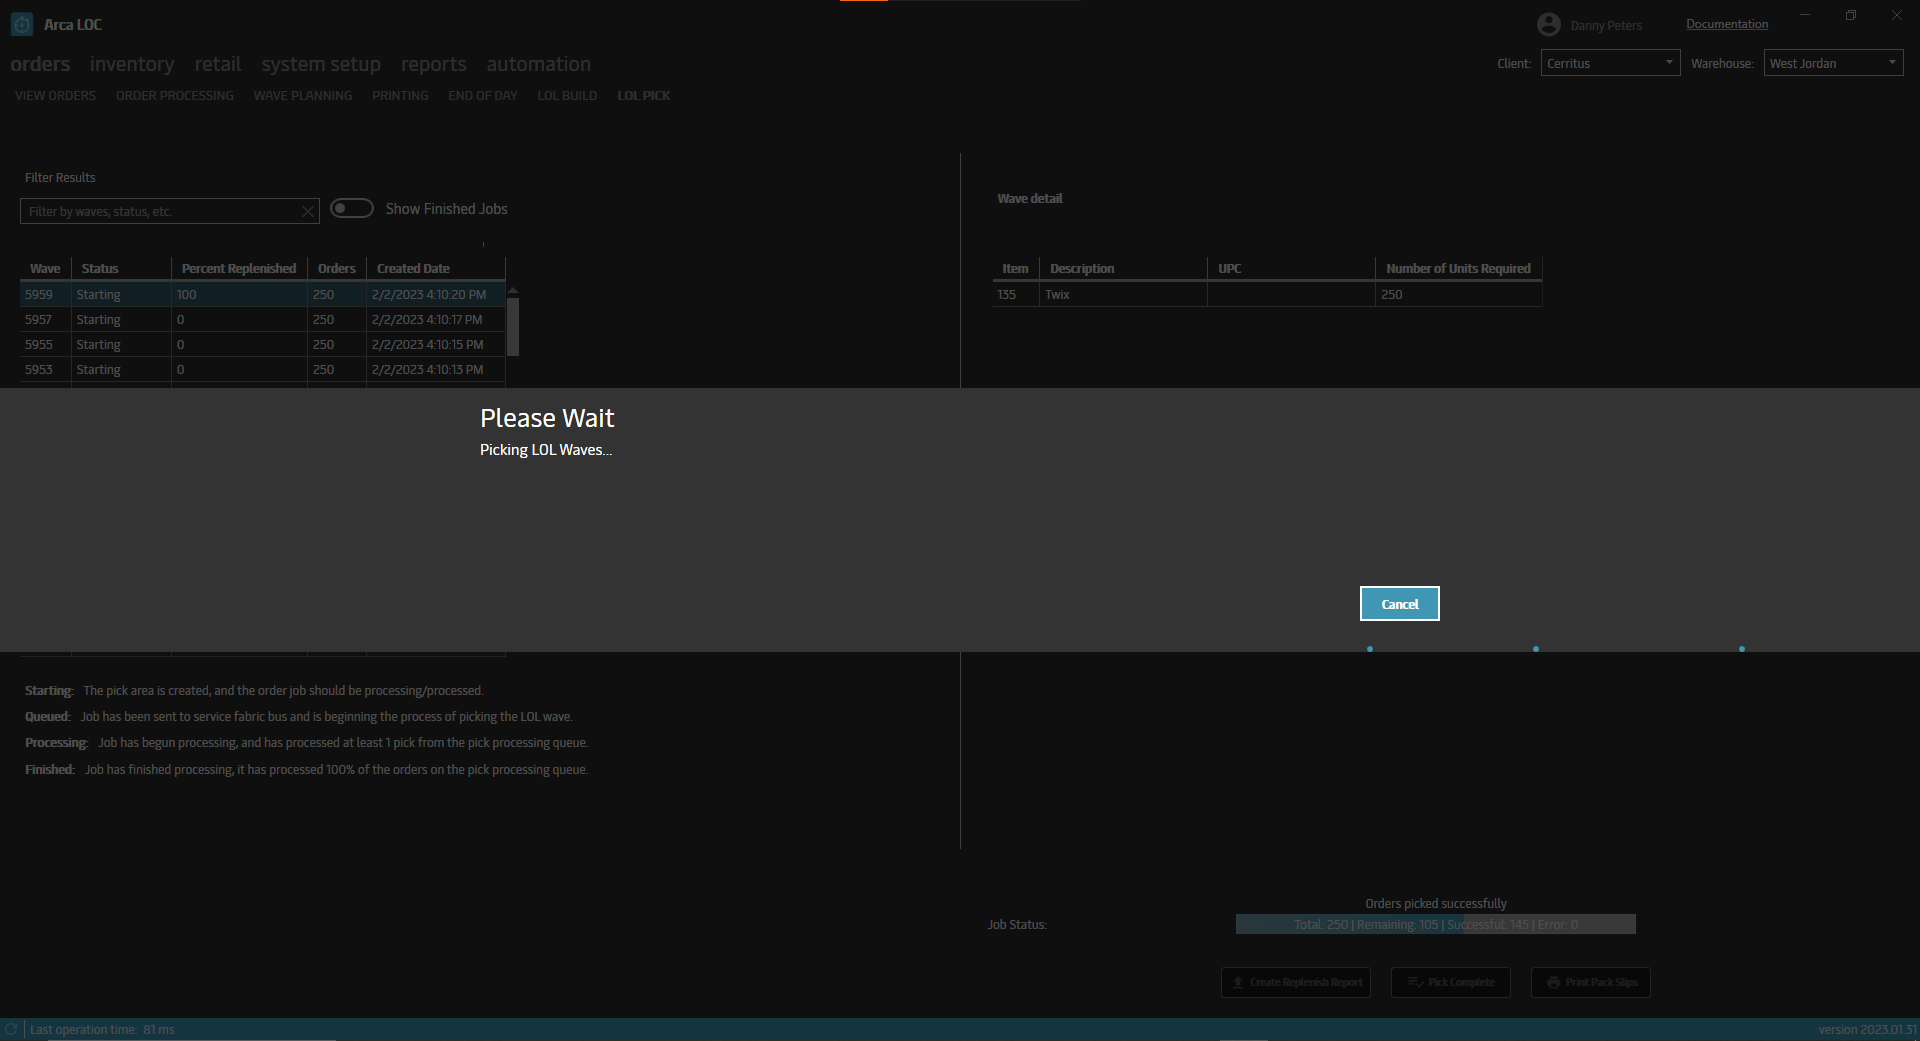
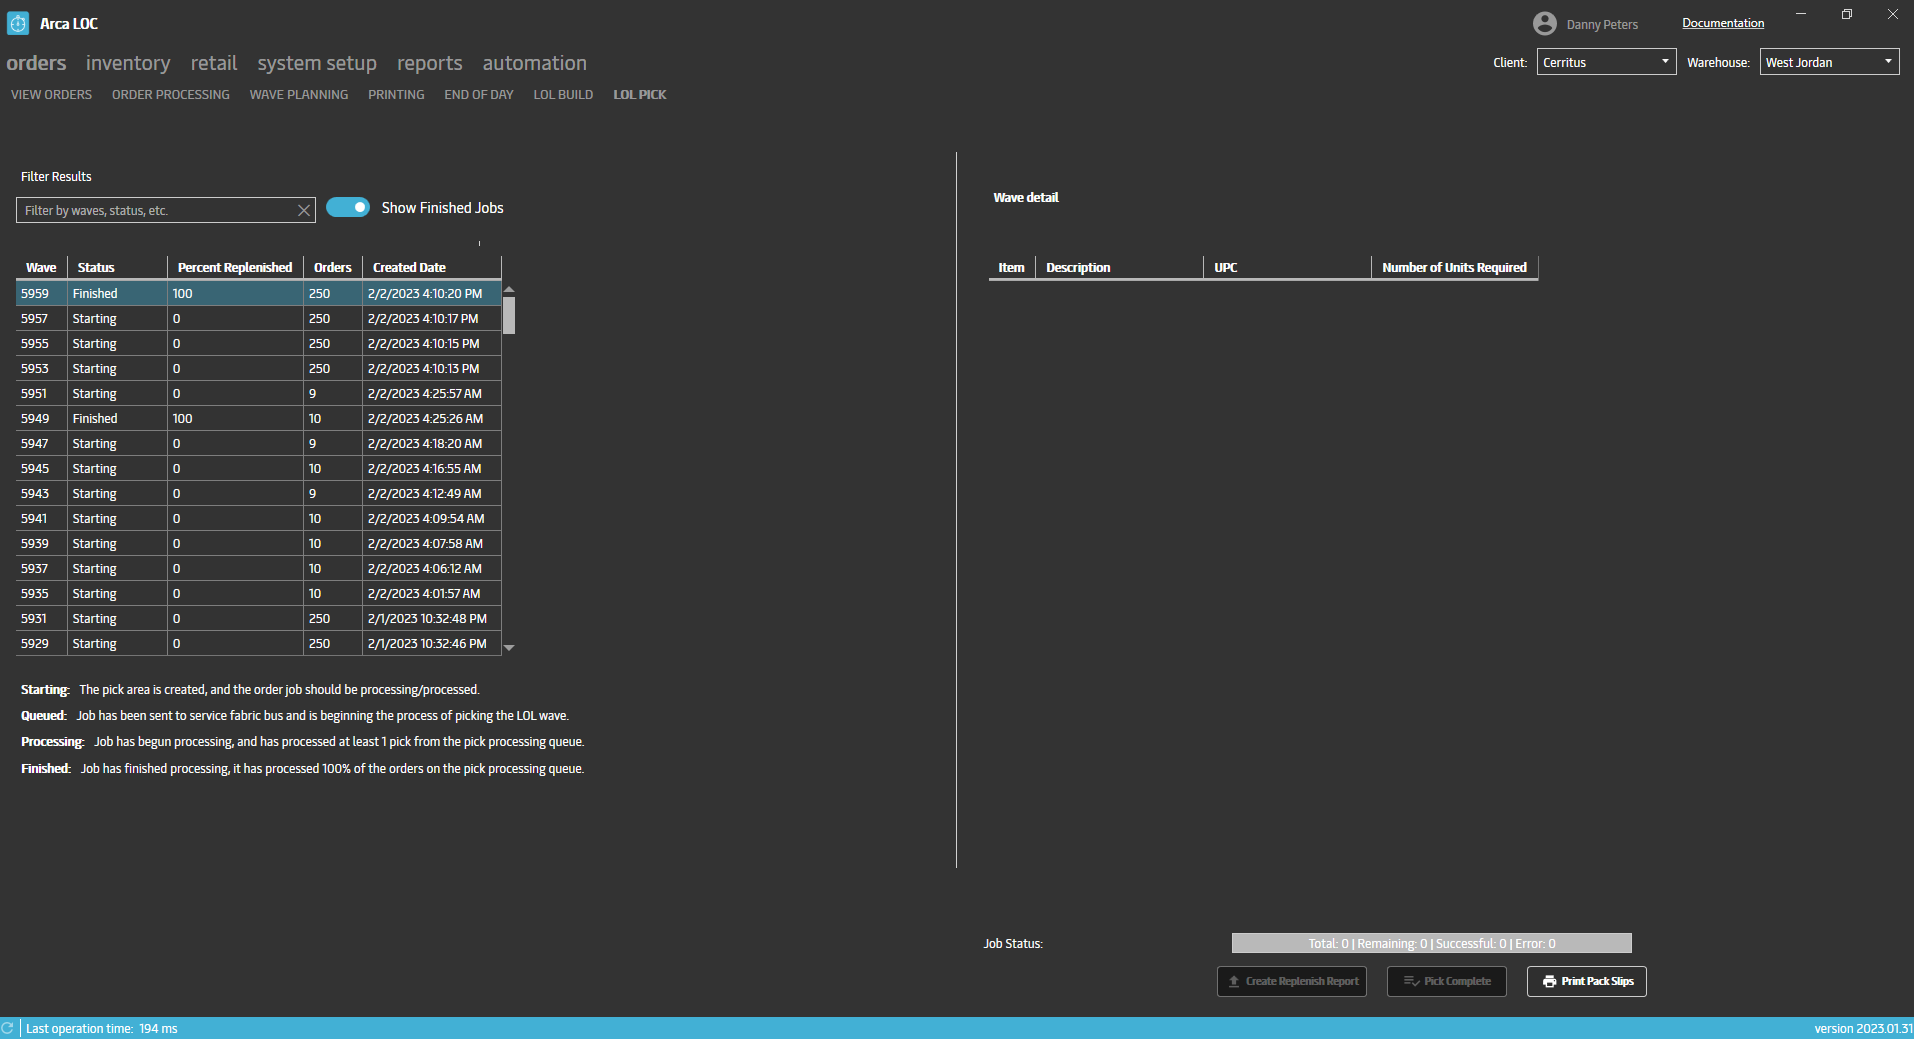
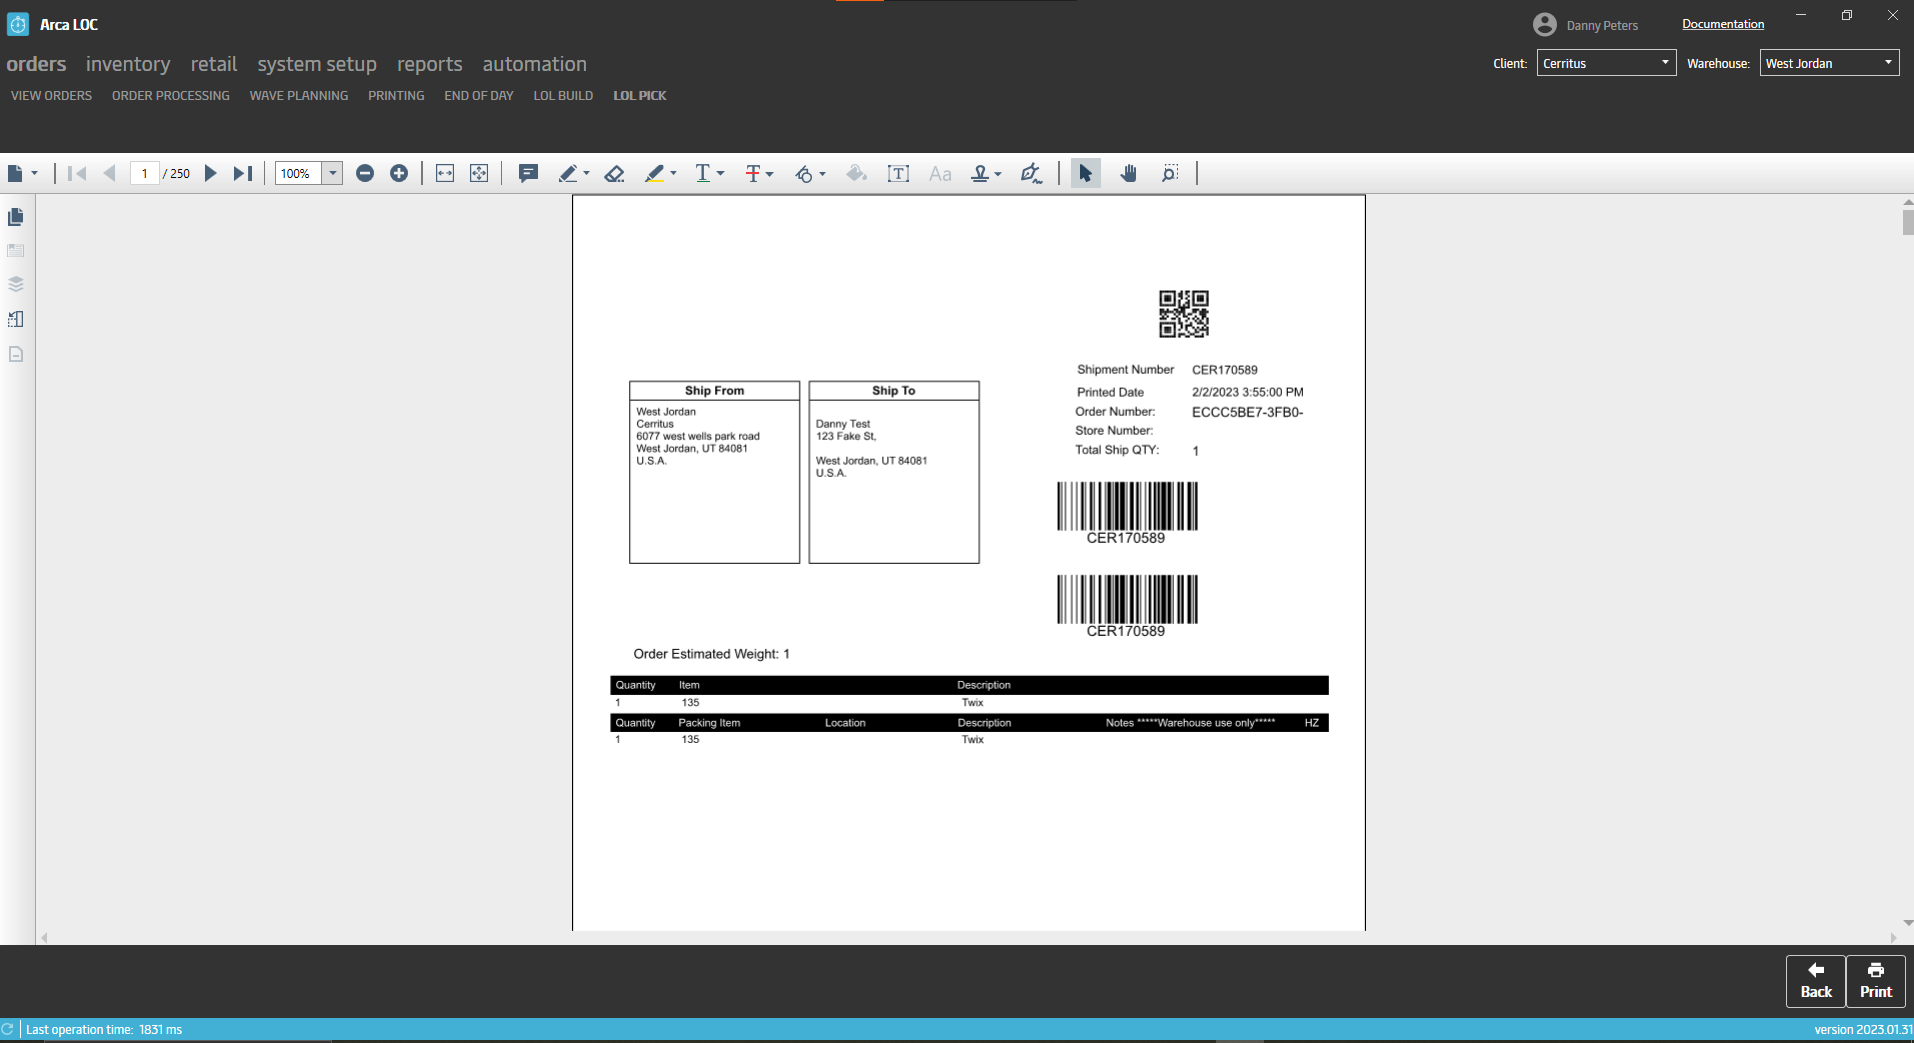
The pick screen shows a grid on the left that contains the waves that need to be completed. There are four different statuses that a wave can be in Starting, Queued, Processing and Finished. Each status is defined on the pick screen. The first thing you will need to do is replenish the pick areas that were created in the build process on the previous screen. Select the first wave you want to work on and click on Create Replenish Report. This will generate an Excel file containing the all the information that you will need to complete the replen including Replen location, pick areas and pallets with available item quantity to use and totals needed for the wave. You will need to complete the replenishment in the Arca Warehouse app. Once all items in the wave have been replenished, the Percent Replenished column on the pick screen will update to 100. To pick the wave, you must be at 100 percent replenished. Select the replenished wave and now you will have access to the Pick Complete button. When you click this pick button it will kick off automated picking of all items in the wave, the progress bar will be filled up as the picking happens and when complete you will see a message “Orders picked successfully”. Once all items have been picked to completion and the LOLPickArea quantity is at 0, that pick area will be deleted automatically. You will need to refresh the screen, then turn on the toggle switch that says Show Finished Jobs. Now you can see the picked wave in a finished status. Select the finished wave and you will now have access to the Print Pack Slips button. Click on the print button and you will see the same printing and saving jobs message as the wave print screen, then you will be shown the PDF previewer and can print all the slips for the wave.
1/20/2023
V 1.21.0
Bug fixing for Wave Planning screen not filtering orders by county selection, and showing wrong number of orders selected.
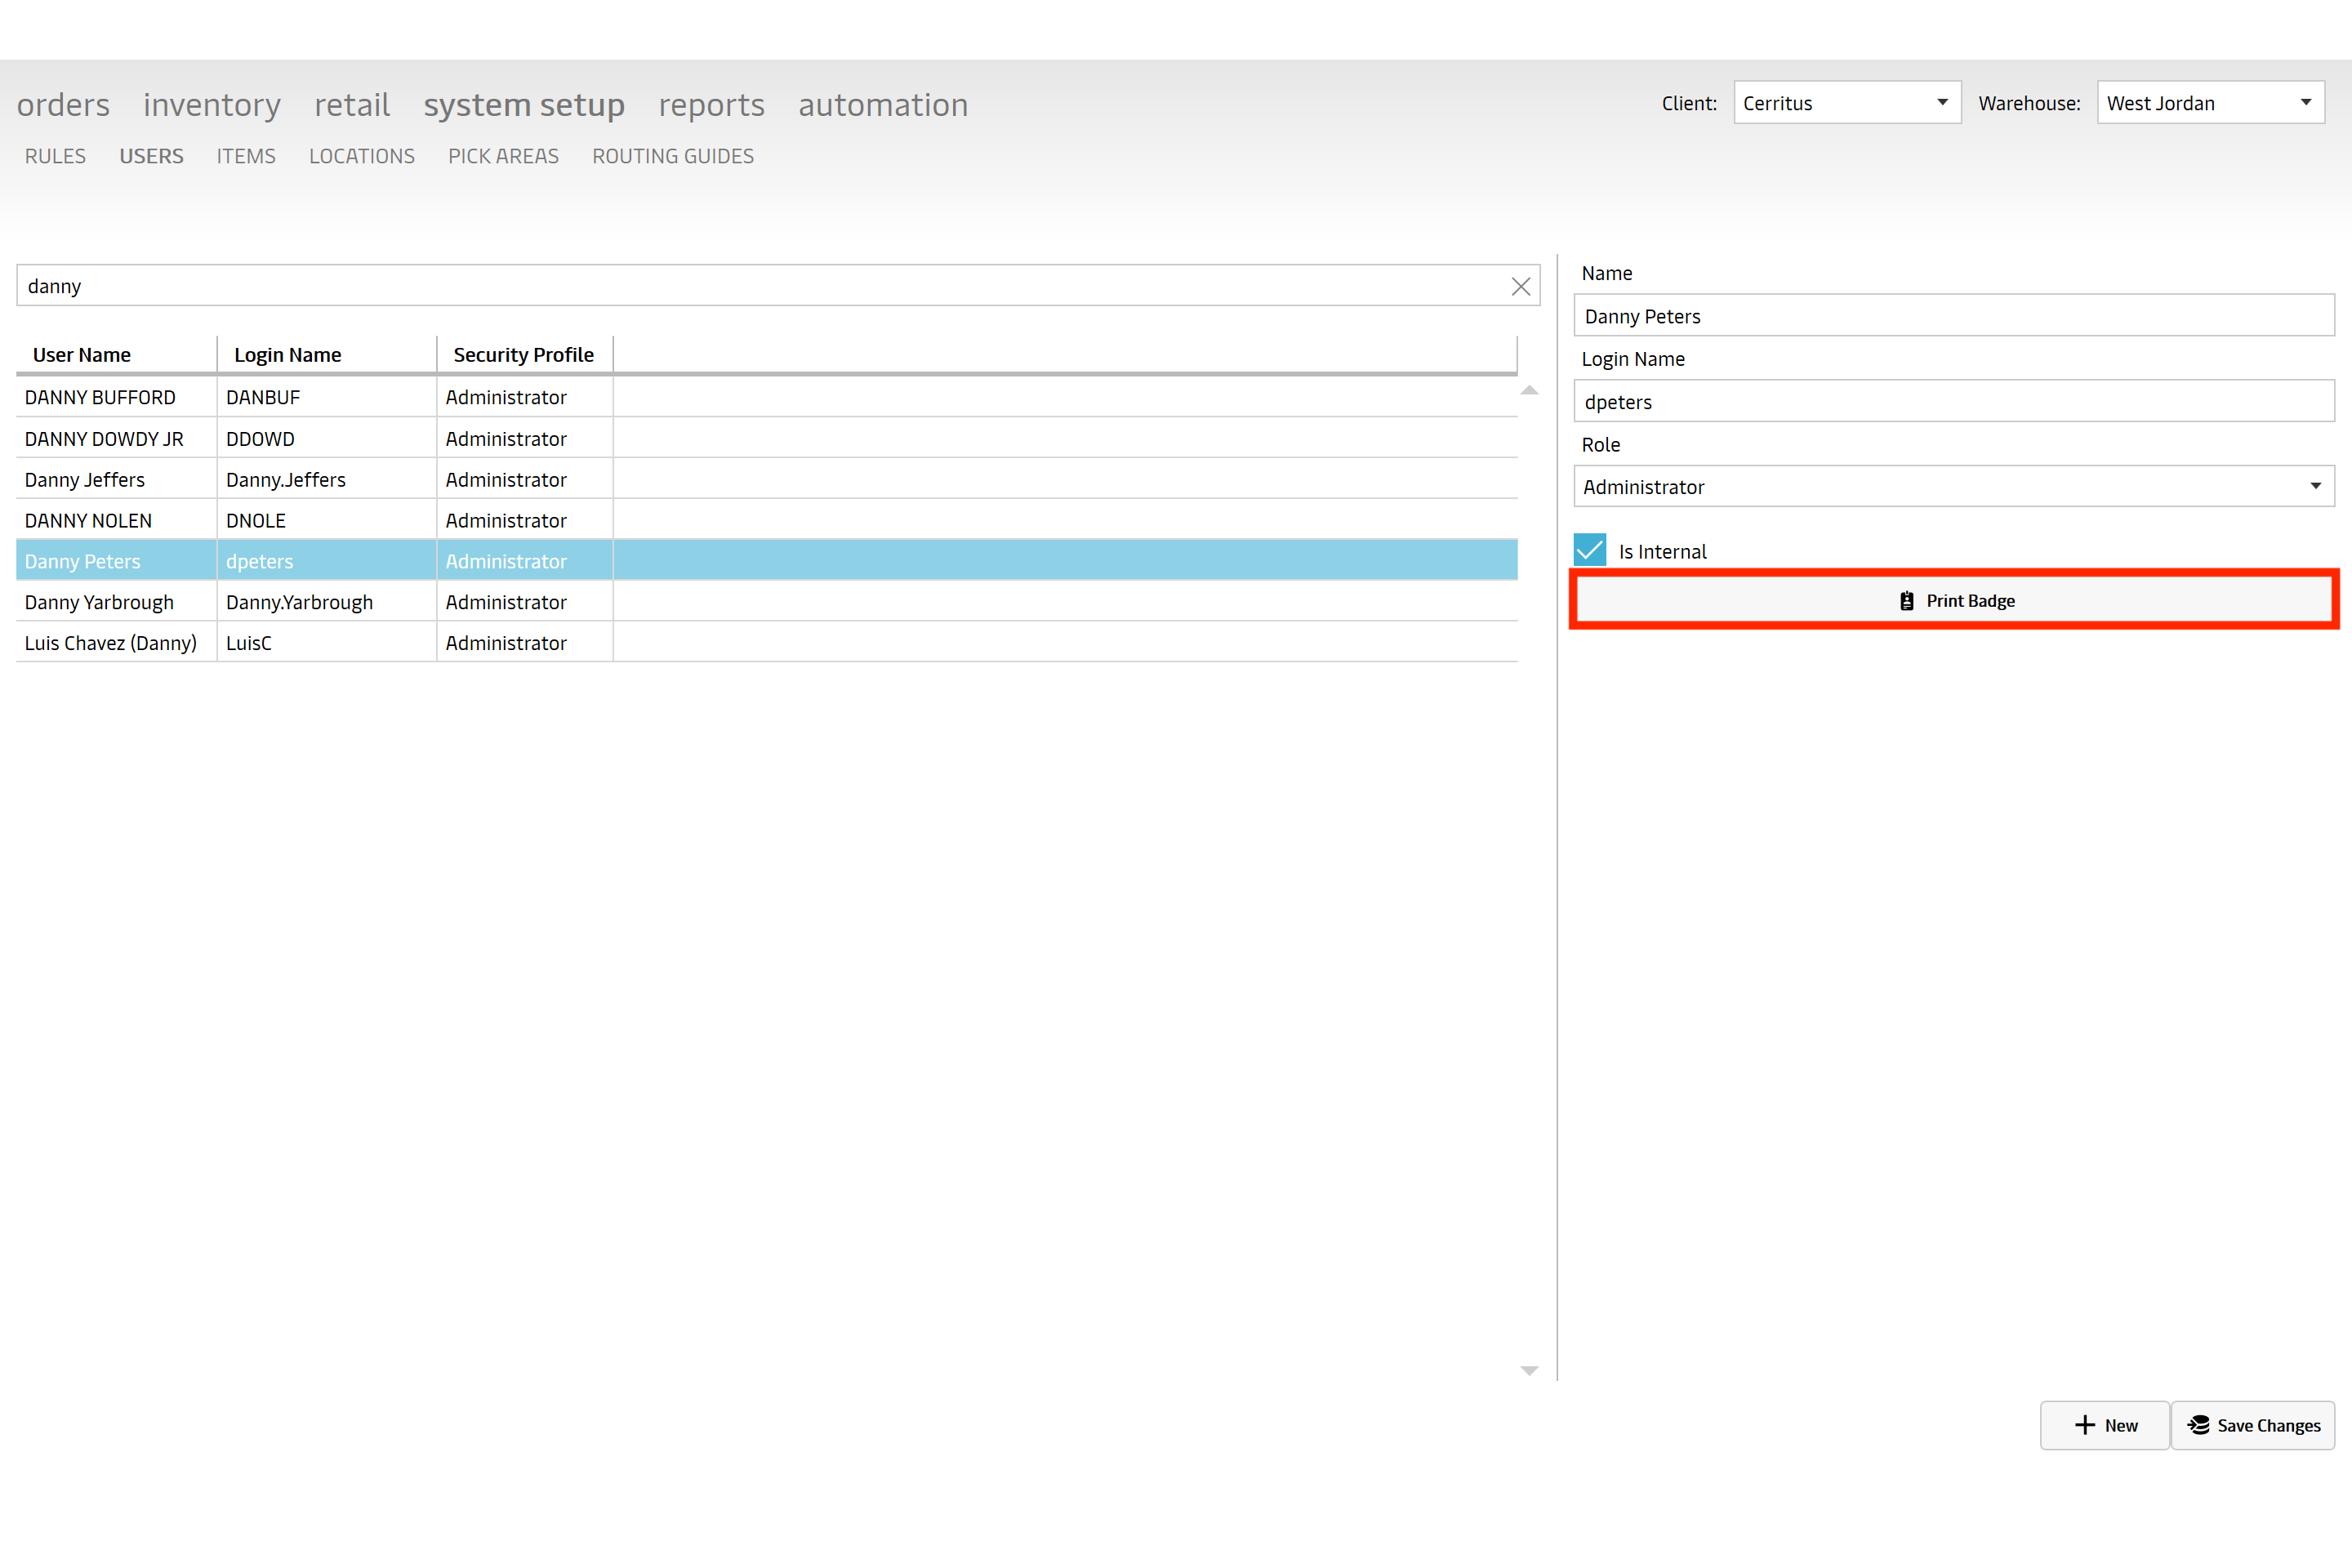
Users Screen - Badge Print Button
This is a new button that will print a barcode which when scanned, contains a user’s login name and password.
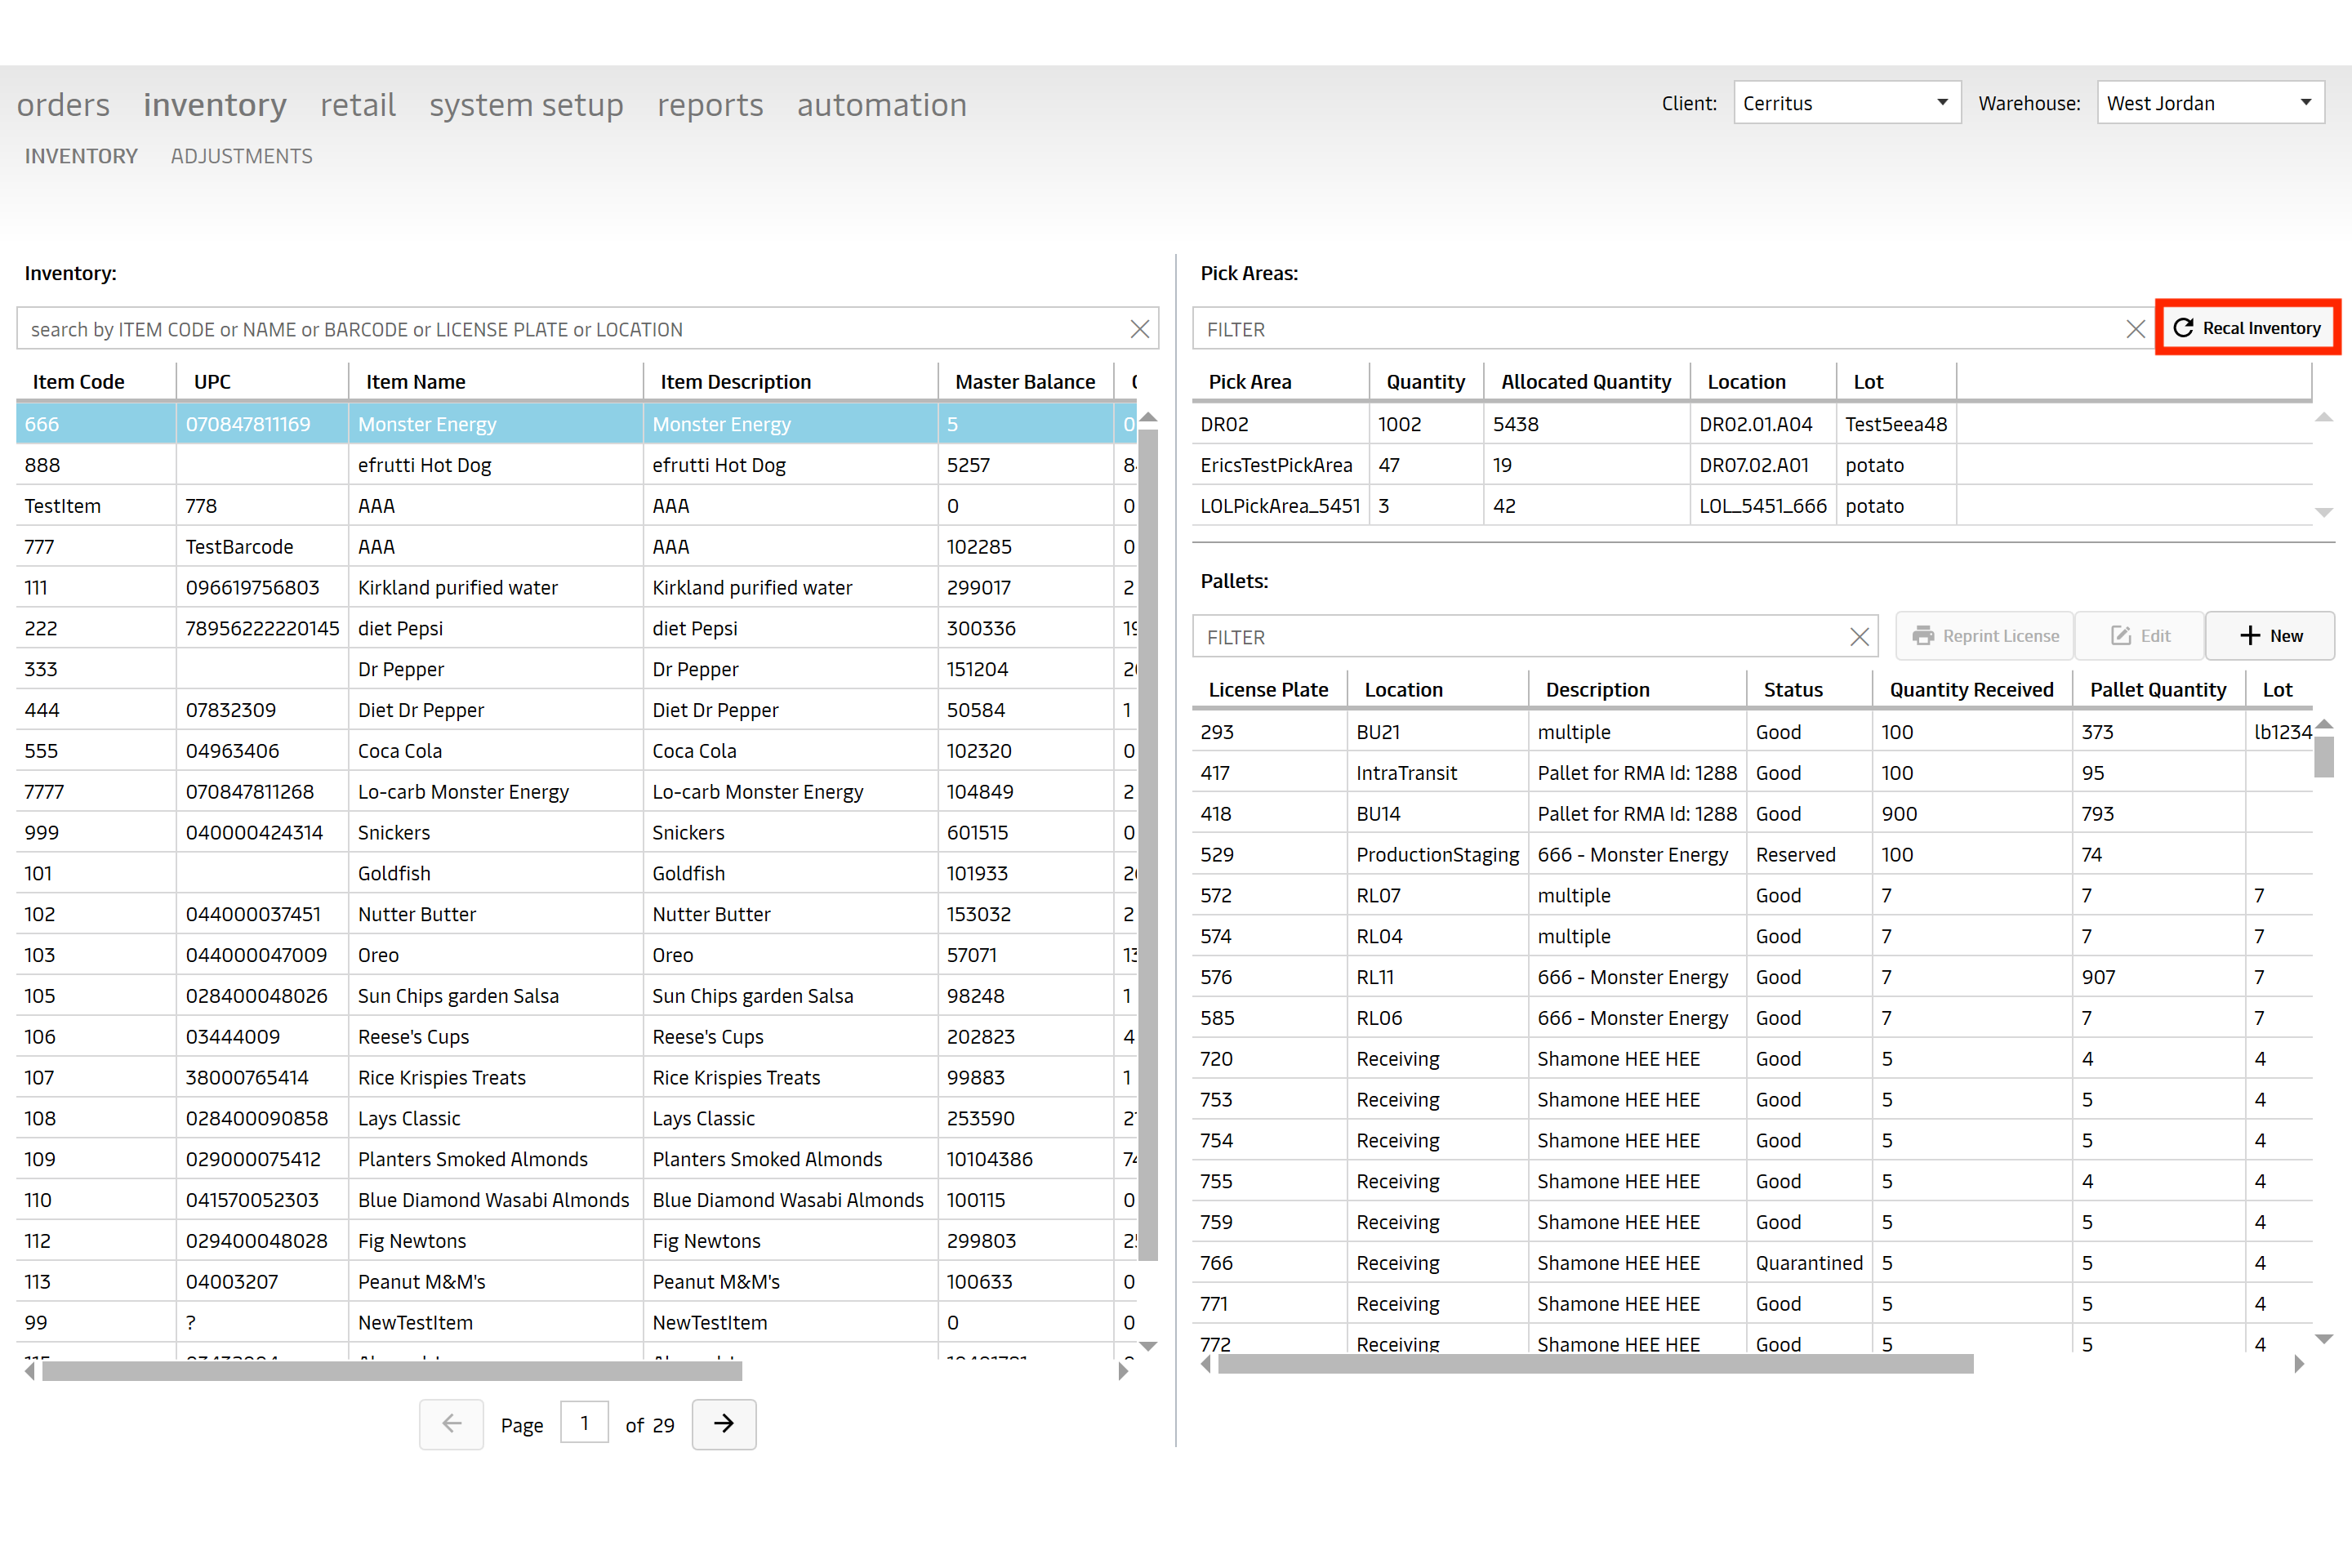
Inventory Screen - Recalculate Inventory Button
This is a new button to allow a user to recalculate the inventory numbers for any selected item. This is going to look at all the pallets and pick areas which contain the selected item and sum up the total quantity and adjust the balance numbers. It will also create a new entry into the Item Ledger report showing that the item’s balance was recounted.
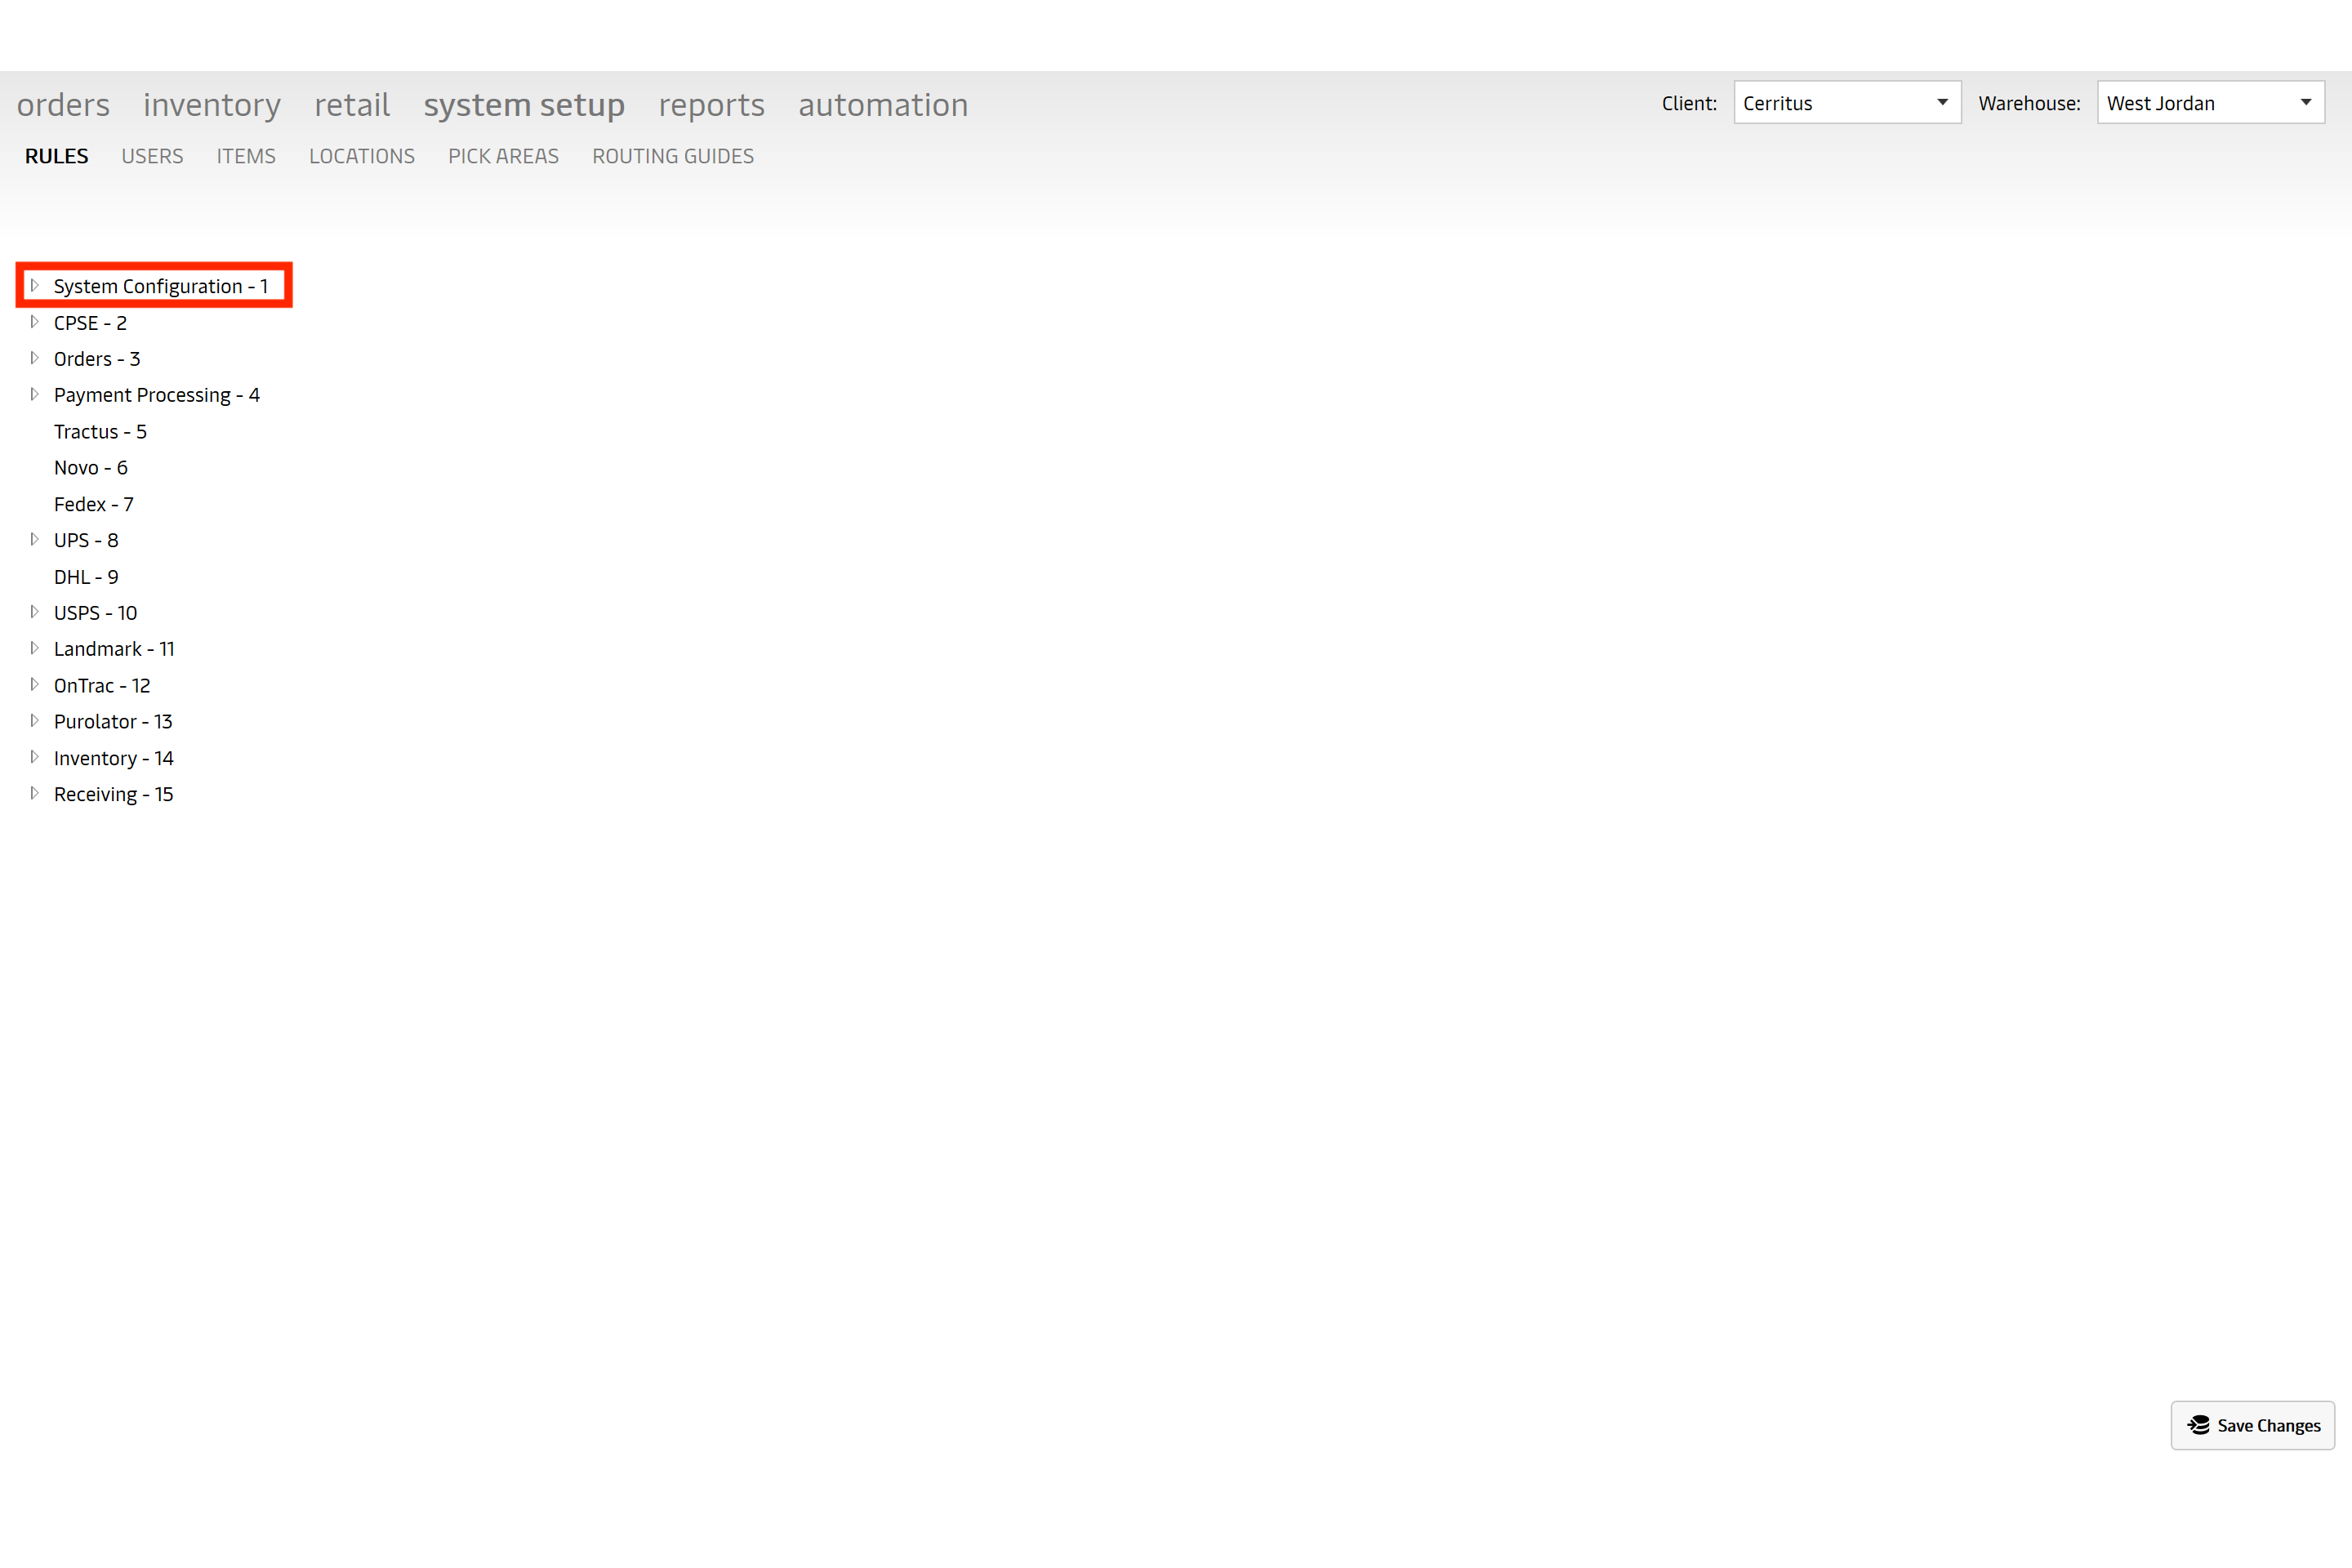
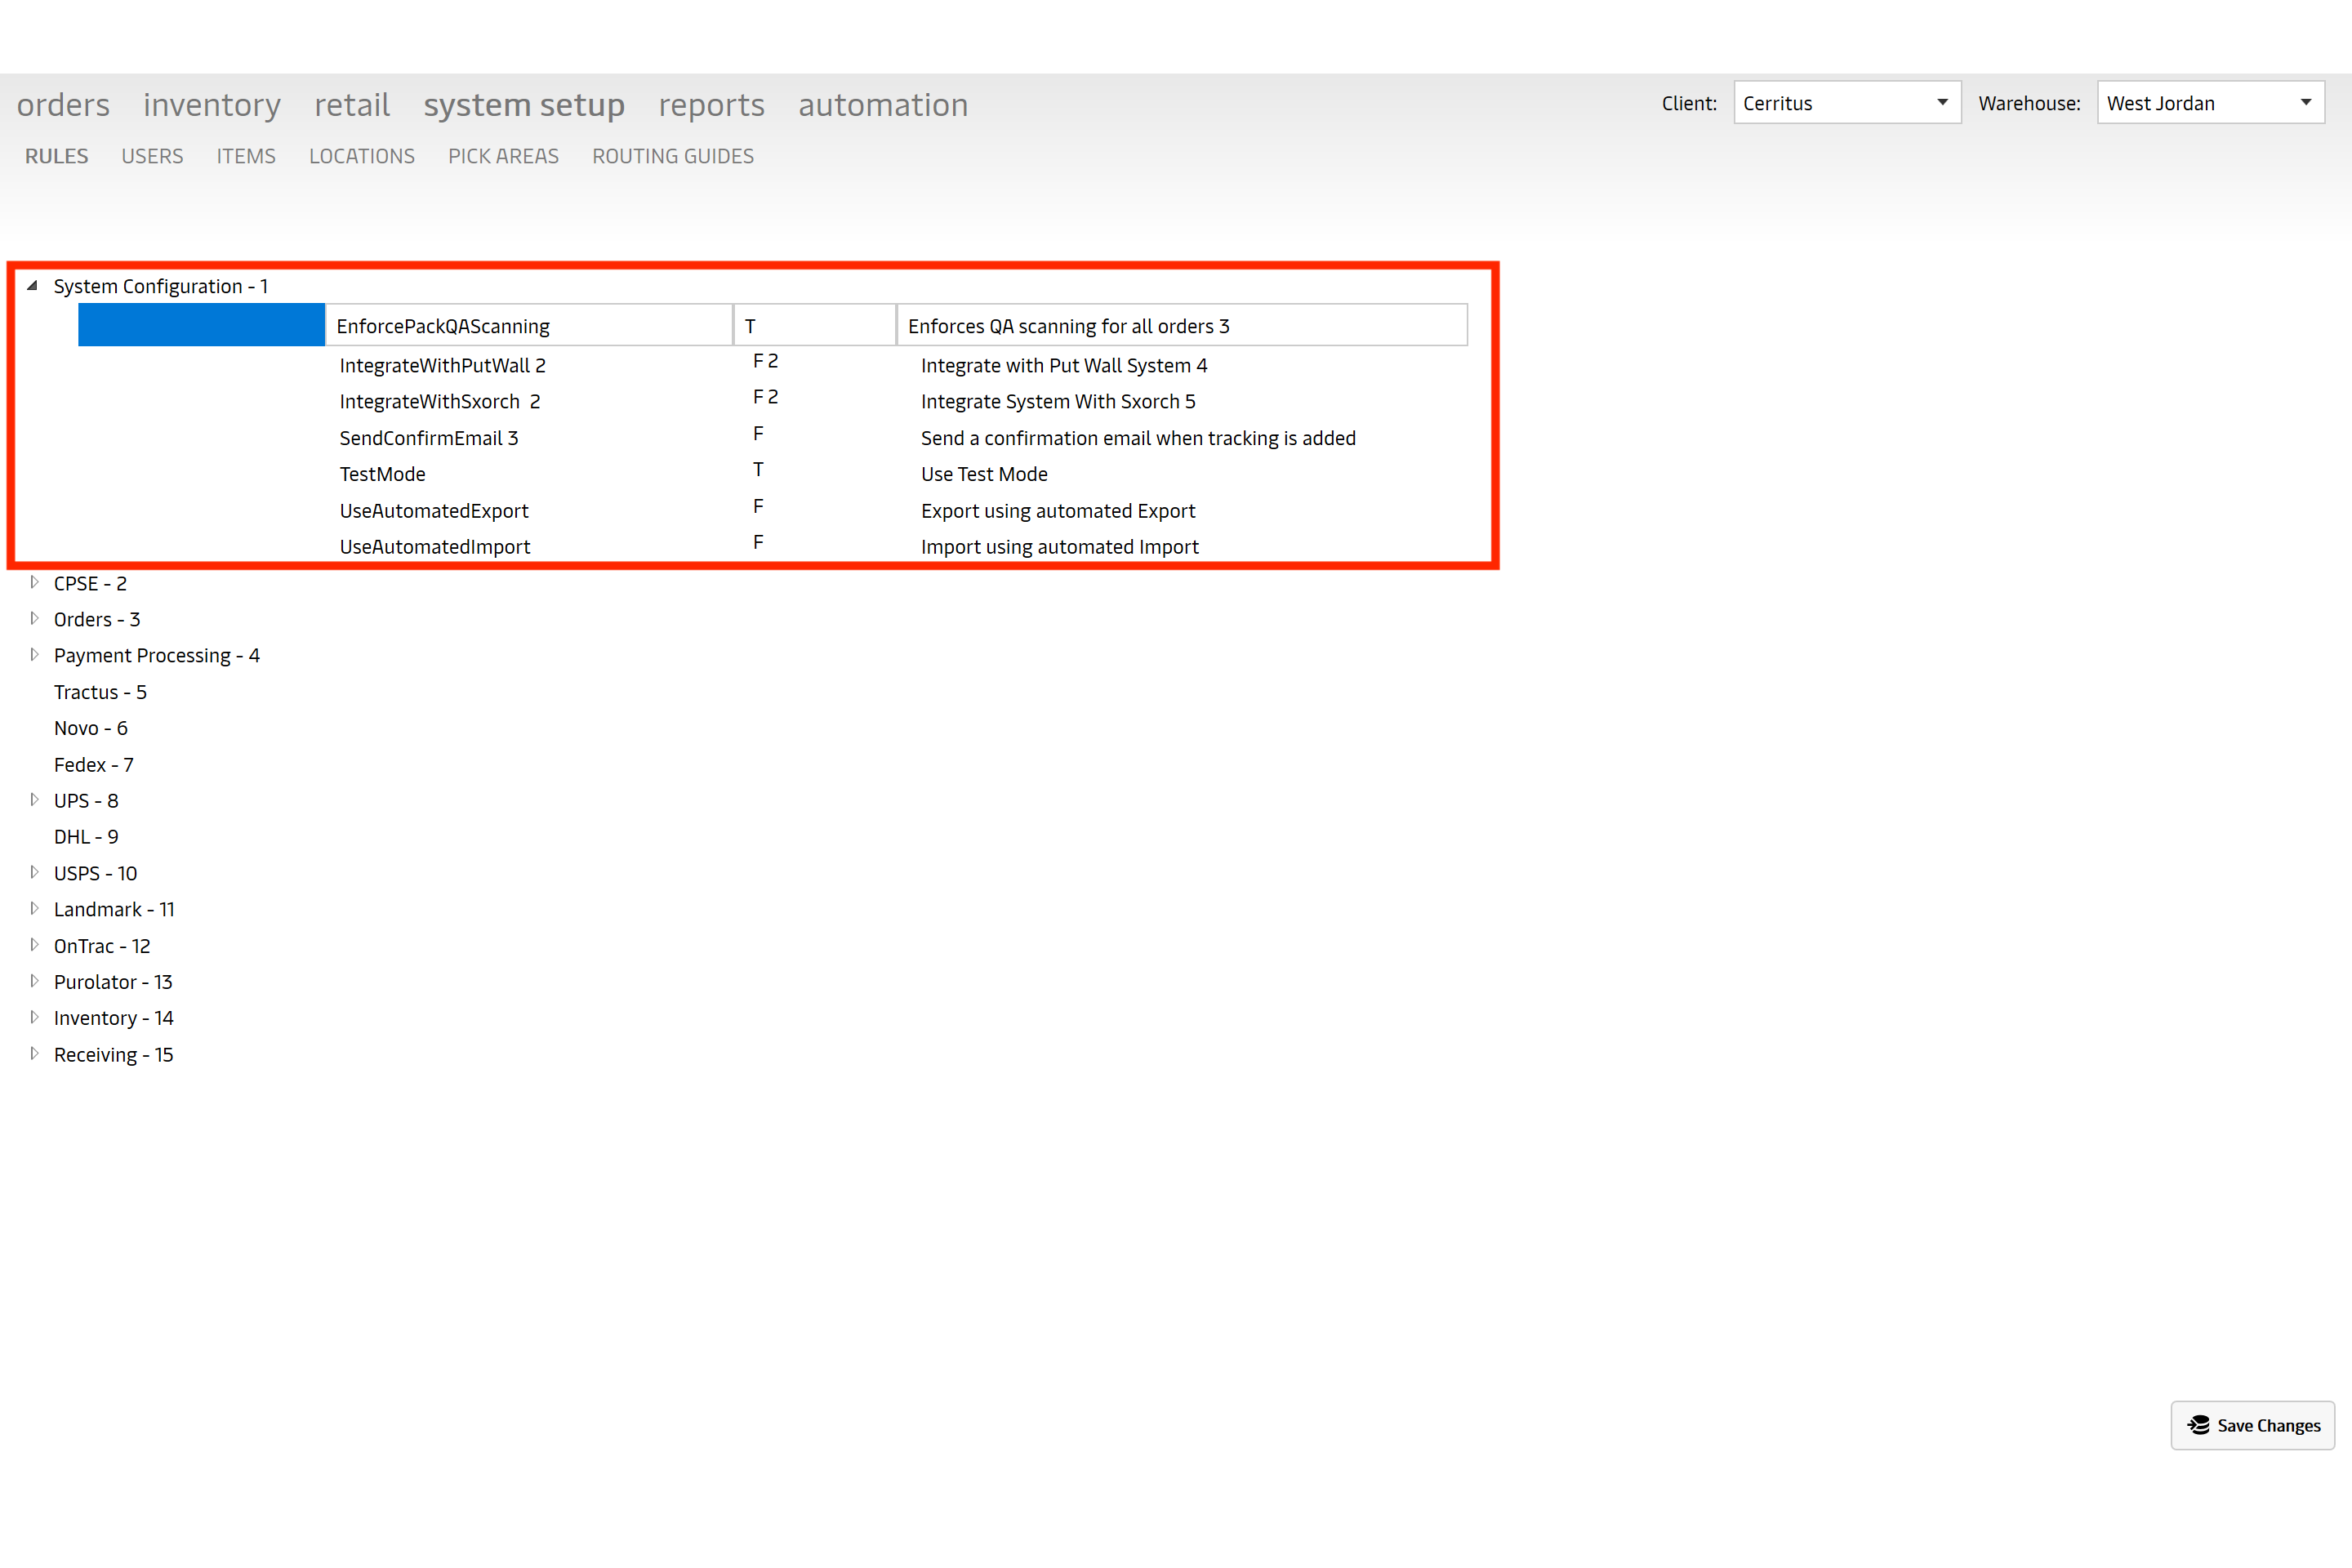
Rules screen - Allows users to edit T/F and turn rules on/off
Rules are now grouped by section ID; you will click on the expand arrow to open a group of rules and see all the rules inside of it. Once you chose a rule from the expanded group a user will be allowed edit the middle column and change values from T/F to turn rules on or off. Some rules have different values than T/F such as PacklistPrintingOrder. This rule’s value is DGFirst, signifying those items marked as Dangerous Goods will print first. Need to be careful not to change values to something that wouldn’t apply to the rule. Users are not allowed to edit/change the Name of a Rule or its description.
Items Screen - New check boxes for lot control
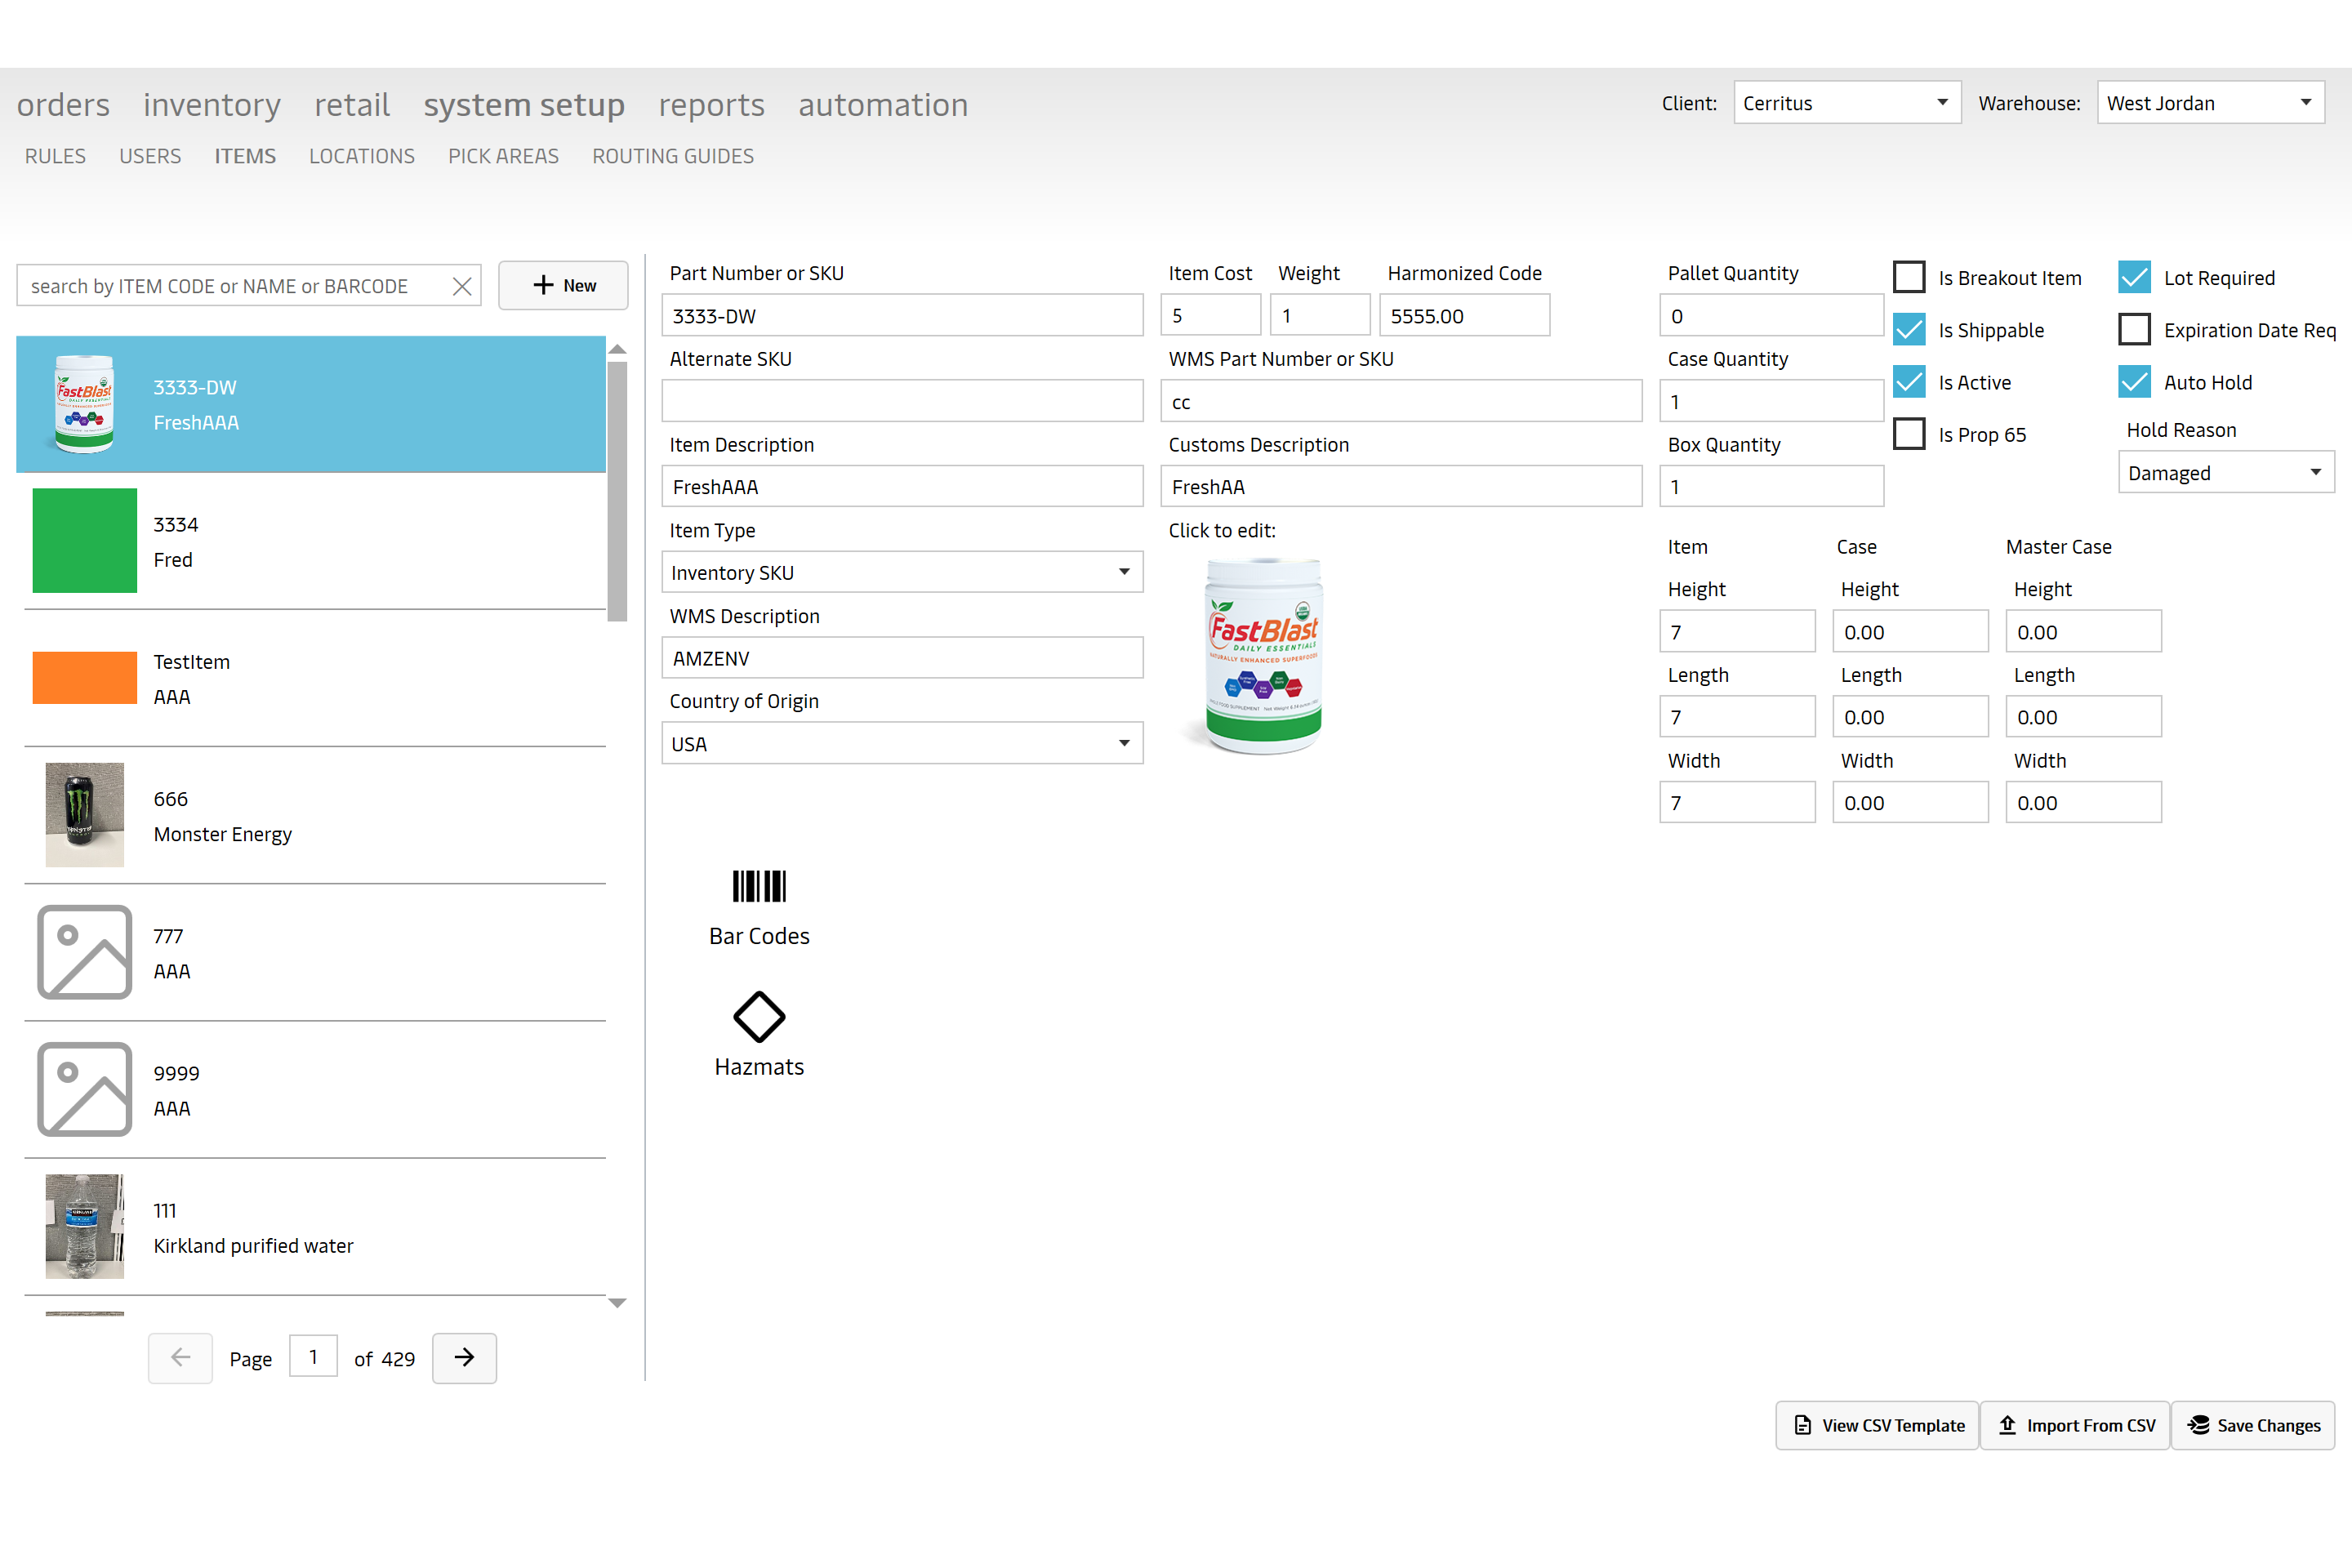
On the Item screen we’ve add a few new check box items that are designed around lot control. Lot required, expiration date required and item auto hold reason. If lot required is checked, then when you’re doing a truck receive a user is required to enter the lot number for this item. Same for expiration required, you will not be allowed to save/commit a truck receive to inventory without entering an expiration date for the lot. New error messages will be displayed telling the user which item is missing either lot, expiration date or both. Auto hold reason comes with a new drop-down menu to select a hold reason from; Bad, Damaged, Quarantined or Reserved. If the item you’re receiving is marked as auto hold and the reason is Bad, then when a user is committing a truck receive to inventory the pallet with that item will automatically default to a pallet status of quarantine. We have used the pallet status quarantine to umbrella all of the ‘not good’ items. So an auto hold reason of bad or damaged will also result in your pallet defaulting to a pallet status of quarantined. This is because there really shouldn’t be a situation where pallet status’ are Bad or Damaged, quarantine will cover them all.
1/18/2023
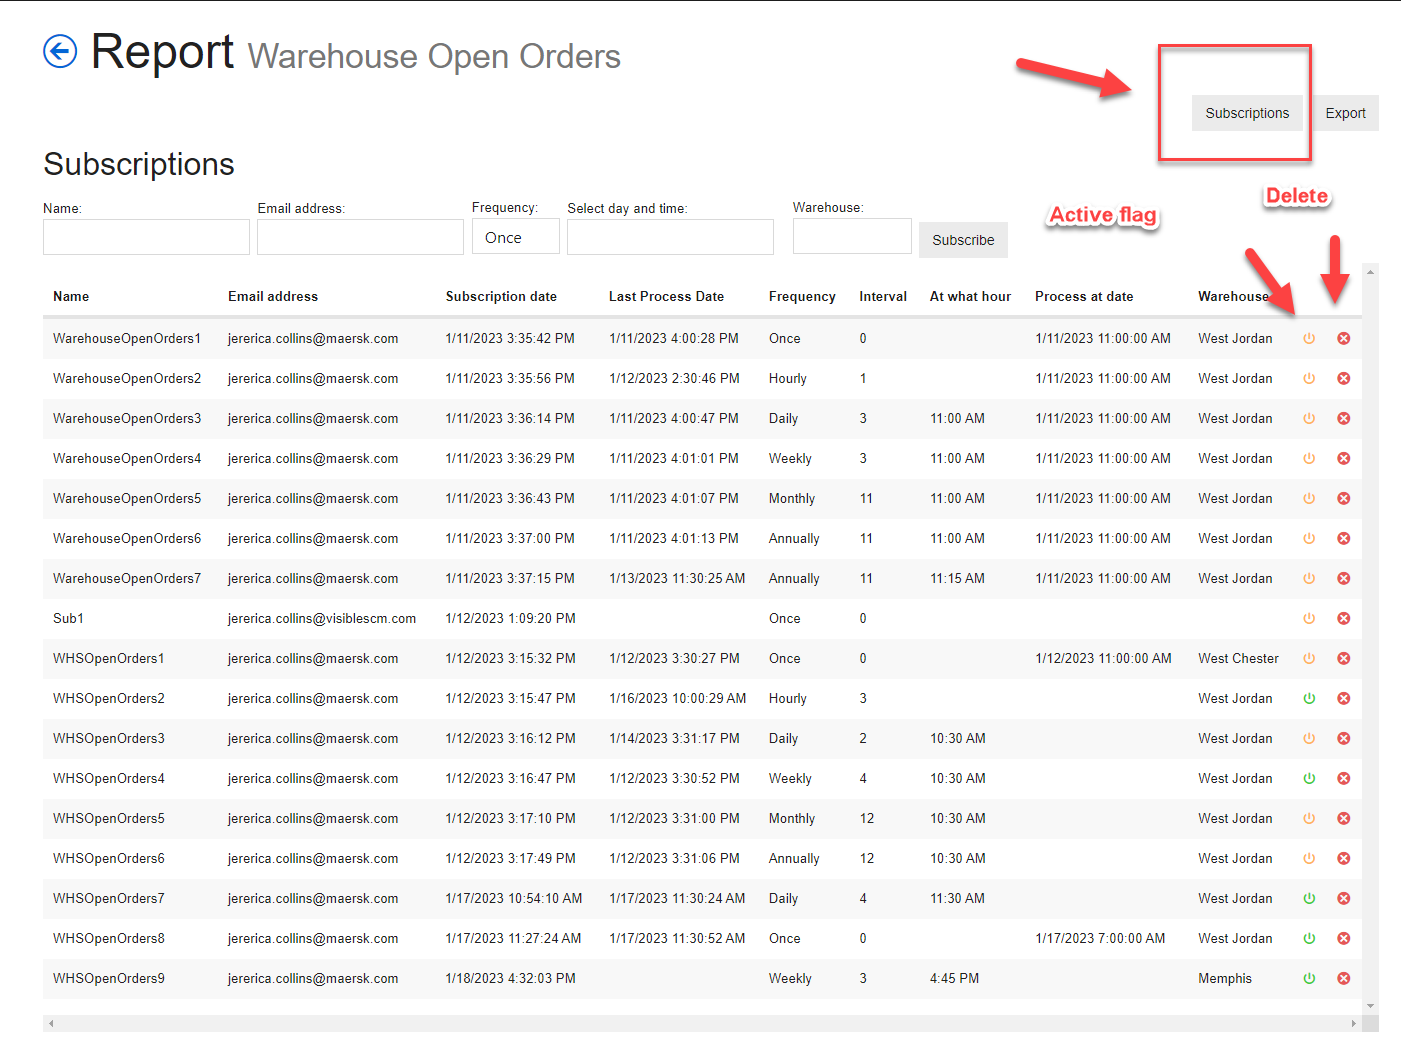
Subscription in Reports
This allows a user to have details for a report to be sent to them in an email on a scheduled basis depending on the frequency/time selected. There is an active/inactive flag. If the flag is green it is active. If the flag is yellow it is inactive. There is also a delete option to remove the subscription.
The reports that will have subscriptions available for right now are:
- Returns
- Inventory Needed
- Warehouse Open Orders
- Open Orders
- Retail Open Orders
- Order Lookup
- Order Reset
- Batch Order Bucket
- Batch Worksheet
- Retail Orders By Status
12/16/2022
V2022.12.10.0
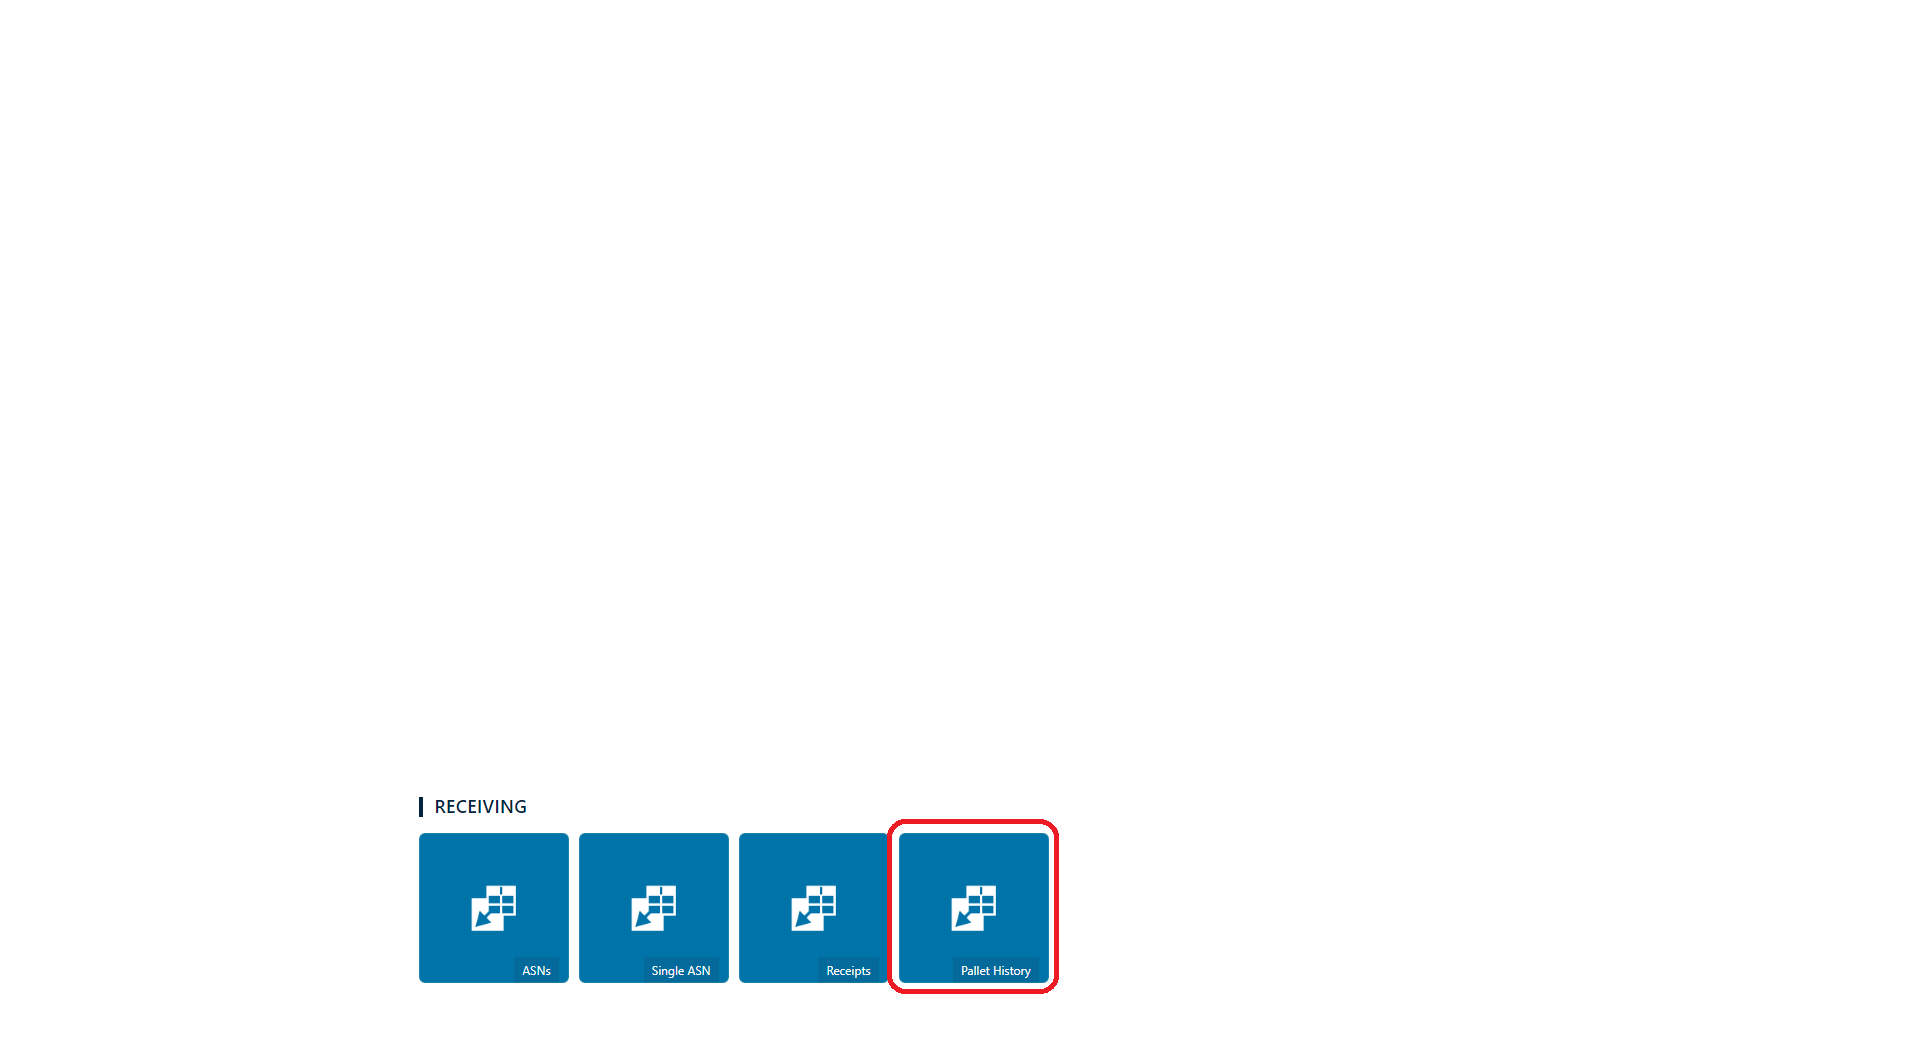
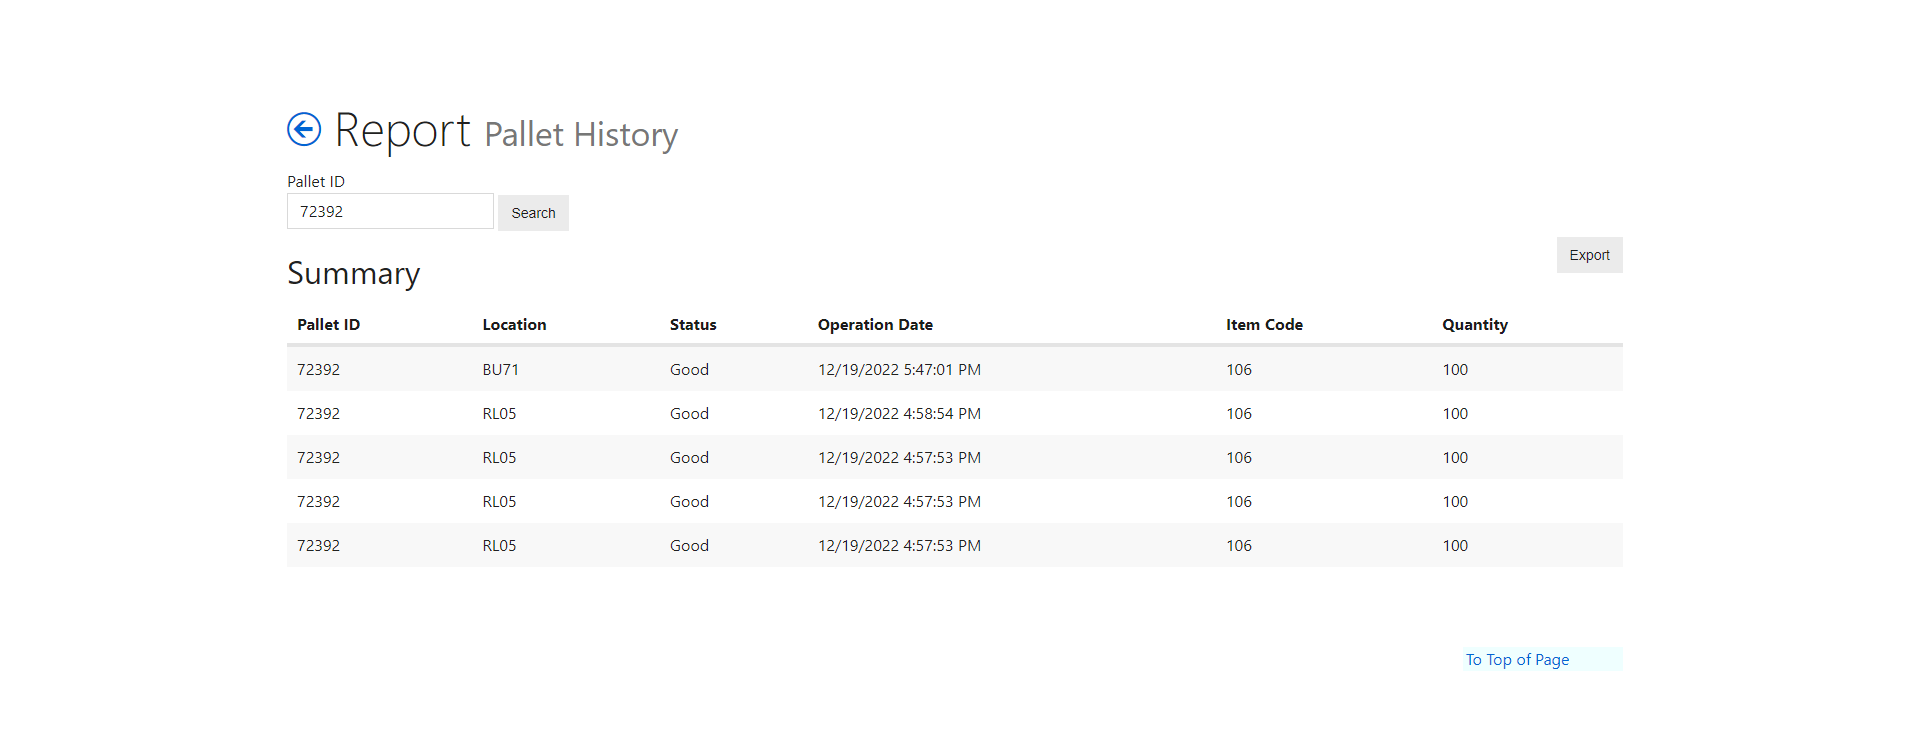
Pallet History Report
Enter a pallet license plate and search, the report returns the pallet detail history. So you can see when it moved locations or when the item quantity was reduced through replenishment.
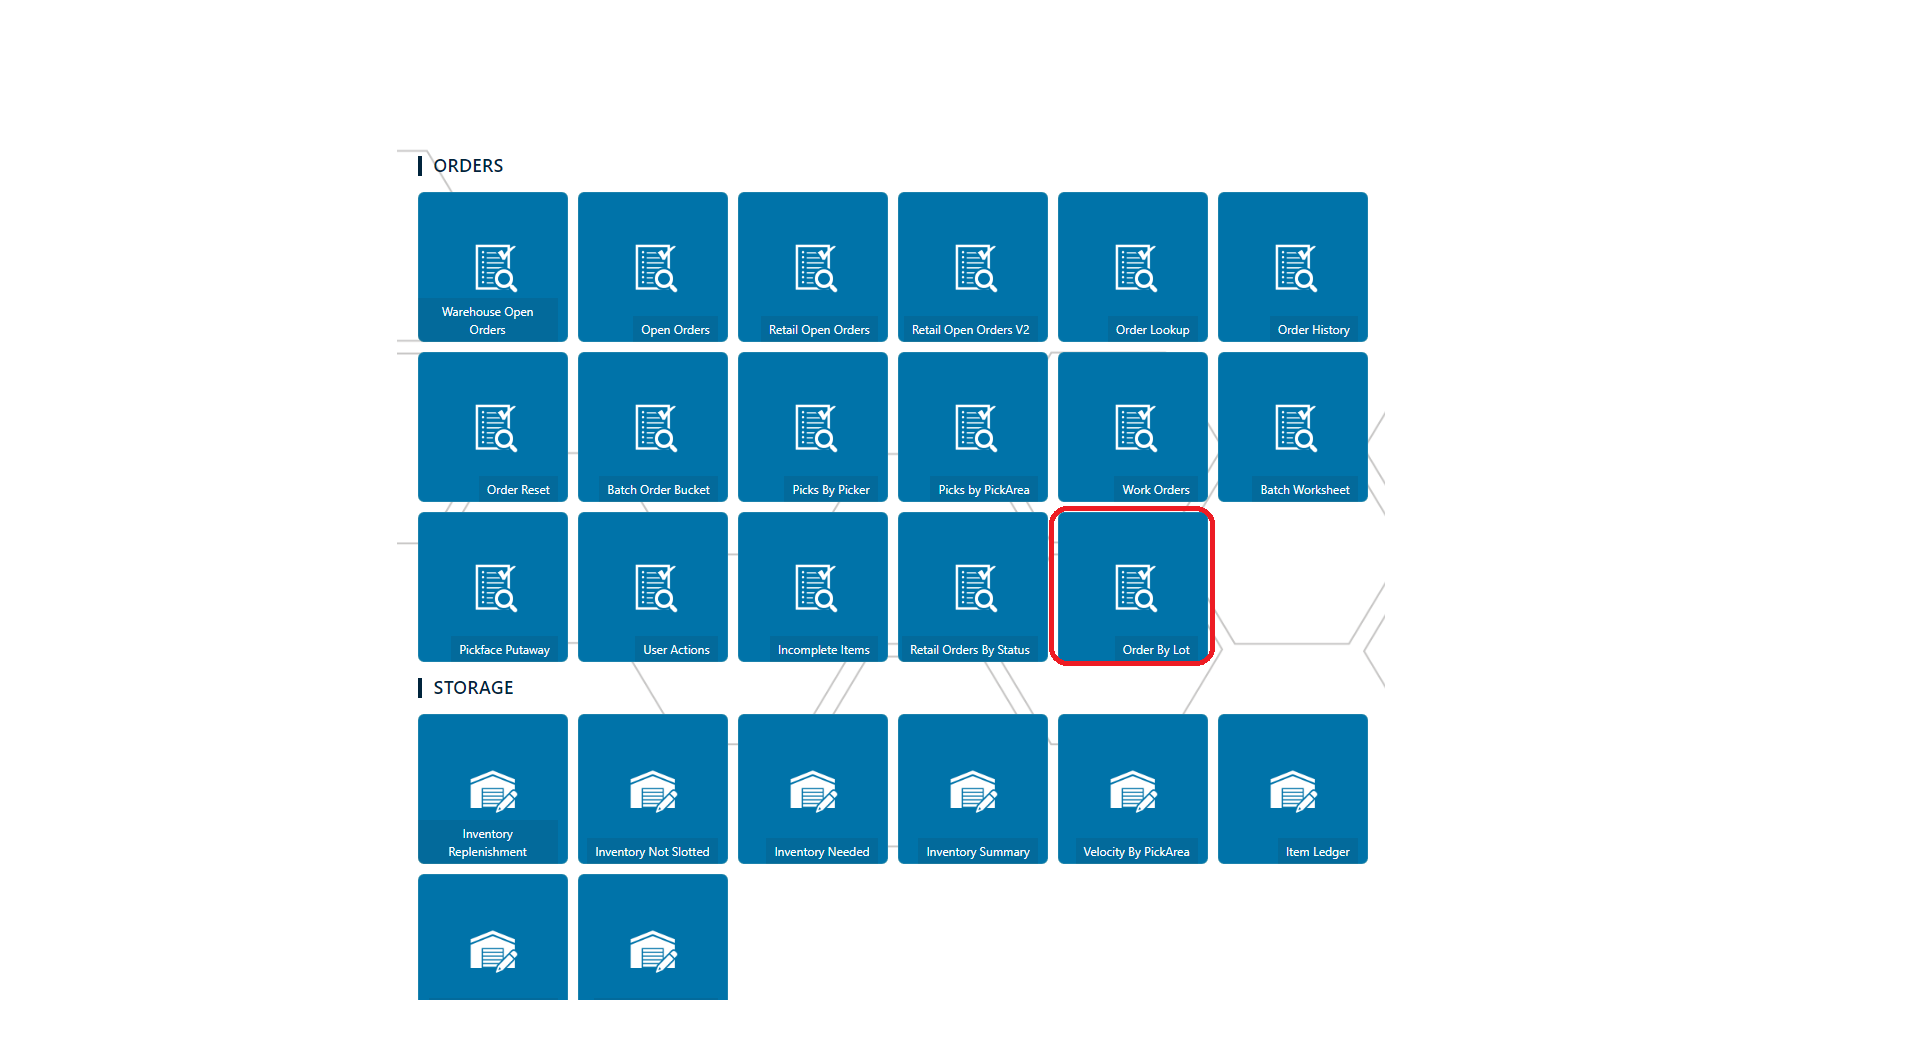
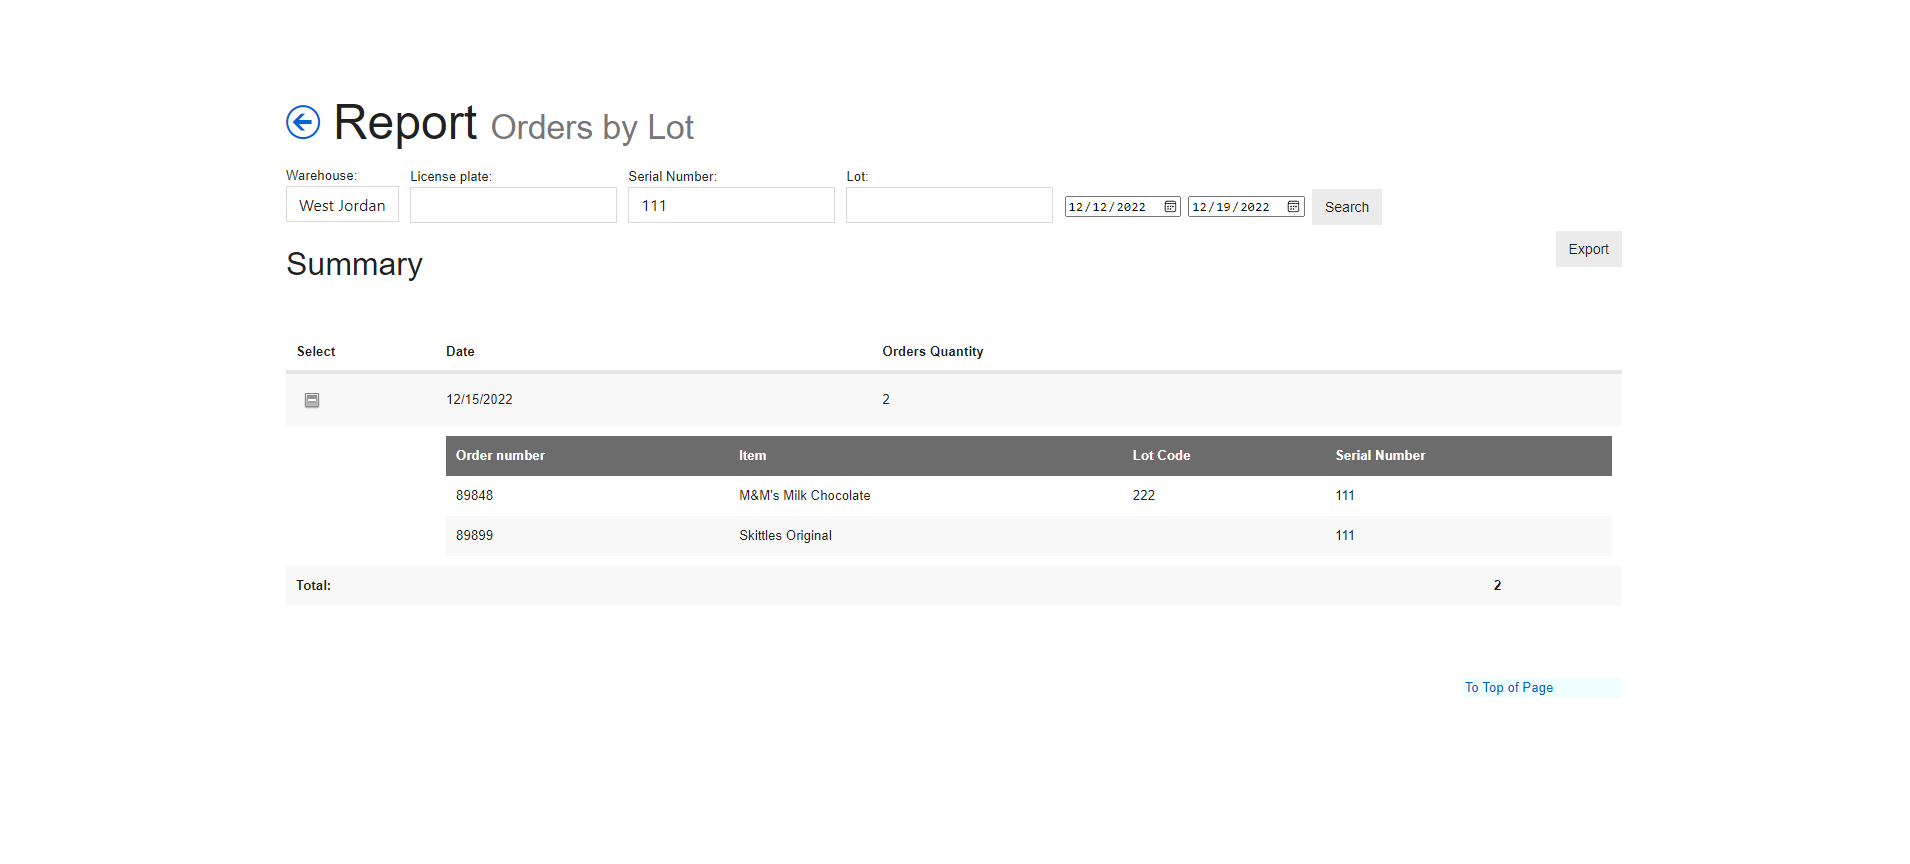
Orders By Lot Report
This one pulls from picked items that use Lot or Serial capture flags. So you can choose a warehouse and date range at minimum then search and it will return the order number and show you the items and lot or serial numbers that were entered when the item was picked. You can filter for specific License plate (that's the Maersk order number/shipping license plate like CER89848), Serial Number and Lot and it will return the orders that fall in the specific date range.
Documentation Link
After logging in, we have added a link for documentation.

Orders/Wave Planning & Retail/Retail Wave Planning
We have added additional Order-Item Variation selection options to the drop down menu
1-5 items per order
5-10 items per order
10-15 items per order
15+ items per order

10/13/2022
2022.10.6.0
| Menu | Release |
|---|---|
| Retail | You can grab all the various snapshots from these categories (Assignment and Labeling was included in the last prod build 2022.5.34.0 but we have updates) |
| Inventory | Added the ability to search by location. |
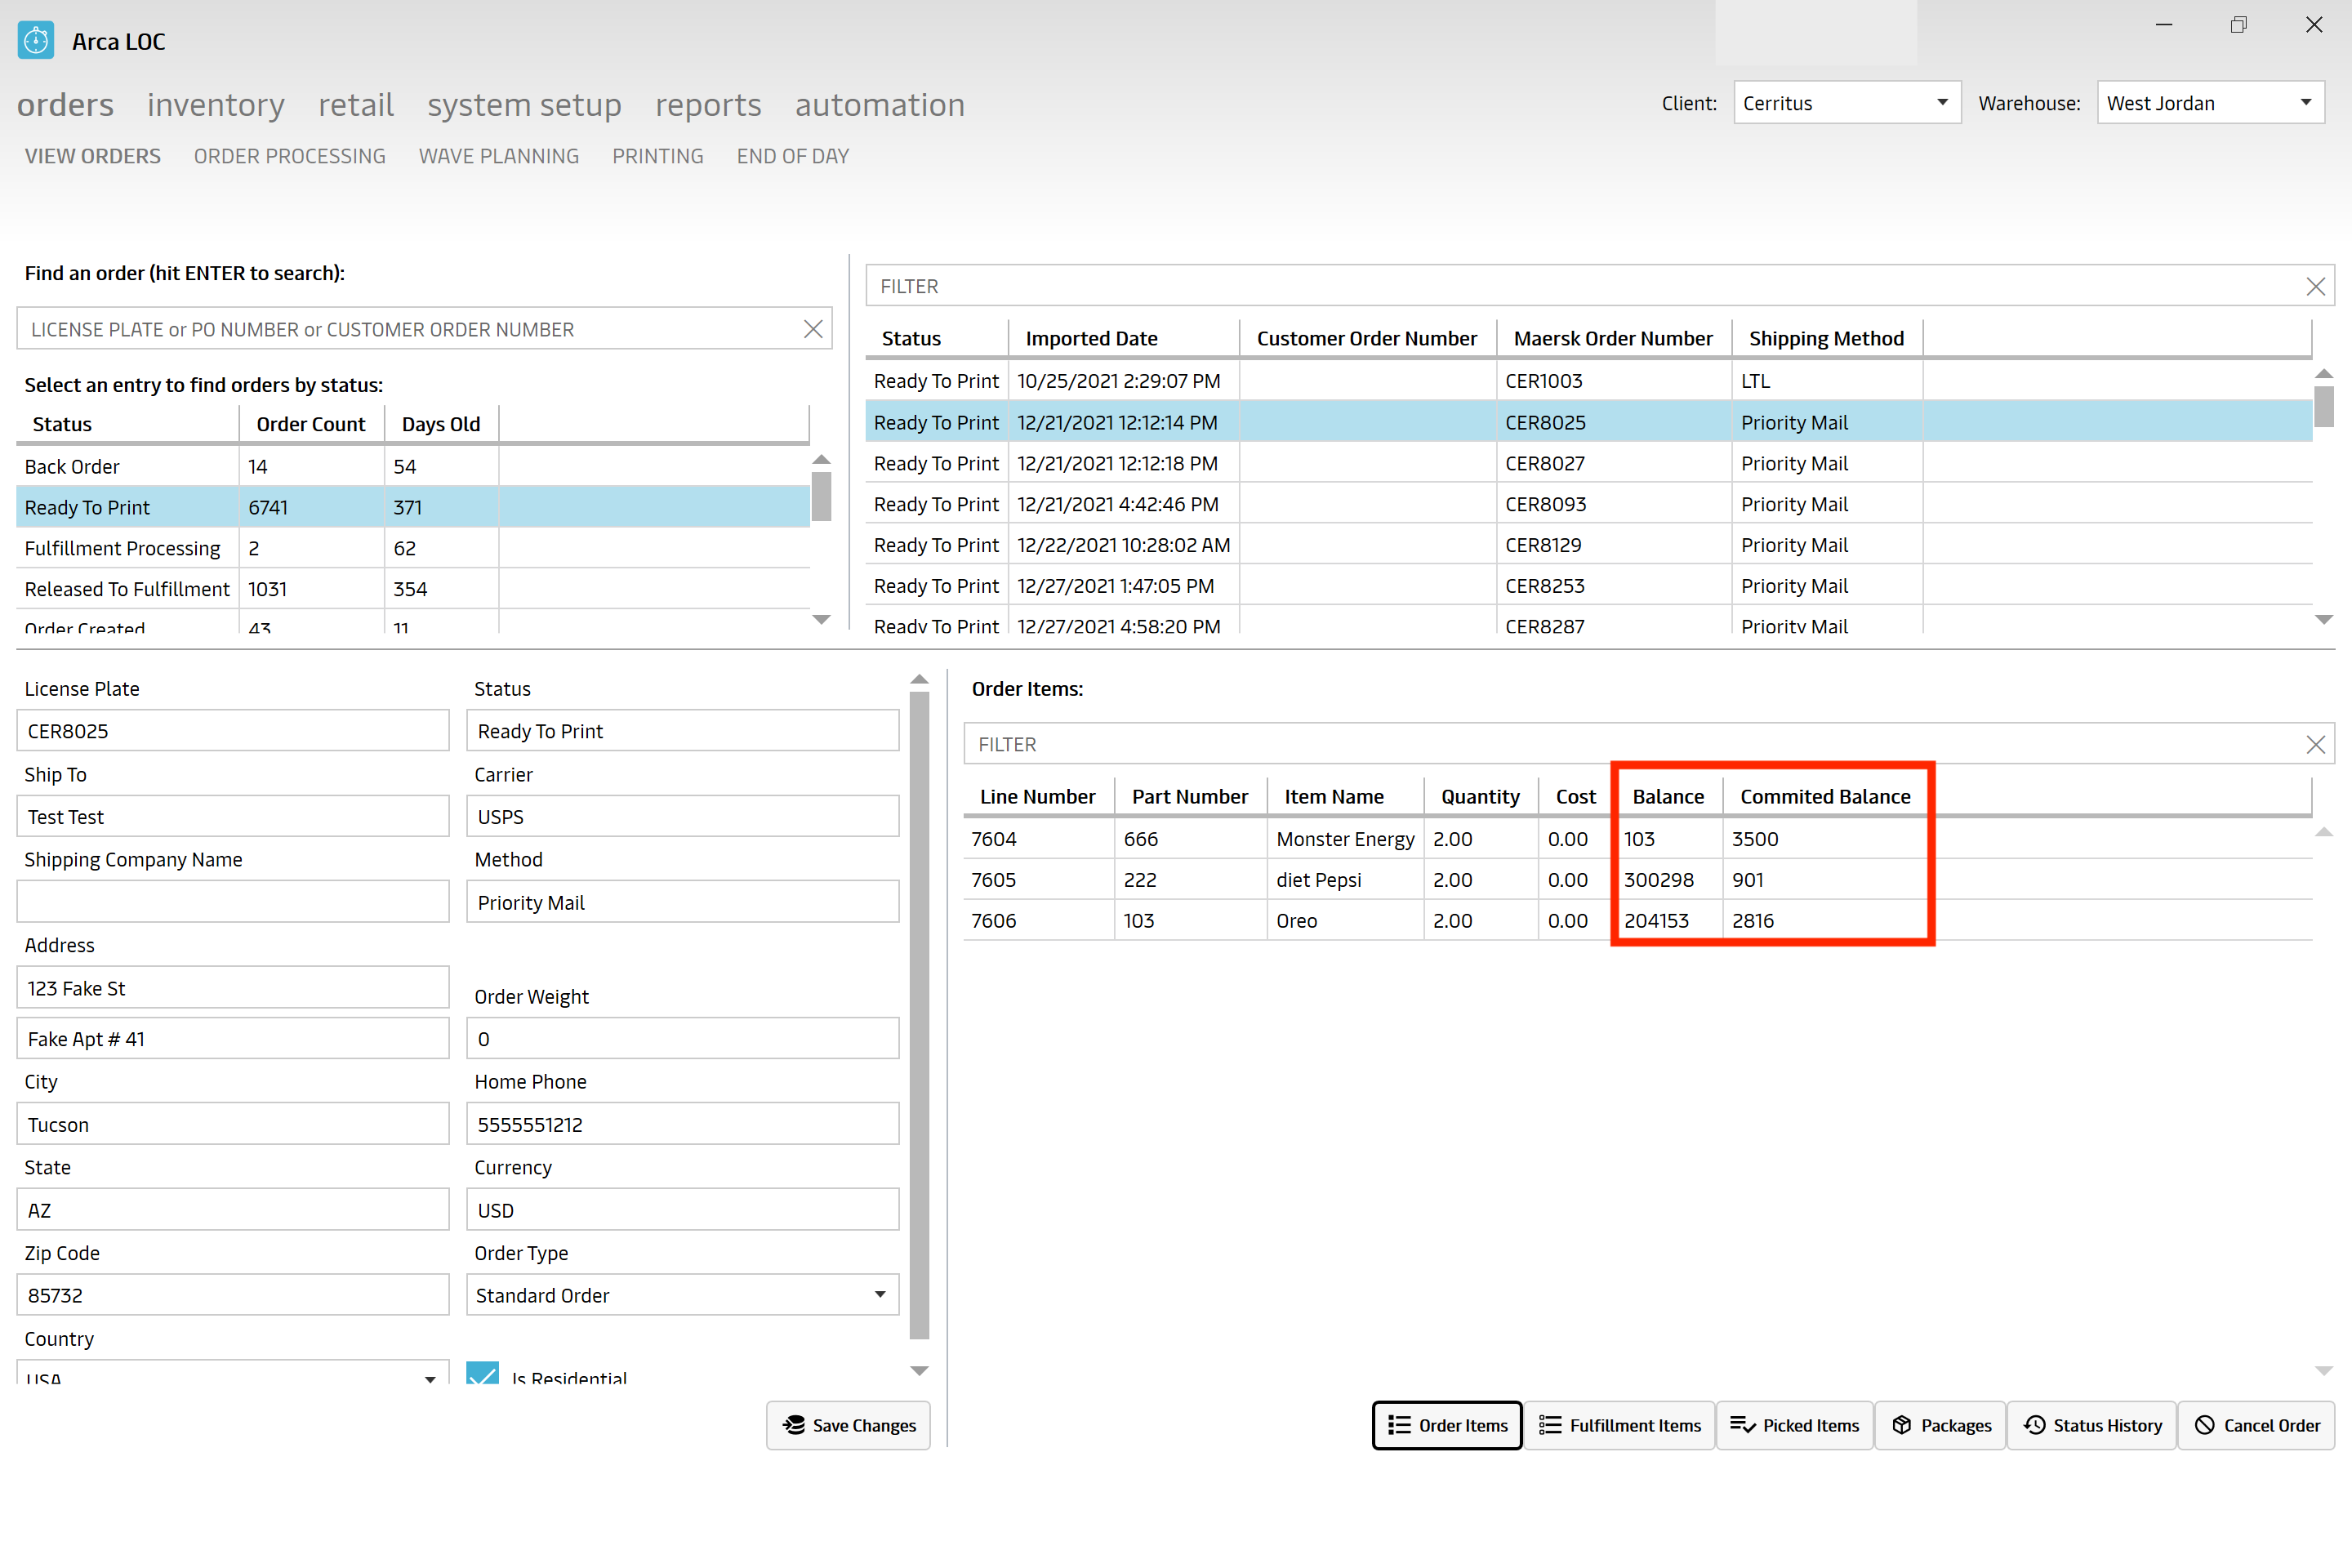
| Orders/View Orders | Added balance and committed balance. |
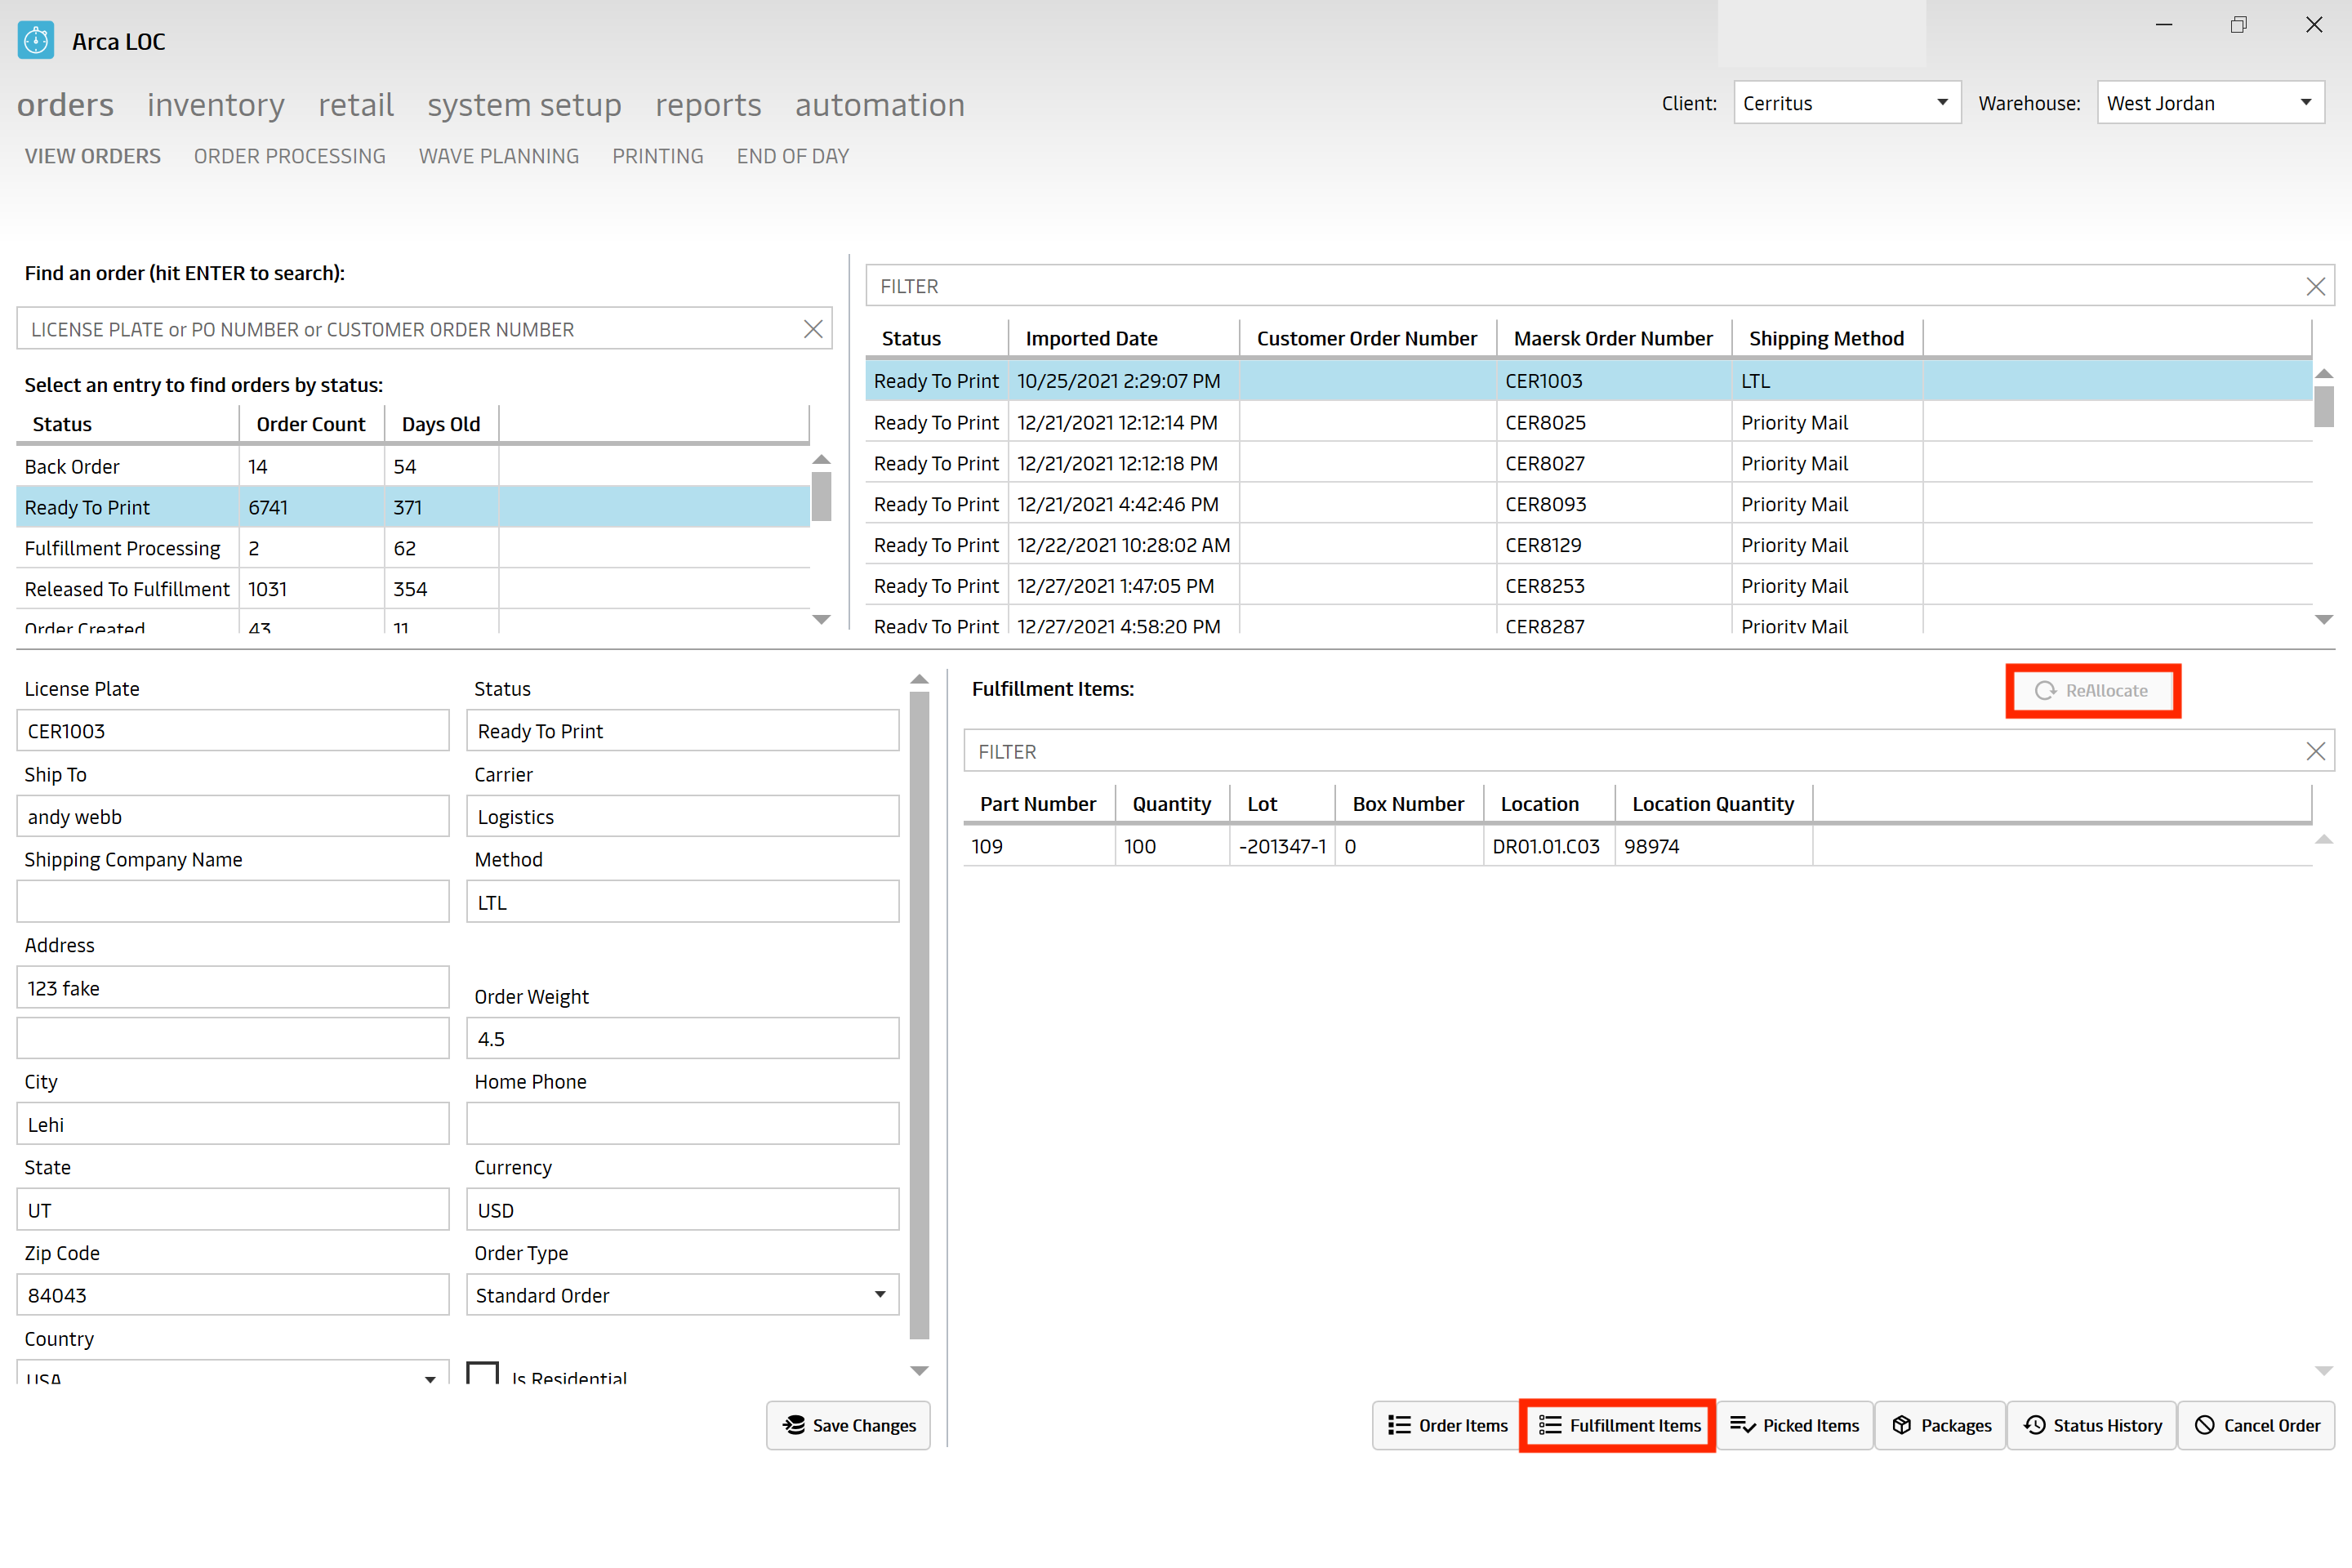
| Orders/View Orders | Added reallocate functionality. |
| Orders/View Orders | Improvement in performance for Open Orders. |
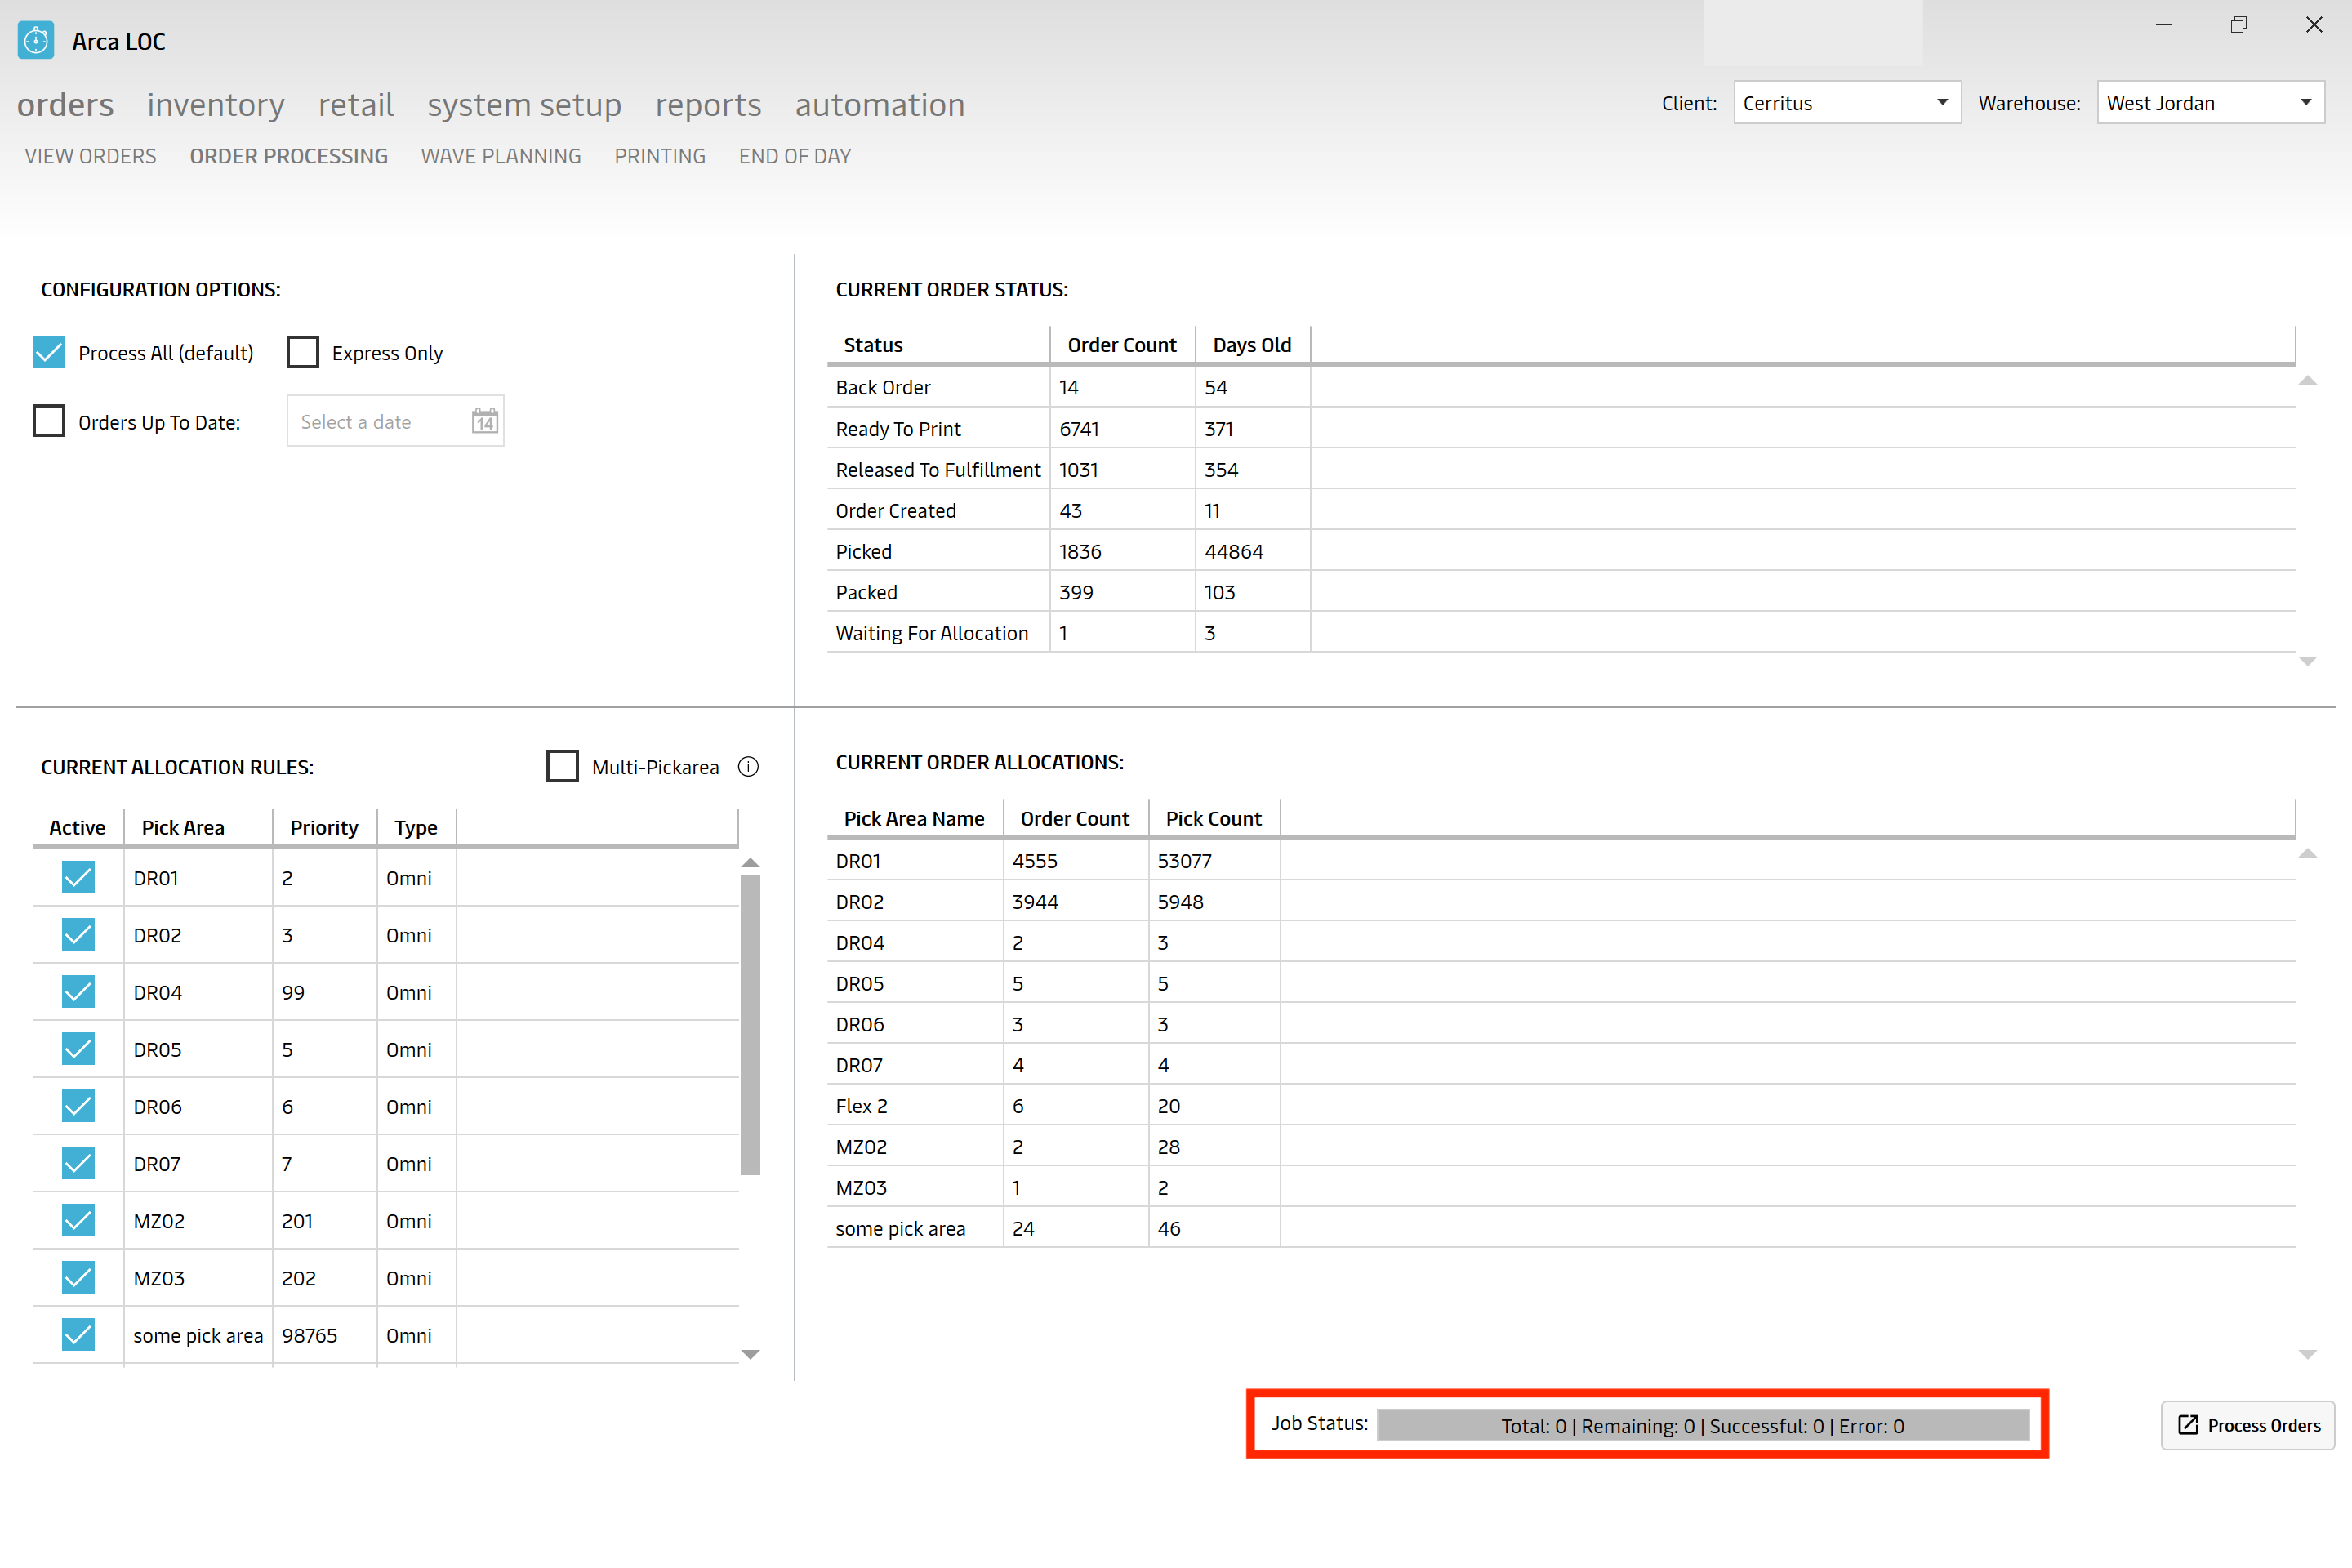
| Orders/Order Processing | Job status bar added to view progress. |
| Orders/Order Processing | Improvement in performance for Order Processing. |
Retail
All new functionality: Assignment Open Orders Routing Selection Route Order Retail Wave Planning Labeling End of Day
Inventory
You are now able to search by location.
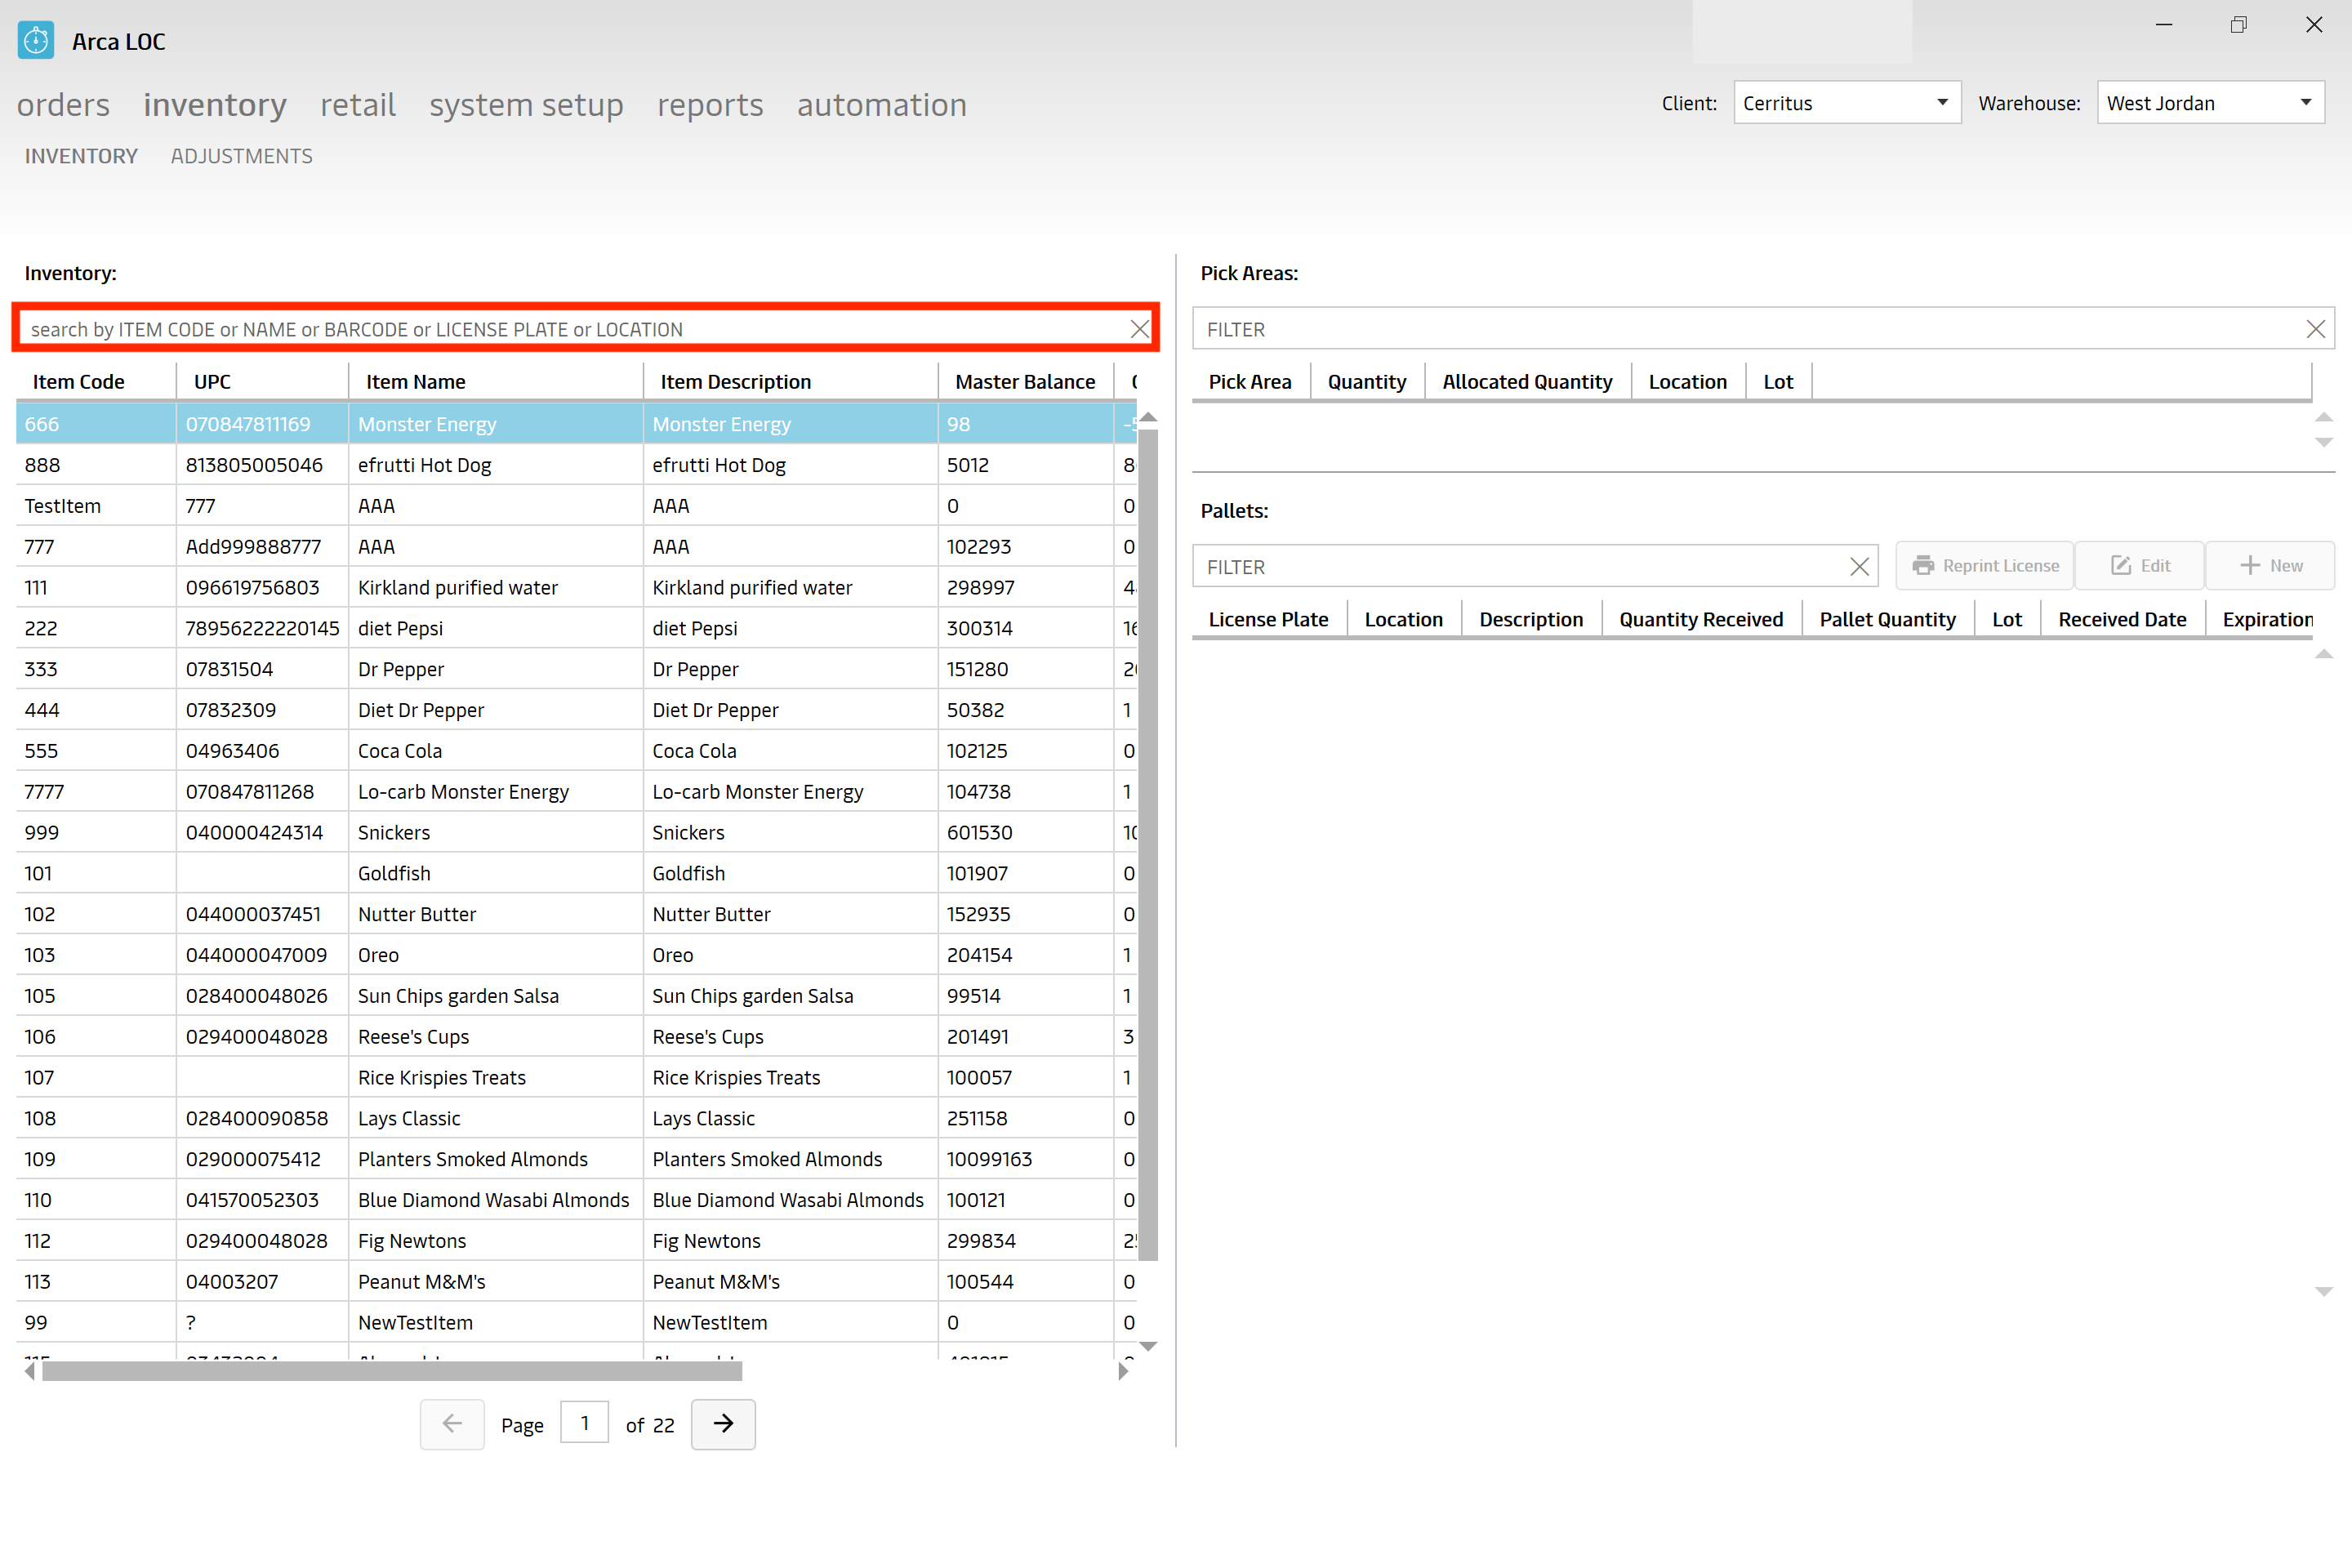
Orders/View Orders
We added in a balance and committed balance section.
We also added in a reallocate function.
Orders/Order Processing
Added in a job status bar to view progress.
Previous Release Notes
7/29/2022
V2022.7.13.0
| Menu | Release |
|---|---|
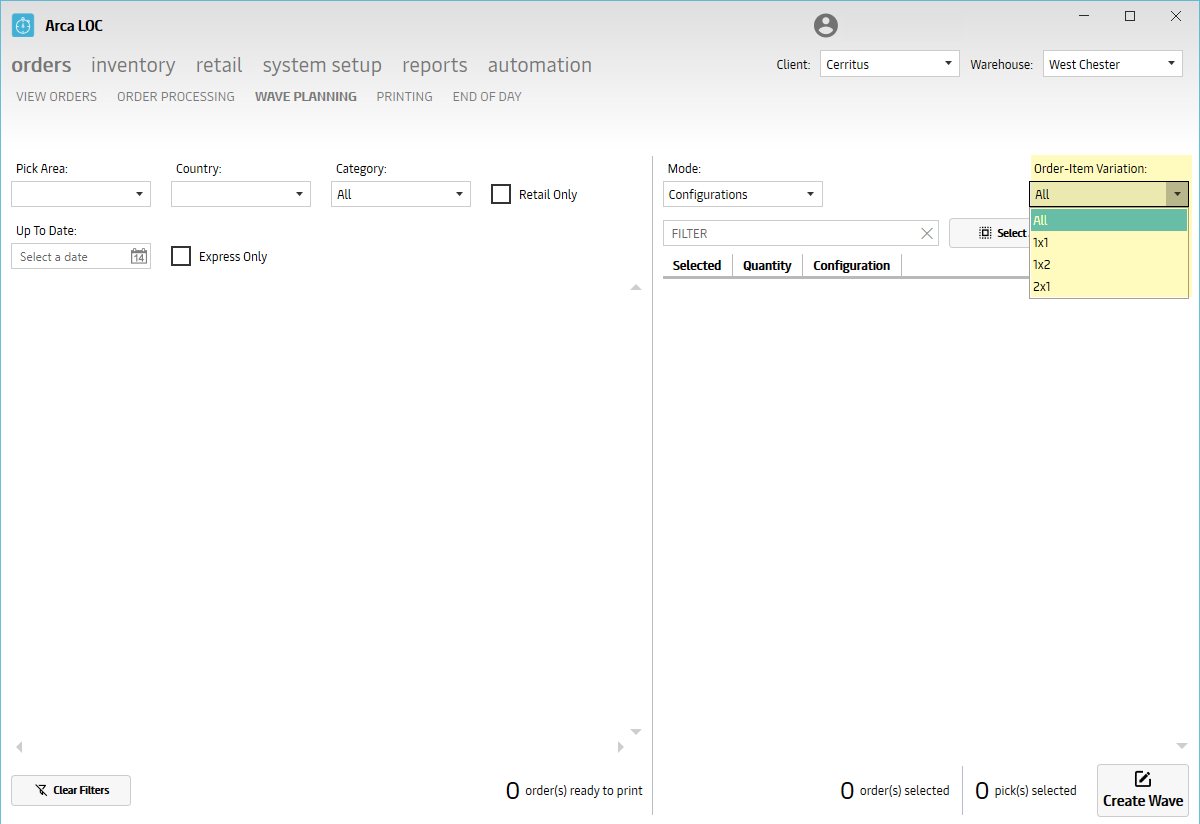
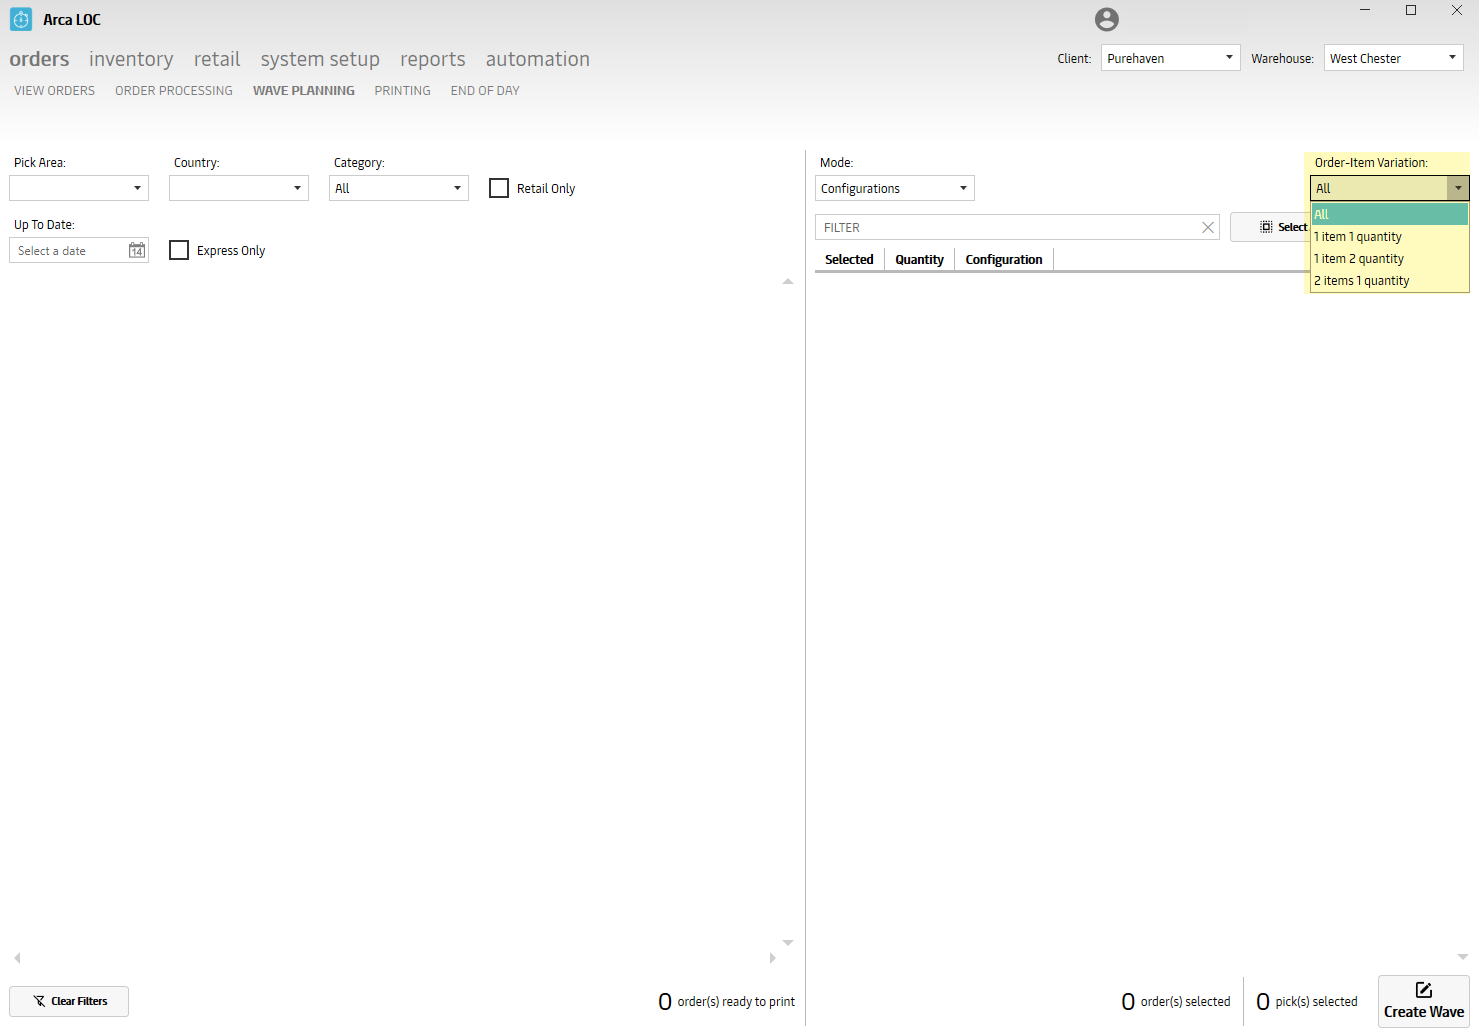
| Orders | Updated "Wave Planning" sub-menu; the Order-Item Variation menu has more user friendly definitions |
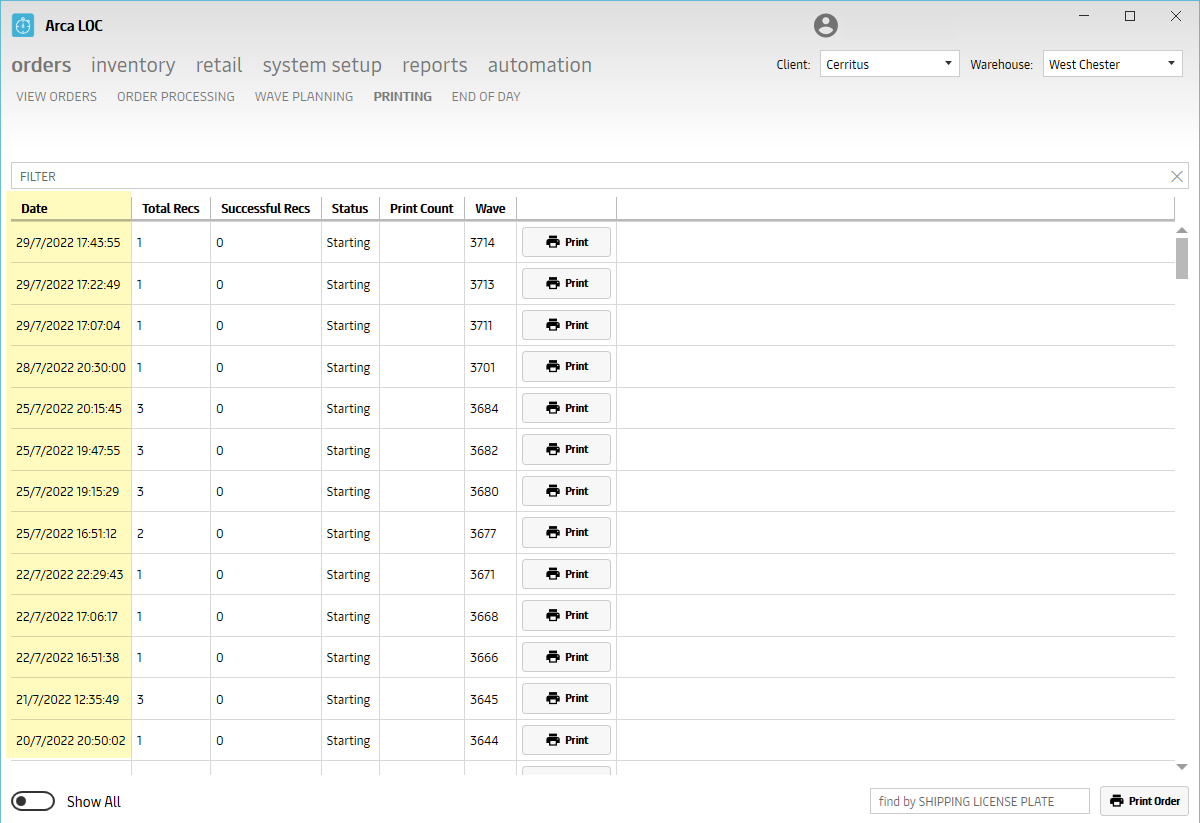
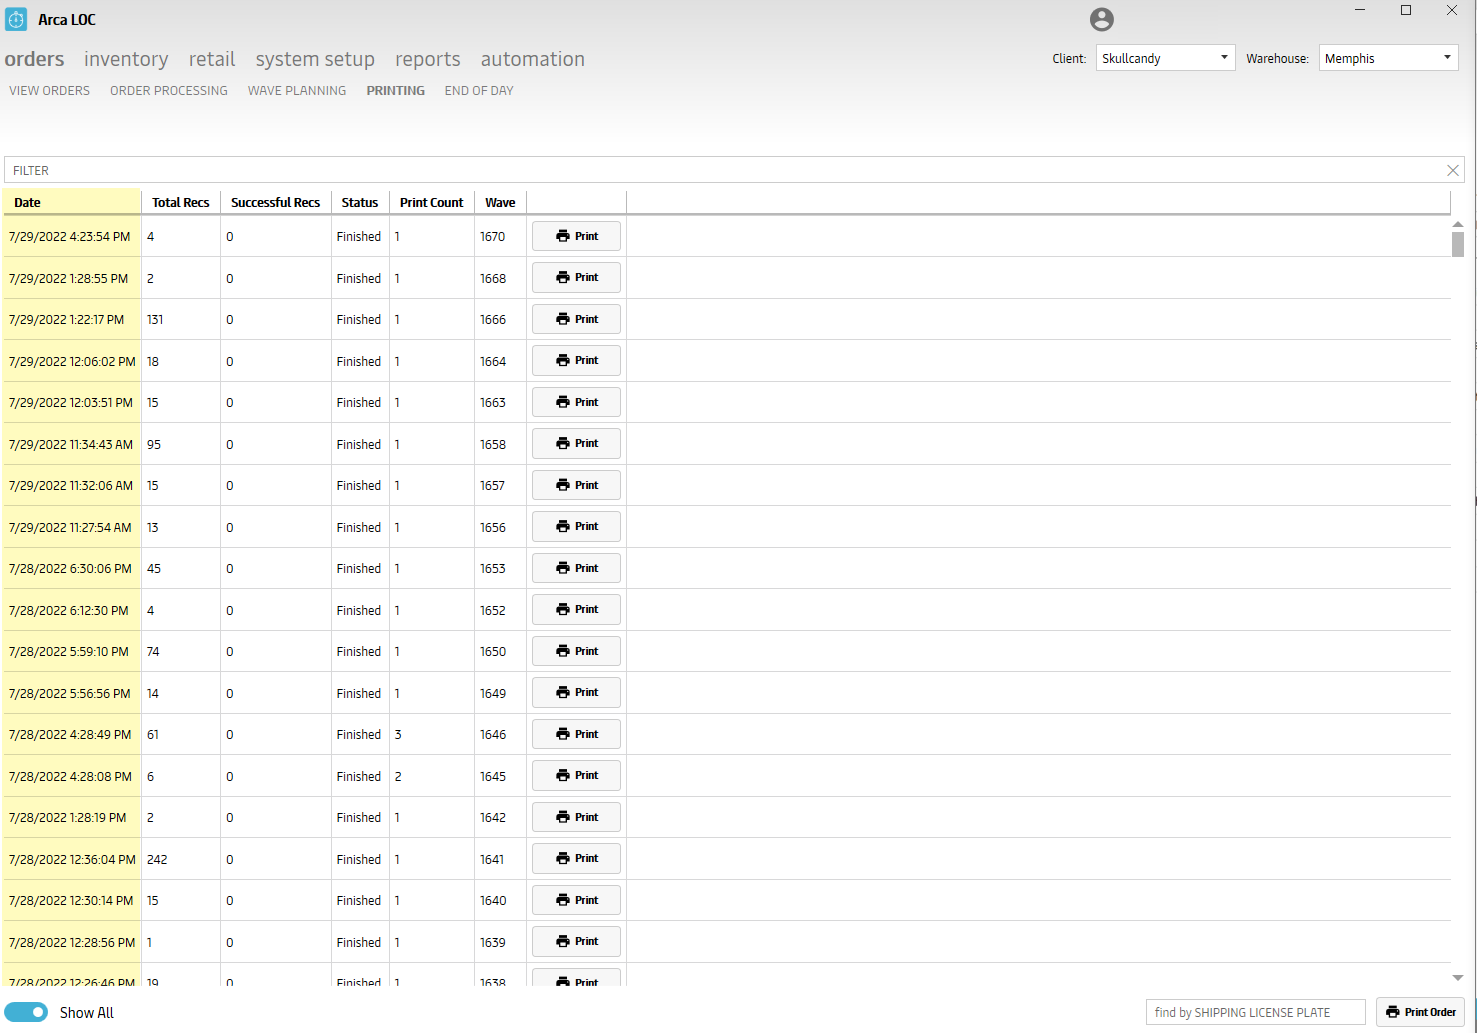
| Orders | Updated "Printing" sub-menu; changed date format to not be European. |
Wave Planning Menu
BEFORE
AFTER
Printing Menu
BEFORE
AFTER
7/19/2022
V2022.7.0.0 - V2022.7.7.0
| Menu | Release |
|---|---|
| Retail | Updated "Assignment" sub-menu. |
| Retail | Added new "Open Orders" sub-menu. |
| Retail | Added new "Routing Selection" sub-menu. |
| Retail | Added new "Route Order" sub-menu. |
| Retail | Added new "Retail Wave Planning" sub-menu. |
| Retail | Updated "Labeling" sub-menu. |
| Retail | Added new "End of Day" sub-menu. |
7/14/2022
7/14/2022
V2022.7.5.0
| Menu | Release |
|---|---|
| Retail | Changed how the item details, pallets and cartons are processed on the Routing Selection view (found in the BoxConfigHashKey value of the Orders. |
| Routing Selection | Changed how the item details, pallets and cartons are processed on the Routing Selection view (found in the BoxConfigHashKey value of the Orders. |
7/11/2022
7/11/2022
V2022.7.3.0
| Menu | Release |
|---|---|
| Routing Selection | export PDF adding Purchase Order, Shipping License Plate, Bar Code, ARCA Order Number and Weight. |
| Route Order | Ability to scan in multiple orders. |
7/7/2022
7/7/2022
V2022.7.1.0
| Menu | Release |
|---|---|
| Routing Guides | Update screen, change label structure. |