ARCA LOC
Session Setup
This section will walk you through how to login and setup your user session.
Login
To login to your session, type in your dedicated username and password:
- Your username will need to be setup for LIVE use; any users needing STAGING access will need a separate login.

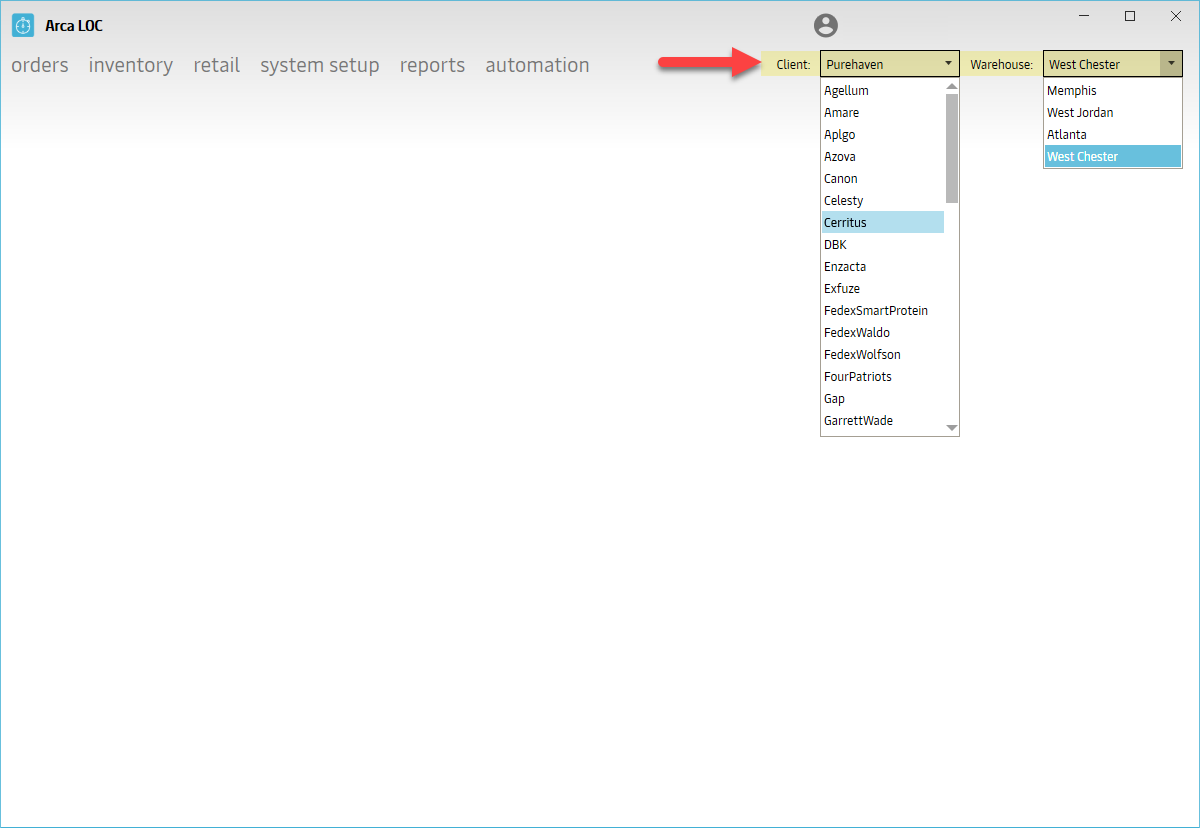
Client and Warehouse
When you launch ARCA LOC, you will need to complete these steps when you first login:
- Choose Client
- Choose Warehouse
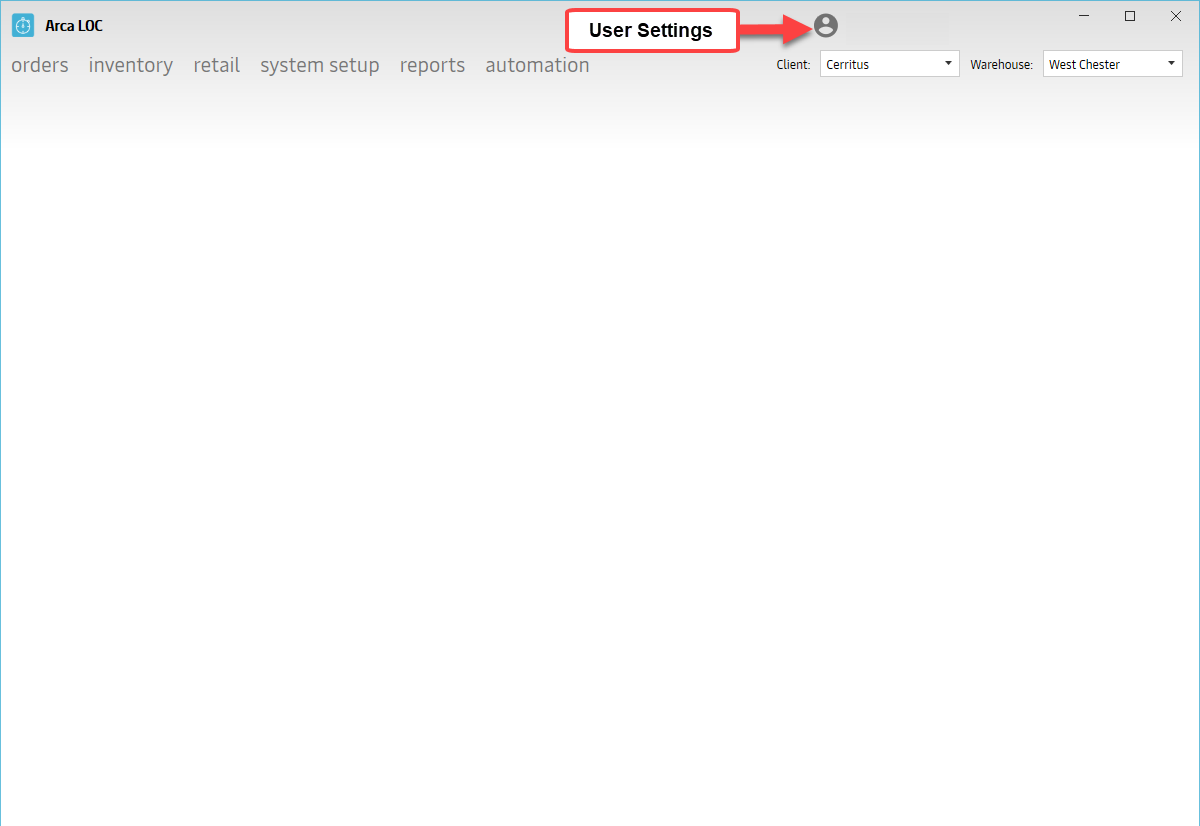
User Settings
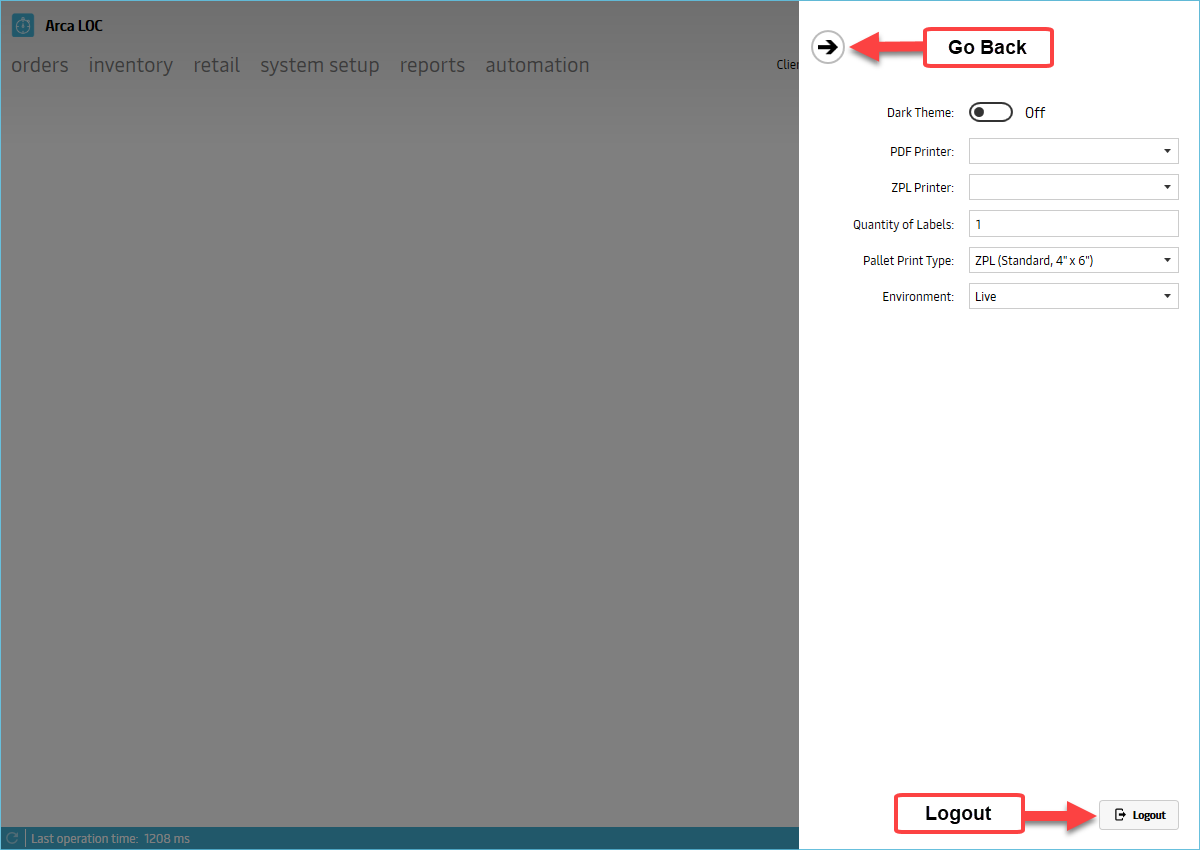
Setup your USER SETTINGS under the user icon in the top right corner:
When you open the USER SETTINGS page, you have the options to customize the experience and setup your preferences.
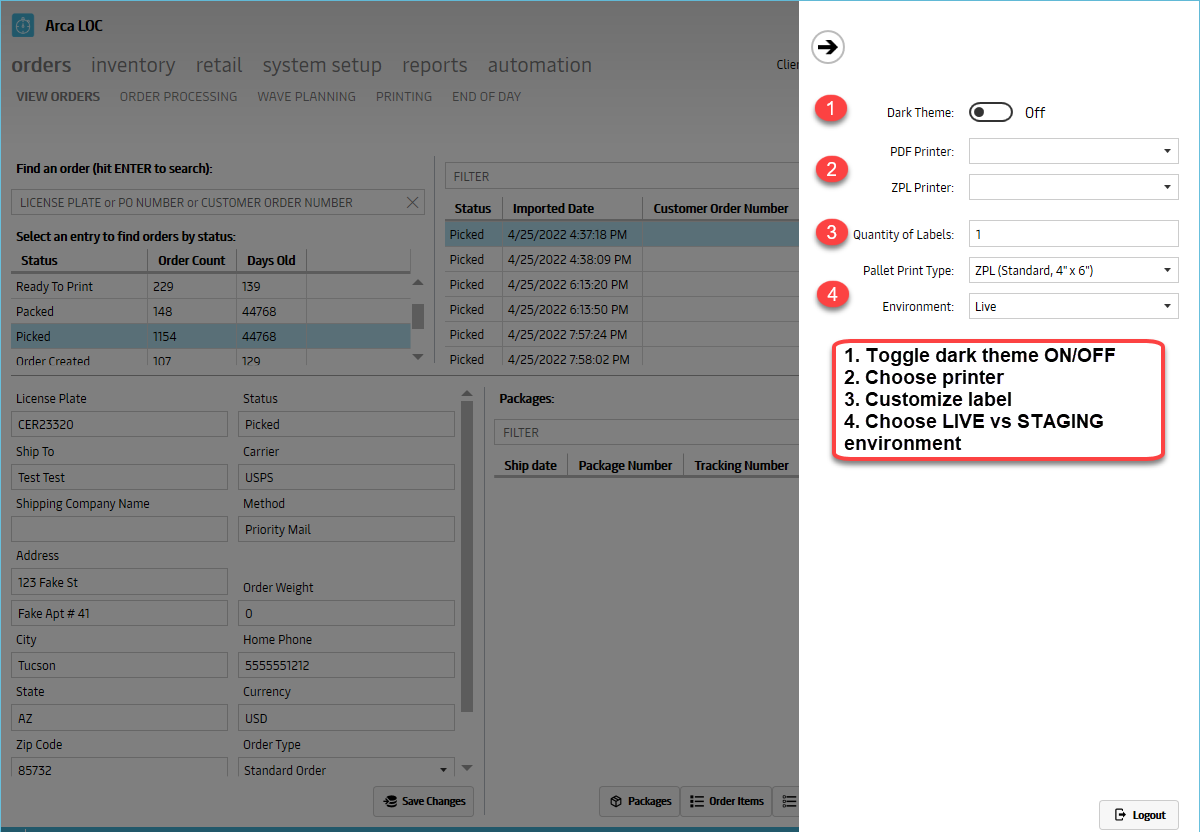
- Toggle dark theme ON/OFF
- Choose printer
- Customize label
- Printing labels would allow receiving to print more than 1 label, for pallet purposes.
- Choose LIVE vs STAGING environment
Logout
To logout of your session, click the icon in the lower right corner:
Orders
View Orders
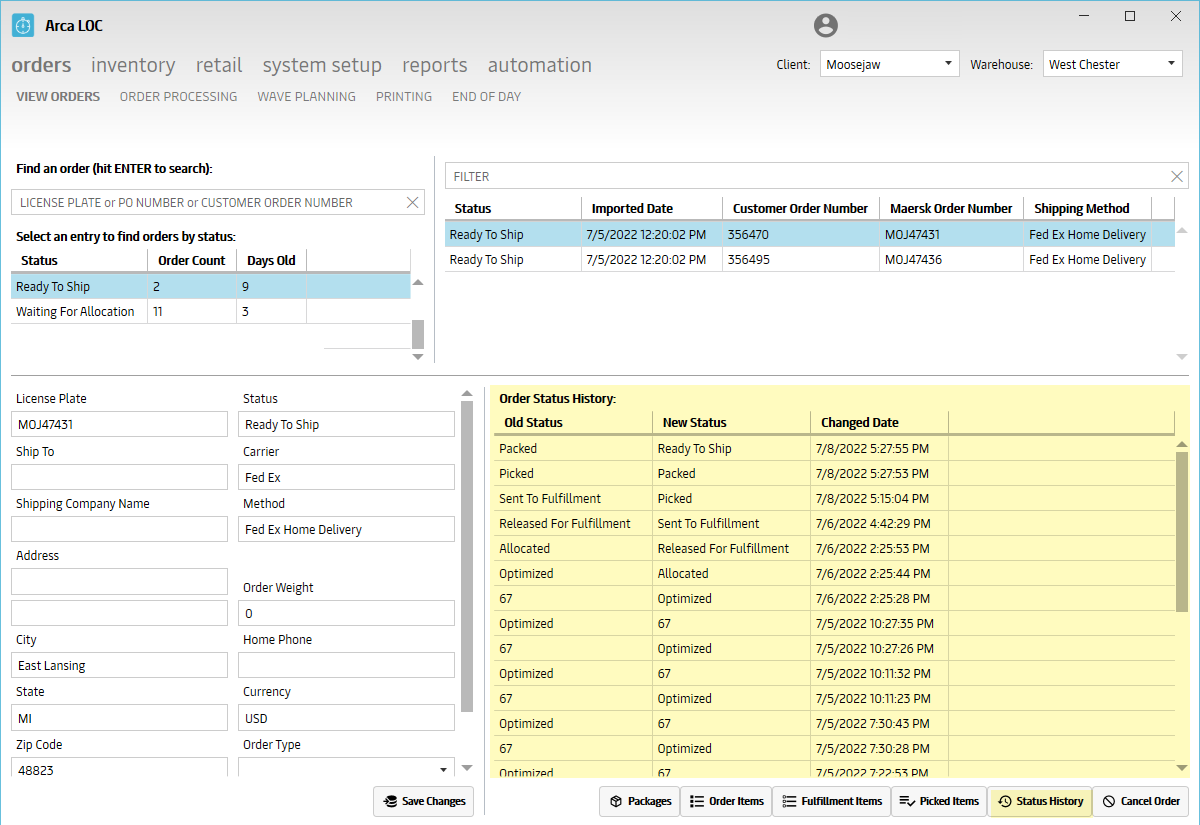
The "View Orders" portion of ARCA LOC is designed to allow orders to be searched, edited, saved and/or cancelled.
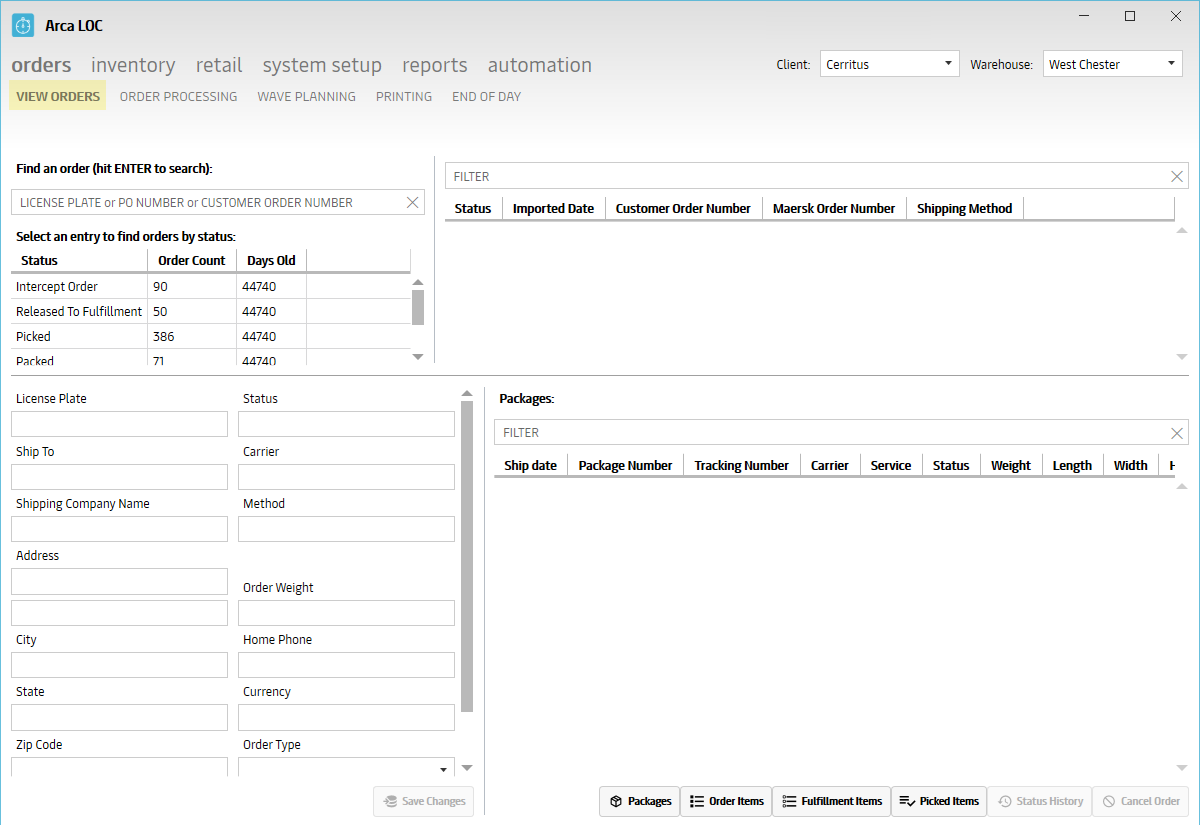
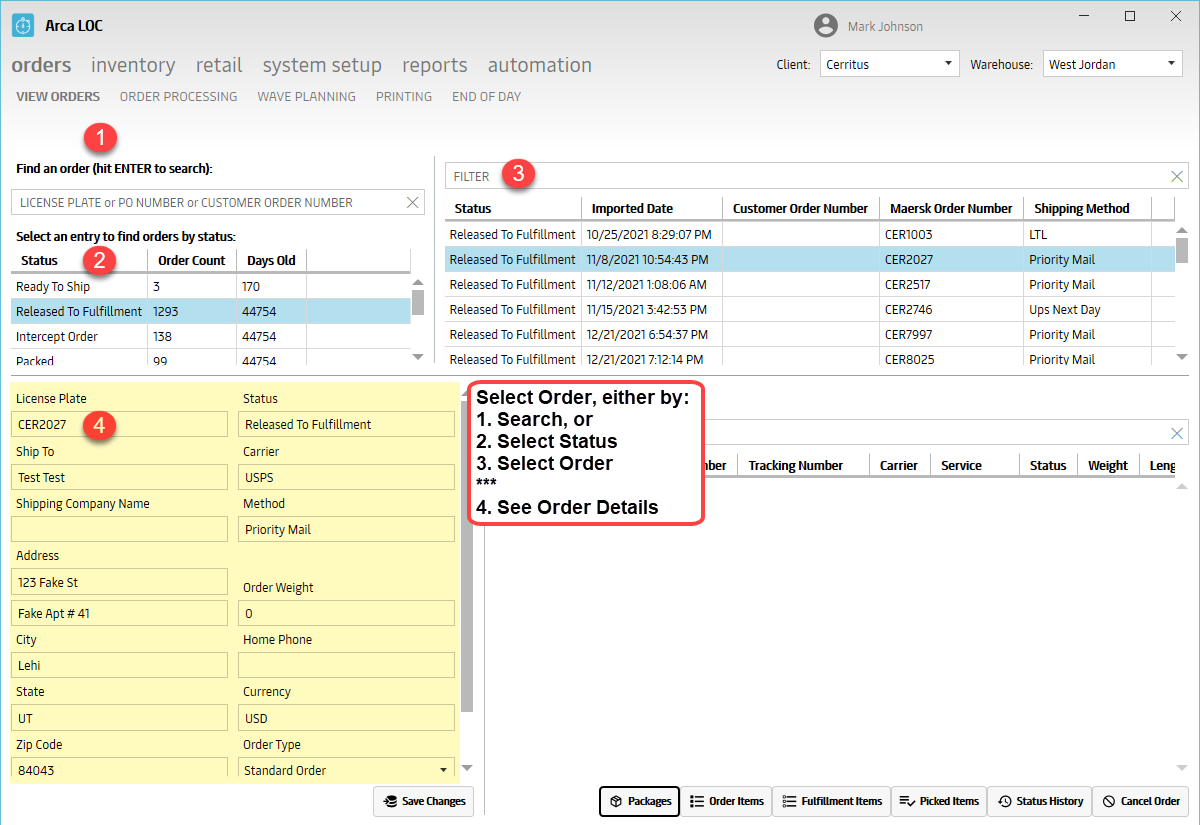
Find An Order
To find an order, you may look it up using the following options:
- License Plate Number
- PO Number
- Customer Order Number
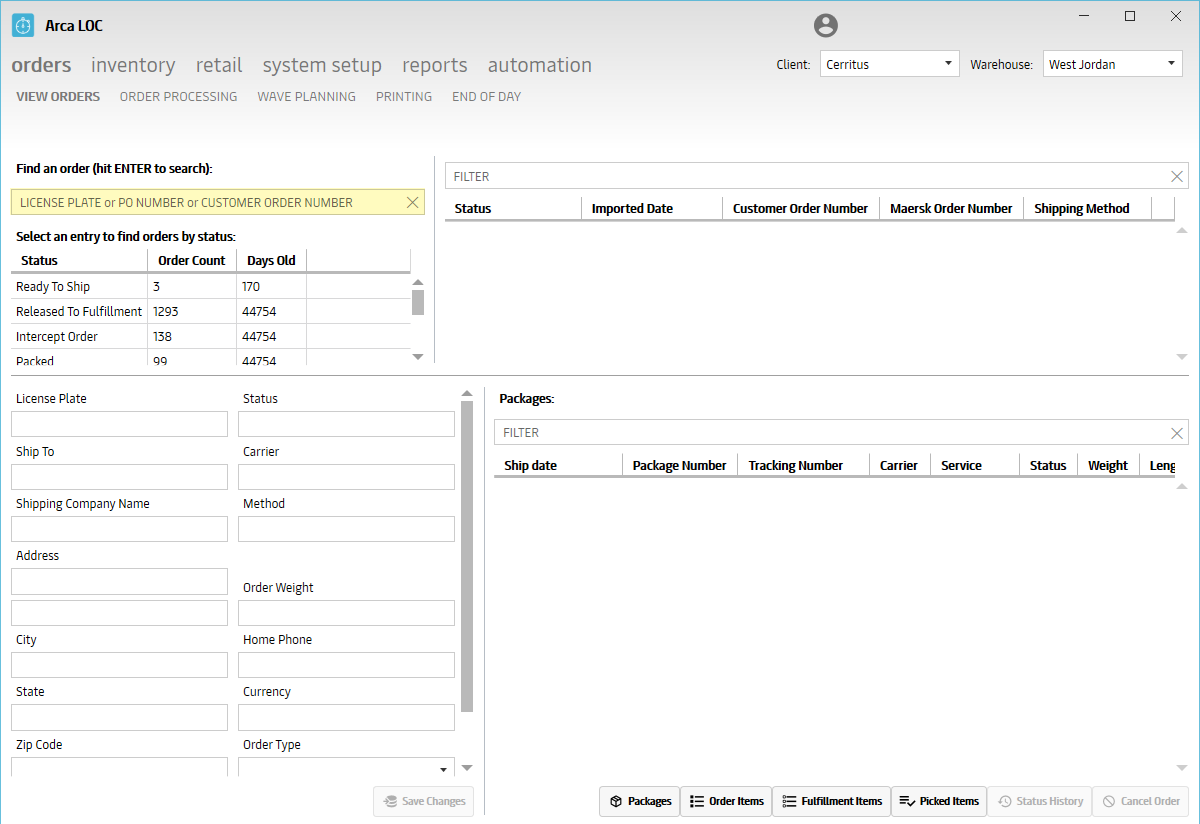
Filter For An Order
If you do not have any of the aforementioned qualifiers, you may filter for your order by the status. Examples of statuses to search under, include but are not limited to:
- Waiting For Allocation
- Released To Fulfillment
- Picked
- Ready To Print
- Confirm Cancel
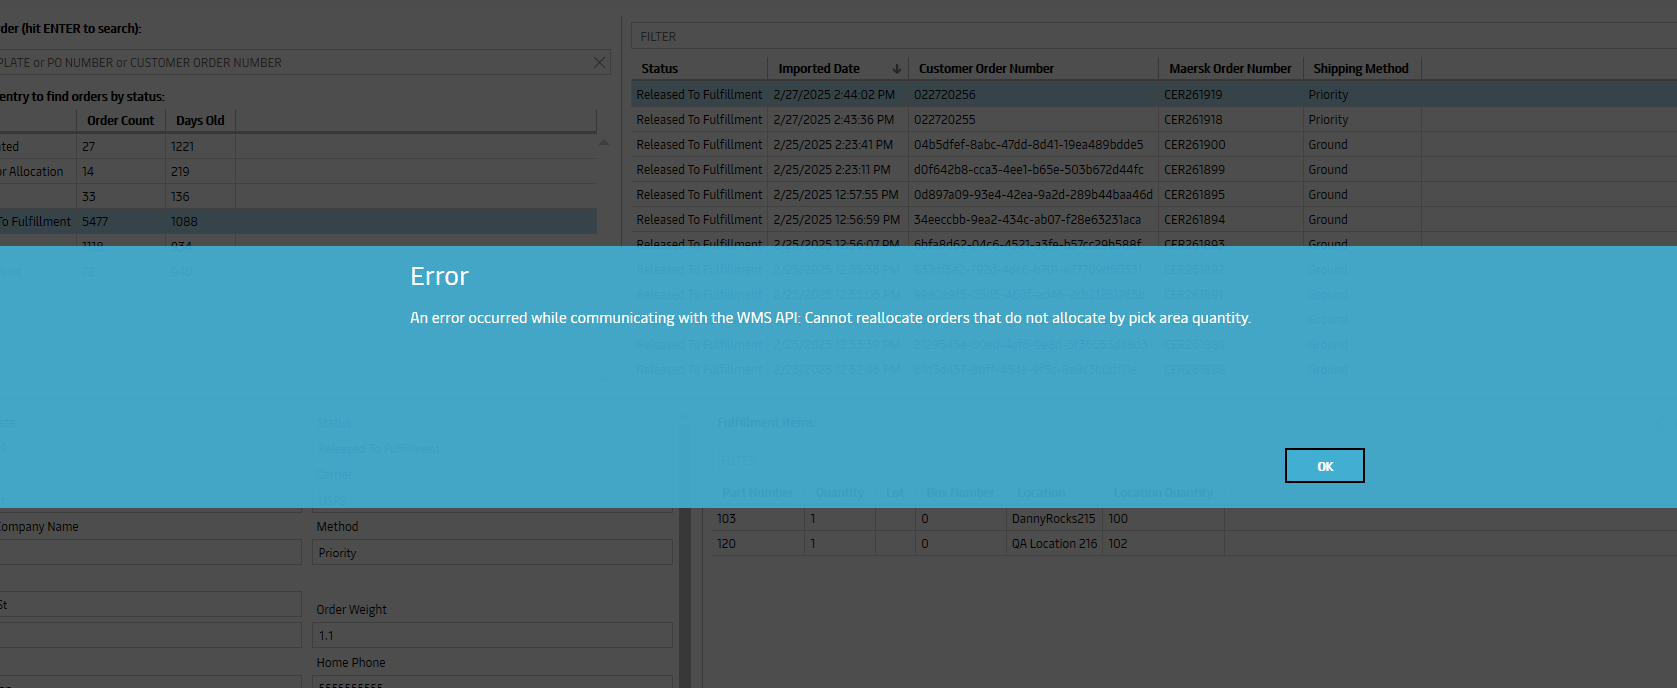
ReAllocate An Order
This feature will work only when an order is in a status of Released to Fulfillment and the Business rule AllocateByPickAreaQuantity is Active. Attempting to reallocate an order when the Business rule is inactive will result in the following error message:
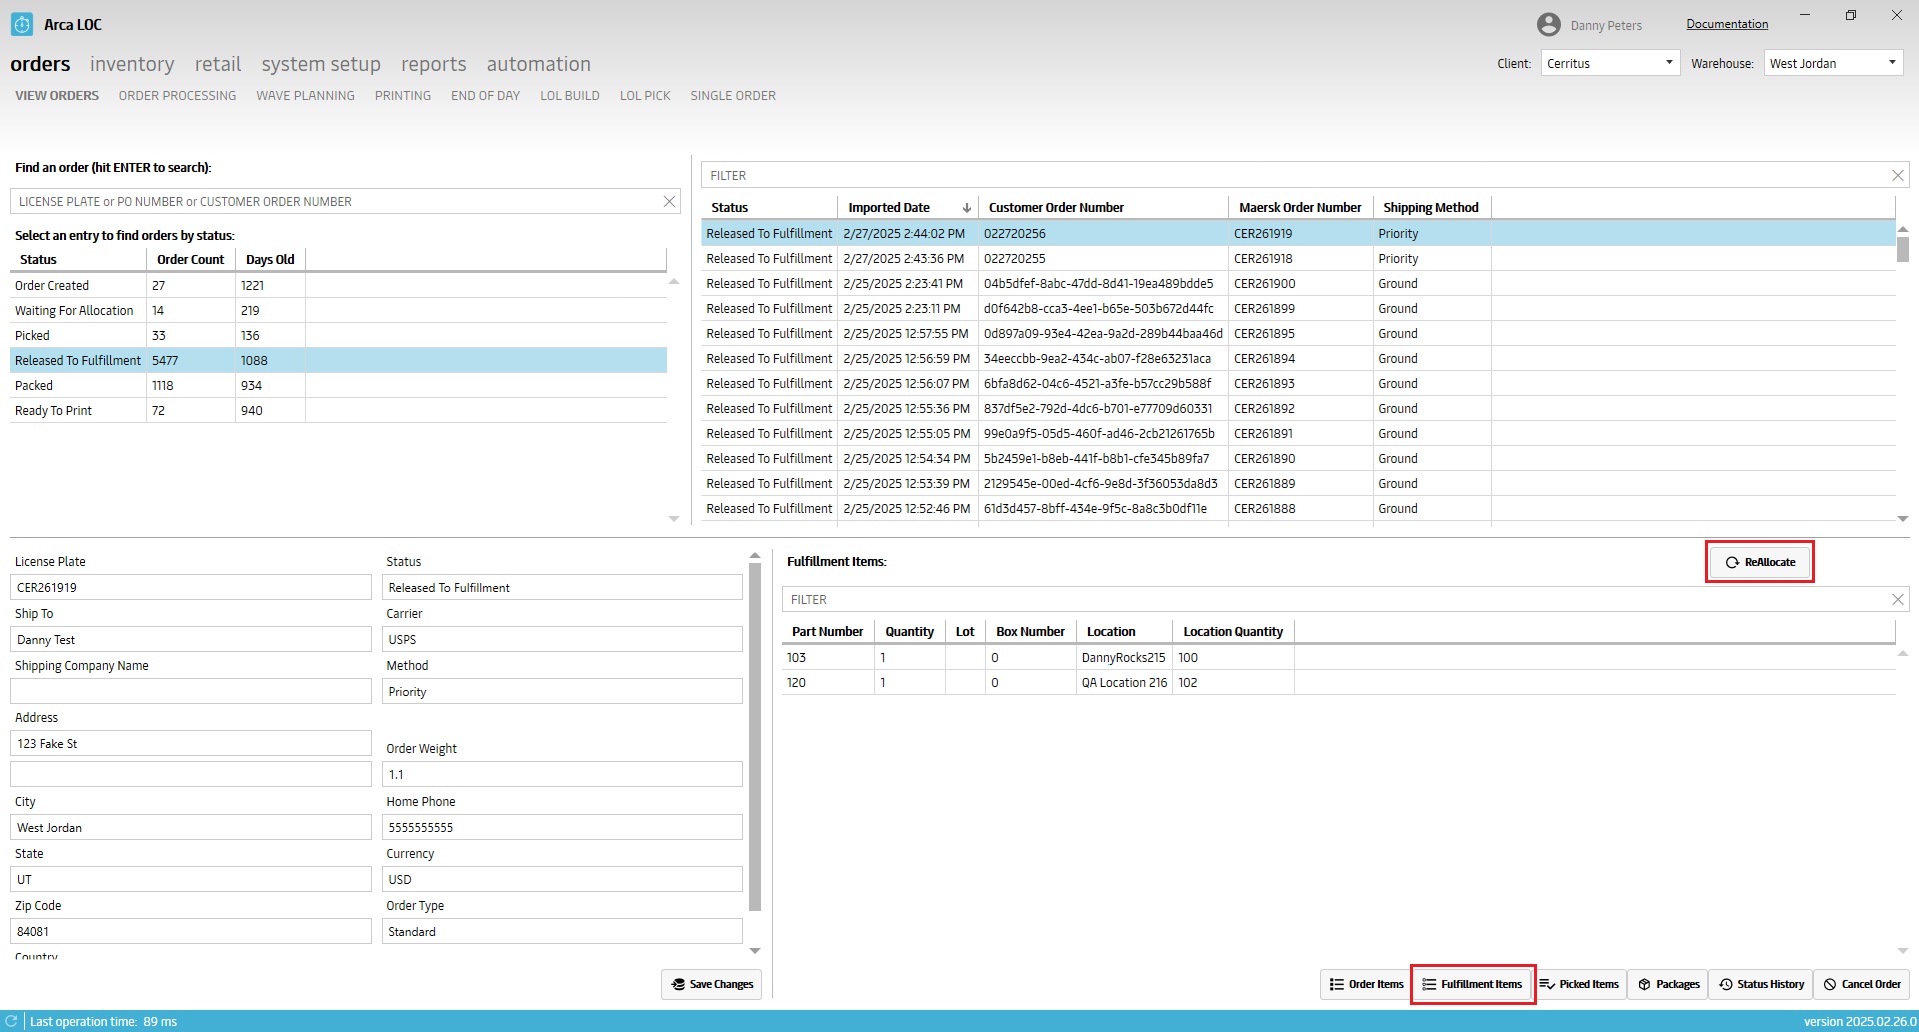
Load the order group released to Fulfillment.
Choose an order to reallocate.
Select the fulfillment items tab to see the reallocate button.
Click the reallocate button, this will attempt to assign the order’s fulfillment items to another pick location. Refresh the screen and check the fulfillment items tab to see the new pick locations.
Order Details
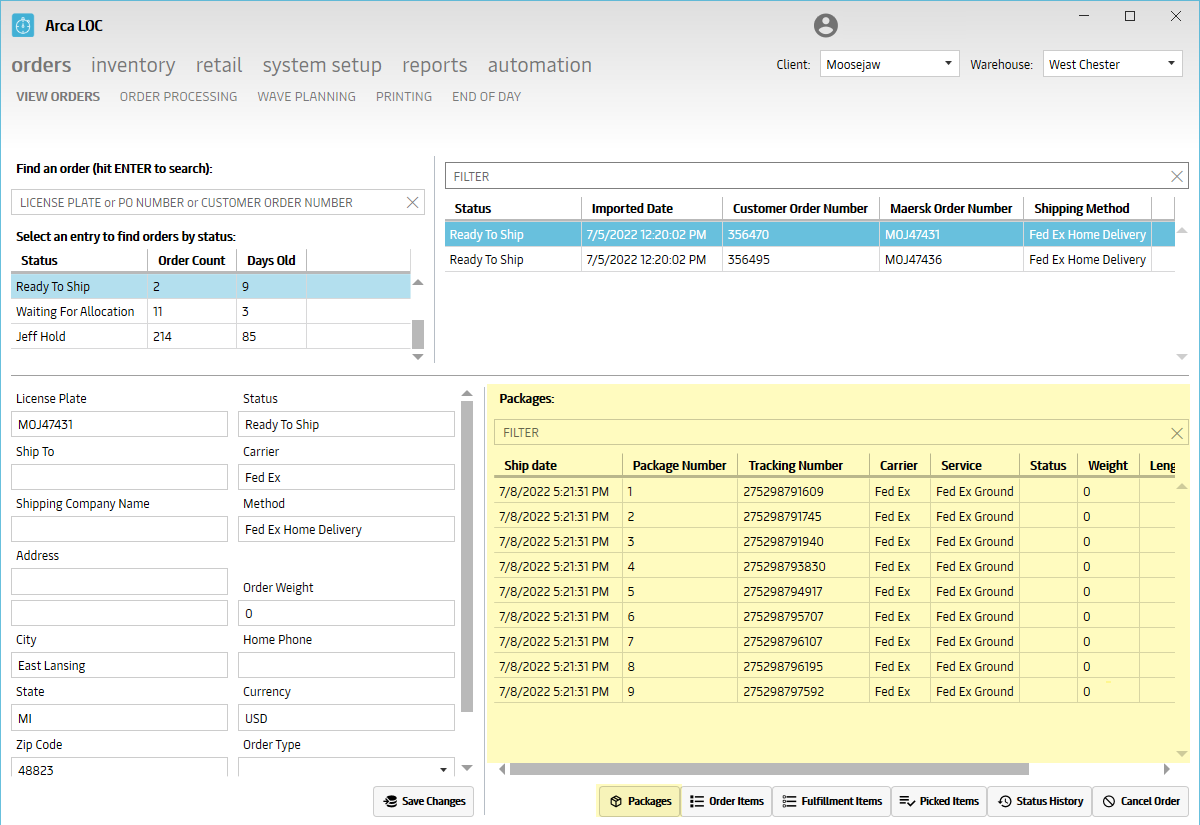
Once you locate the order, you will be able to view the order details such as customer address, carrier, and order status.
There are additional details and actions available located at the bottom of the screen. With an order number selected, you will be able to access the following sub-menus:
| Packages | Order Items | Fulfillment Items | Picked Items | Status History | Cancel Order |
Packages
Here, you will see a list of packages scanned to the order, with the Carrier and tracking details.
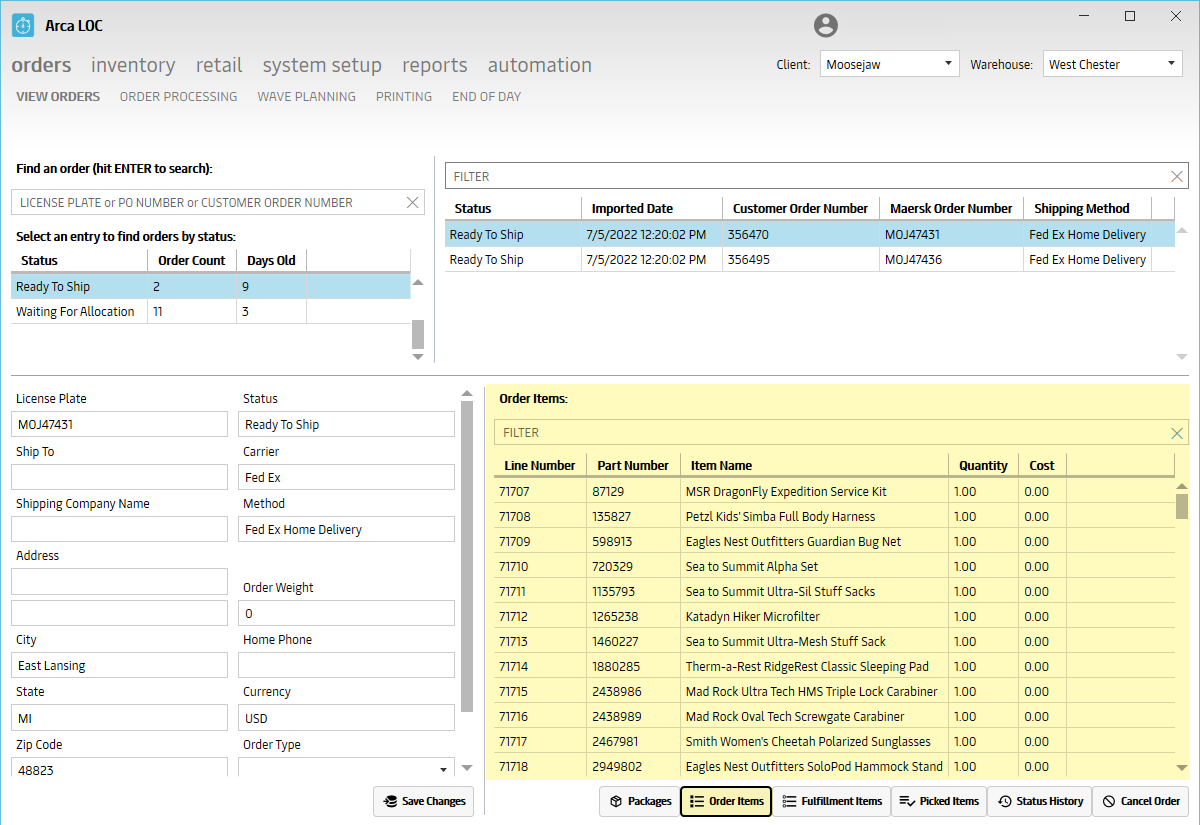
Order Items
Here, you will see a list of items on the customer sales order.
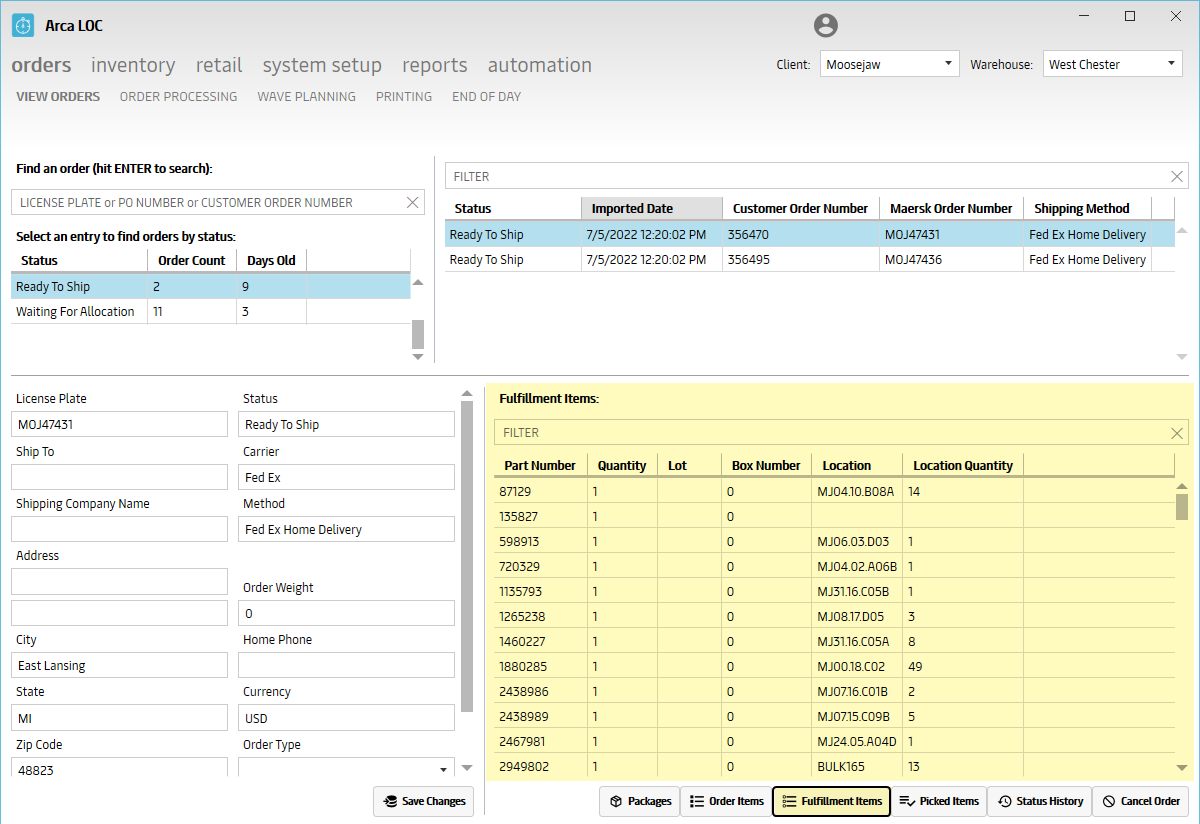
Fulfillment Items
Here, you will see the list of the order items, with regards to the warehouse storage location and quantity available.
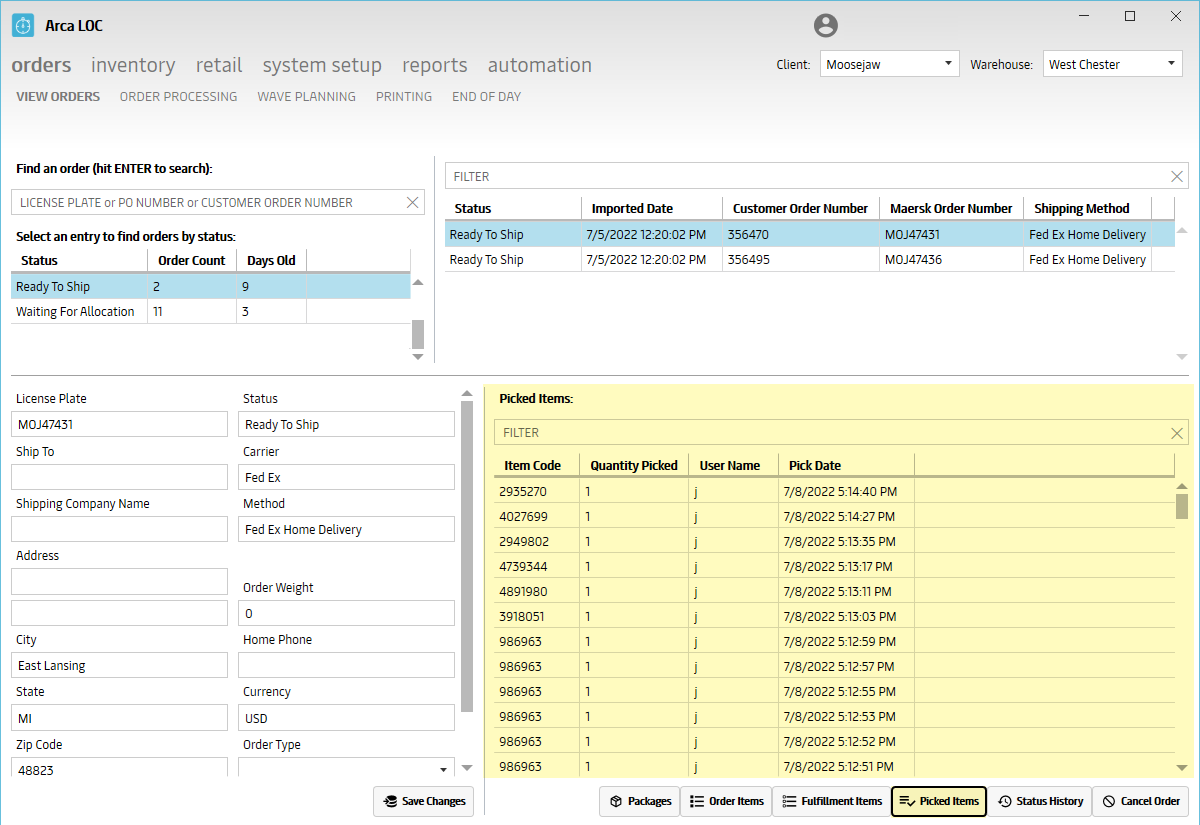
Picked Items
Here, you will see the list of the order items with the quantity picked, along with the user (picker) information and date/timestamp of the physical pick.
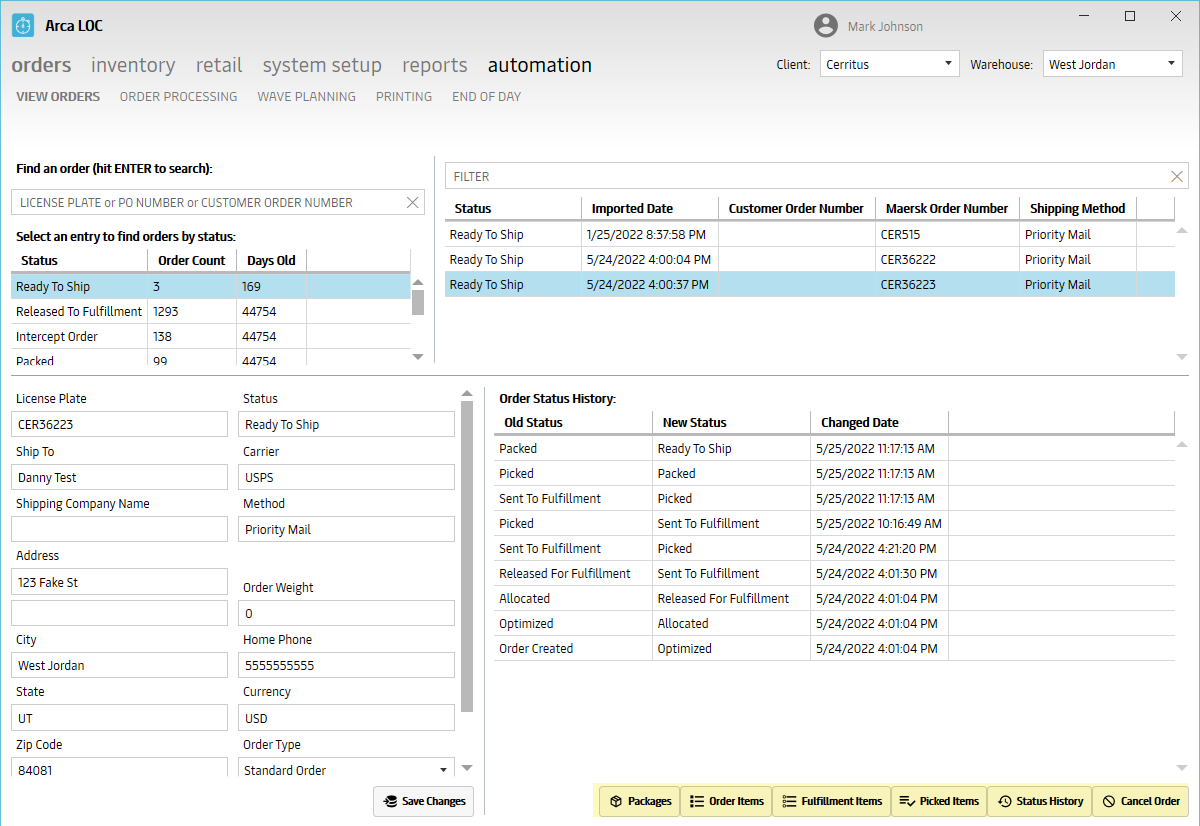
Status History
Here, you will see the history of all the statuses associated with this customer sales order; contains the old status, the new status and date/timestamp.
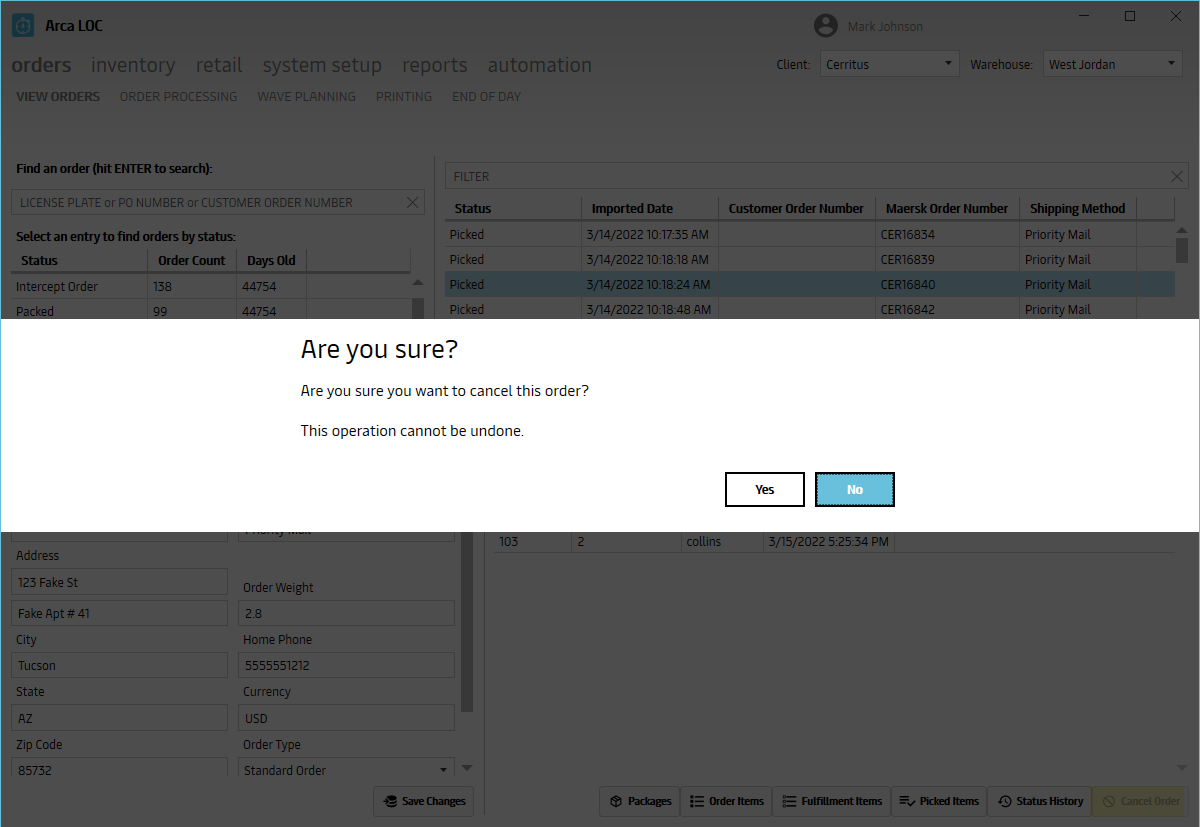
Cancel Order
Here, you will have the ability to cancel an order. There will be a confirmation page to ensure you want to proceed.
API Calls
- OrderSave
- OrdersGet
- OrderCancelByLicensePlate
Order Processing
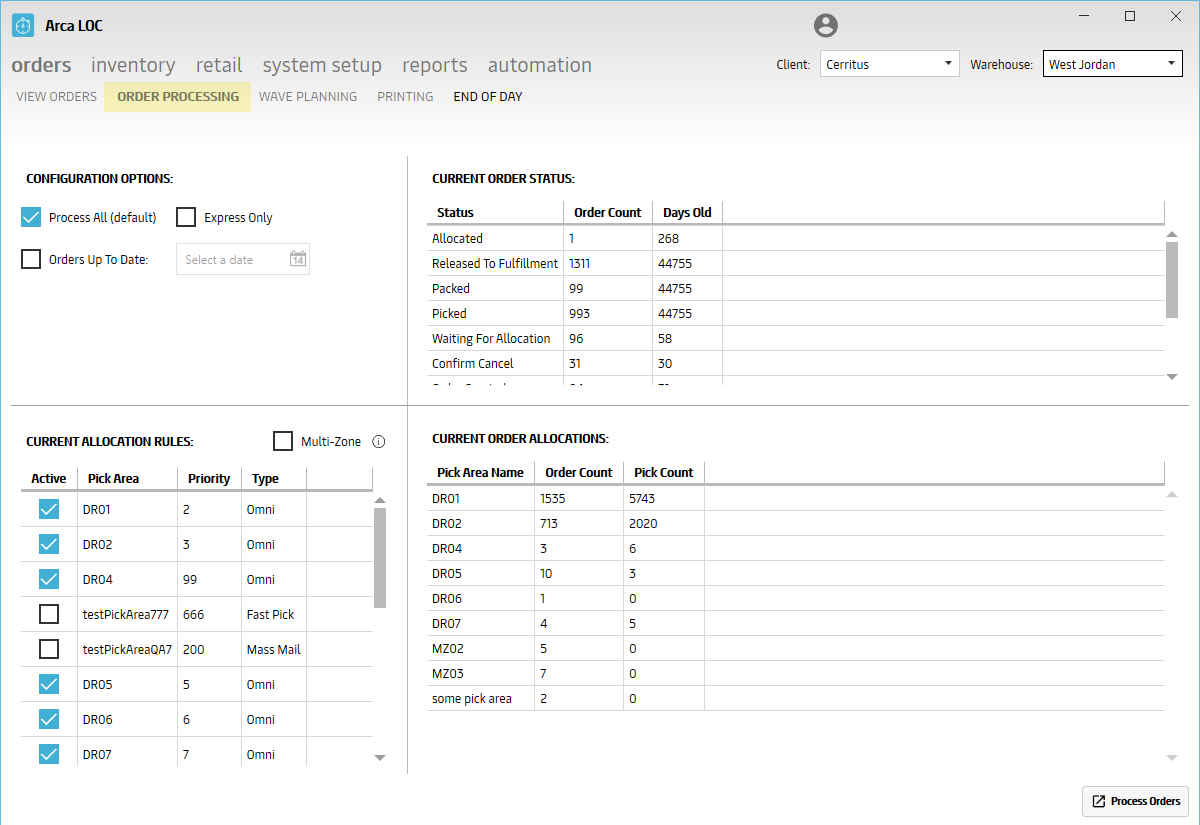
The "Order Processing" portion of ARCA LOC is designed to find and gather all open orders for processing.
Order processing is looking for pick areas that have all the items needed to fulfill the order. Once it finds a pick area that has all the needed items, it will create the fulfillment items for the order, it allocates that order to the pick area, updates the committed balance for the items and changes the order status to Ready to Print. Then those orders will show up in the wave planning screen to be put into a batch.
Configuration Options
To pull orders for processing, you can filter and search using the following options:
- Process All (default) - default setting to process all orders regardless of ship method or order date
- Express Only - only display orders marked with express shipping
- Order up to Date - the timestamp of the order import date
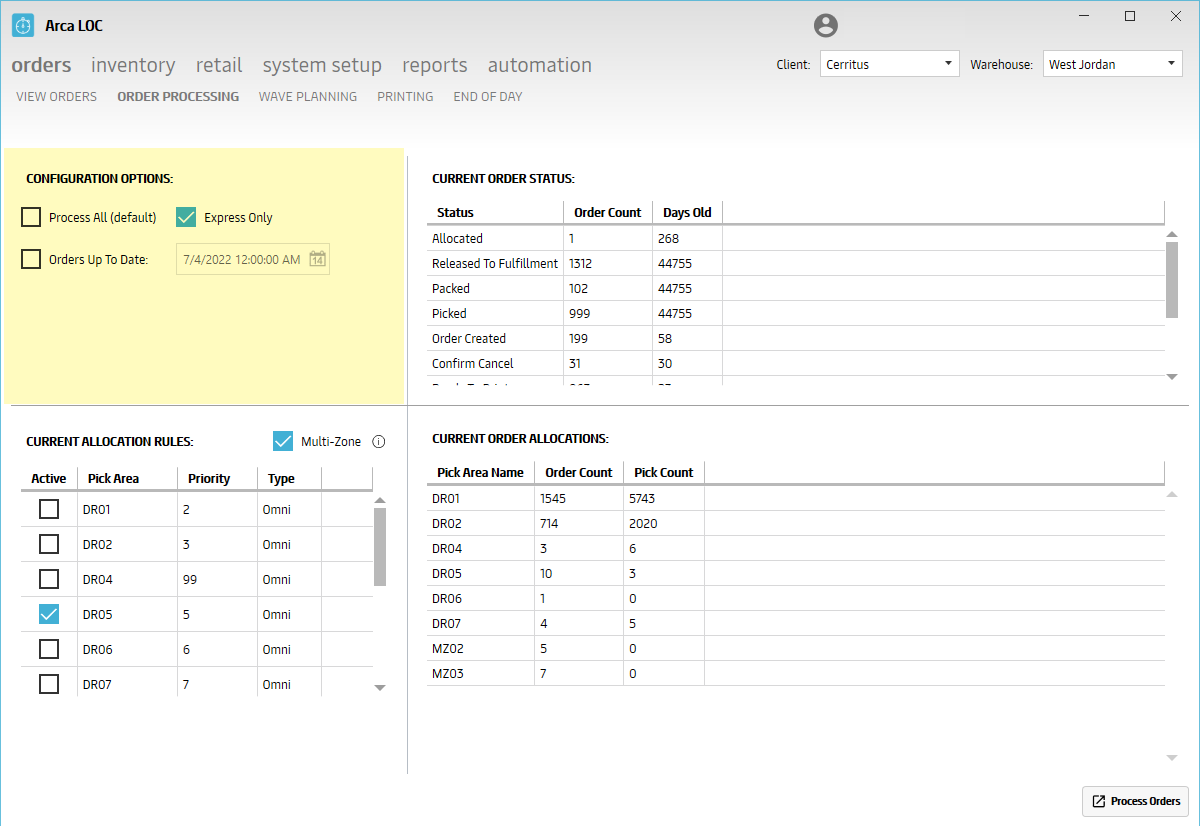
Current Allocation Rules
Here you can choose any pick area to allocate from when processing the orders:
- Multi-Zone: If items on an order are stored in different pick zones, turn this ON to allow orders to be allocated across multiple active pick areas. Contingent on RULES setting to be T.
Note
That all pick areas are displayed - even those that are inactive.
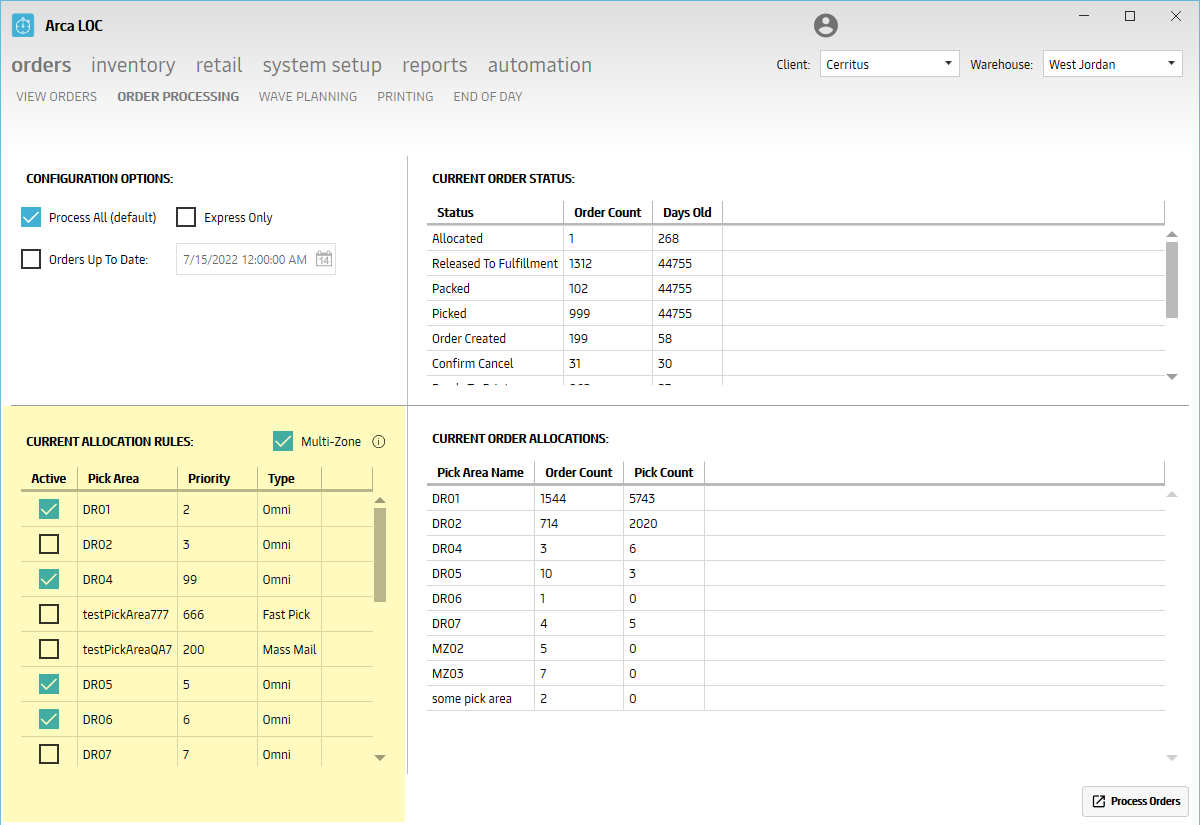
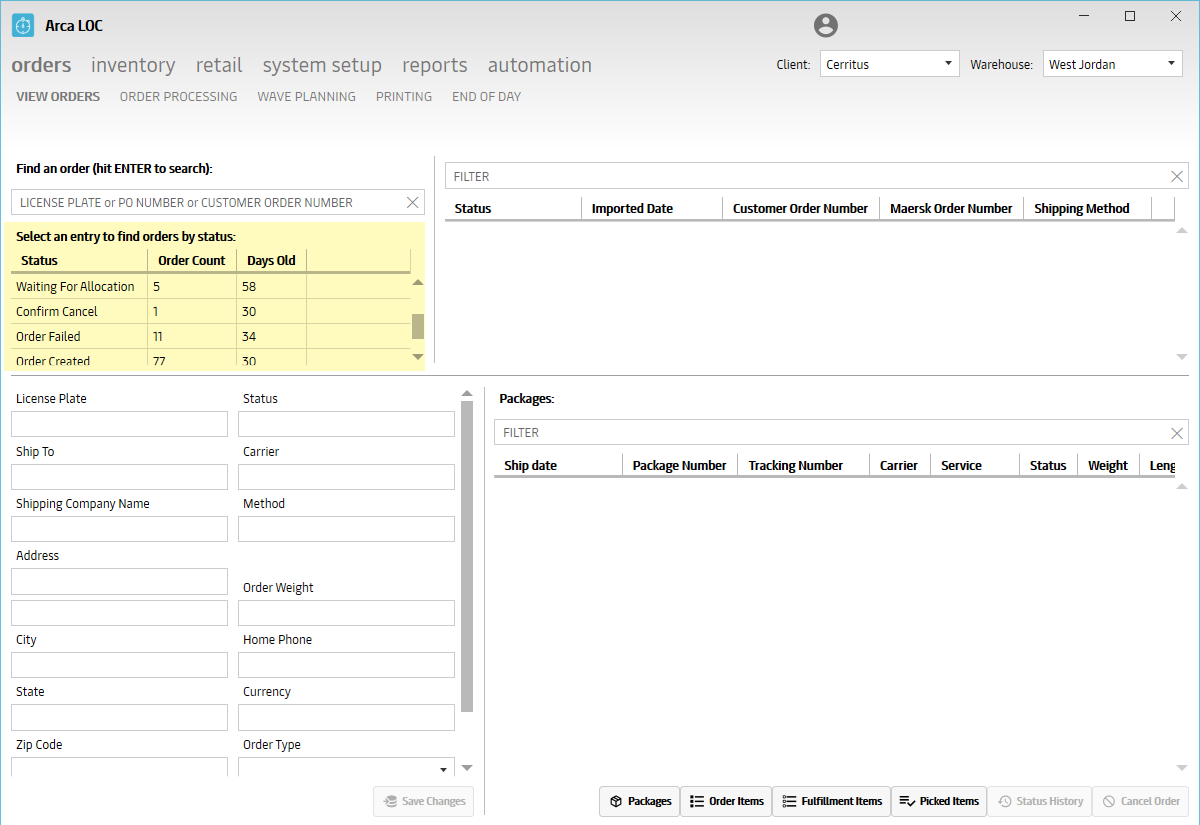
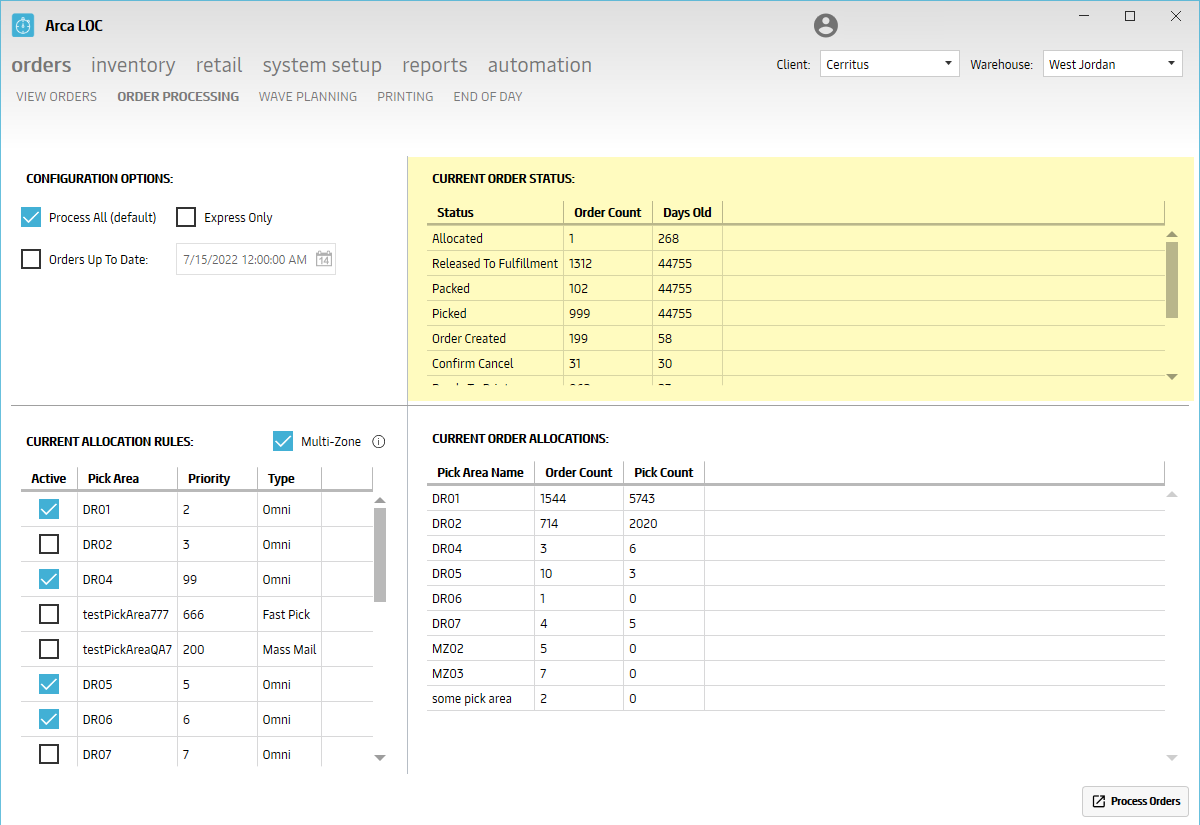
Current Order Status
The "Order Status" section on right side of the screen is an overview ONLY. Any configurations done on the left side of the screen will not alter the right side.
There are 3 columns of information:
Status - current status of a customer sales order in the system
Order Count - total quantity of customer sales orders in the respective status
Days Old - the total number of days the order has been in the system, starting count on Order Import Date.
Some examples of an Order Status include:
- Back Order
- Allocated
- Picked
- Order Created
- Released To Fulfillment
Note
The system will only allocate orders that are marked ACTIVE under the Pick Area in the "Order Status" section.
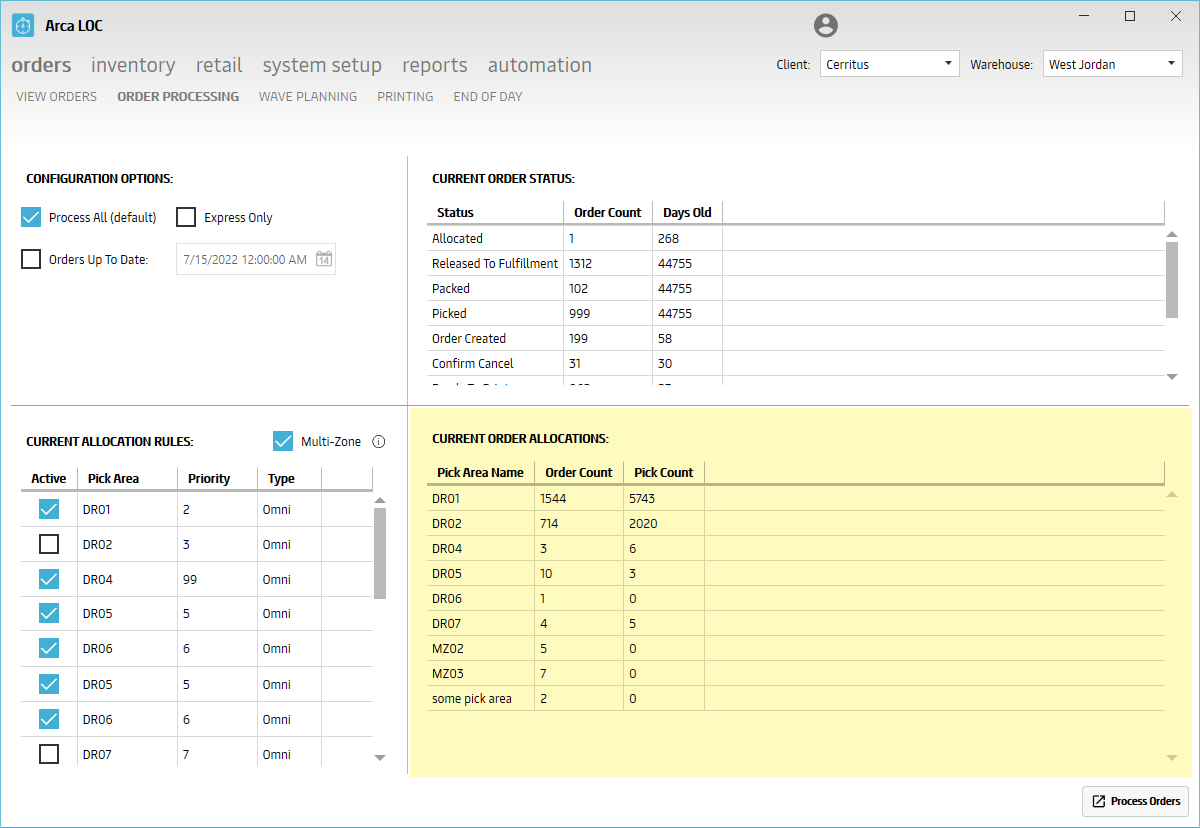
Current Order Allocations
The "Current Allocations Rules" section on right side of the screen is an overview ONLY. Any configurations done on the left side of the screen will not alter the right side.
There are 3 columns of information:
- Pick Area - A section within a storage type in which all picking activities are carried out in the same way
- Order Count - total quantity of customer sales orders in the respective status
- Pick Count - total quantity of customer sales orders in the respective status
Some examples of a Pick Area include:
- DR01
- DR02
- SC01
- SC02
- TU27
Note
The system will only allocate orders that are marked ACTIVE under the Pick Area in the "Current Allocations Rules" section.
Process Orders
Based solely on PICK AREAS marked as ACTIVE under the "Current Allocation Rules" as well as under SYSTEM SETUP-PICK AREAS (see management if needed).
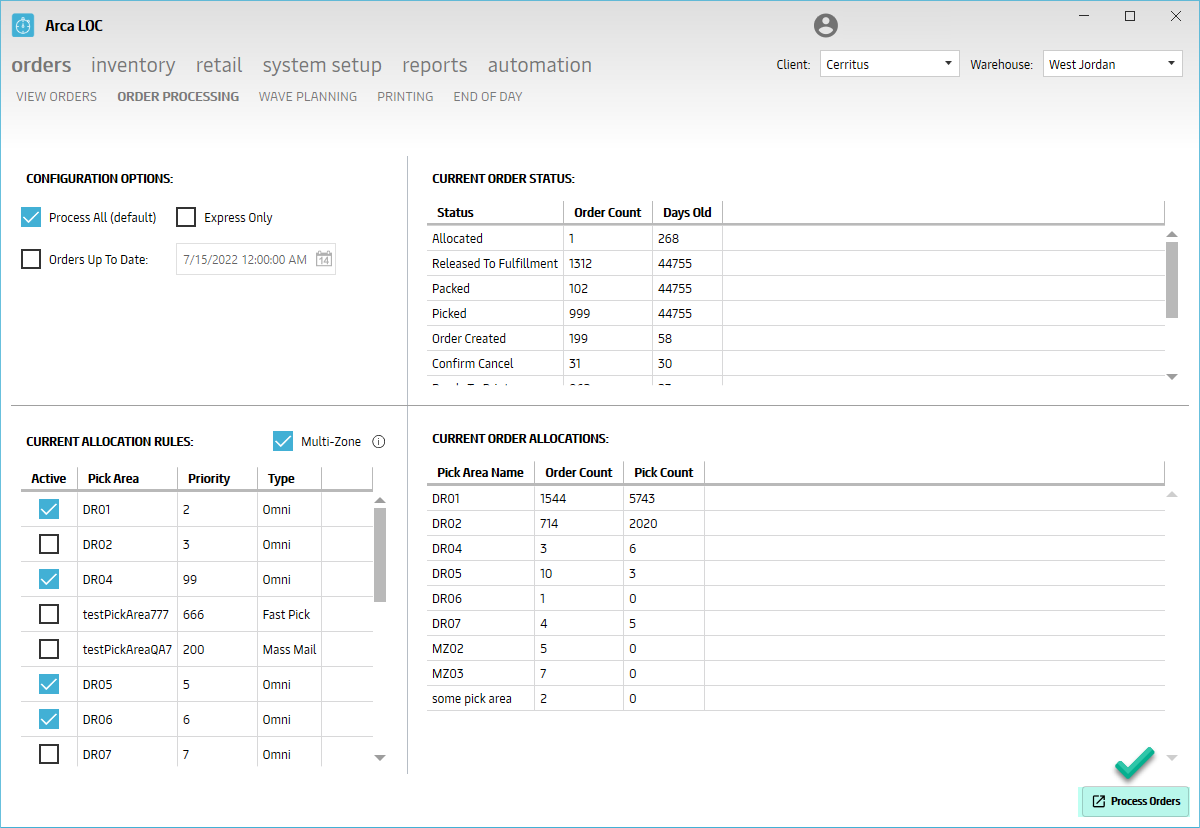
While the processing job is running, a status bar will be shown to the user. It tracks progress of orders in the queue and will give you a count of successful orders and errors when the job finishes. To the left of the Job status bar, you will see the current count of orders in the queue to be processed. *Note that order processing has a single queue for all clients. The Processing Que count is the total number of orders for everyone. The Job Status bar will be focused on your current client.
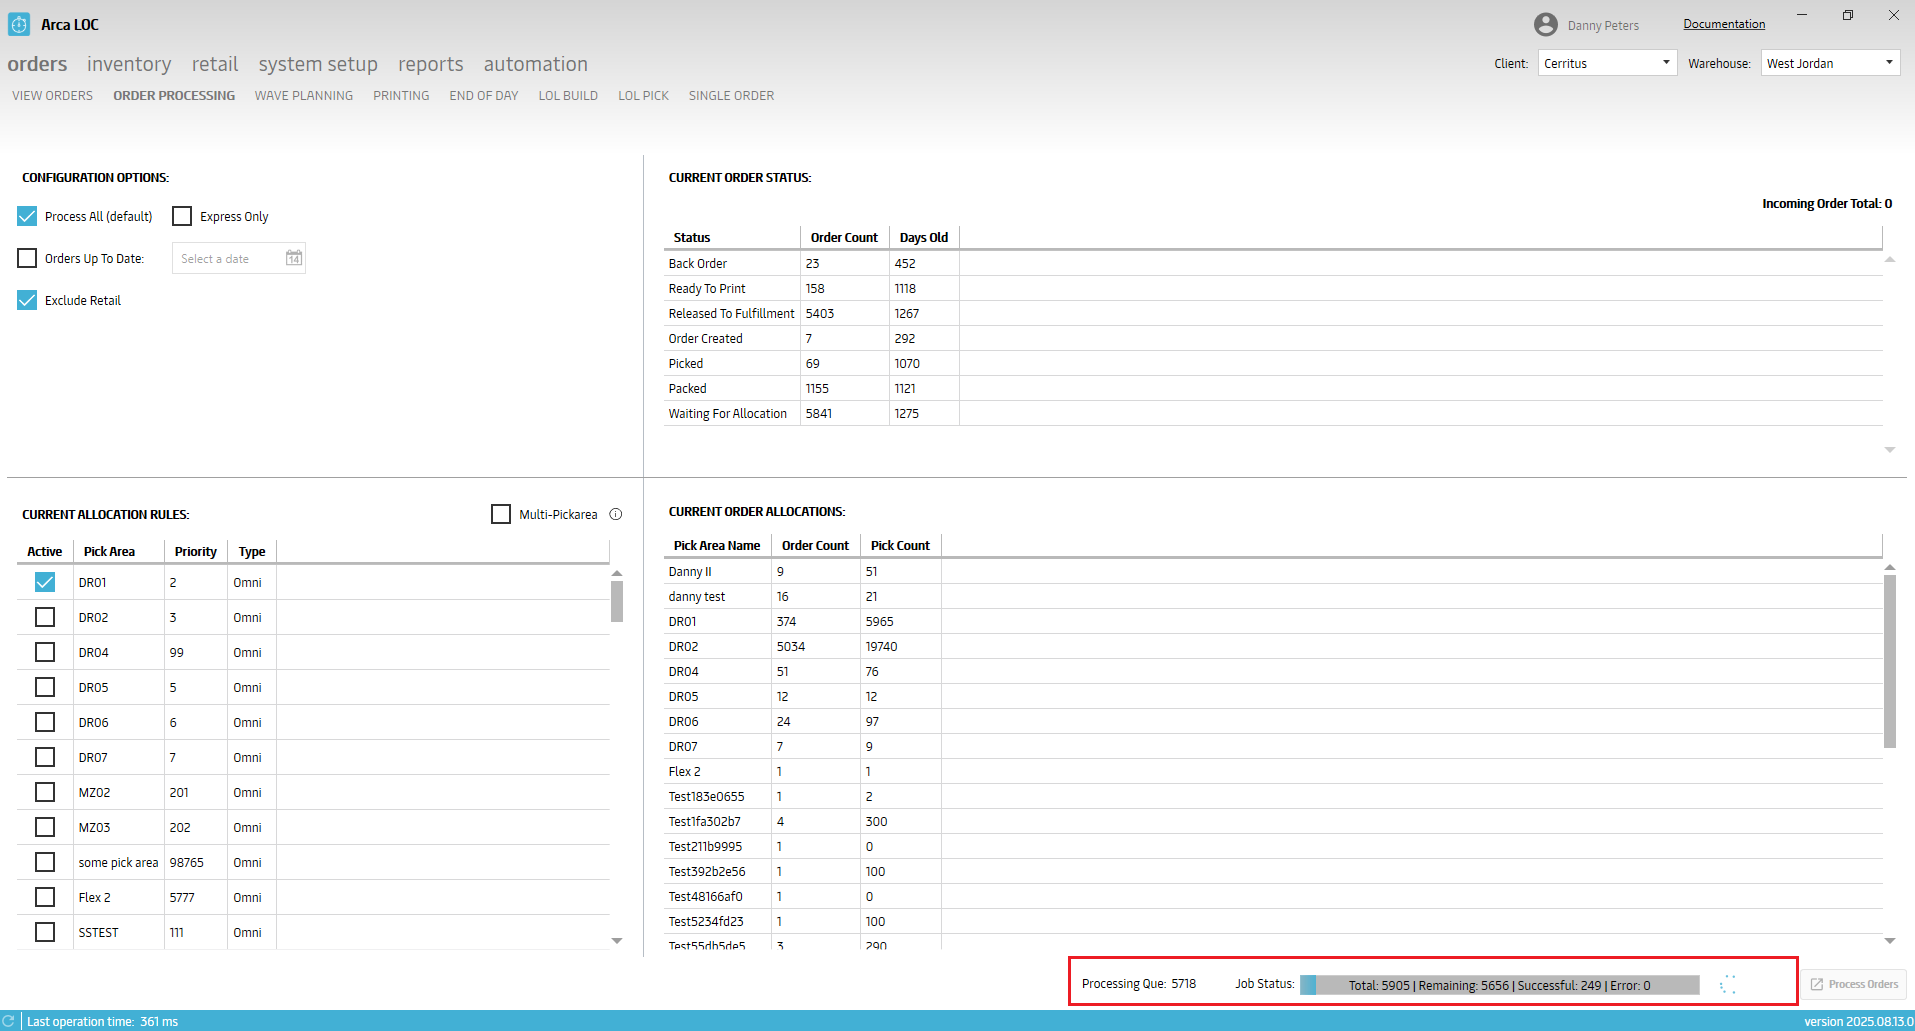
Incoming Order Total
This is an active total for any orders that are currently being imported into Arca.

API Calls
- OrdersGatherForProcessing
Wave Planning
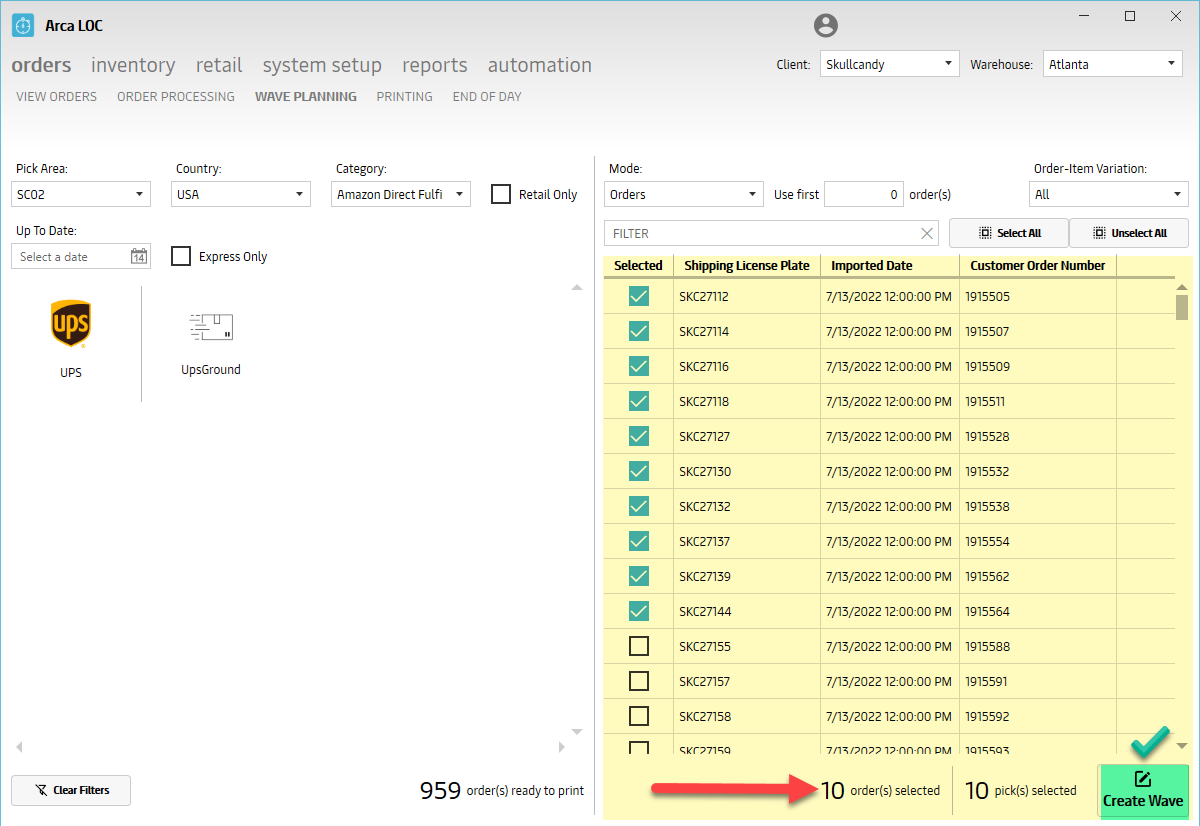
The "Wave Planning" portion of ARCA LOC is designed to create customized waves for order allocation.
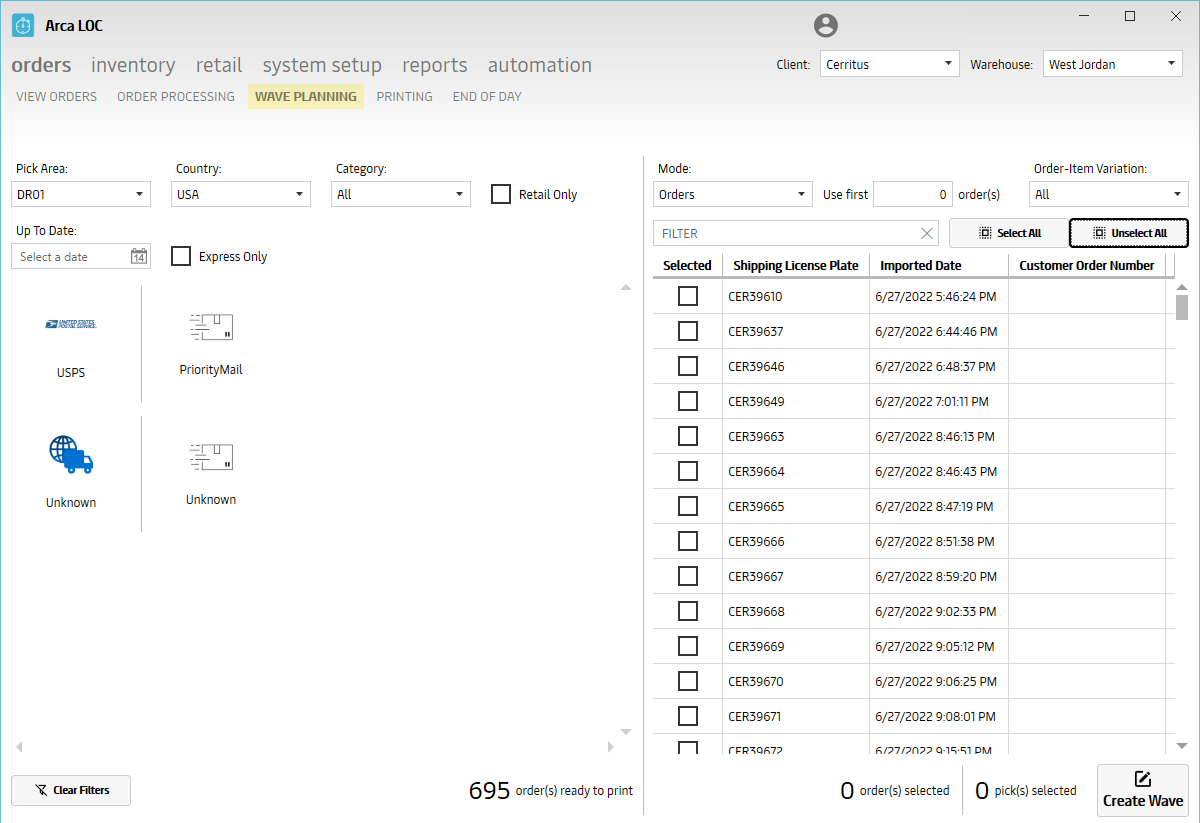
Pull Orders
To find orders to allocate to a wave, you are given the following options:
- Pick Area - the pick areas assigned to the client.
- Country - the approved countries available to ship goods.
- Category - the routing guides created for the client, ie. Amazon, Best Buy, etc.
- Retail Only - the ability to toggle Retail ON/OFF; brick and mortar stores only.
- Filter by Date - the ability to filter for order import date stamps.
- Express Only - the ability to filter for "Express" mode of delivery orders only.
- Ship Method - the respective ship methods assigned to the listed orders.

Continue on to further detail your wave criteria:
Mode - choice of Configuration, Items or Orders.
- Configuration - bundles setup for a predetermined set of items
- Items - to allocate wave per item
- Orders - to allocate by timestamp
Use first # of orders - the ability to limit the size of the wave, by giving a threshold.
Order Item Variation - the option to choose an Order-Item combination (ie. 1x1, 1x2, etc (1 item x 1 qty, 1 item x 2 qty). Single line orders with differing quantities.
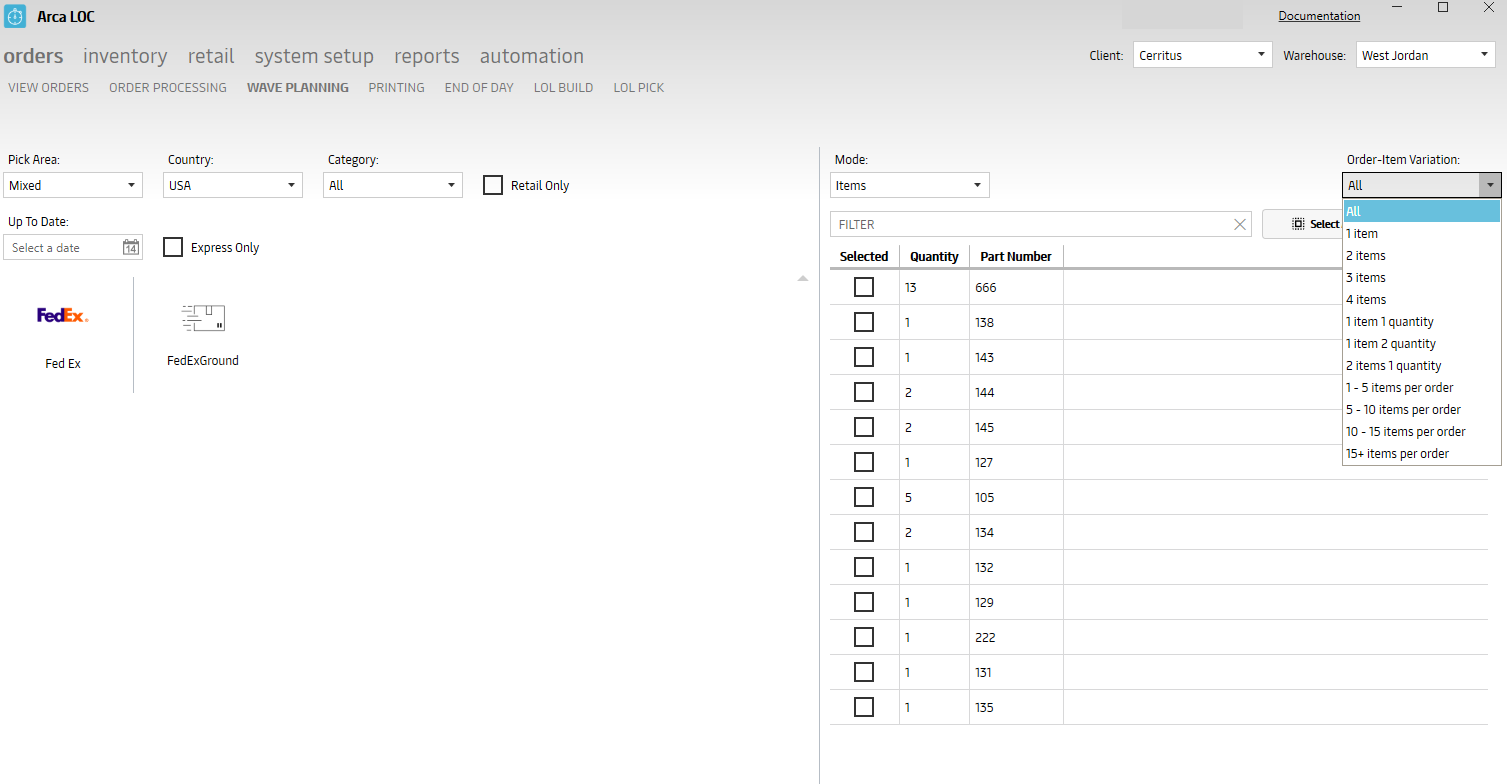
- Filter - an open filter to choose a certain shipping license plate or customer order number.
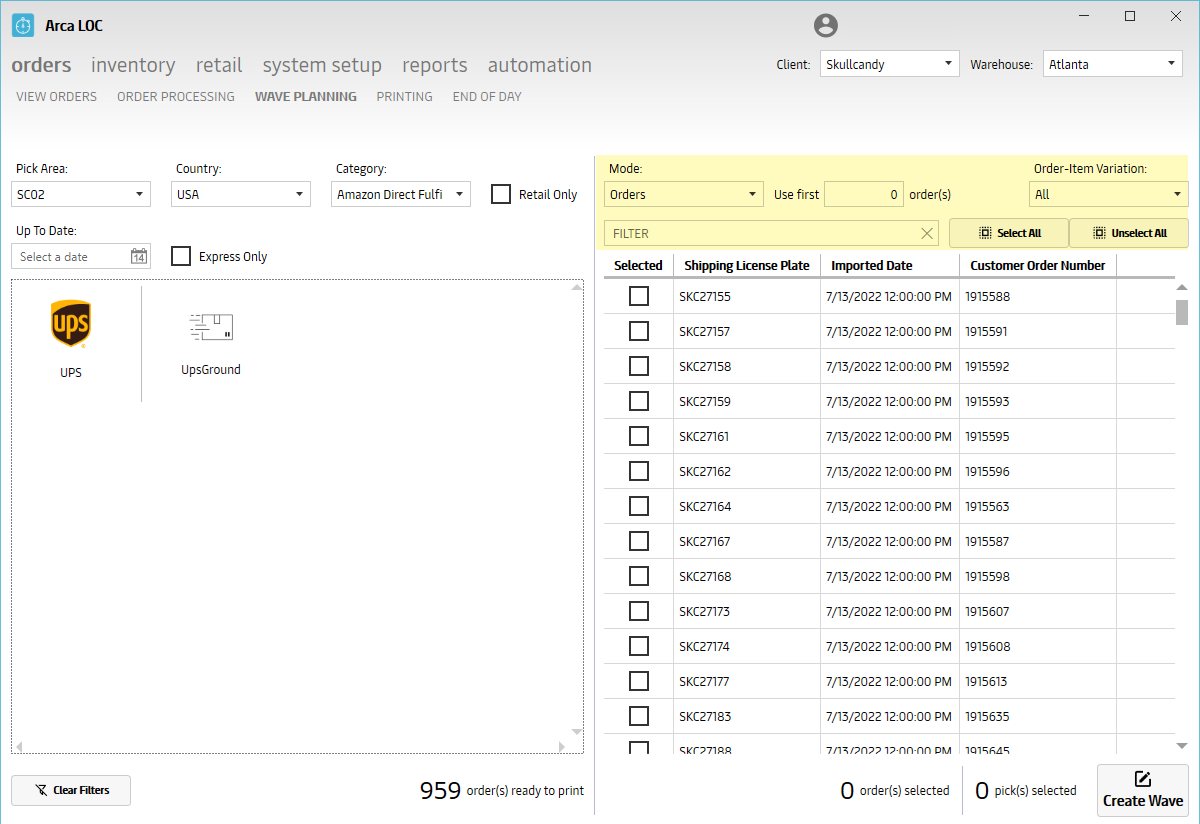
Create Wave
Once you have your criteria set, select your orders and "Create Wave".
Note
You can see the number of orders selected to allocate next to the action button.
Printing
The "Printing" portion of ARCA LOC is designed to print customer sales order packing slips.
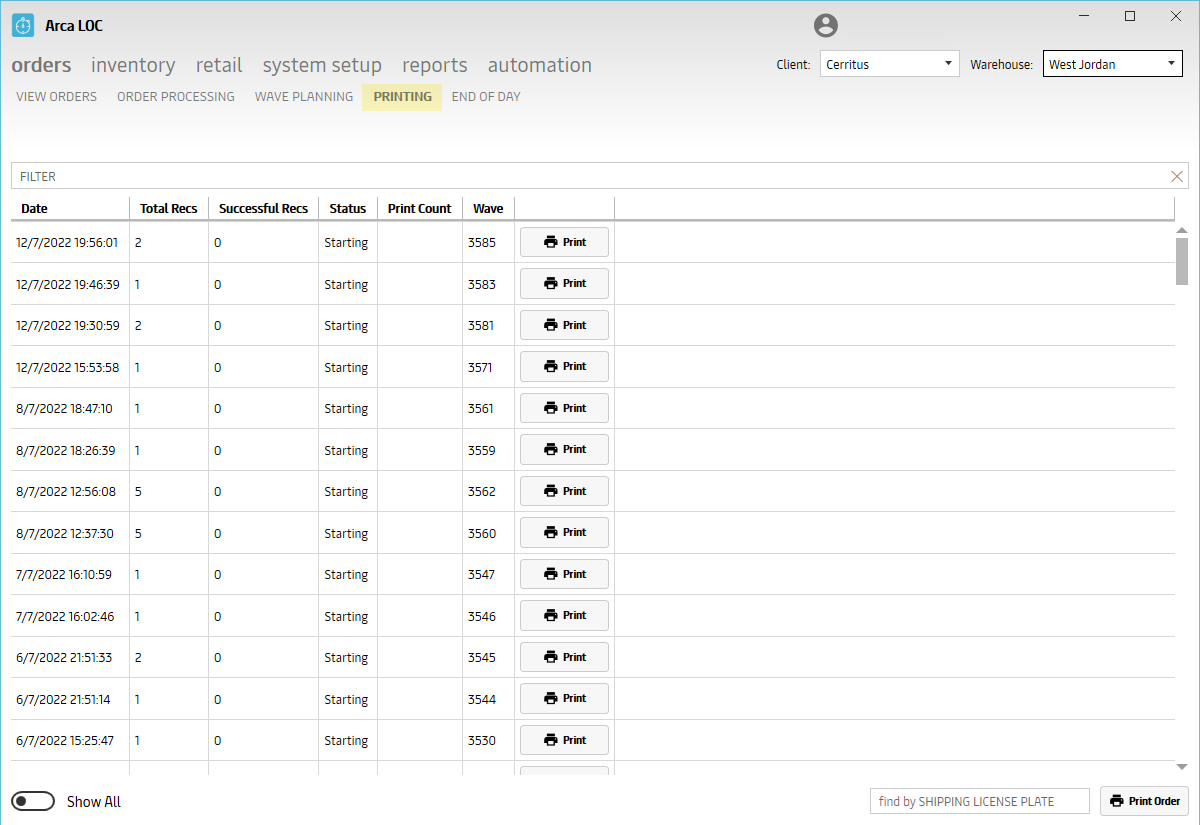
Select by Wave Number
To pull orders associated to a wave, you can filter and search using the following options:
- Date - the date stamp of the wave creation date.
- Status - the status of the wave.
- Wave - the wave number.
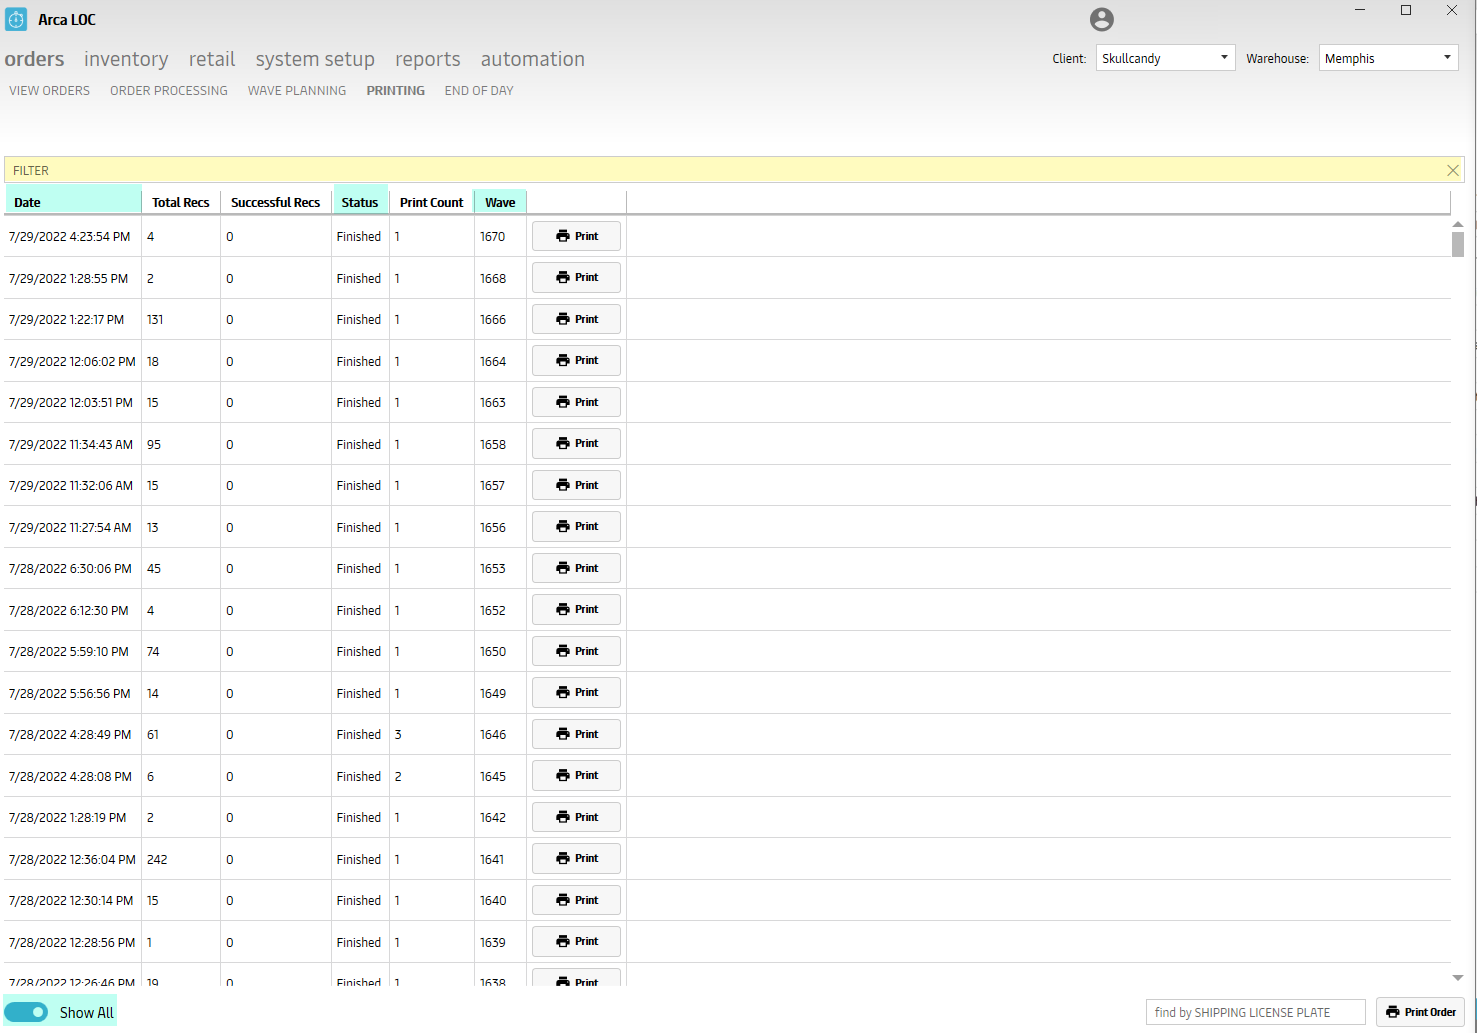
- Show All - toggle "Show All" ON/OFF to show or hide statuses, ie. Starting or Finished.
Select by License Plate Number
To pull an order based on the license plate, you can directly pull that information:
- Find by Shipping License Plate - the license plate (Maersk Order Number) associated to your order.
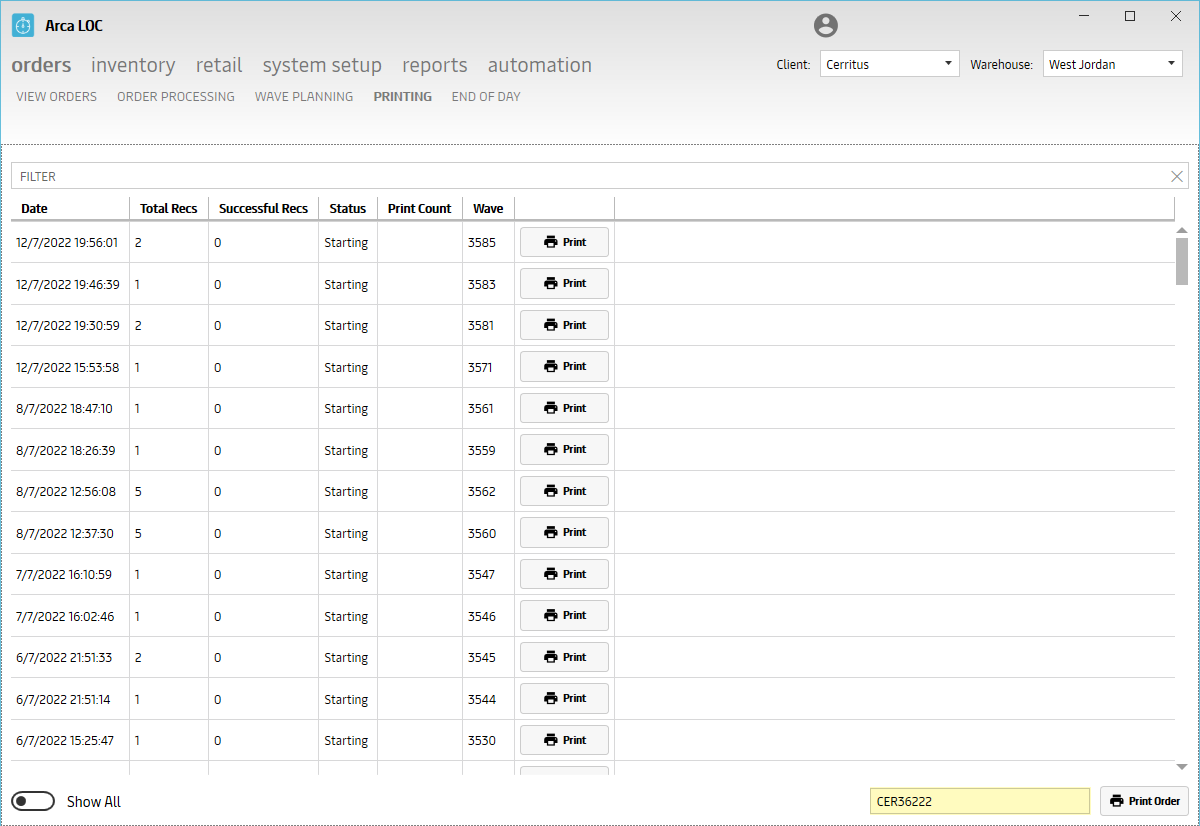
To print orders, either choose by wave(s) or license plate and click "PRINT":
- A print preview will pull up, with options to go BACK or PRINT.
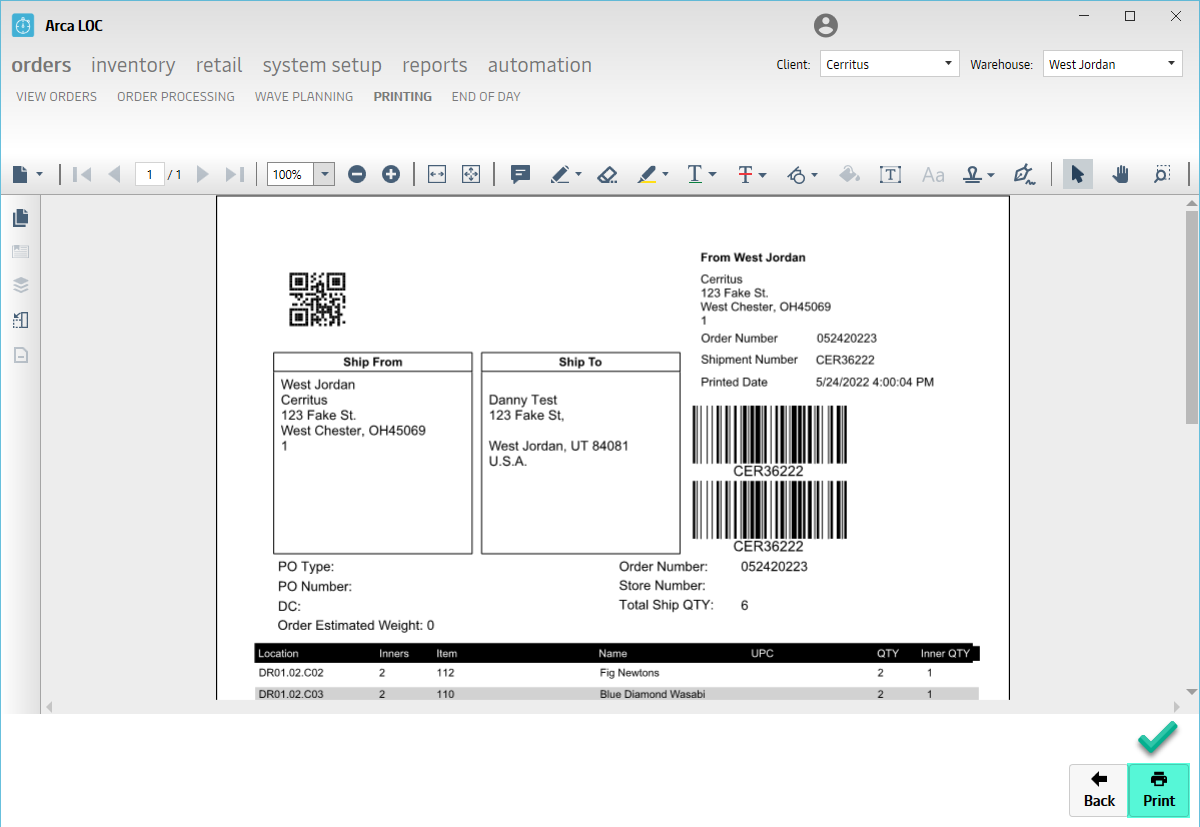
Packslip
Here is an example of a generic packslip. These can be customized per client.
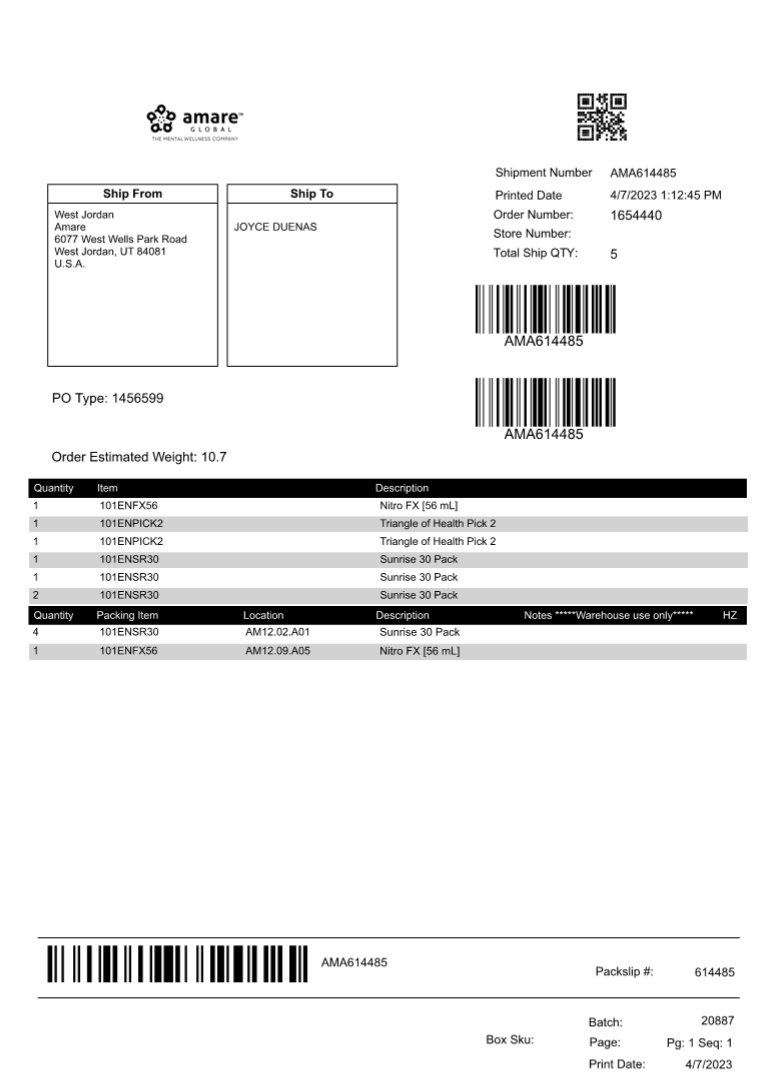
Note
If an order includes anything related to Prop 65 or Hazmats, this will be included on the packslip. Prop 65 is intended to provide California residents with information about compounds in the environment around them that might be harmful (i.e. have been linked to cancer, reproductive harm, or developmental defects). A sticker will need placed on the shipping carton.
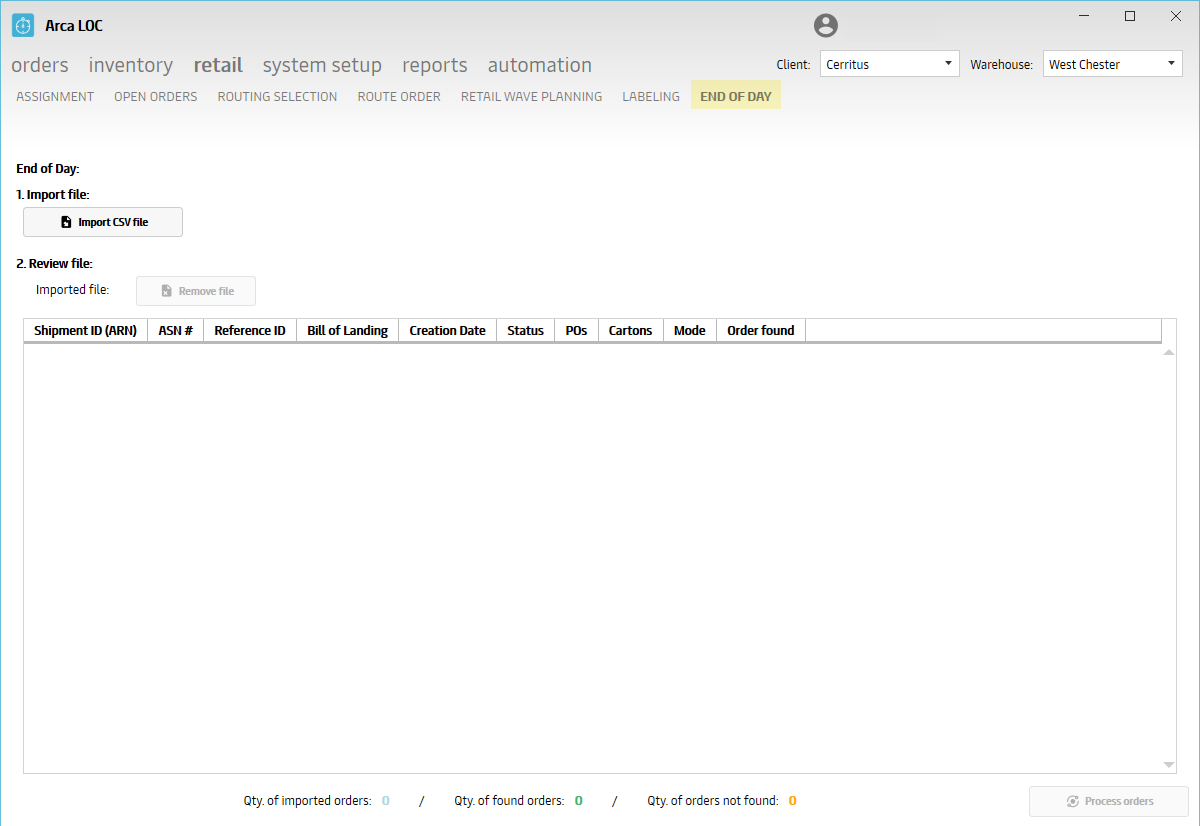
End of Day
The "End of Day" portion of ARCA LOC is designed to provide an overview of the order shipment summary, with manual .csv file upload. As a part of closing out the order, the system will save pick records and deduct quantity from inventory. This is important to know if you're closing out an order that is in a status of 'Released to Fulfillment' or something that is only partially picked. This can be due to the orders shipped outside of the normal process but to keep the normal flow of shipping consistent, it needs to be closed out here in End of Day to complete the normal flow.
By using the template, you can:
- Save a blank copy and populate fields.
- Upload .csv file back into LOC. "View your data on-screen."
- Edit and reload file, as needed.
- Save data and Finish upload.
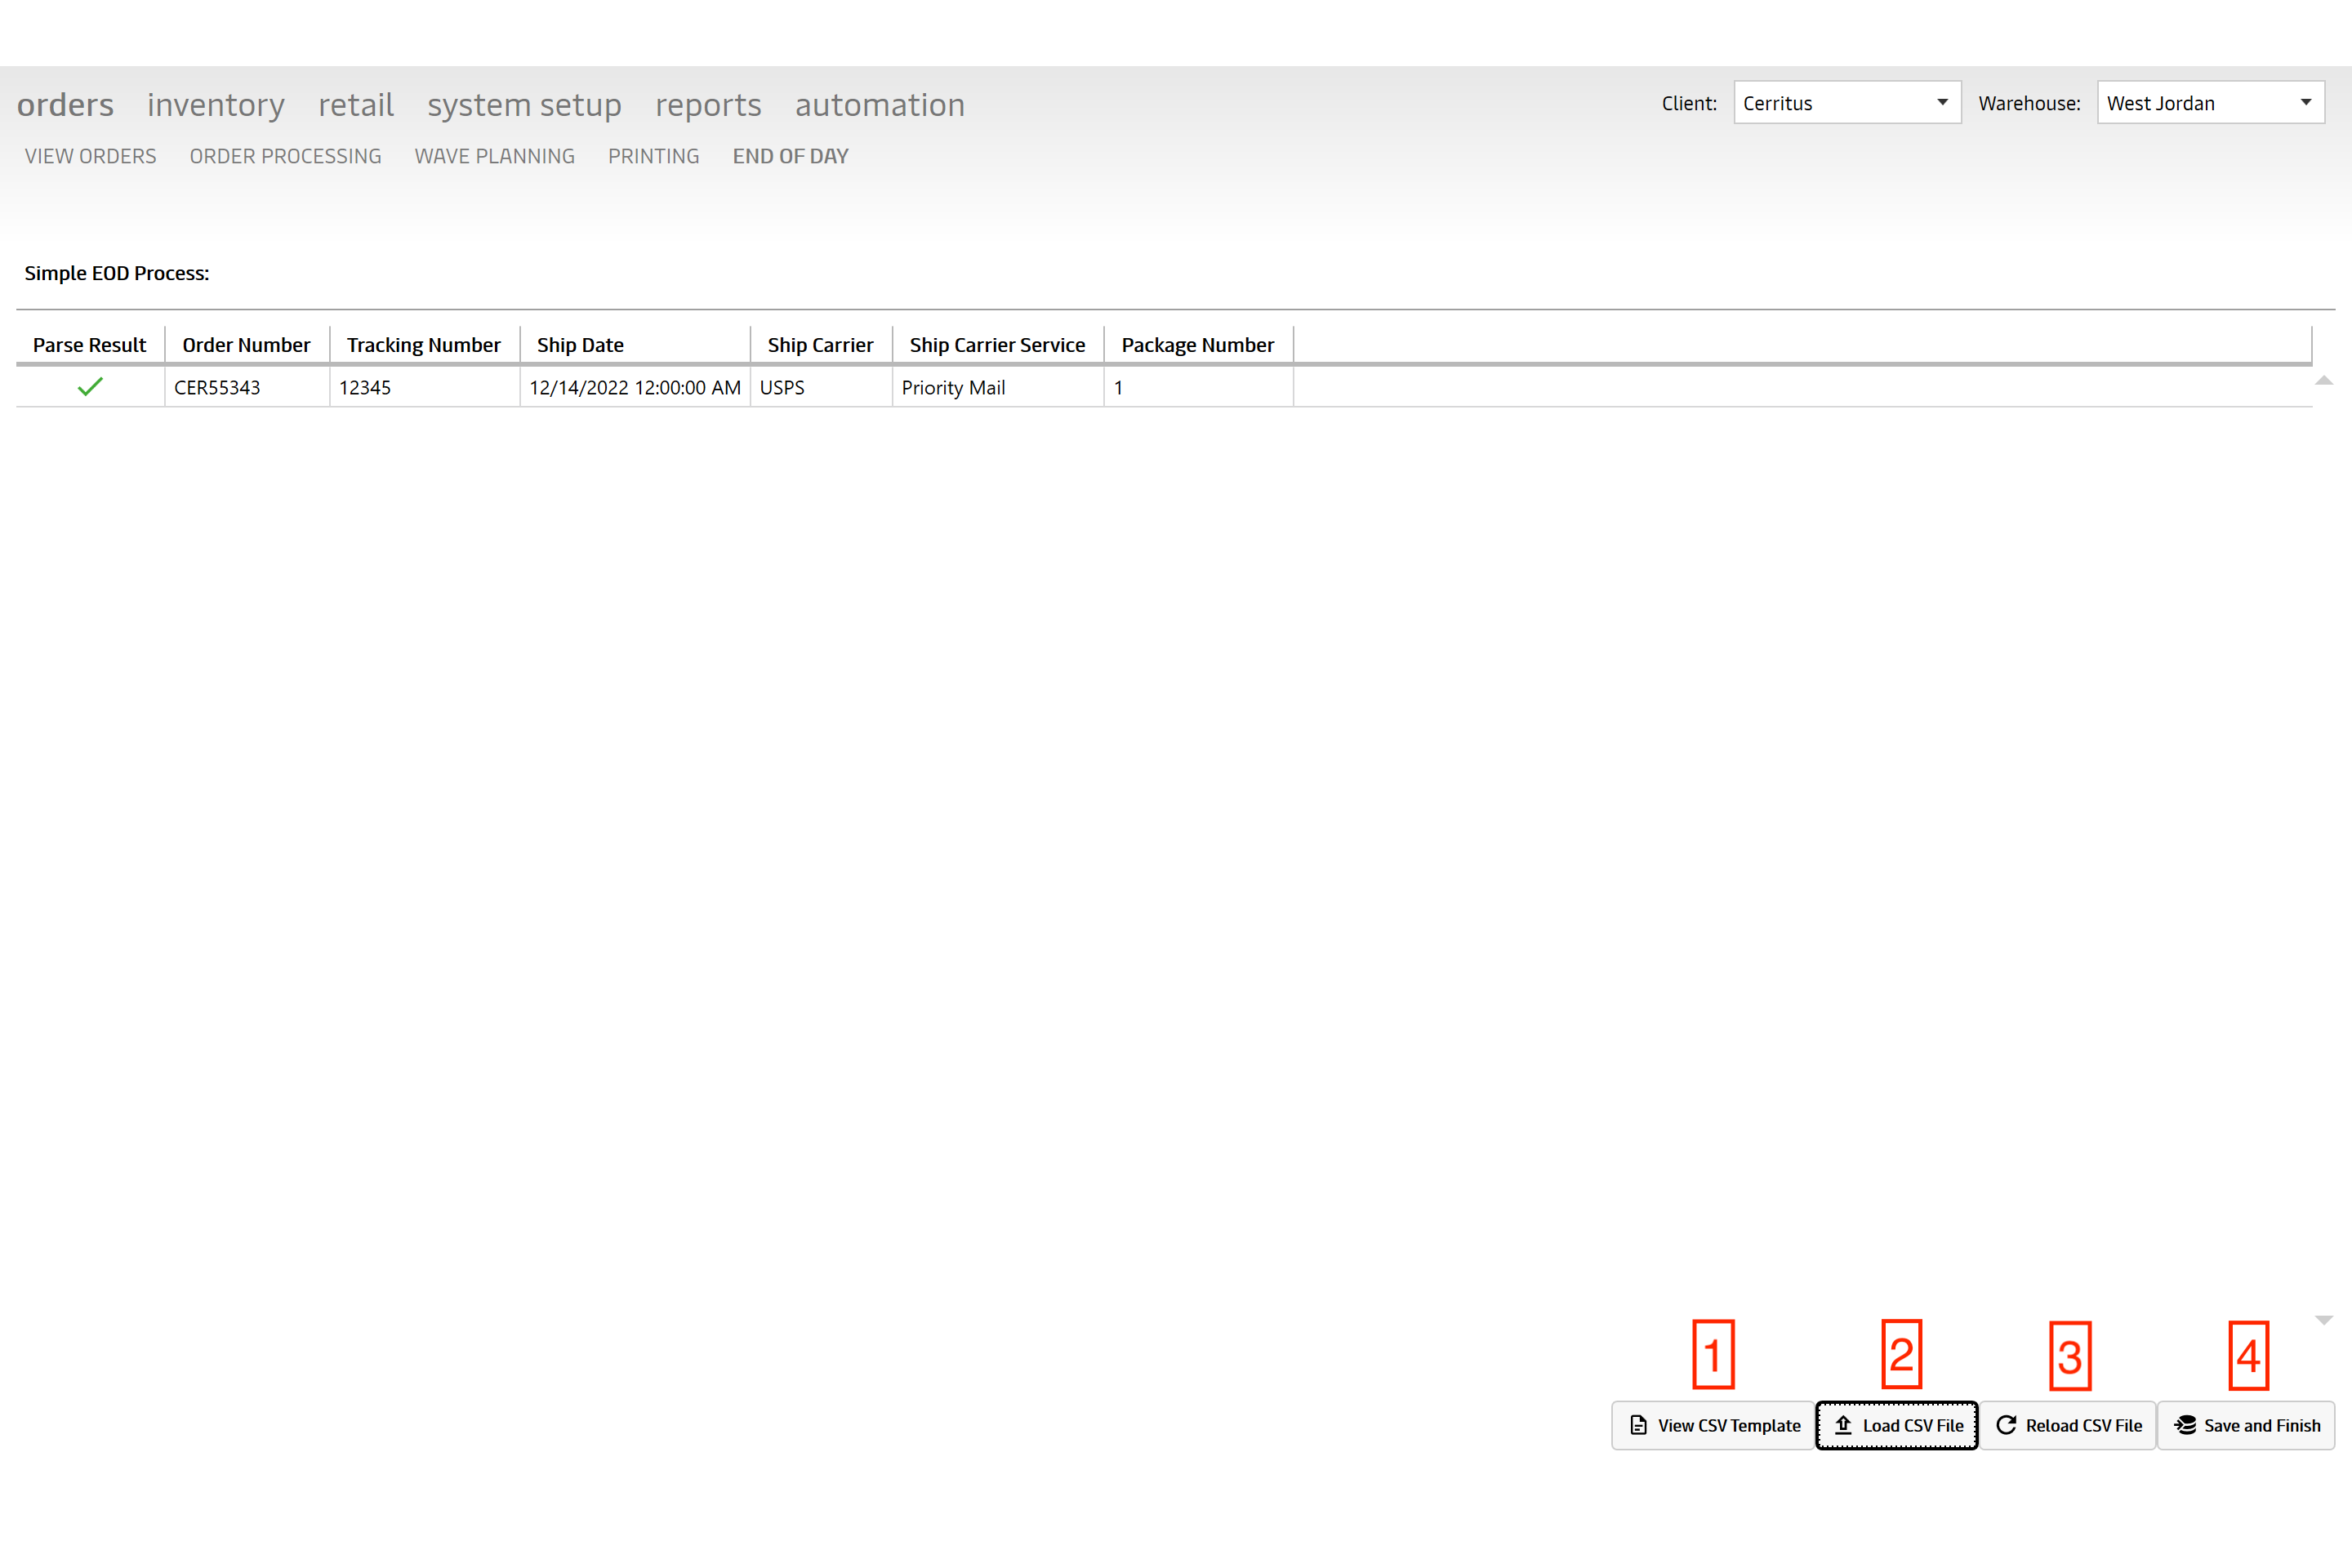
Note
"Parse Result" will display carrier mappings to give you the values.
LOL Build
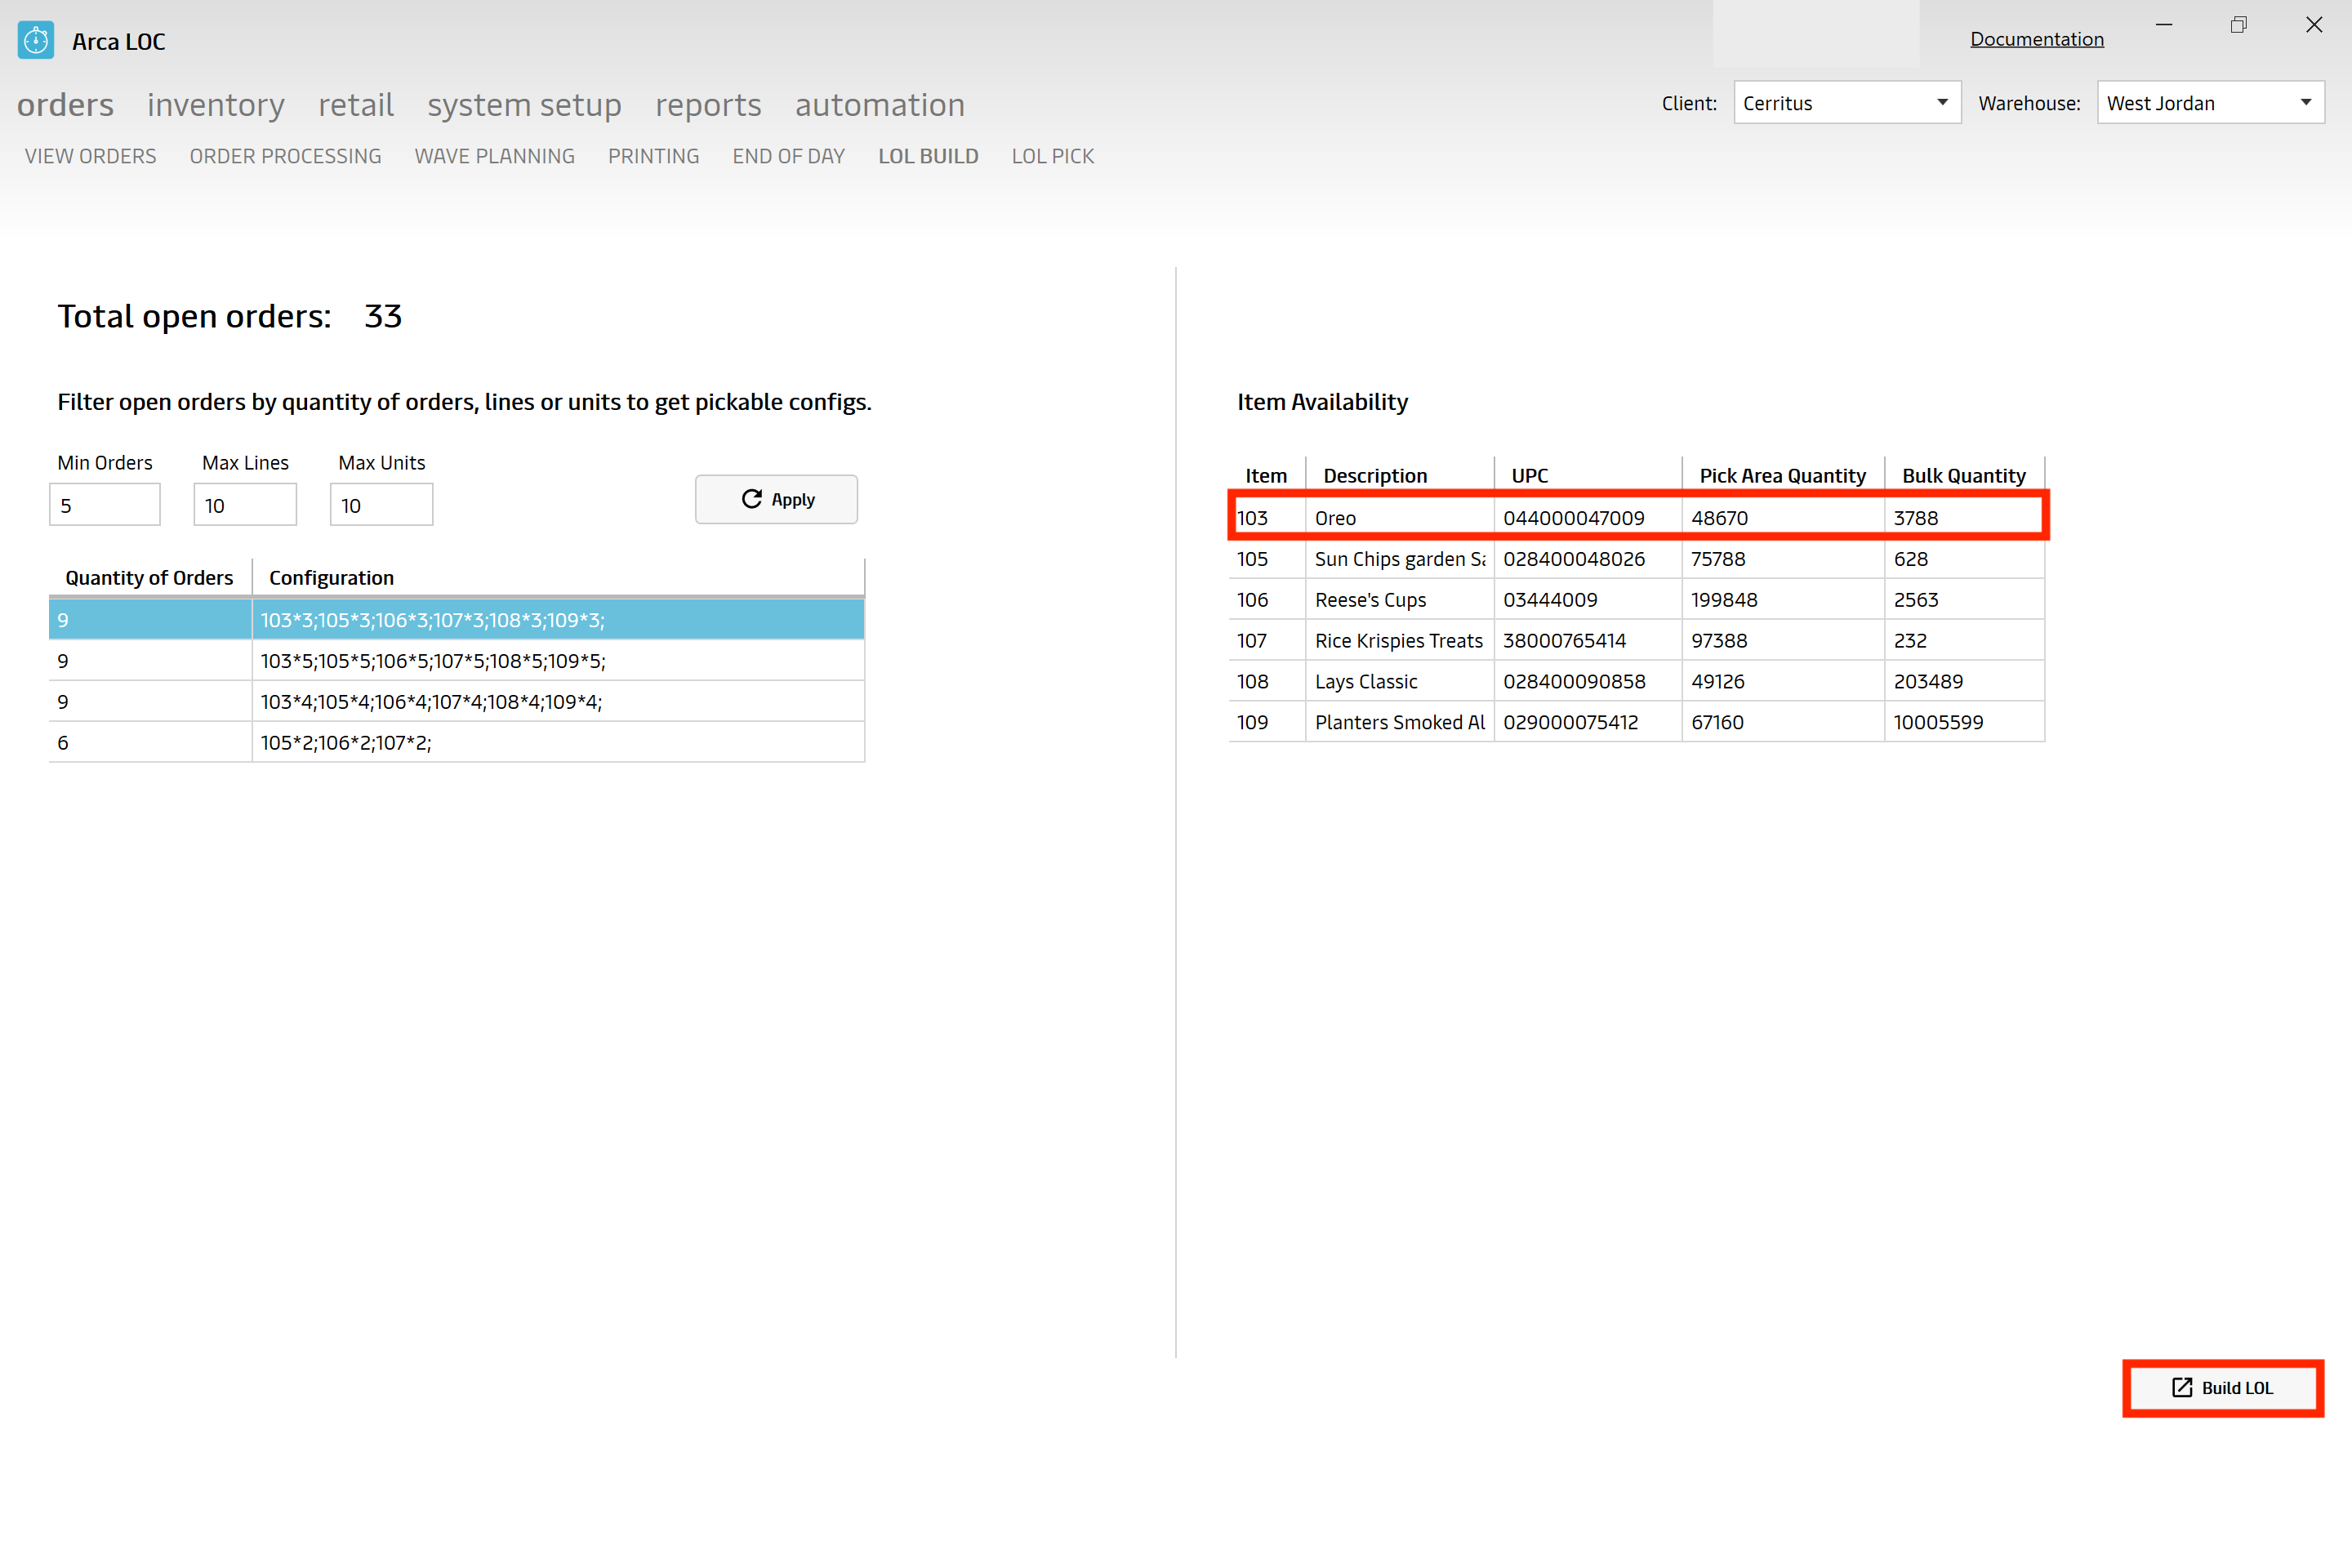
On the build screen you will select a group of orders by item configuration in the grid on the left.
It will display the item information for the selected group in the grid on the right. The right grid will show the total quantity of the item in all pick areas (Pick Area Quantity) and the total quantity of the item being stored on any pallets (Bulk Quantity). You can filter the left grid by Min Orders; how many orders are in the group, Max Lines; how many items are there per order, and Max Units; total item quantity on each order. These filters will determine what group of orders are shown in the grid. You will need to click on the Apply button to refresh the gid using your filters.
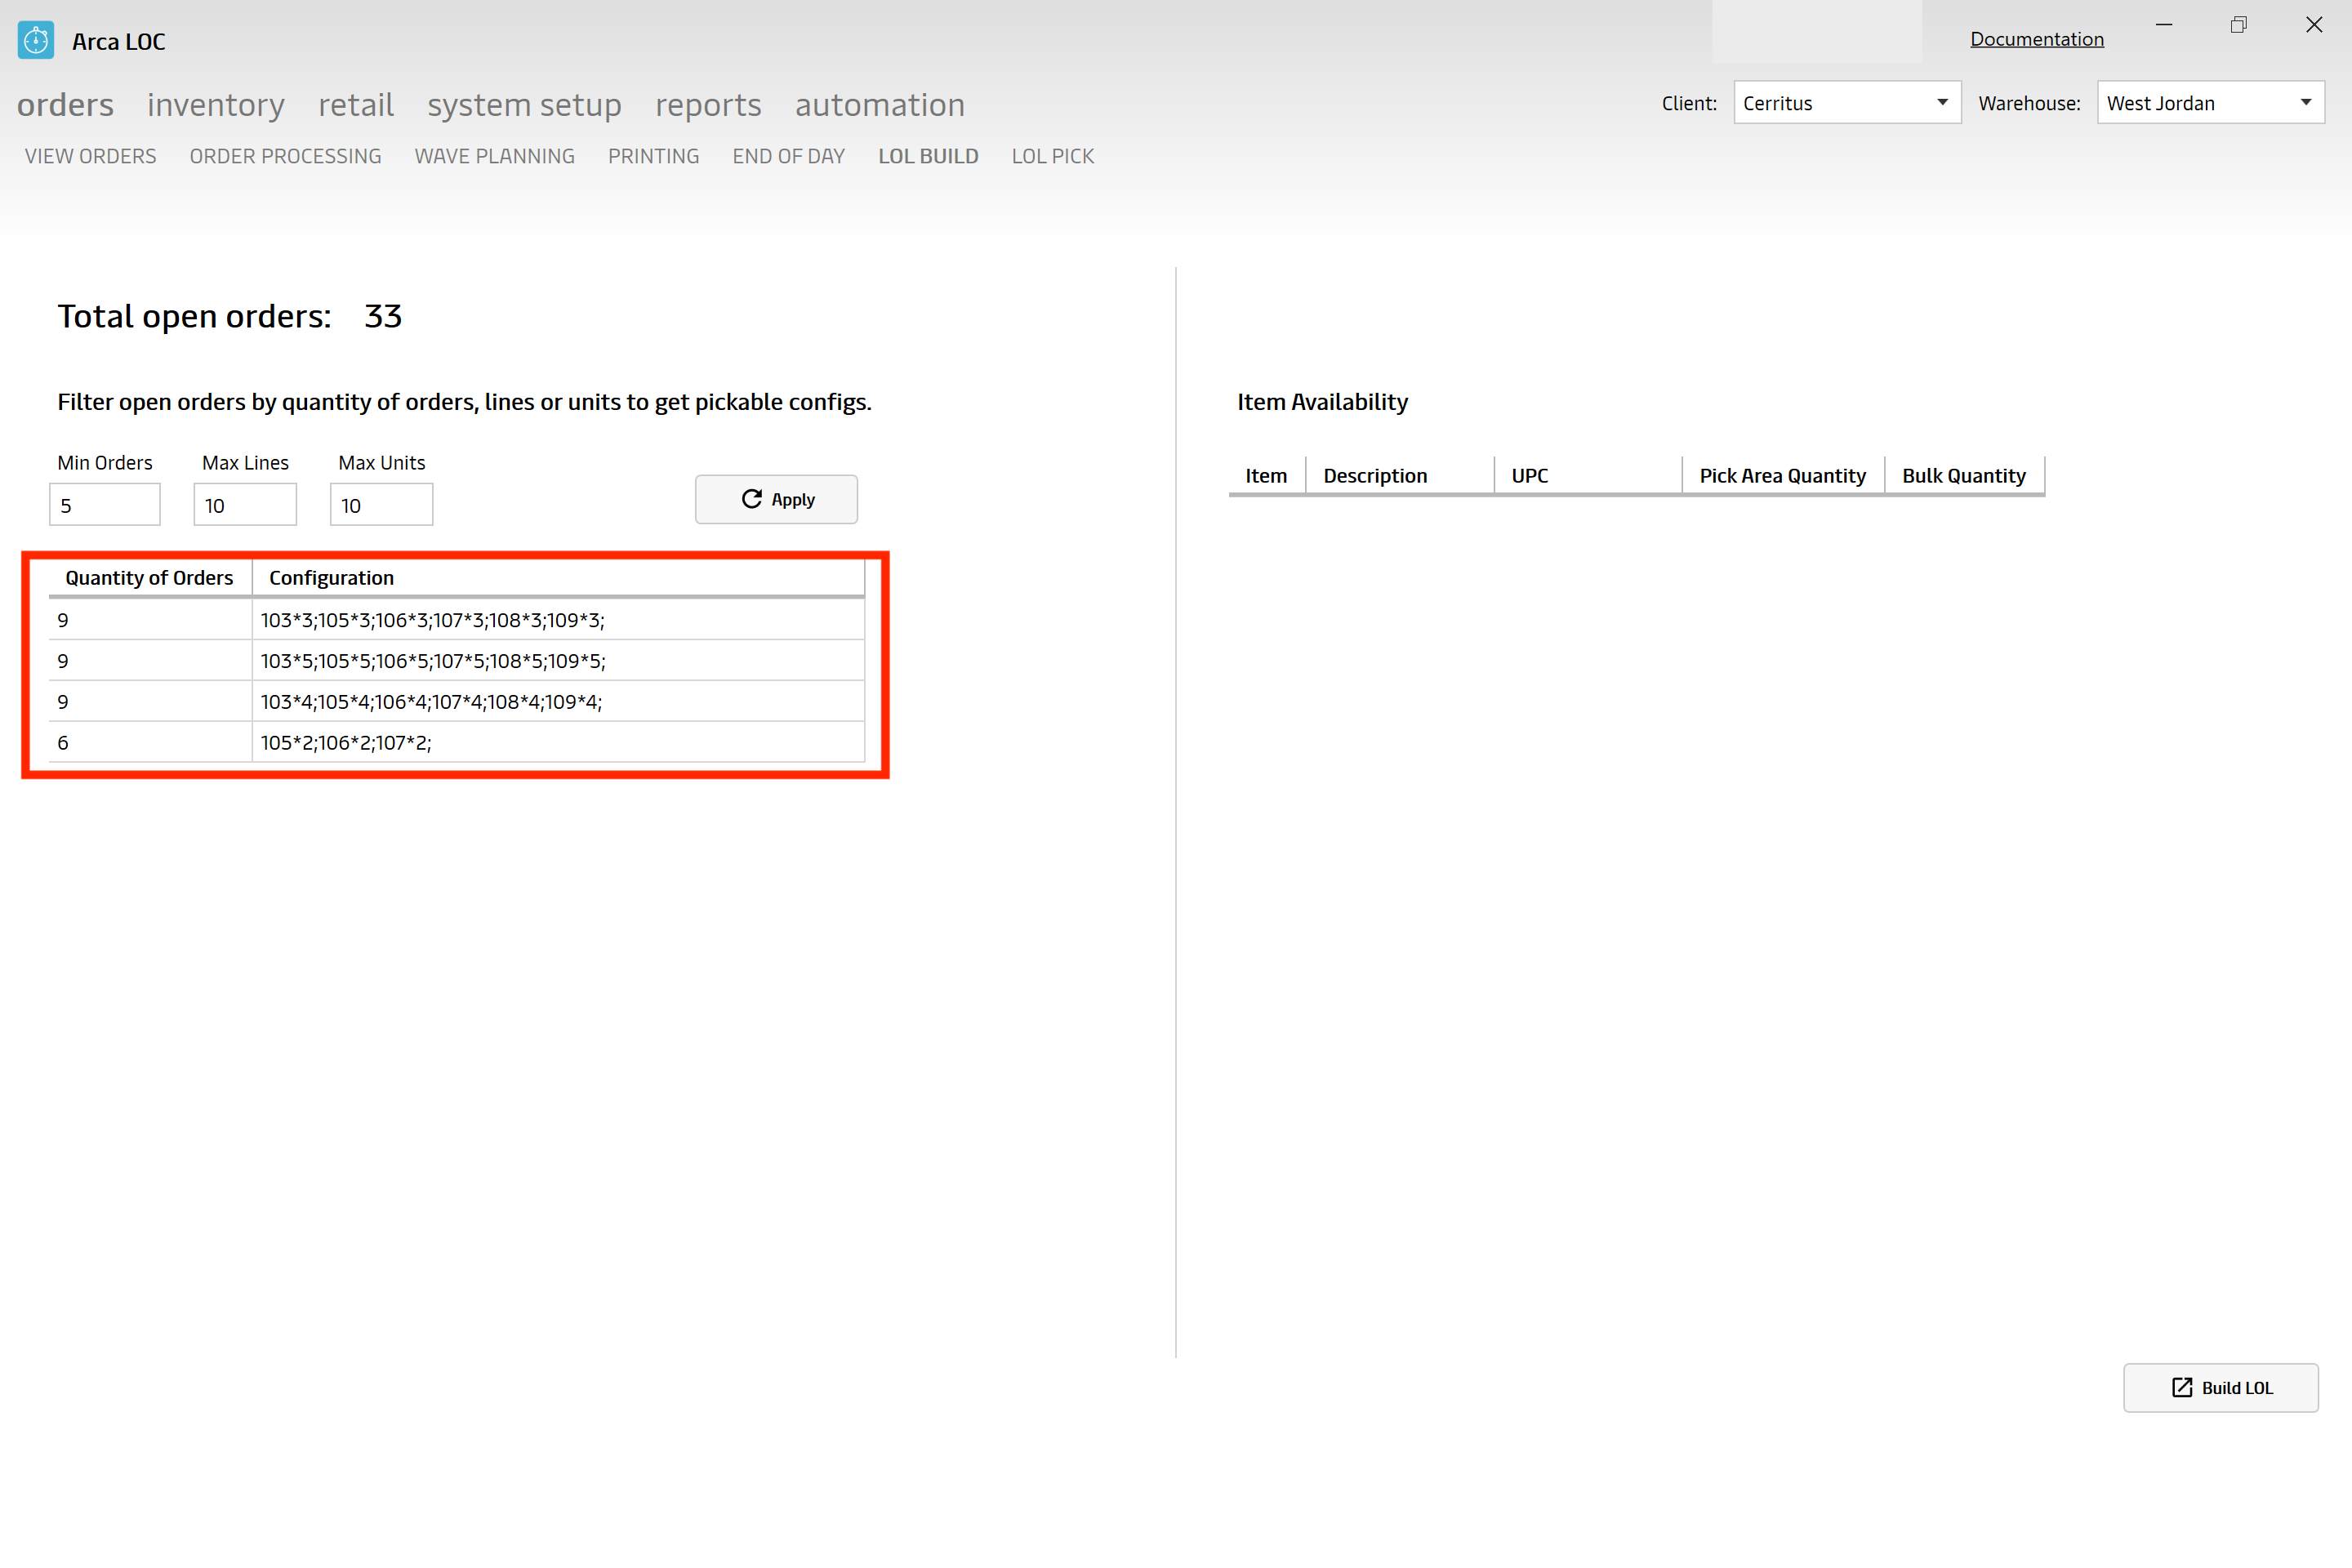

Select one of the groups that you want to build and click on Build LOL button in the bottom right of the screen.
The build action does a few things, first it will group the orders together and create a wave (batch) just like the wave planning screen. This will move all the orders statuses into the state of Released for Fulfillment so that they can be picked. Second it will create a new Pick area and Pick area details for all the items in the orders. You can view the pick area that was created on the Pick areas screen, it will be named LOLPickArea_Wave number. Example: LOLPickArea_5959. The pick area detail will be named LOL_Wave number_Item code. Example: LOL_5959_135. Once building the wave is complete it will show a message next to the Build LOL button that says, “Build created successfully” and your new wave will be shown on the next screen LOL Pick.
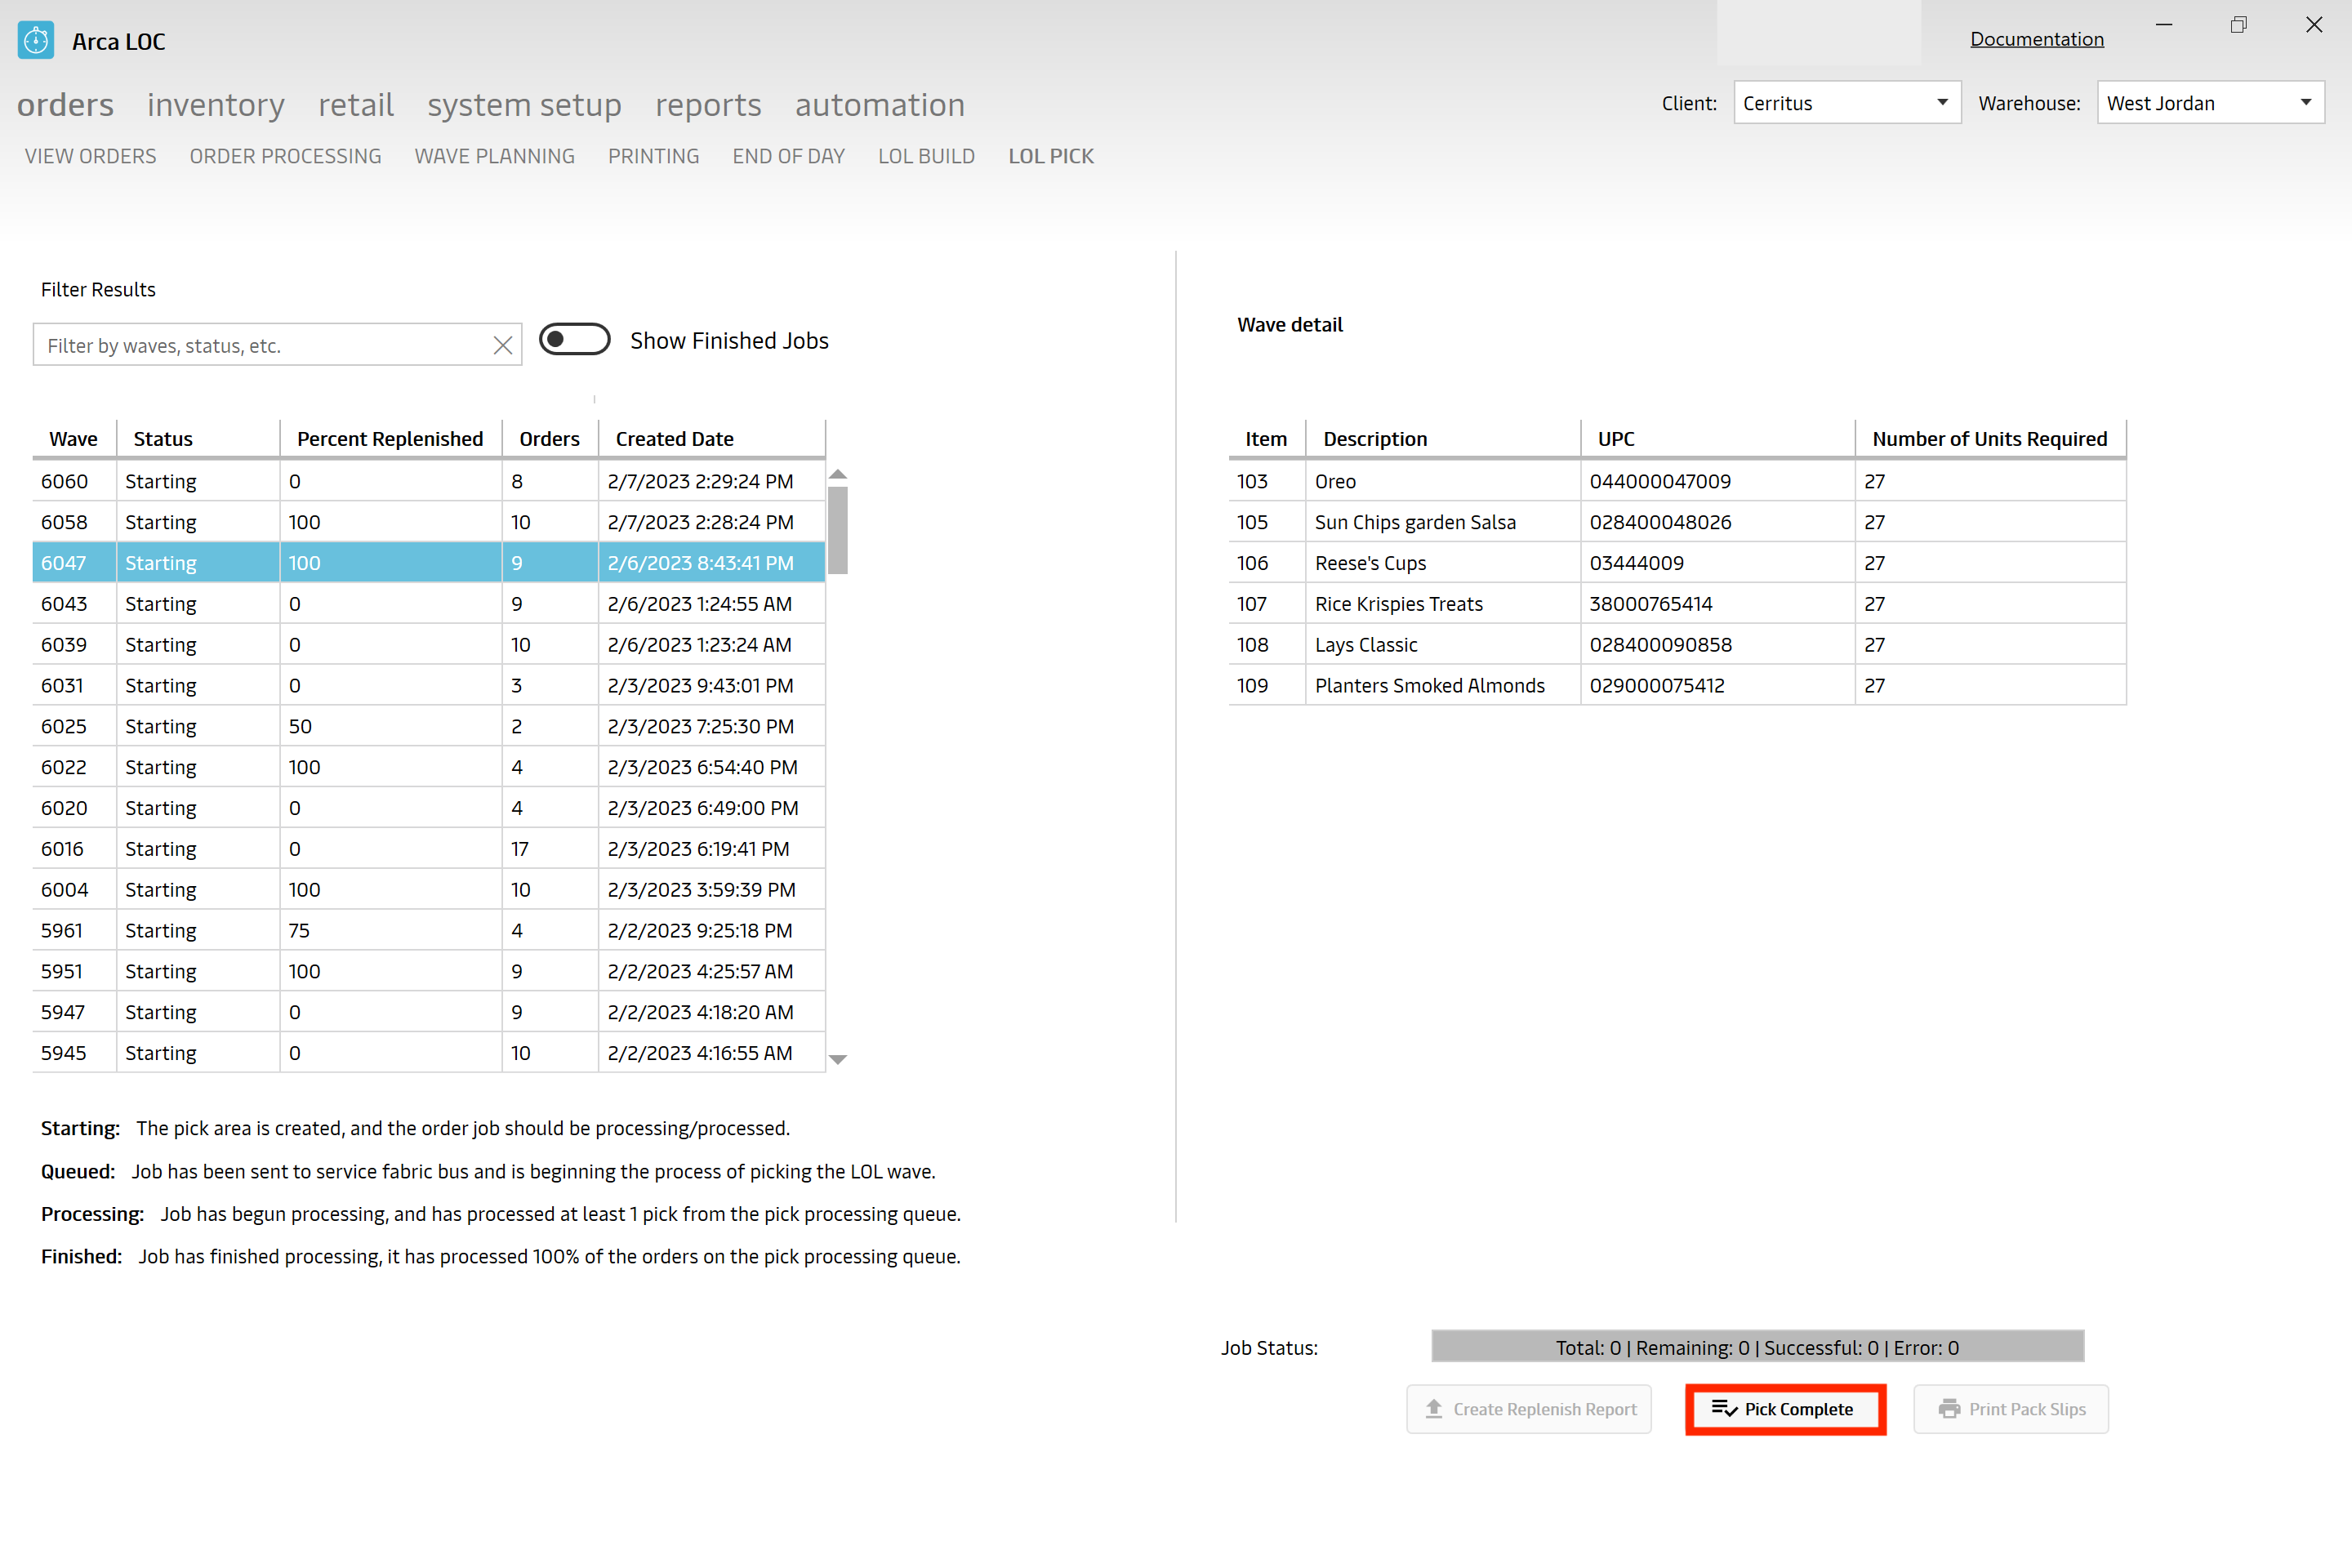
Your wave will be the first wave. Click on it. It will pull up your wave details to the right.
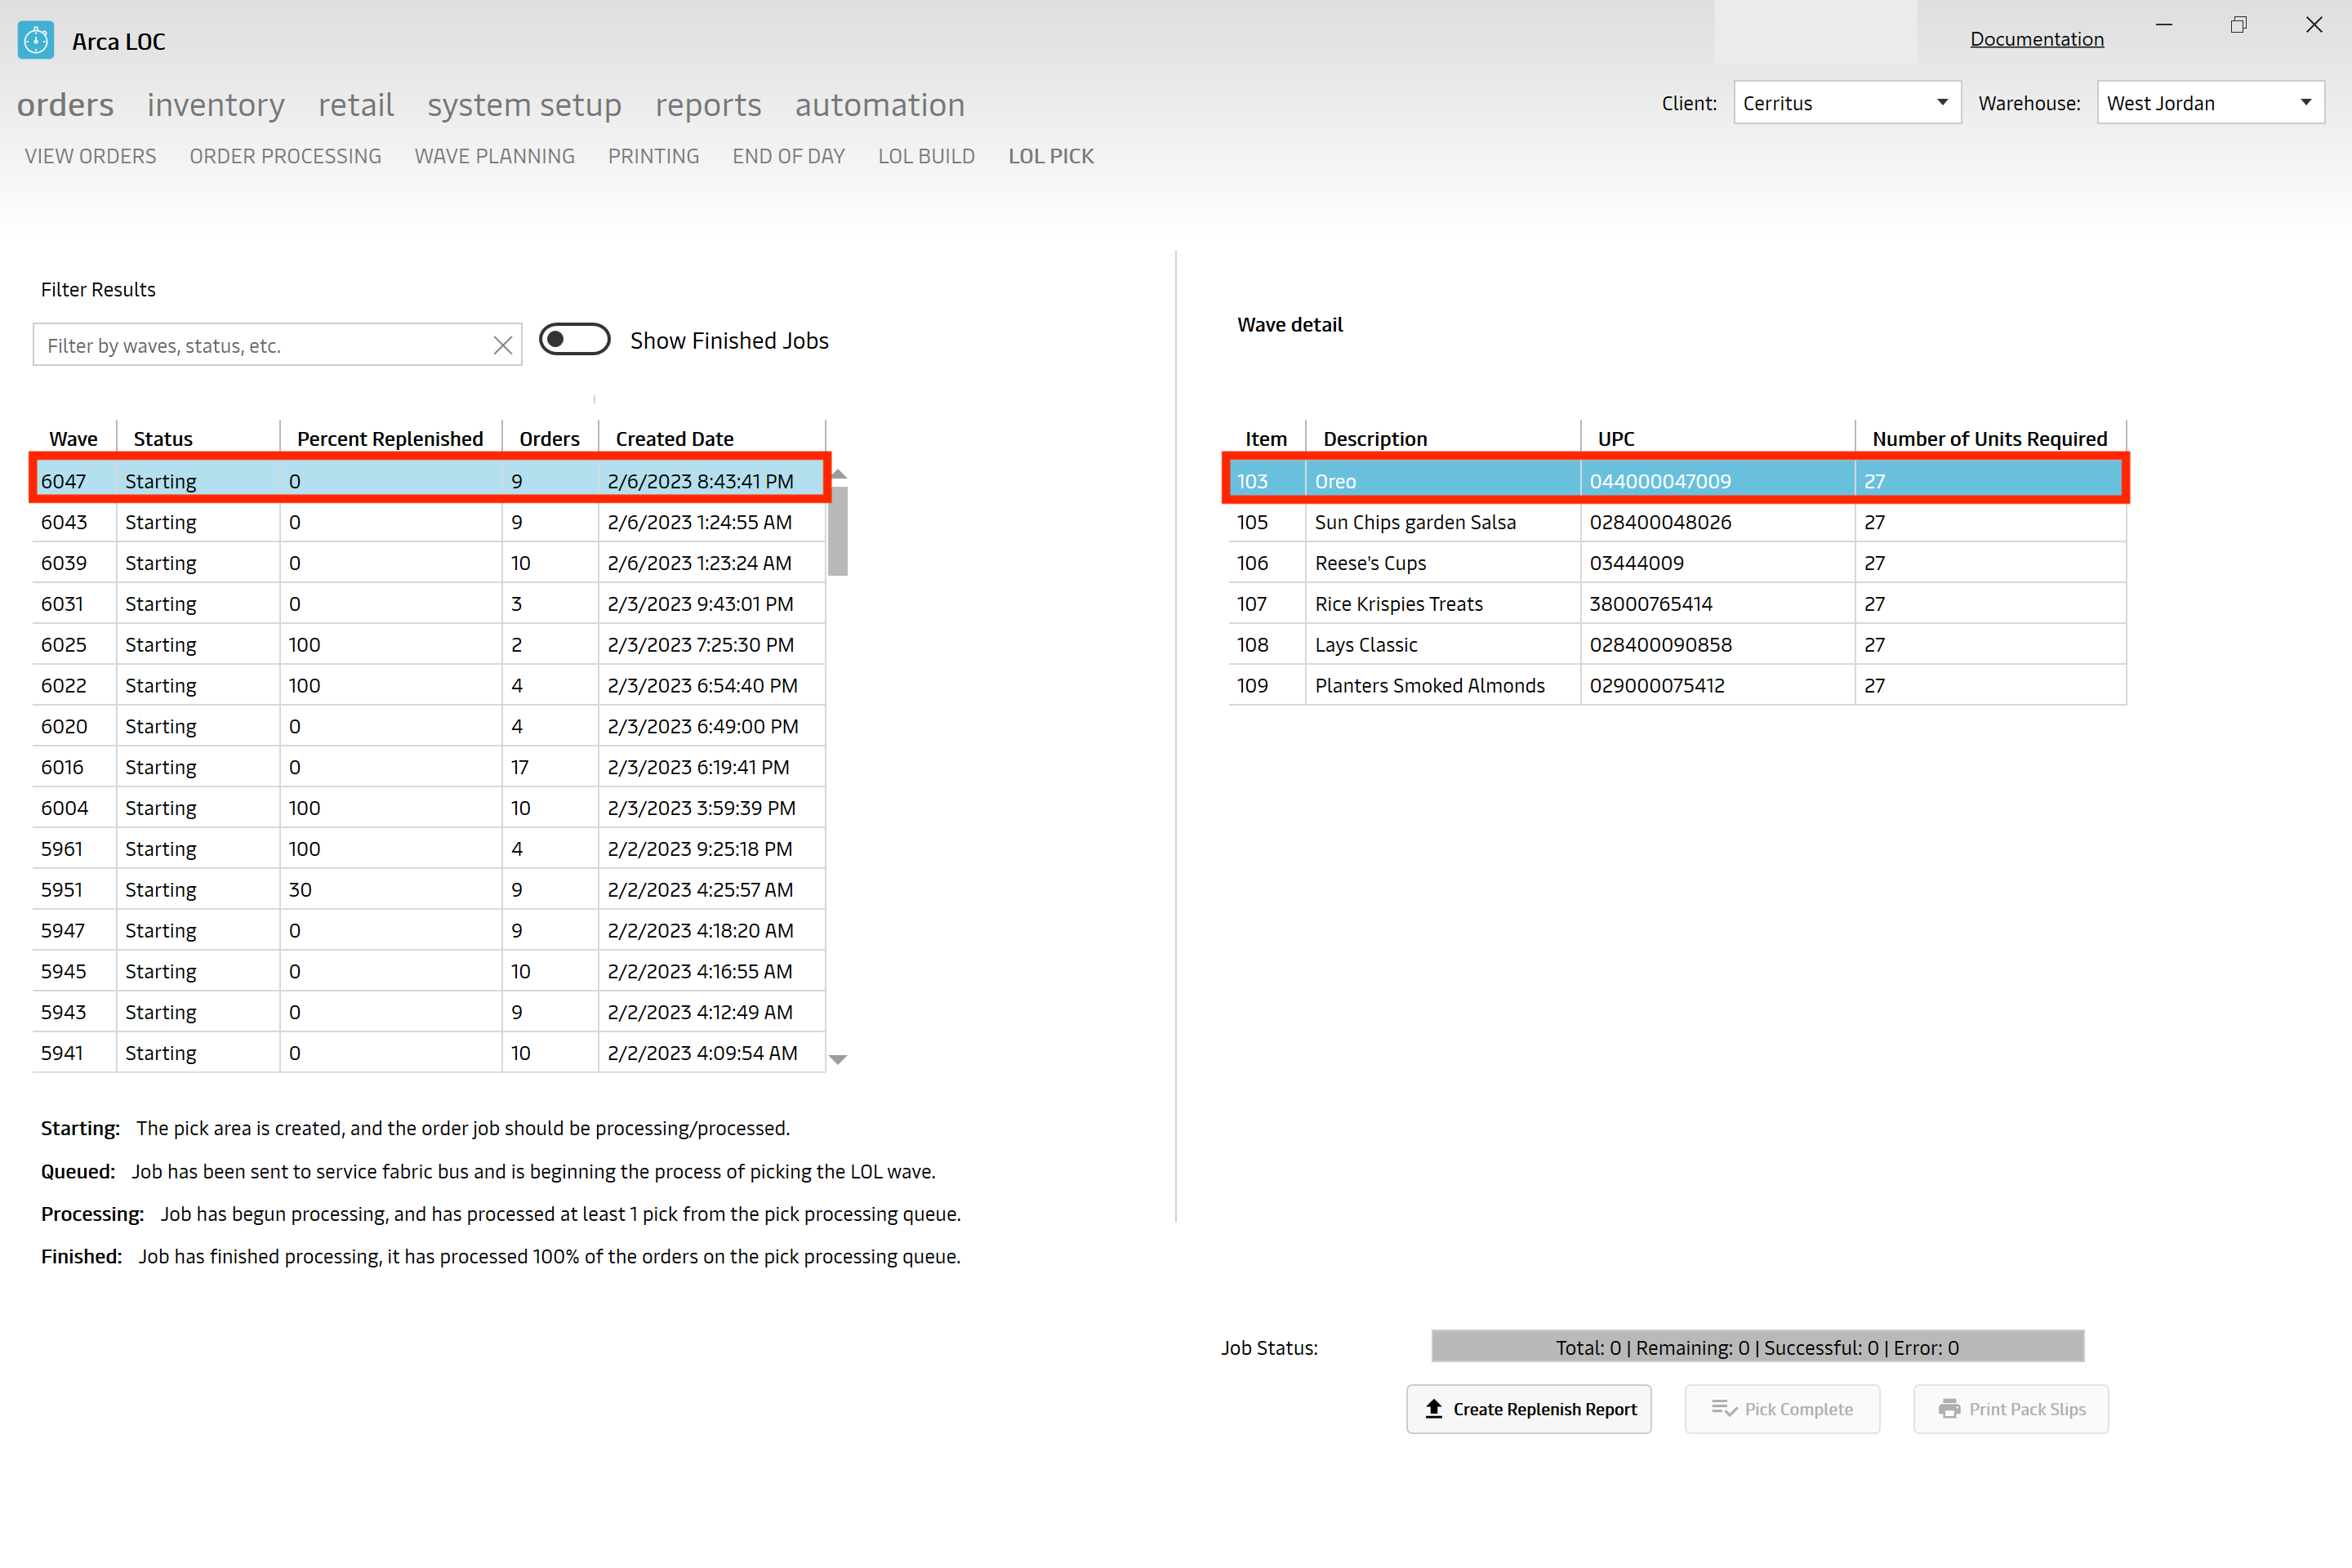
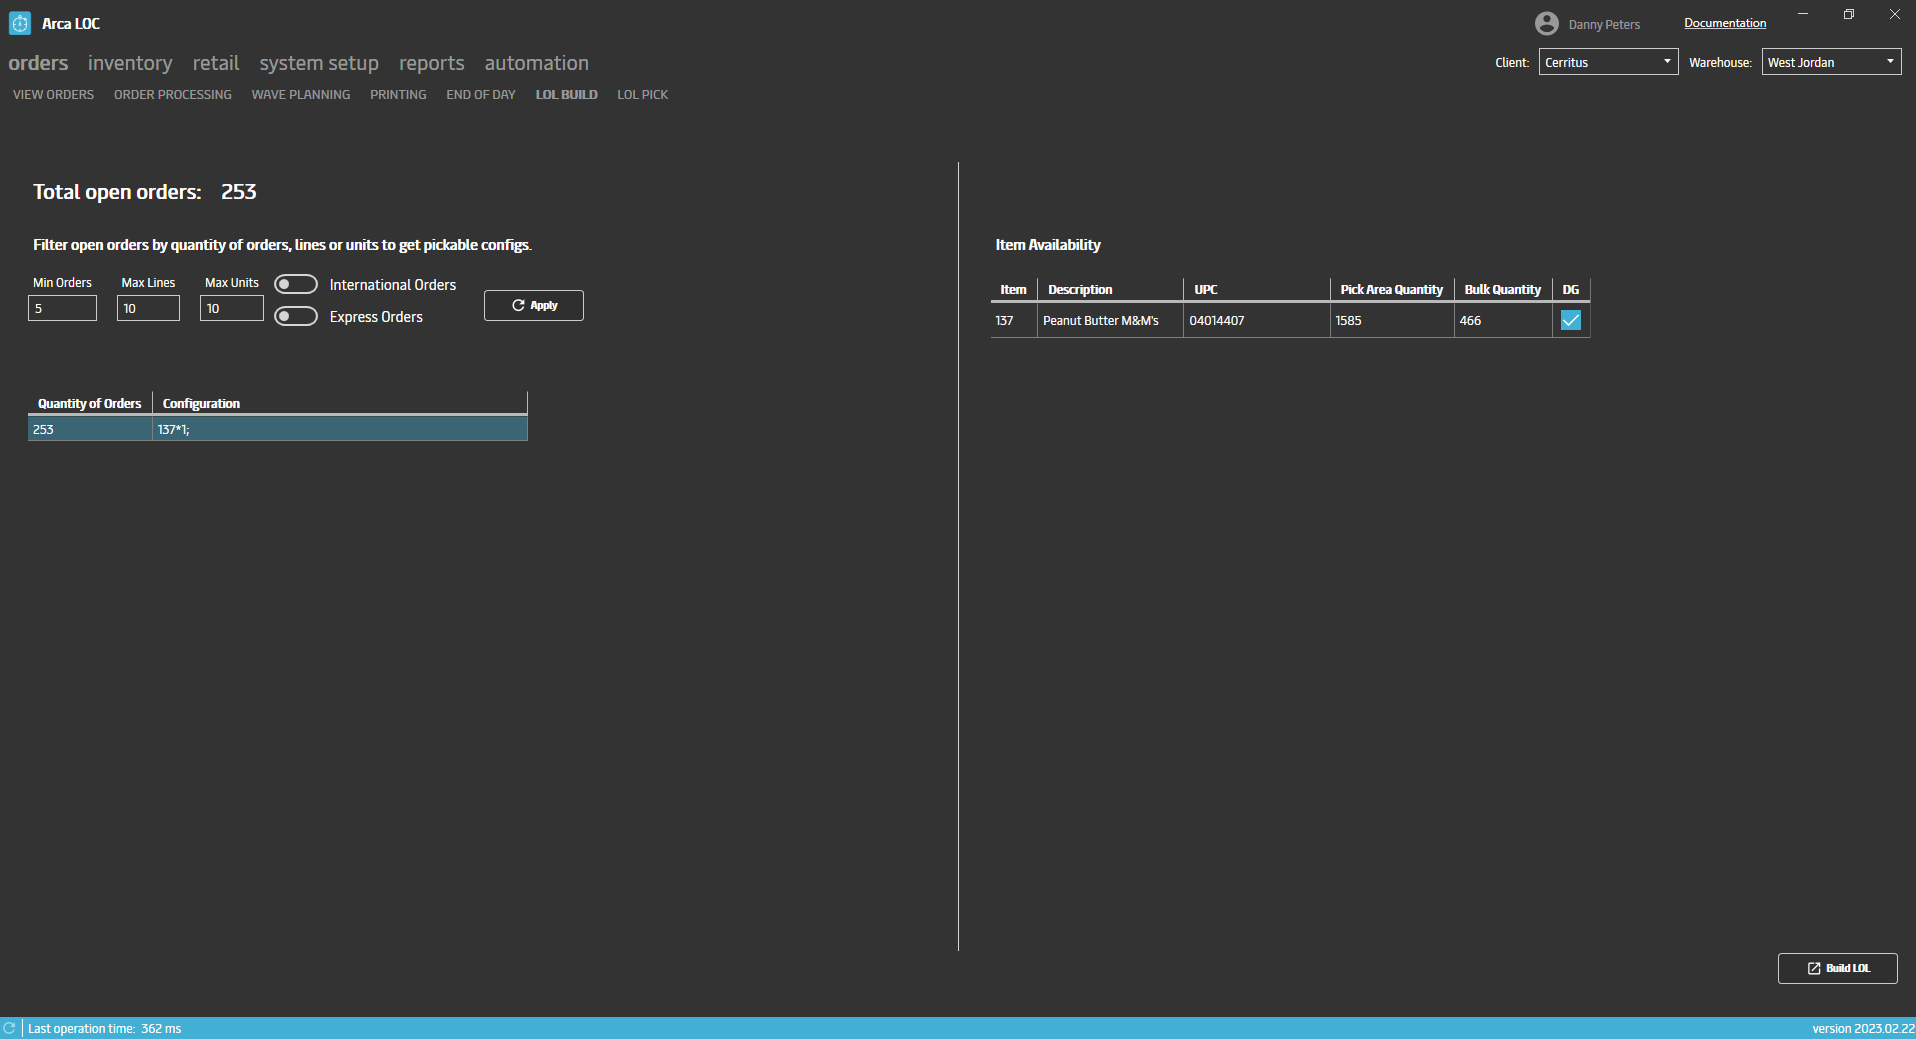
Also in the Item grid on the right side it will now display DG (dangerous goods), if that has been applied to the item during set up.
When you are ready, click on "Create Replenish Report."
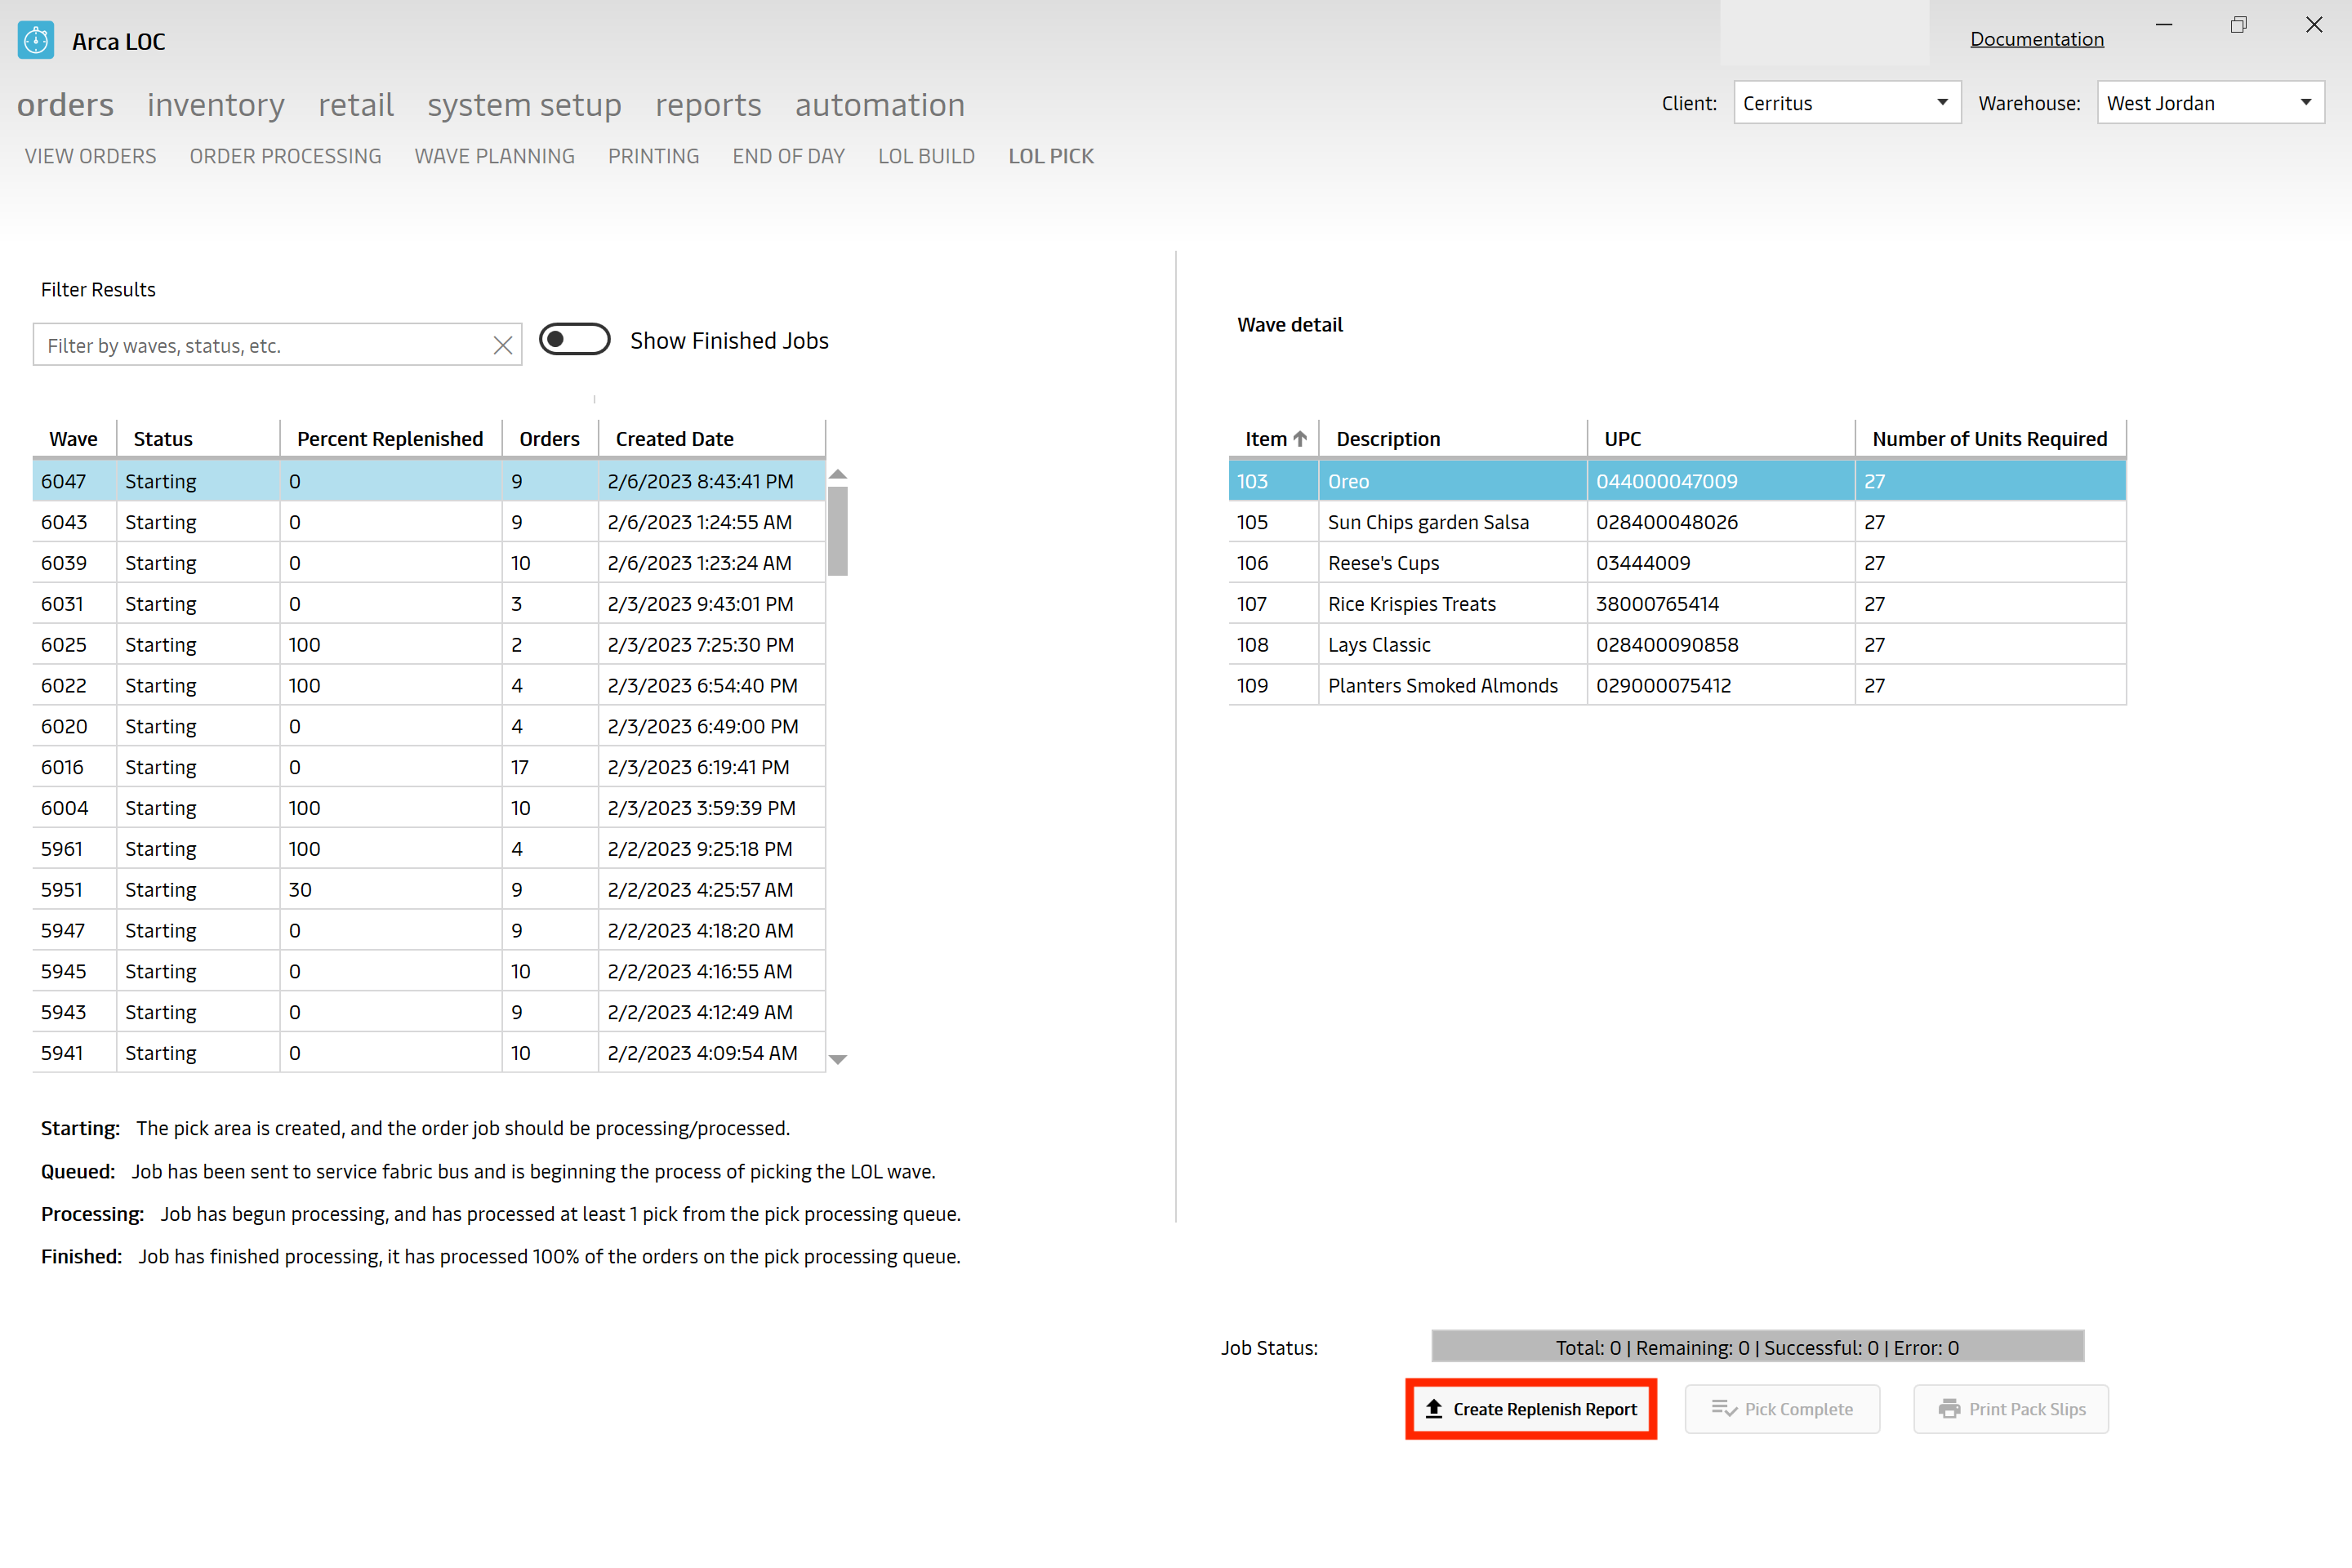
This replenish report will show you all of the pick areas and pallets that have enough quantity for your wave including location.
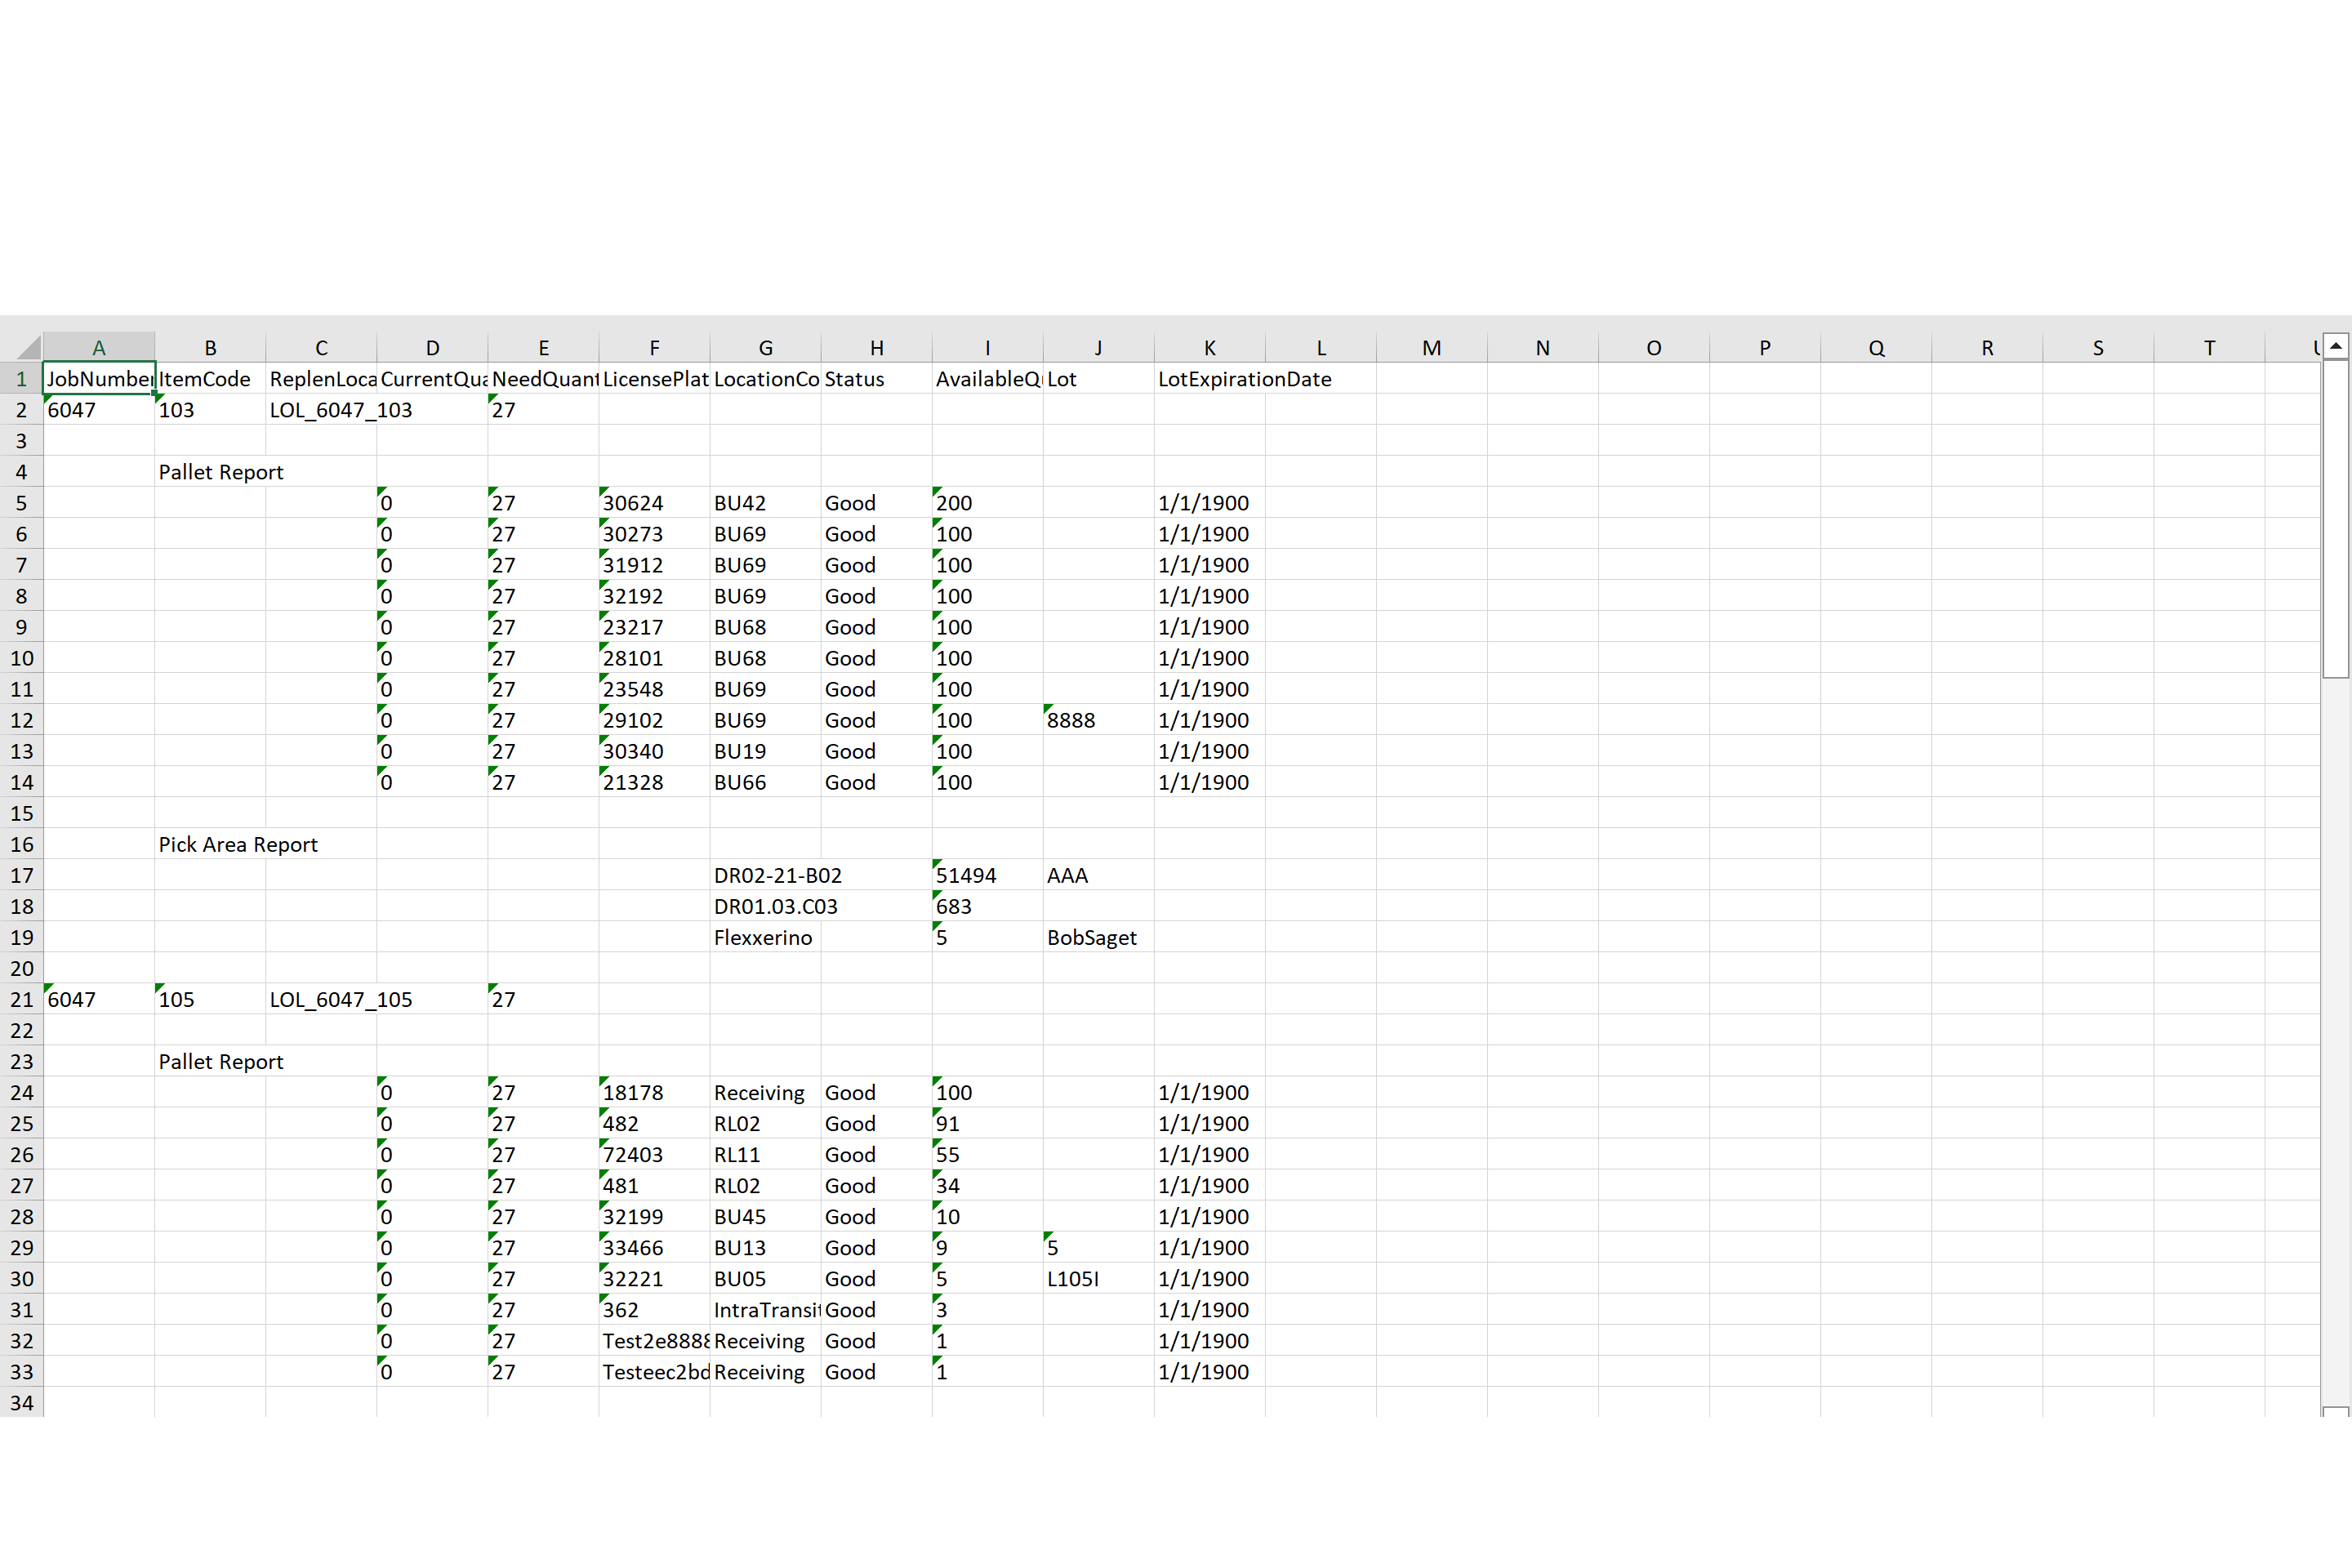
From here you are able to go into ARCA Warehouse app, into Move>Replenish and move your inventory to the new pick area.
Note
Your new pick face area is going to be under "ReplenLocation" on the excel sheet.
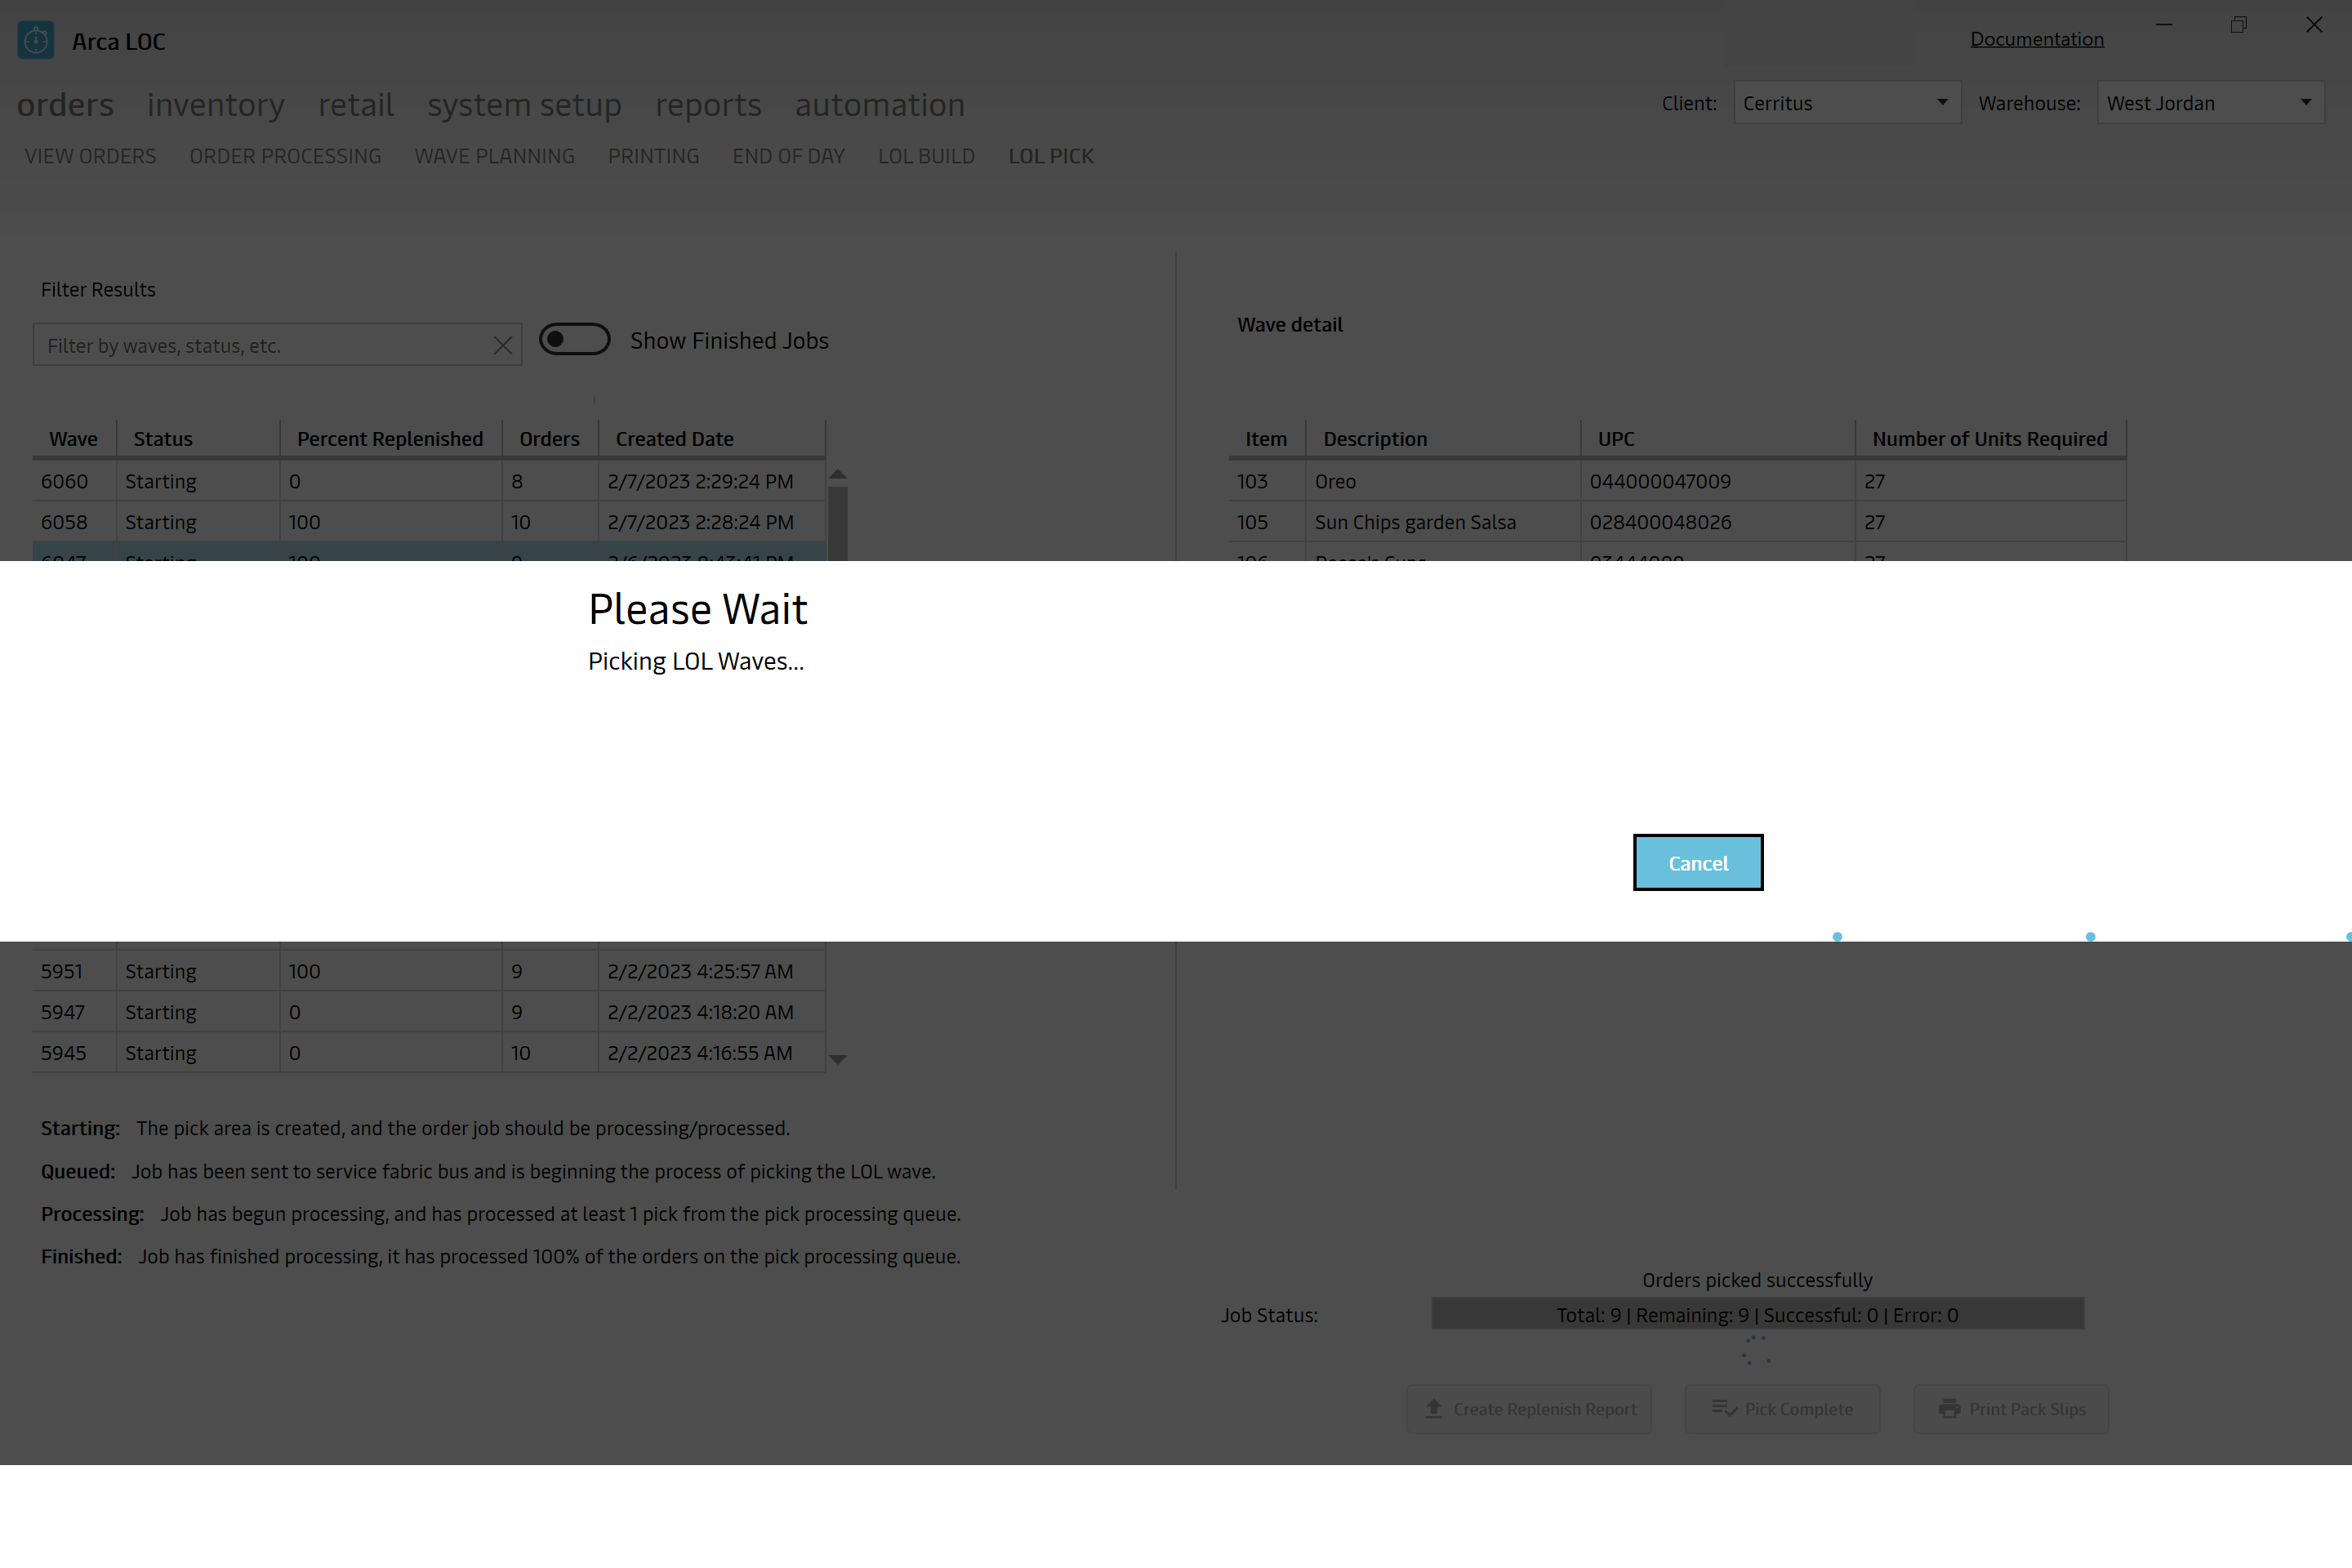
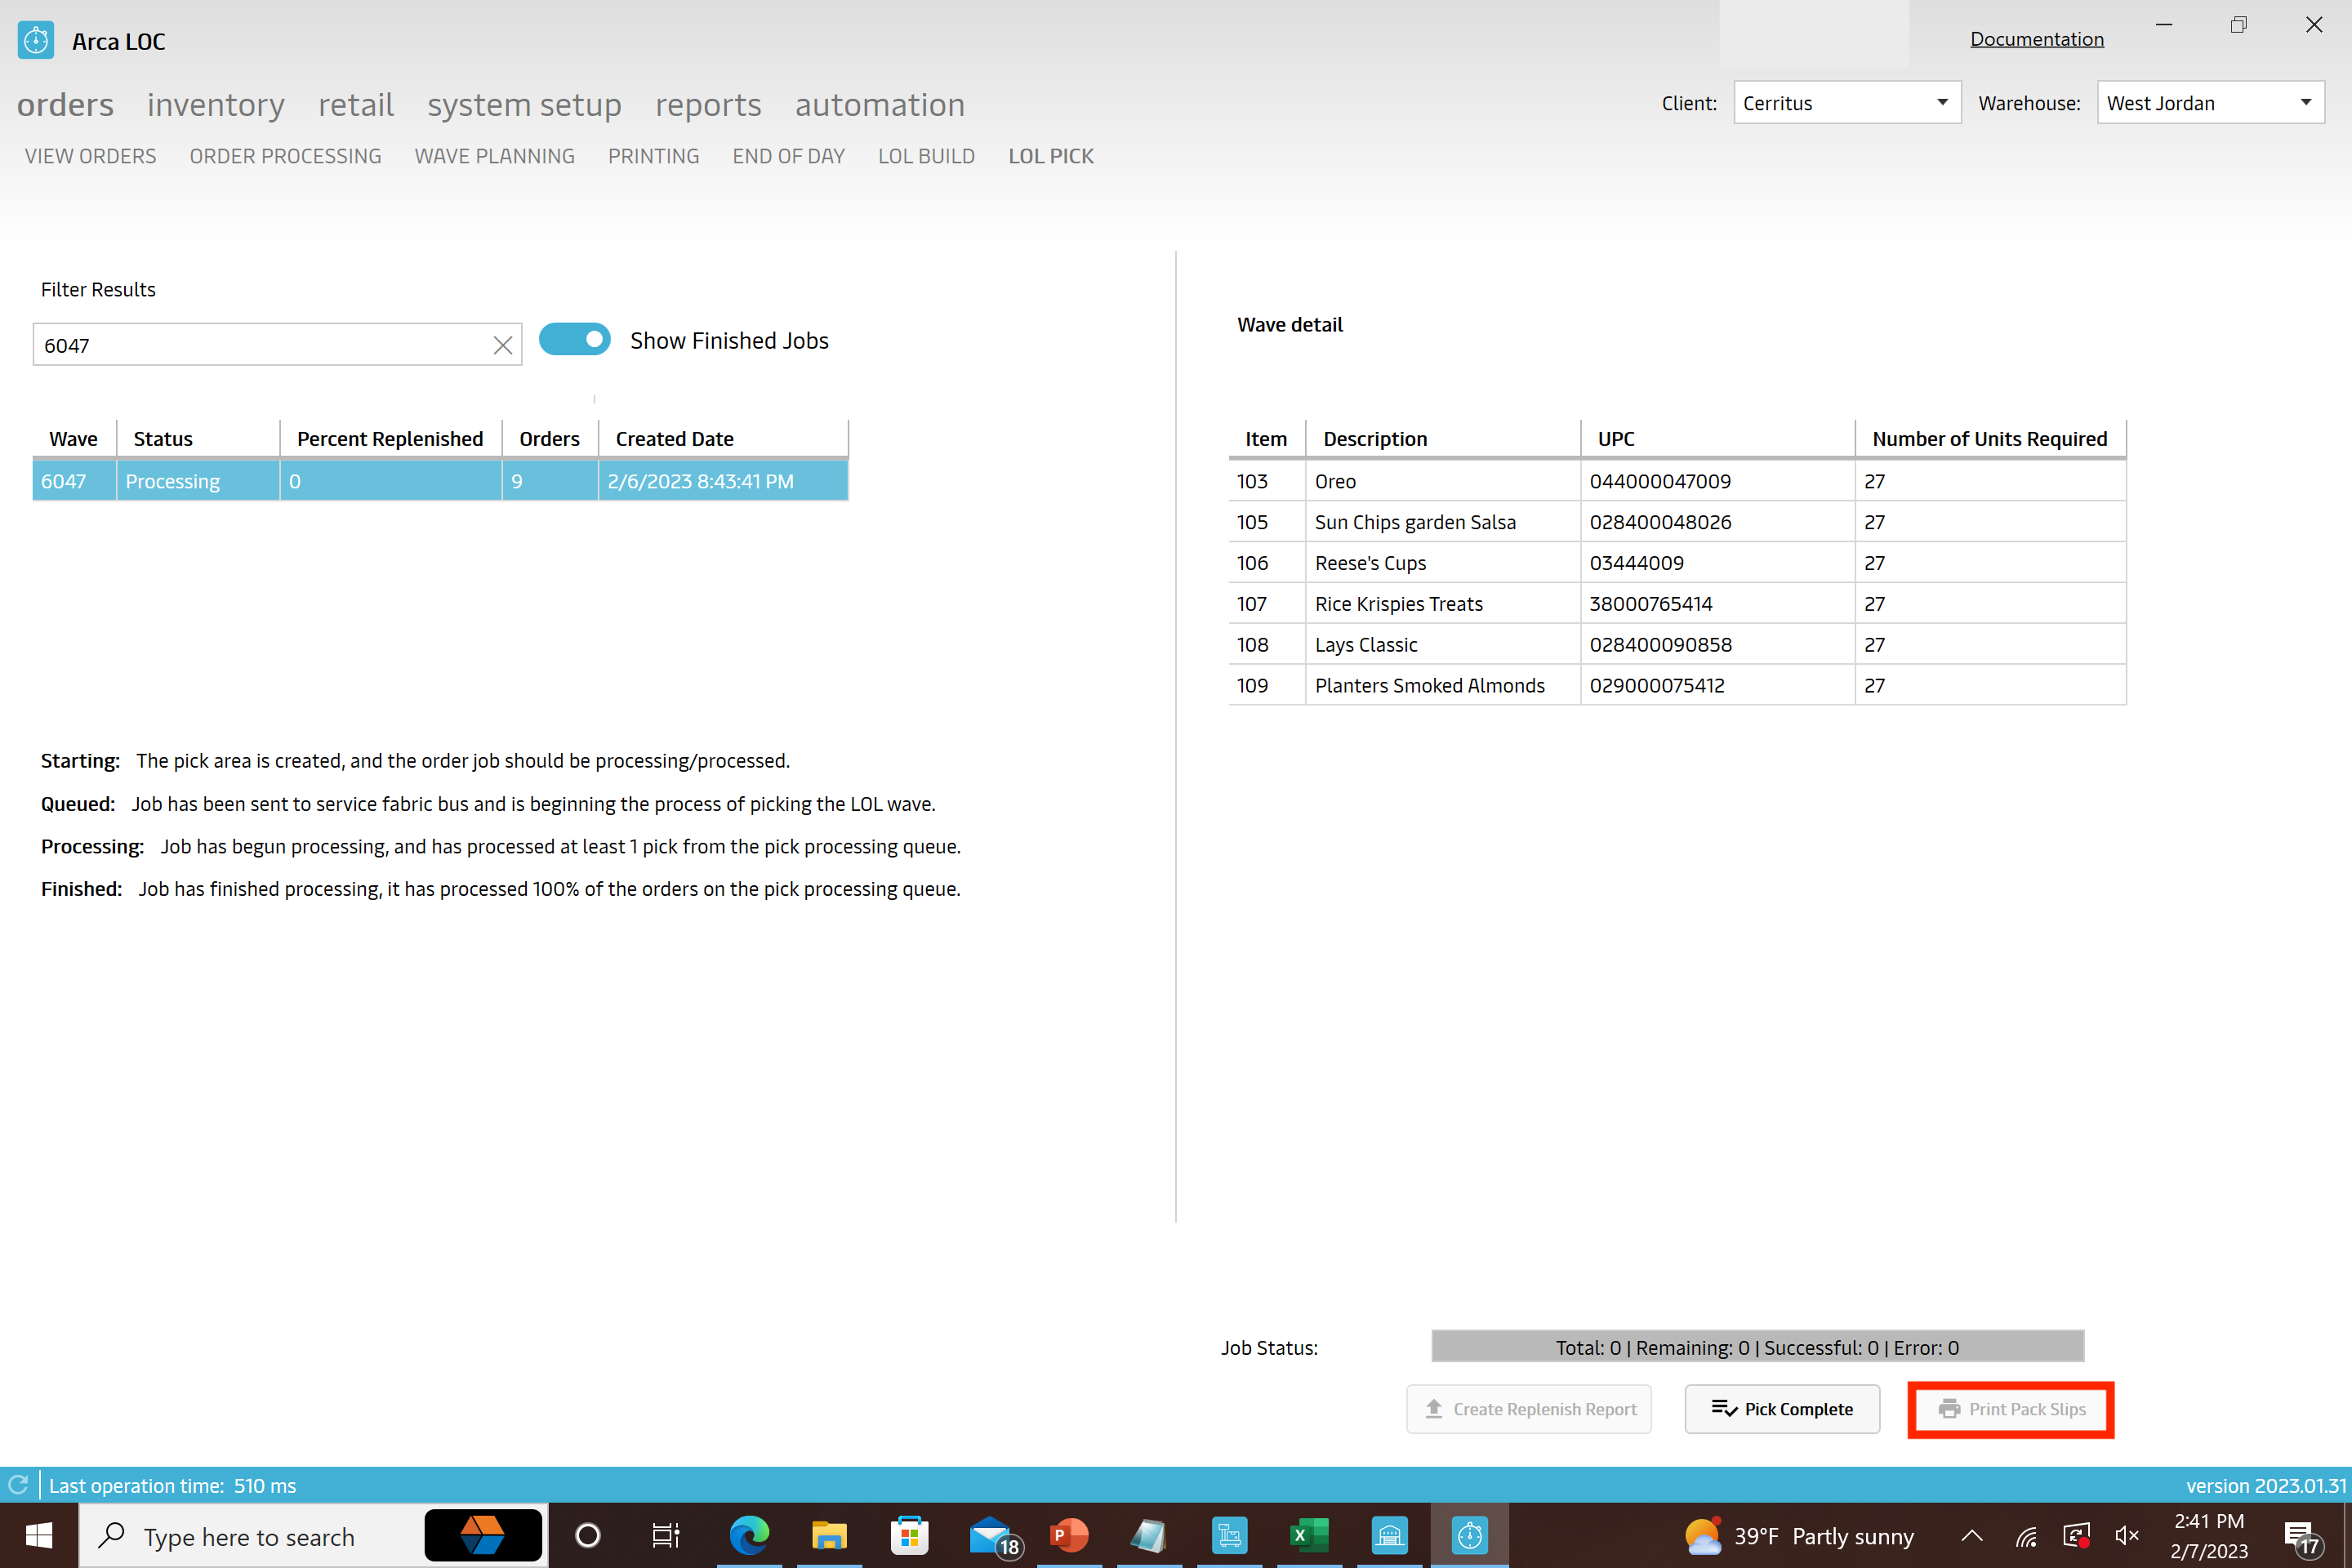
Once you have completed your replenishes, you will be able to go back into the "LOL Pick" screen and click "Pick Complete." Refresh your screen and click "Print Pack Slips"
Note
There are limits set for the number of orders that we can build on this screen, we break them up to allow sufficient time for each wave to be created. You can only send a maximum of 2,500 orders to the build job at once. If the order group has 5,000 orders of the same item configuration, then the first 2,500 orders will be built when you click the build LOL button the first time and you will have to refresh the build screen and then select the remaining 2,500 orders and click on build LOL a second time. When you click build, it will break up the 2,500 (or less) orders into waves, each containing 250 orders. On the next screen, LOL Pick, you will see 10 new waves (or less) of 250 orders.
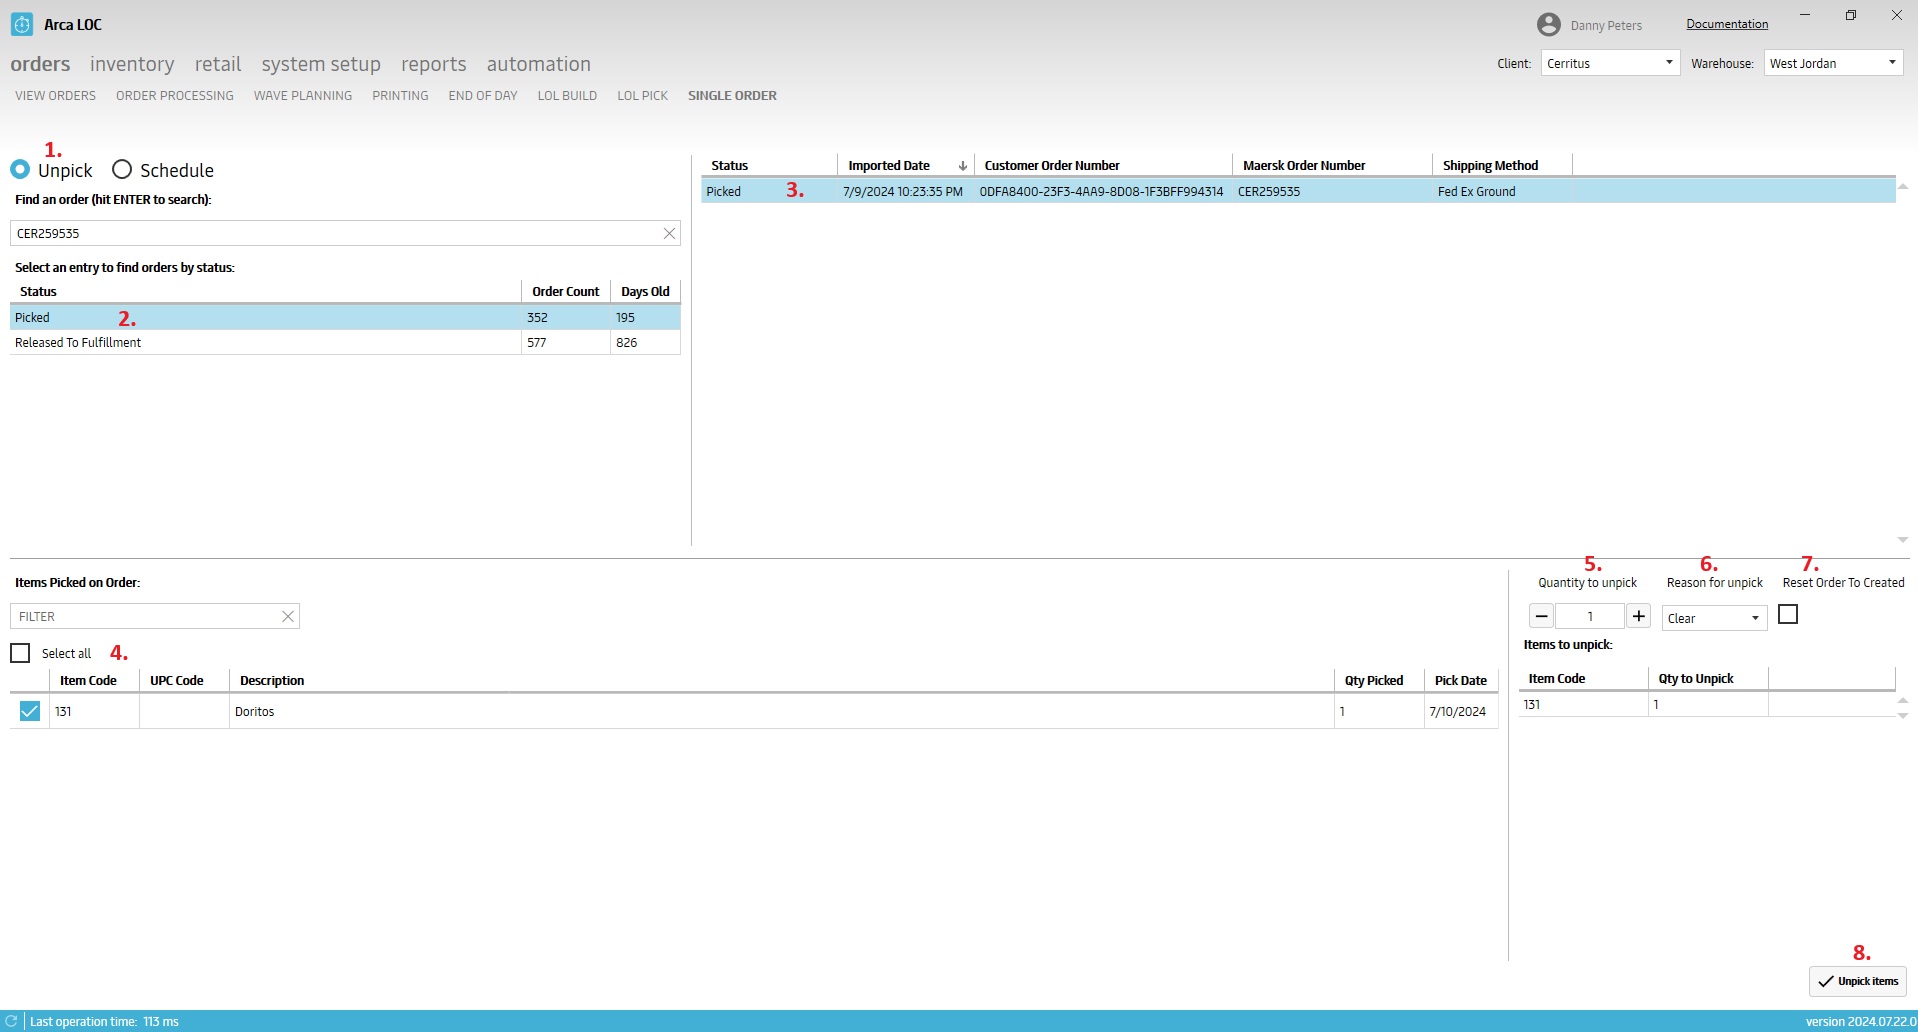
Single Order - Unpick
The unpick screen is designed to allow users to unpick and reset orders. This screen is filtered to just show orders in status Picked and Released to fulfillment. Picked status are orders that are completely picked and released to fulfillment will give you access to partially picked orders.
When an order is unpicked, it will attempt to return the inventory to the pick location where it came from. If that location is not available at the time of unpicking, then the system will create a new pallet and put the unpicked item on that pallet. When unpicking multiple items each item goes to its own pallet. Use the Split/Consolidate screen in Arca Warehouse to combine like items into a single pallet if needed. If the item is designated as scrap during the unpick, then the system will make a deduction from the item’s balance.
Unpicking will set the order status back to released to fulfillment, unless the user specifies the order be reset back to order created status. If an item’s pick location is not available during the unpick, this will also cause the entire order to be unallocated and reset. An order cannot be in the status of released to fulfillment with an item allocated to a location that doesn’t exist so the system will reset the order and force the user to rerun order processing to find current available pick locations.
Chose the Unpick button, this will load the available order status groups. You can unpick an order that is in Picked or Released to Fulfillment status.
Select a status group to load the order list.
Select an order from the list or filter by searching for a specific order number. This will load the order’s picked items.
Select the items to be unpicked individually or use the select all check box.
Set the quantity to be unpicked for each item.
Chose an unpick reason. The Clear option will return the picked item to inventory either in the existing pick location or on a new pallet. The balance of the item will be the same as before the order was picked. Scrap will remove the item from inventory. The item balance will show a negative deduction for scrap.
Reset order to created. If you don’t check this box, the order will be unpicked and remain in the status released to fulfillment. The order will keep the same allocations as before and is ready to be picked again. If you check this box, the order will undo all current allocations and be reset back to its original status of Order Created. Then the order will need to be processed again.
Click on Unpick items.
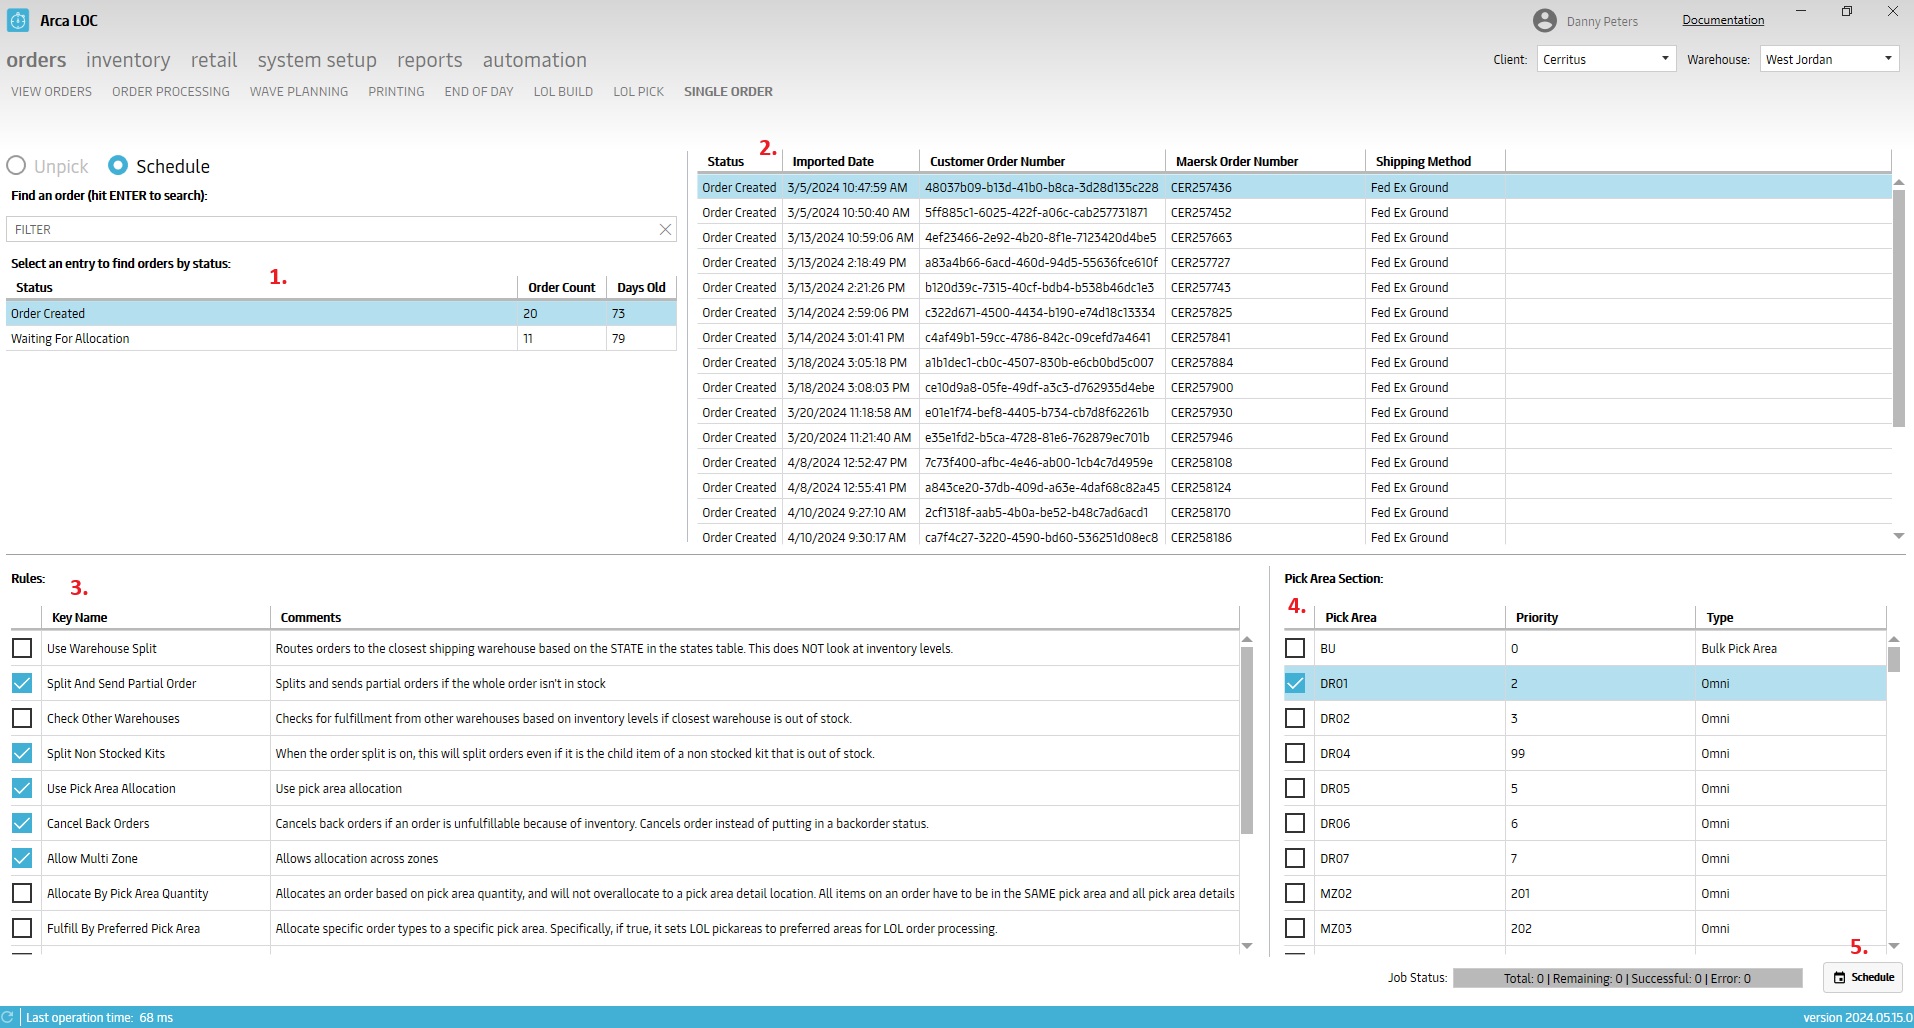
Single Order - Schedule
This screen will allow a user to select single orders for processing. This screen operates independently from the Order Processing screen. A user must select processing Rules and Pick Areas on this screen to be used when processing single orders. These selections will not change, or update selections made on the main Order Processing or Rules setup screens.
- Select a group of available orders from the list on the left of the screen.
- Select an individual order from the grid on the right side of the screen.
- Set rules to be On/Off, these are applied to any order processed on this screen.
- Chose which Pick Areas to allocate the order to.
- Click on the Schedule button to kick off the order processing event.
API Calls
- SendEndOfDayUpdate
Status Process
Click to expand Status Process
| Status | Description |
|---|---|
| Order Created | Orders imported, validated, waiting to move to Ready for Optimization next. |
| Allocated | Orders with stock allocated, now waiting for Billing Processing. |
| Ready to Print | Orders successfully billed, waiting for Fulfillment Processing. |
| Released to Fulfillment | Orders already batched and sent for packaging and shipping. Not editable! |
| OrderPicked | Order has been picked. |
| OrderPacked | Order has been packed. |
| Ready to Ship | Order has been picked and packed and is ready to ship. |
| Completed | Completed orders have successfully finished the entire order and payment process. |
| Completed and Exported | Completed orders that have had tracking info exported |
| On Hold | Orders imported but placed On-Hold or orders placed On-Hold by users. |
| Ready for Optimization | Orders have passed validation checks, and are ready to go thru optimization processing. |
| Stock Allocation Processing | Orders undergoing stock allocation processing. |
| Back Order | Orders Back Ordered because of insufficent inventory. |
| Billing Processing | Orders undergoing Billing Processing. |
| Fulfillment Processing | Orders undergoing Fulfillment Processing. |
| Ship Verified | Orders successfully shipped from warehouse. |
| Cancelled | Orders that have cancelled. |
| Order Optimized | Order Optimized. |
| Waiting for Allocation | Order Allocated in the pick face. |
| Confirm Cancel | Confirm the cancellation of an order. |
The first step in the Status Process is an ordering being created or imported. Then when we kick off order processing it gets allocated/assigned to a pick area. After processing it goes into the ready to print status. Once the scheduling office creates a batch and prints the packslips it moves to released to fulfillment. This is when it goes out onto the floors for picking. After the pick status it then moves into the packing status. Once it has been packed at the packing stations and you have your tracking numbers and shipping labels, the status will then be changed to "Packed." Once we send the shipping confirmation to the client it then goes into the final status which is "Completed and Exported."
Inventory
Inventory
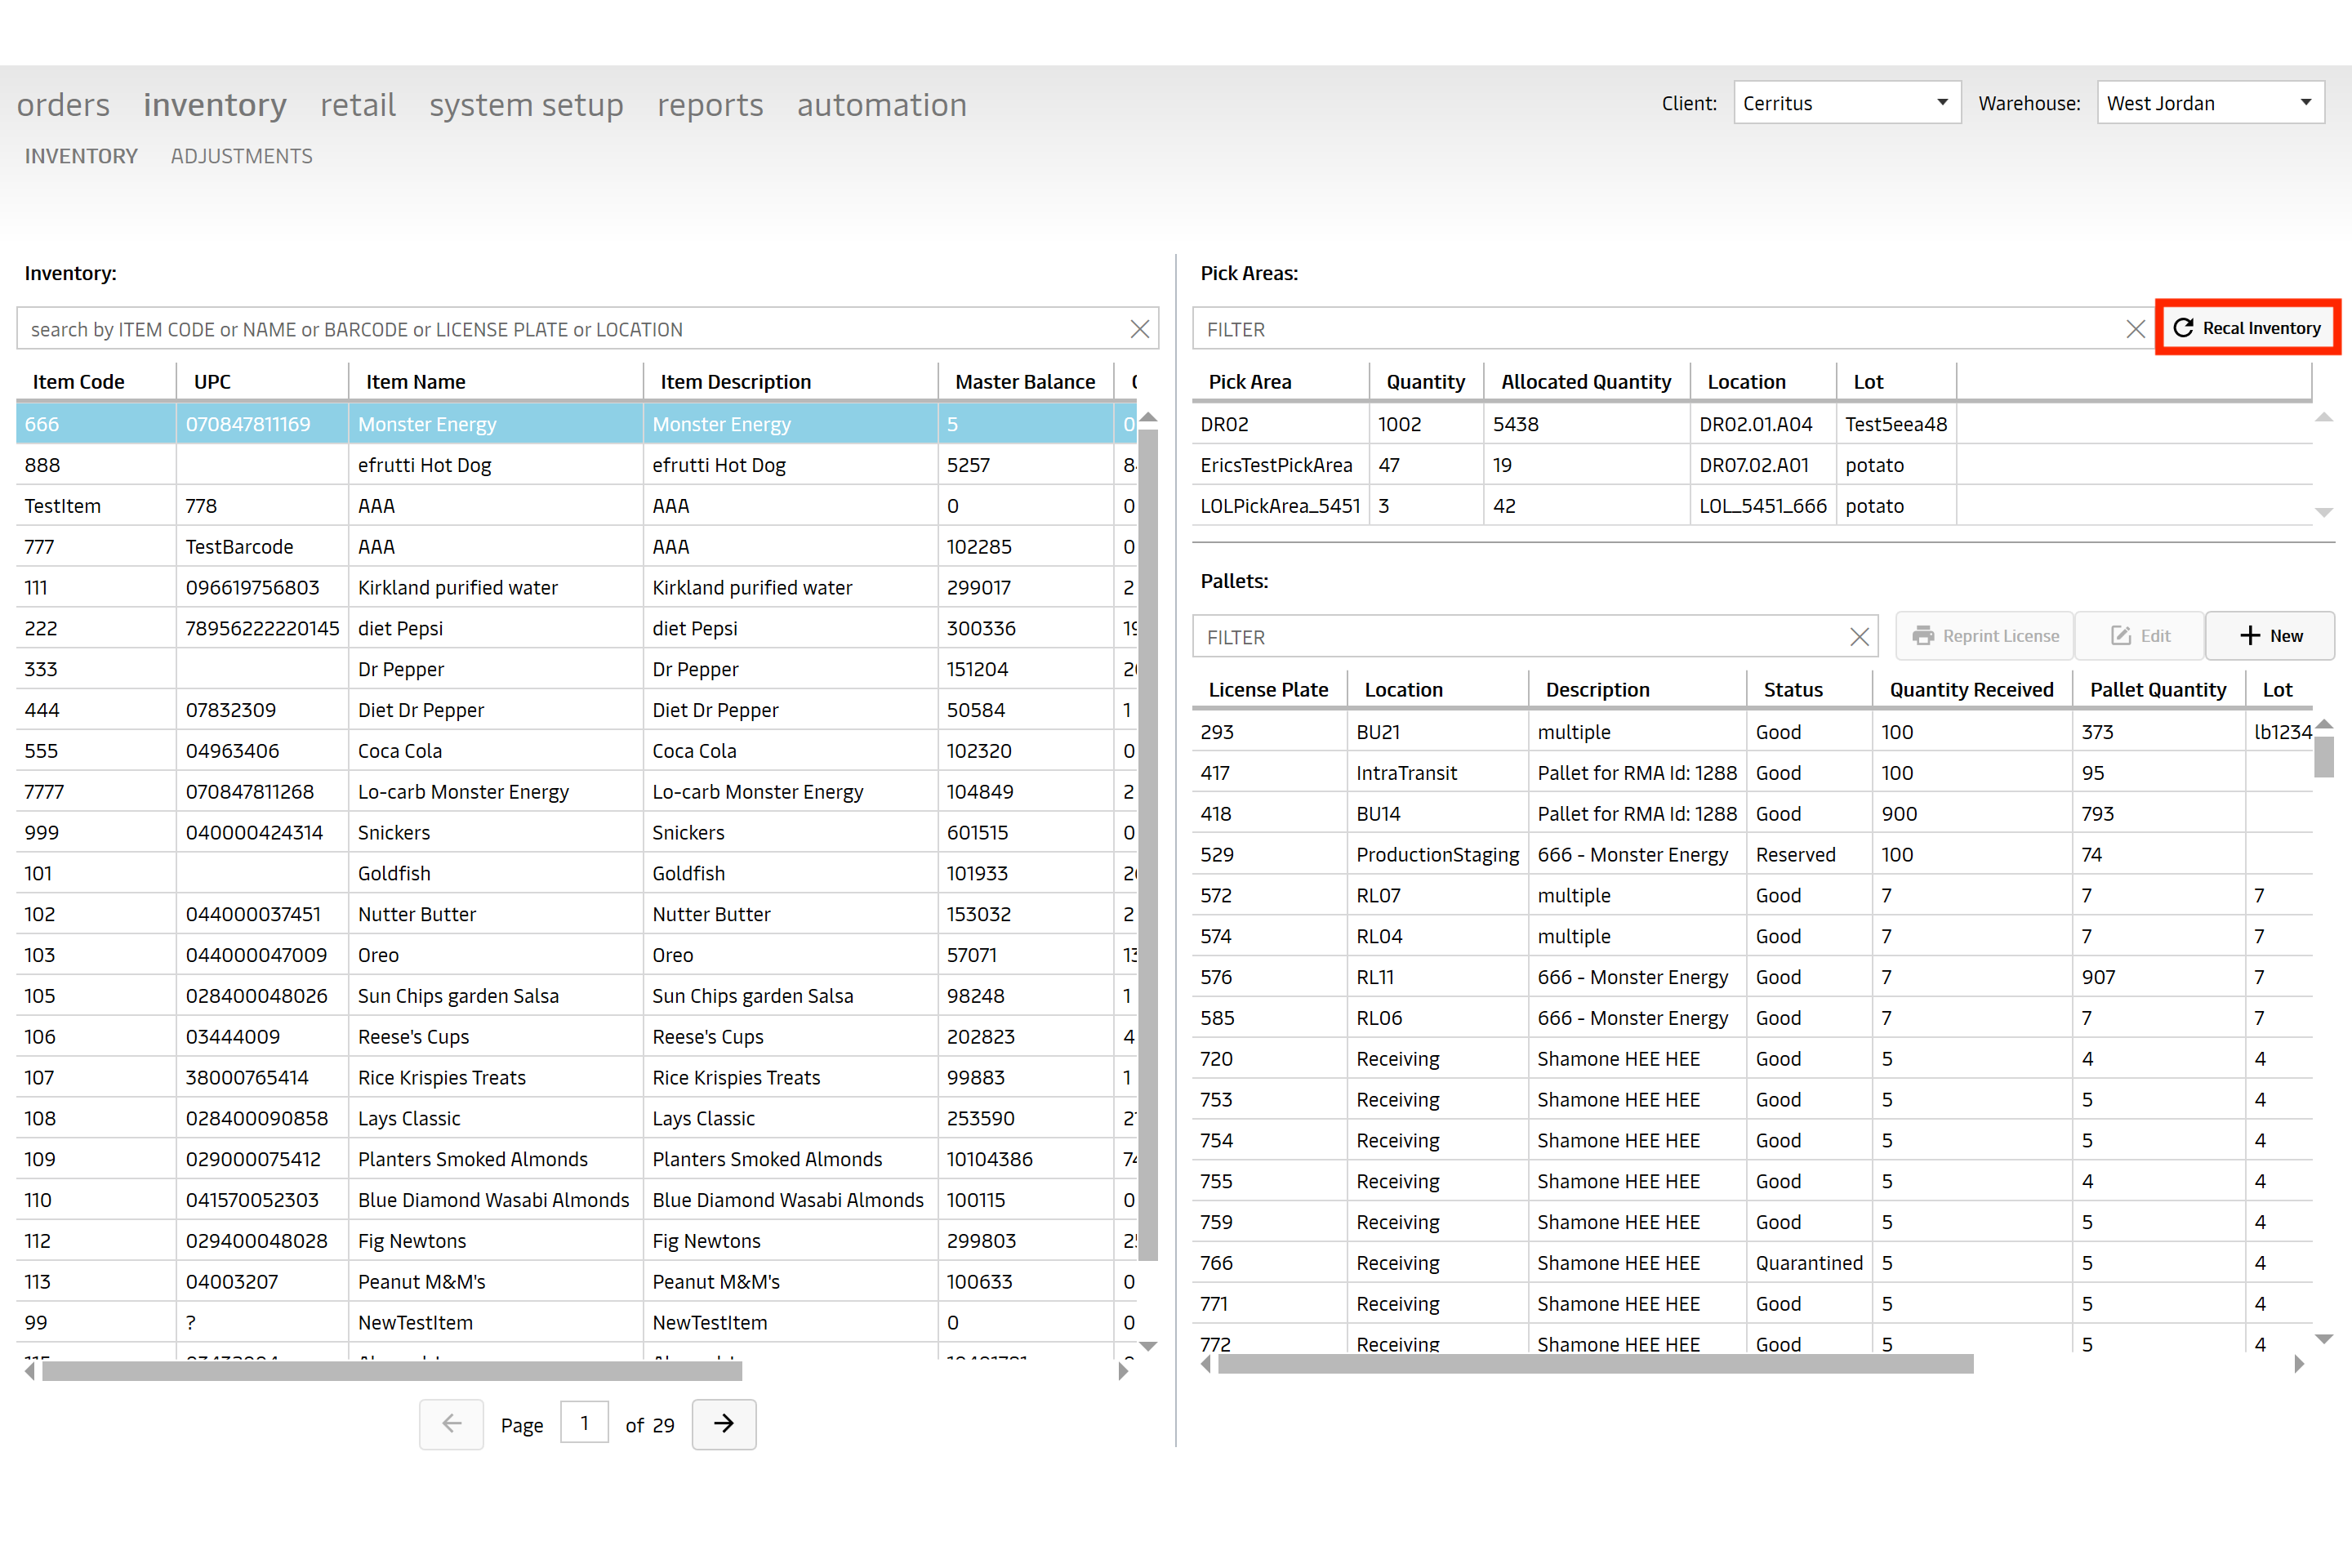
The "Inventory" portion of ARCA LOC is designed to display the current up-to-date information on the inventory; including item stats, replenishment data and balance, and pick area locations. With ARCA LOC, this is a more user-friendly approach having the inventory information exist on a single screen, rather than navigating through multiple menu options.

Item Inventory Search
To find inventory associated to an item, you may search using the following criteria:
- Item Code - customer part number
- Item Name - customer item name
- Barcode - customer item UPC
- License Plate - used for Non-Orders, Pallet Only
Item Inventory Details
You will find the following information provided, per item:
- Item Code - customer part number
- Item Name - customer item name
- Item Description - customer item description
- Master Balance - total balance, all statuses
- Quarantined - quantity of items in a quarantine location
- On Hand - quantity of items in the primary warehouse, not including quarantine
- Committed - quantity of items allocated to a customer sales order
- Available - quantity of items available to be allocated, prior to being committed
- Shippable - quantity of items available in a shippable status, including On Hand, Committed and Available.
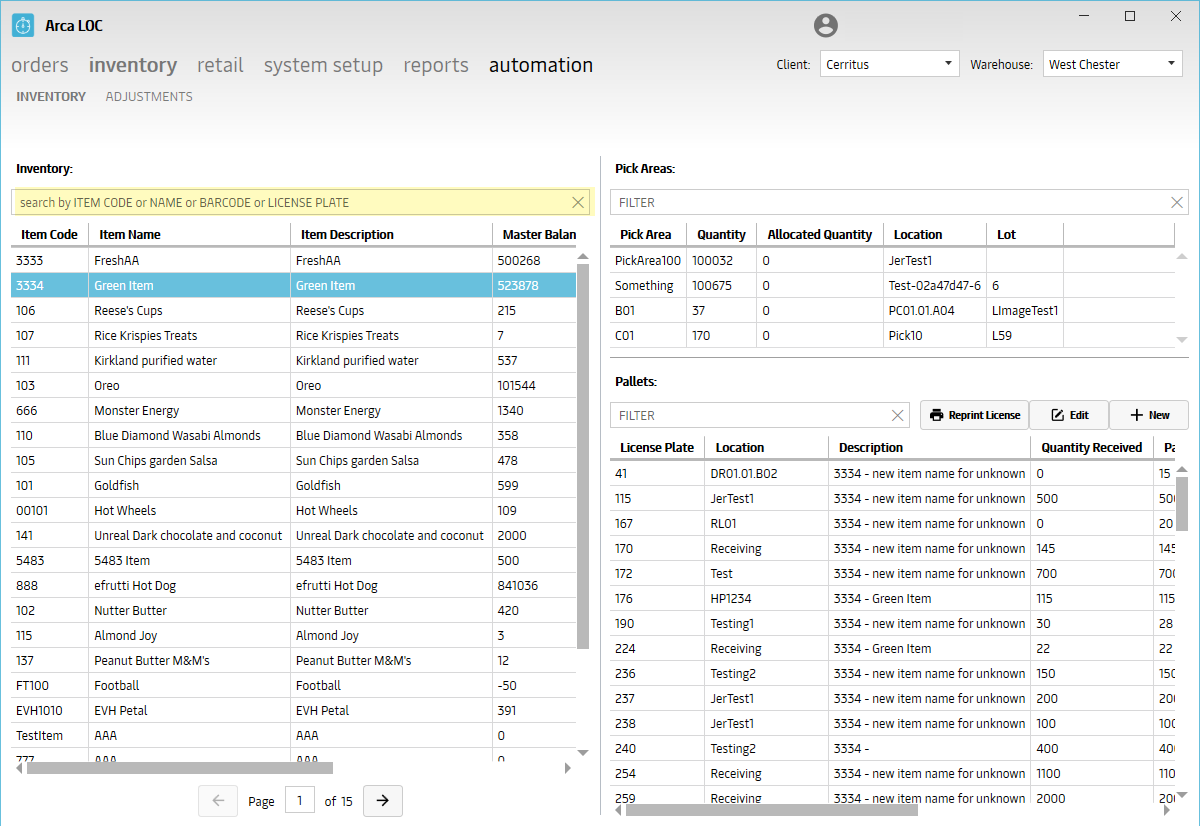
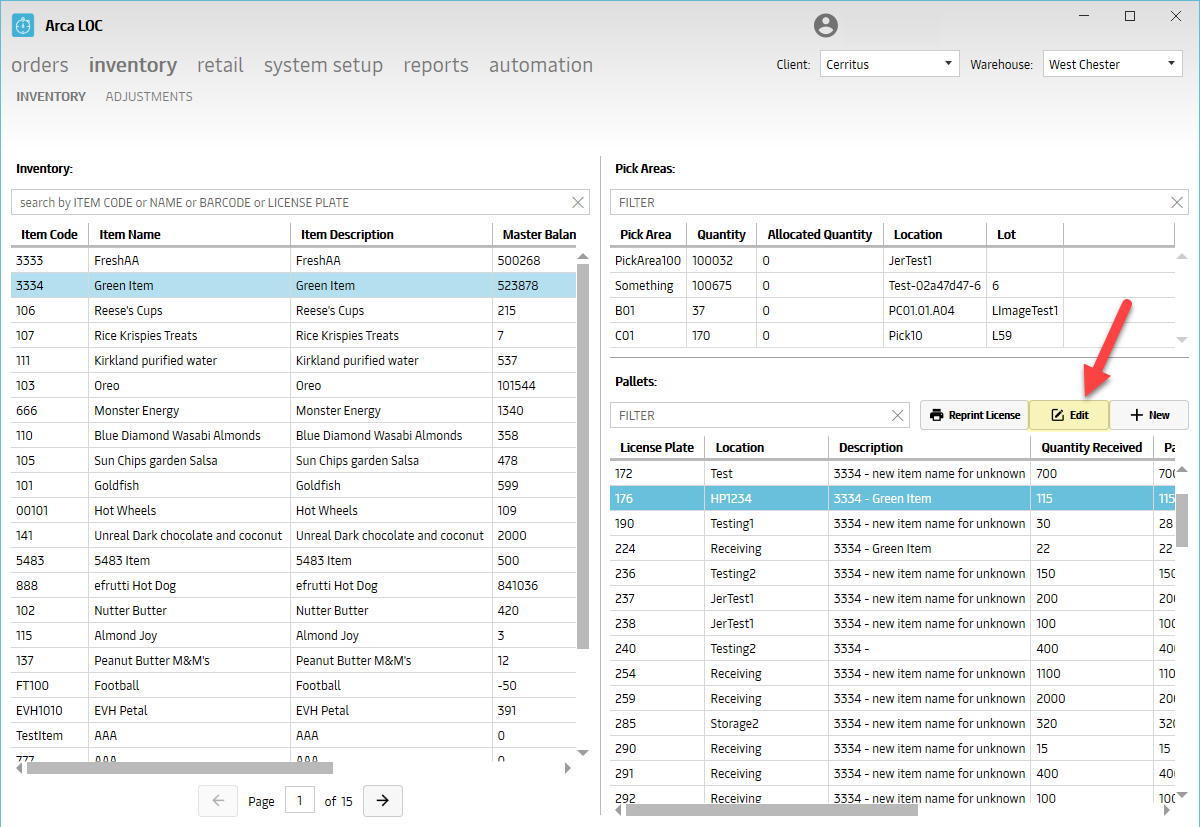
Once an item is selected, the screen will further display additional inventory details on the right half of the screen, under PICK AREAS and PALLETS.
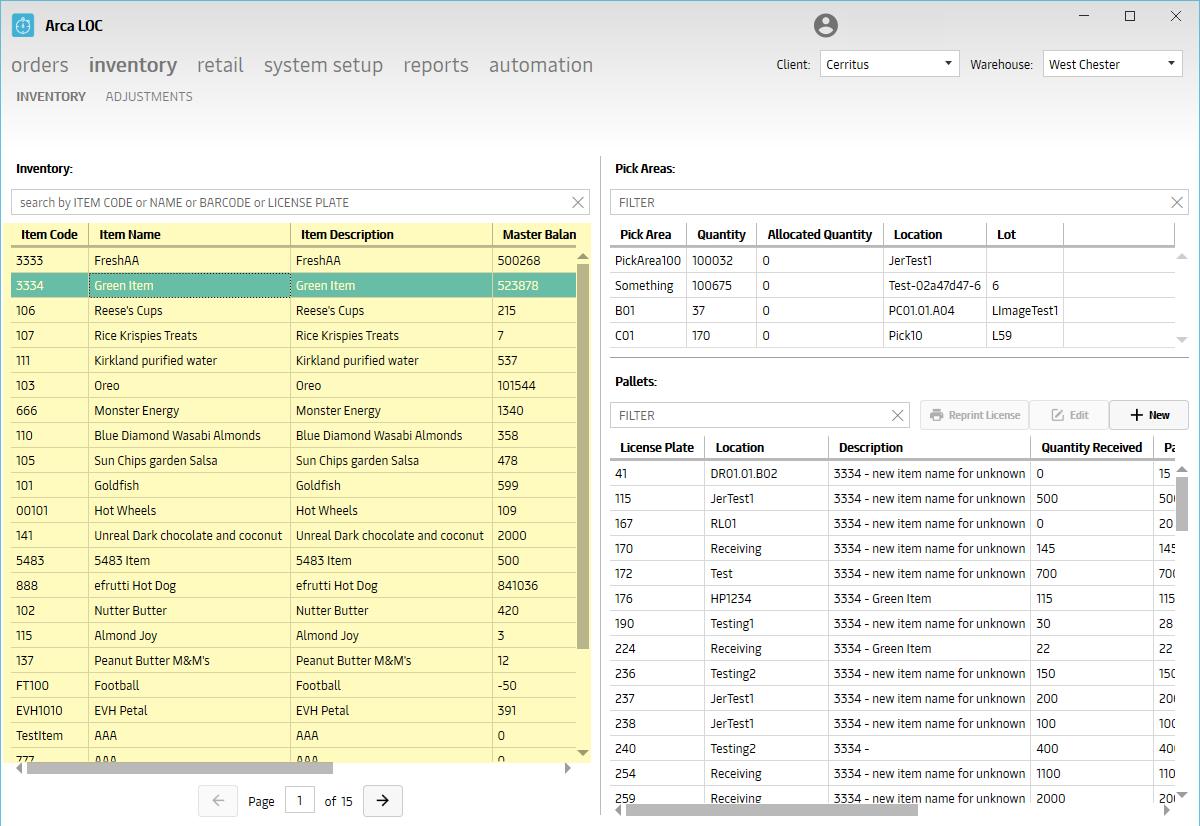
Pick Areas
Once an item is selected, the screen will update to show an overview of inventory in each pick areas with stock. To see inventory associated to a specific pick area, you may search for that using the following criteria:
- Item Code - customer part number
- Item Name - customer item name
- Barcode - customer item UPC
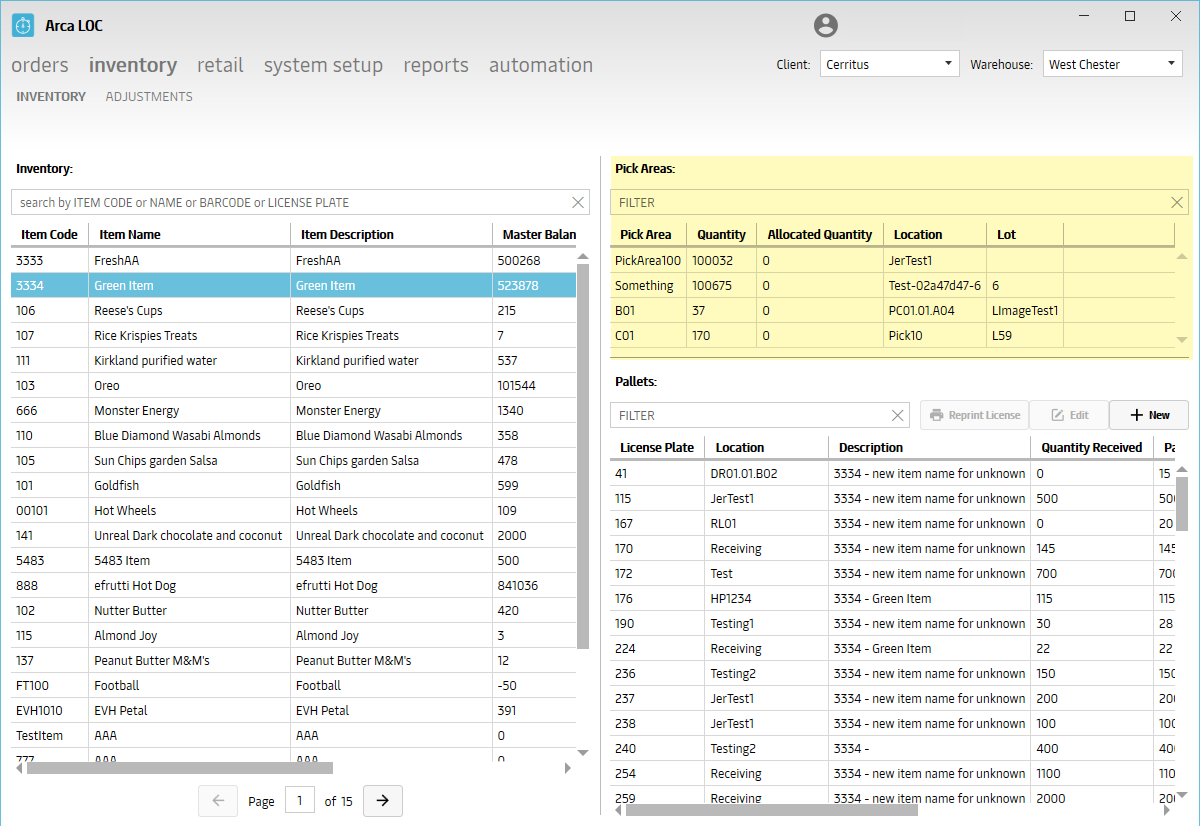
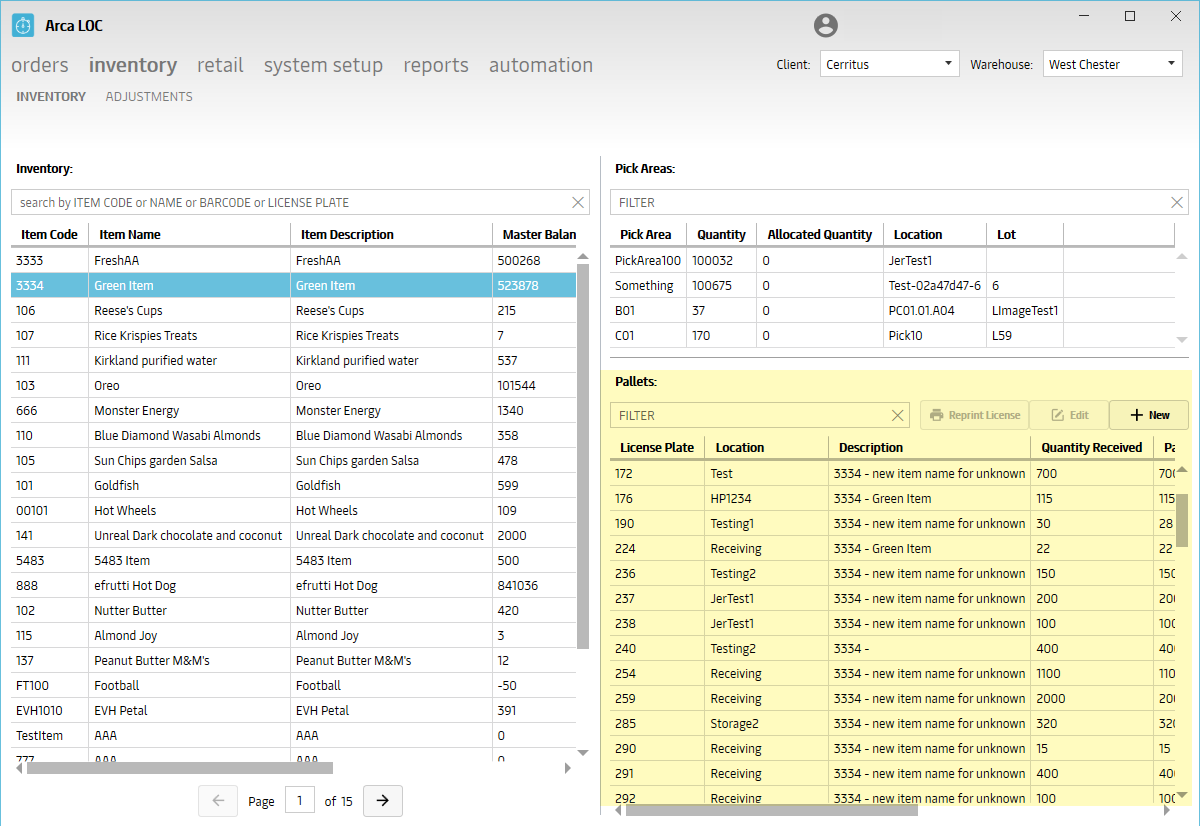
Pallets
Once an item is selected, the screen will update to show an overview of inventory on each pallet with stock. To see inventory associated to a specific pallet, you may search for that using the following criteria:
- Pallet
- License Plate - used for Non-Orders, Pallet Only
- Location - internal warehouse storage bin location
- Description - item name and description
- Lot Number - identification number on a specific batch on an item that has been made or processed at the same time.
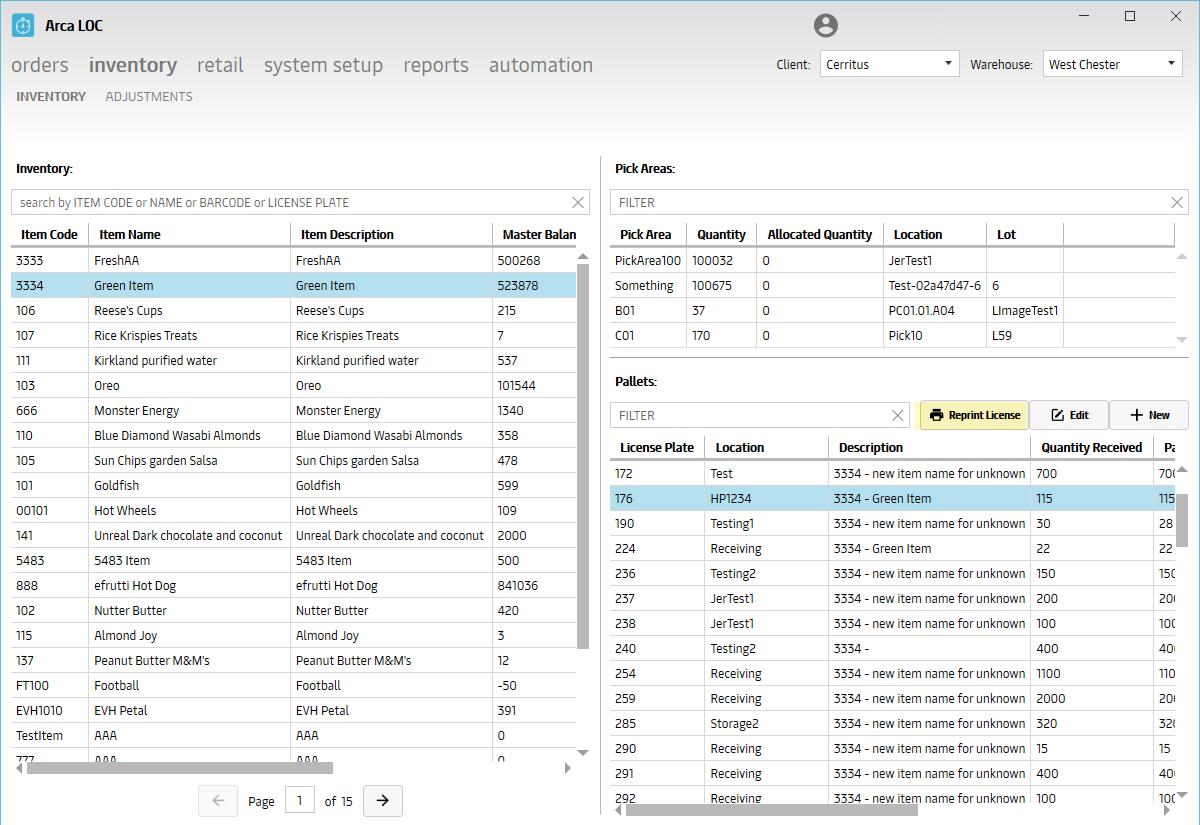
Re-print License
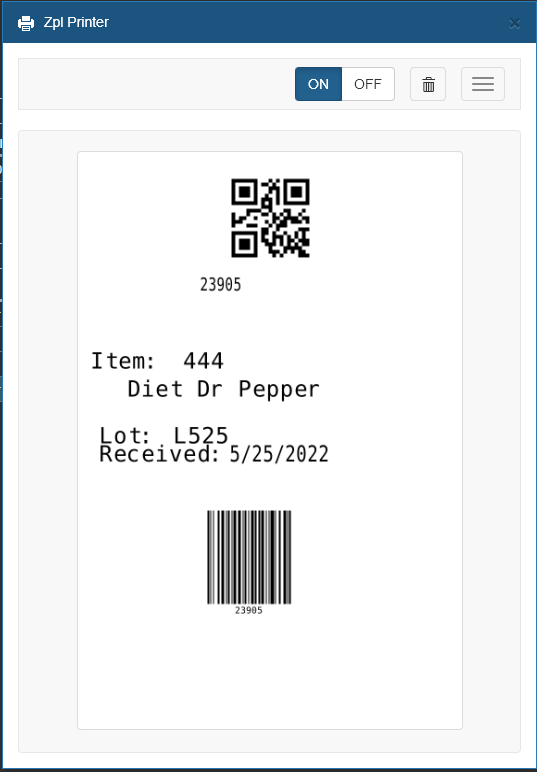
Once ready, you may re-print the Pallet Label, click on the "REPRINT LICENSE" button under Pallets.
The following information will be displayed:
- Barcode - customer item UPC
- Item Code - customer part number
- Item Name - customer item name
- Lot Number - identification number on a specific batch on an item that has been made or processed at the same time.
- Received - Datestamp when received
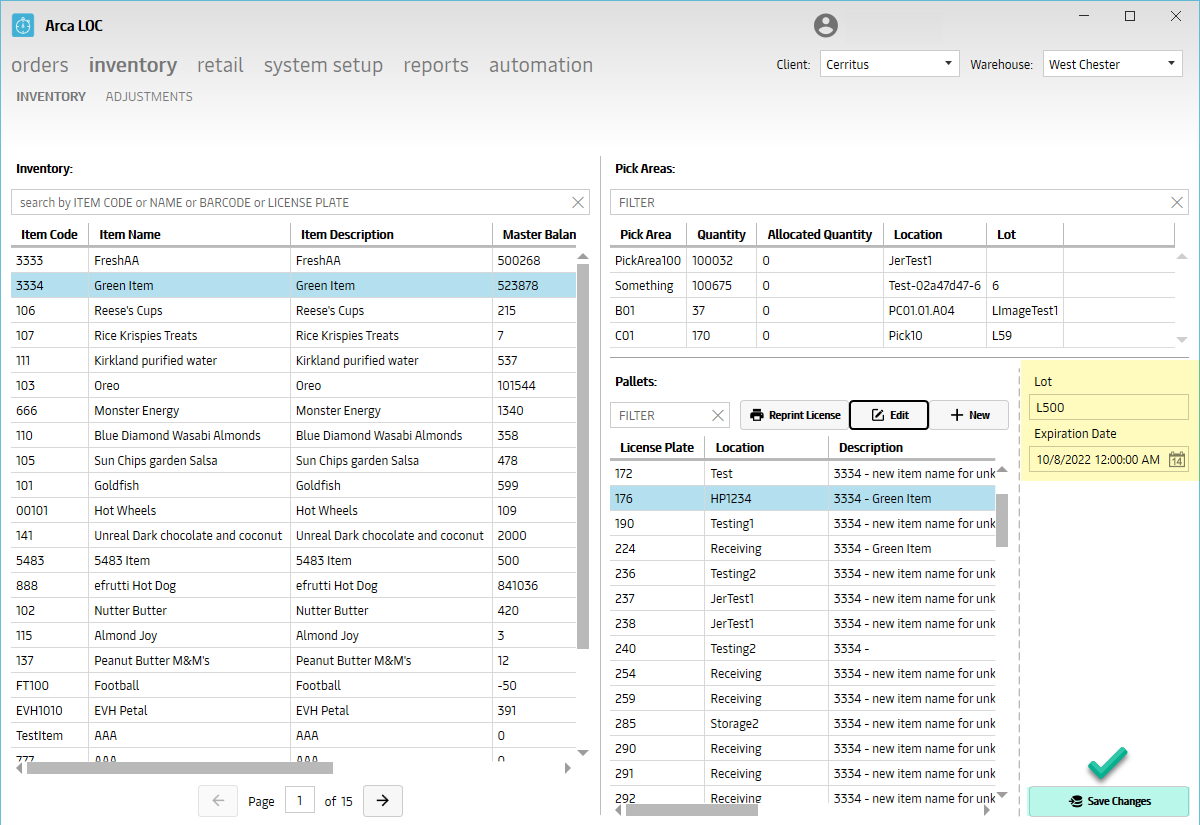
Edit Pallets
Once filtered you may also edit the following criteria:
- Lot Number - identification number on a specific batch on an item that has been made or processed at the same time.
- Expiration Date - item expiration date, associated to the lot number
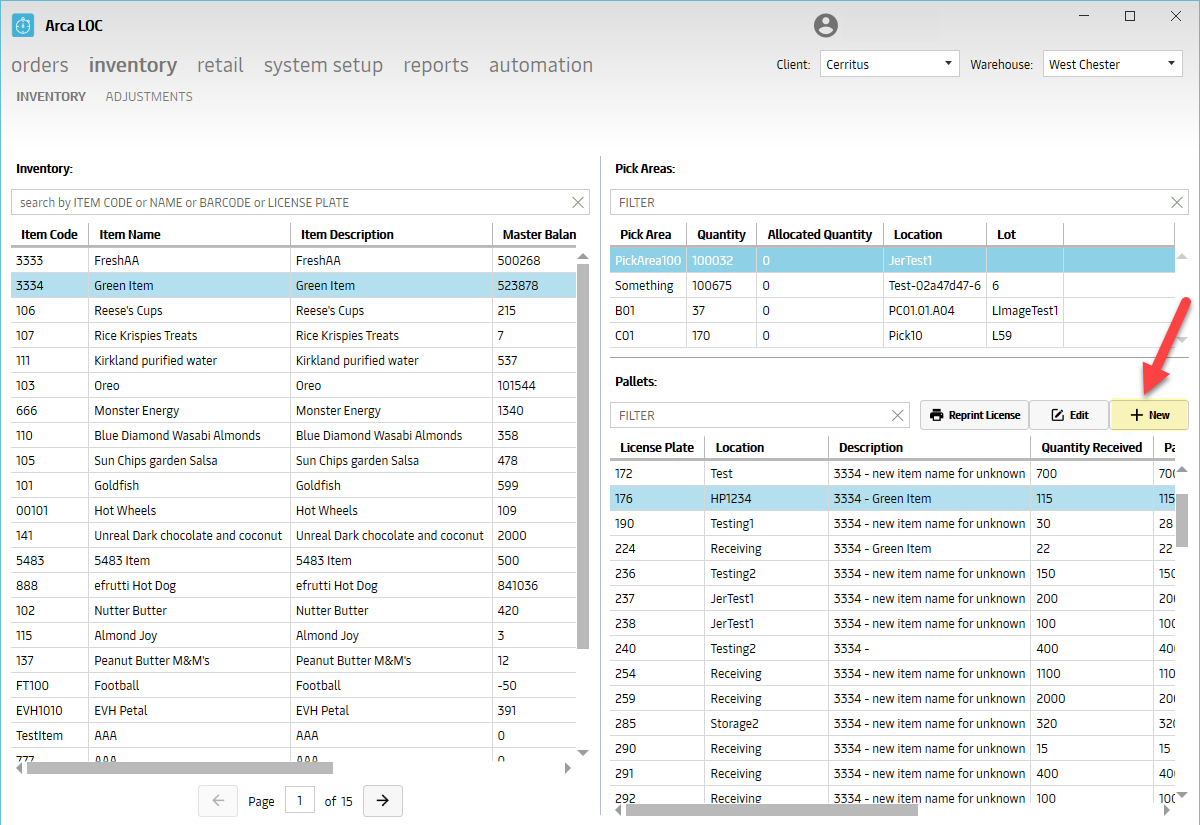
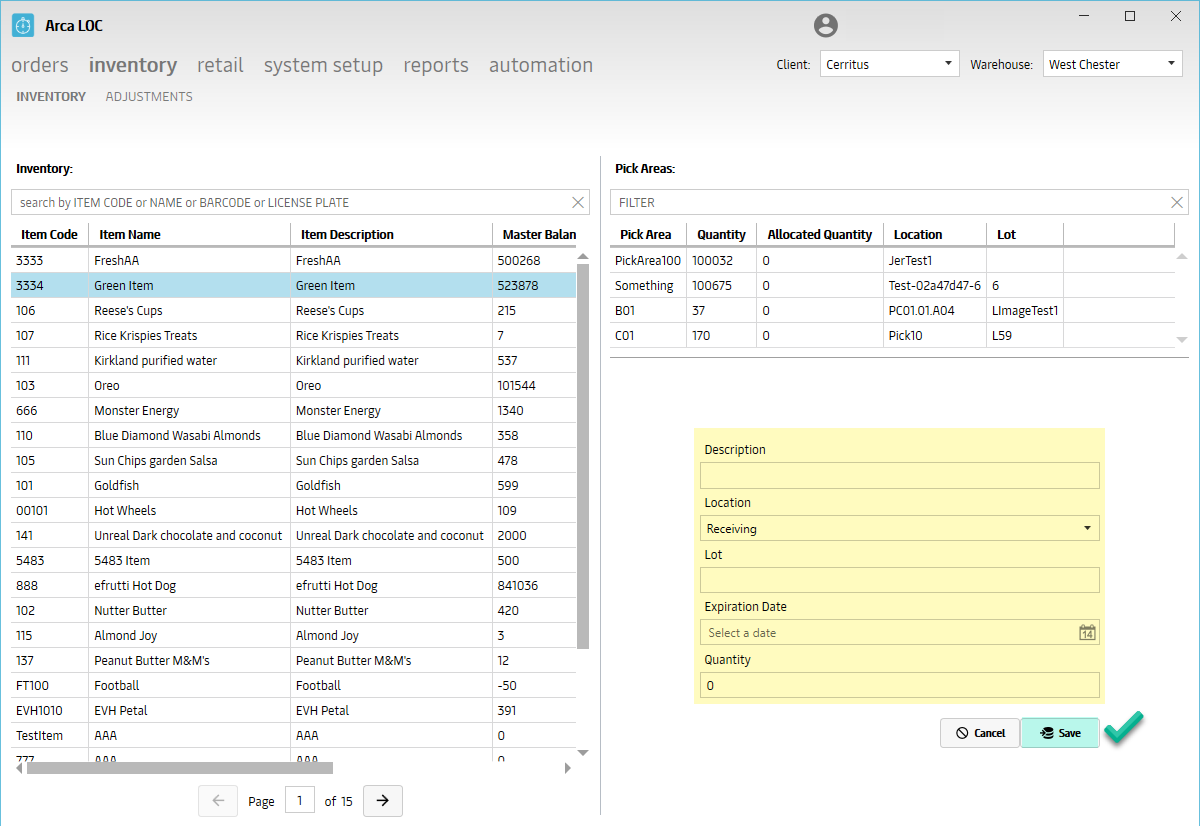
Create New Pallets
To create a new pallet, click on the "NEW" button under Pallets.
Populate the following fields and click SAVE:
- Description - item name and description
- Location - internal warehouse storage bin location
- Lot Number - identification number on a specific batch on an item that has been made or processed at the same time.
- Expiration Date - item expiration date, associated to the lot number
- Quantity - item quantity to add in to inventory
Recalculate Inventory Button
This is a button that allows a user to recalculate the inventory numbers for any selected item. This is going to look at all the pallets and pick areas which contain the selected item and sum up the total quantity and adjust the balance numbers. It will also create a new entry into the Item Ledger report showing that the item’s balance was recounted.
API Calls
- InventoryGetAll
Adjustments
The "Adjustments" portion of ARCA LOC is designed to display the current up-to-date information on the inventory; to allow the action of creating inventory adjustments. With ARCA LOC, this is a more user-friendly approach having the inventory information exist on a single screen, rather than navigating through multiple menu options.
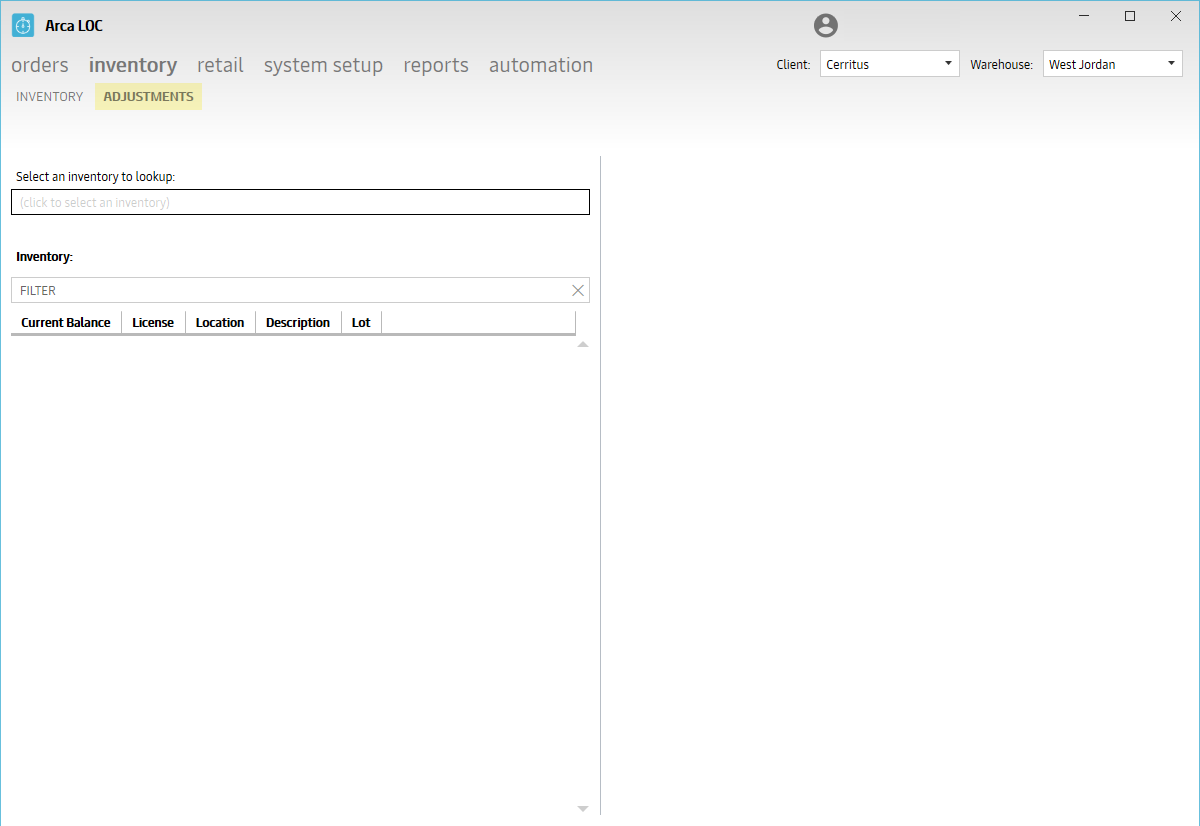
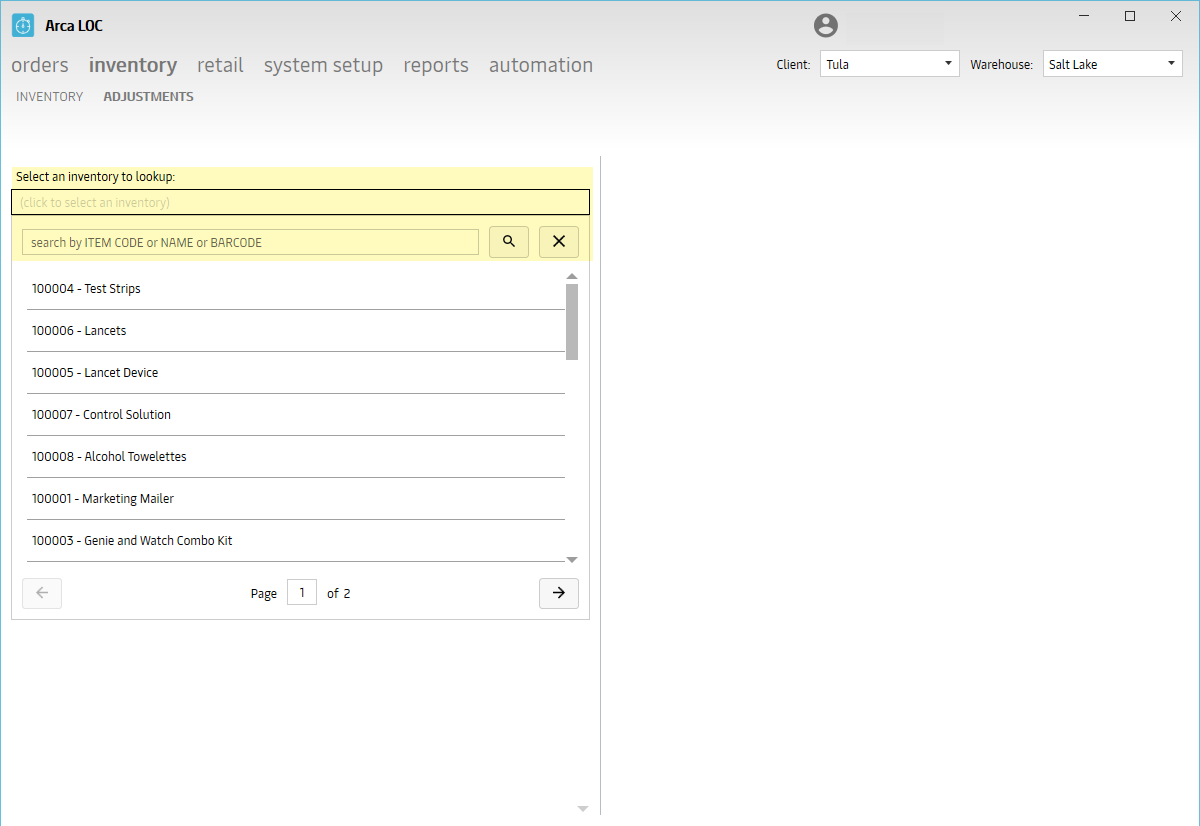
Item Lookup
To adjust inventory associated to an item, you must first select your item. You can pull this up using any of the following criteria:
- Item Code - customer part number
- Item Name - customer item name
- Barcode - customer item UPC
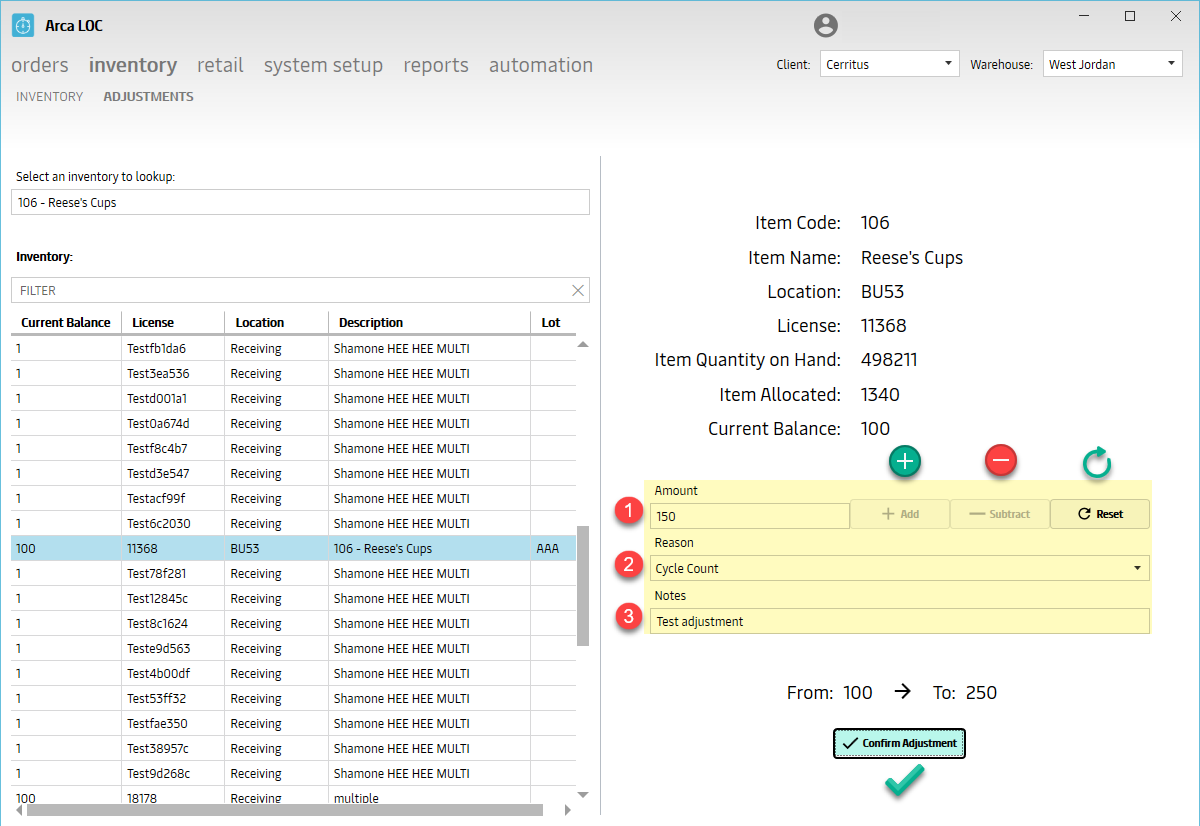
Create Inventory Adjustment
After you have selected your item, you can now adjust the inventory. Populate the following fields:
- Amount - the quantity you are adjusting
- Add - add stock
- Subtract - remove inventory
- Reset - reset edit quantity back to zero
- Reason - pull-down list of options from which to choose (i.e. Cycle Count, Transfer, etc)
- Notes - a free-style field to write in notes on the adjustment
Once the screen looks correct, verify the quantity adjustment area, you will click "Confirm Adjustment" to complete the transaction.
API Calls
- InventoryAdjust
Retail
Assignment
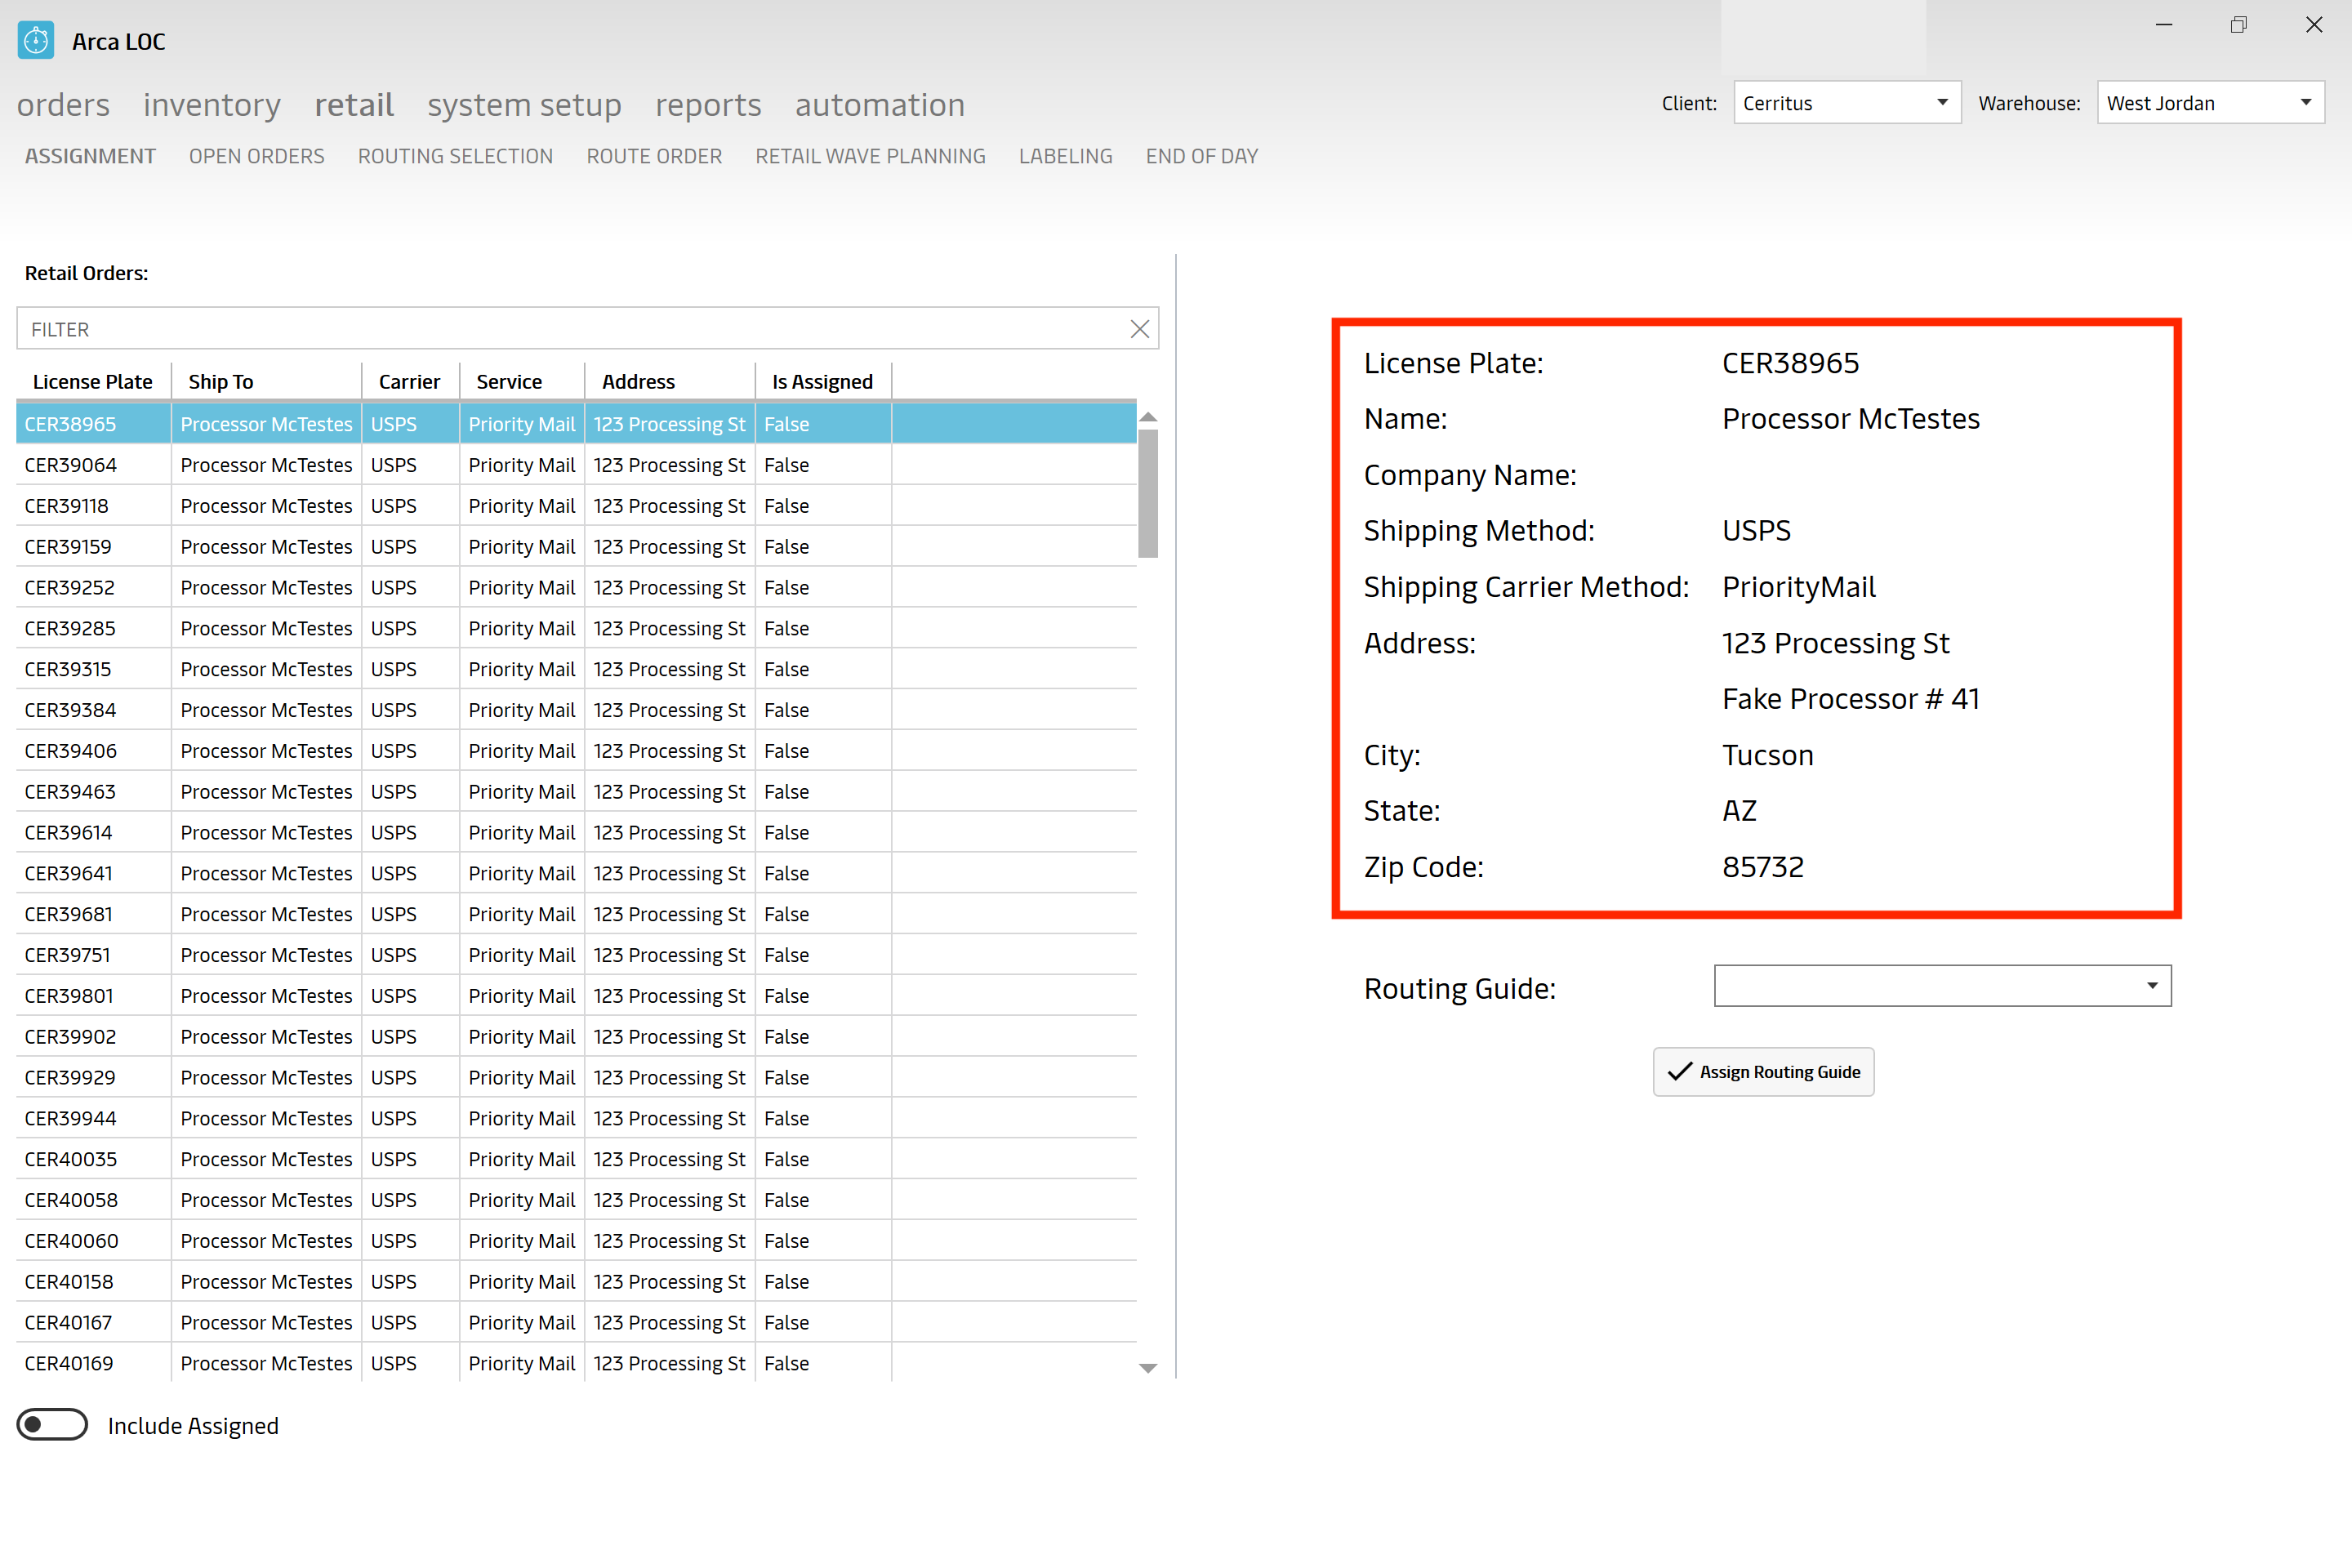
The "Assignment" portion of ARCA LOC Retail is designed to assign routing guides (category) for retail orders (store orders). You must assign a routing guide before you can print labels.
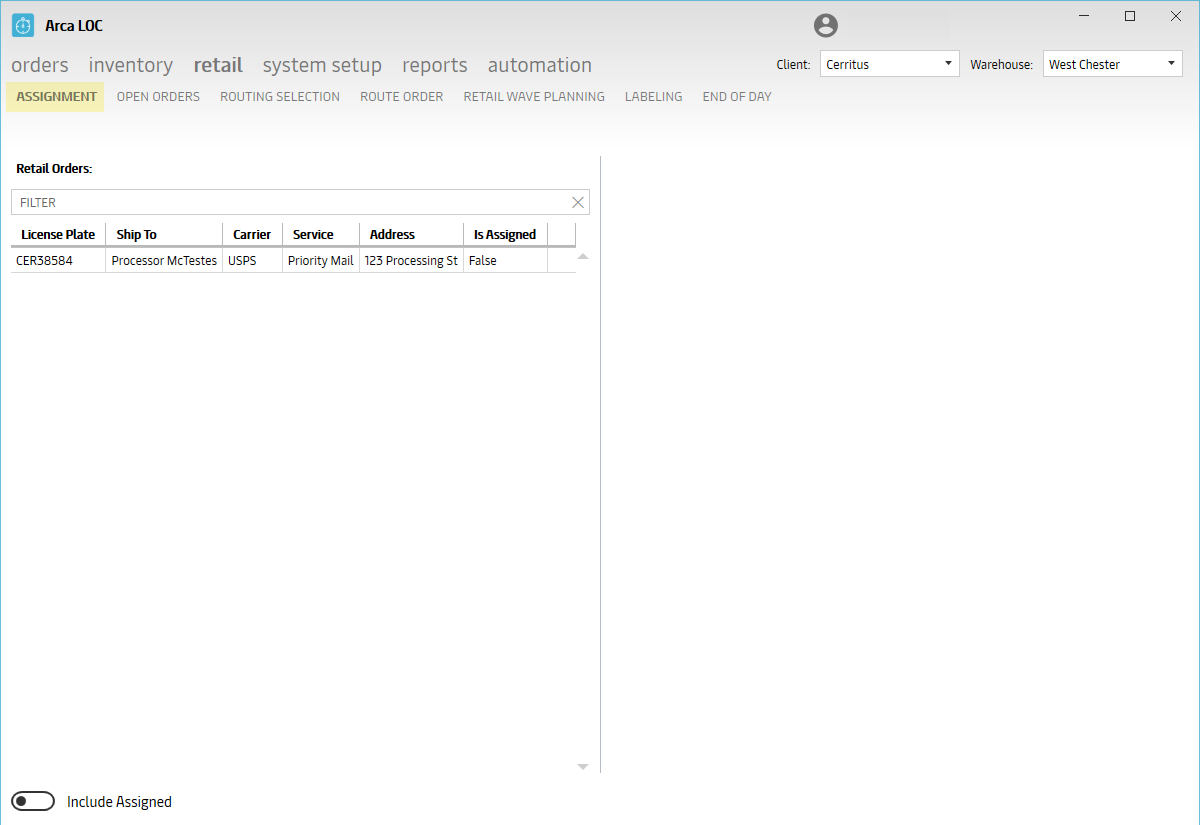
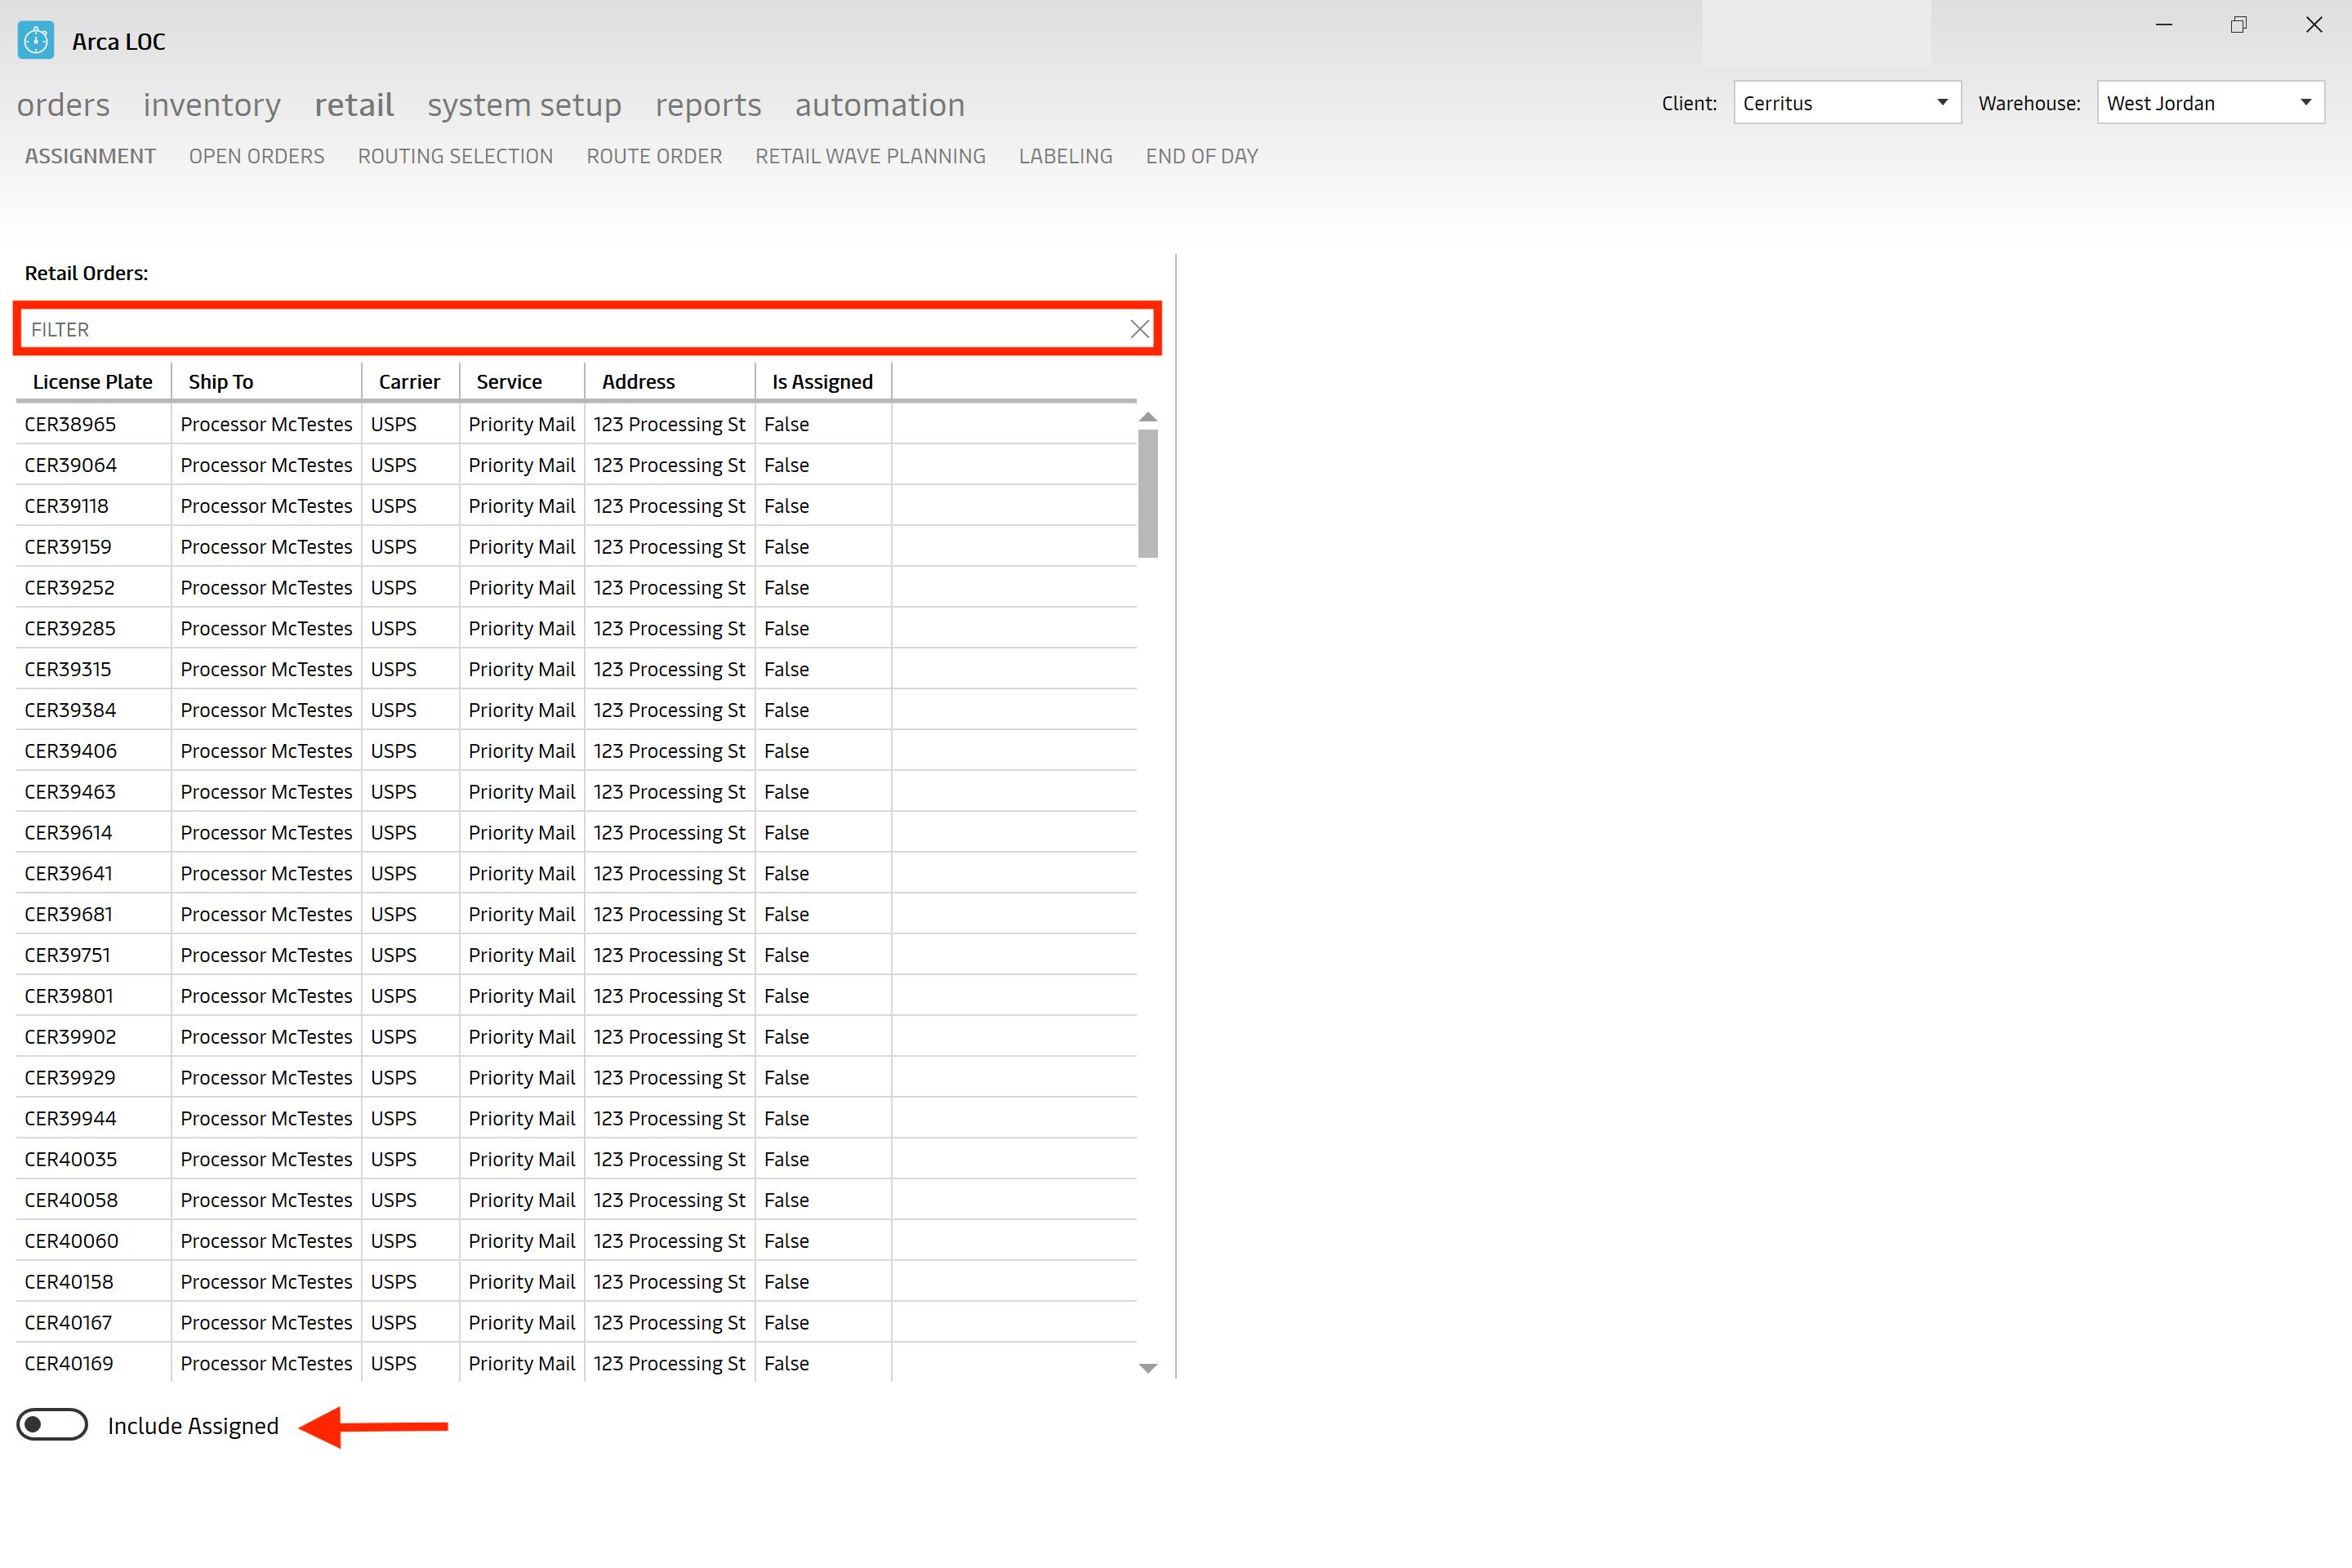
Retail Orders
To find a retail order, you may search using the following criteria:
- License Plate - unique identifier for the customer sales order number; non-pallet
- Ship To - the ship to delivery name
- Carrier - the carrier company service that is delivering the package
- Service - the mode of delivery used by the carrier delivering the package
- Address - the ship to address
Note
You may also include Assigned orders by toggling the switch ON/OFF at the bottom left.
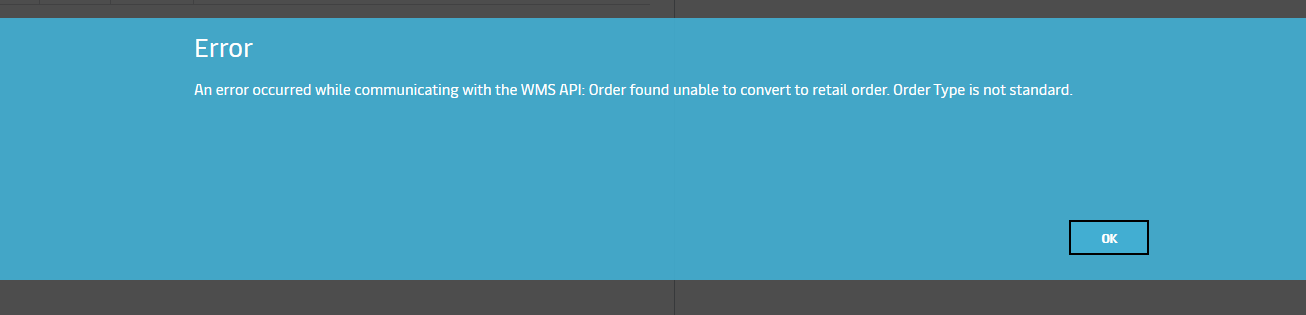
Convert to Retail
This new feature will allow a user to search for a standard order and convert it to a retail type order. Only standard orders are allowed to be converted to retail. The standard order must be in either status Back Order or Order Created to be converted to retail. If you try to convert an order that is not the correct type or status, the following error messages will be shown.

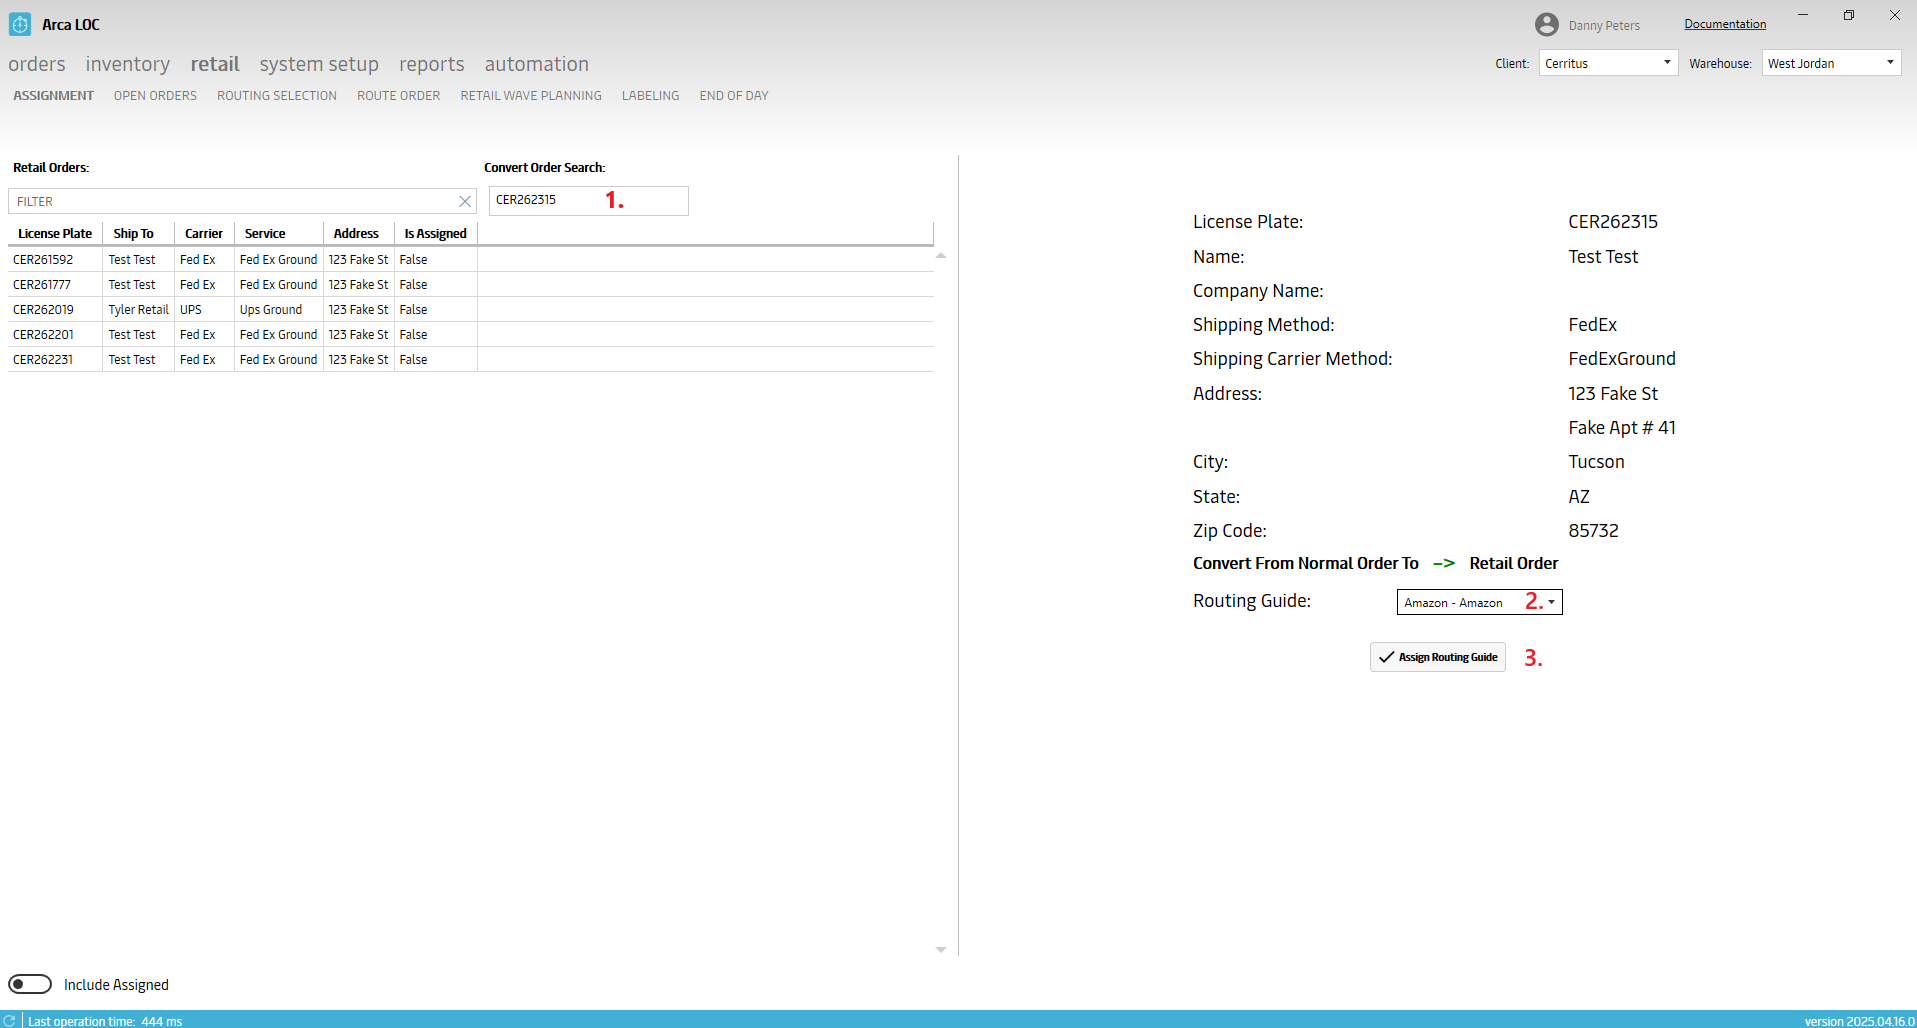
Search for an eligible standard order to convert.
Select a routing guide from the drop-down list. *Routing Guides are managed through the system setup tab.
Click on assign routing guide. This will convert the order type to be retail and assign the selected routing guide in one step.
Retail Details
You will find the following information provided, per item:
- License Plate - unique identifier for the customer sales order number; non-pallet
- Name - the ship to delivery name
- Company Name - the ship to company name
- Shipping Method - the carrier company service that is delivering the package
- Shipping Carrier Method - the mode of delivery used by the carrier delivering the package
- Address - the ship to street address
- City - the ship to city
- State - the ship to state
- Zip Code - the ship to zip code
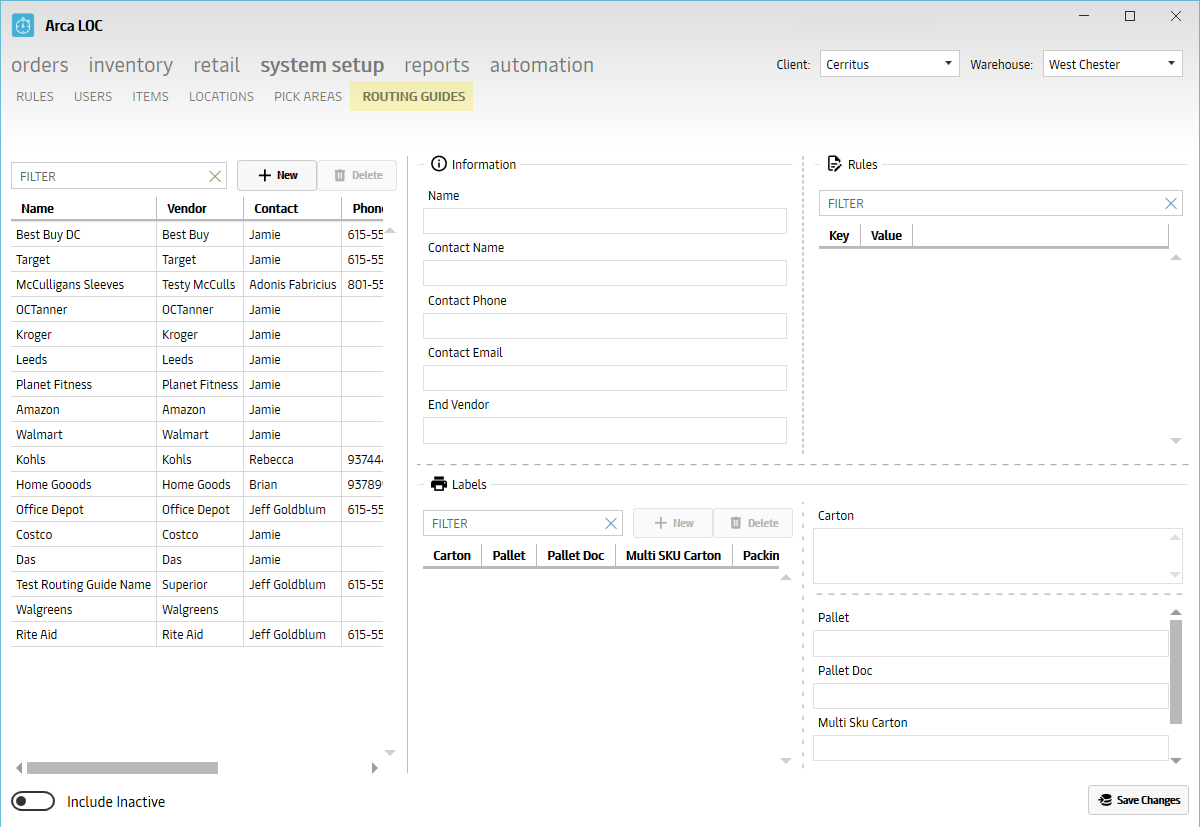
Routing Guides
A routing guide in a warehouse management system is a set of guidelines or instructions that dictate the proper routing of inbound and outbound shipments within a warehouse or distribution center. The routing guide typically includes information such as carrier selection, delivery instructions, transit times, shipping requirements, and other relevant details that help ensure that products are delivered to their intended destination in a timely and cost-effective manner.
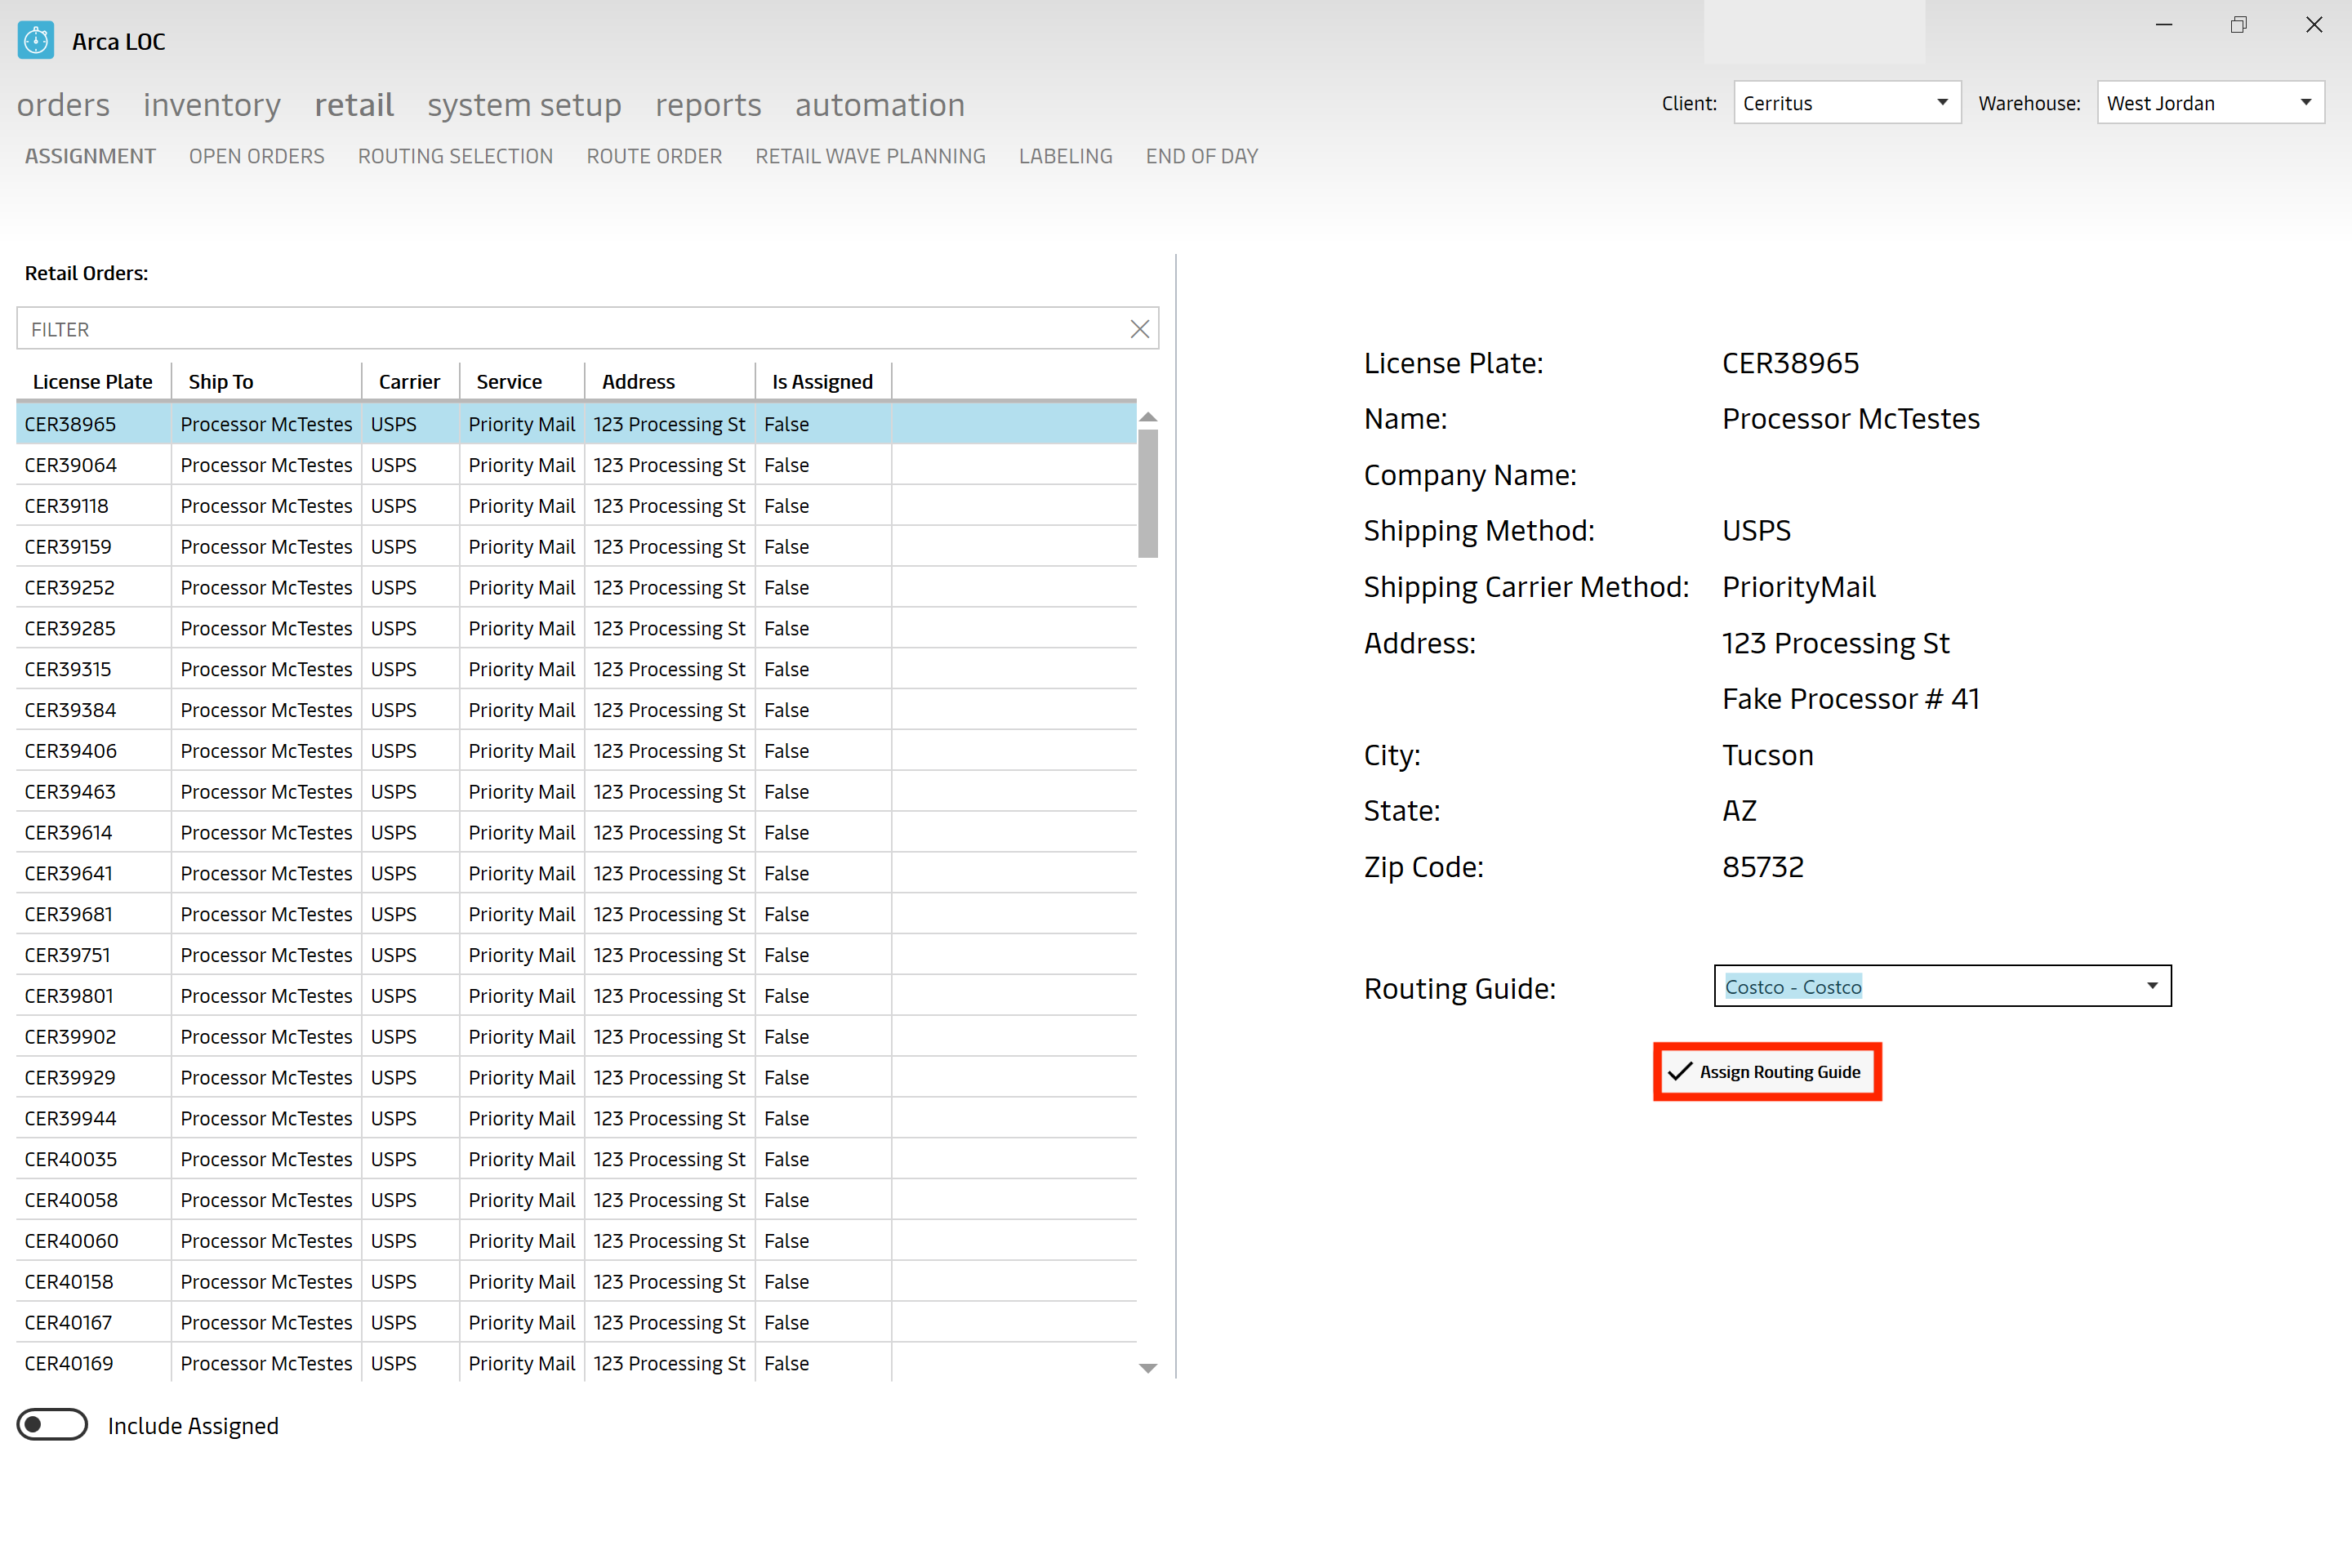
Once you select your retail order, you will need to assign a routing guide. Choose one from the pull-down menu:
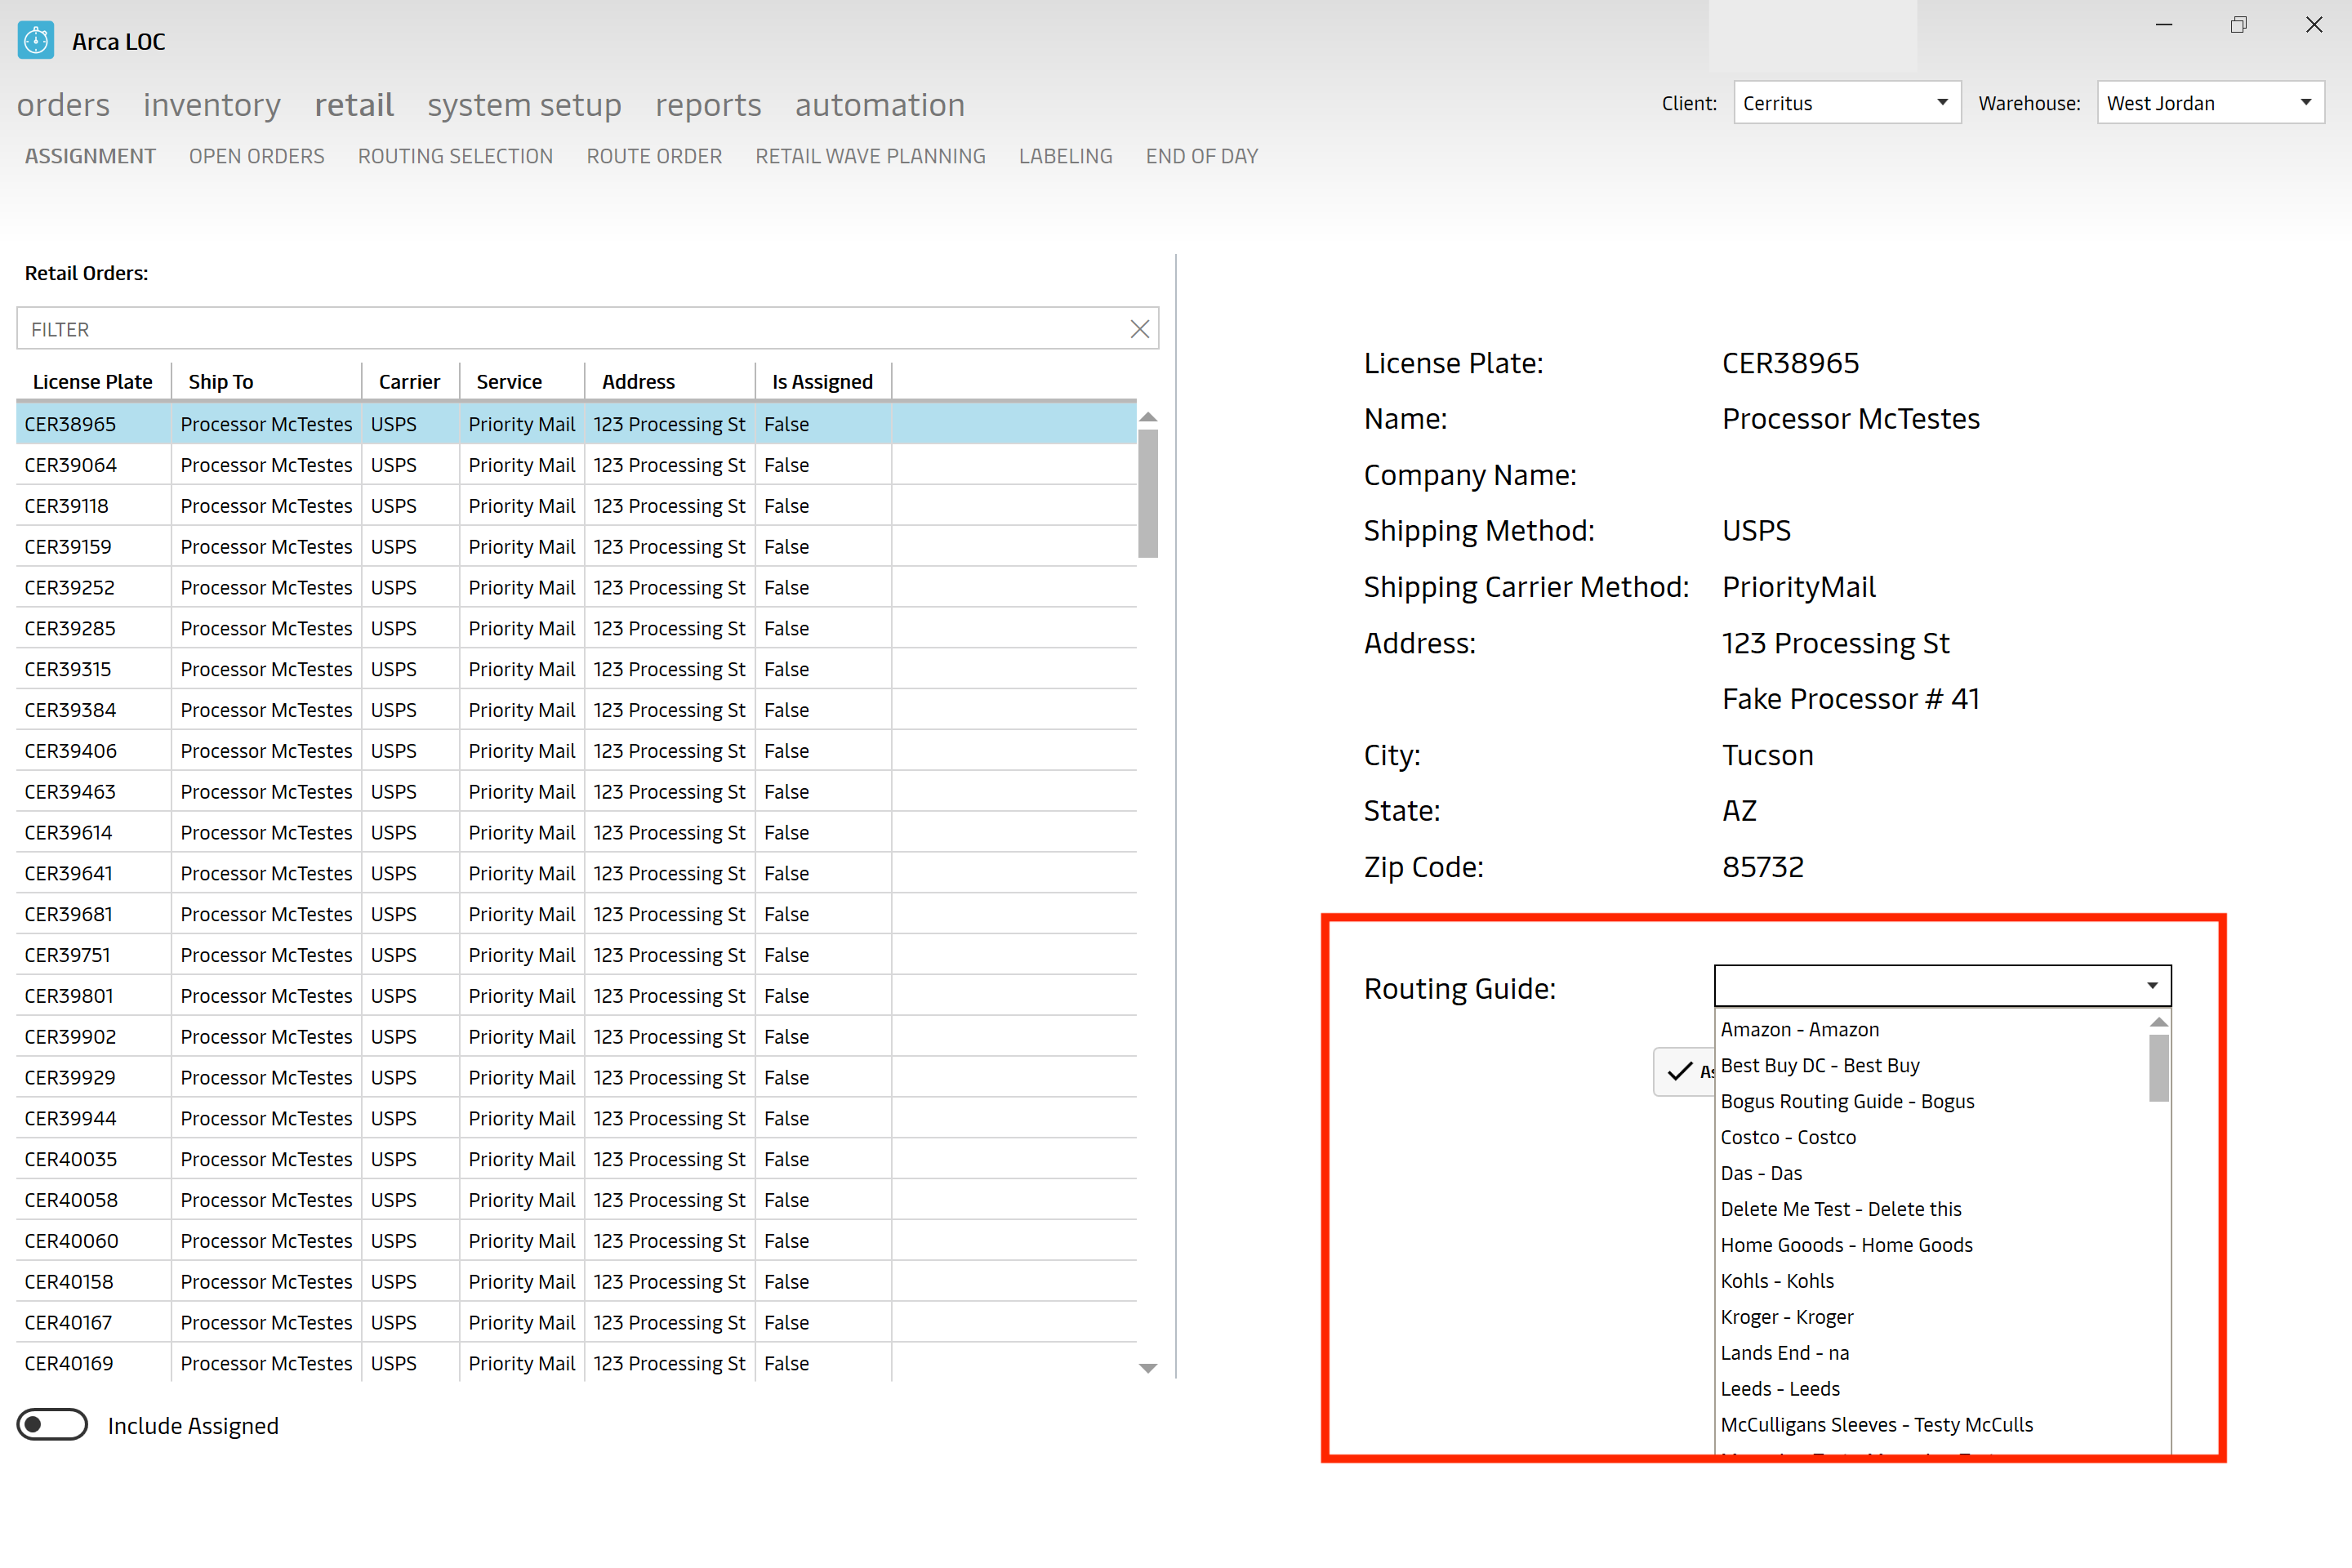
Once you are ready to proceed, click "Assign Routing Guide" to complete the transaction. You are now set to print labels, on the next module "Labeling".
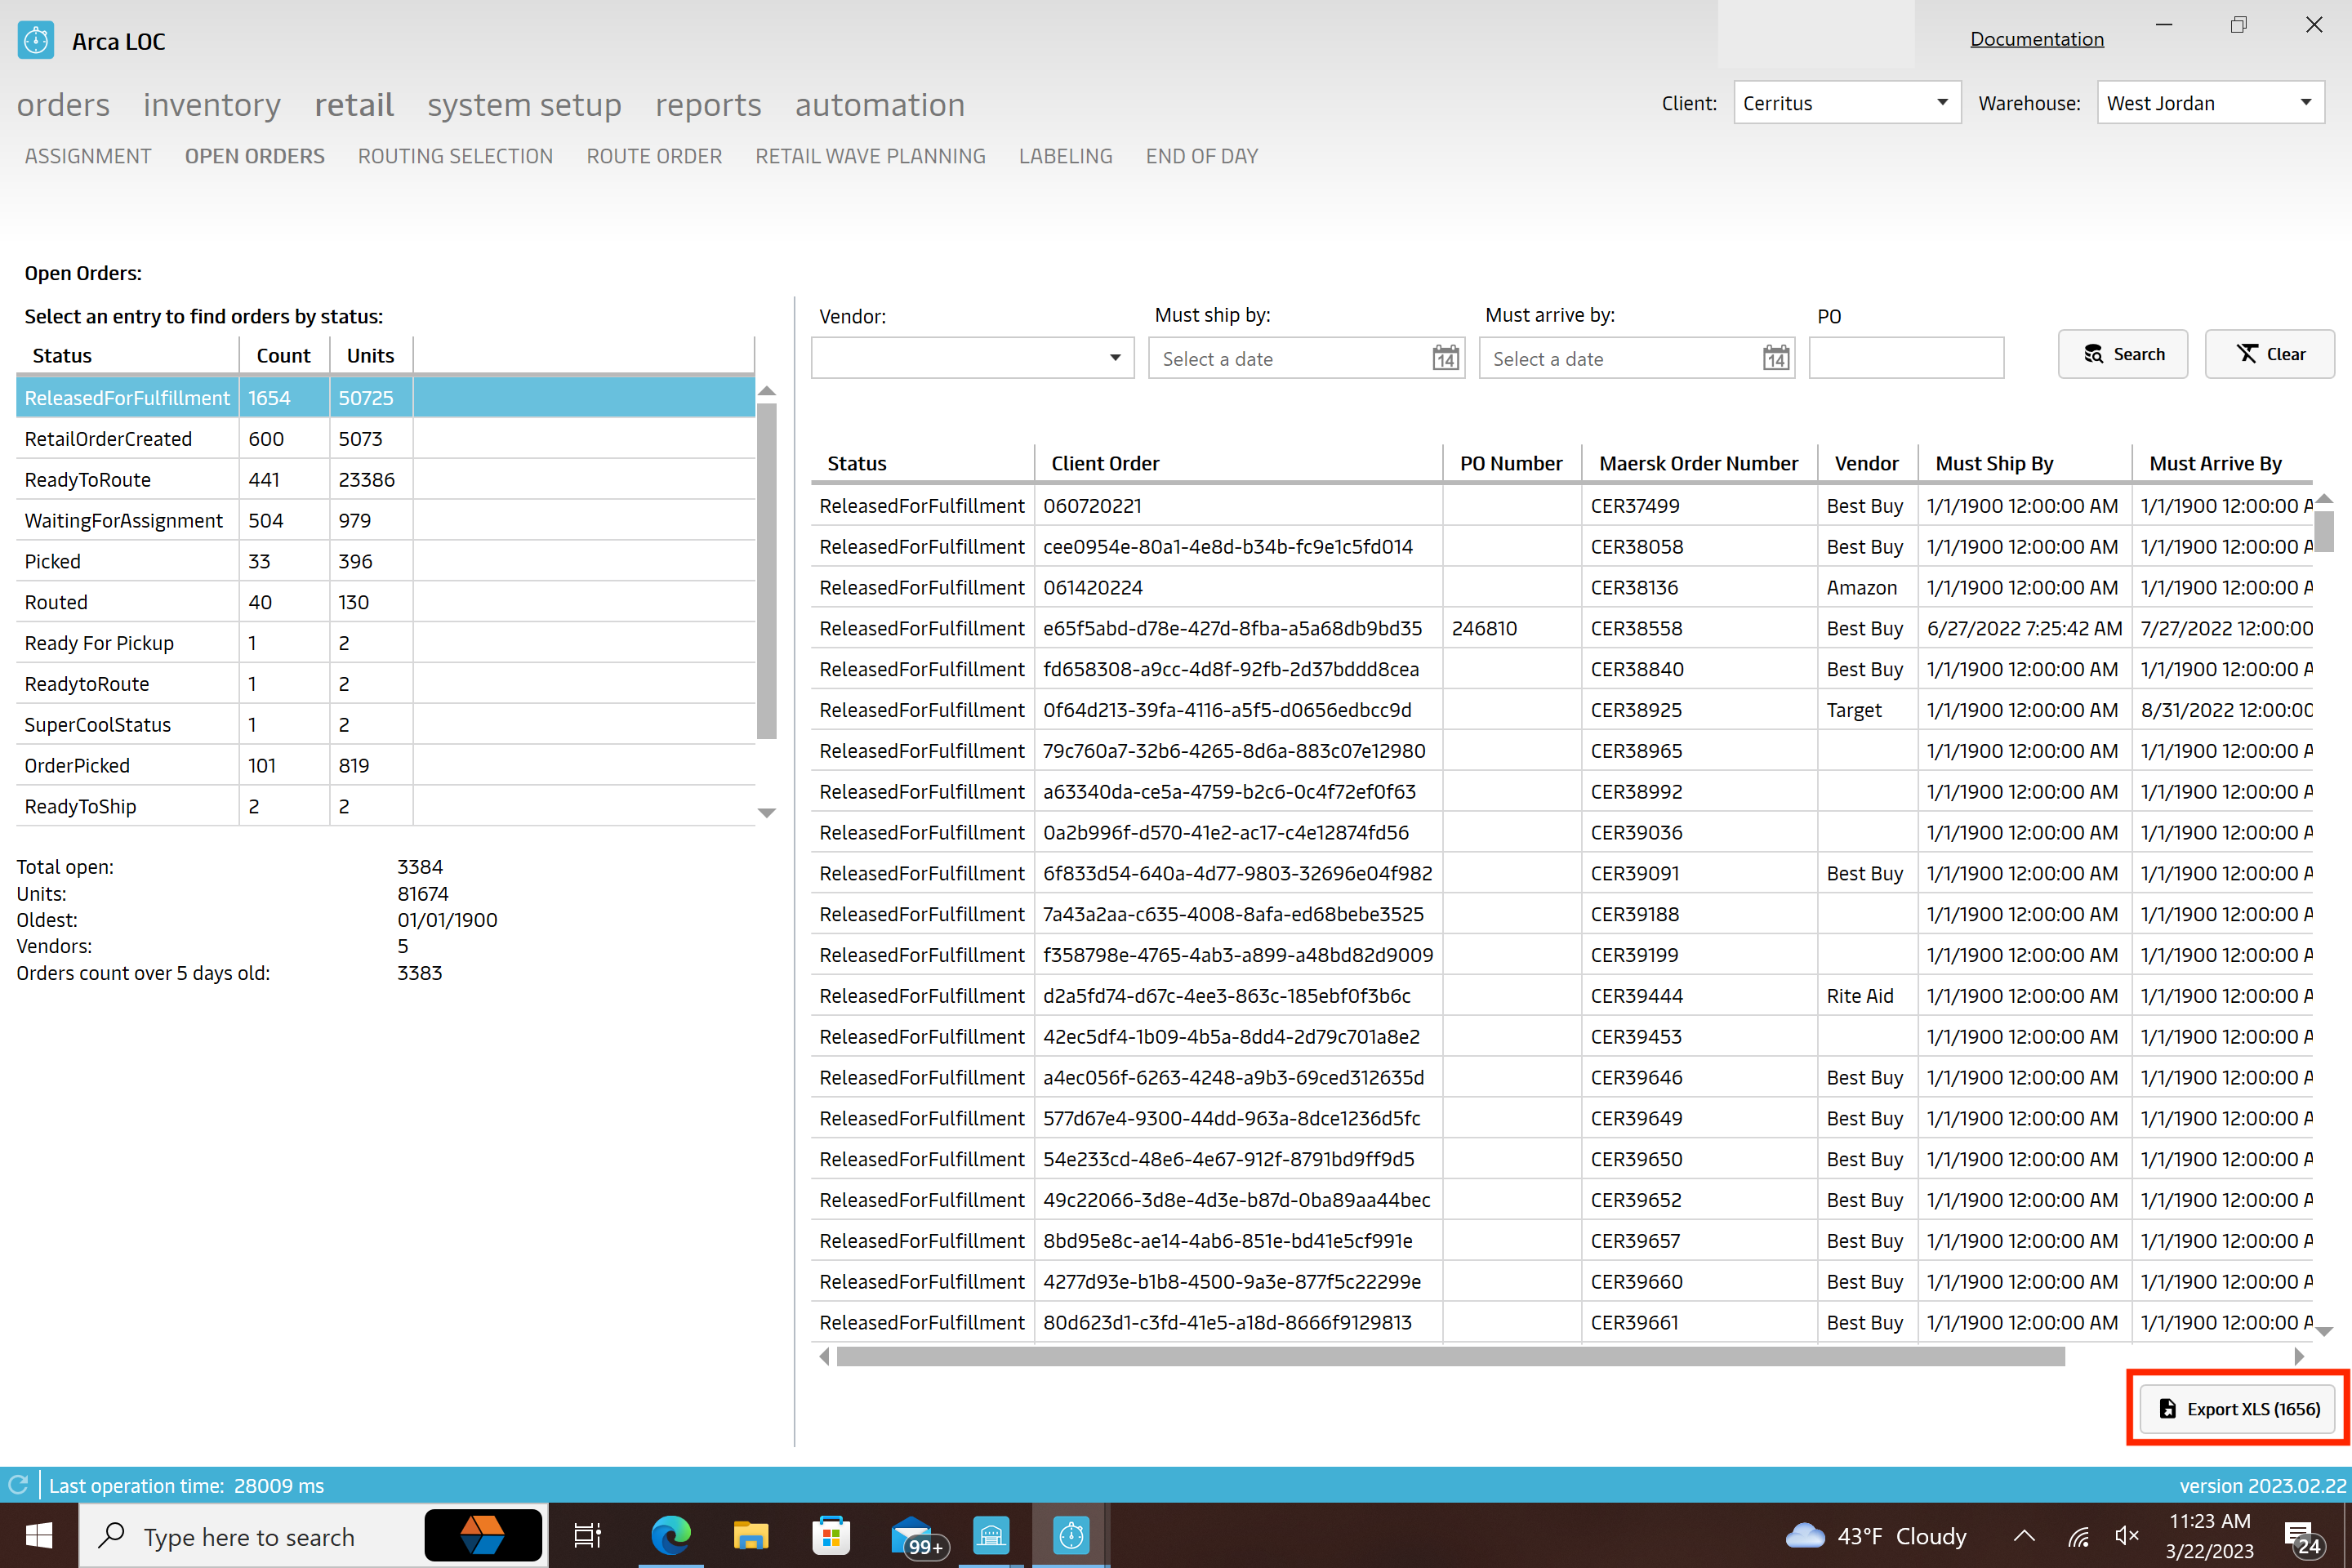
Open Orders
The "Open Orders" portion of ARCA LOC Retail will give the ability to view all open orders by status and you also have the ability to export to an excel sheet.

Under "open orders" you will see all of the different status types. You are able to click on those individually and view all of the orders that are in that status.
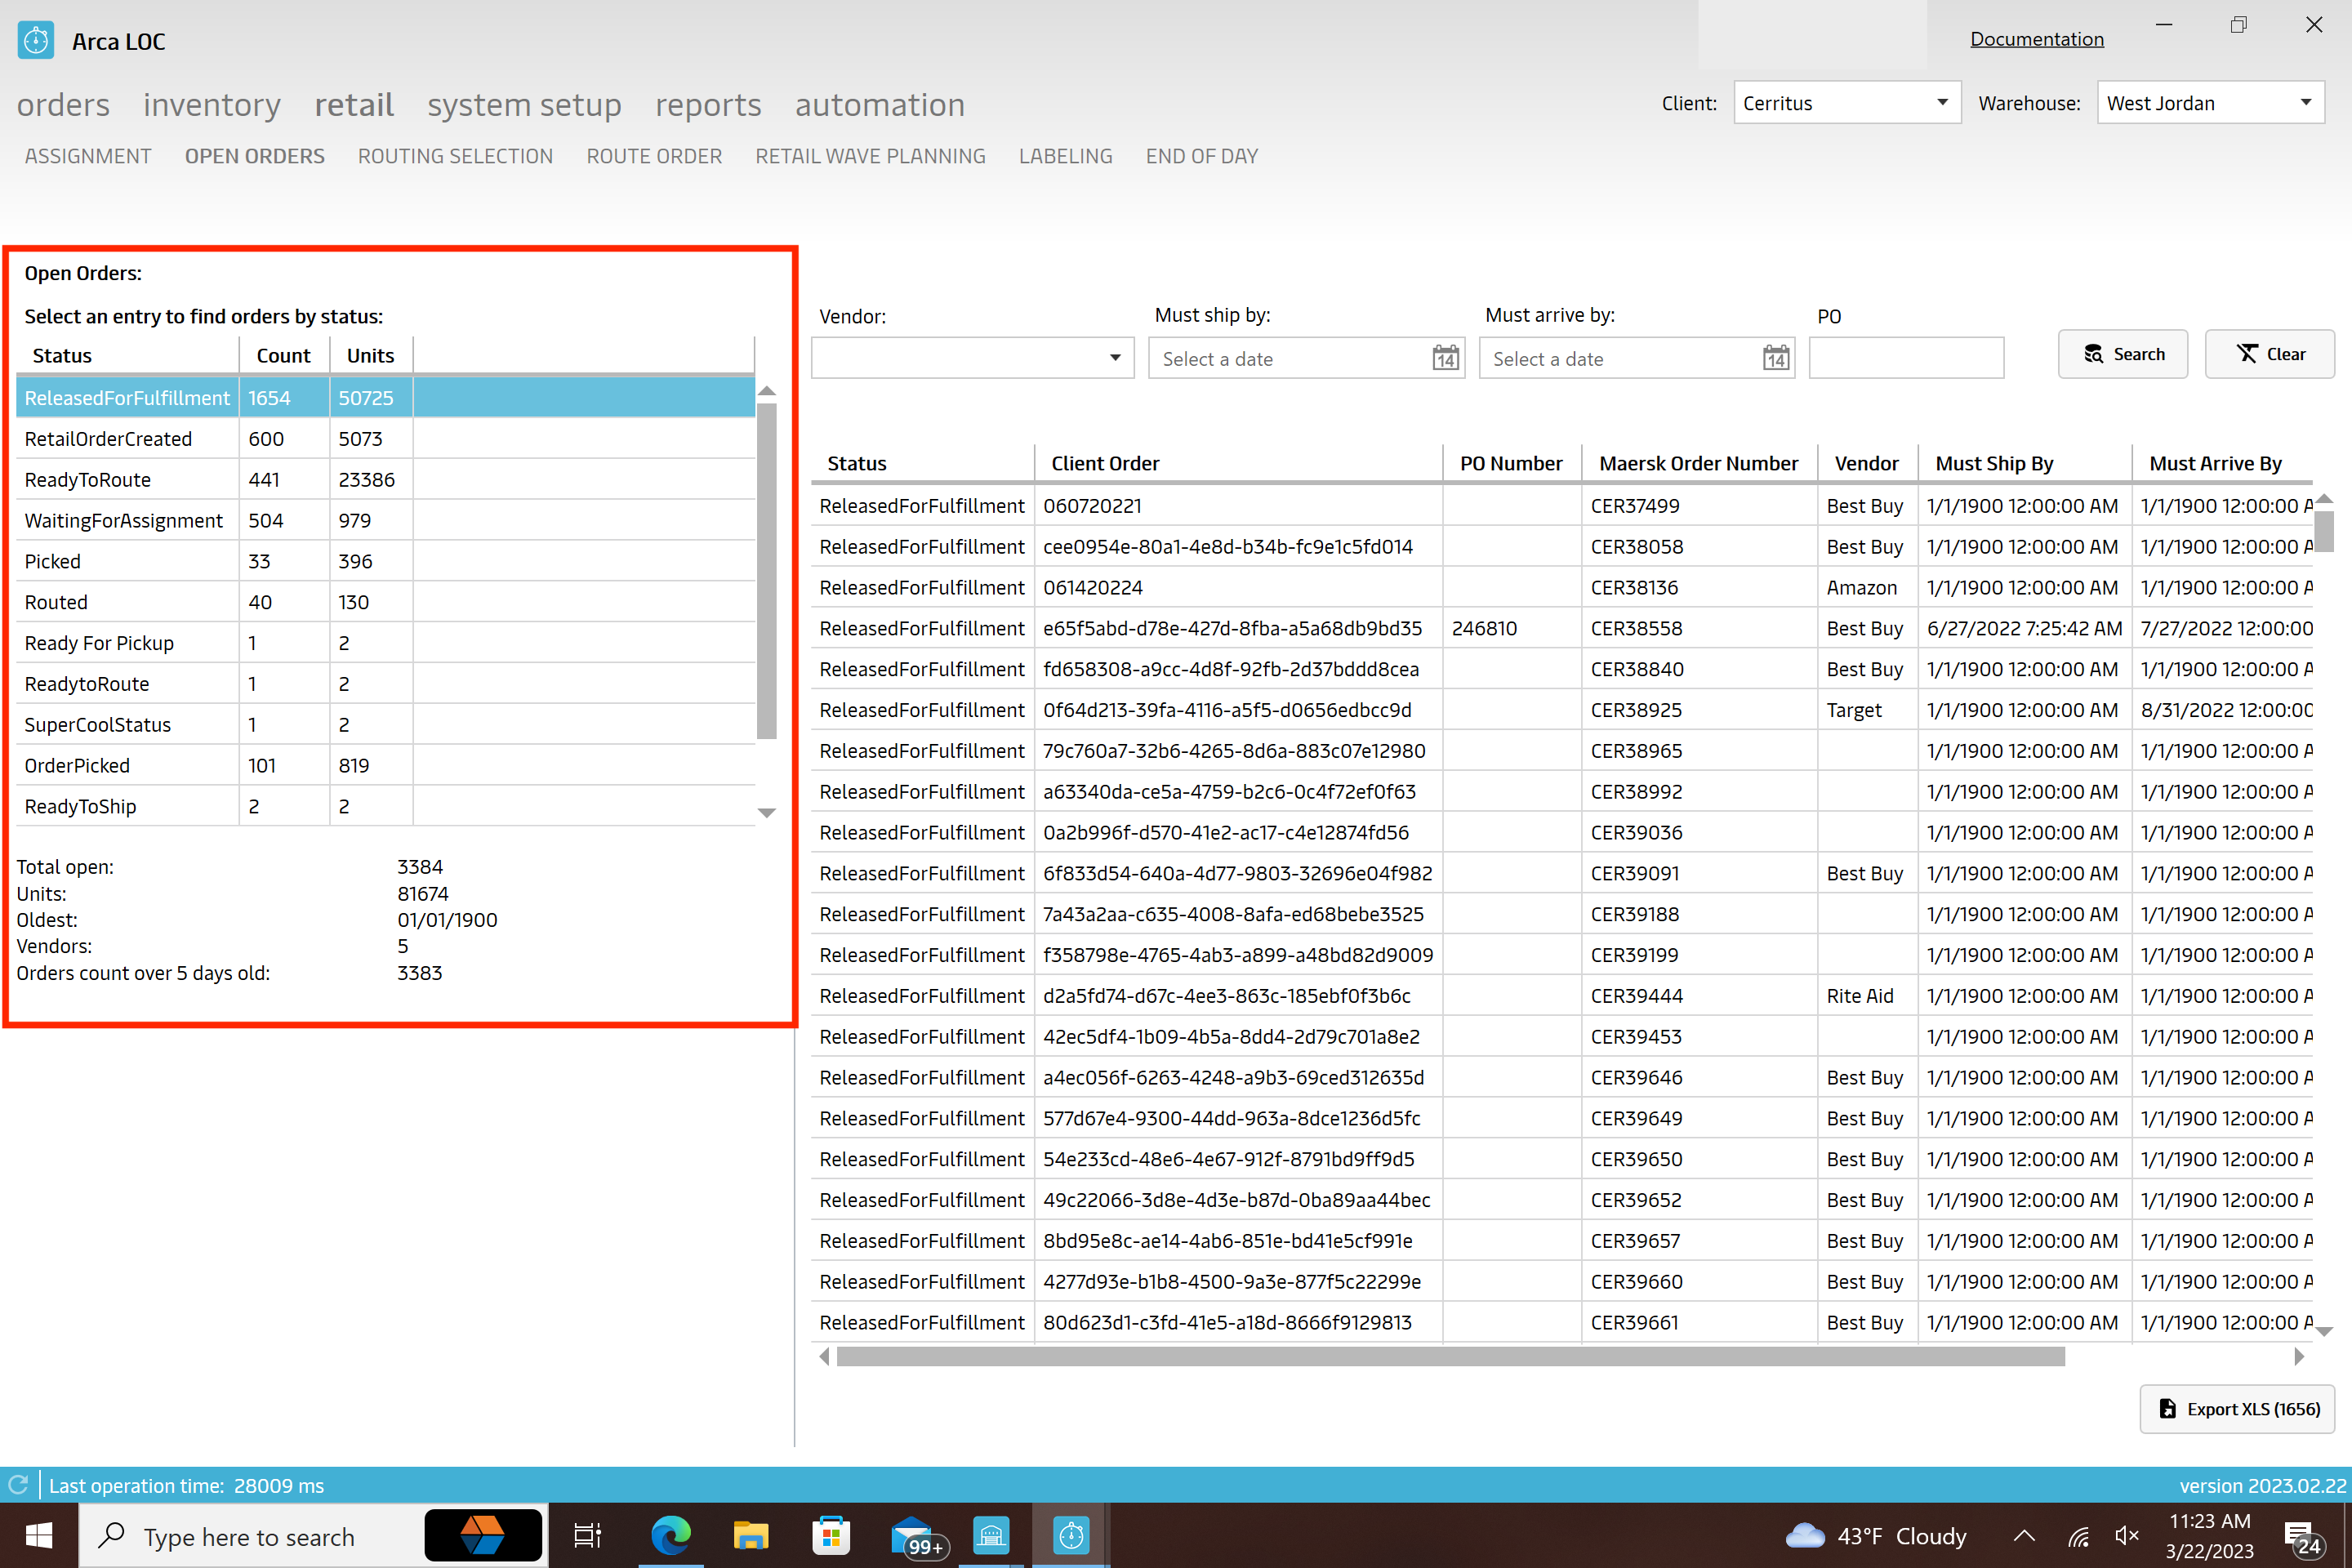
You do have the ability to filter at the top by Vendor, Must ship by date, must arrive by date as well as PO Number. Be sure you click "Search." You may also click "Clear" to clear the entire filter bar if needed.
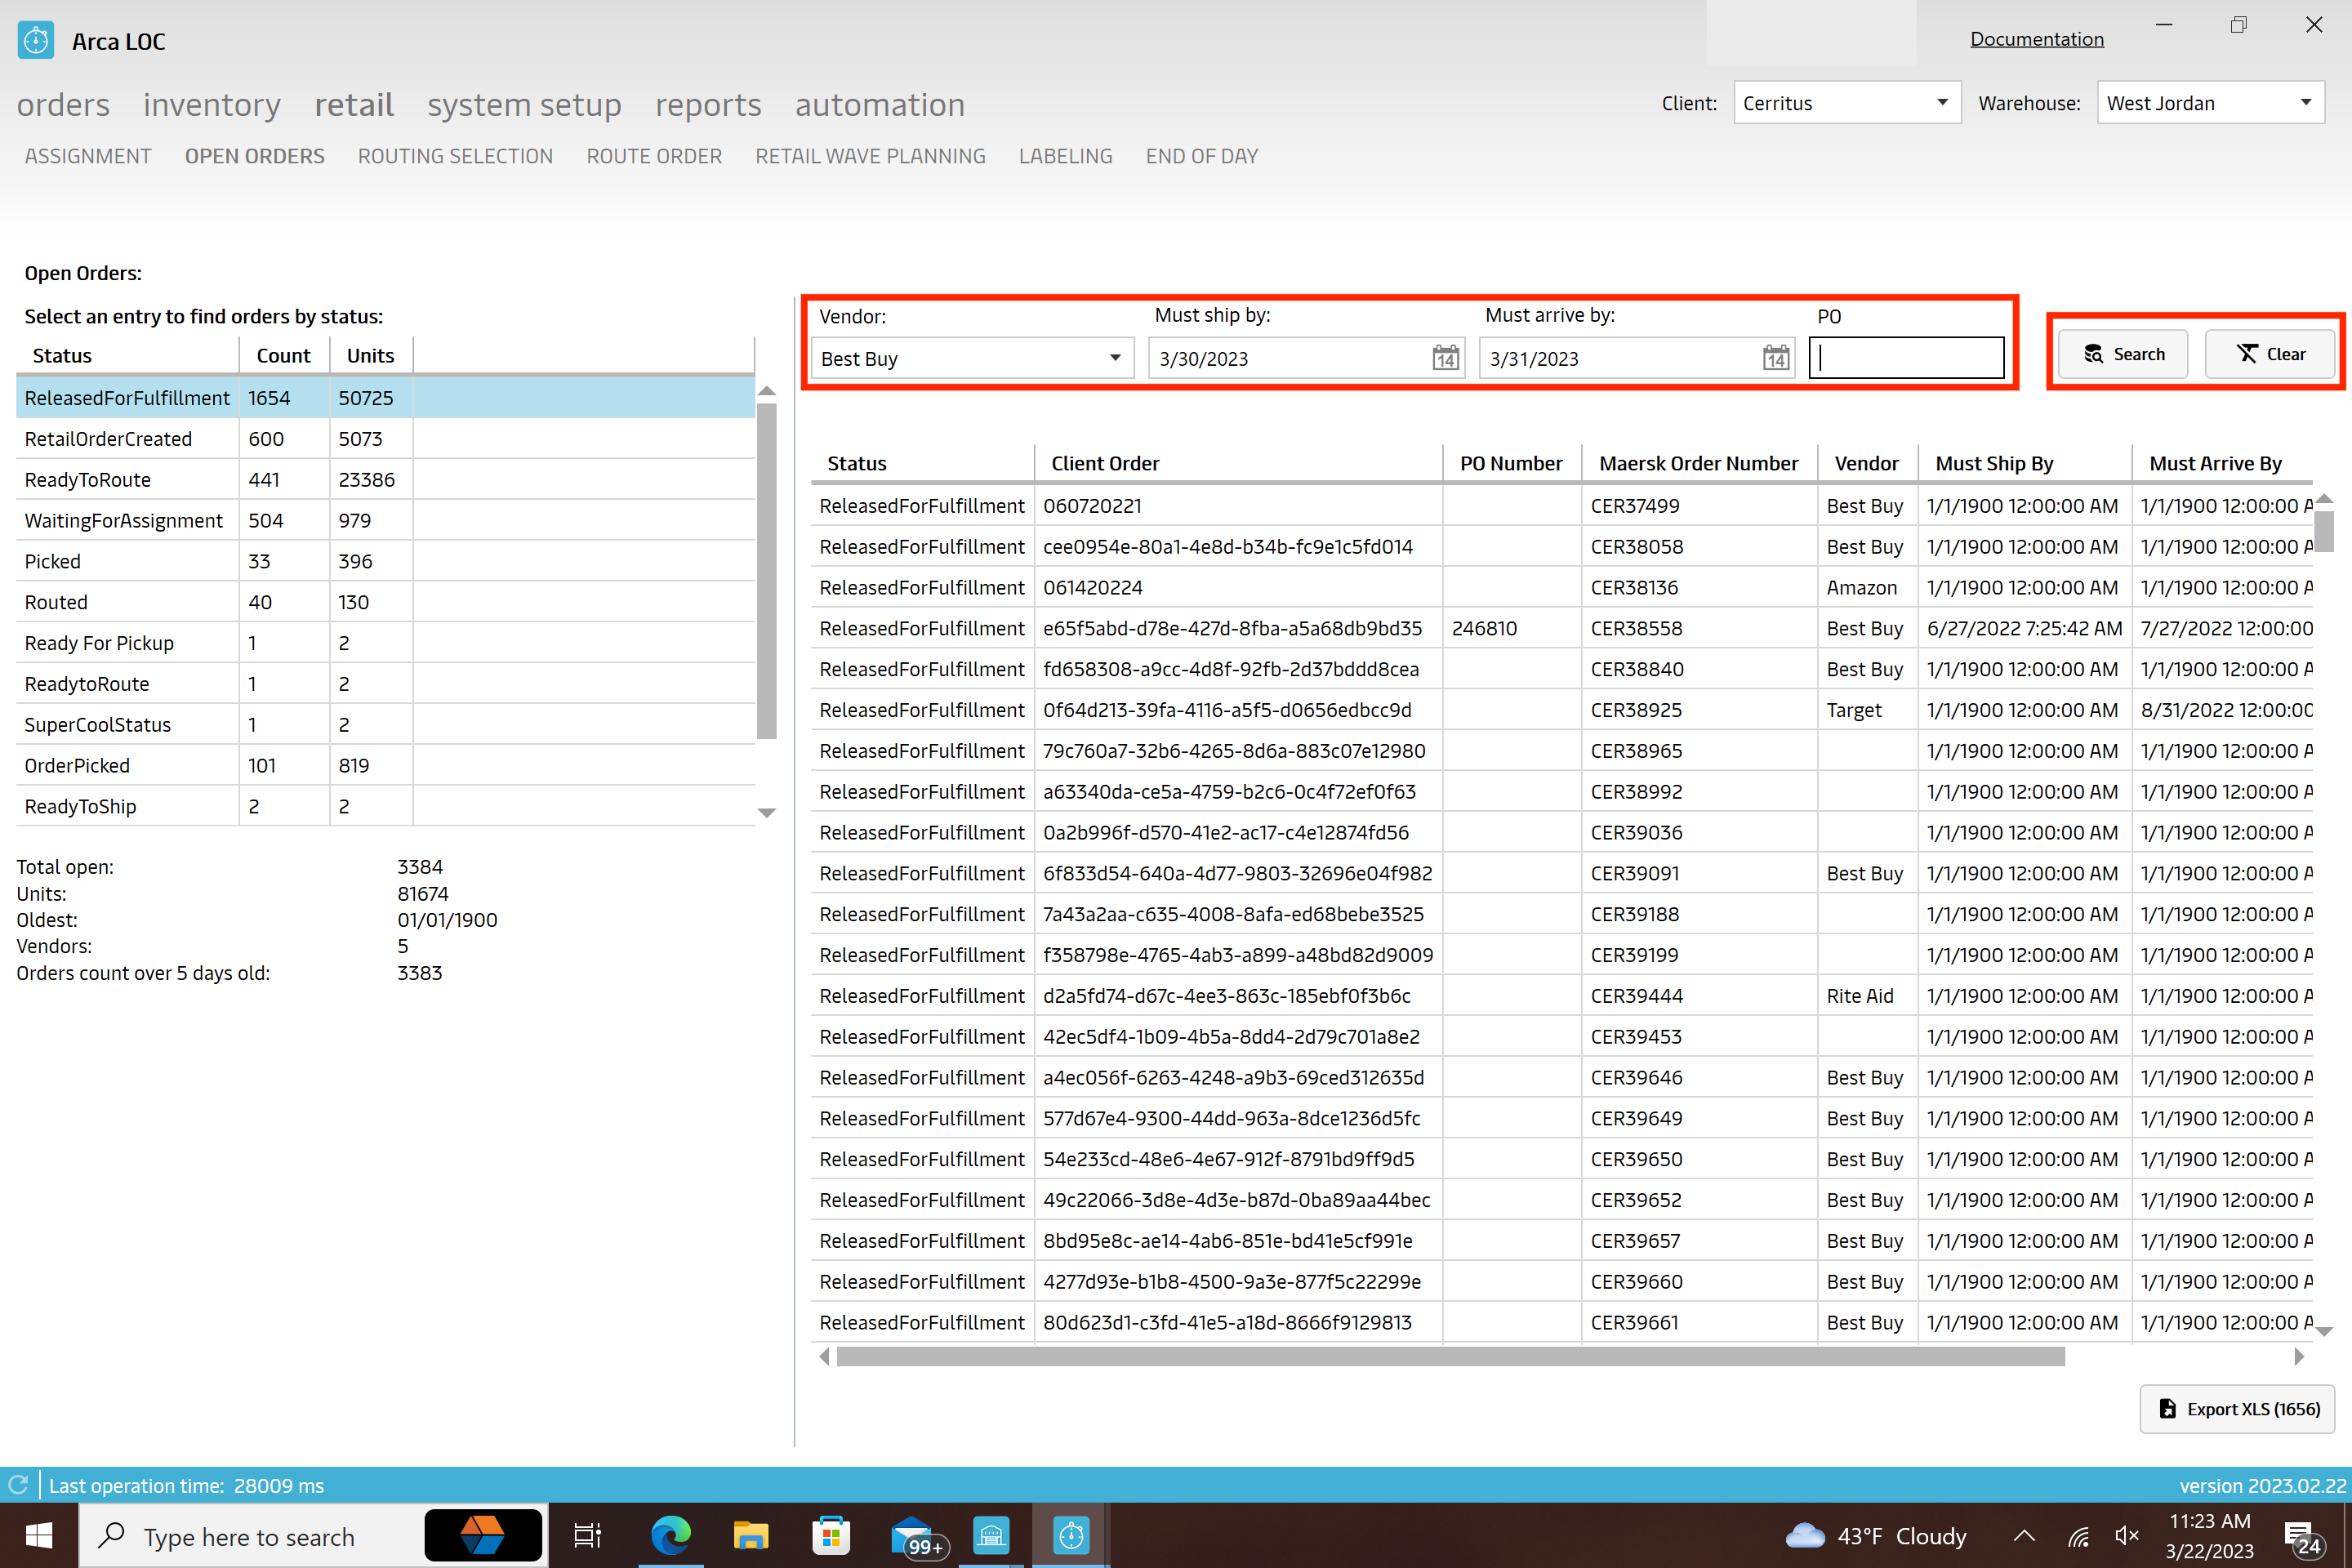
You have the option to download all of these orders to an excel sheet.
Retail Order Processing
Retail Orders will now be excluded from standard order processing using the Business Rule ExcludeRetailOrdersFromScheduling. There are two options to process your retail type orders. This is now available in the Retail module, on the Open Orders screen or you can use the Single Order Screen to process retail orders one at a time. Retail processing will function like the standard order processing screen.
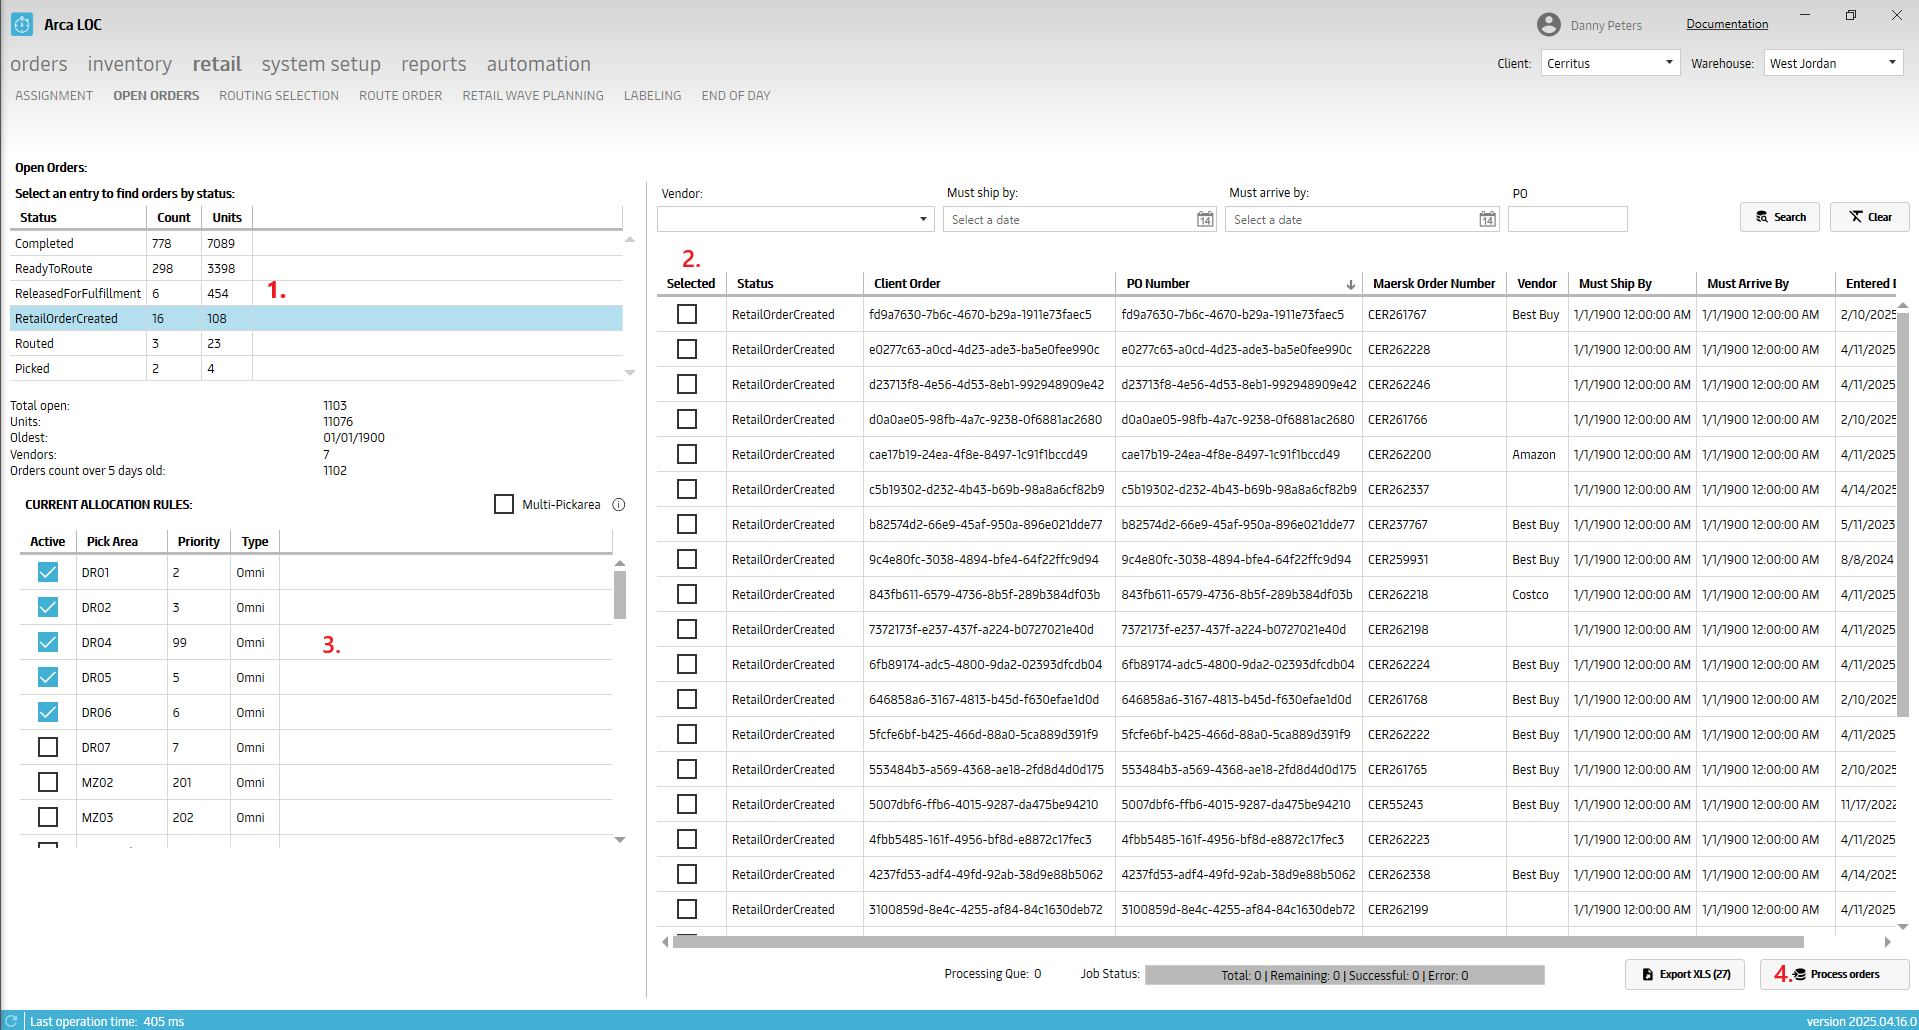
Select an eligible status group on the left side of the grid. RetailOrderCreated or ReadyToRoute.
Select the orders to be scheduled. You can use filters for Vendor, PO number and others to build the order list.
Choose the pick area(s) that the orders will be scheduled to. If you select a pick area, then the orders will be scheduled as standard orders. If you select Bulk, then the orders will be scheduled with the bulk order flow. Orders scheduled to the bulk area will need to be picked in the bulk pick station of the Arca Pick app and will pick from pallets in storage locations.
Click on process orders. Progress bar will be updated and let the user know when the processing job has been completed.
Cartonize
This new feature will run retail cartonization on a selected single or group of orders. This will populate the quantity unit of measure column and help the user decide on which method of scheduling to use for fulfilling the orders.
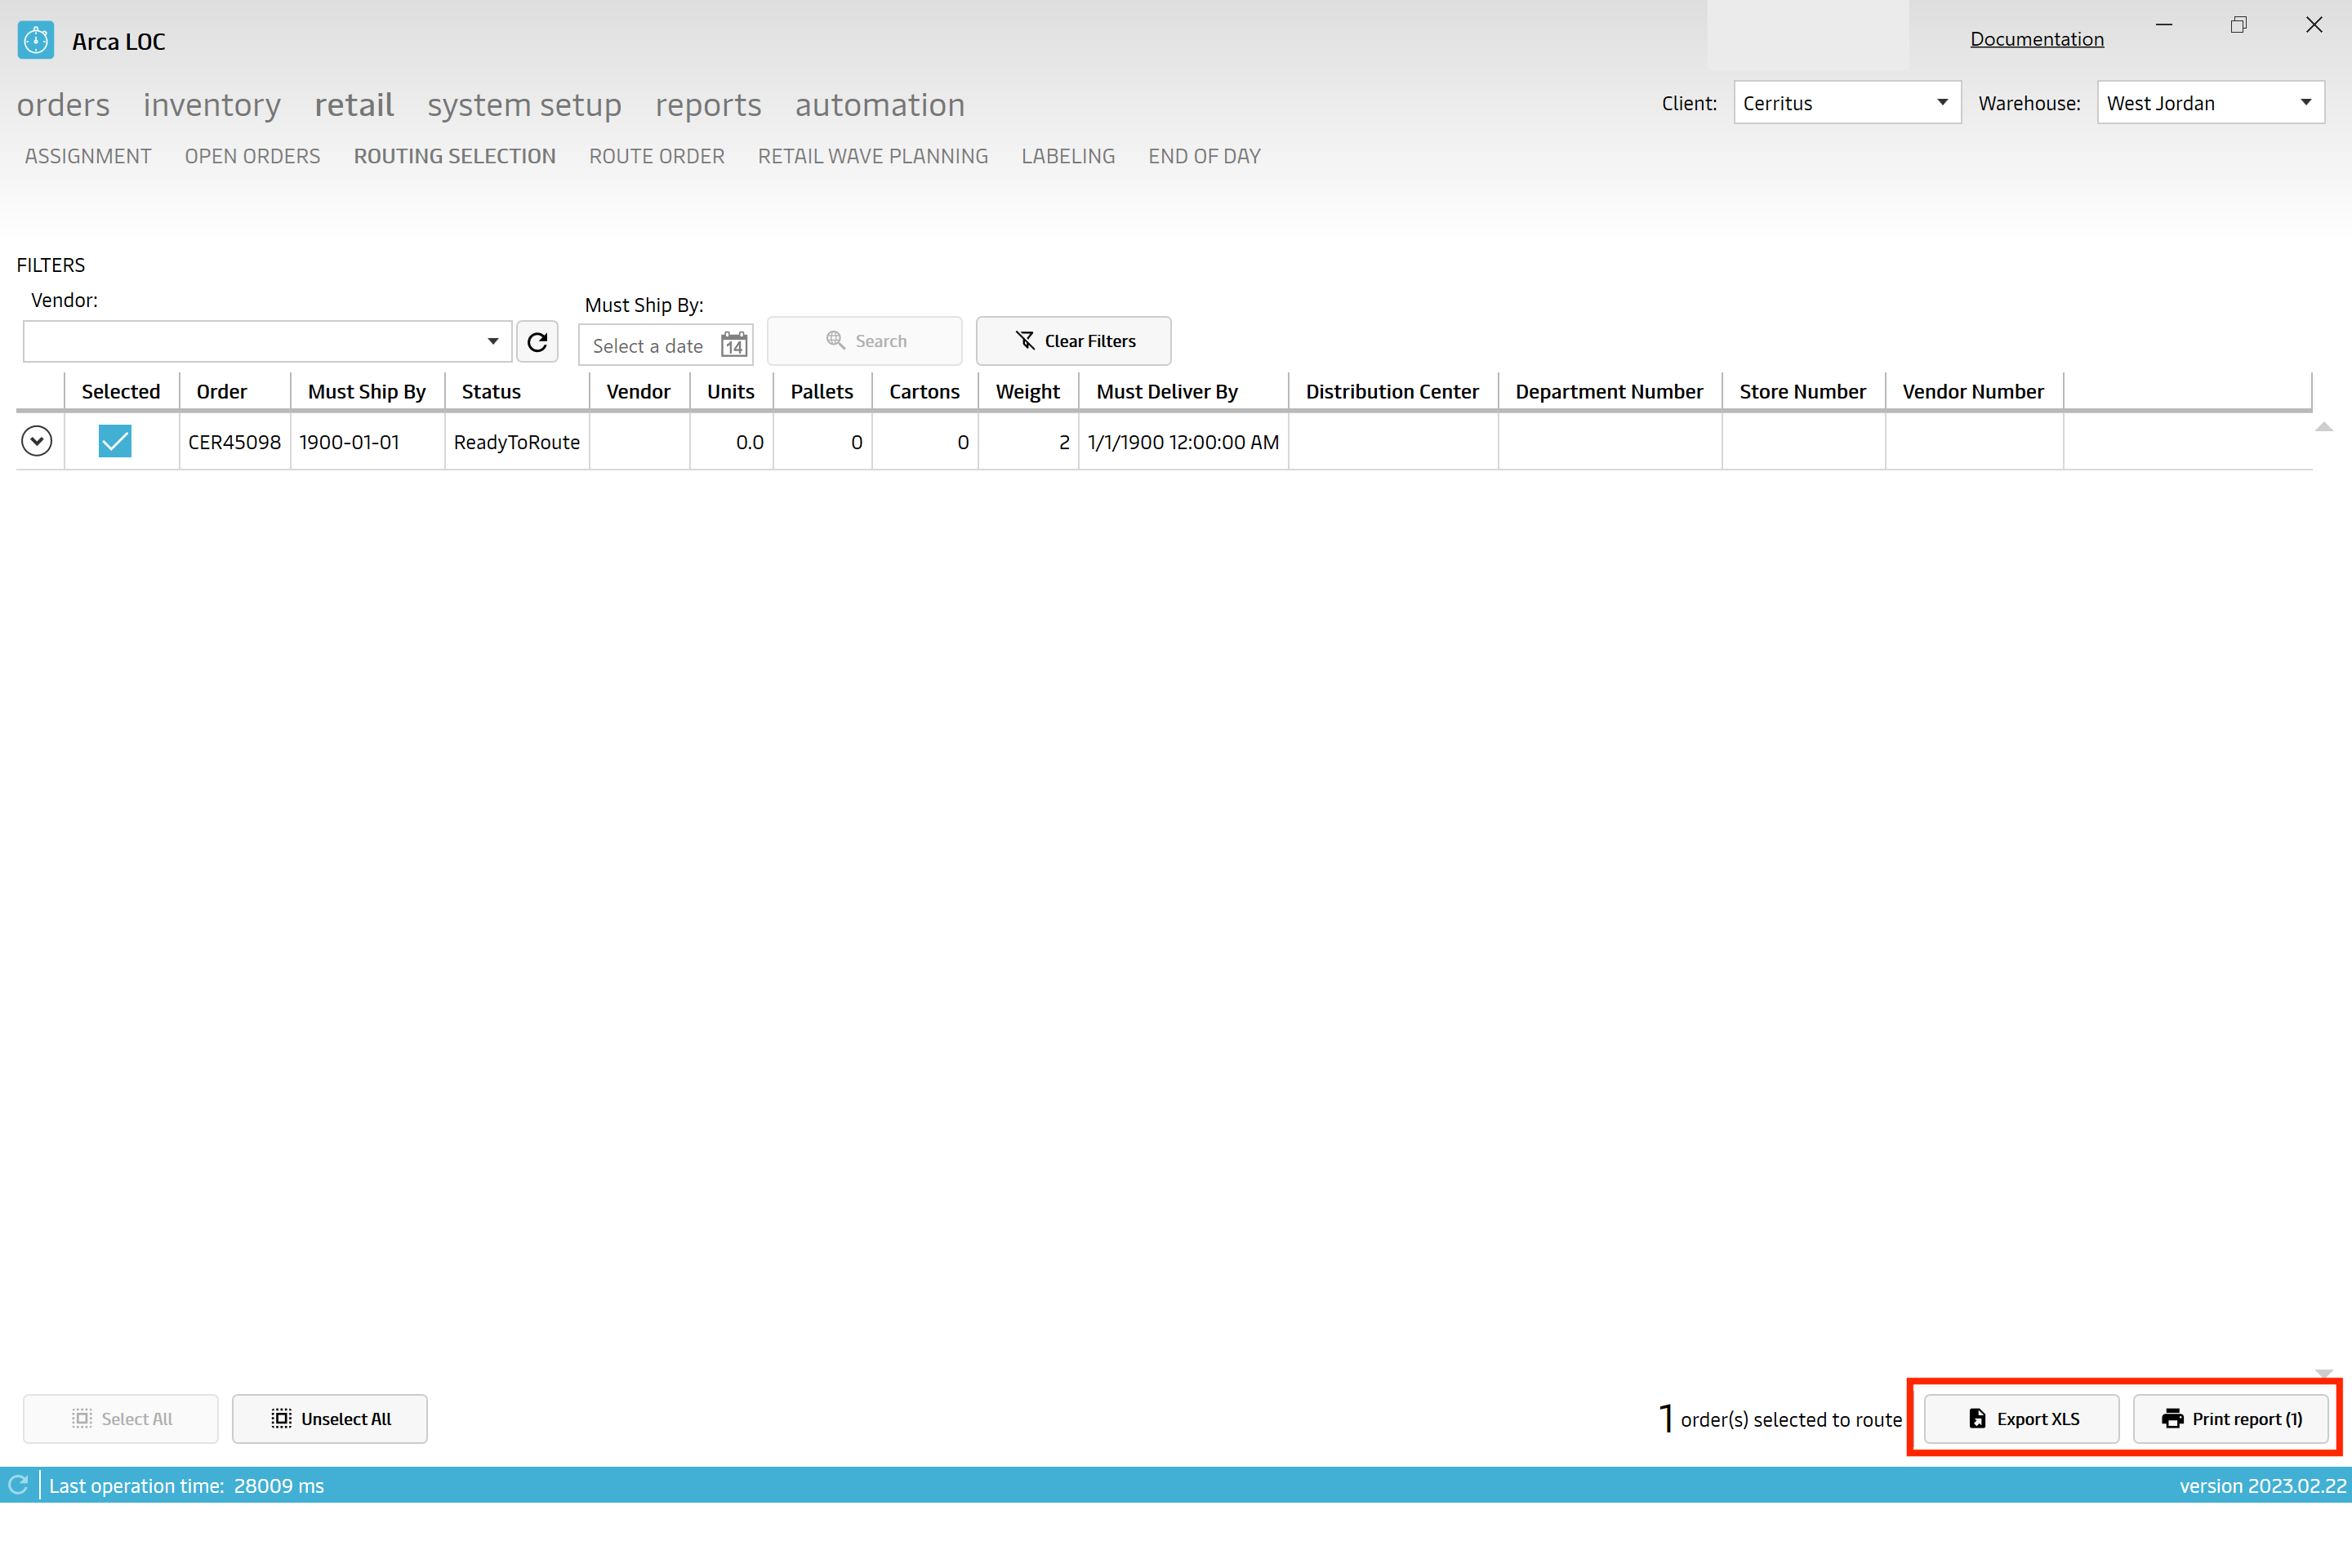
Routing Selection
This section of the User Guide will cover the "Routing Selection" portion of ARCA LOC Retail. Routing selection in a warehouse management system refers to the process of selecting the most efficient shipping route for inbound and outbound shipments based on various factors such as distance, carrier availability, transit times, shipping costs, and delivery requirements. The goal of routing selection is to minimize transportation costs and delivery time while ensuring that products are delivered to their intended destination in a timely and cost-effective manner.
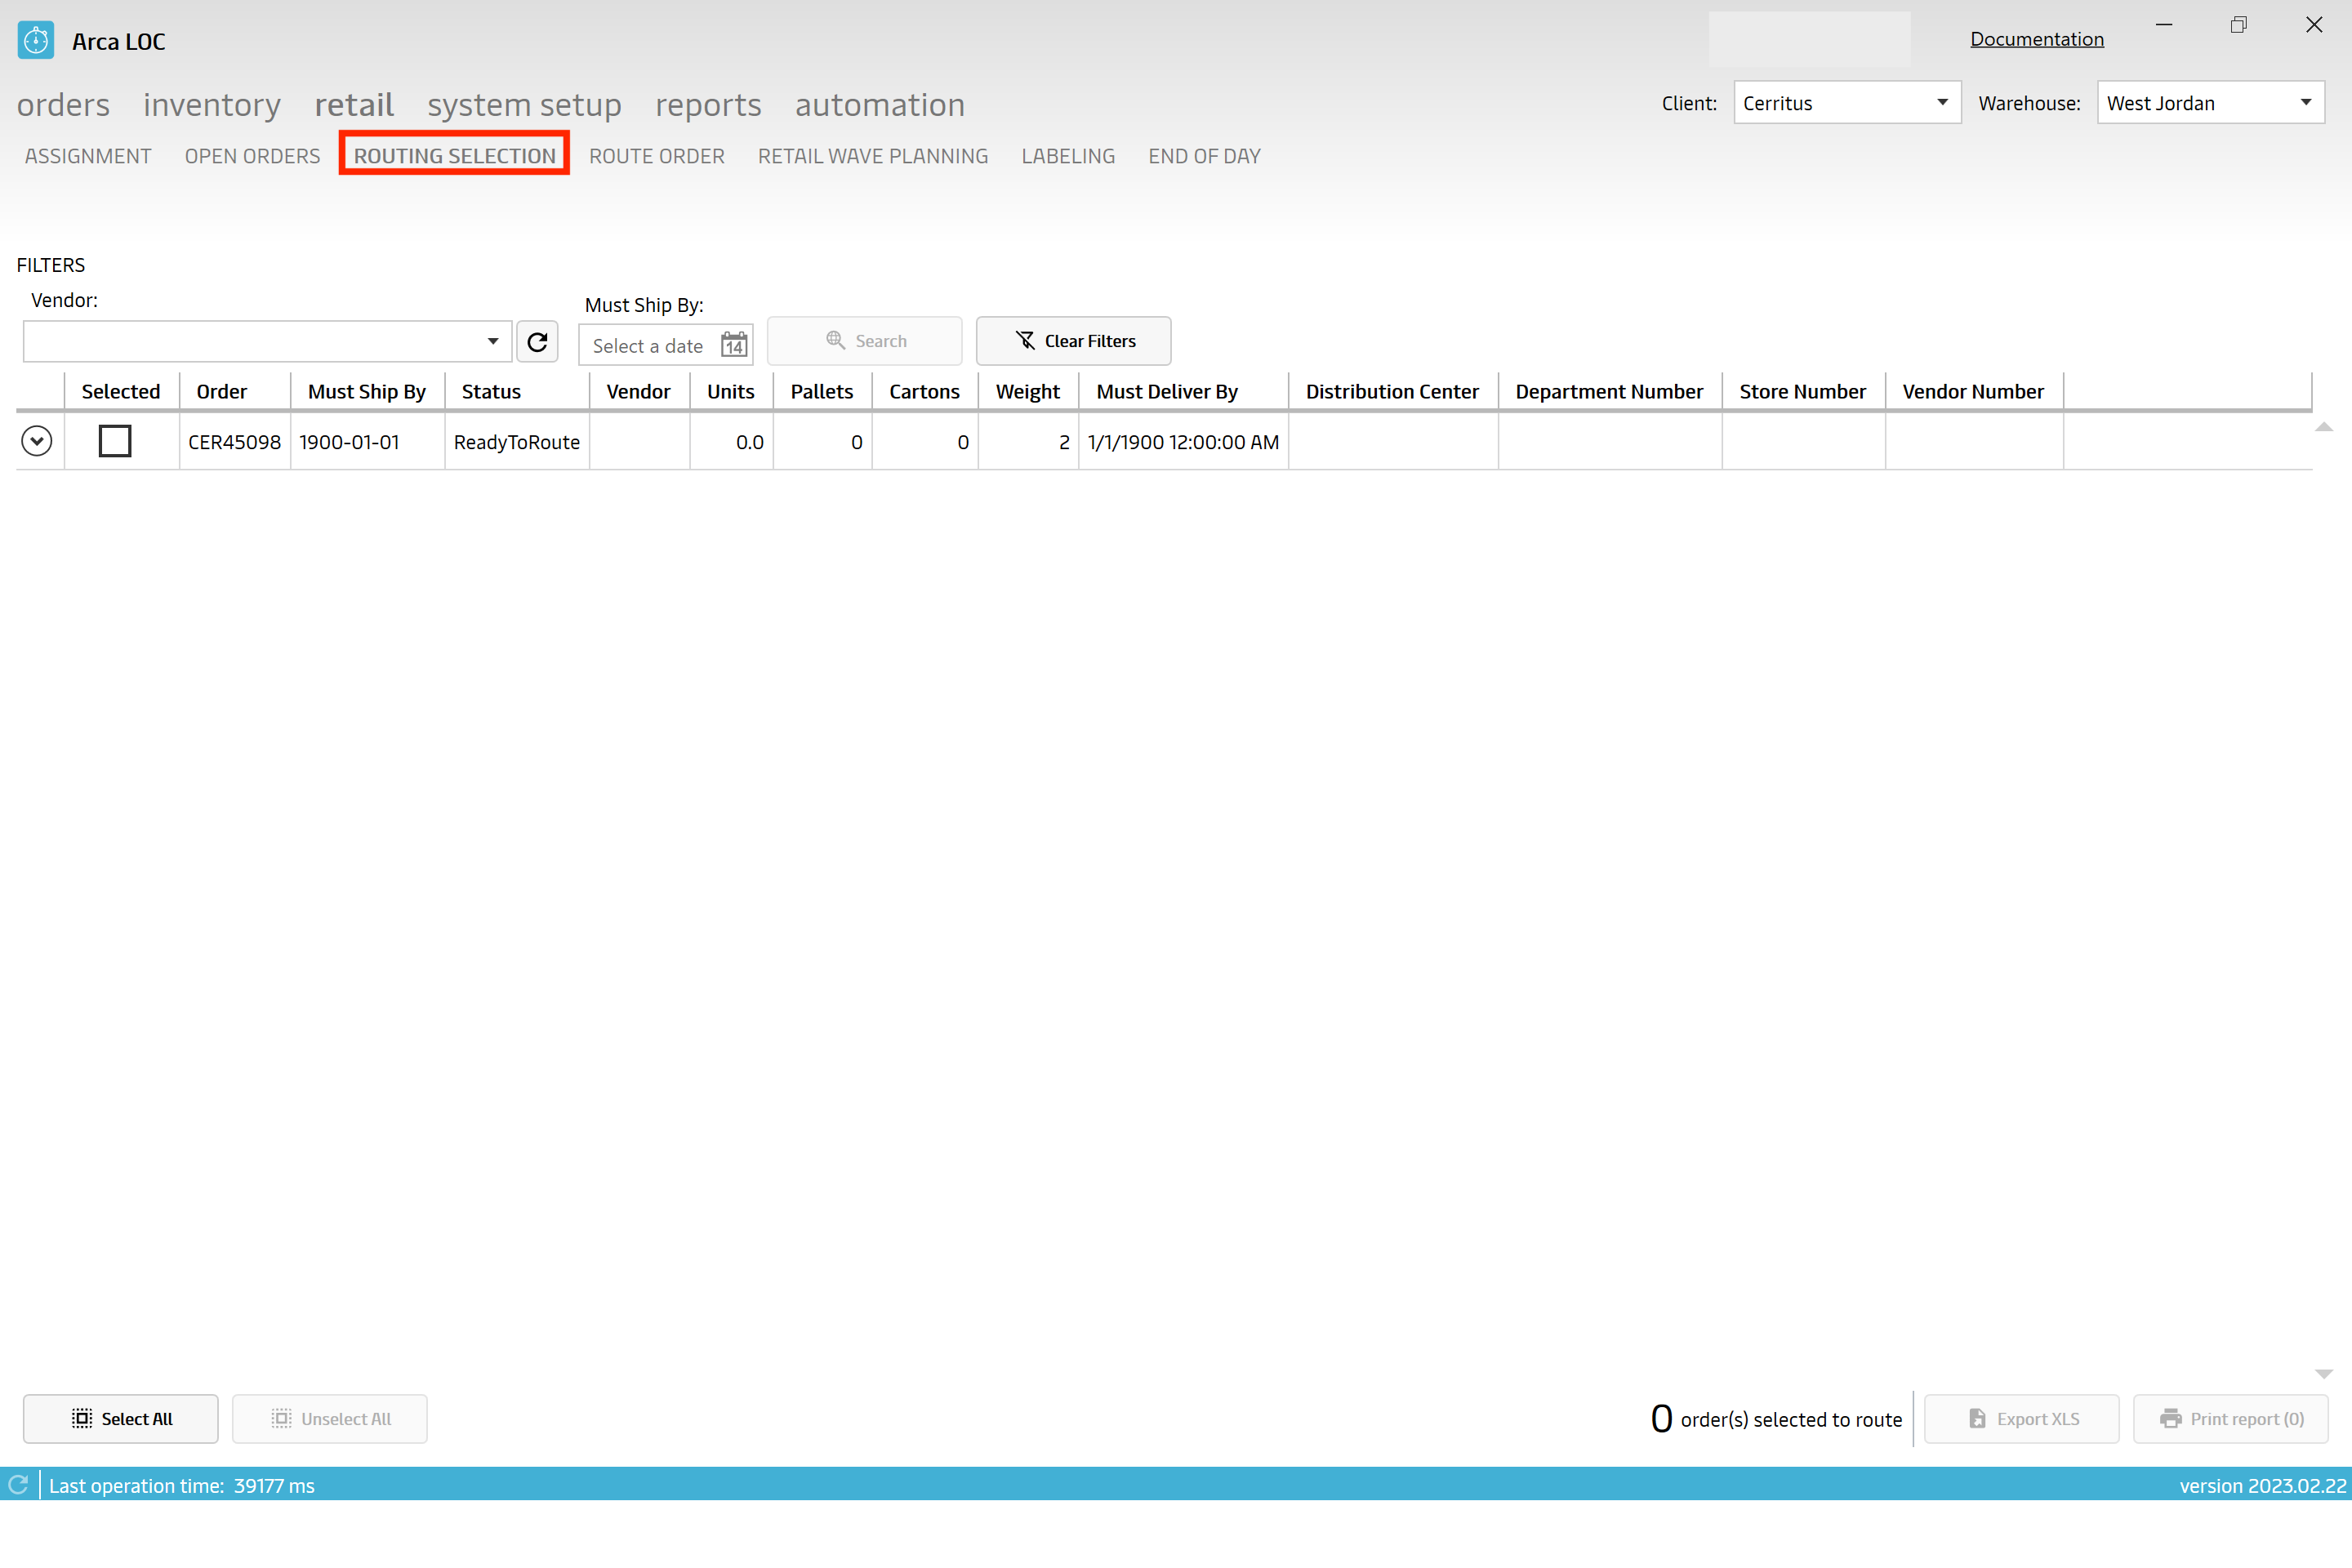
You are able to click on an order and print a report as well as download to an excel sheet if needed.
Route Order
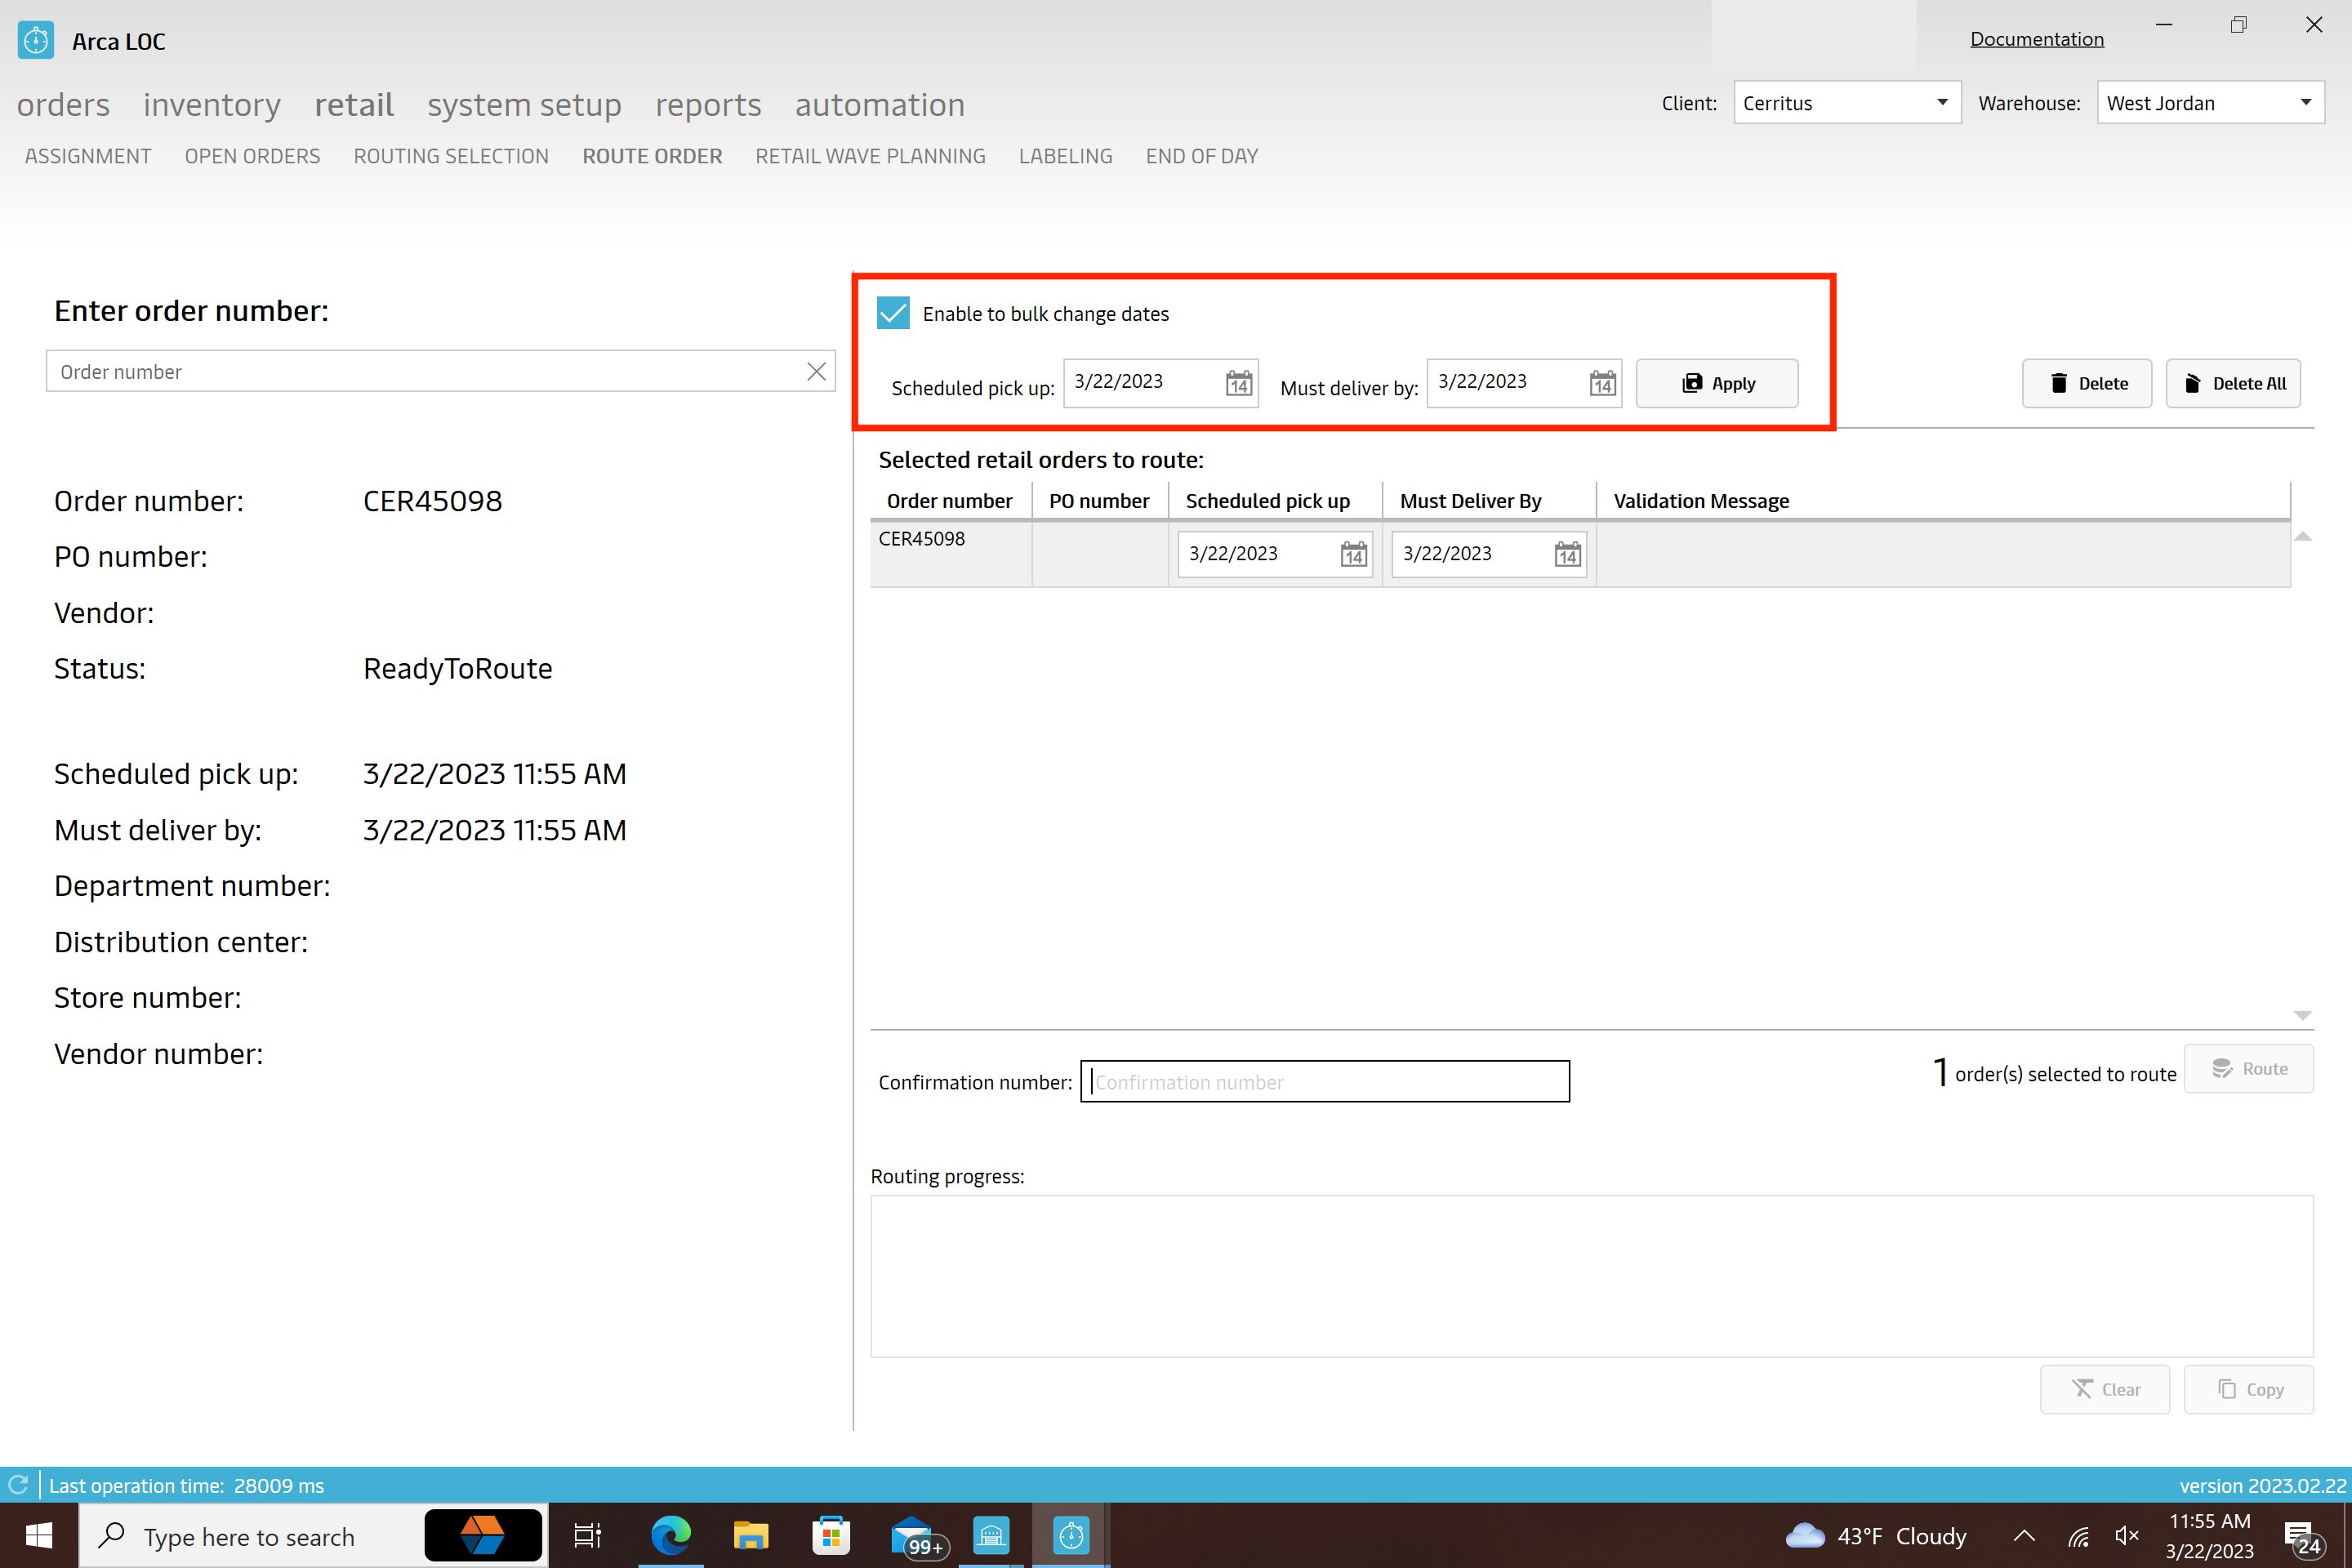
This section of the User Guide will cover the "Route Order" portion of ARCA LOC Retail. Route order refers to the sequence in which individual shipments or orders are grouped and assigned to specific transportation routes for delivery. Here you will be able to release an order out to get ready to ship.
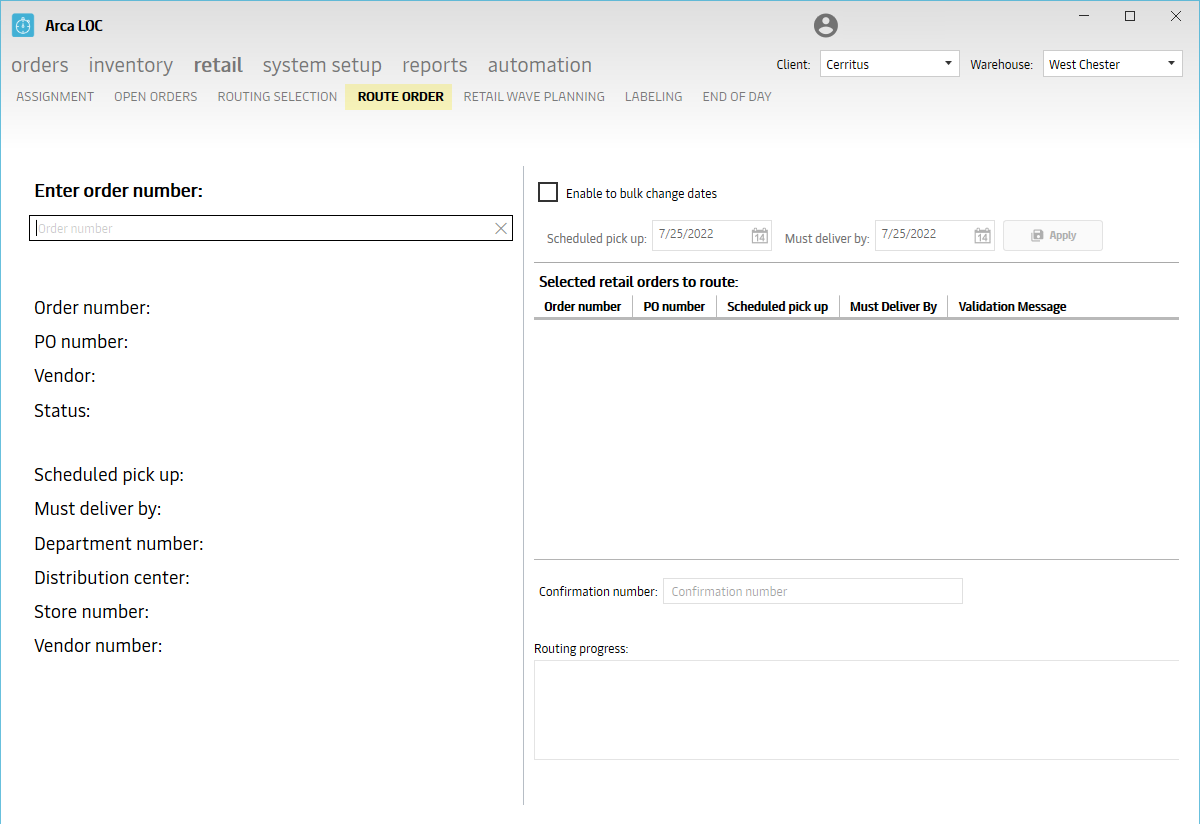
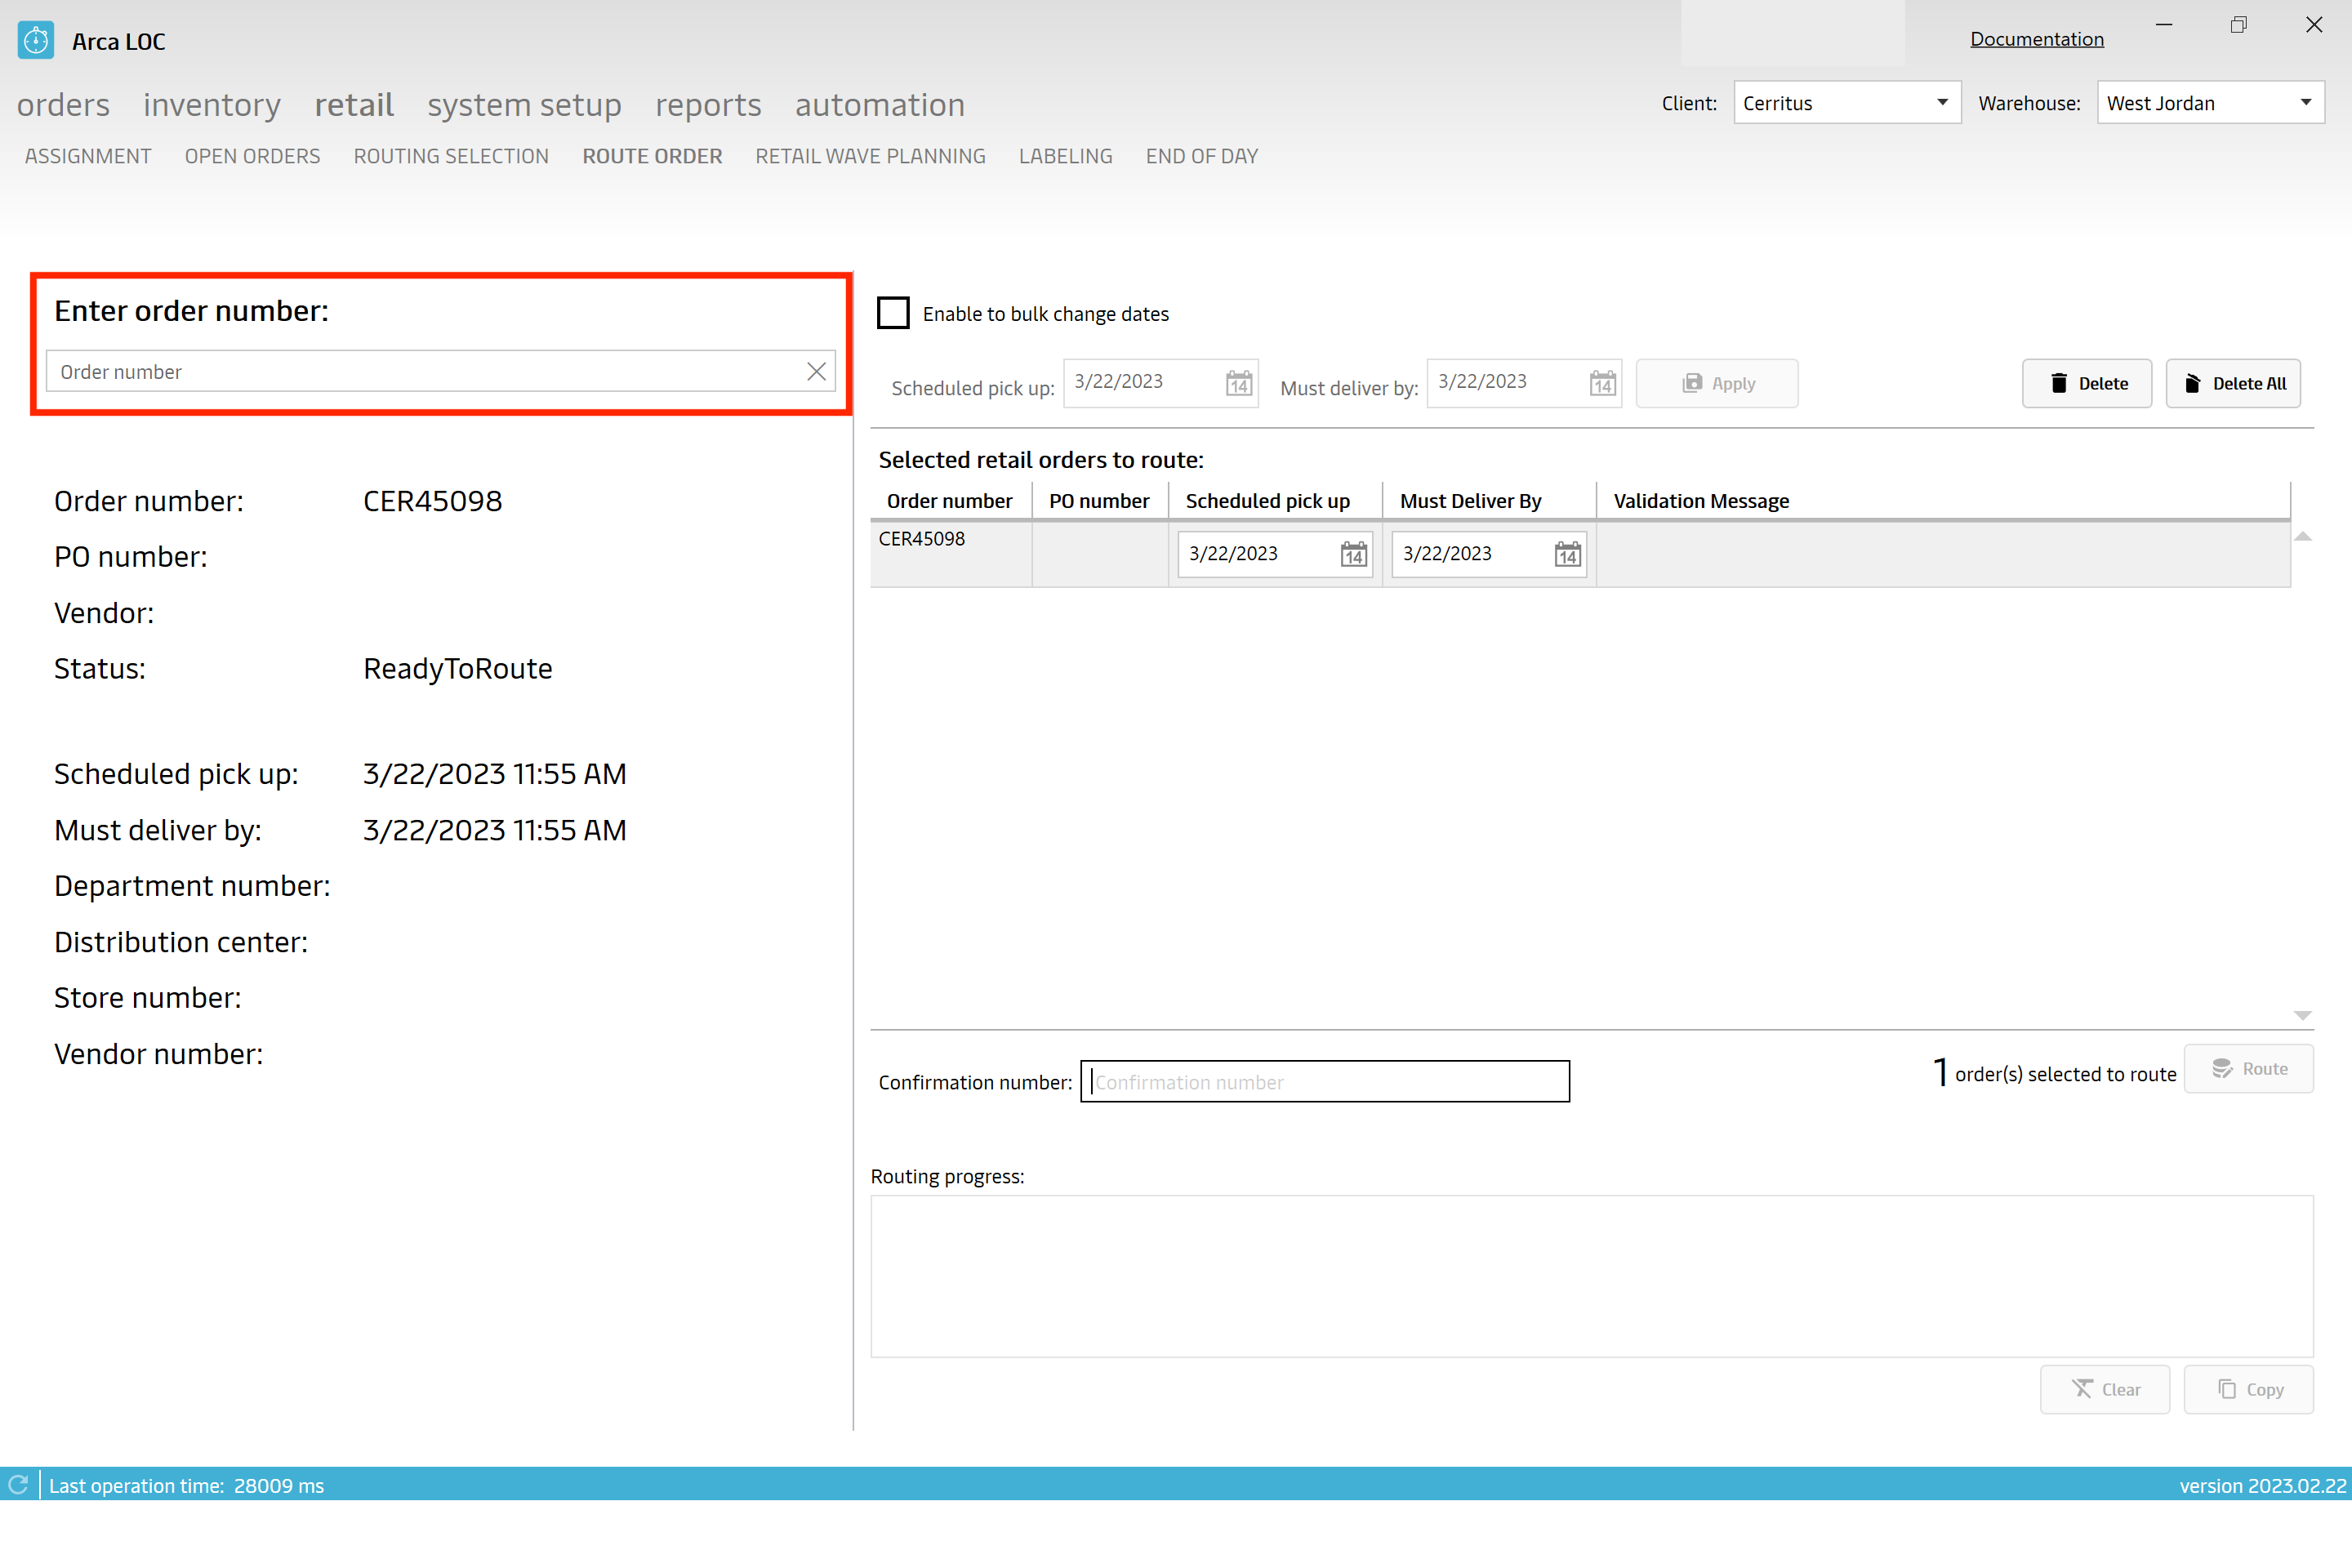
First, you will enter your order number. You then have the ablity to schedule pick up date and have a must deliver by date.
You have the option to click the enable to bulk change dates button. Be sure to click "Apply."
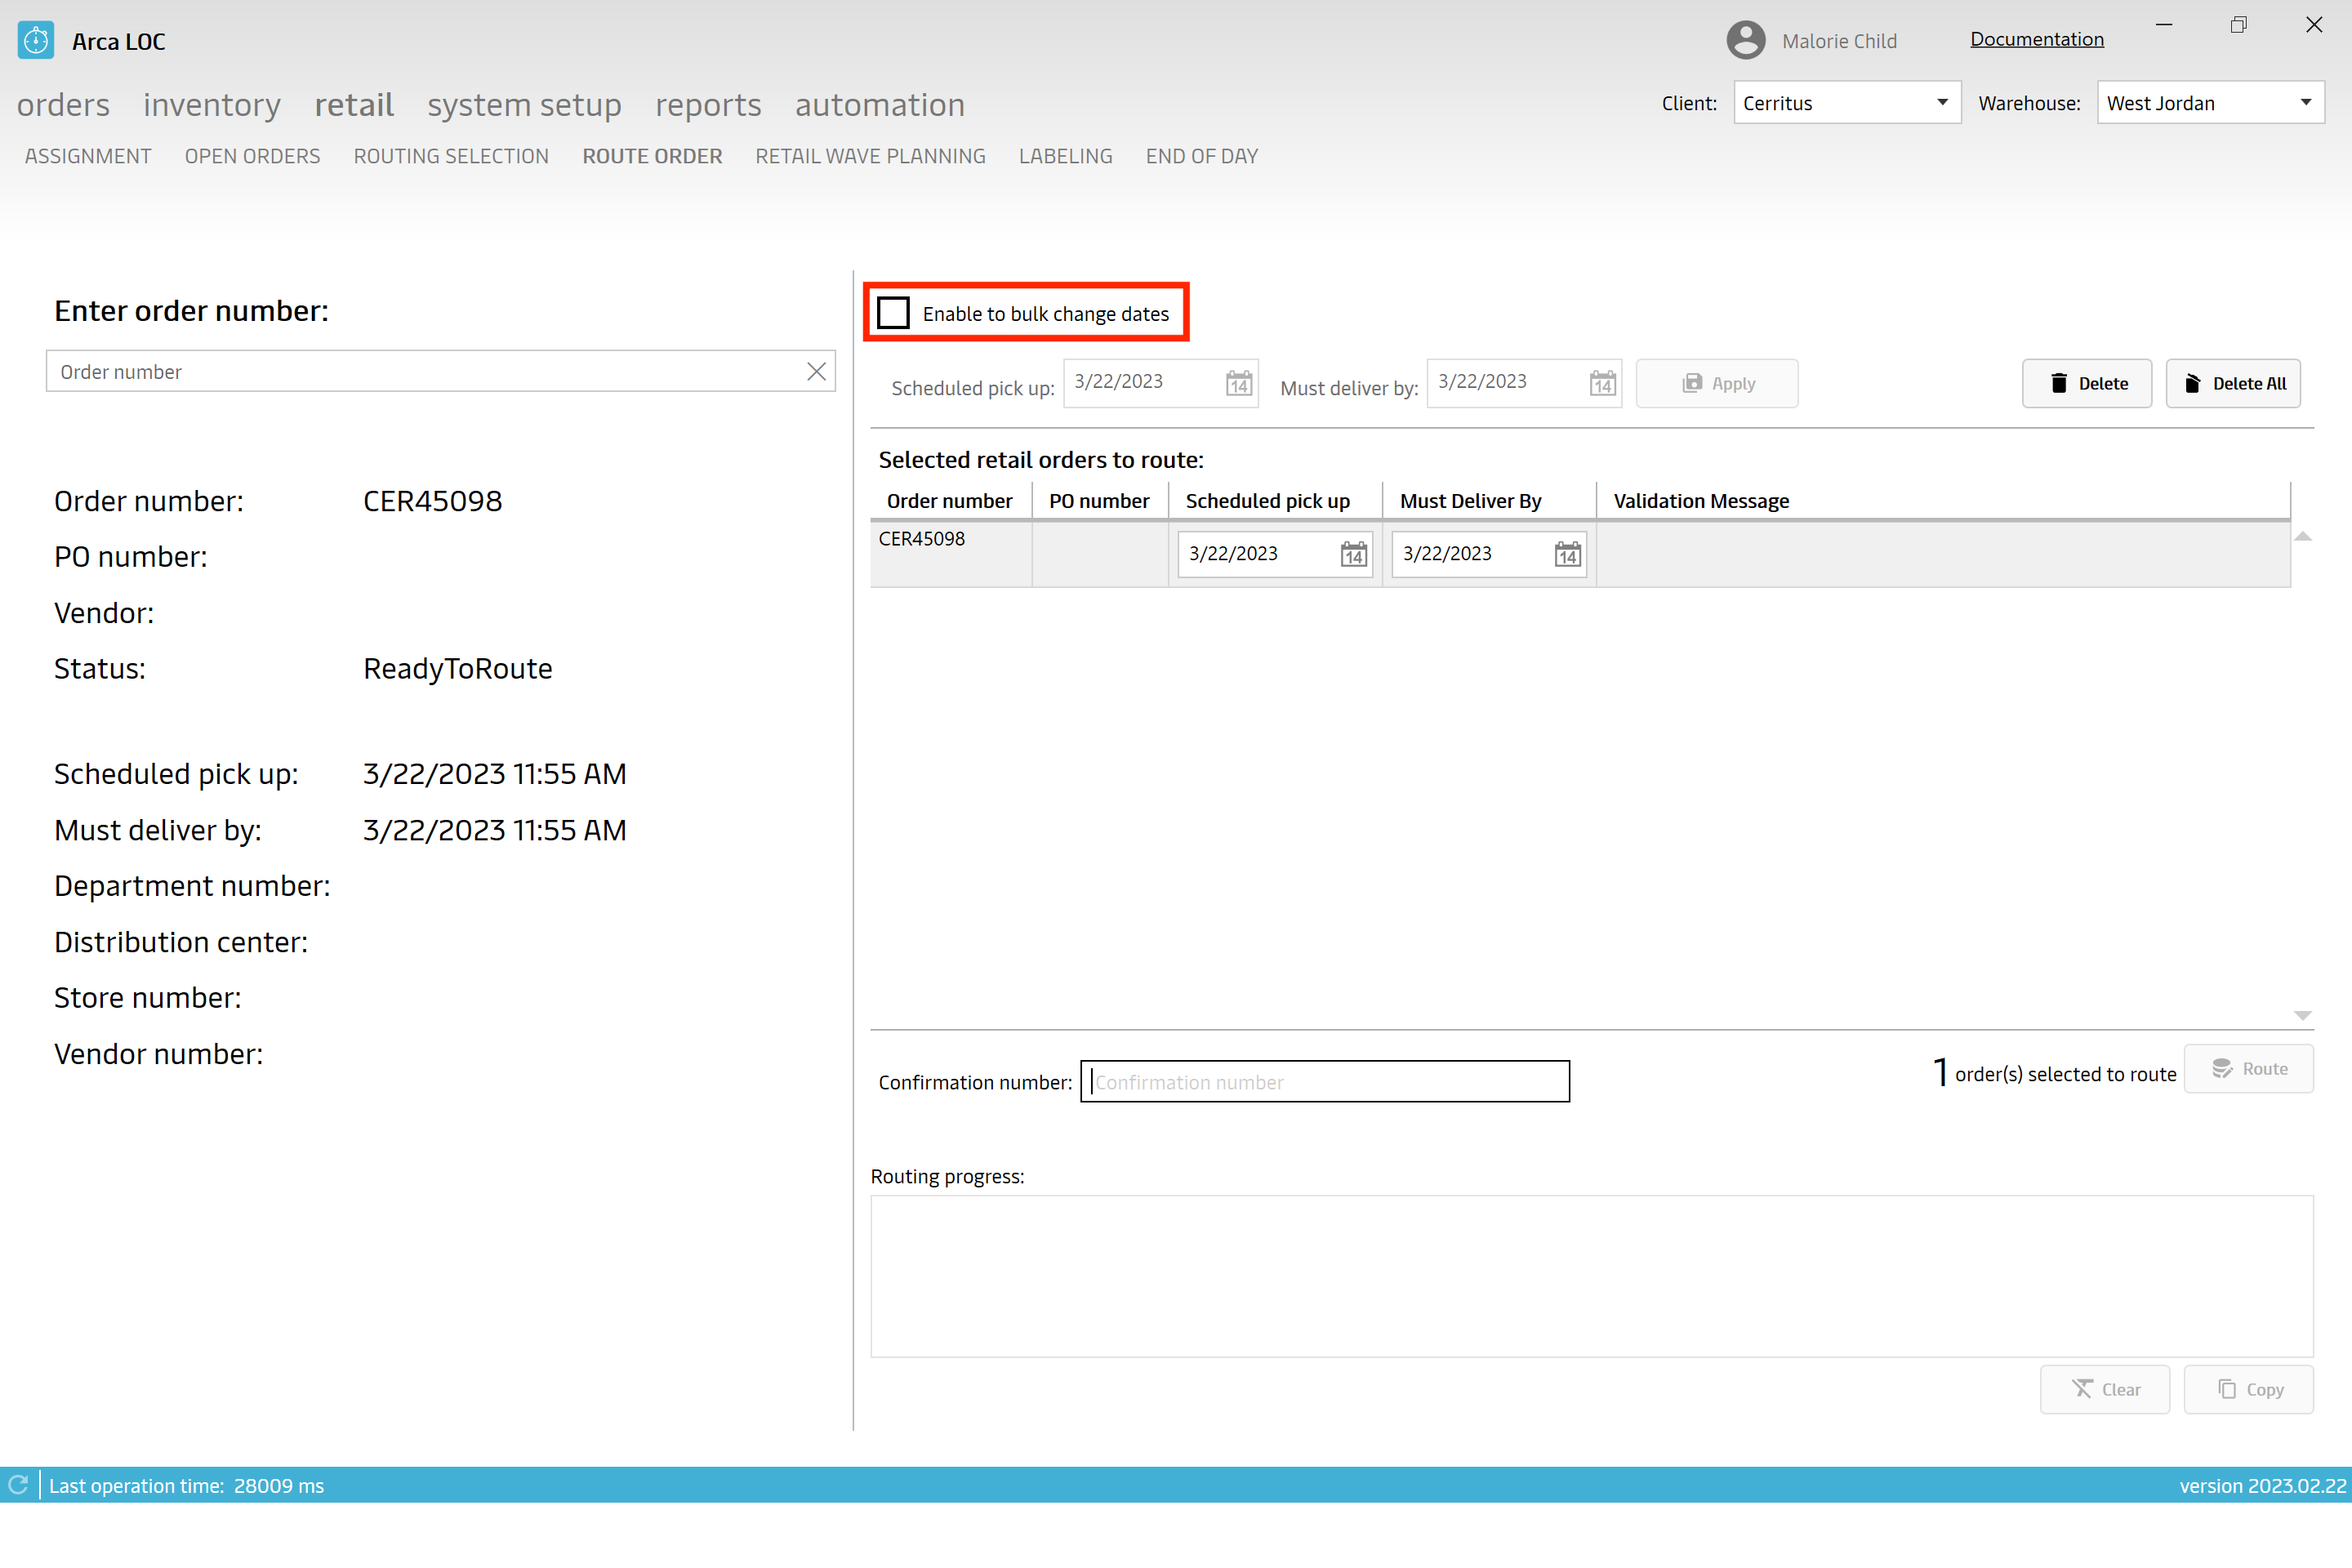
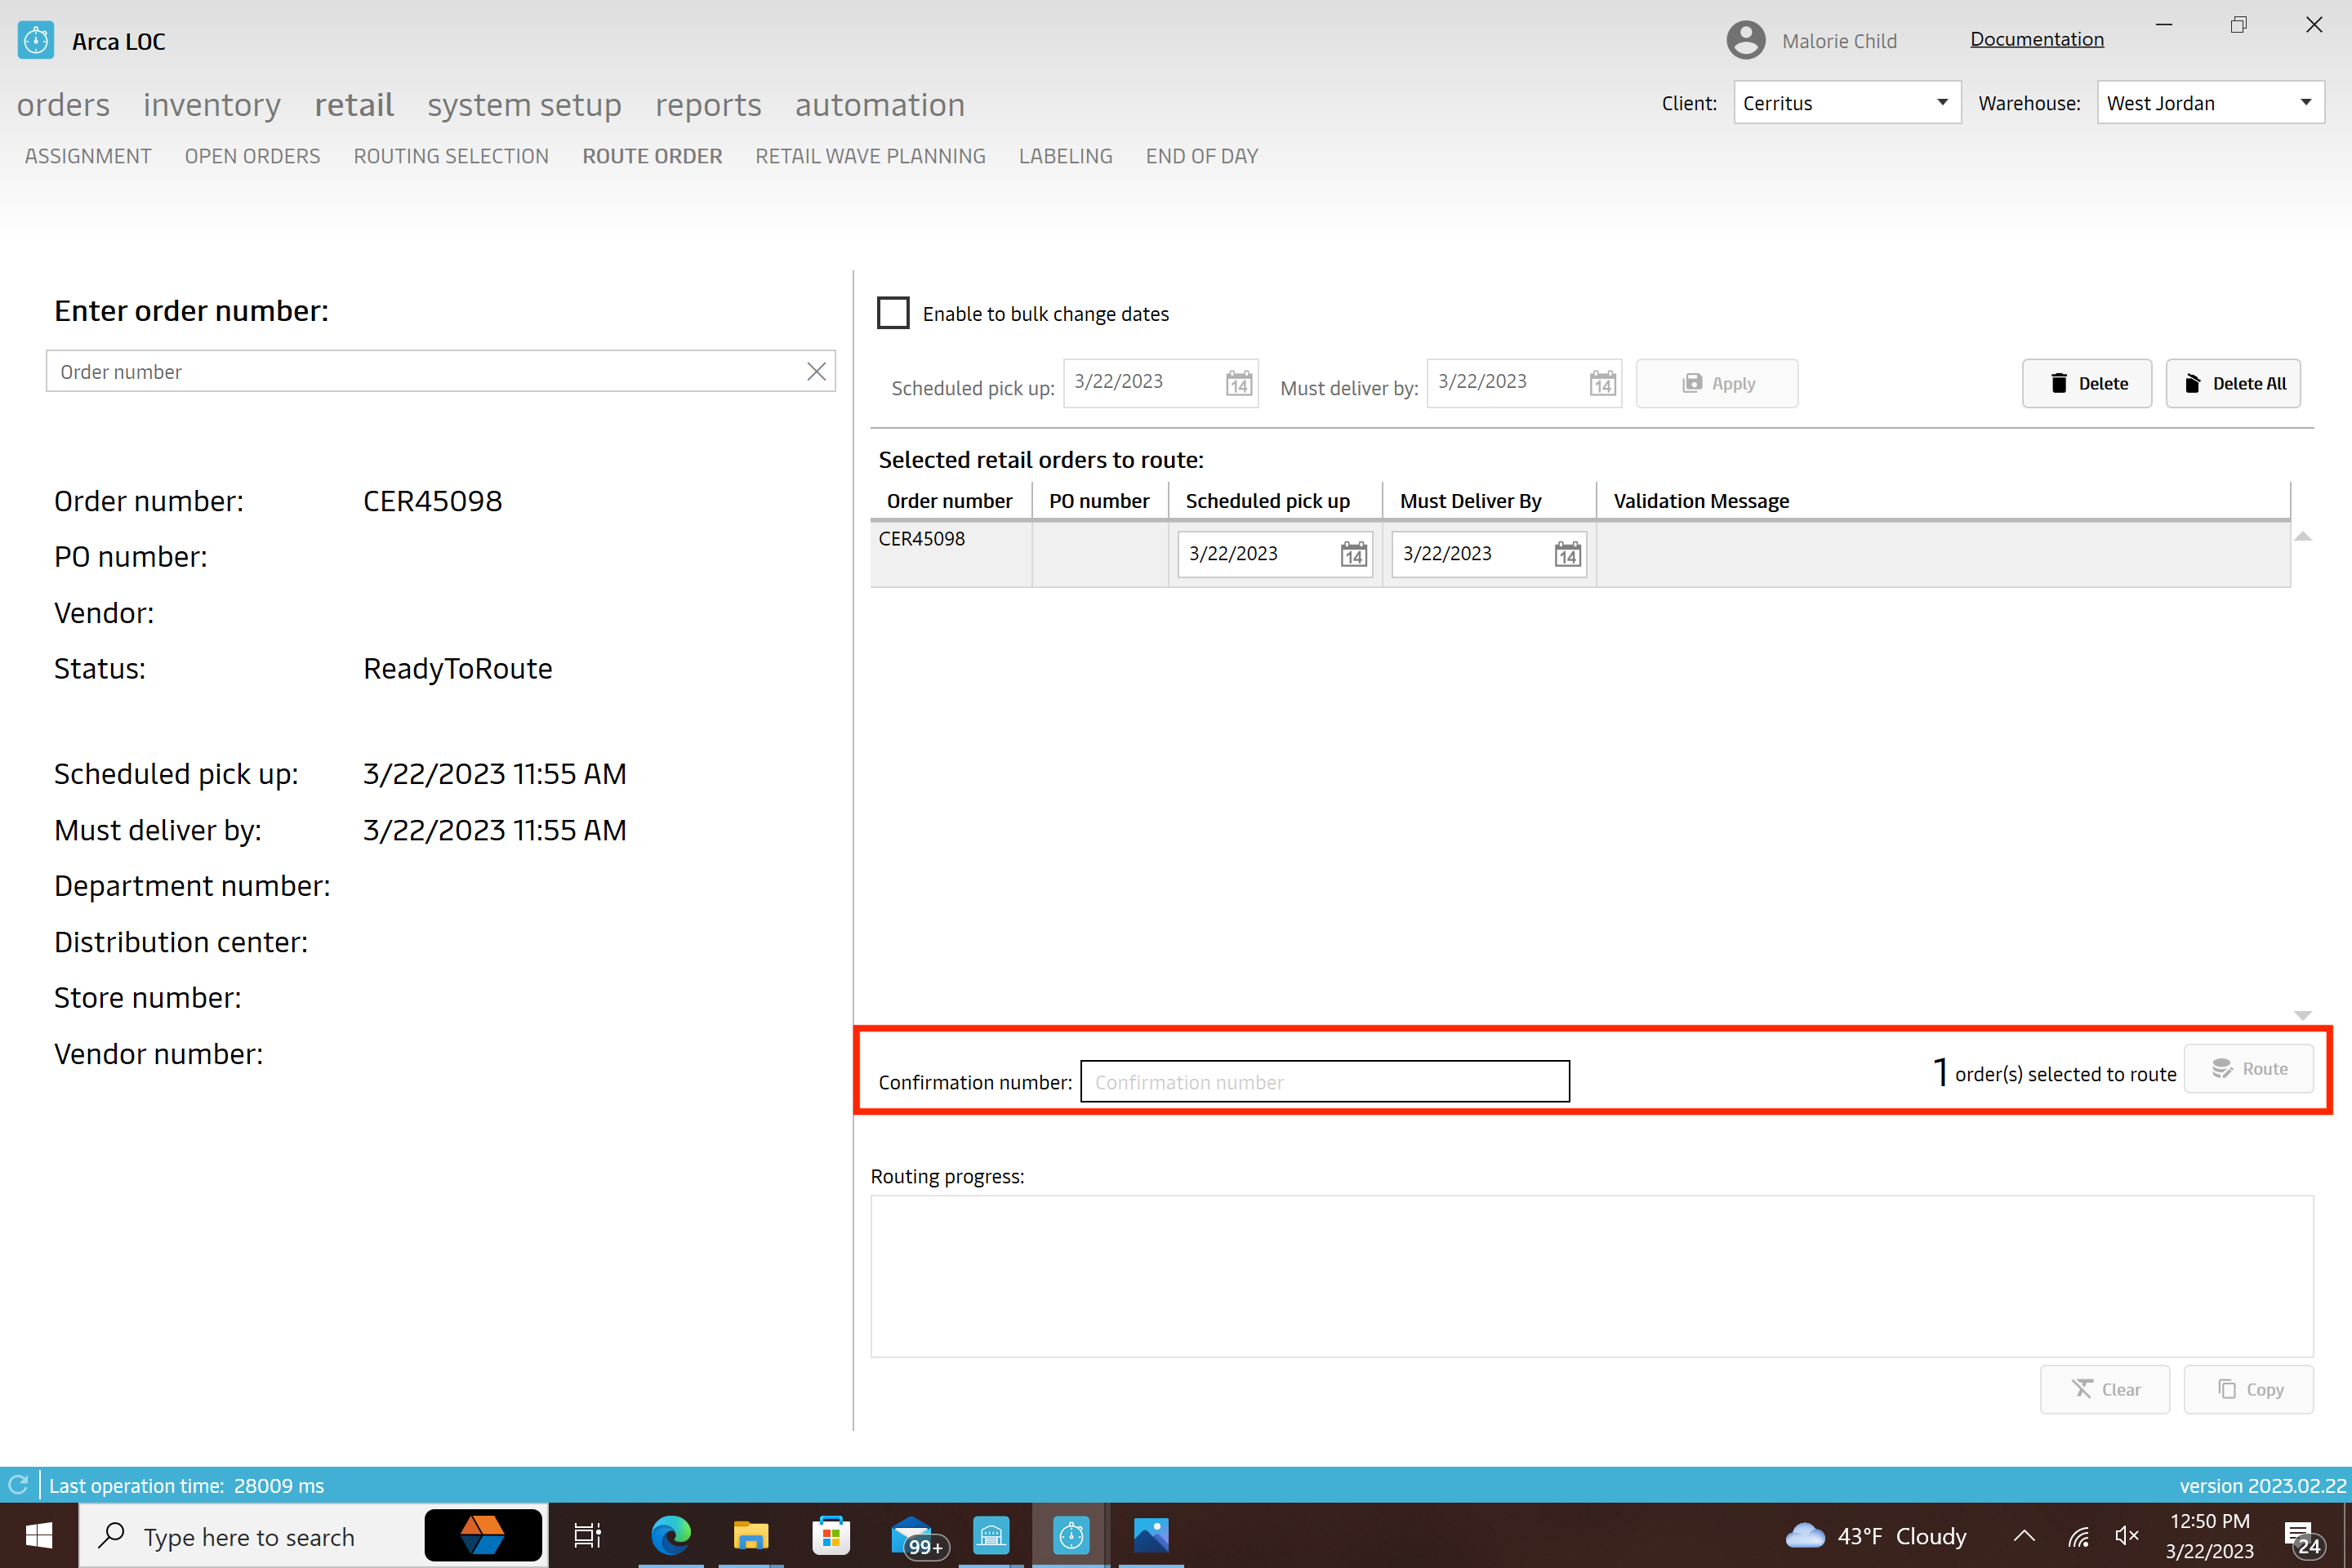
Type in a confirmation number to route the order. If you do not type a number in this bar, the "Route" button will not be available.
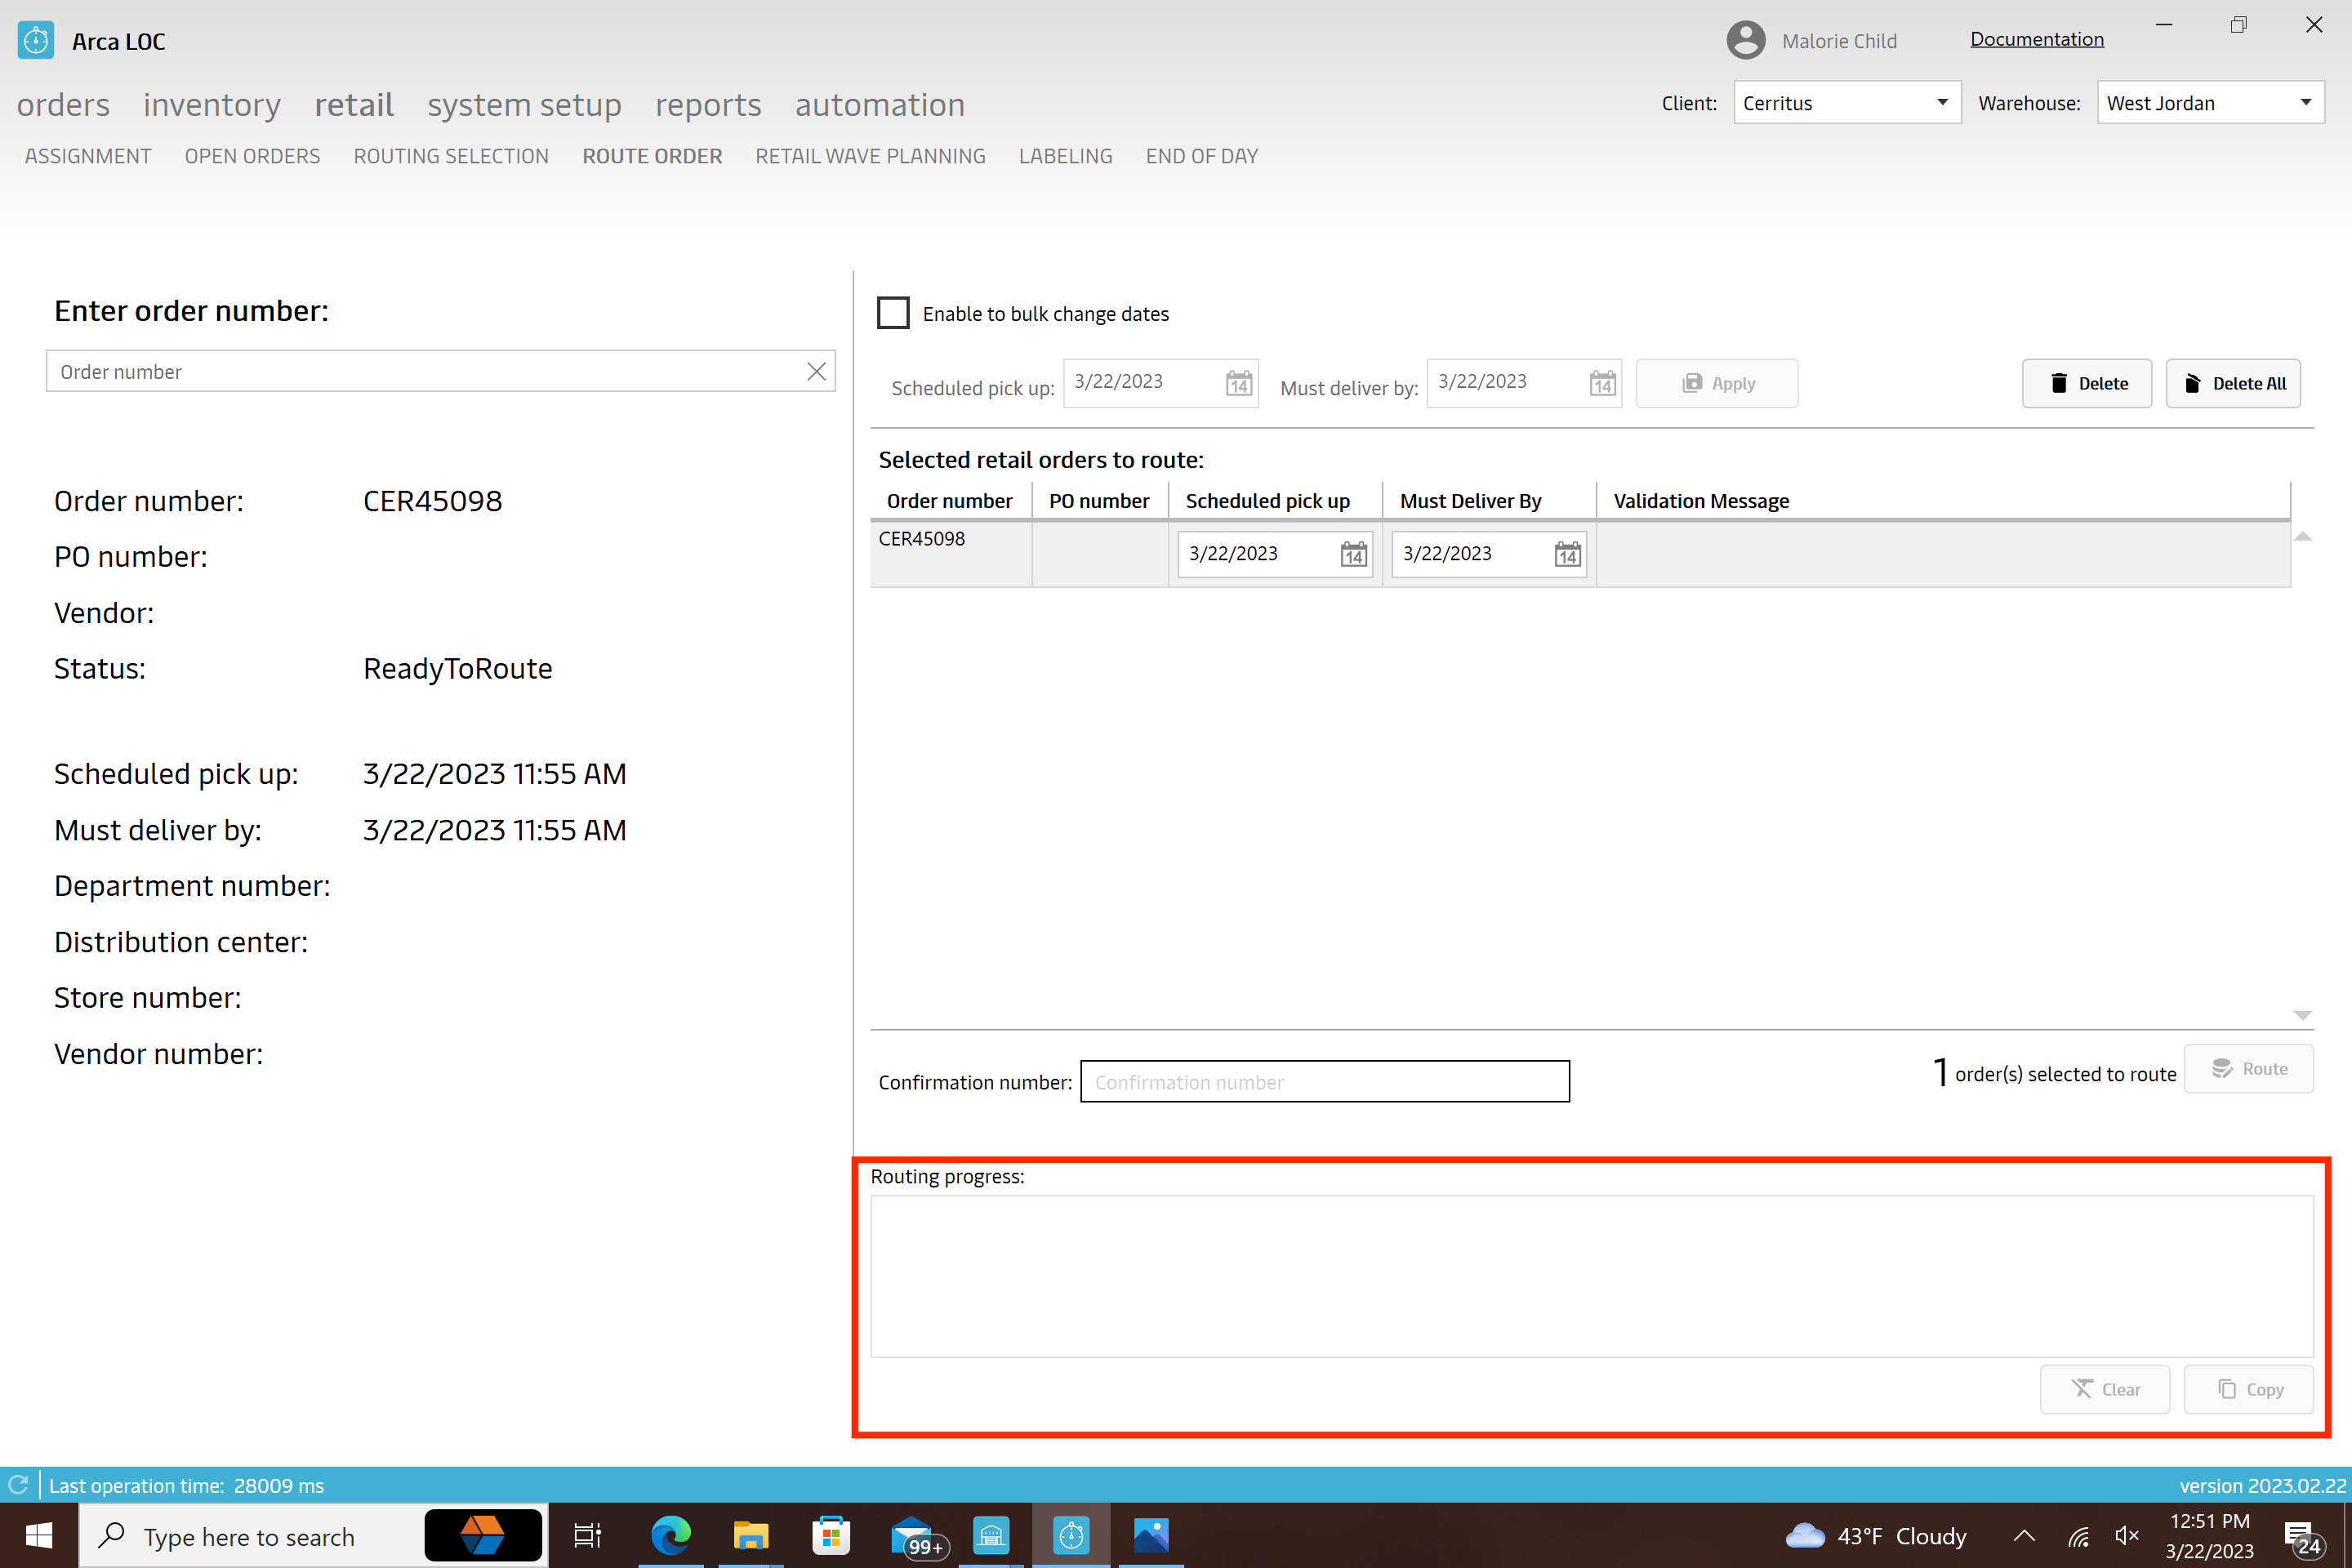
At the bottom you have a progess bar that will show you as your order have processed successfully.
Retail Wave Planning
This section of the User Guide will cover the "Retail Wave Planning" portion of ARCA LOC Retail.
Creating a wave will allow you to print labels and that will send it into the status of ready to pick.

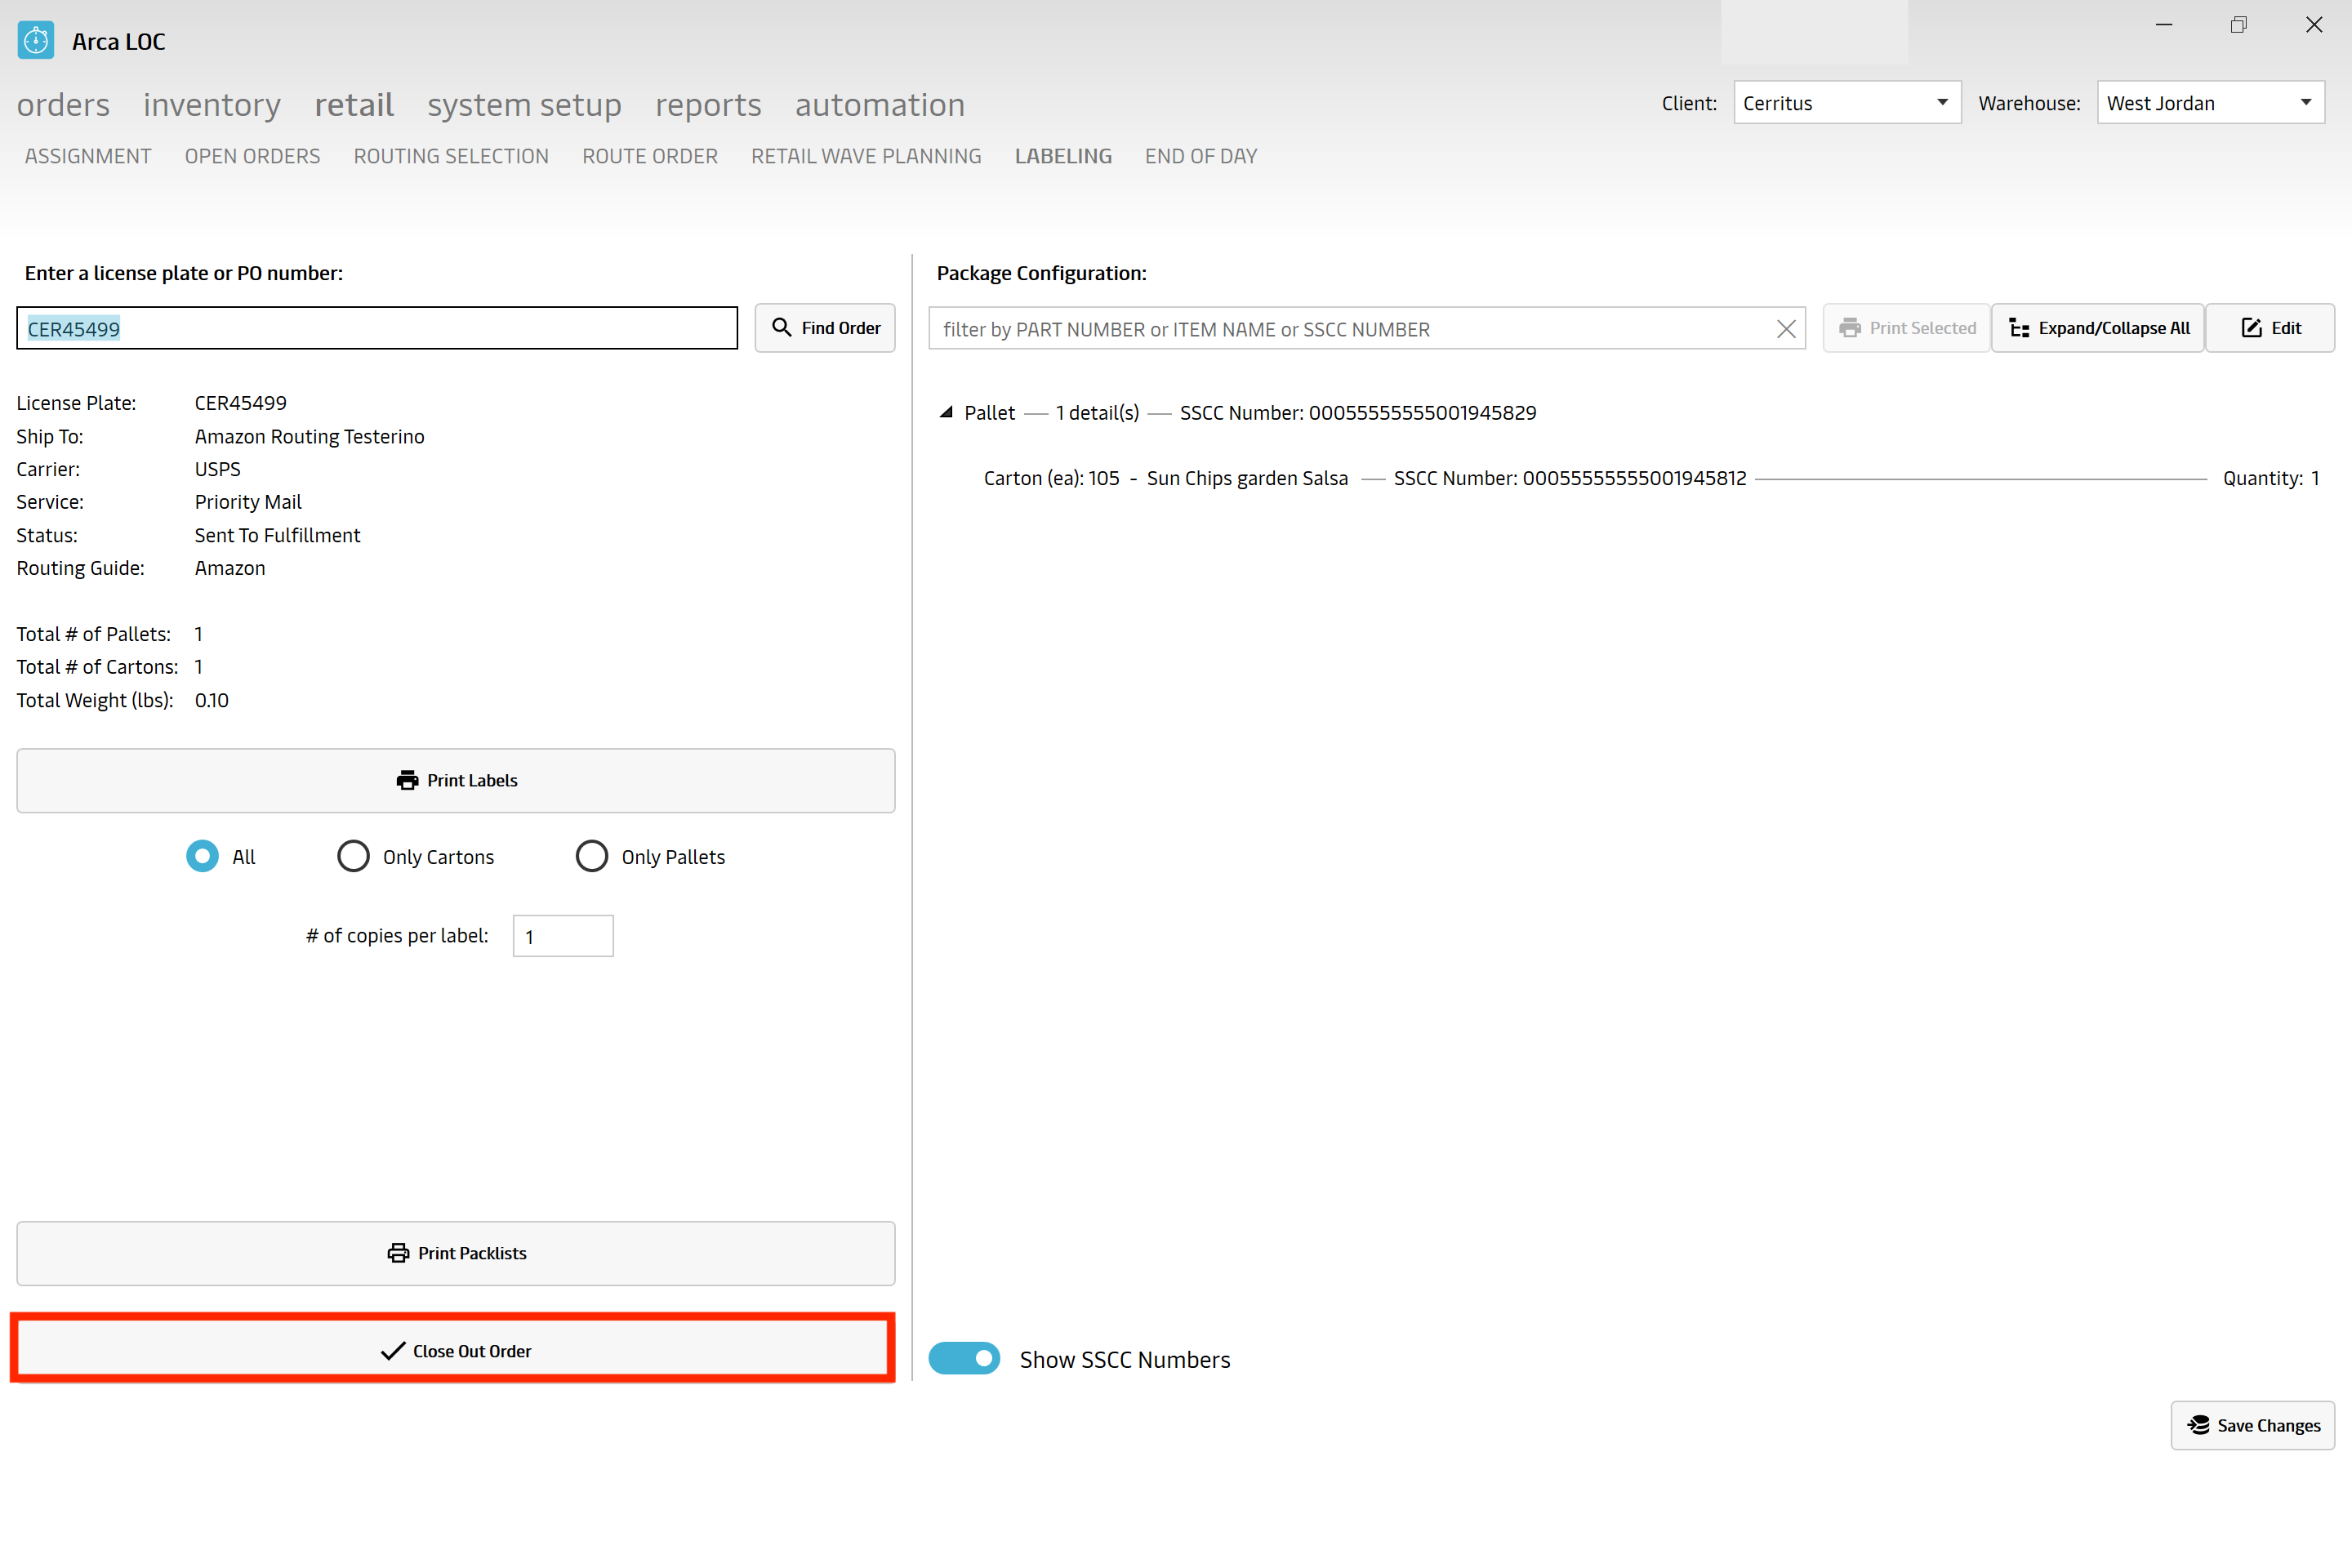
Labeling
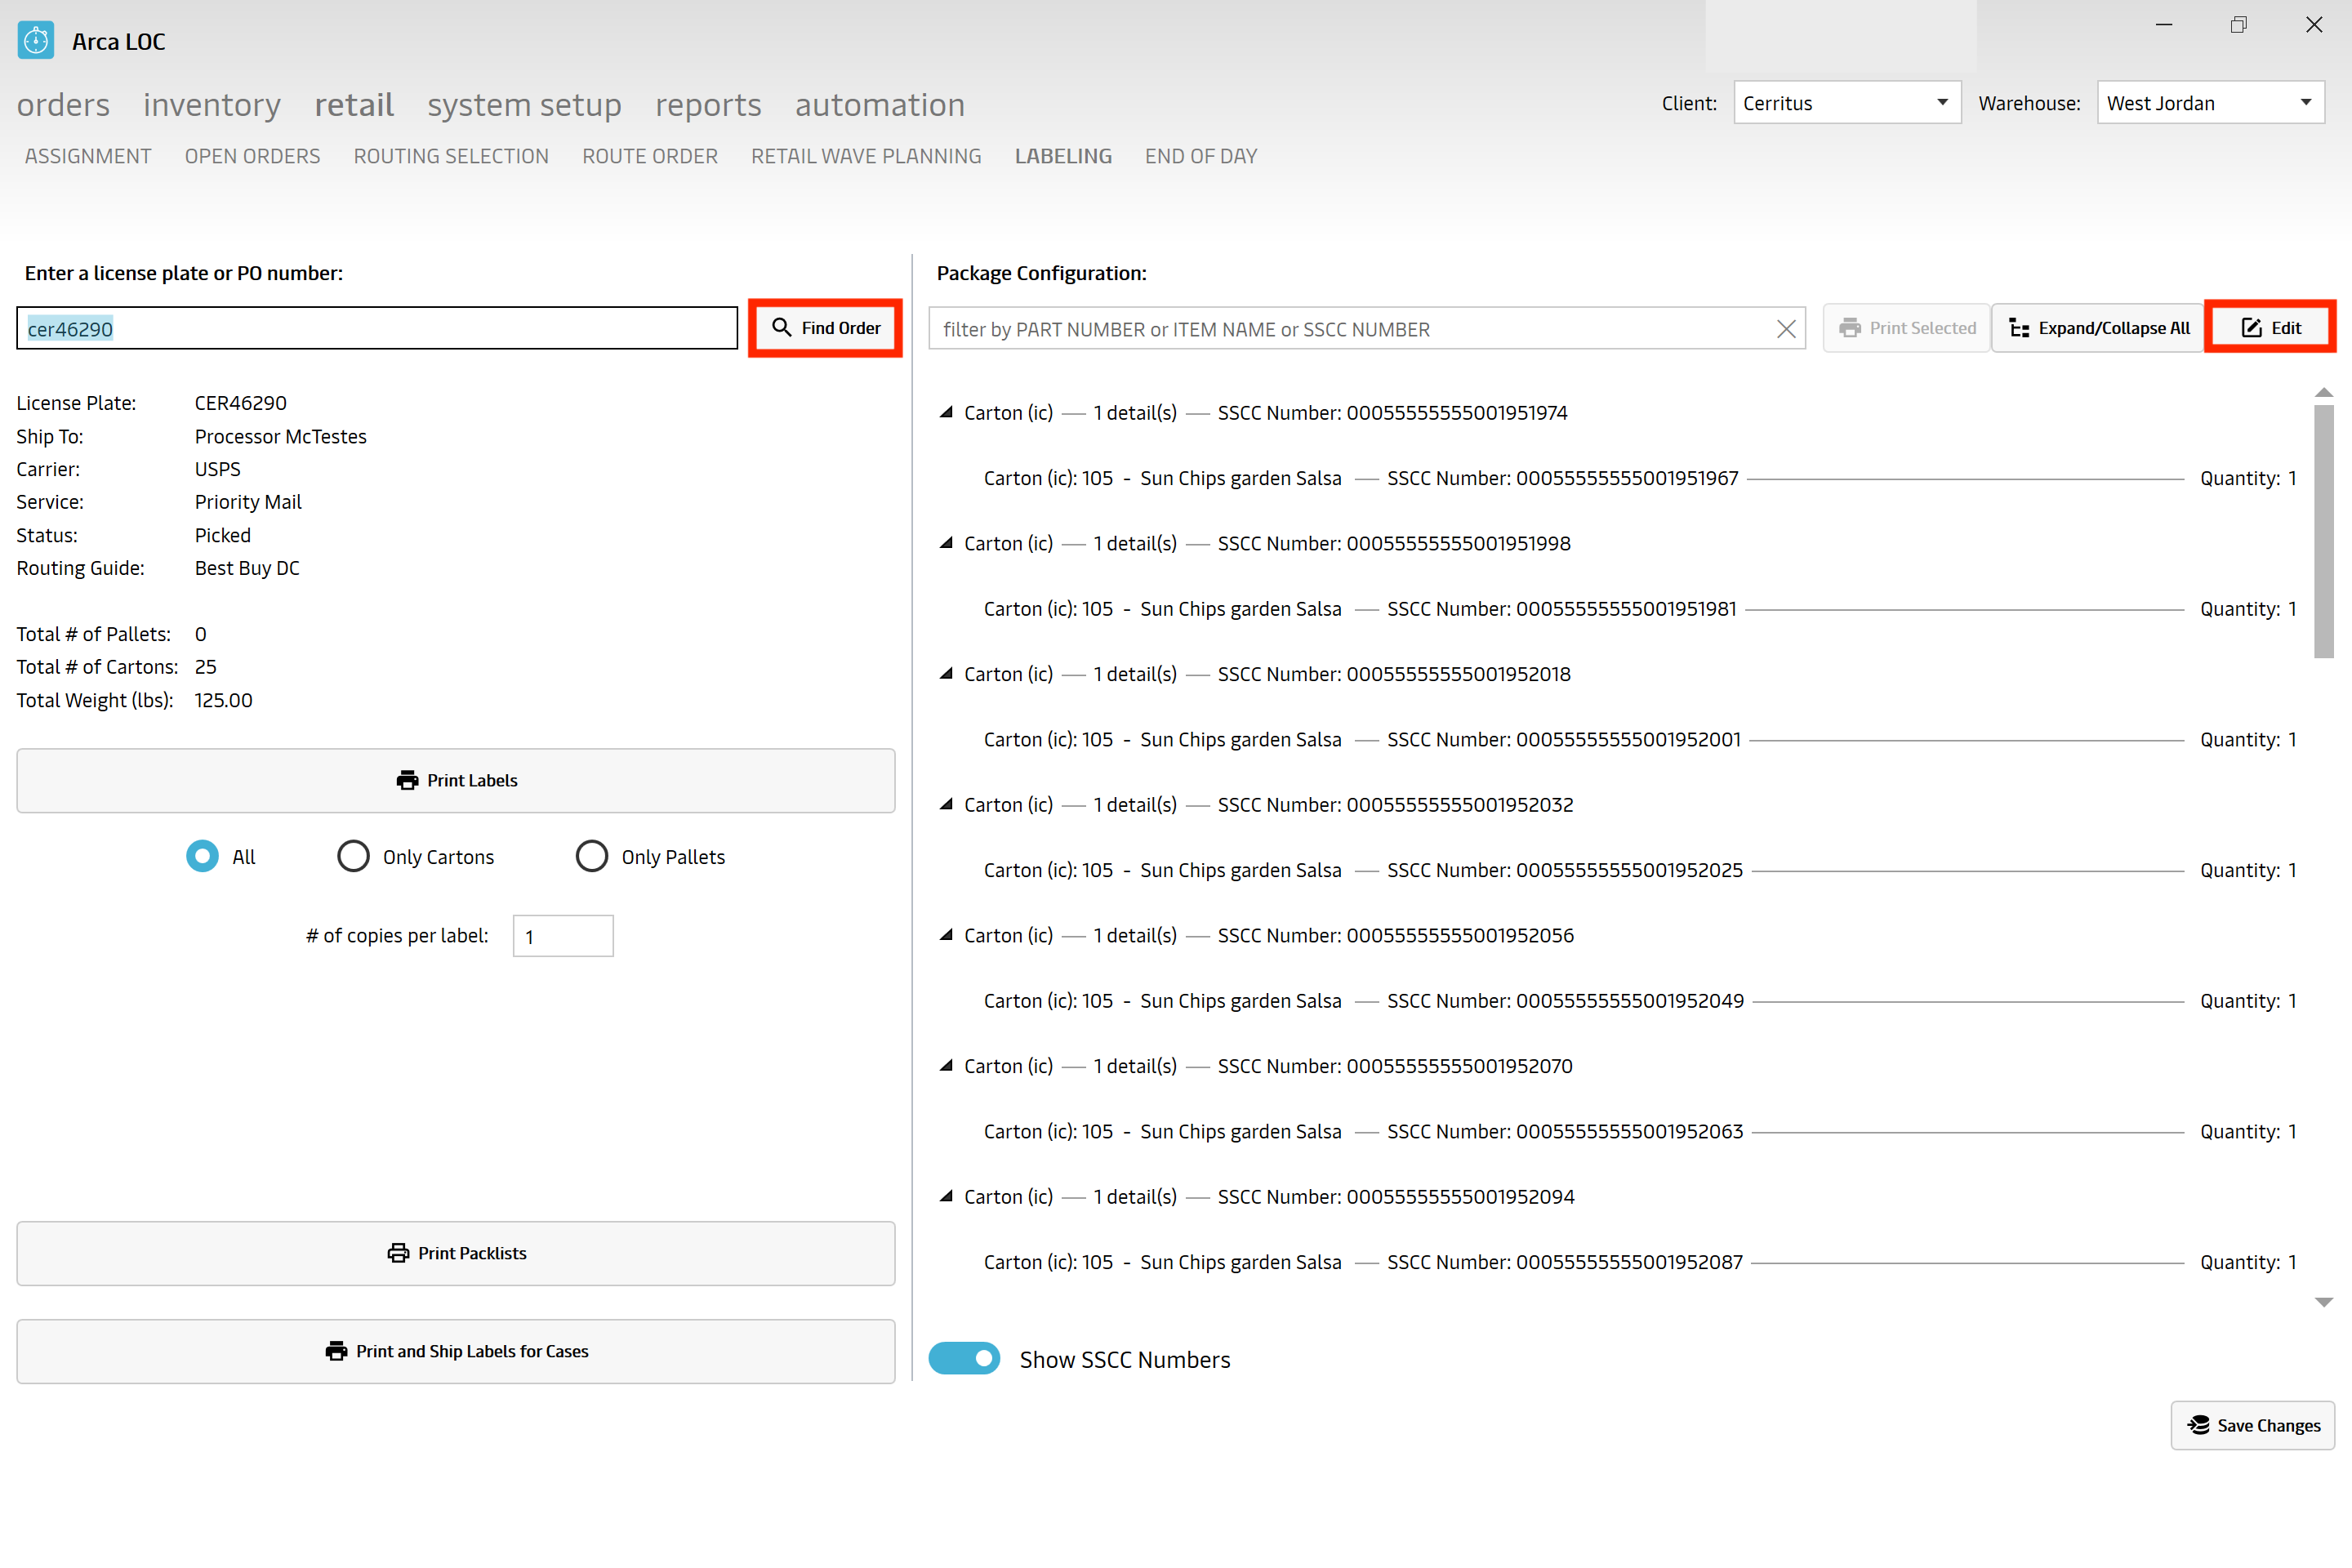
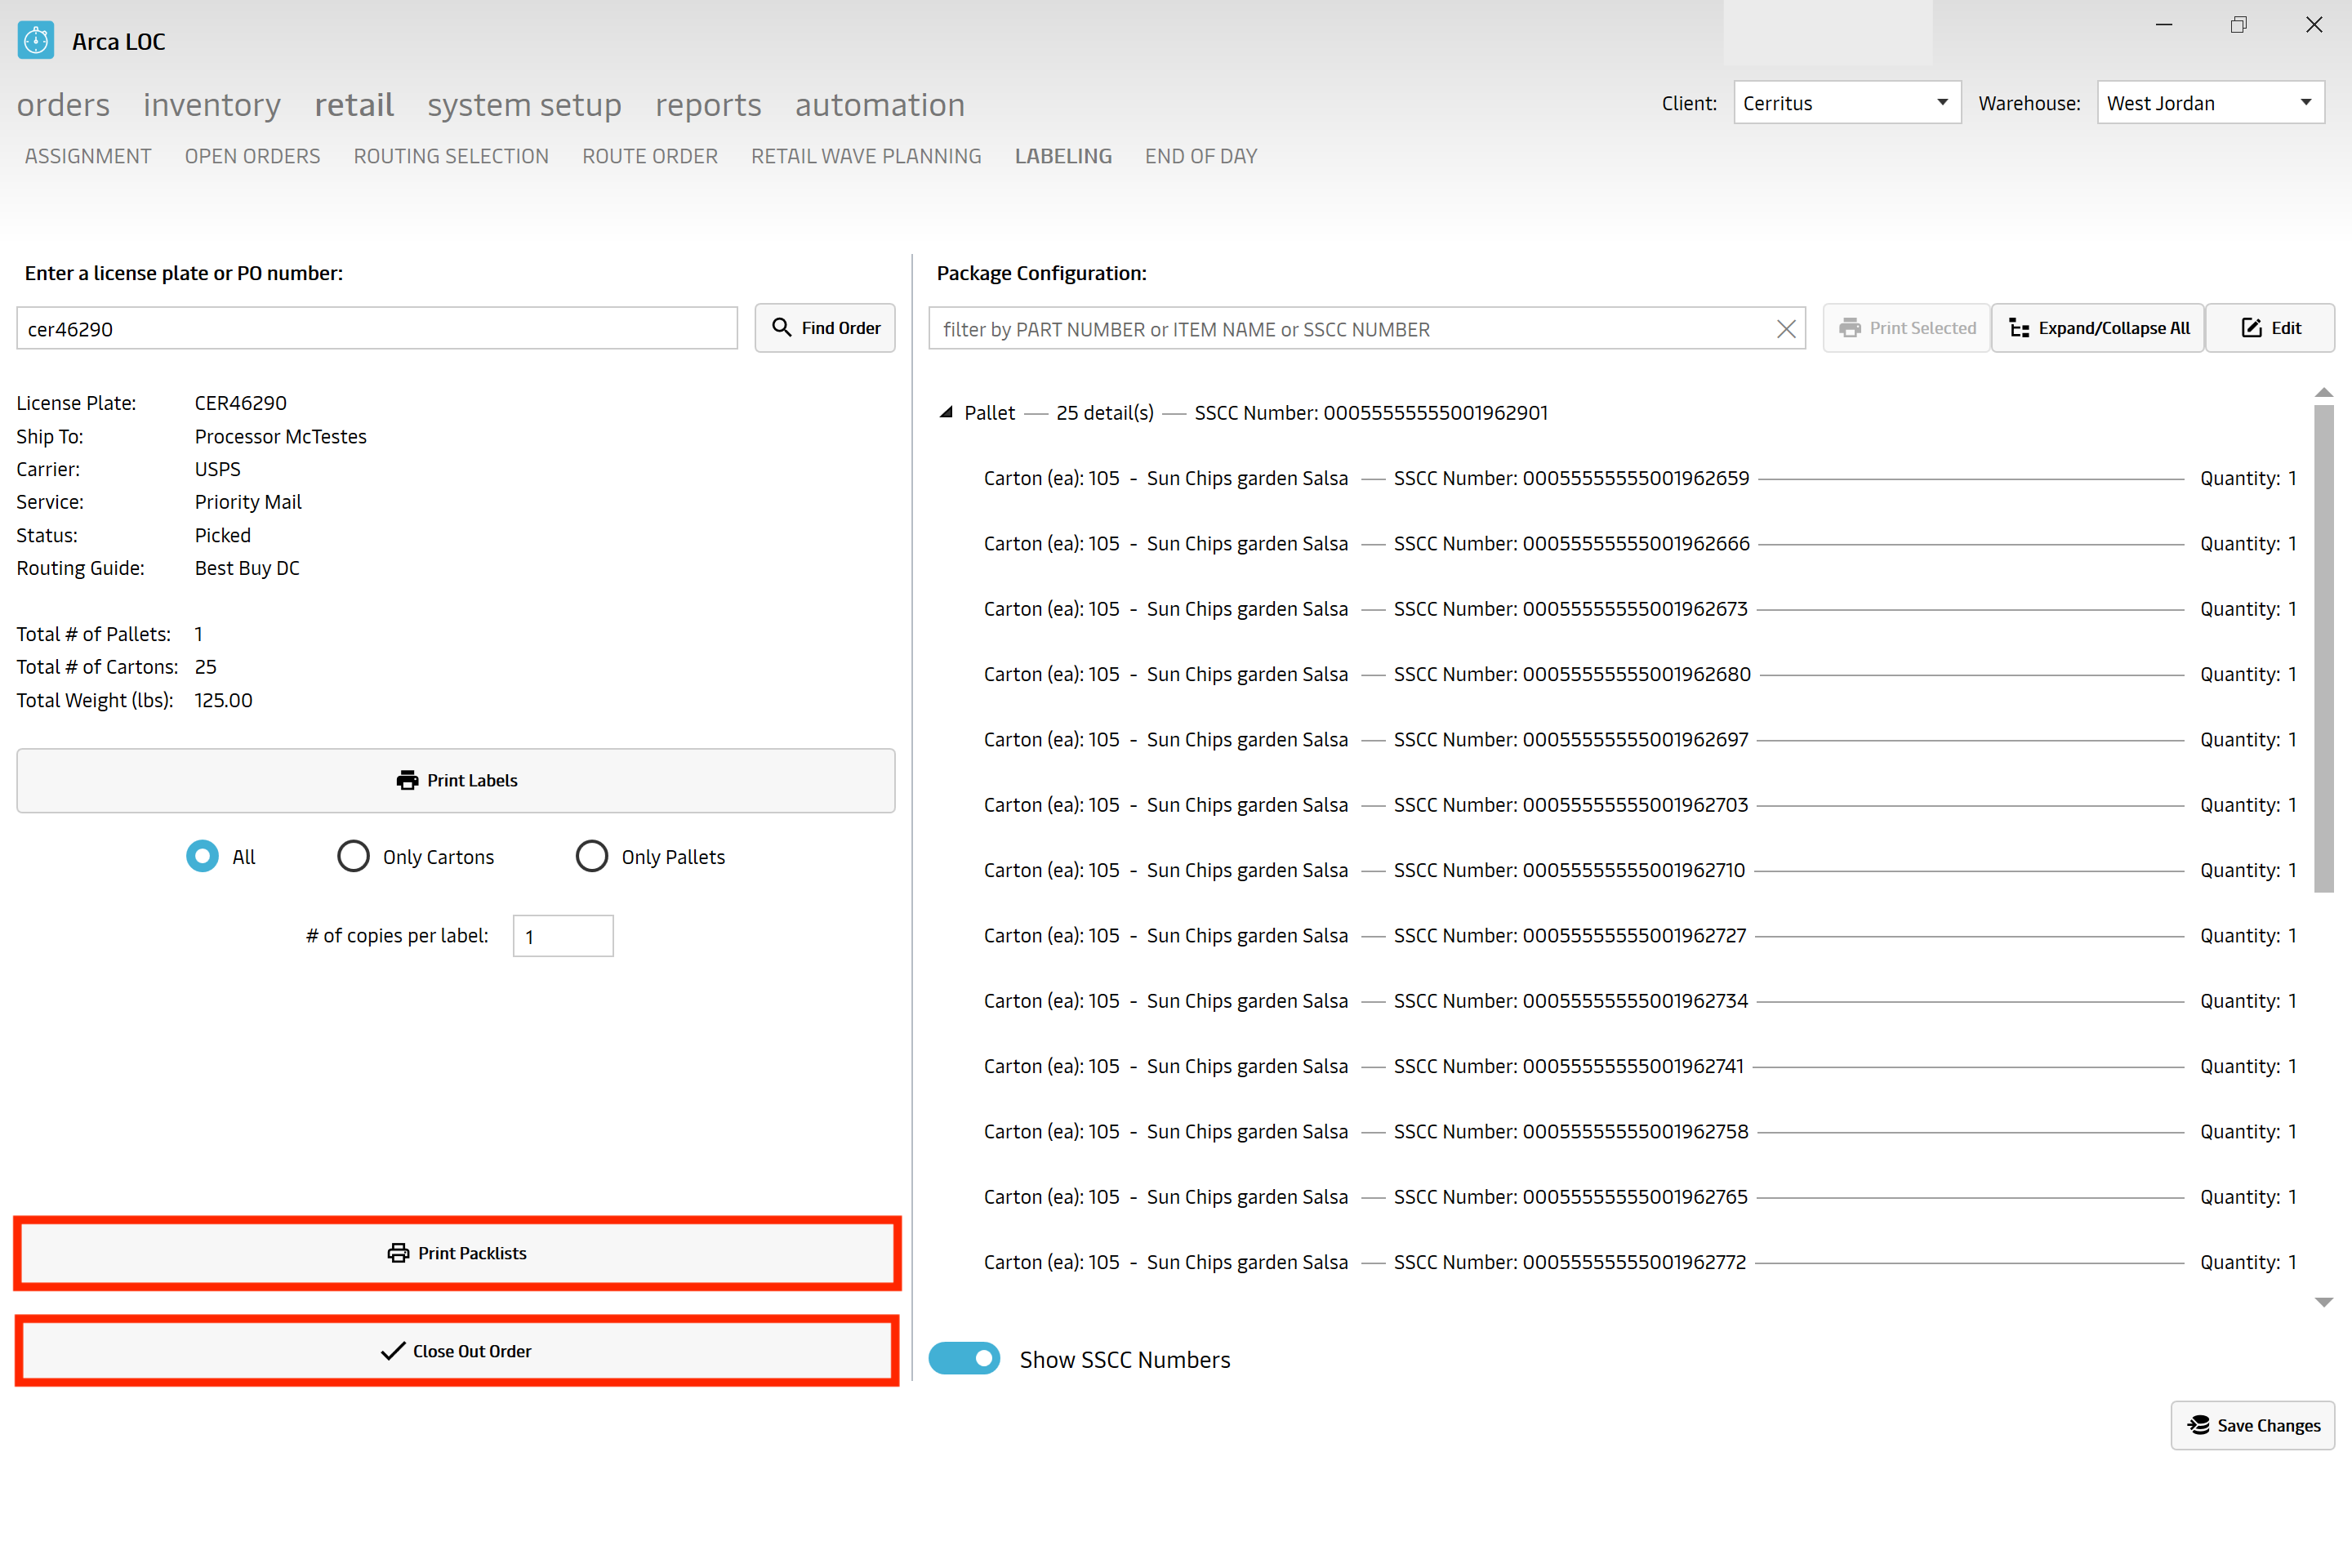
The "Labeling" portion of ARCA LOC Retail is designed to print labels that have been assigned a routing guide, from a sales order or purchase order. There is access to print all labels, label by carton or label by pallet. There will also be access to print packlists, and print and ship labels for cases. There is a section on the screen that provides the package configuration details, along with a toggle ON/OFF switch for SSCC information.
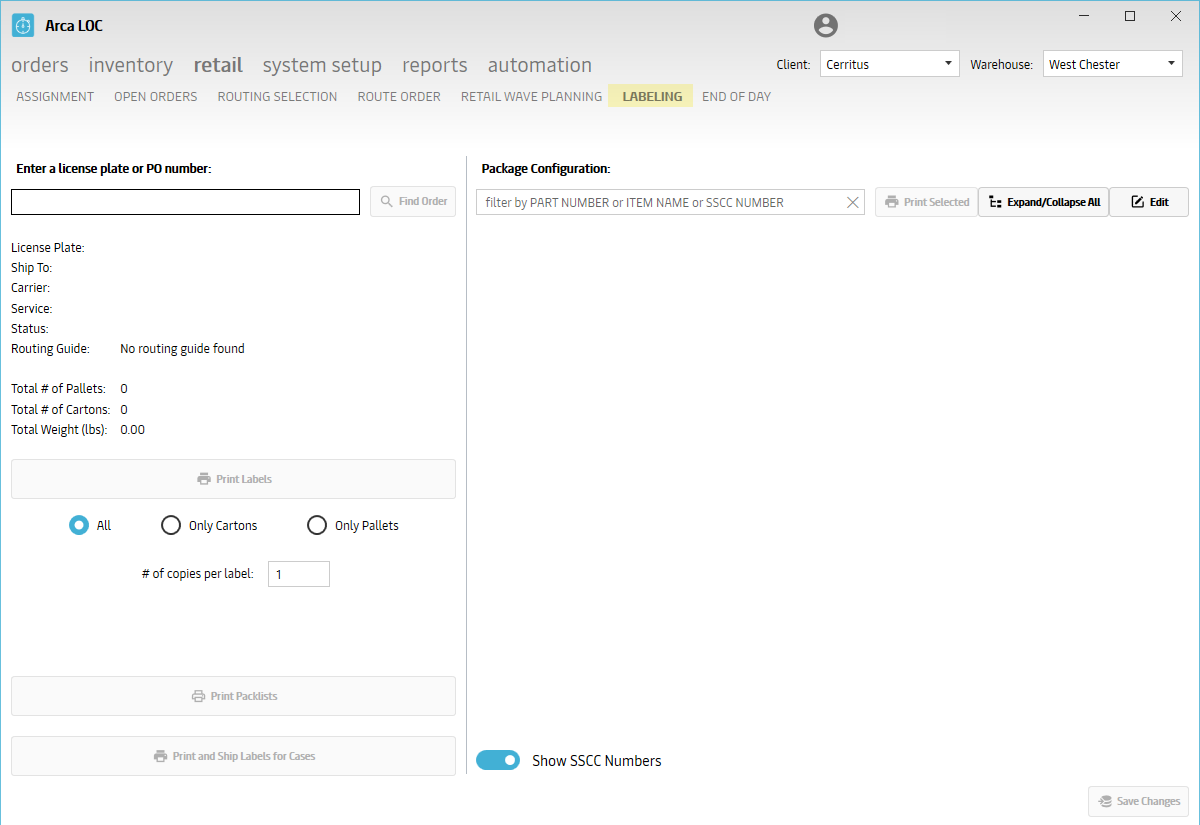
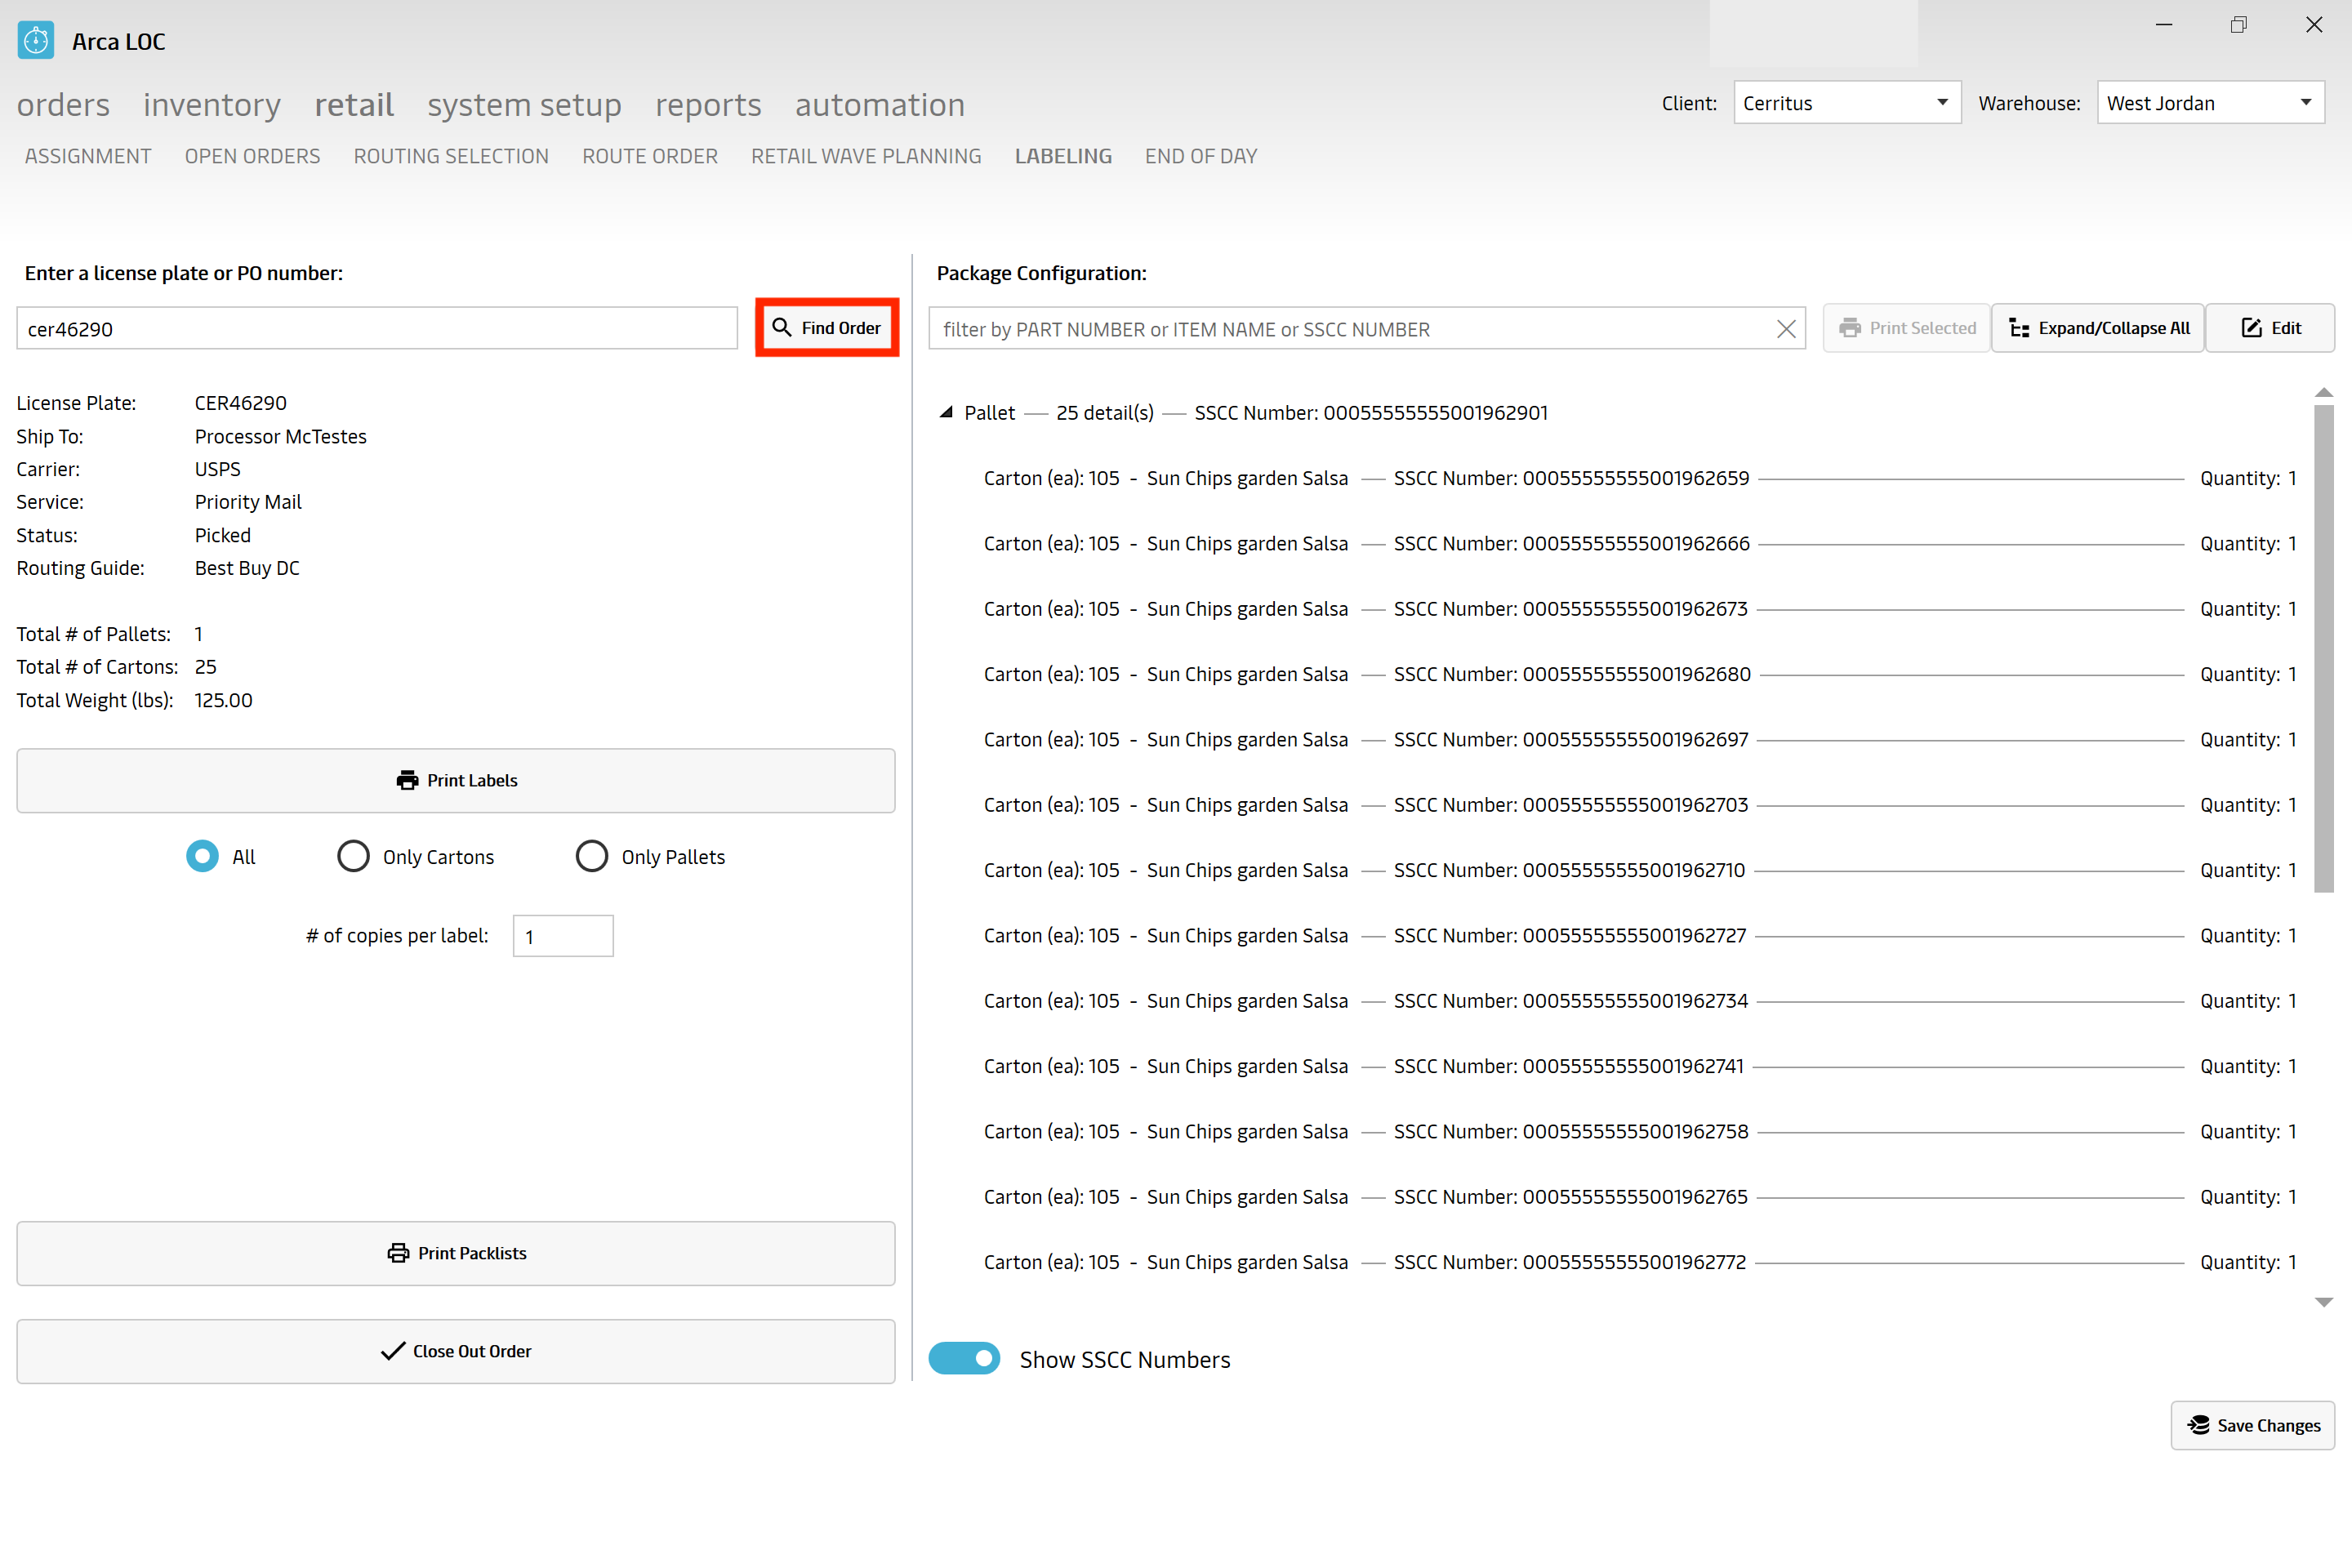
Find An Order
To find an order, you may look it up using the following options:
- License Plate - unique identifier for the sales order or purchase order number
- PO Number - A request for goods sent from a buyer to a seller.
- Quick lookup button
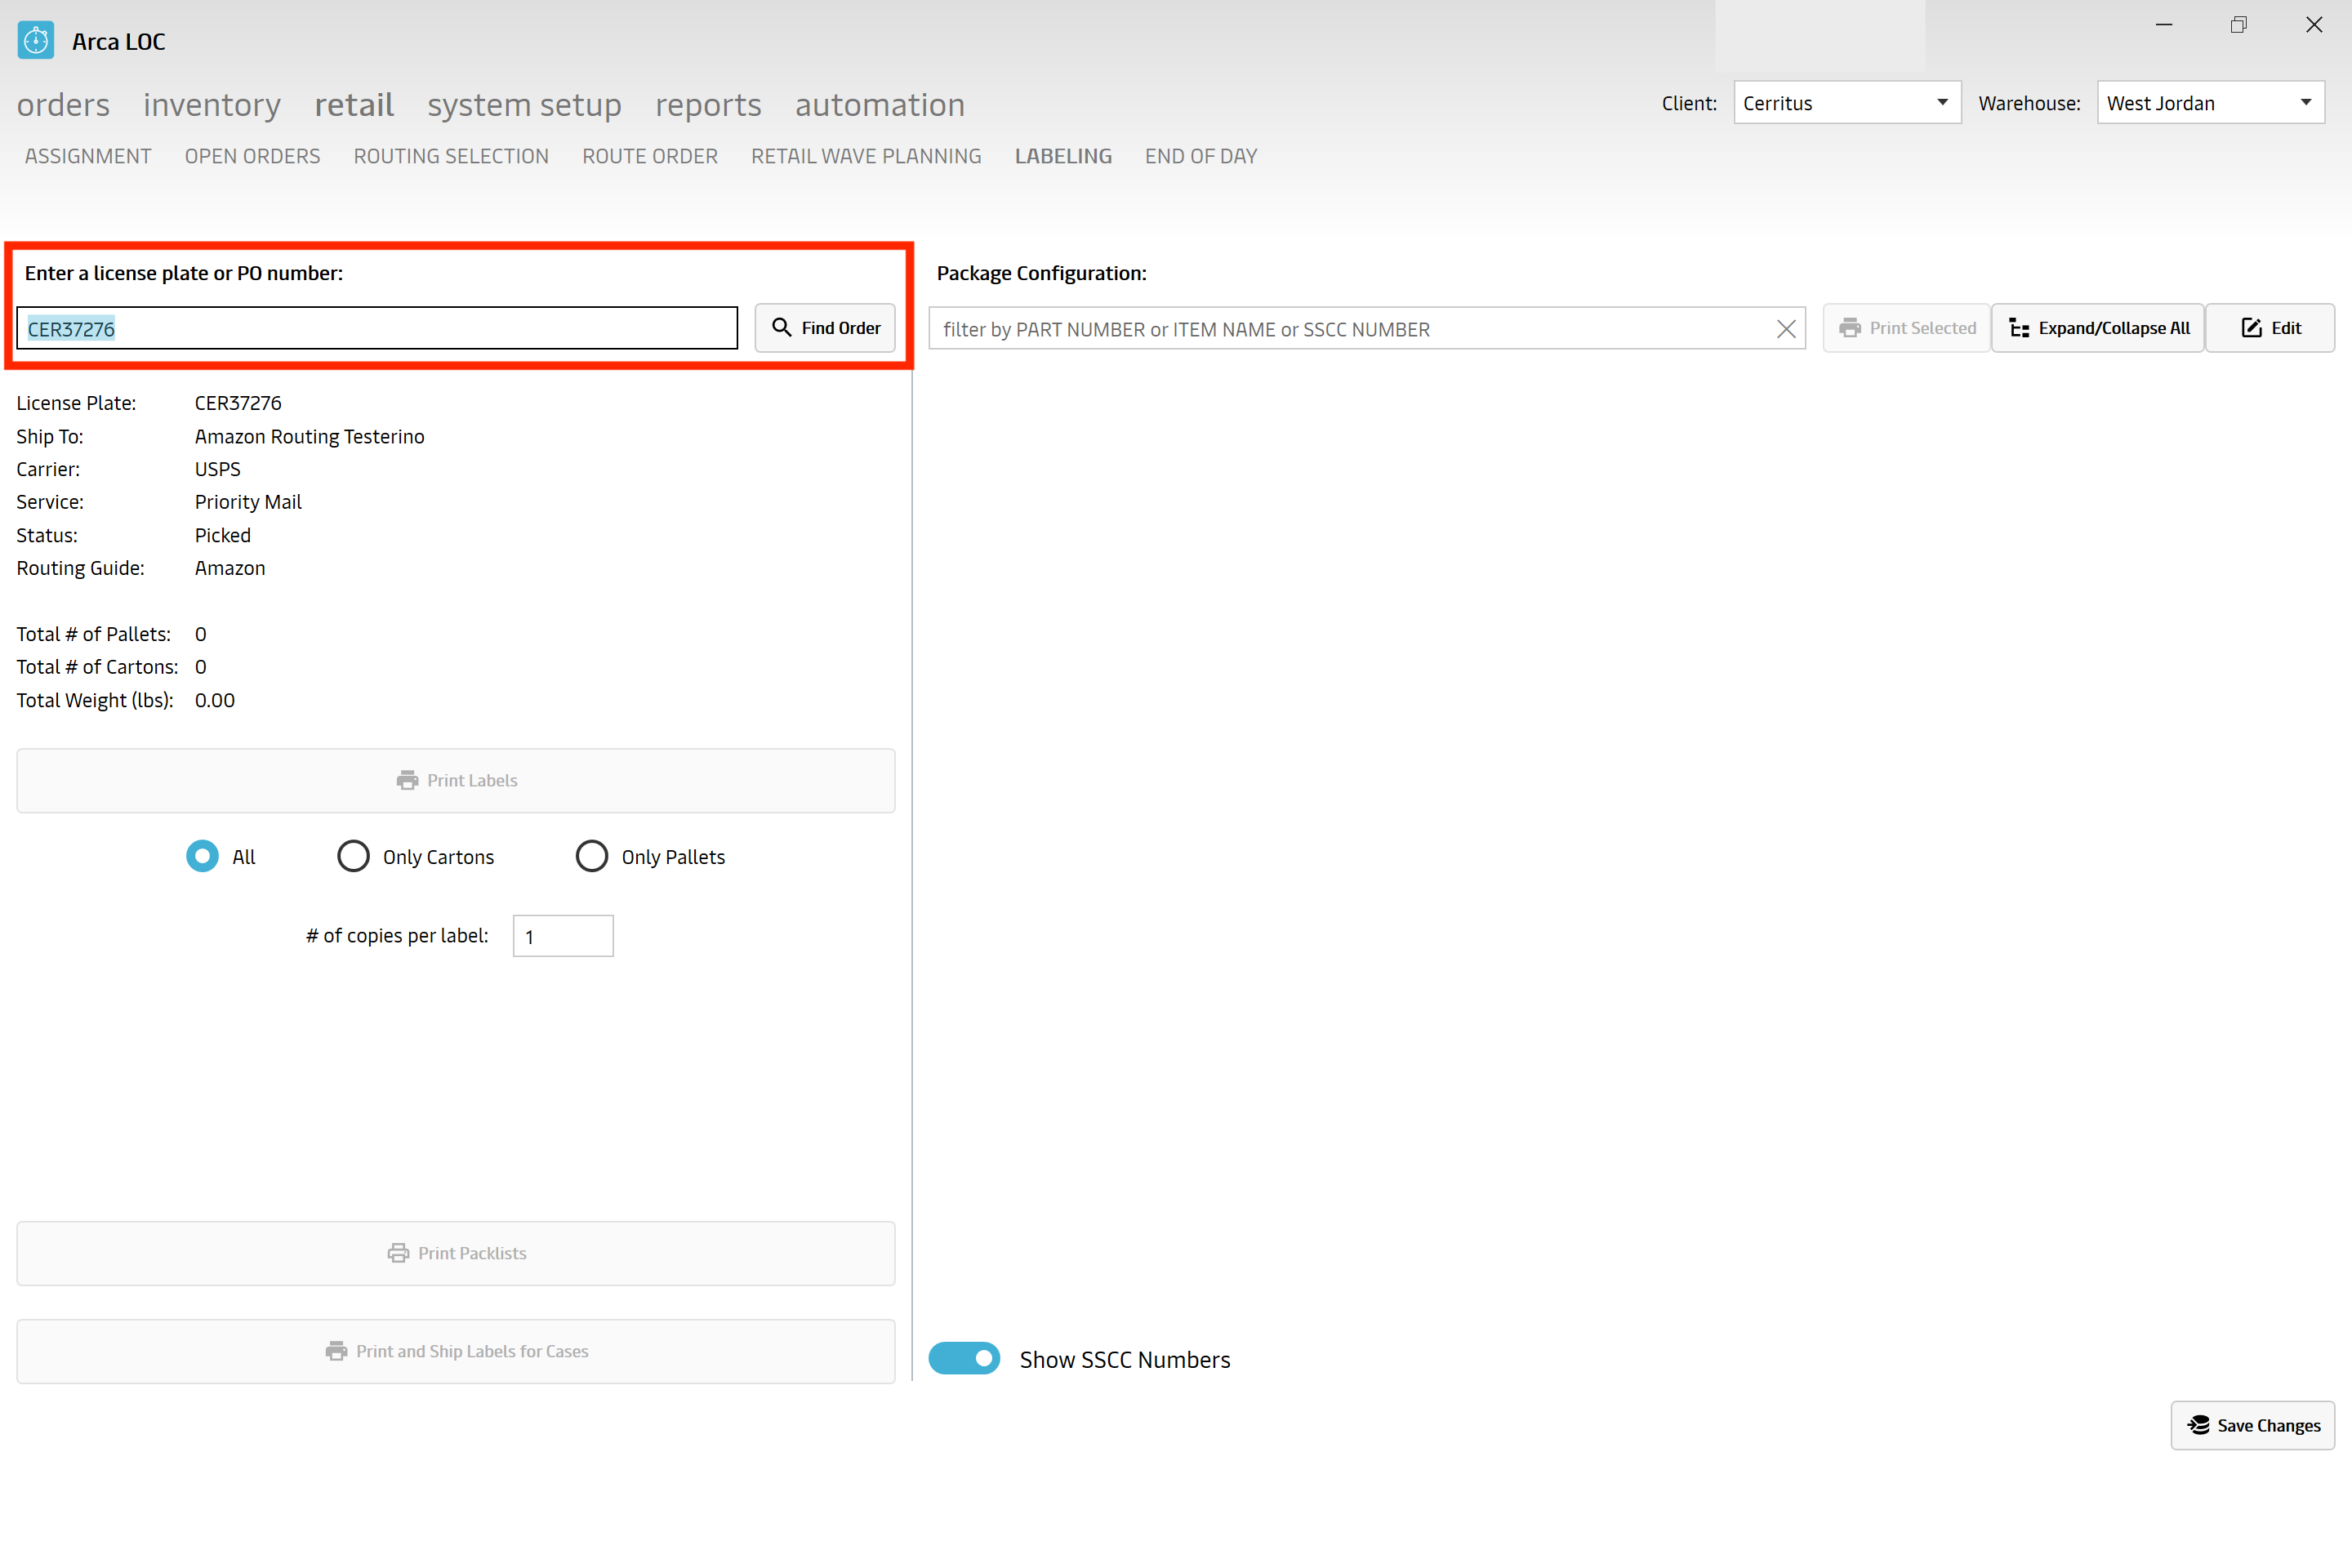
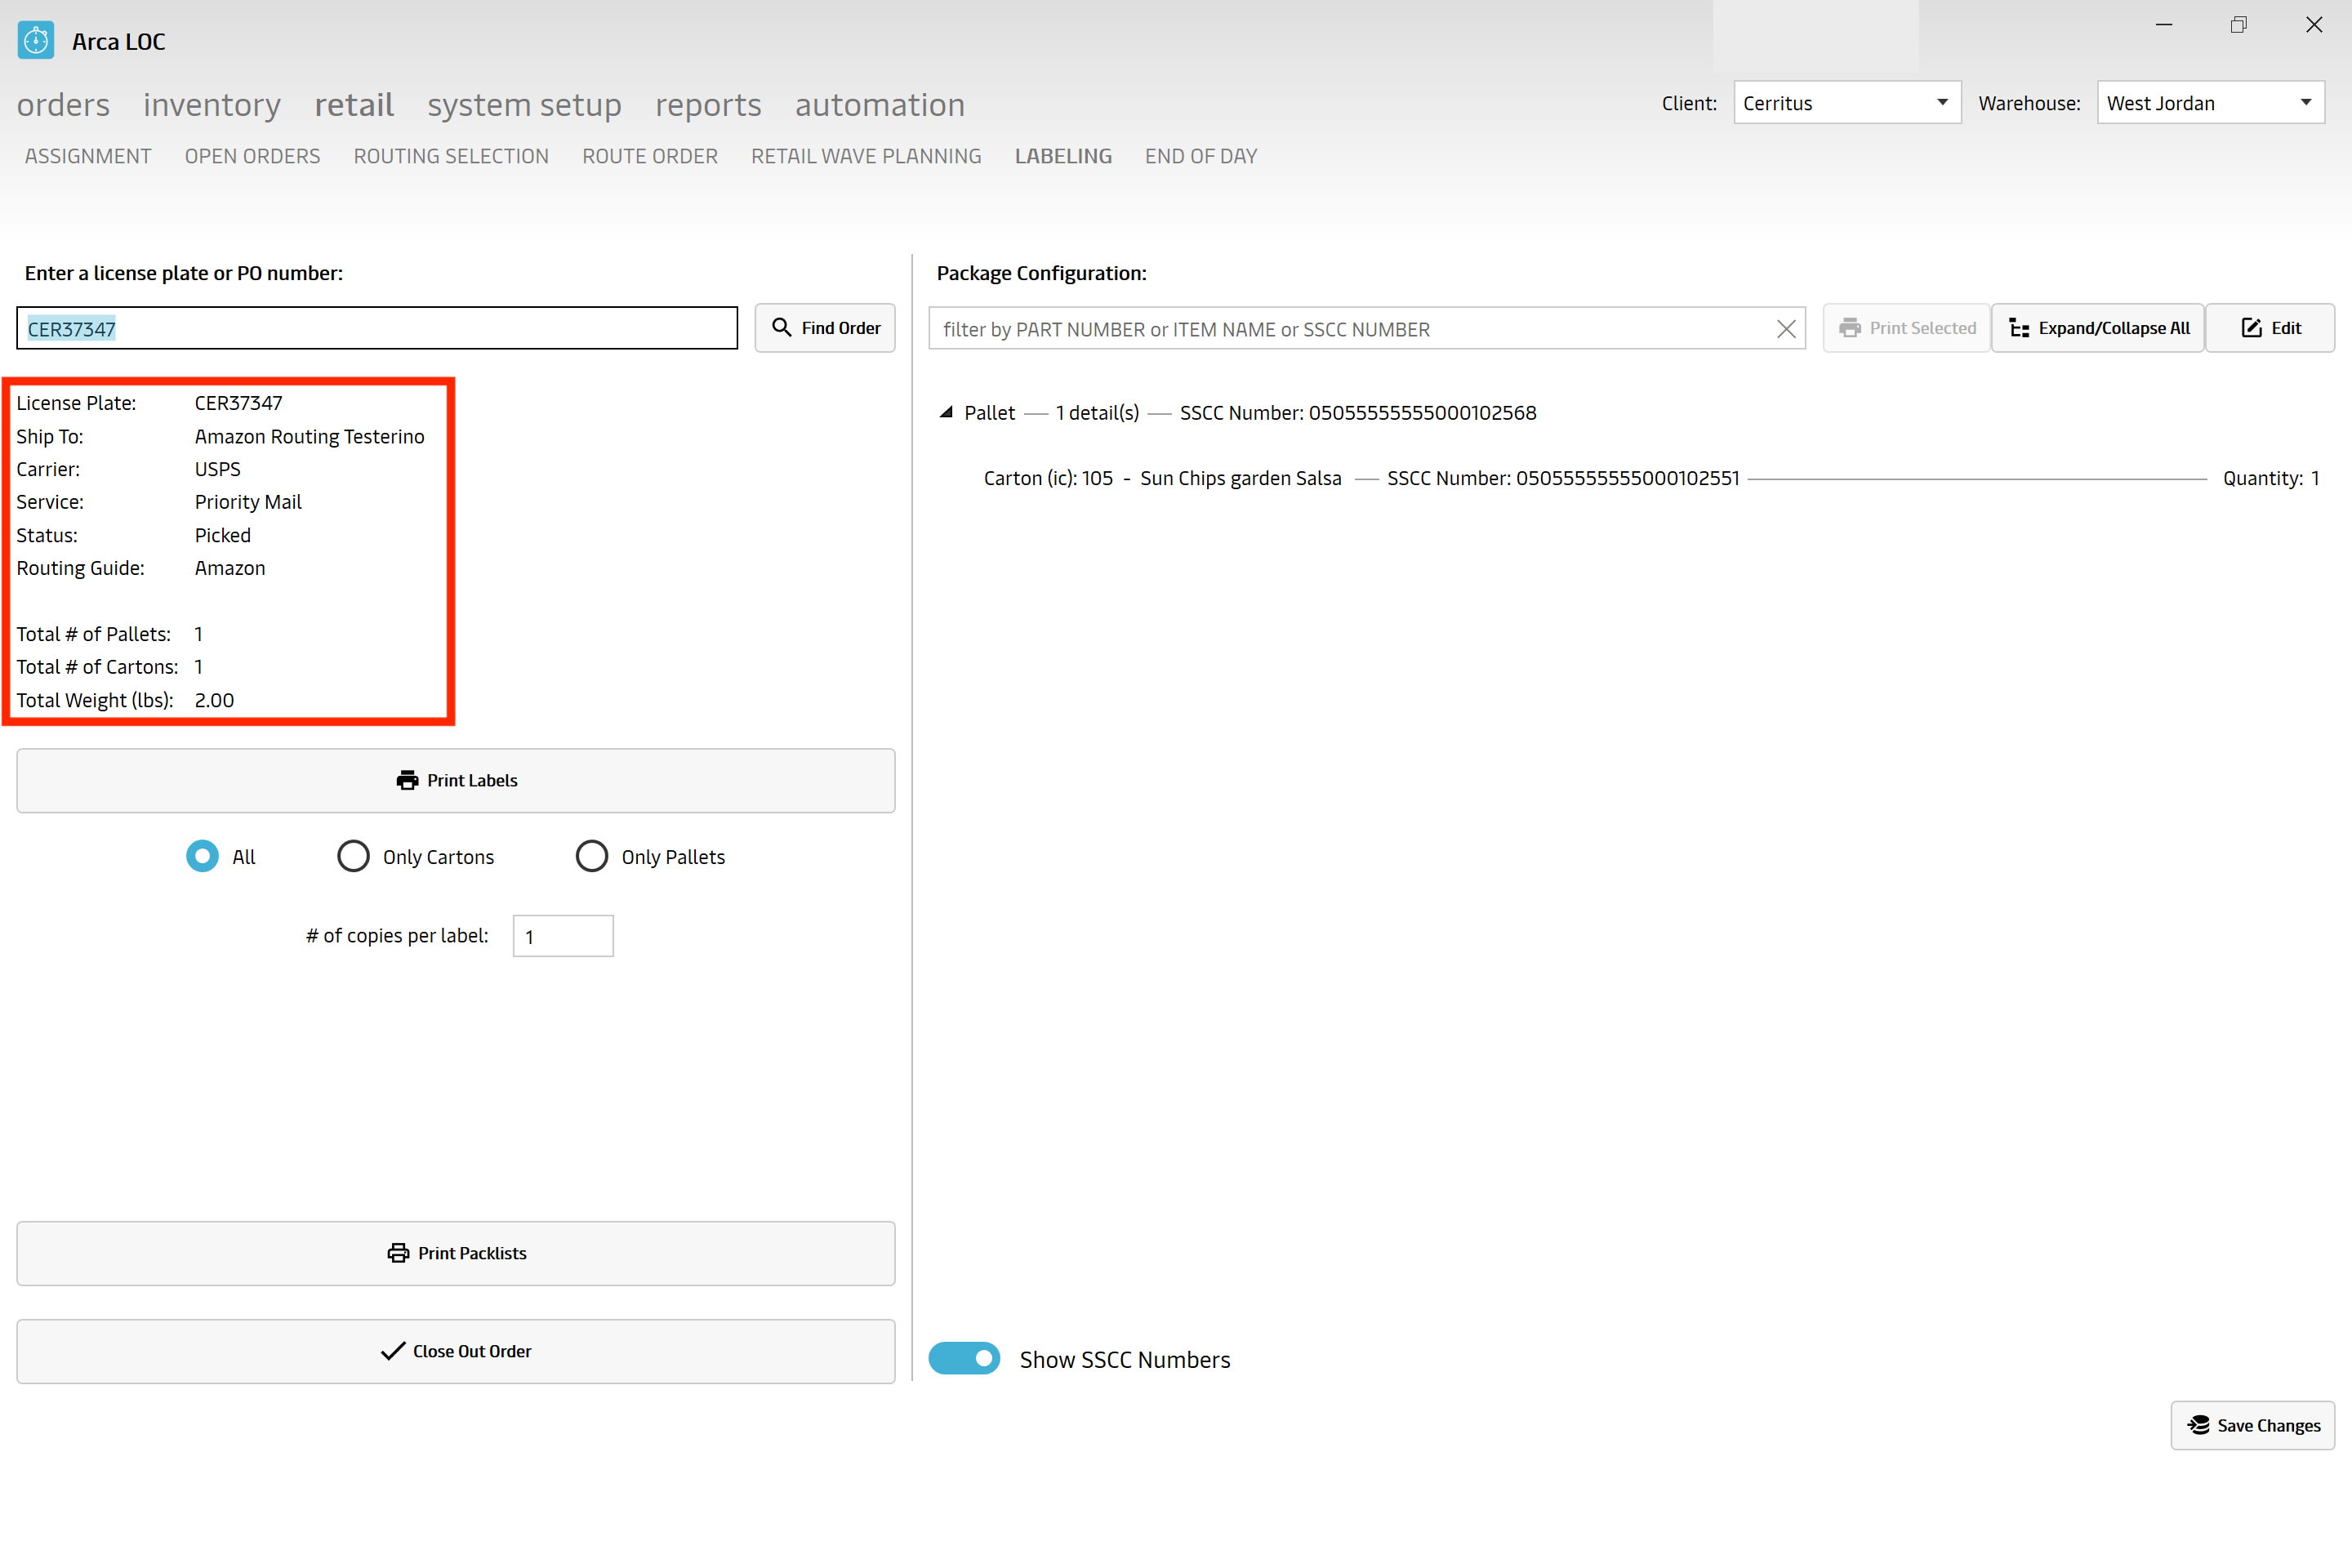
Once an order is selected, you will see the following information:
- License Plate - unique identifier for the customer sales order number; non-pallet
- Ship To - the ship to delivery name
- Carrier - the ship to company name
- Service - the carrier company service that is delivering the package
- Status - system assigned status with regards to step of process
- Routing Guide - a category assigned under the client
- Total # of Pallets - the total number of pallets on the order
- Total # of Cartons - the total number of cartons on the order
- Total Weight (lbs) - the total weight of the package
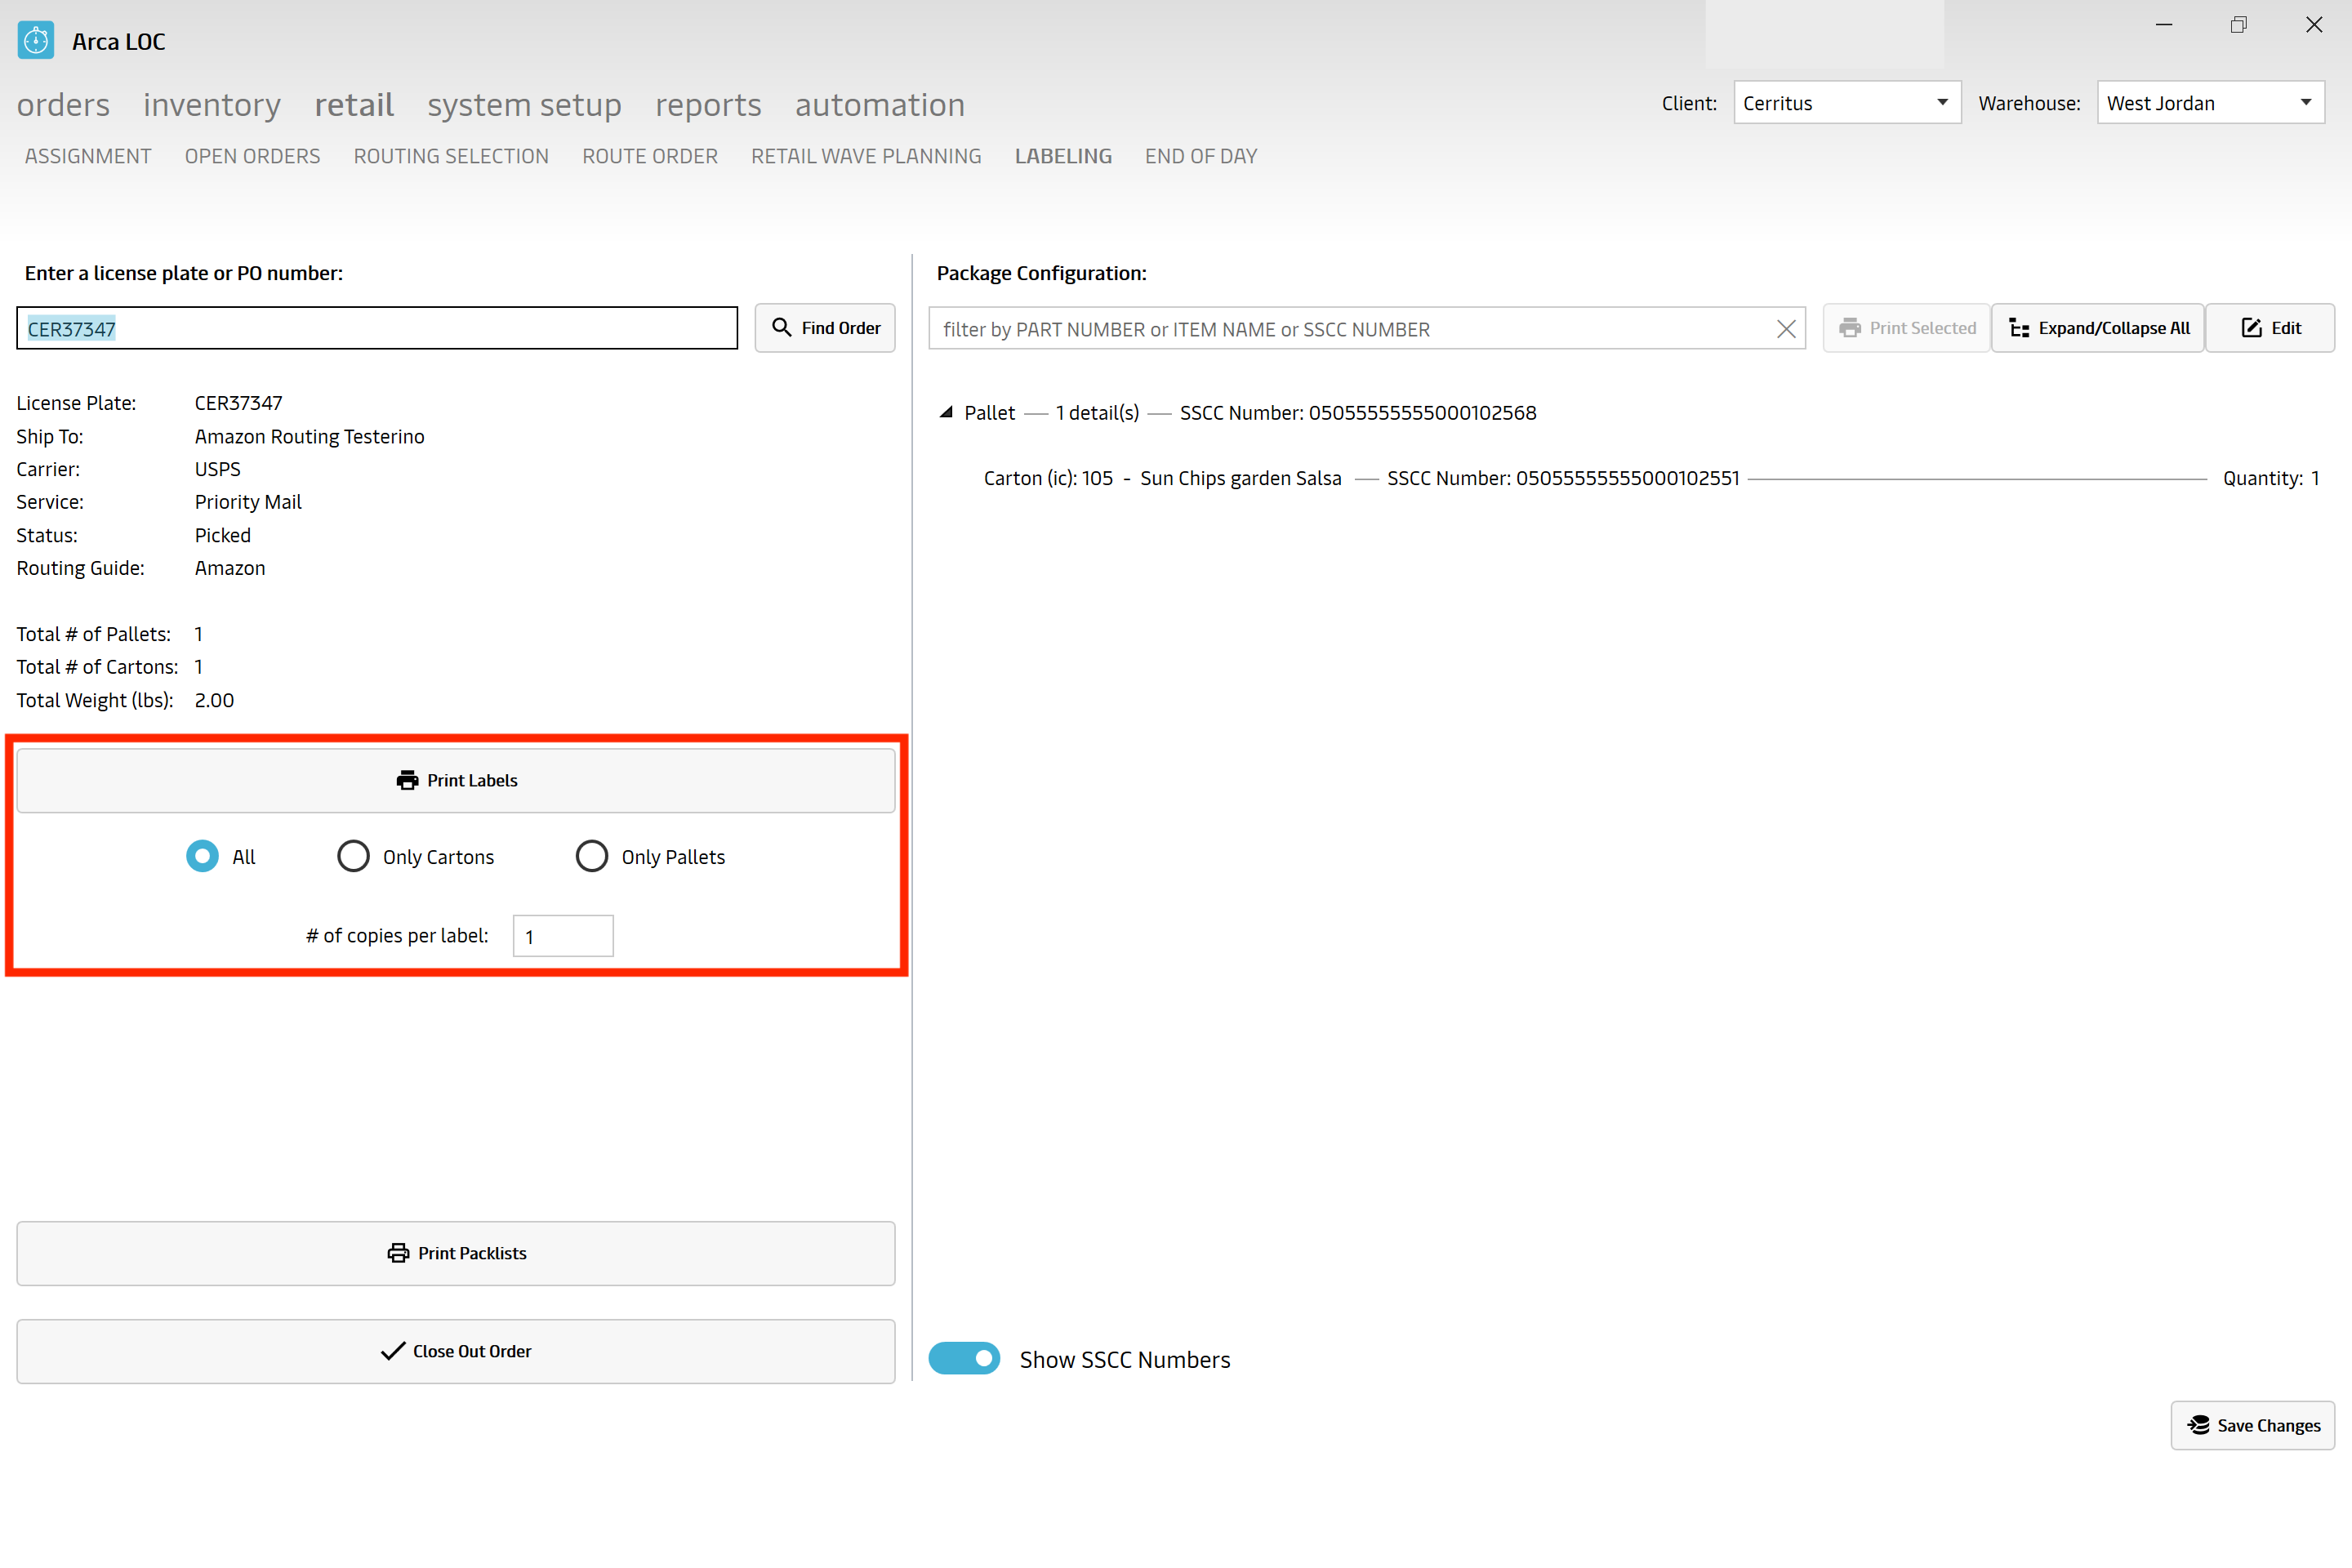
Print Labels
To print a label, you choose one of the following options:
- Print All
- Print Cartons Only
- Print Pallet Only
- You will also get a choice as to how many labels to print, default is set to 1.
Once selections are set, click "Print Labels".
Print Packlists
A packlist is a document that shows the net and gross weights, dimensions and contents of all shipping pieces in a shipment. To print a packlist, click the button below:
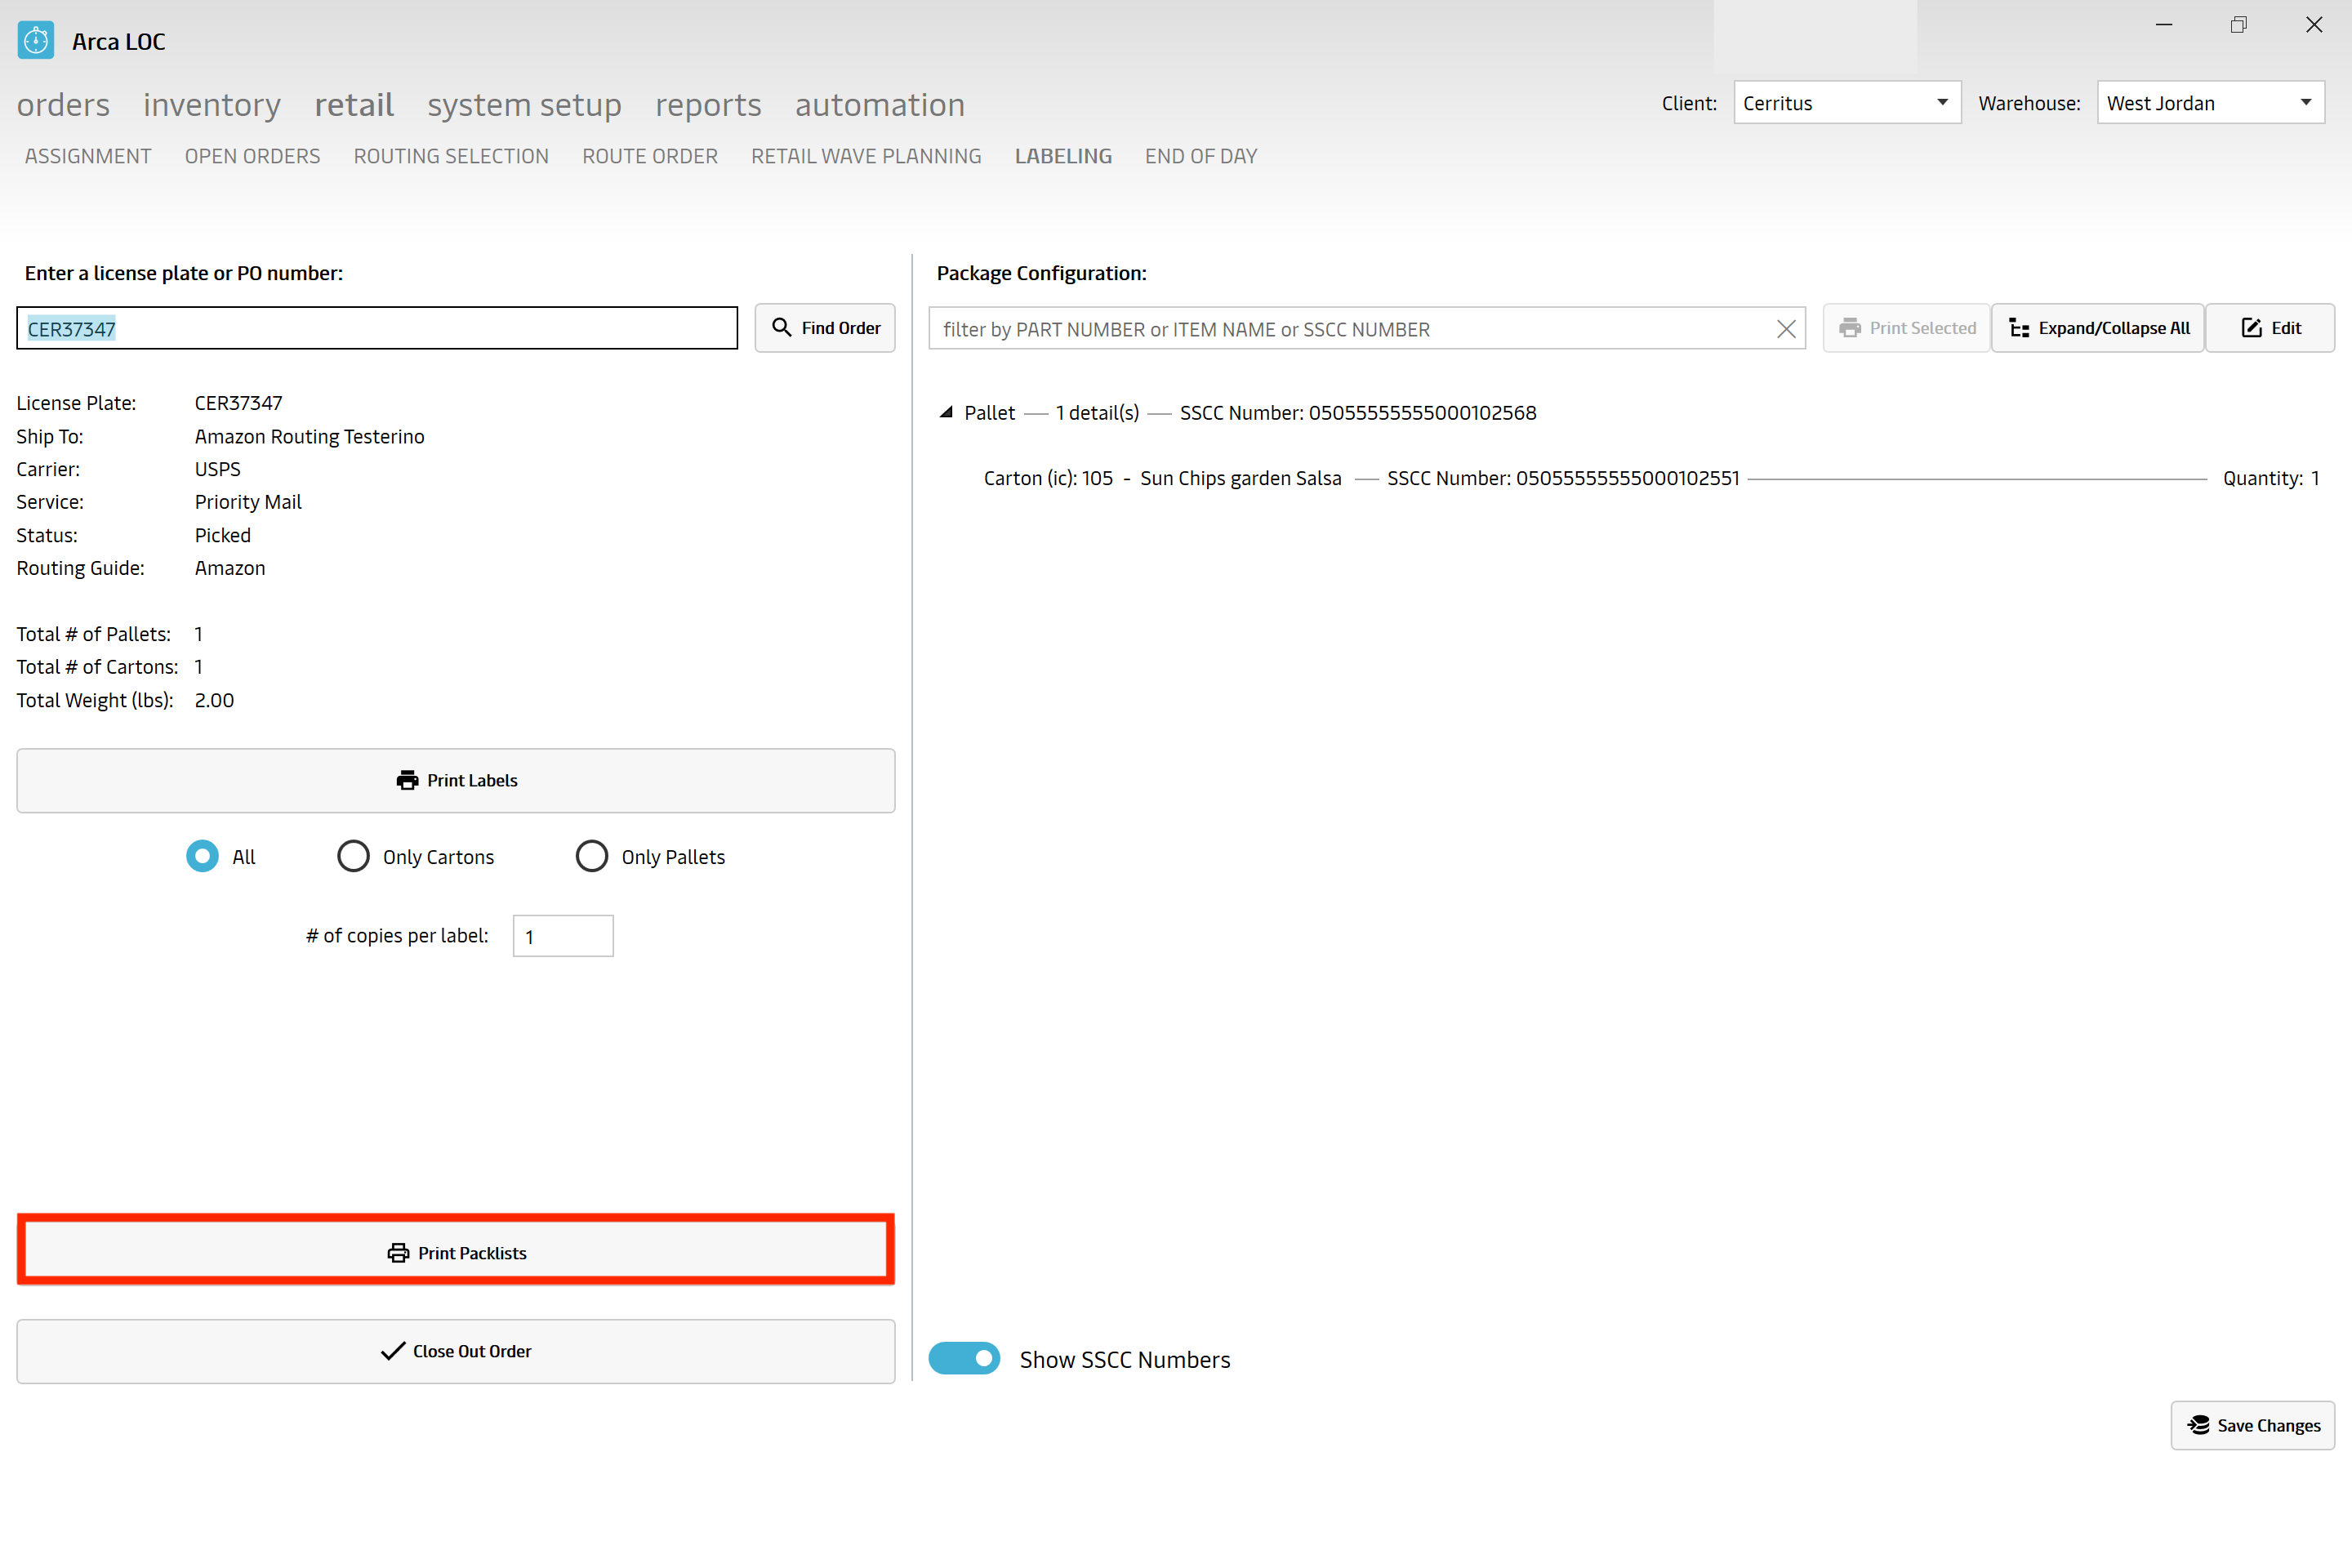
Close Out Order
Once you are done and ready to close out orders, click the button below:
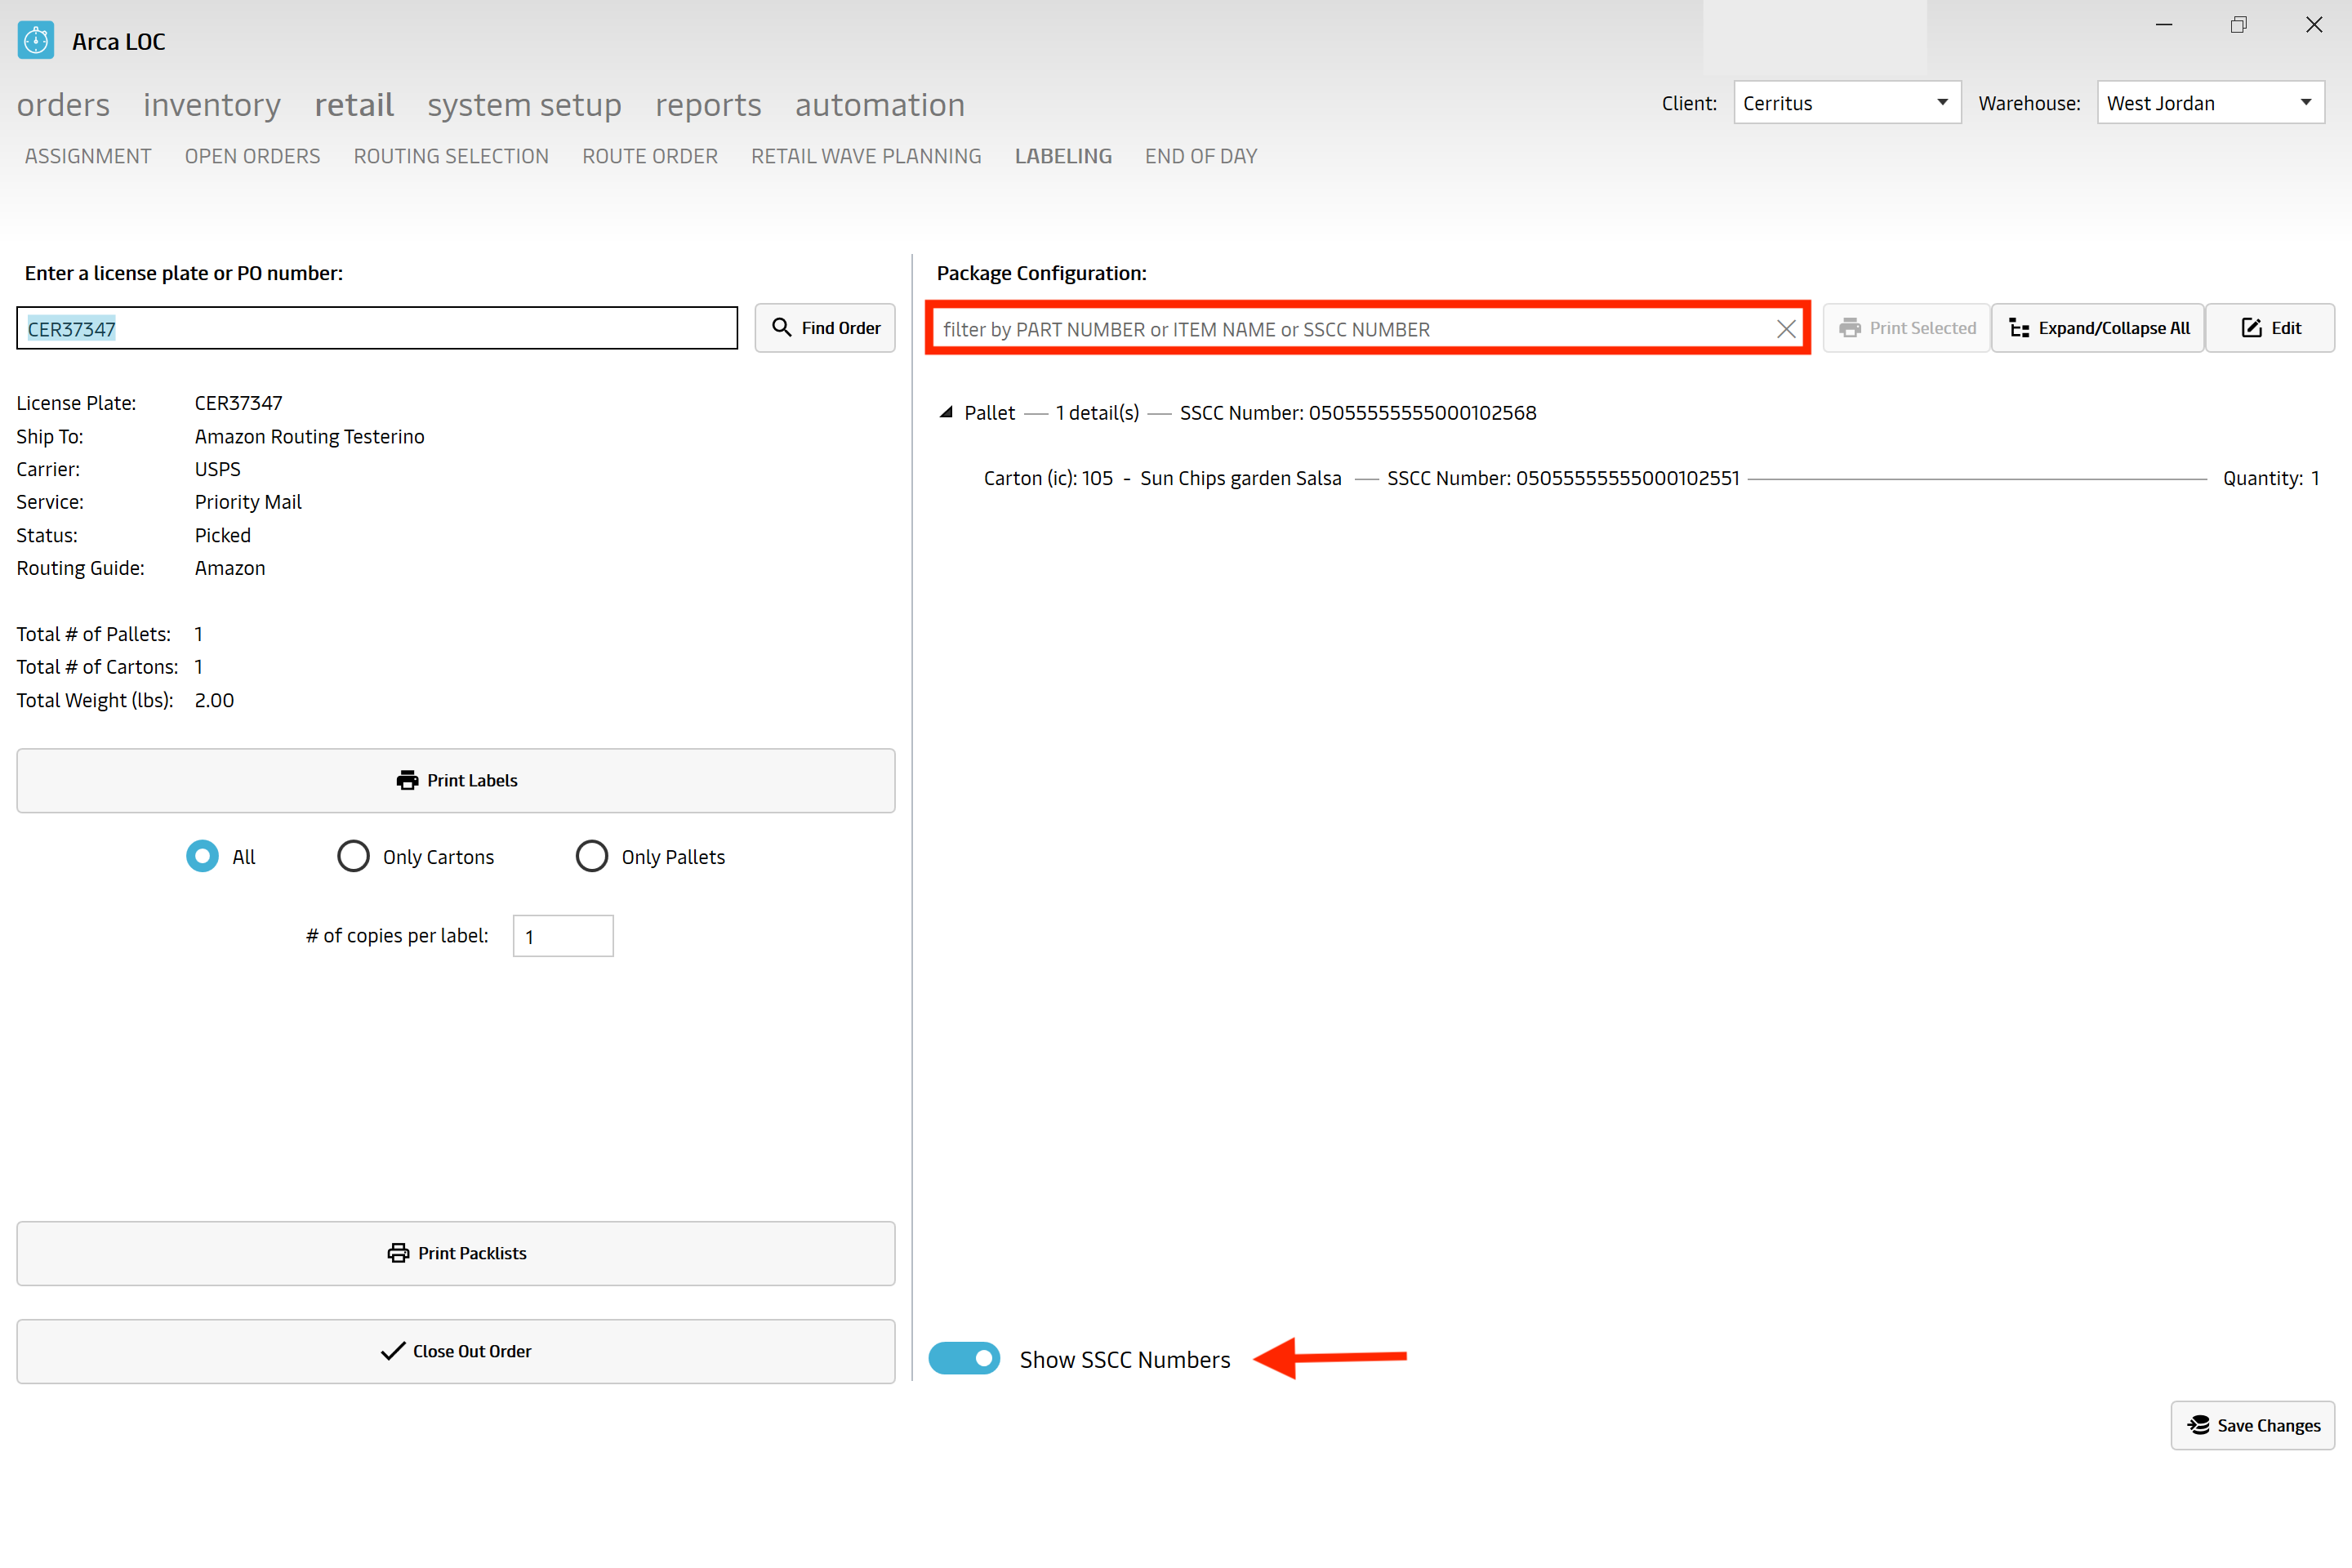
Package Configuration
To view or edit the package configuration, you can filter for the package using the following criteria:
- Part Number - customer part number
- Item Name - customer item name
- SSCC Number - Serial Shipping Container Code — is a logistics standard used in the supply chain to identify each storage or transportation unit that enters or leaves the warehouse
- To include the "SSCC Number" toggle the ON/OFF switch at the bottom left
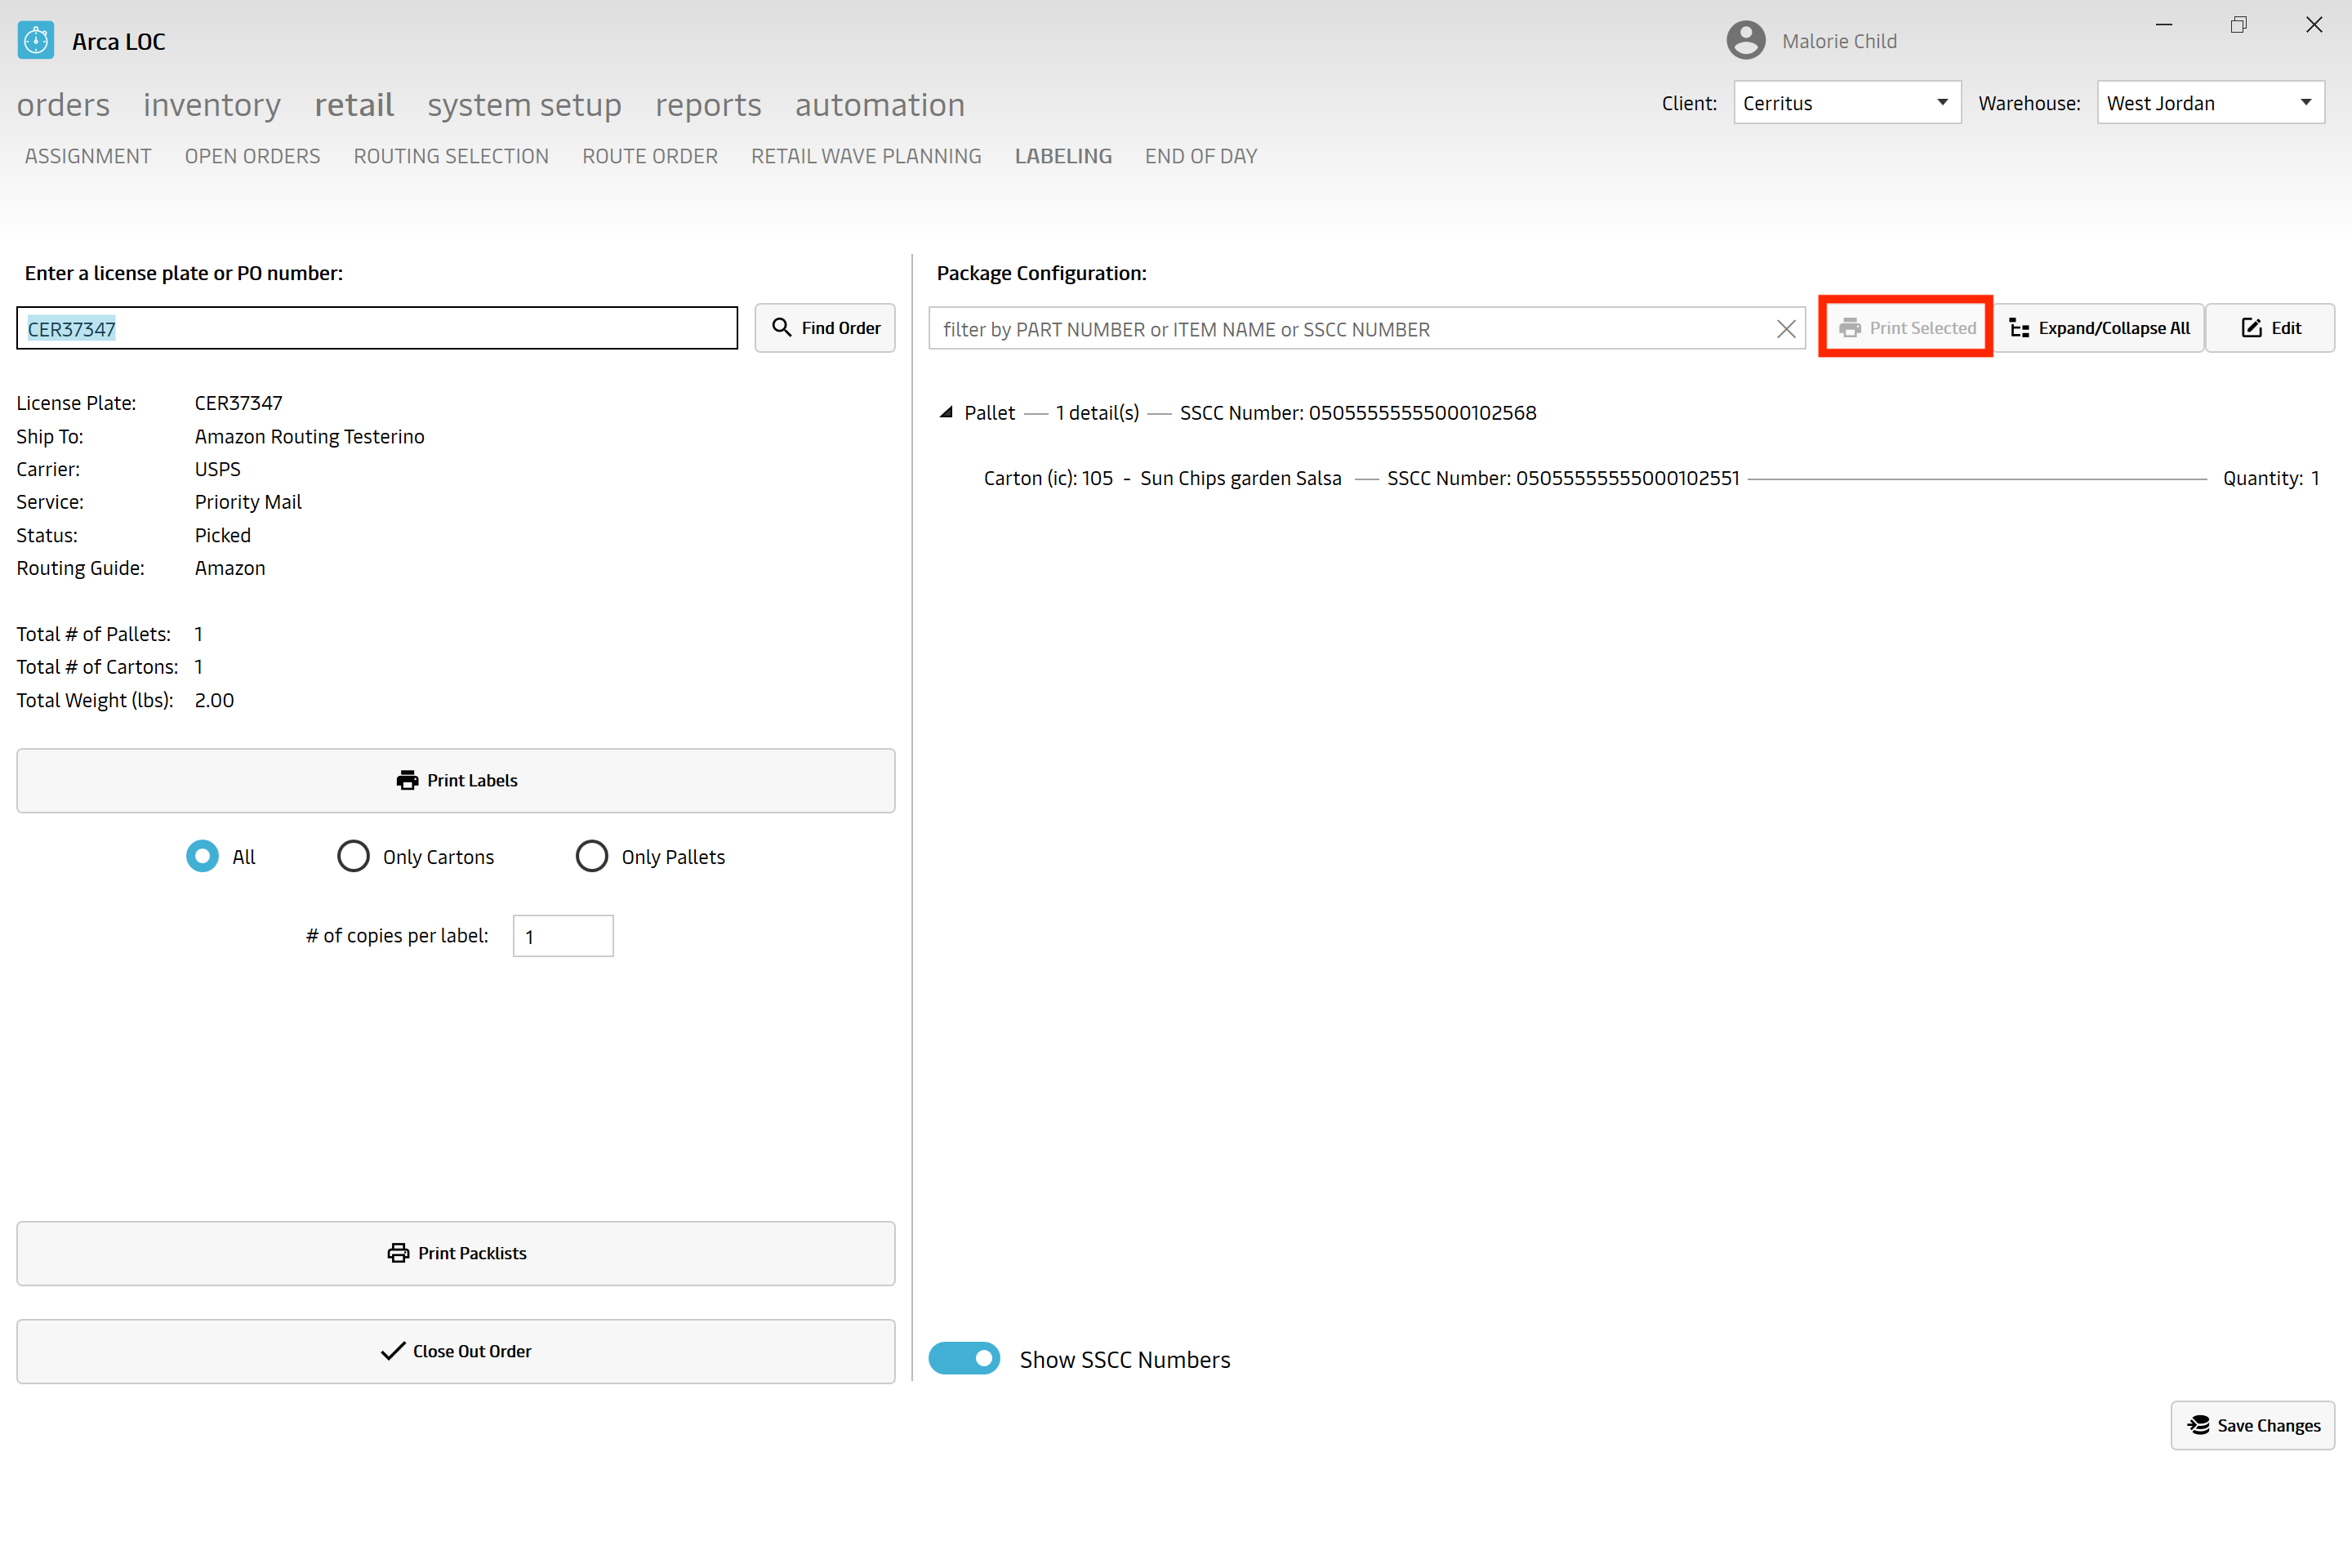
Print by package
To print by package configuration, highlight the package and click "Print Selected".
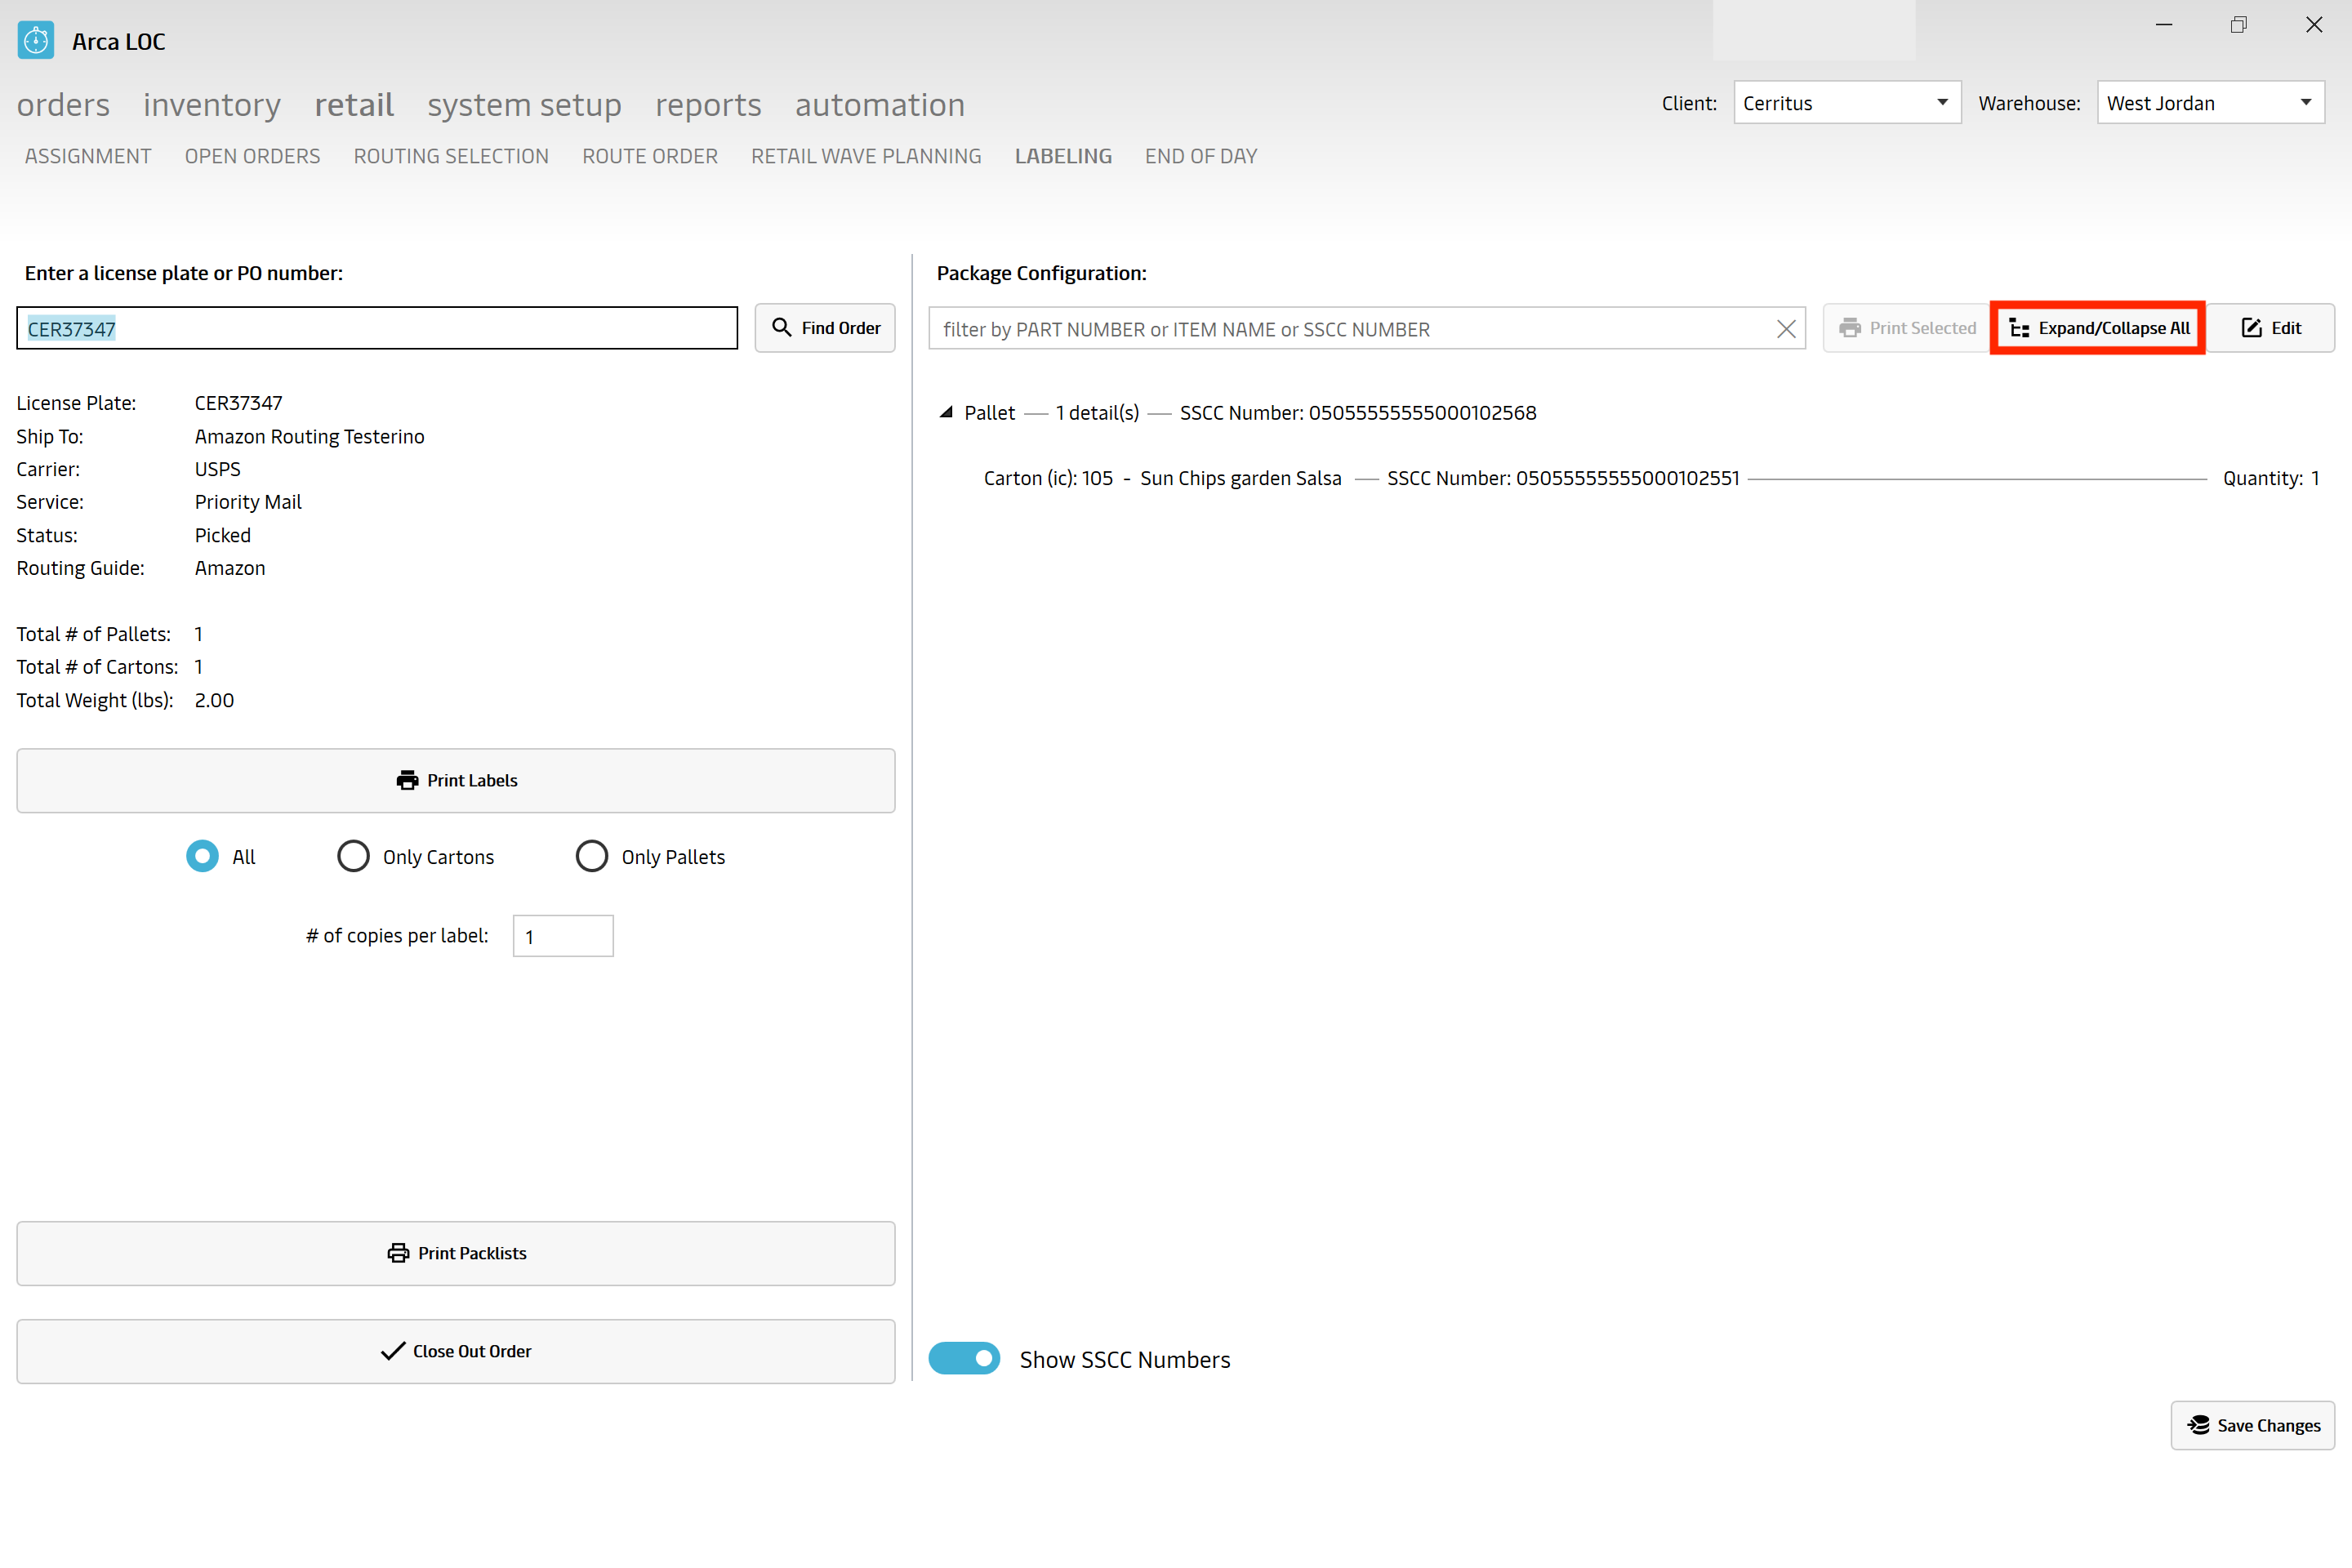
Expand/Collapse All
To edit the view, you may expand/collapse the packages with a click:
Edit Options
Edit Freight
- Add a pallet
- To make freight edits, click on "Edit", you will see a new view on the left side of the screen that provide options from which to choose.
- Delete a pallet
- Clear a pallet
- Update Pallets to Cartons
- Update Cartons to One Pallet
- Add item to configuration
- Add a BOL (Bill of Lading)
- Add LTL Pro (Less Than Truckload Progressive number): used for when an order doesn't fill an entire semi truck.
- Update carton properties (LxHxW, type, etc)
Edit Quantity
To make quantity edits, click on "Edit", you will see a quantity box appear on the right side of the screen, per line.
- Add or Remove quantity
Do not forget to click on the SAVE CHANGES for the changes to take effect.
Click on the BACK button if you do not want to save your changes.
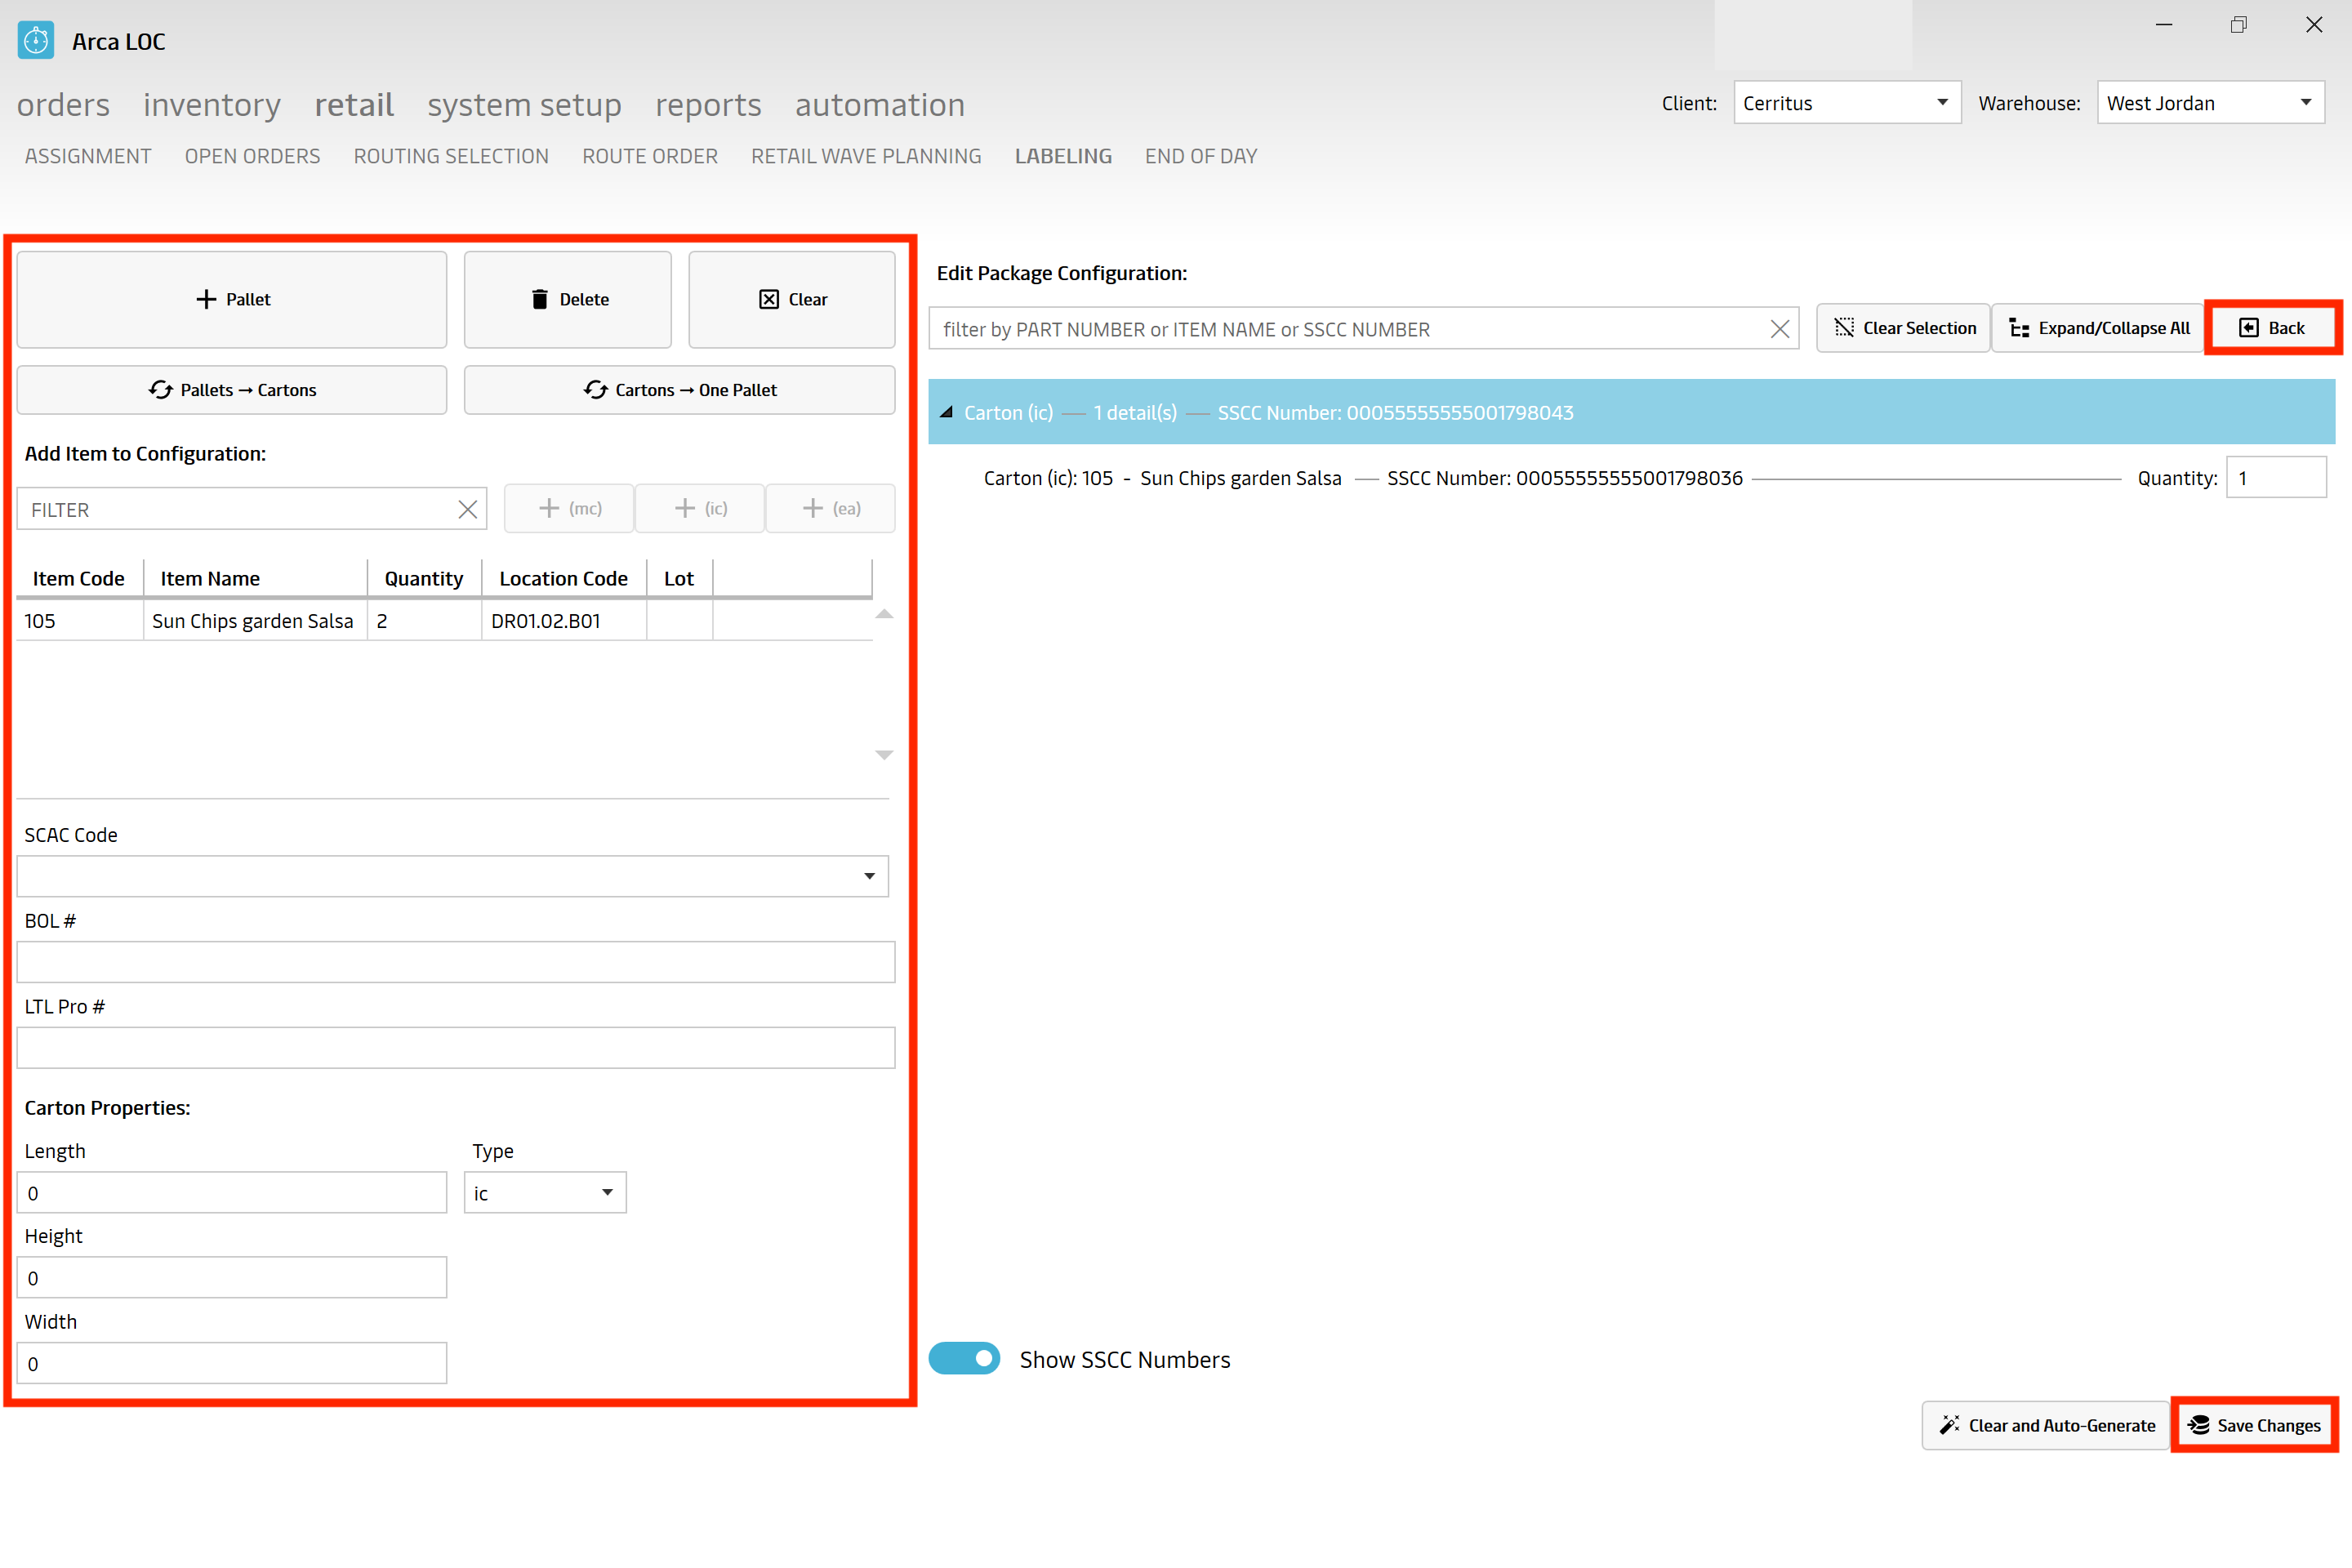
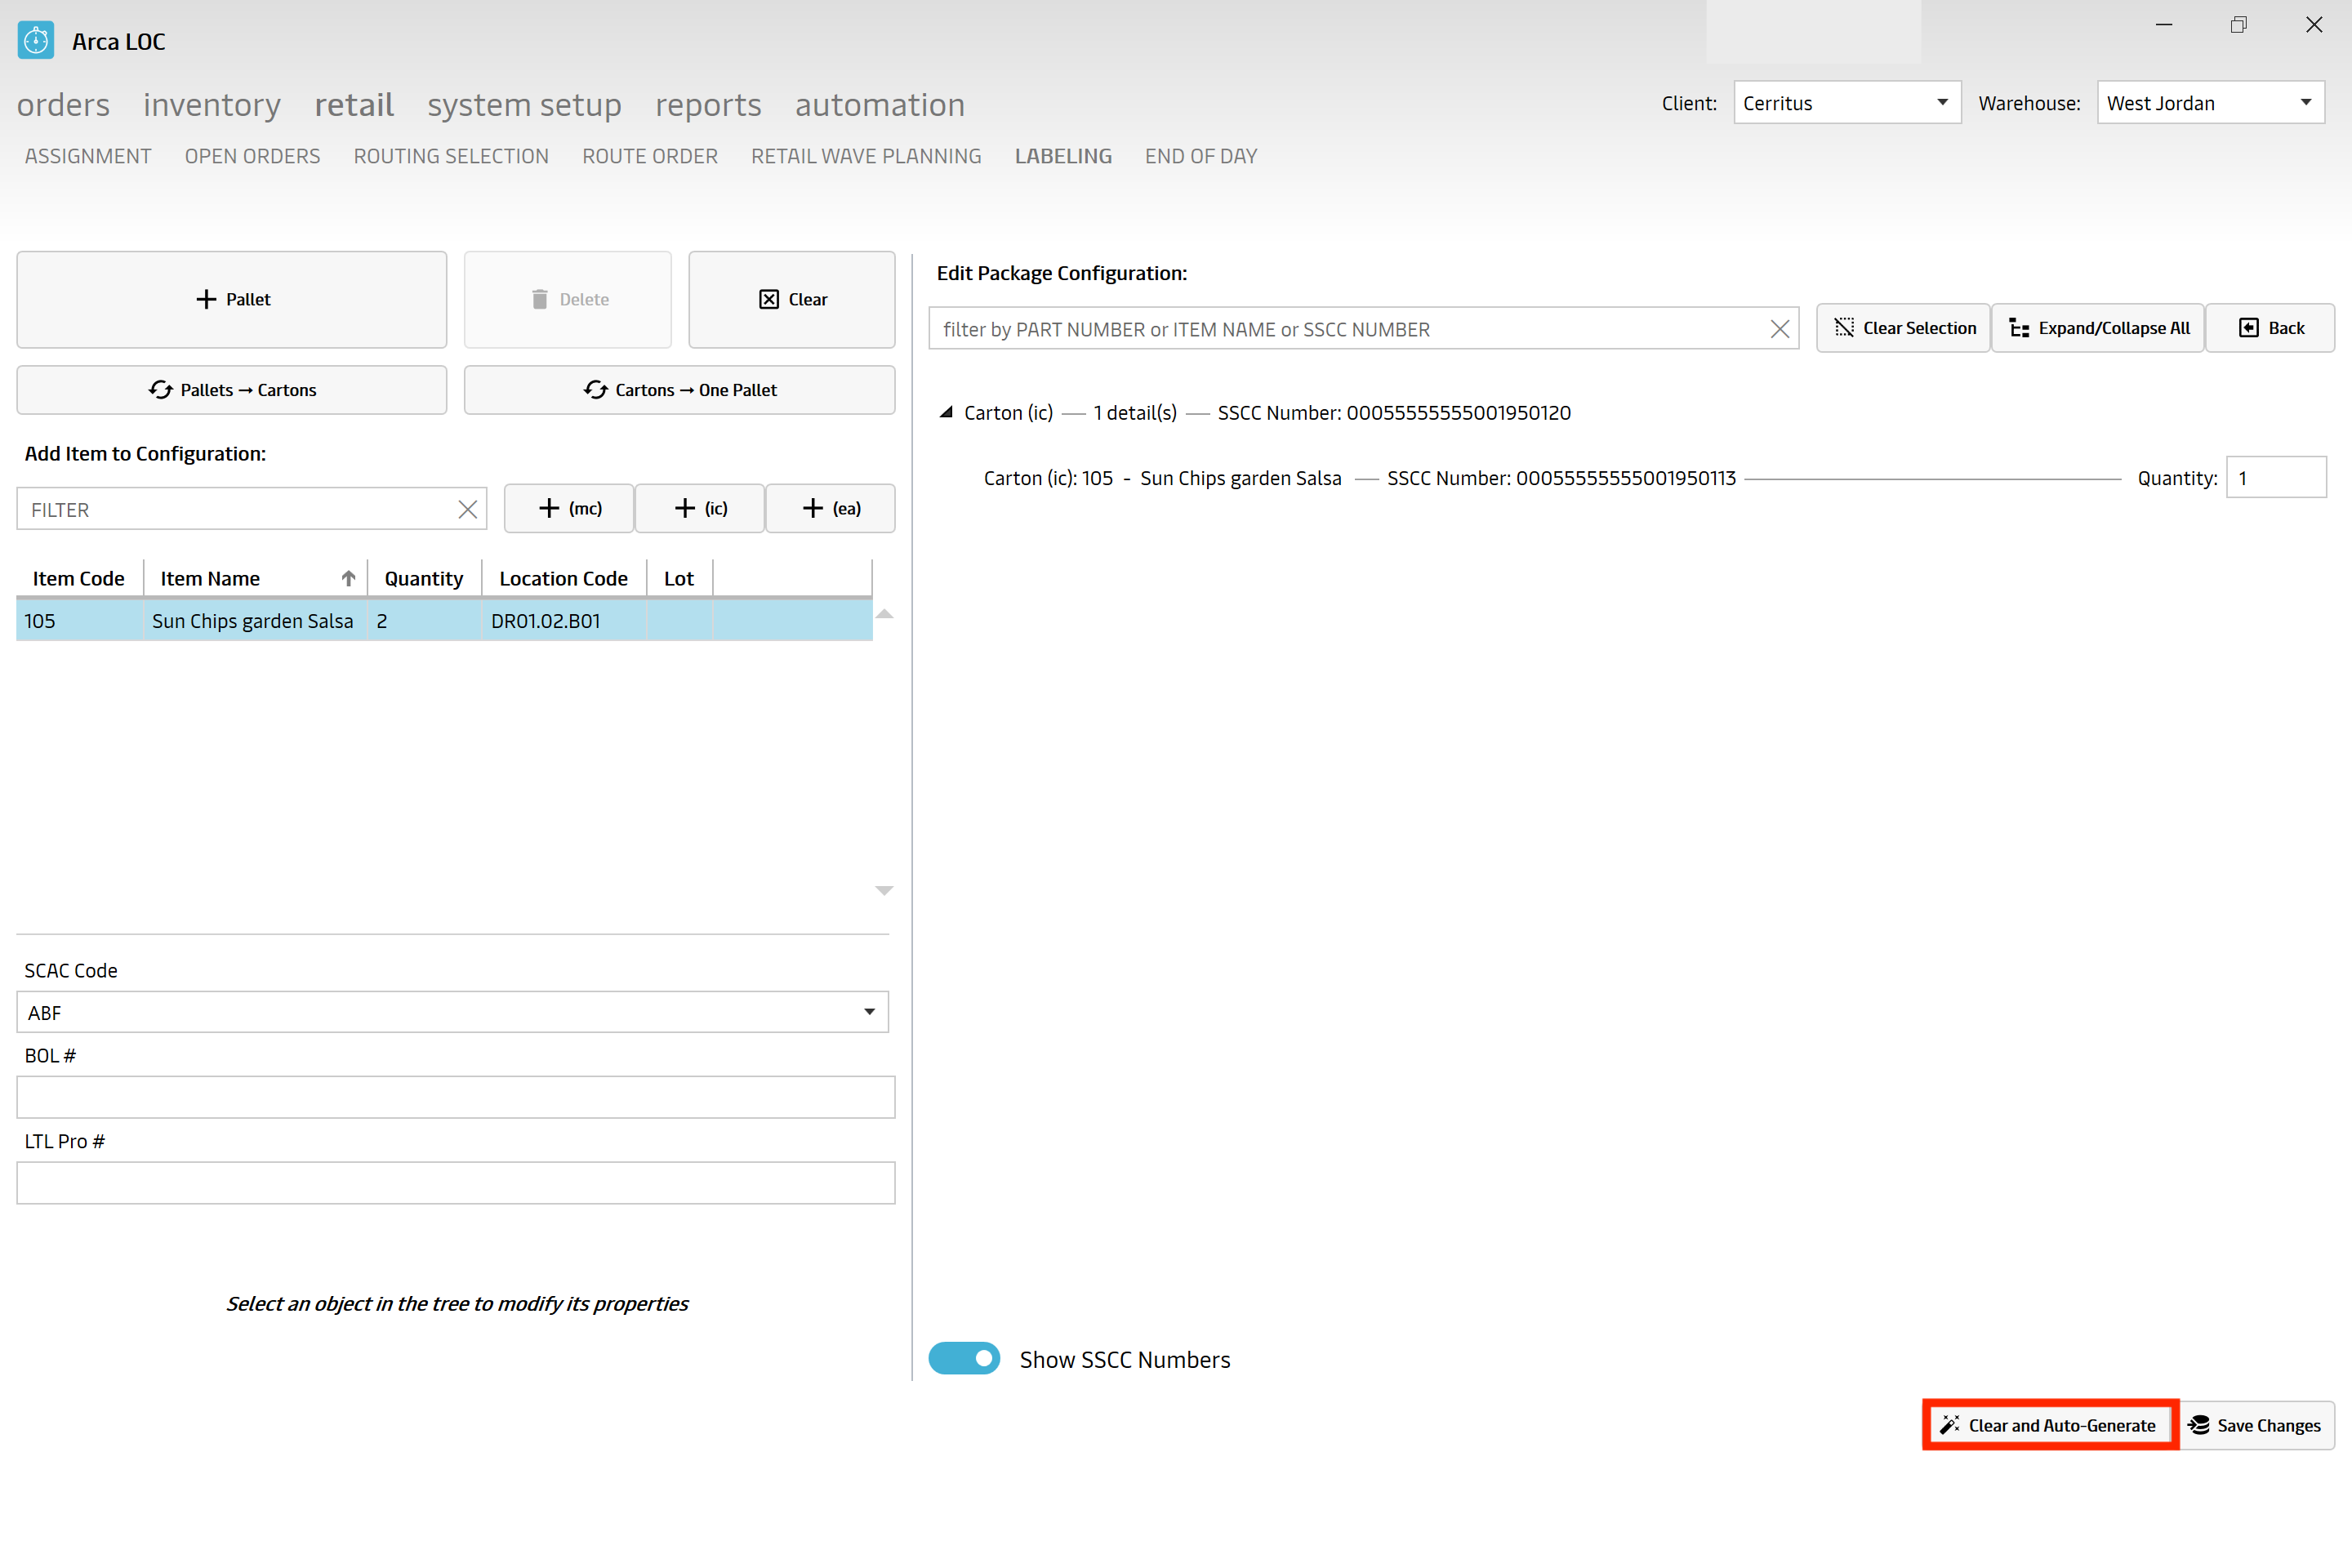
Clear and Autogenerate
This feature will clear out your pack configuration and you are able to just do it manually.
First you will click on "Clear and Autogenerate"
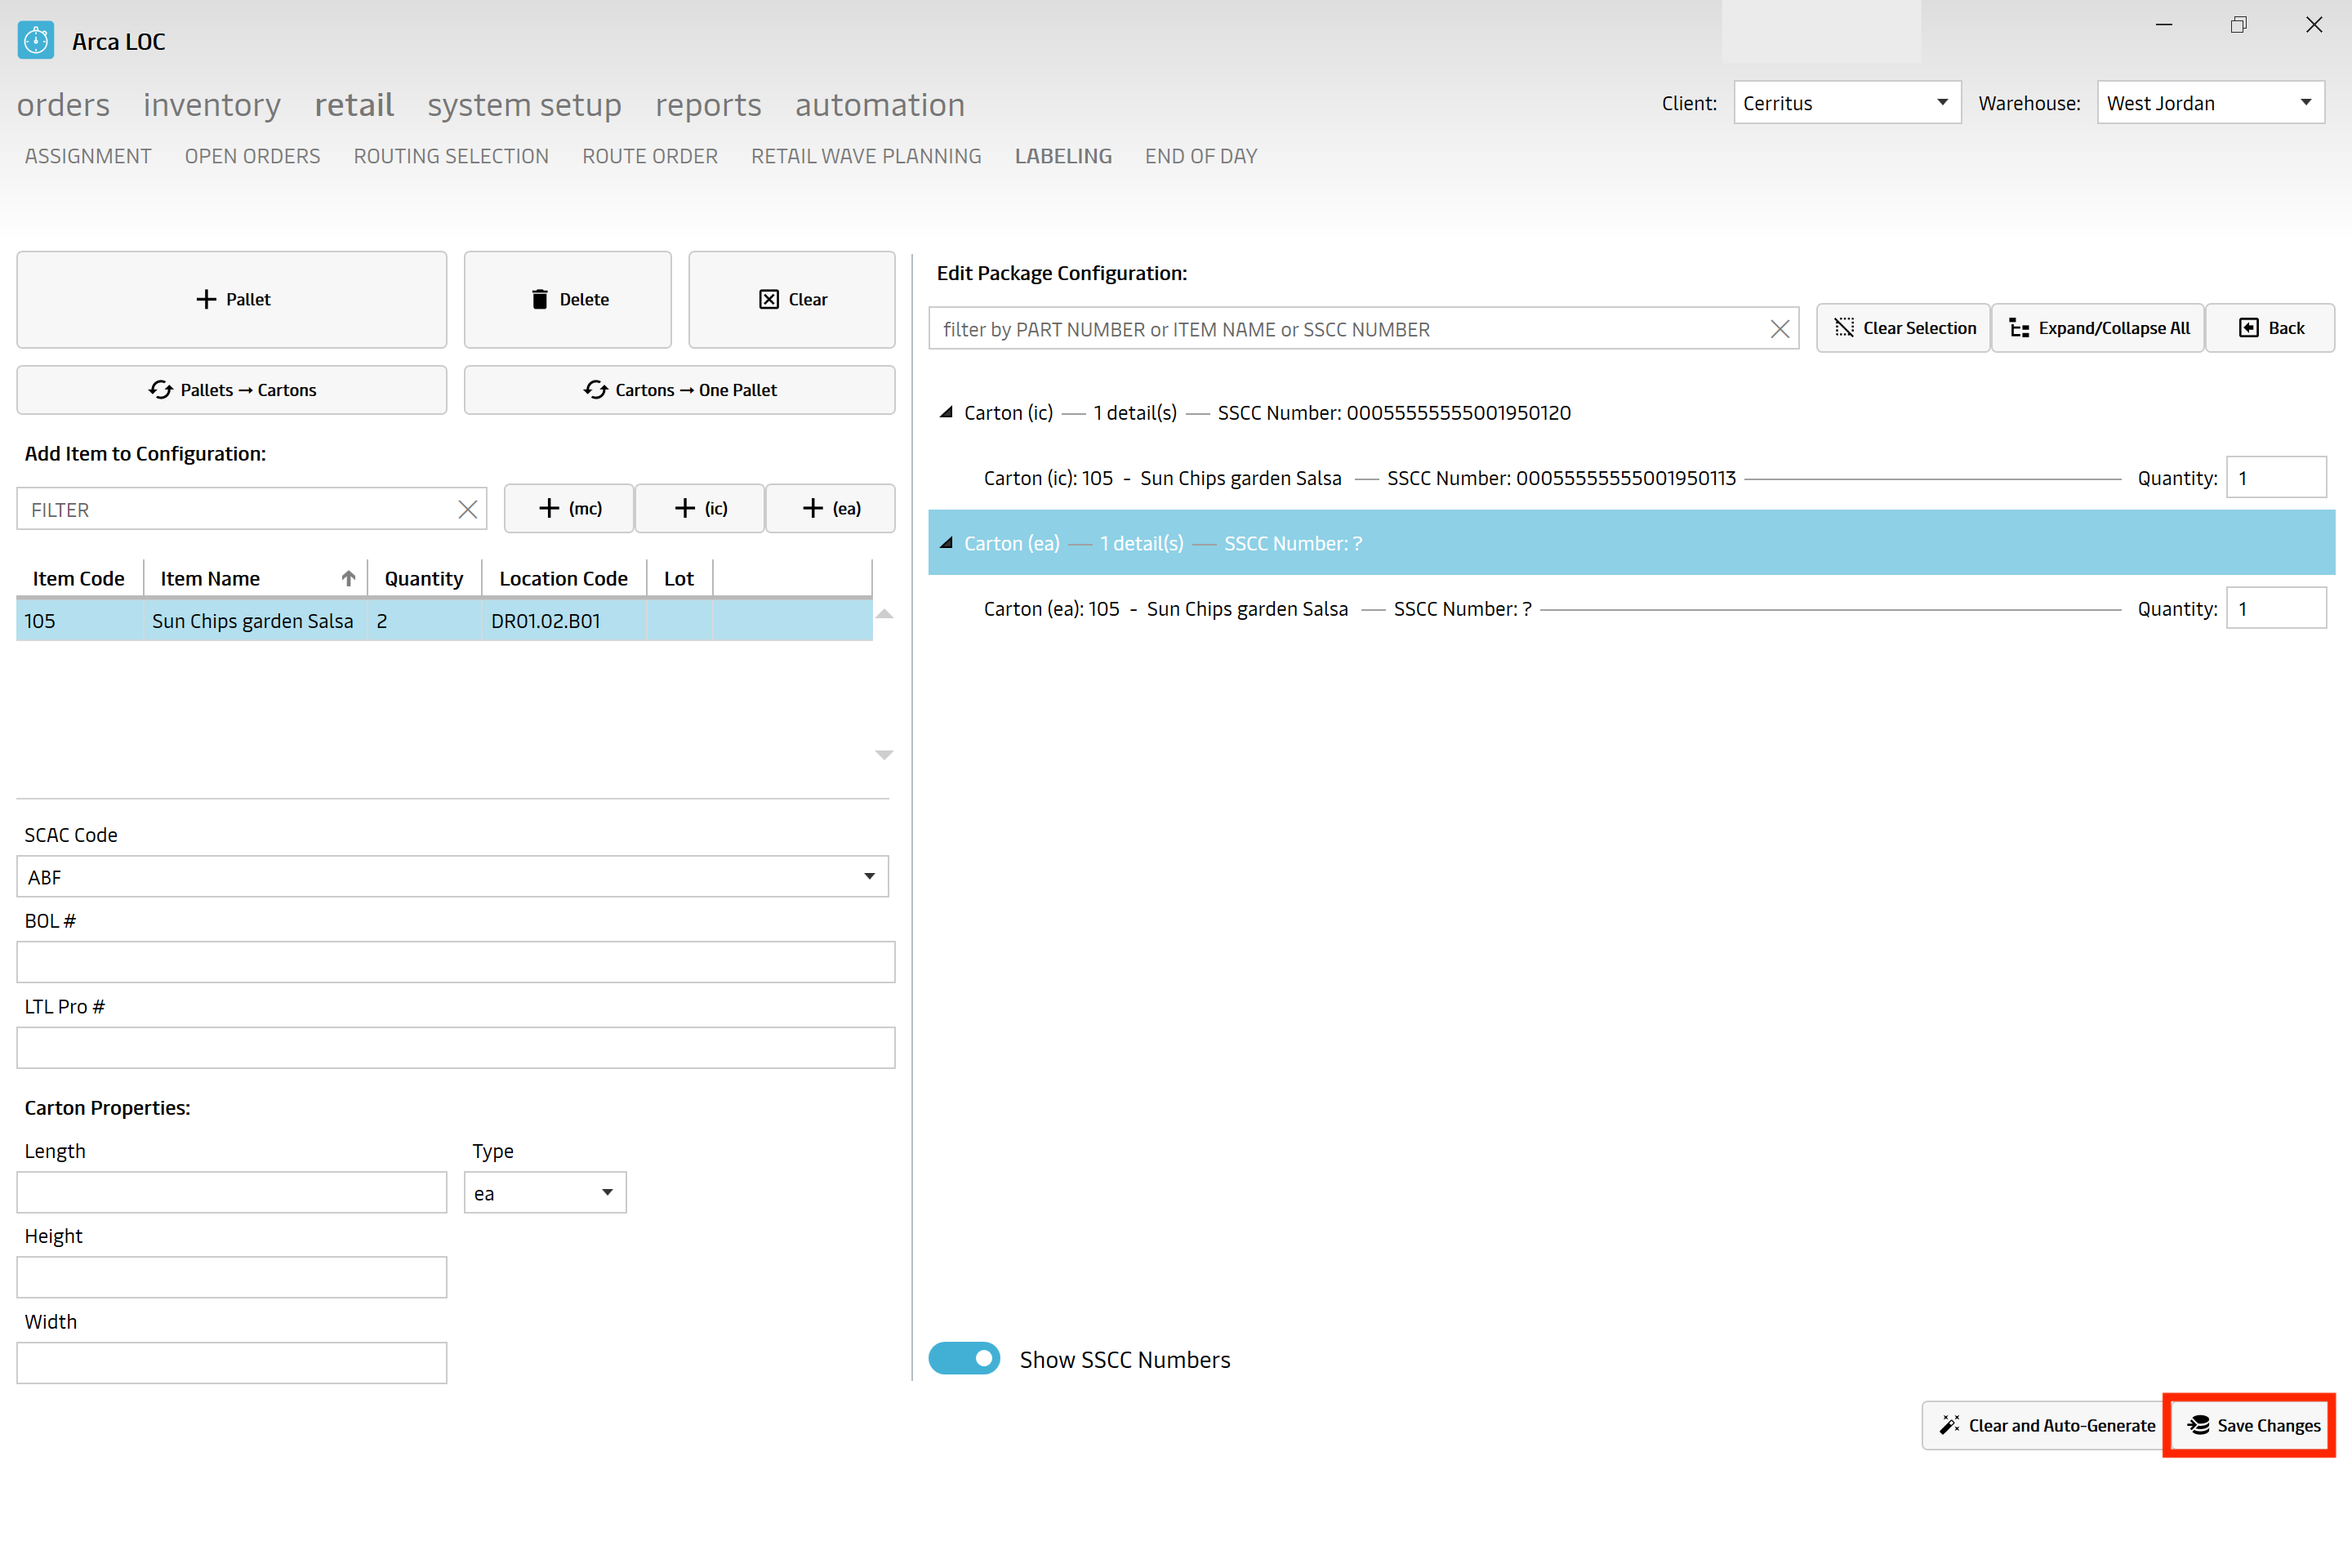
You will then add in that item manually. You have 3 different options.
- ic is your innercase meaning how many of each item are inside of the box. In other words, your "Box Quantity."
- mc is your master case or your case quantity.
- ea is "each" meaning a single item.

Once you have your package set up correctly, you will click on "Save Changes."
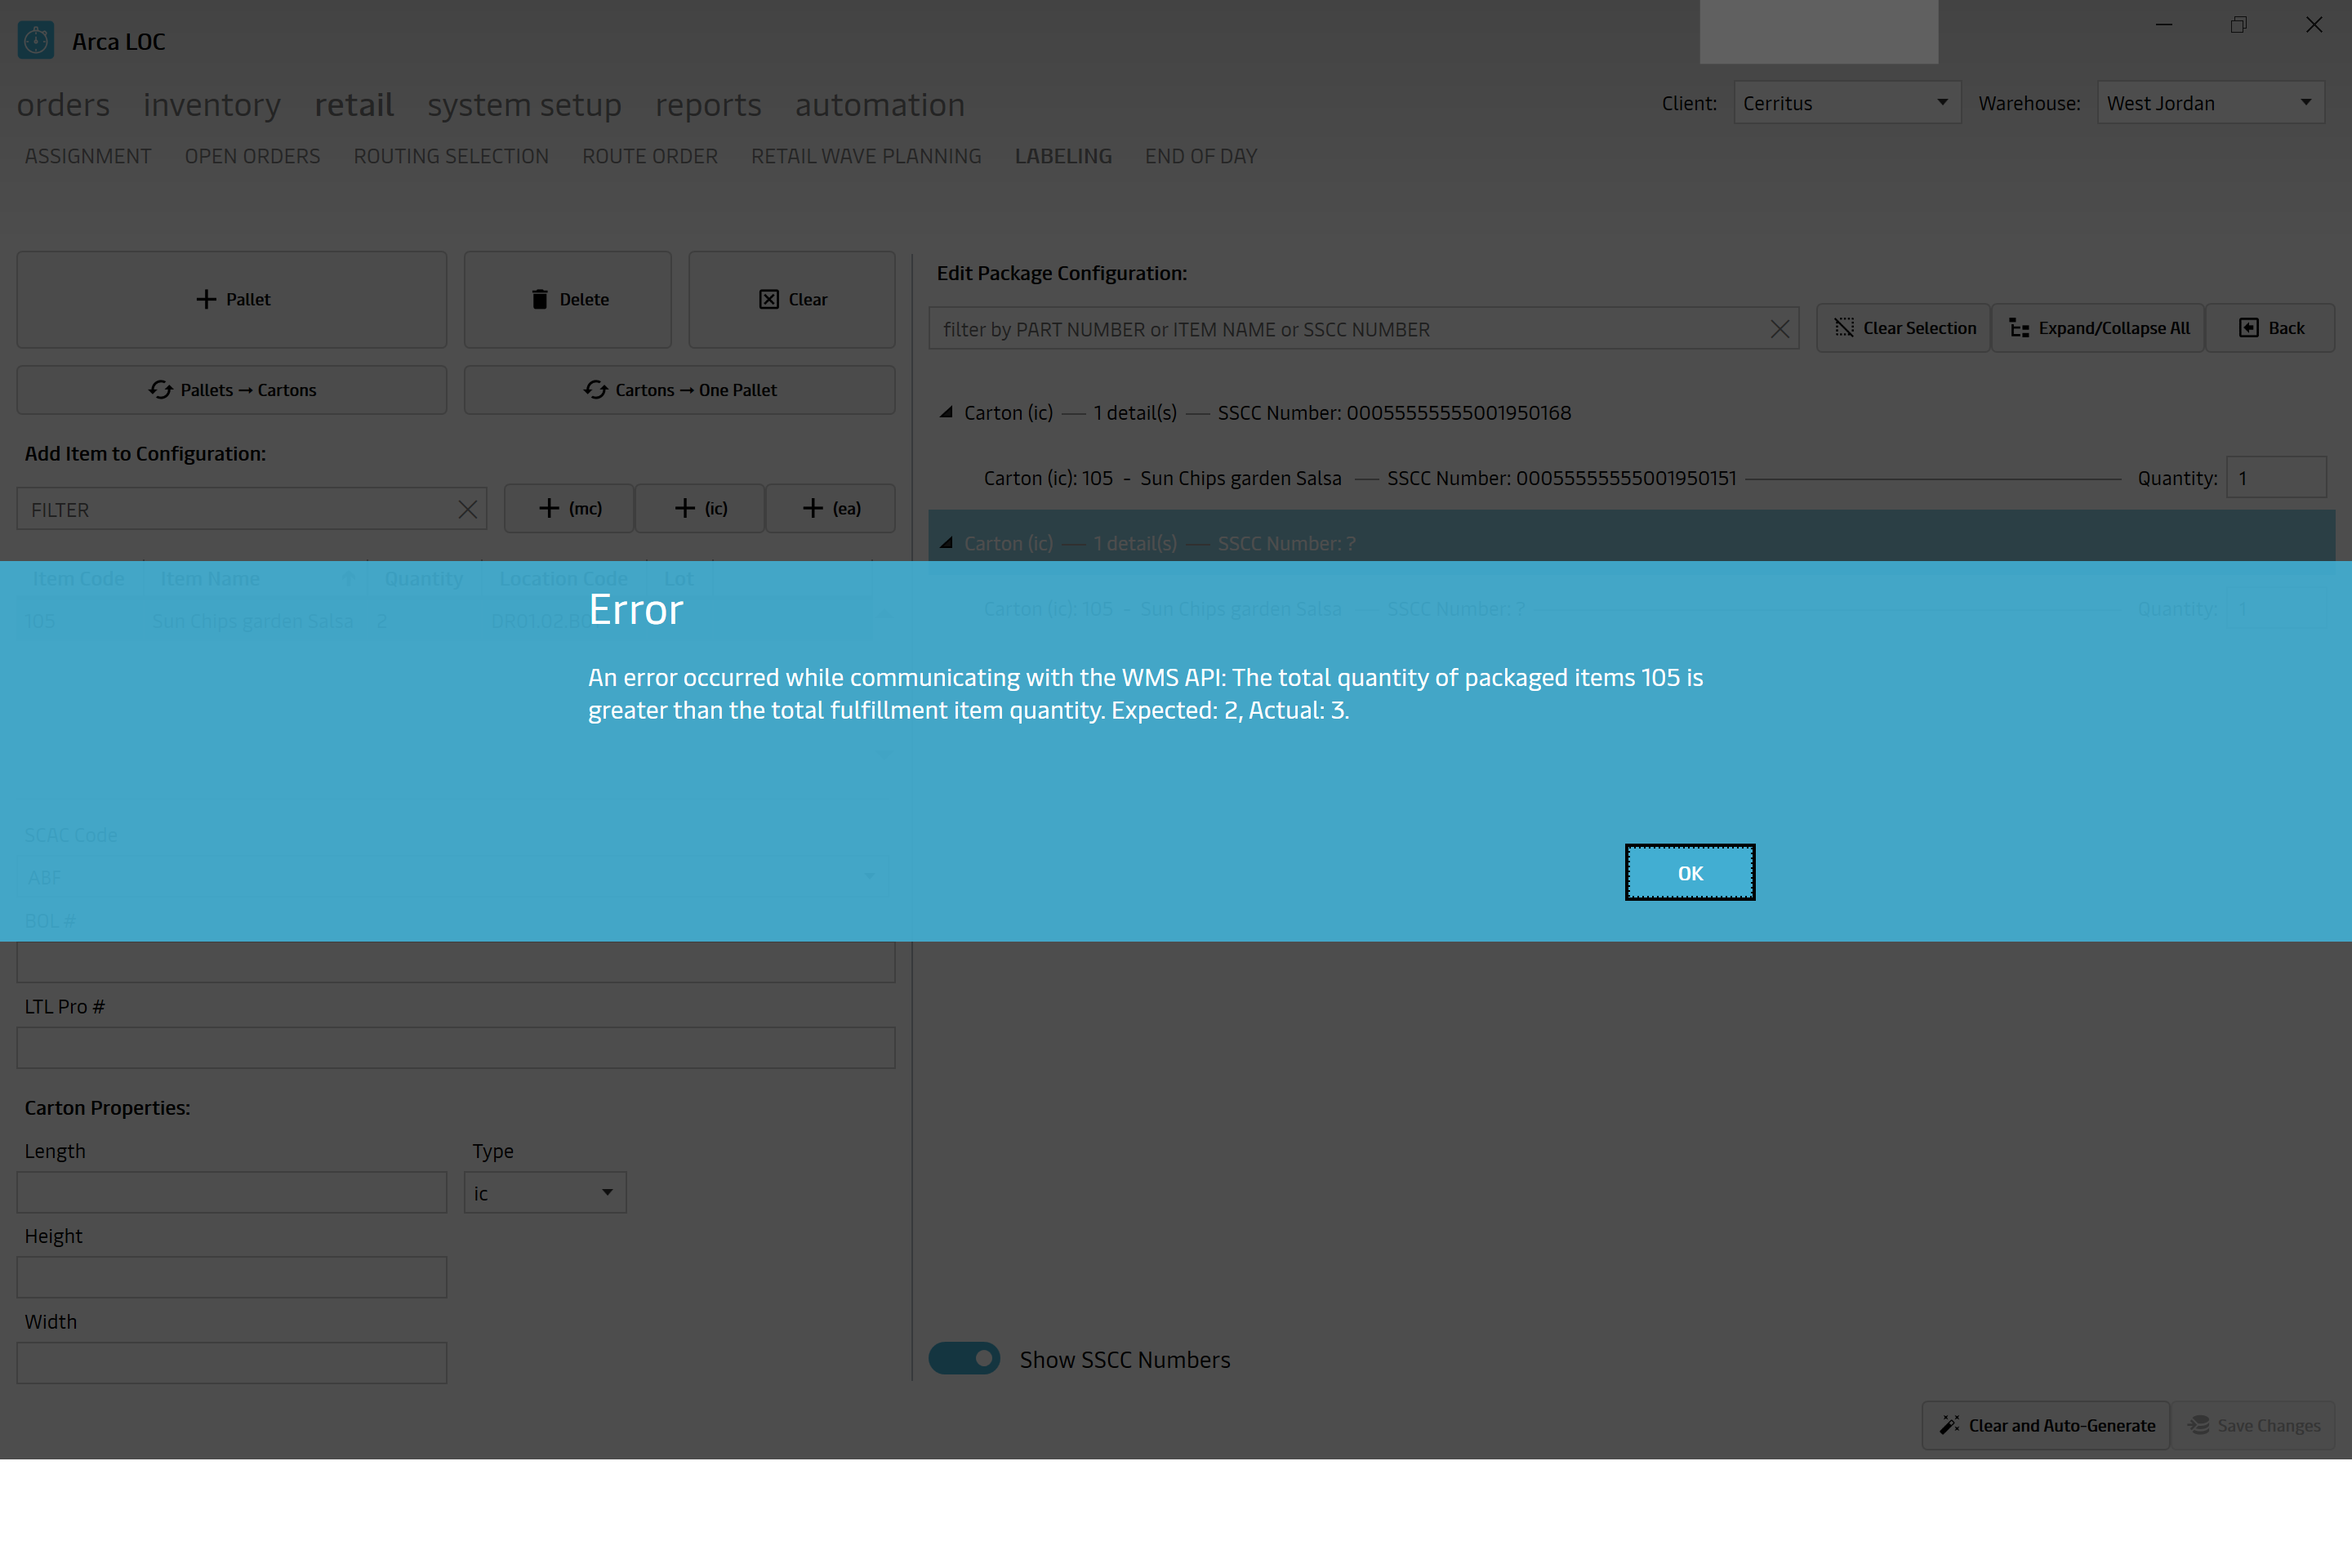
Warning
You will get this error if you have gone over your quantity needed.
LTL
Less Than Truckload
Cartons - One Pallet
LTL is used for when an order doesn't fill an entire semi truck.
You will first enter your license plate or PO number and click on "Find Order"
You will then click on "Edit"
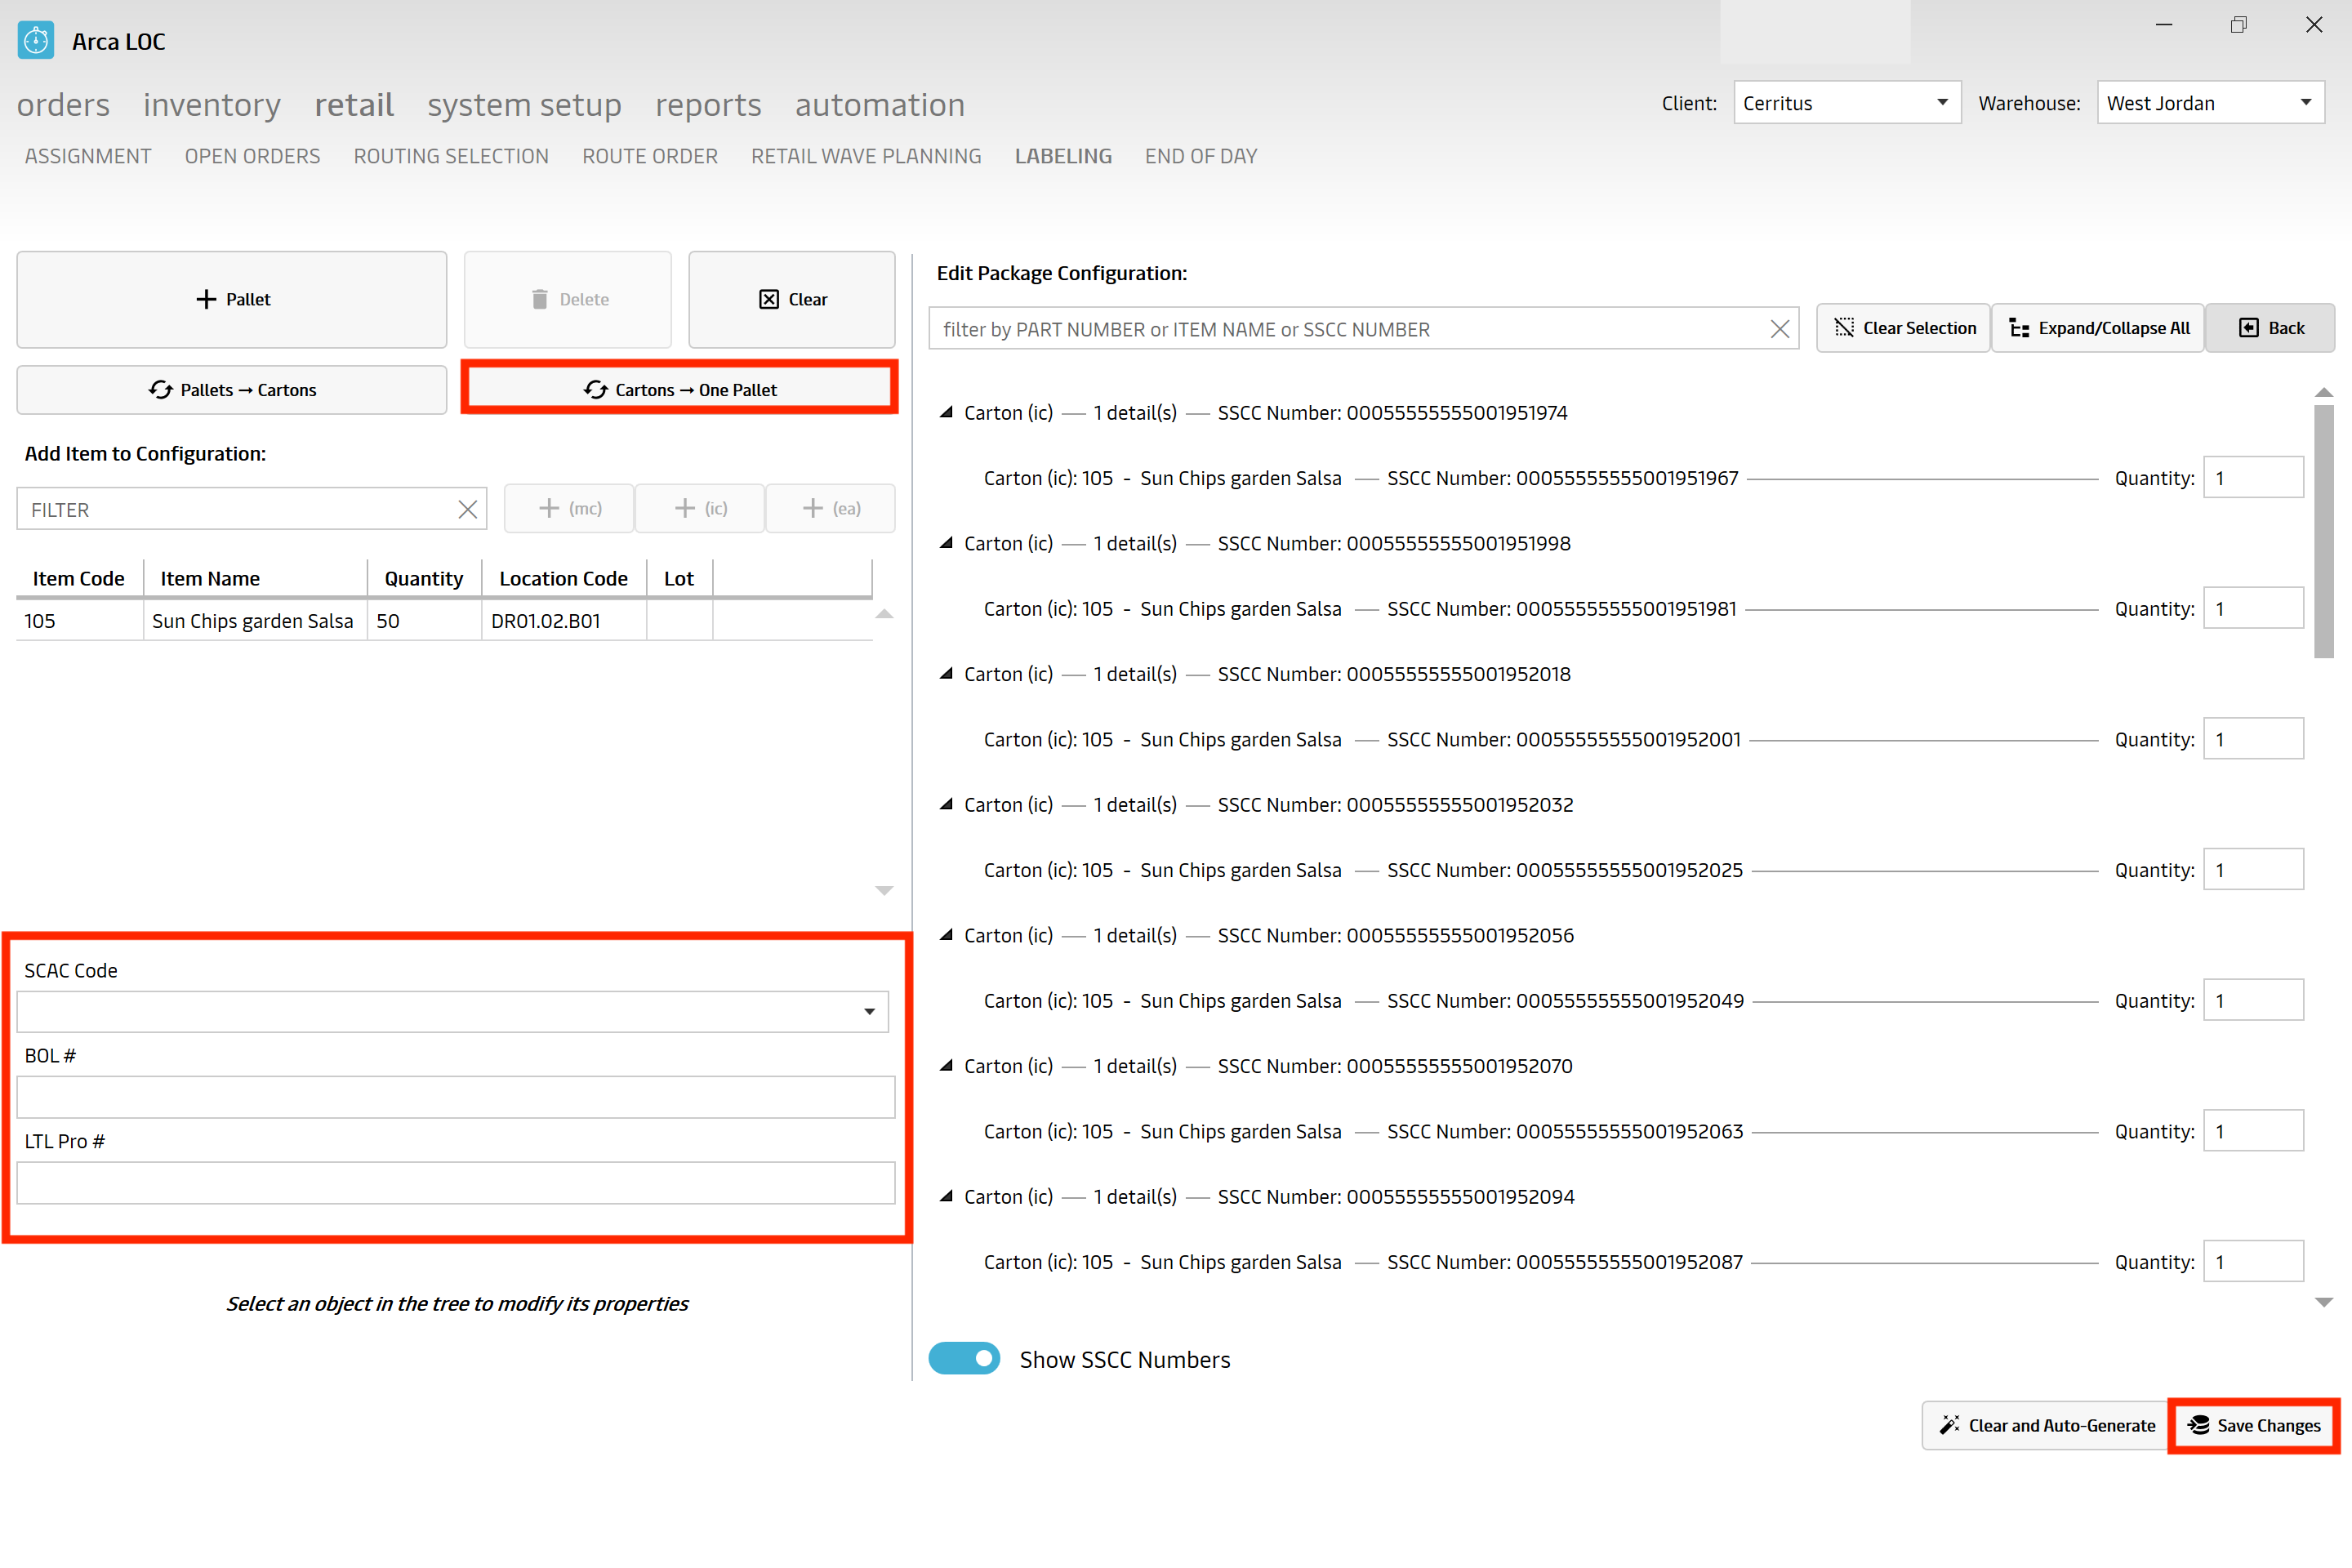
You will then fill in all of the relevant information on the left side. SCAC Code, BOL # and LTL Pro #.
Then you will click on "Cartons to One Pallet"
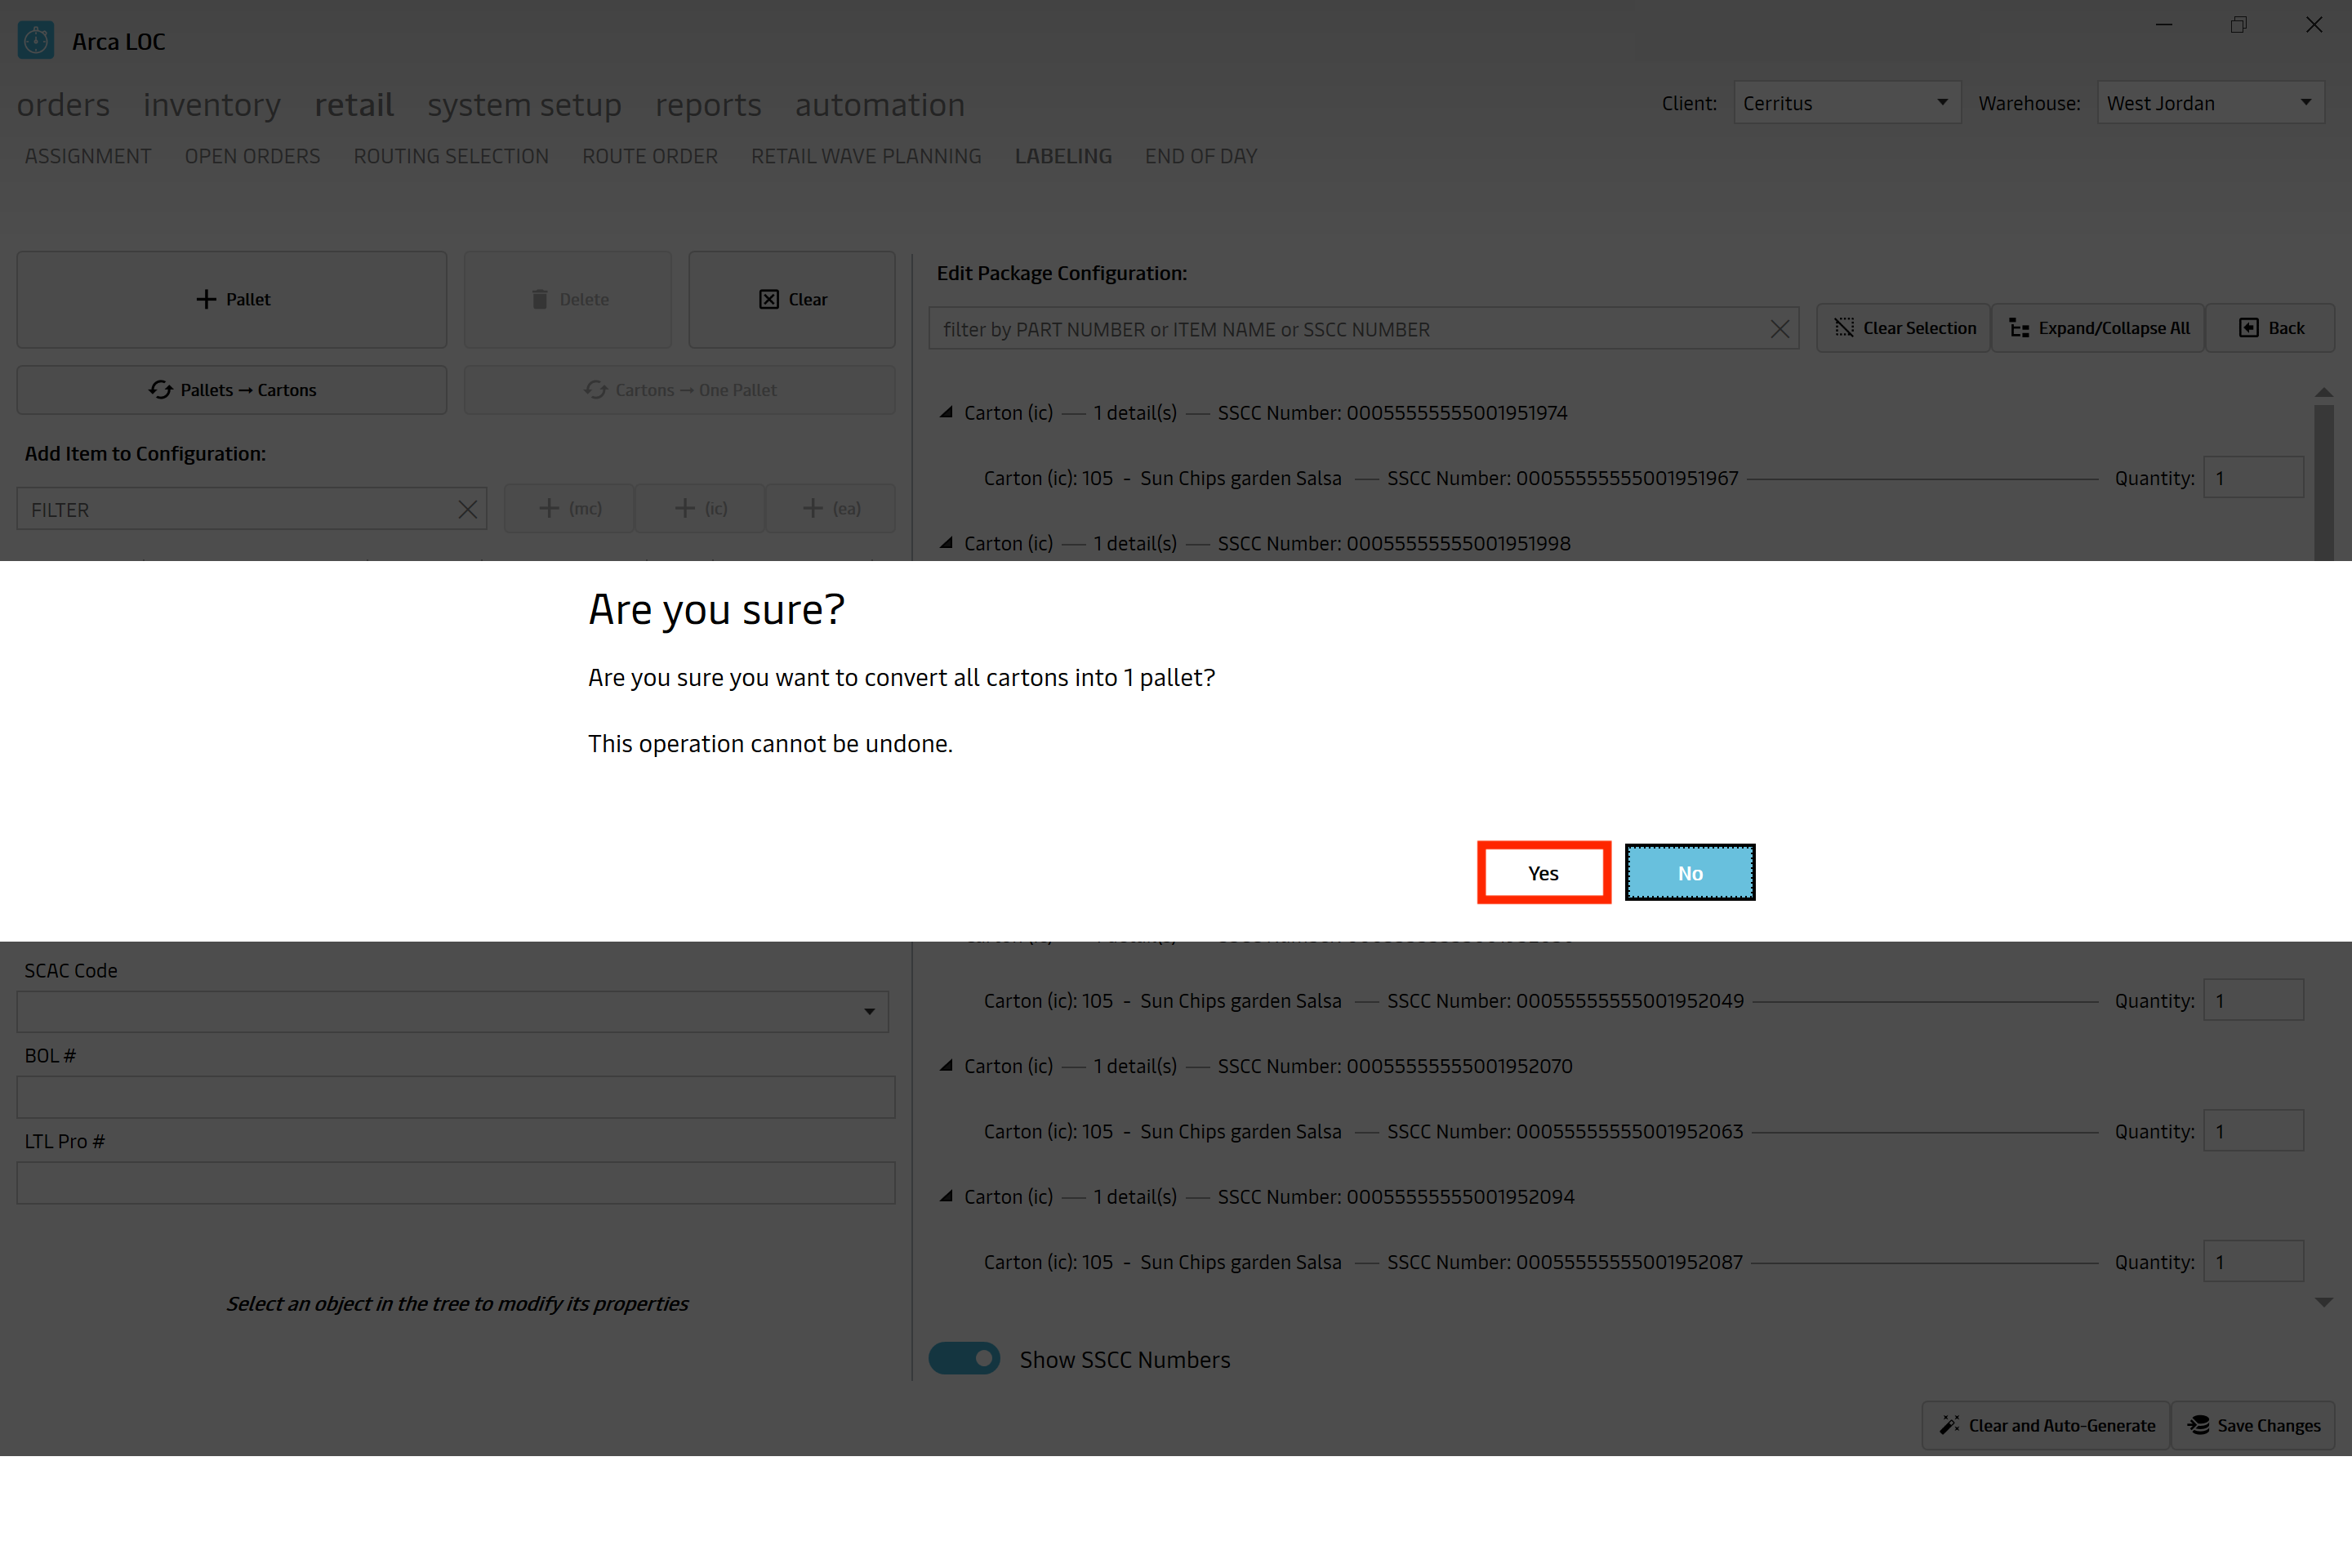
This message will pop up to confirm that you want to proceed with the action.
You will be able to see that it has put all of those items onto one pallet. From here, click on "Back"
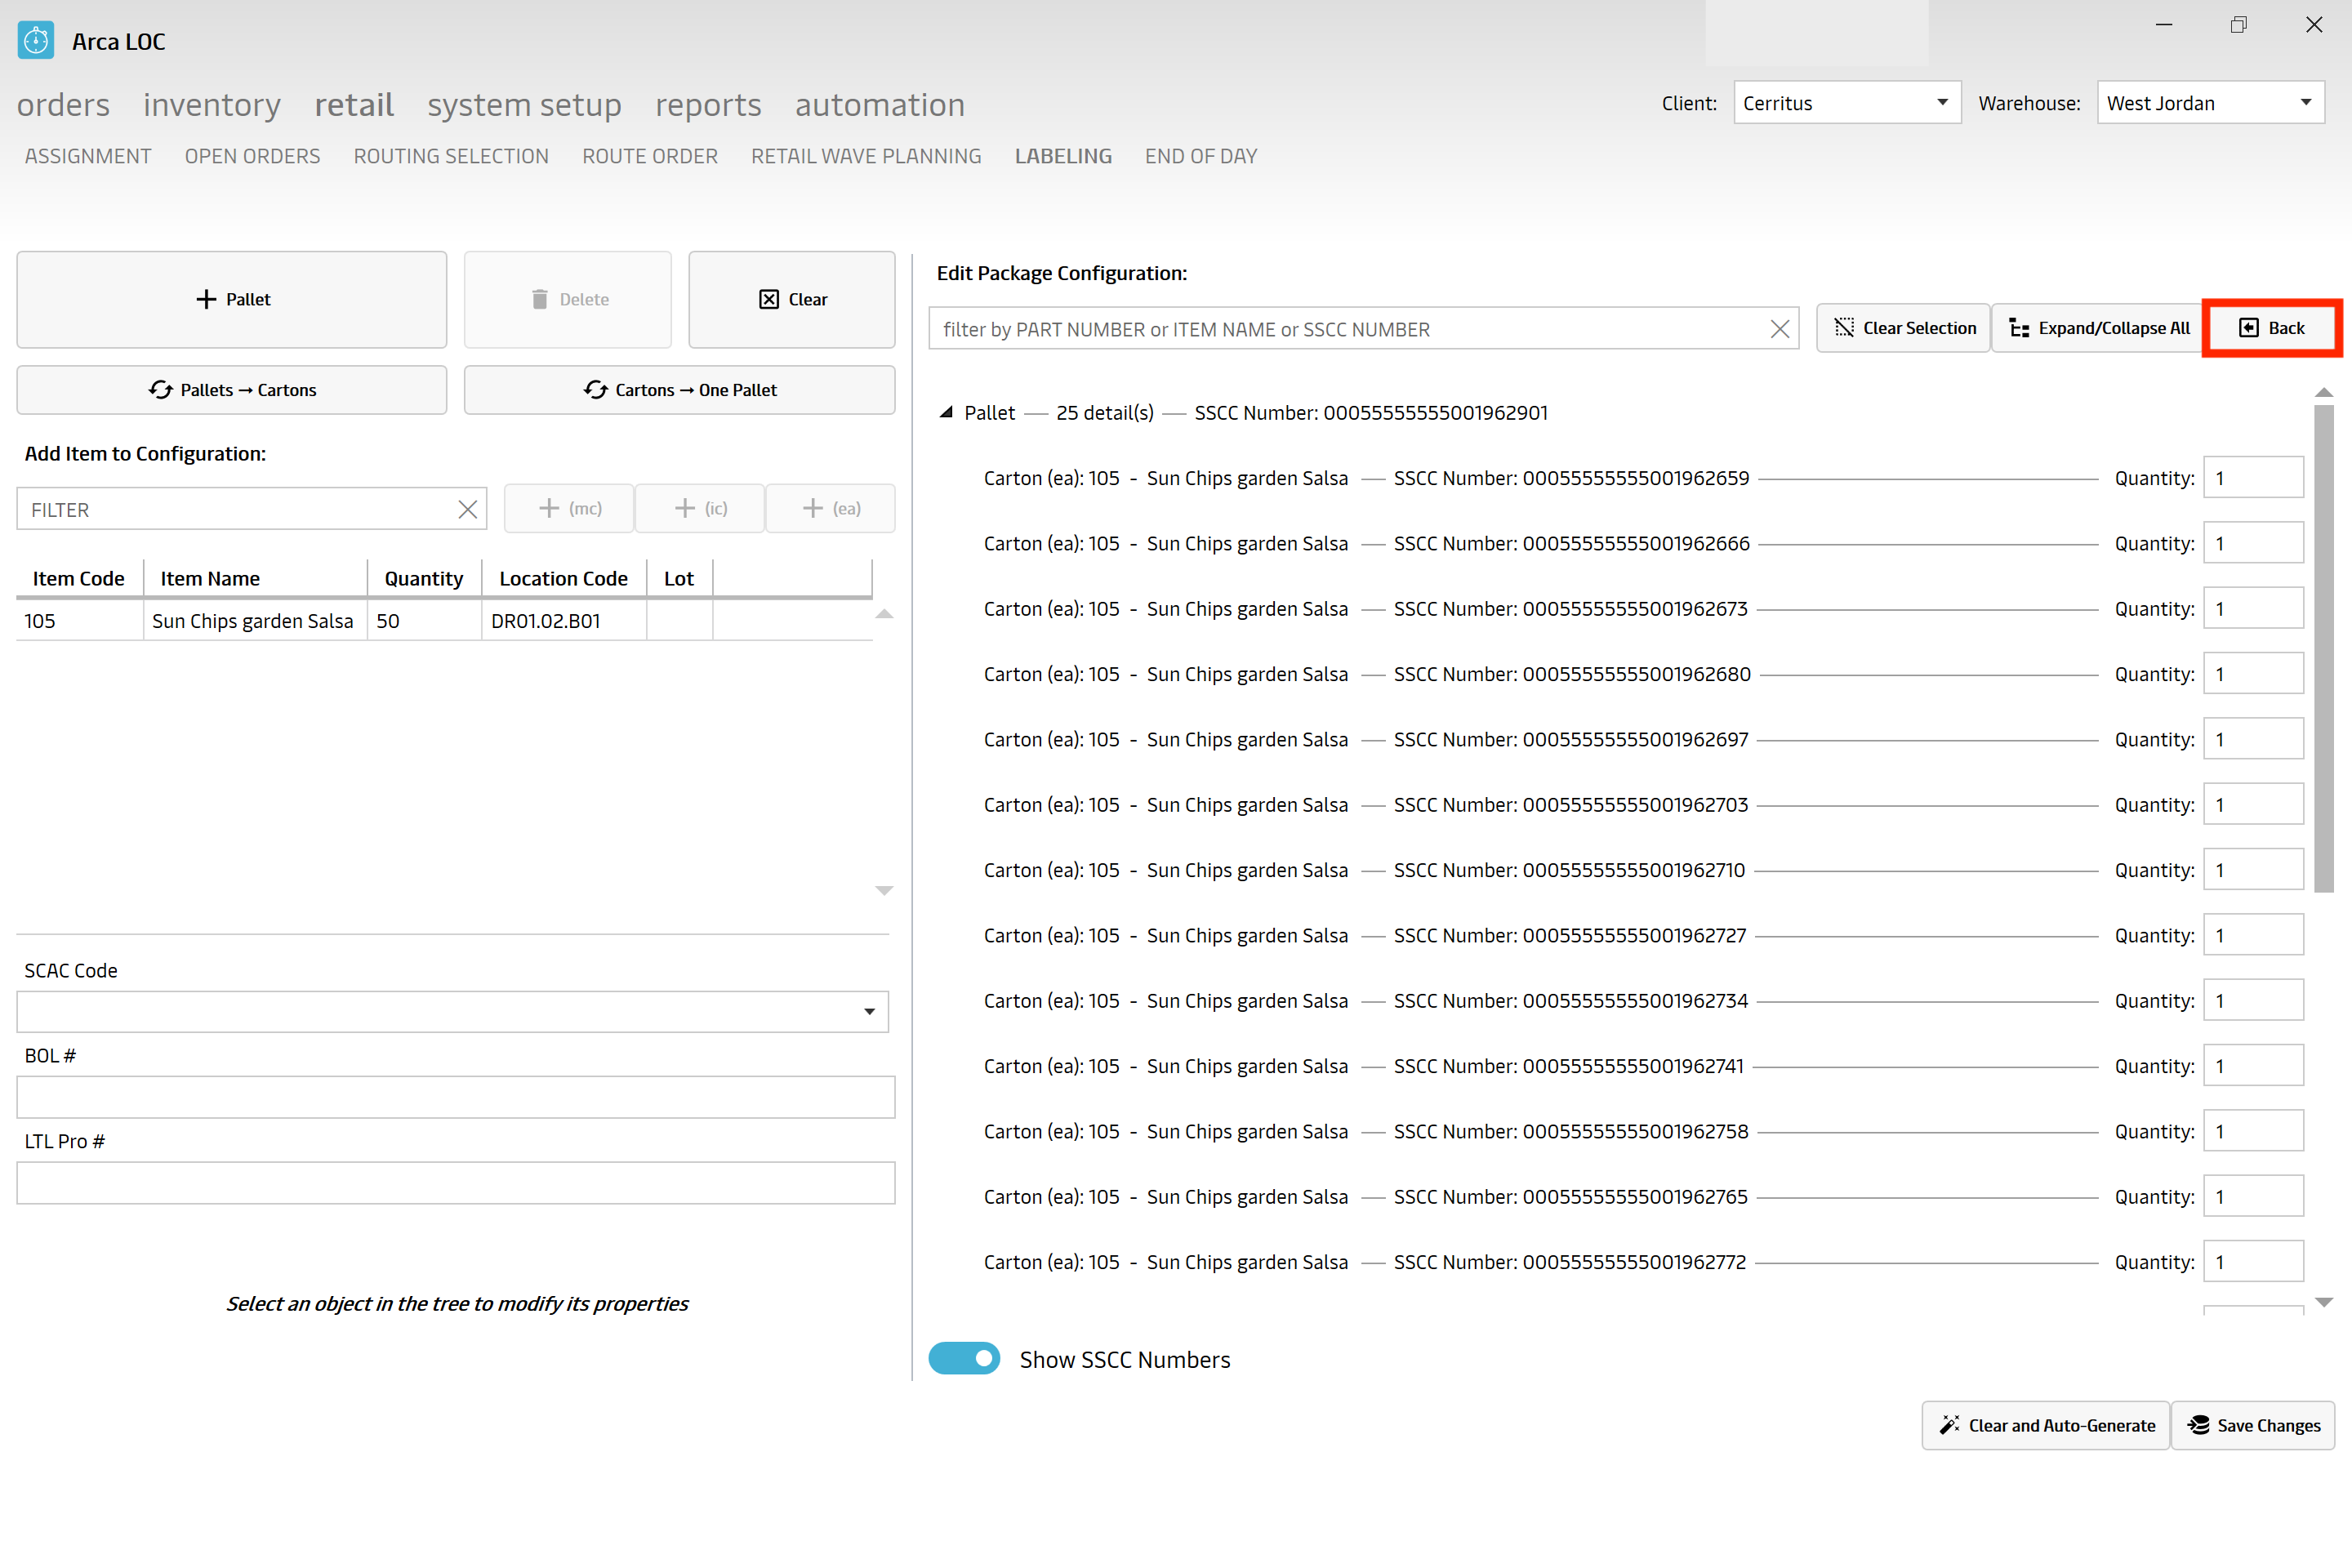
You will now have the option to "Print Packlists" and to "Close Out Order."
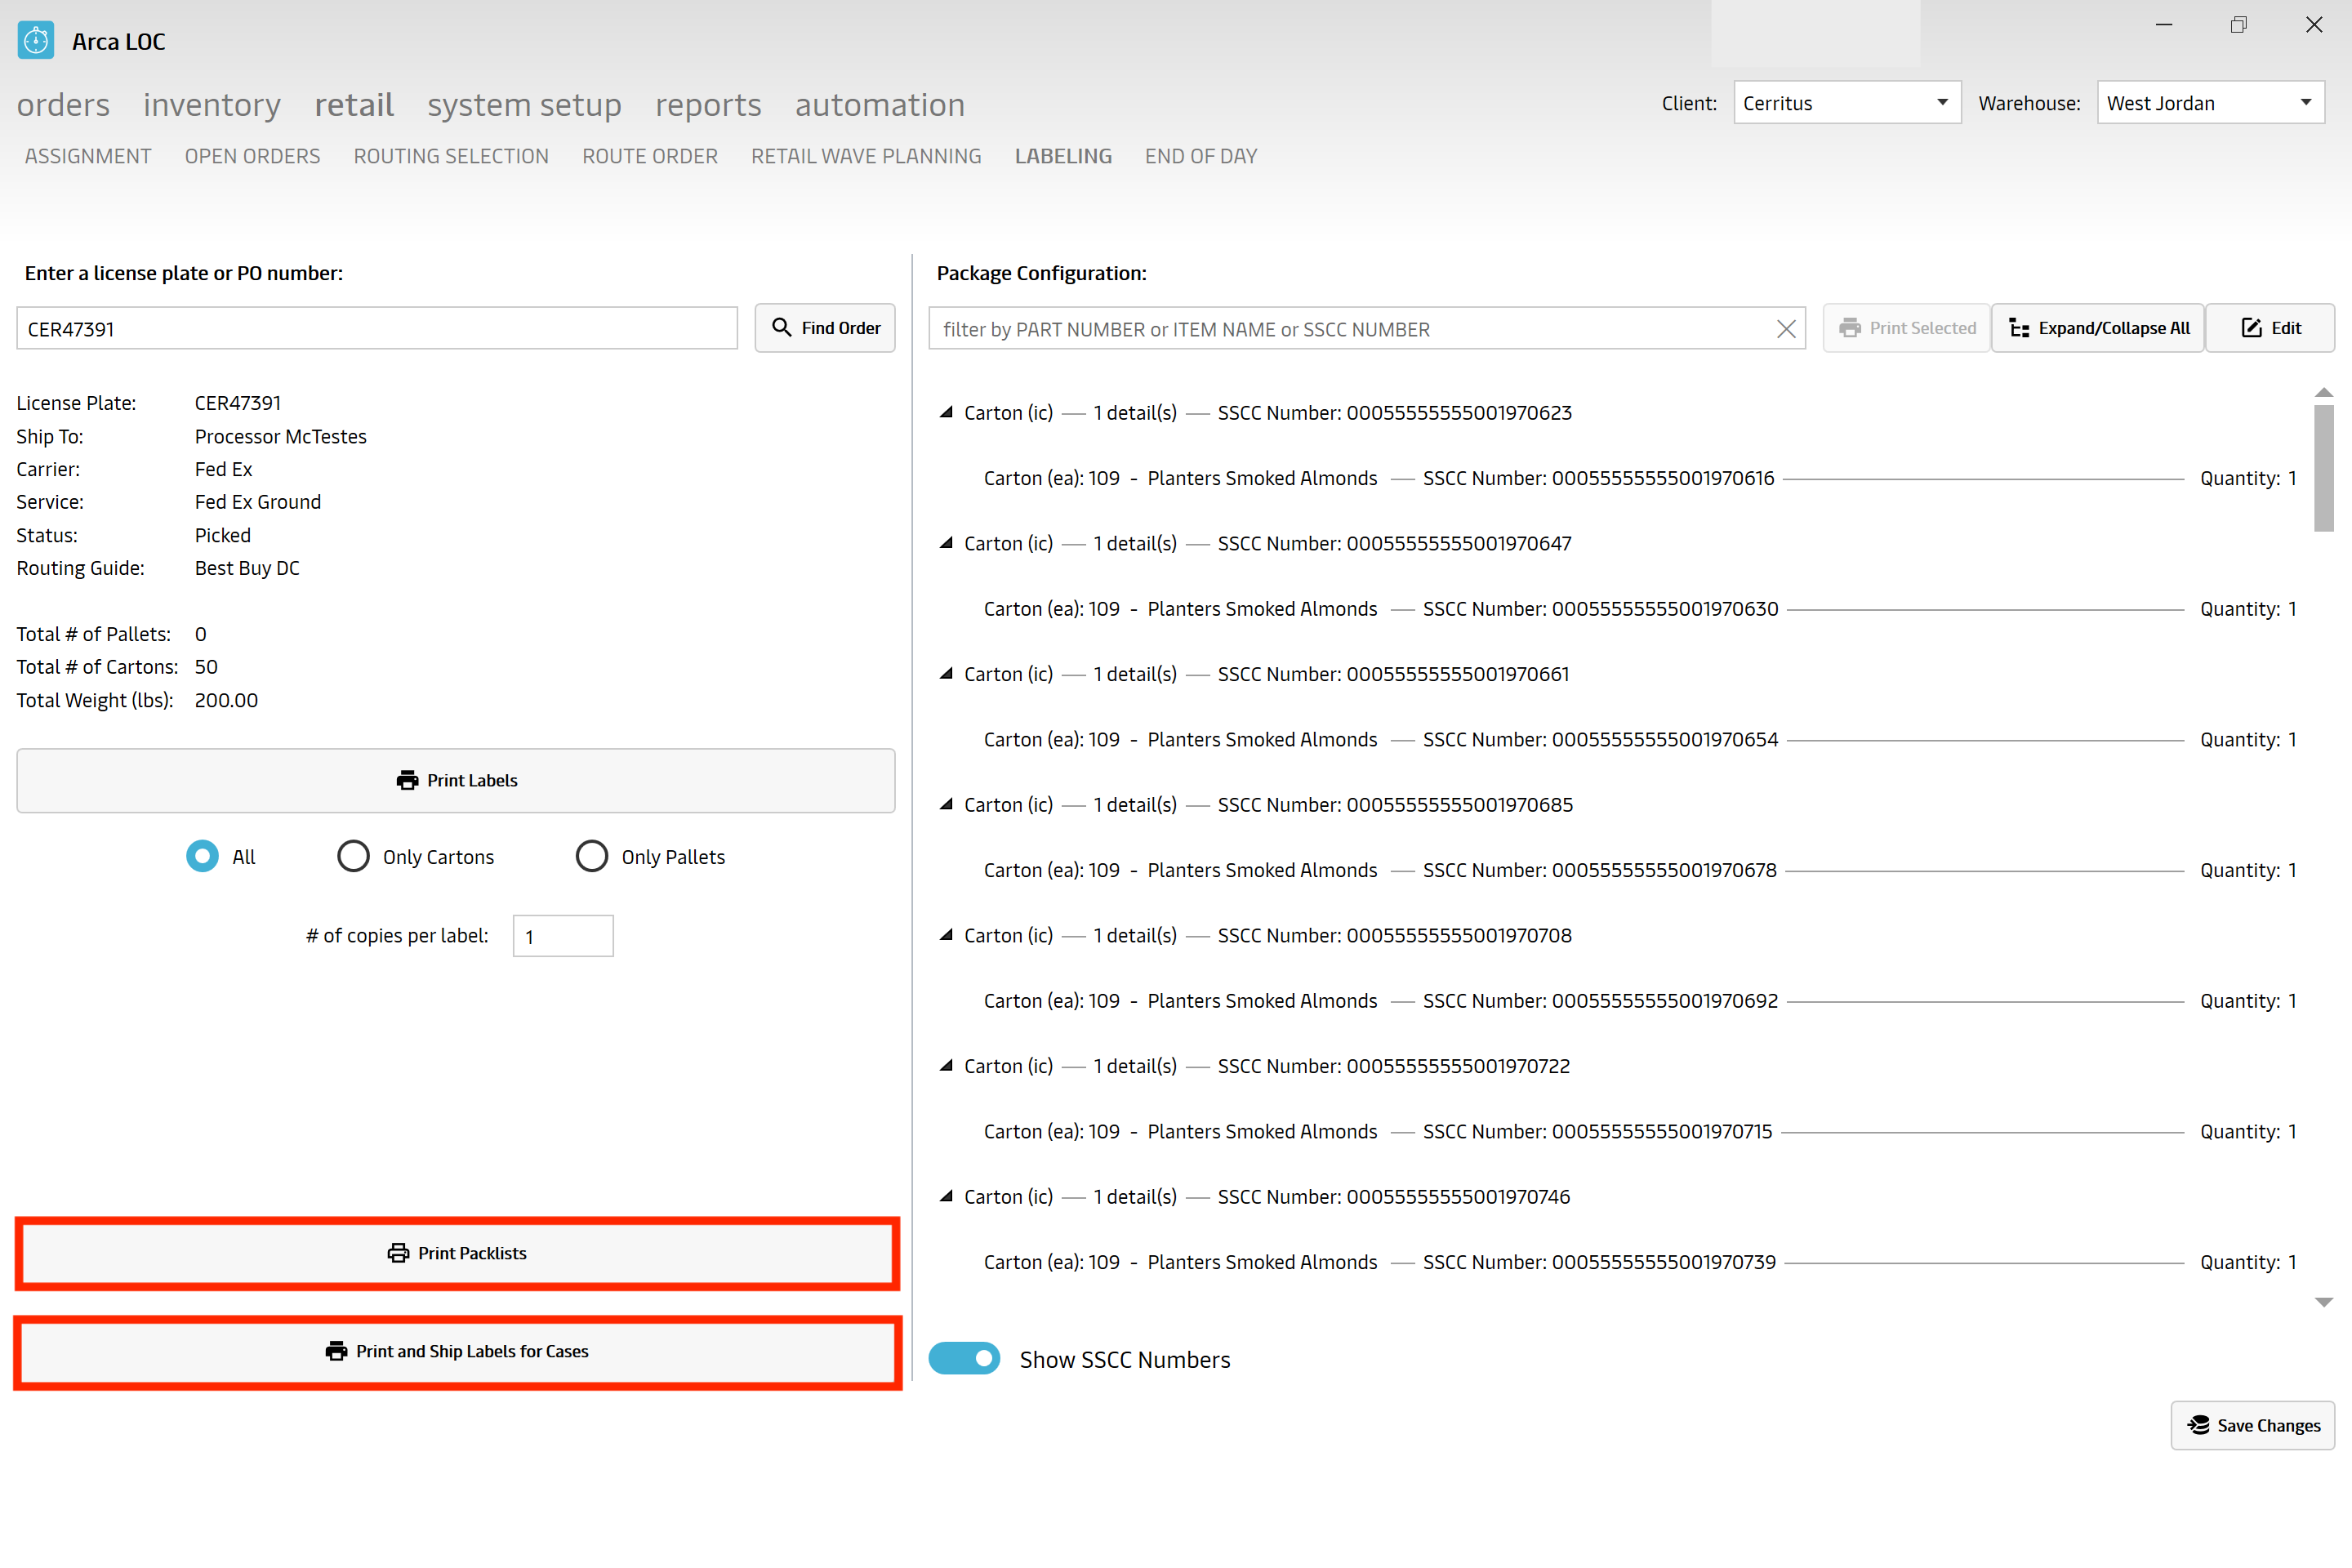
Pallets - Cartons
The pallets to cartons is going to look a little different from Cartons to One Pallet. You are going to have the option to print and ship labels for all cases.
First type in your license plate or PO Number and click "Find Order"
You then have the option to "Print Packlists" as well as "Print and Ship Labels for Cases."
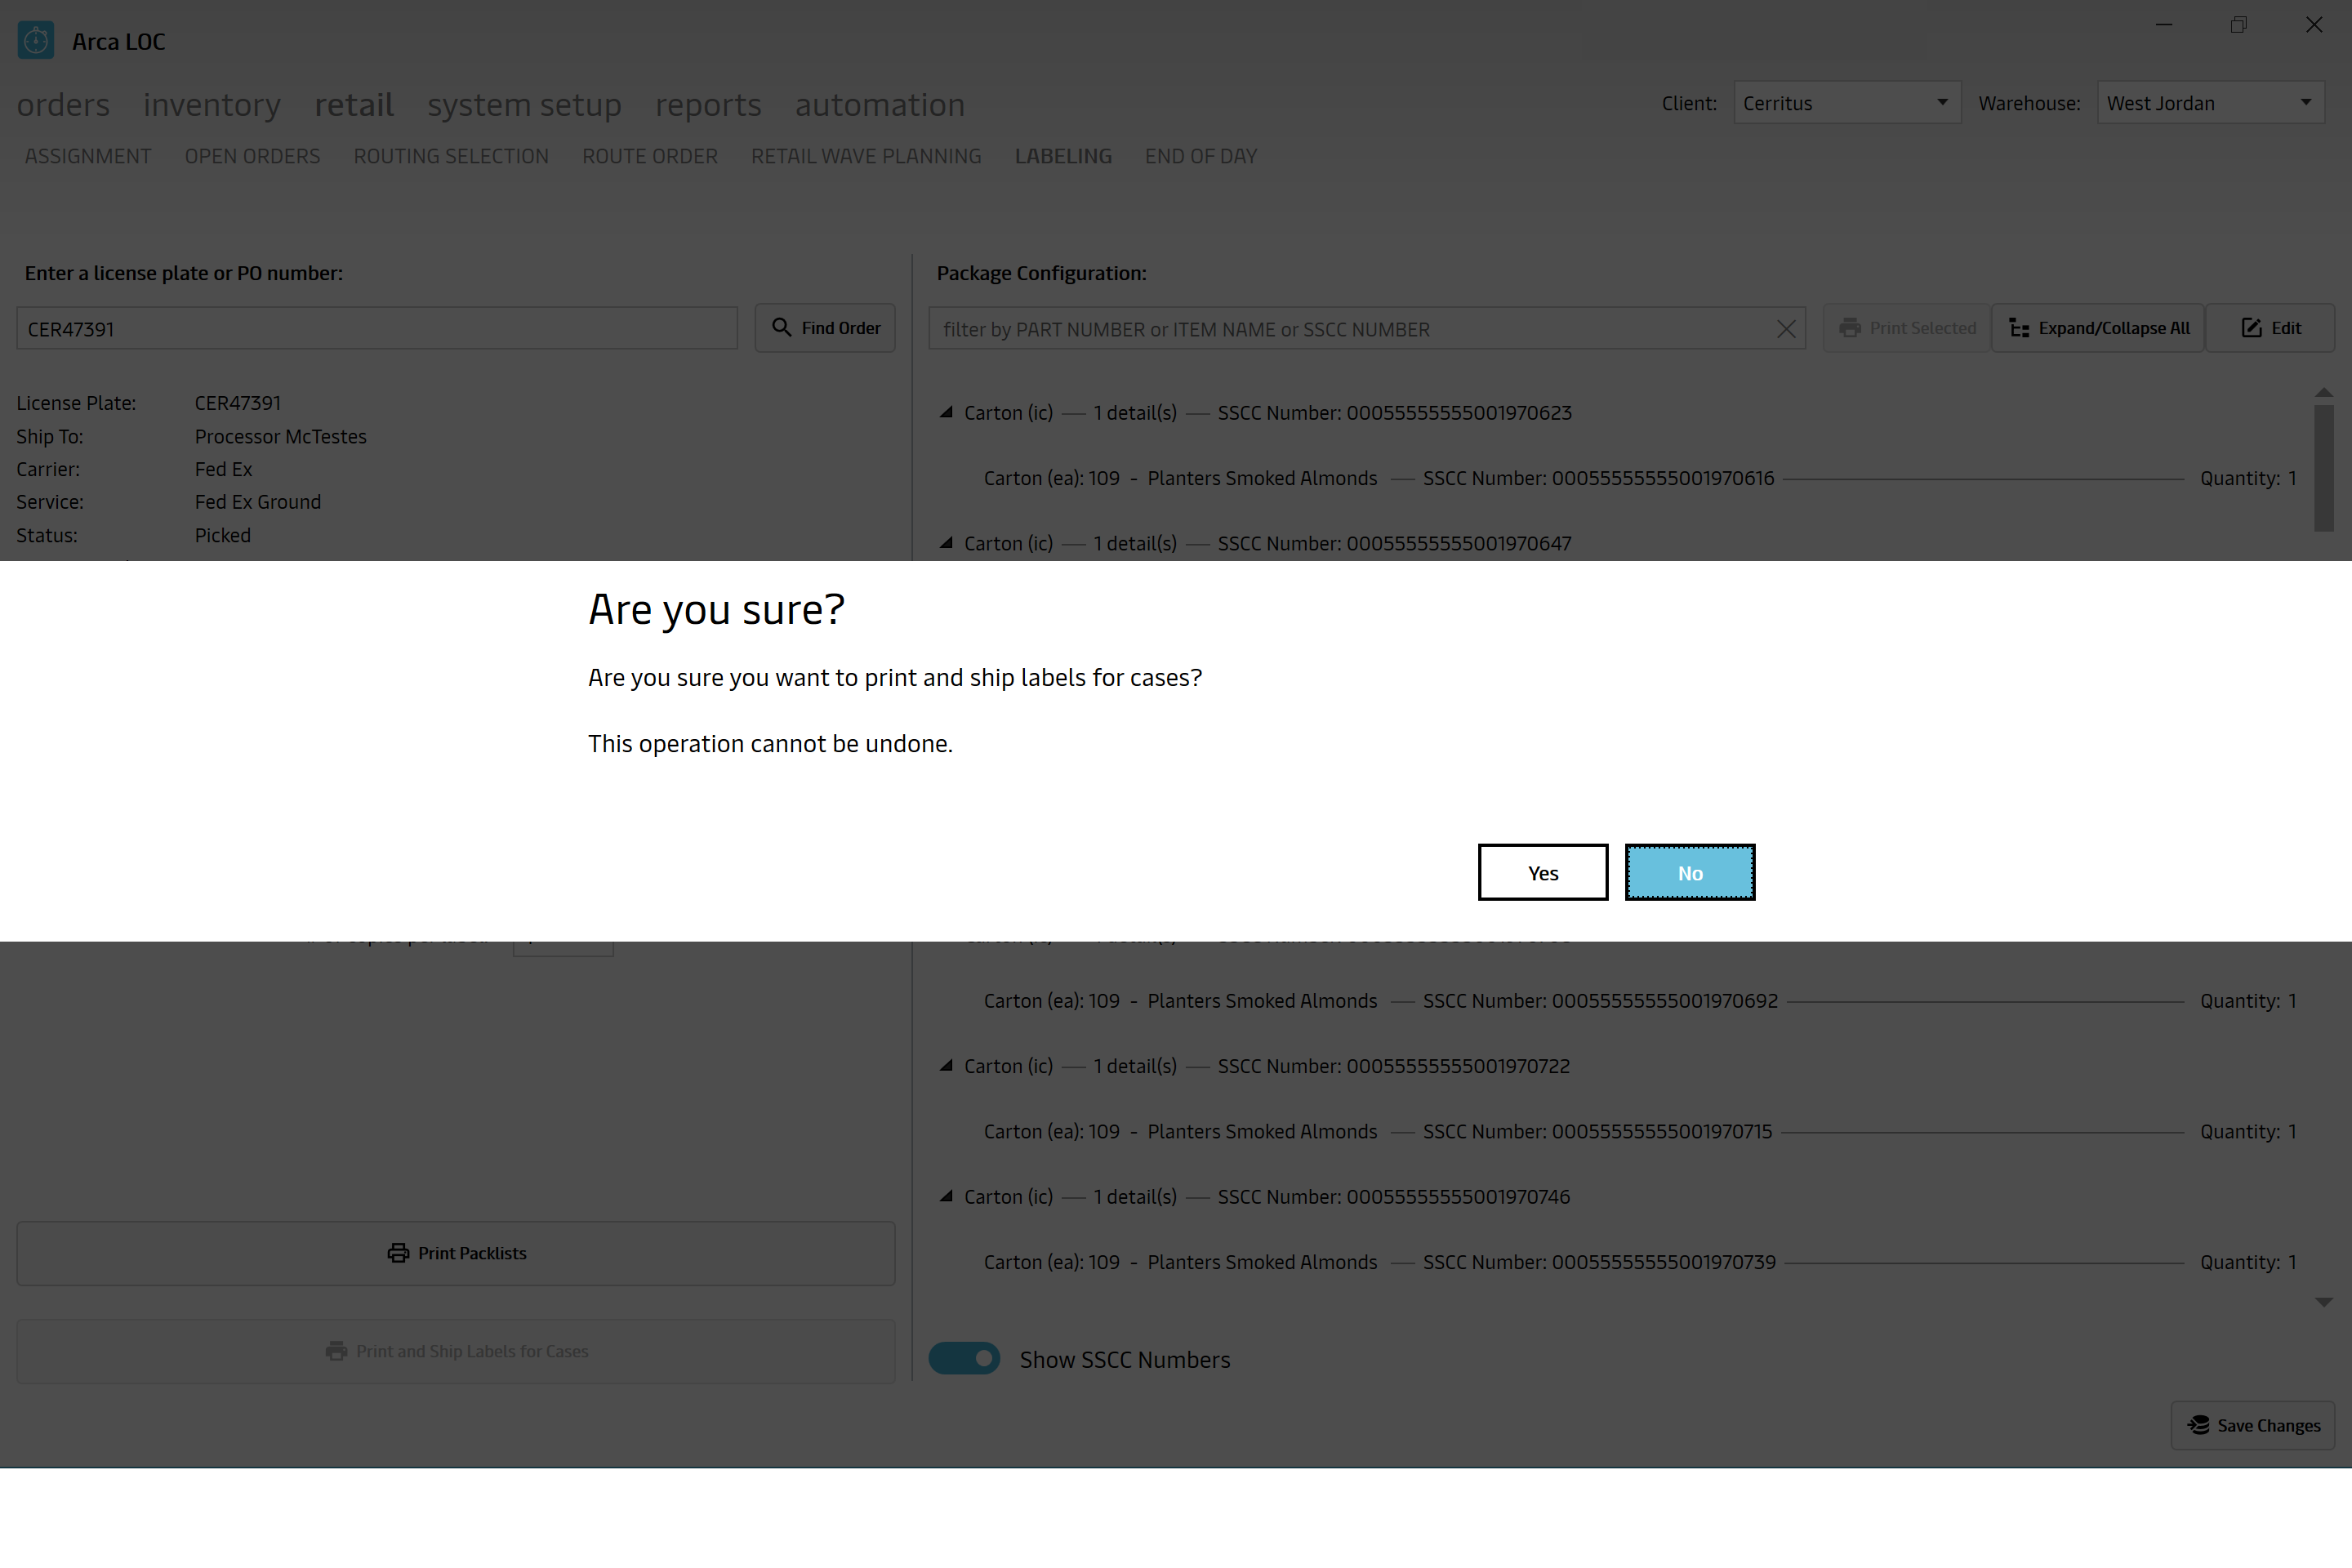
Once you've click "Print and Ship Labels for Cases" it will give you this pop up to ensure that you want to proceed with the action. Once you have clicked that "Print and Ship Labels for Cases" buttons, it will close out the order.
End of Day
This section of the User Guide will cover the "End of Day" portion of ARCA LOC Retail.
System Setup
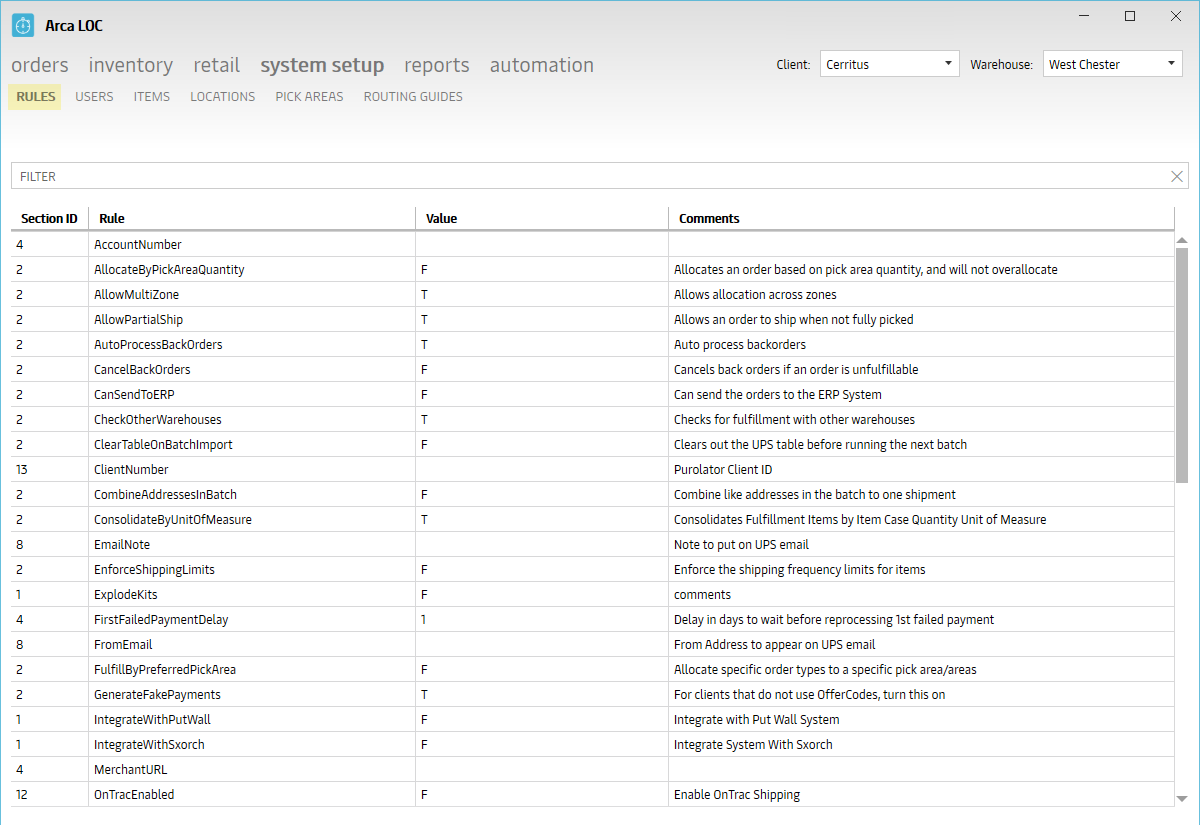
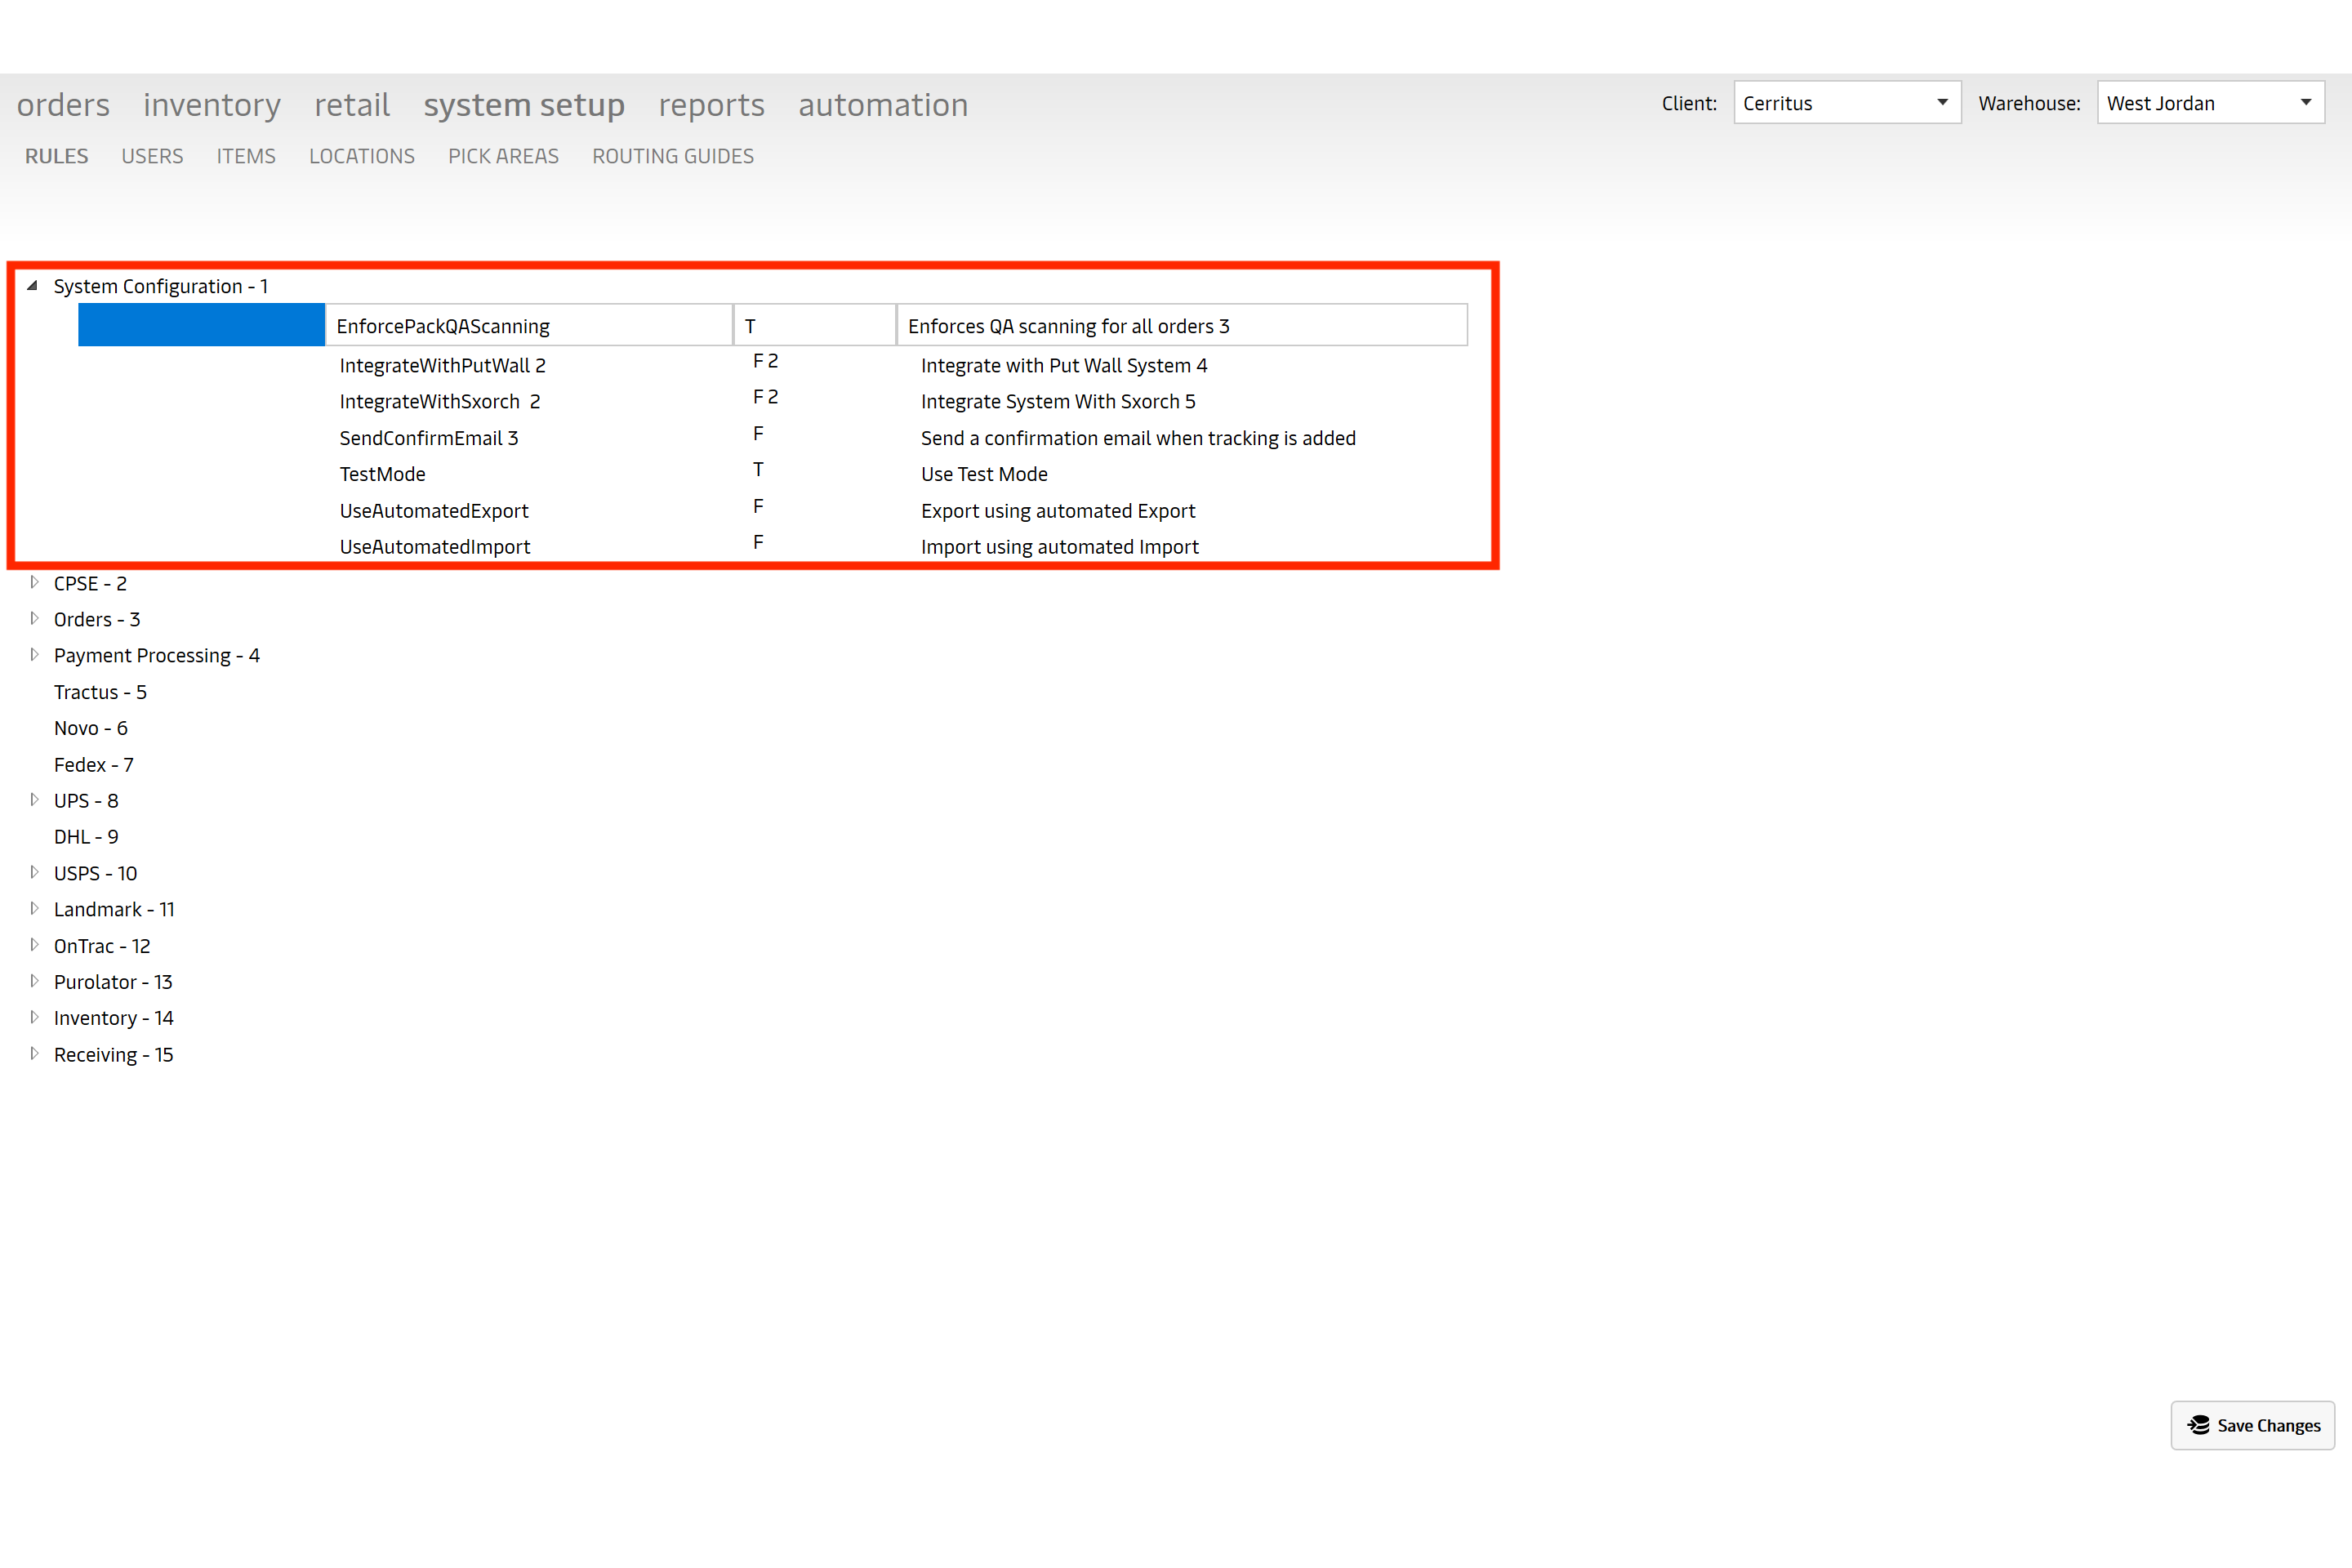
Rules
The "Rules" portion of ARCA LOC System Setup will allow you to view business rules for clients.
| Rules | Description | Section ID |
|---|---|---|
| AllocateByPickAreaQuantity | Allocates an order based on pick area quantity, and will not overallocate | 2 |
| AllocationSortOrder | Determines the order in which allocations are sorted. Descending or Ascending | 2 |
| AllowMultiZone | Allows allocation across zones. | 2 |
| AllowPartialShip | Allows an order to ship when not fully picked. | 2 |
| AutoProcessBackOrders | Auto process backorders | 2 |
| CancelBackOrders | Cancels back orders if an order is unfulfillable. | 2 |
| CanSendtoERP | Can send the orders to the ERP System | 2 |
| CheckOtherWarehouses | Checks for fulfillment with other warehouses | 2 |
| ClearTableOnBatchImport | Clears out the UPS table before running the next batch. | 2 |
| Client Number | LEGACY: Purolator Client ID. | 13 |
| CombineAddressesInBatch | Combine like addressesi n the batch to one shipment | 2 |
| ConsolidateByUnitOfMeasure | LEGACY: Consolidates Fulfillment items by item case quantity unit of measure. | 2 |
| EmailNote | Note to put on UPS email. | 8 |
| EnforcePackQAScanning | Enforces QA scanning for all orders 3. | 1 |
| EnforceShippingLimits | Enforce the shipping frequency limits for items | 2 |
| ExplodeKits | comments | 14 |
| FirstFailedPaymentDelay | LEGACY: Delay in days to wait before reprocessing 1st failed payment | 4 |
| FromEmail | From Address ro appear on UPS email. | 8 |
| FulfillByPreferredPickArea | Allocate specific order types to a specific pick area/areas | 2 |
| GenerateFakePayments | For clients that do not use OfferCodes, turn this on. | 2 |
| IntegrateWithPutWall 2 | Integrate with Put Wall System 4 | 1 |
| IntegrateWithSxorch 2 | Integrate System With Sxorch 5 | 1 |
| LockPartiallyClosedASNs | When an ASN has been partially received, lock the ASN and ASNDetails from being updated/changed. | 15 |
| MerchantURL | Turning on MerchantURLRule | 4 |
| OnTracEnabled | LEGACY: Enable OnTrac Shipping. | 12 |
| OrderCreatePushDelay | Delay in seconds that an order will age at order created before processing. | 2 |
| OrderProcessingDiagnostics | Service Fabric Order Processing verbose logging to applog.diag | 2 |
| OverridePricing | Uses pricing from the file instead of database. | 2 |
| PackListPrintingOrder | LEGACY: Pack slip printing order. Values: Default, -- normal by arca ordernumber, ByNumberOfLines, ByOrderNumber, ByFirstPickLocation, DGFirst. | 3 |
| Password | Password for landmark shipping. | 11 |
| PickingSingleScanPerUnit | To enforce a barcode scan of each unit picked. | 14 |
| PreventOverReceiptofASN | Prevents a truck from being received if any items received quantity exceeds the ASN quantity. | 15 |
| PrintPackSlipMessage | Whether or not to print the packslip message | 3 |
| PrintPricesOnPackSlip | Whether or not to print prices on a packslip | 3 |
| ProcessPayments | Should payments be processed on import or skipped | 4 |
| ReAuthorizeDelay | Days to wait before re-attempting a failed authorization. | 4 |
| ReceiptMustMatchPO | Enforces that a truck must match an existing PO in order to be received. | 15 |
| RestrictReplens | Allow replenish action to occur for pallets that are not in a good status | 14 |
| RetailCartonization | Automatically cartonize retail items into packages and details. | 2 |
| ReturnAddressUpdateToCompanyDefaultWhs | When items are returned, they will have a return address based on the warehouse they shipped from. | 14 |
| ScanItemtoBox | Enables scan to box relationship | 3 |
| SecondFailedPaymentDelay | Delay in days to wait before reprocessing 2nd failed payment. | 4 |
| SendAllOrdersOnePoundUSPS | Automatically send all packages 1 lb or less to USPS | 2 |
| SendConfirmEmail 3 | Send a confirmation email when tracking is added | 1 |
| SplitandSendPartialOrder | Splits and sends partial orders if whole order isn't in stock. | 2 |
| SplitCanadaEastWest | Split Canada Orders into an East File and West File | 2 |
| SplitNonStockedKits | When the order split is on, it will split non stocked kits. | 2 |
| TestMode | Use Test Mode | 1 |
| ThirdFailedPaymentDelay | Delay in days to wait before reprocessing 3rd failed payment. | 4 |
| UpgradeShippingAfterBackorder | Will check to see if shipping should be upgraded after coming off backorder. | 2 |
| URL | LEGACY: URL to contact landmark shipping. | 11 |
| UseAddressValidation | Should use Address Validation. | 2 |
| UseAutomatedExport | Export using automated export | 1 |
| UseAutomatedImport | Import using automated import | 1 |
| UseCubeShipping | Use the Cube Shipping Calculation for USPS | 2 |
| UseEndicia | LEGACY- Determines if USPS should export to a database table. | 10 |
| UseLotControl | Use Lot control for allocation | 14 |
| UseMassMail | Use mass mail | 2 |
| UsePickAreaAllocation | Use pick area allocation | 2 |
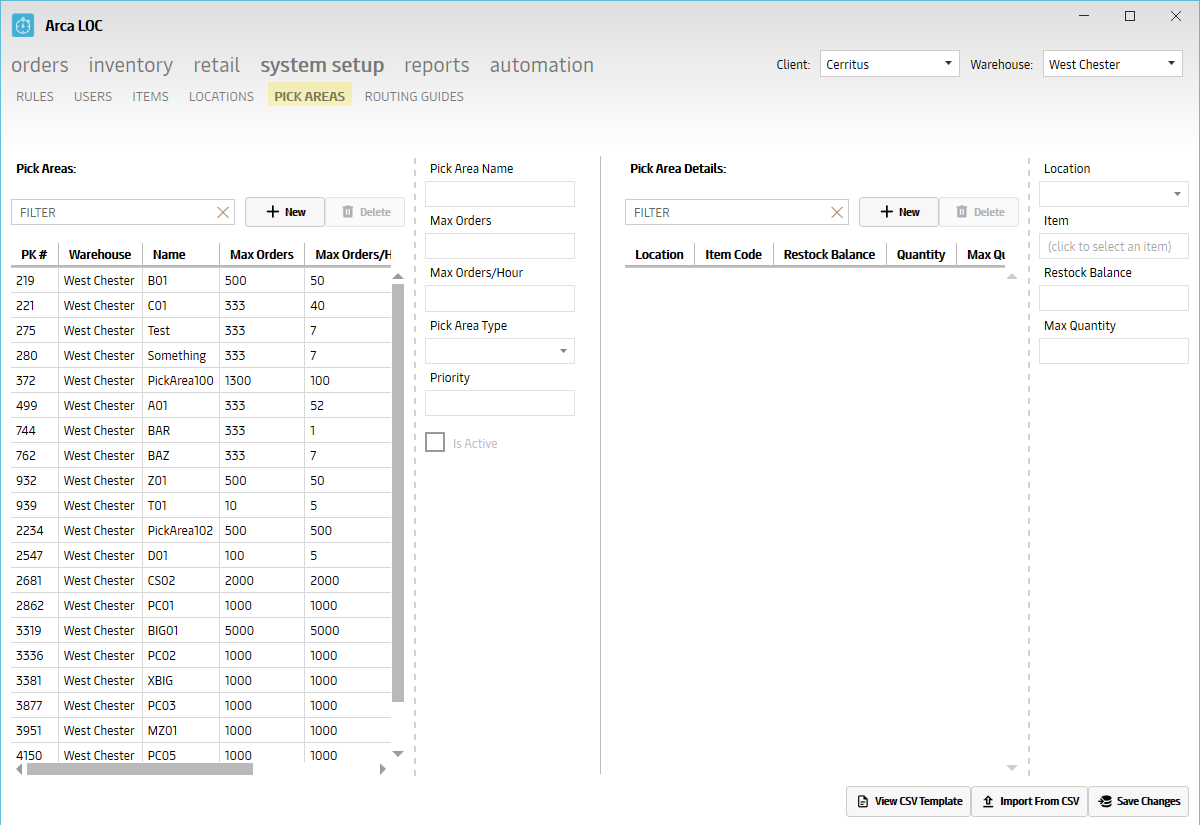
| UsePickAreaMaximumOrderAllocation | If this rule is turned on when you process orders, then it will check the total amount of orders that are allocated to any one pick area. It ties directly to this Max Orders column on the pick area screen. Example: if the max orders for a pick area is 2000 and you've got 1000 orders already allocated there, then when you kick off processing it will only try to add another 1000 orders to that pick area. Once you pick some of those allocated orders it will free up more to be assigned there. If the pick area's max quantity was already reached when you try to process orders they will all go to the status waiting for allocation. | 2 |
| Username | LEGACY: Username for landmark shipping. | 11 |
| UseWarehouseSplit | Routes order to best shipping warehouse. | 2 |
| ValidateLot | Enforces that the lot must be entered. | 14 |
| WarehouseLocationAllowMultiplePickAreaDetails | Allow warehouse locations to include multiple pick area details. | 14 |
Search for Rule
To find a rule, you may search using the following criteria:
- Section ID - need definition
- Rule - need definition
- Comments - need definition
Note
You will not be able to edit or create new rules in this module.
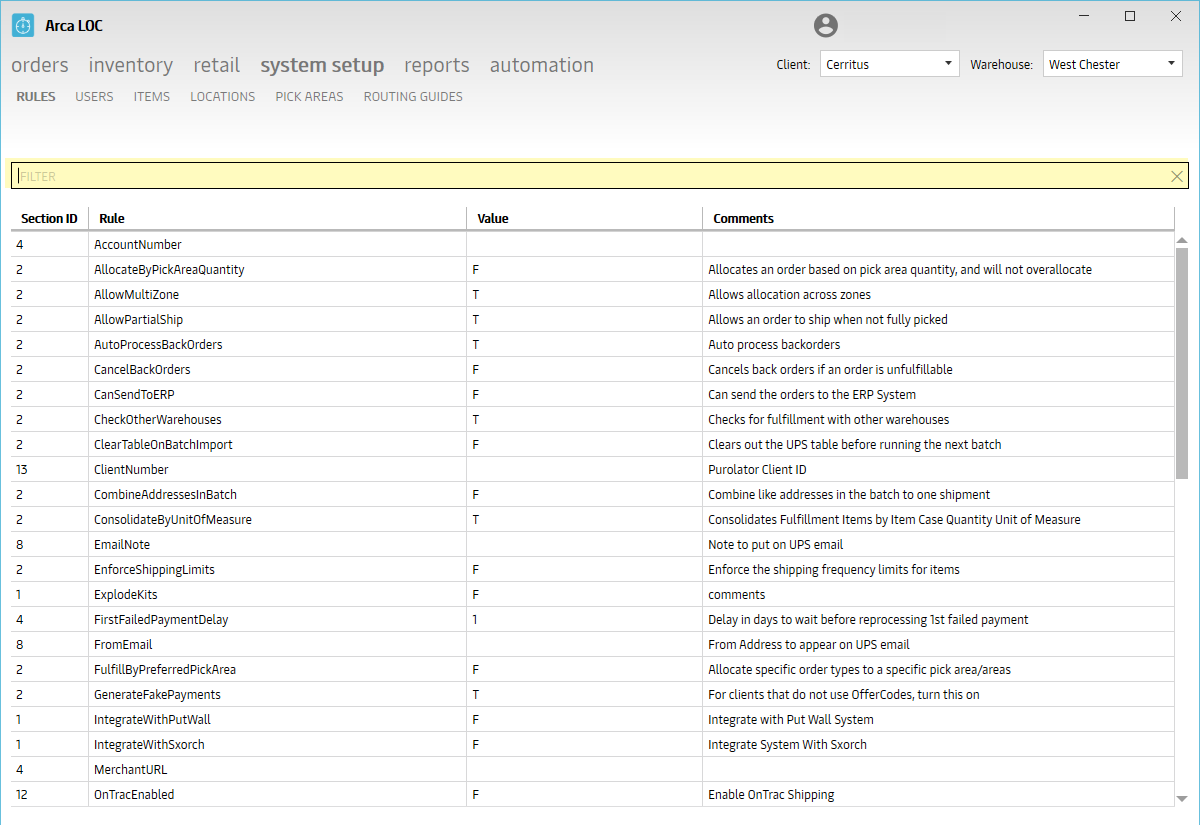
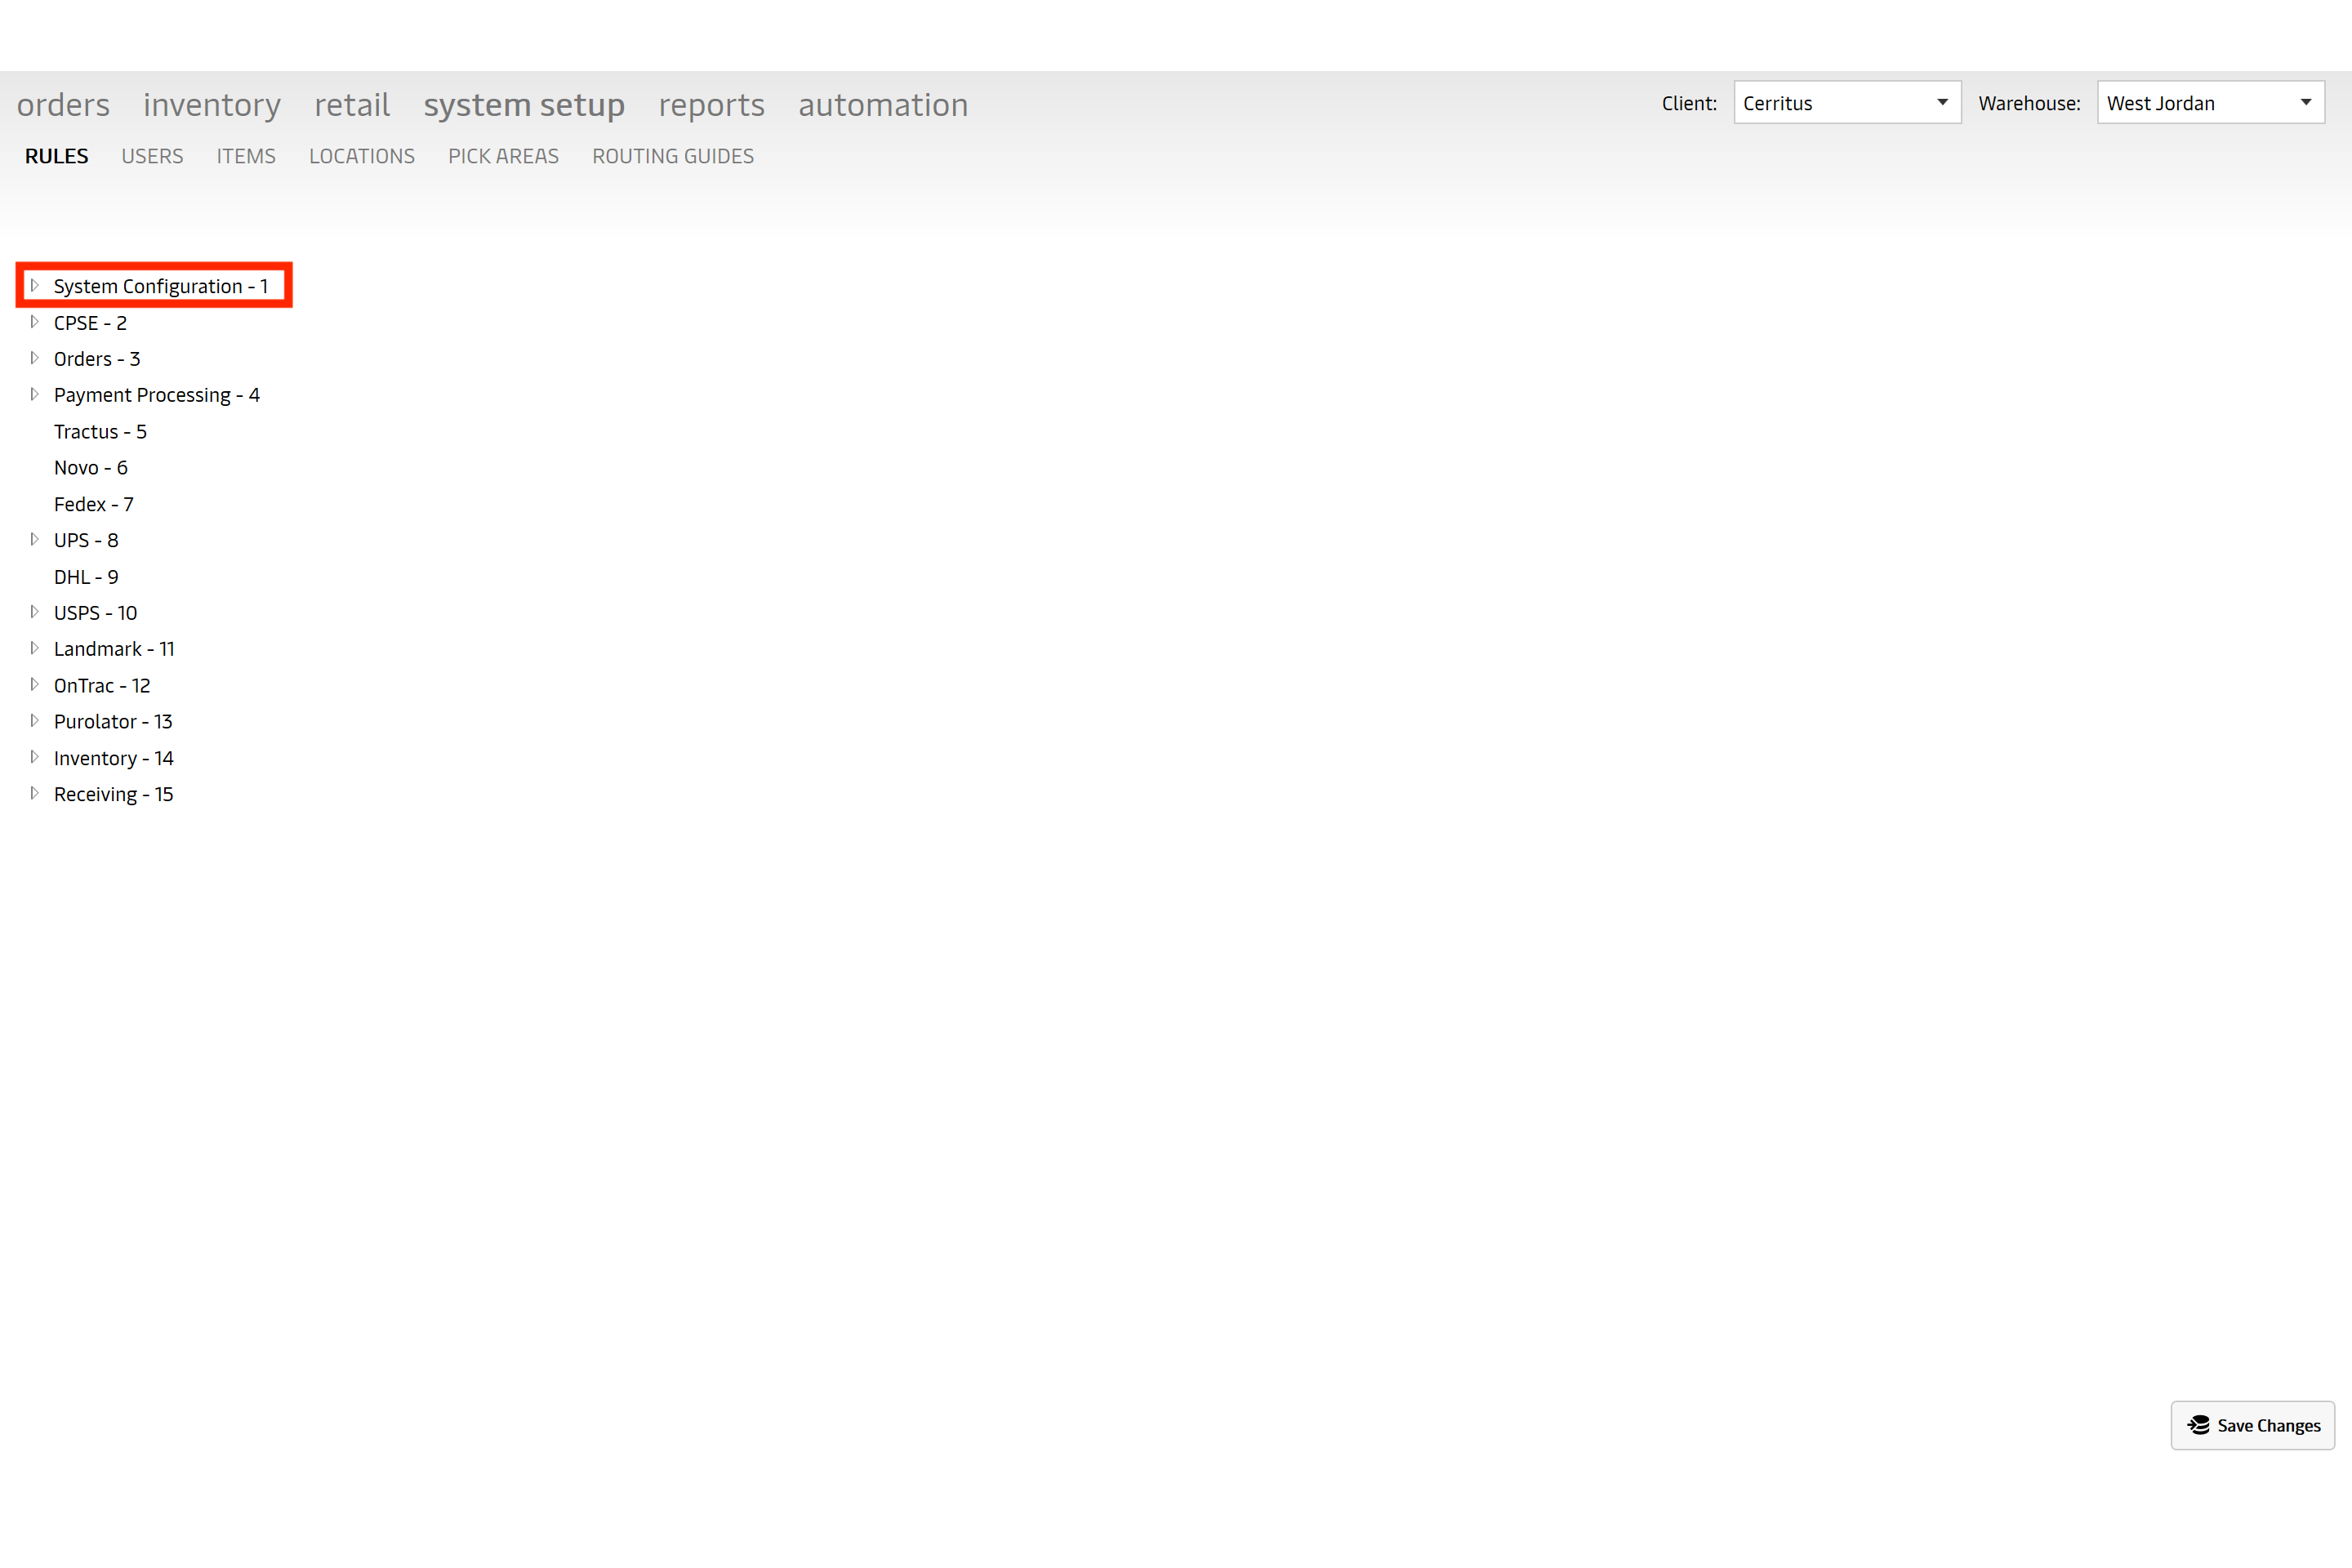
Edit Rules
Rules are now grouped by section ID; you will click on the expand arrow to open a group of rules and see all the rules inside of it. Once you chose a rule from the expanded group a user will be allowed edit the middle column and change values from T/F to turn rules on or off. Some rules have different values than T/F such as PacklistPrintingOrder. This rule’s value is DGFirst, signifying those items marked as Dangerous Goods will print first. Need to be careful not to change values to something that wouldn’t apply to the rule. Users are not allowed to edit/change the Name of a Rule or its description.
API Calls
- Setup.Business_Rules
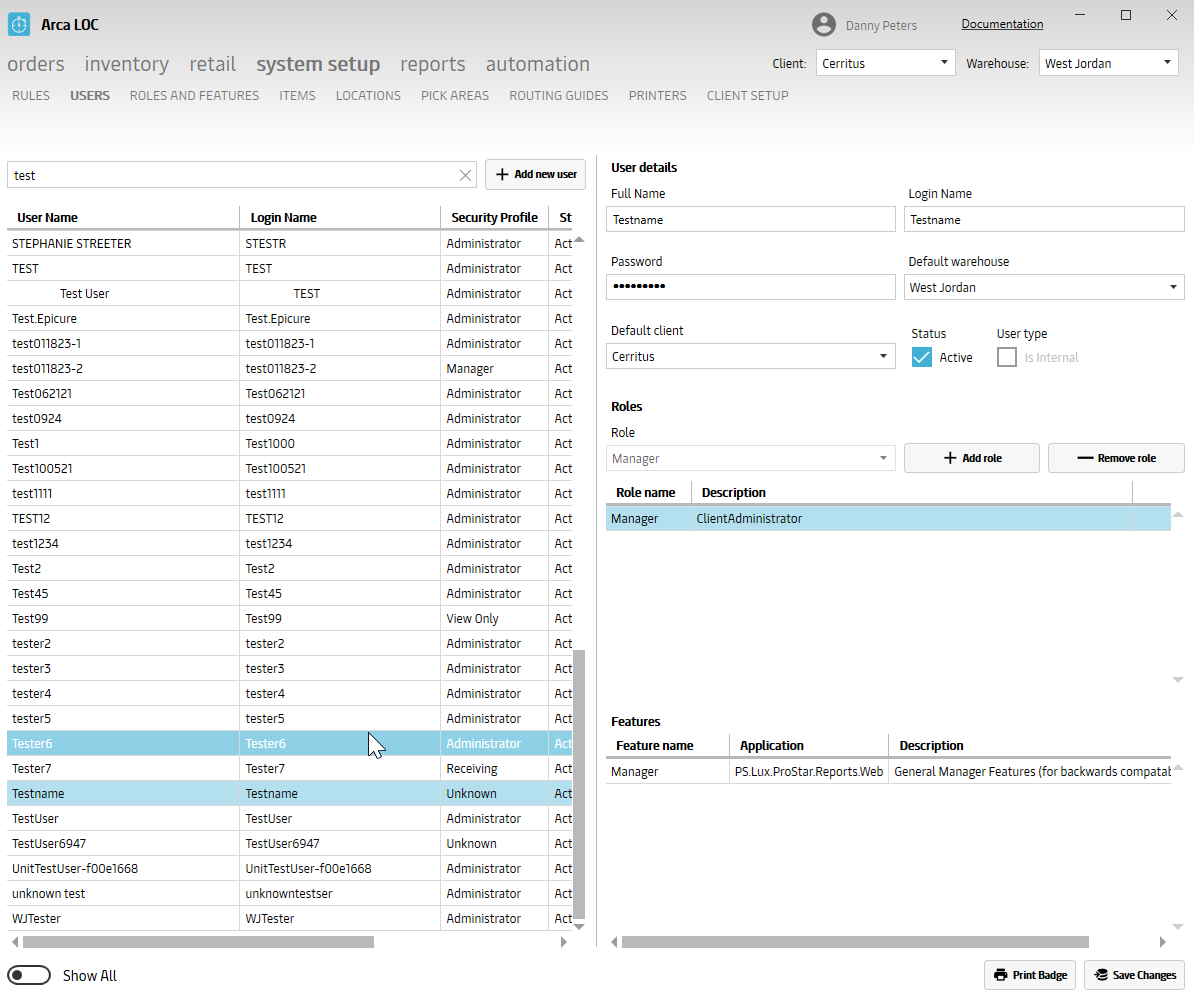
Users
The "Users" portion of ARCA LOC System Setup will allow you to setup and manage end-users. Note that we run an internal process to audit users. For internal warehouse people, after 14 days of inactivity your user account will be deactivated. For external users of the client report site, after 30 days of inactivity your account will be deactivated.
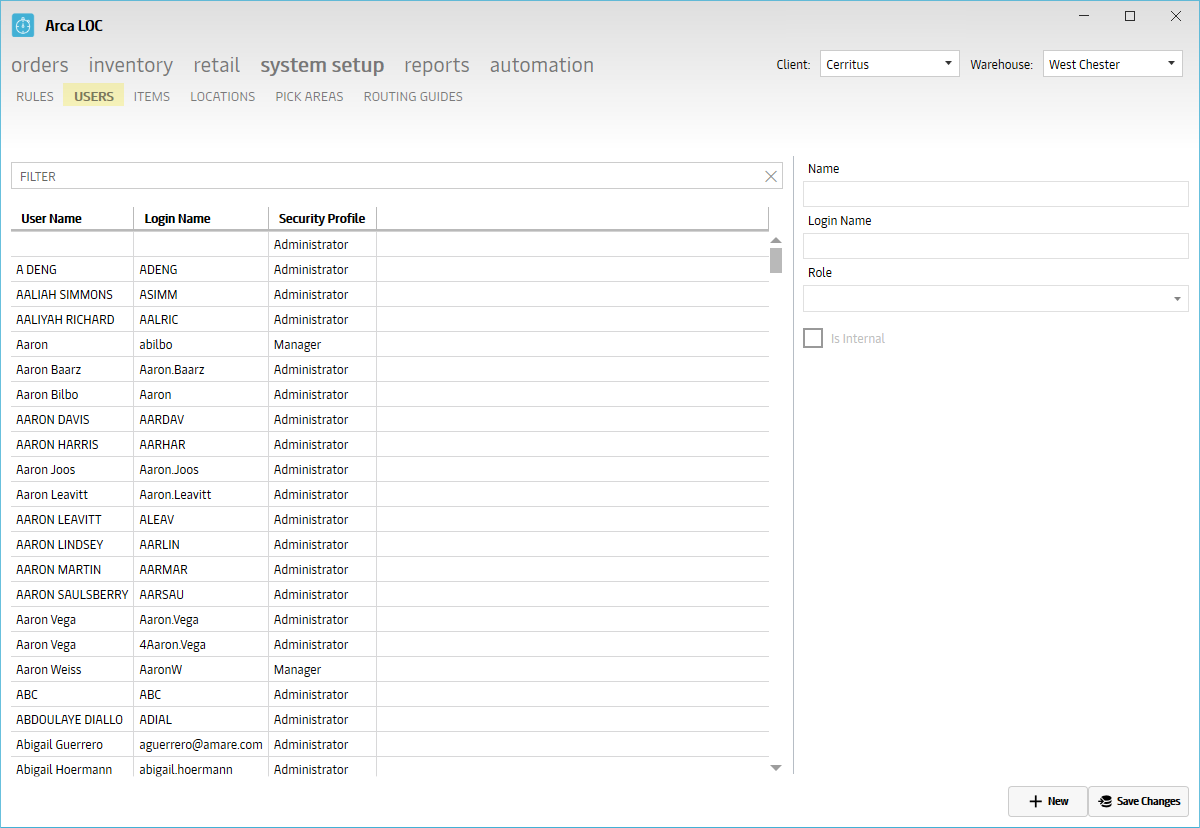
Users
To find a user, you may search for the User Name or Login Name using the following criteria:
- Full or partial user name, ex. Sam or Smith or Samuel Smith
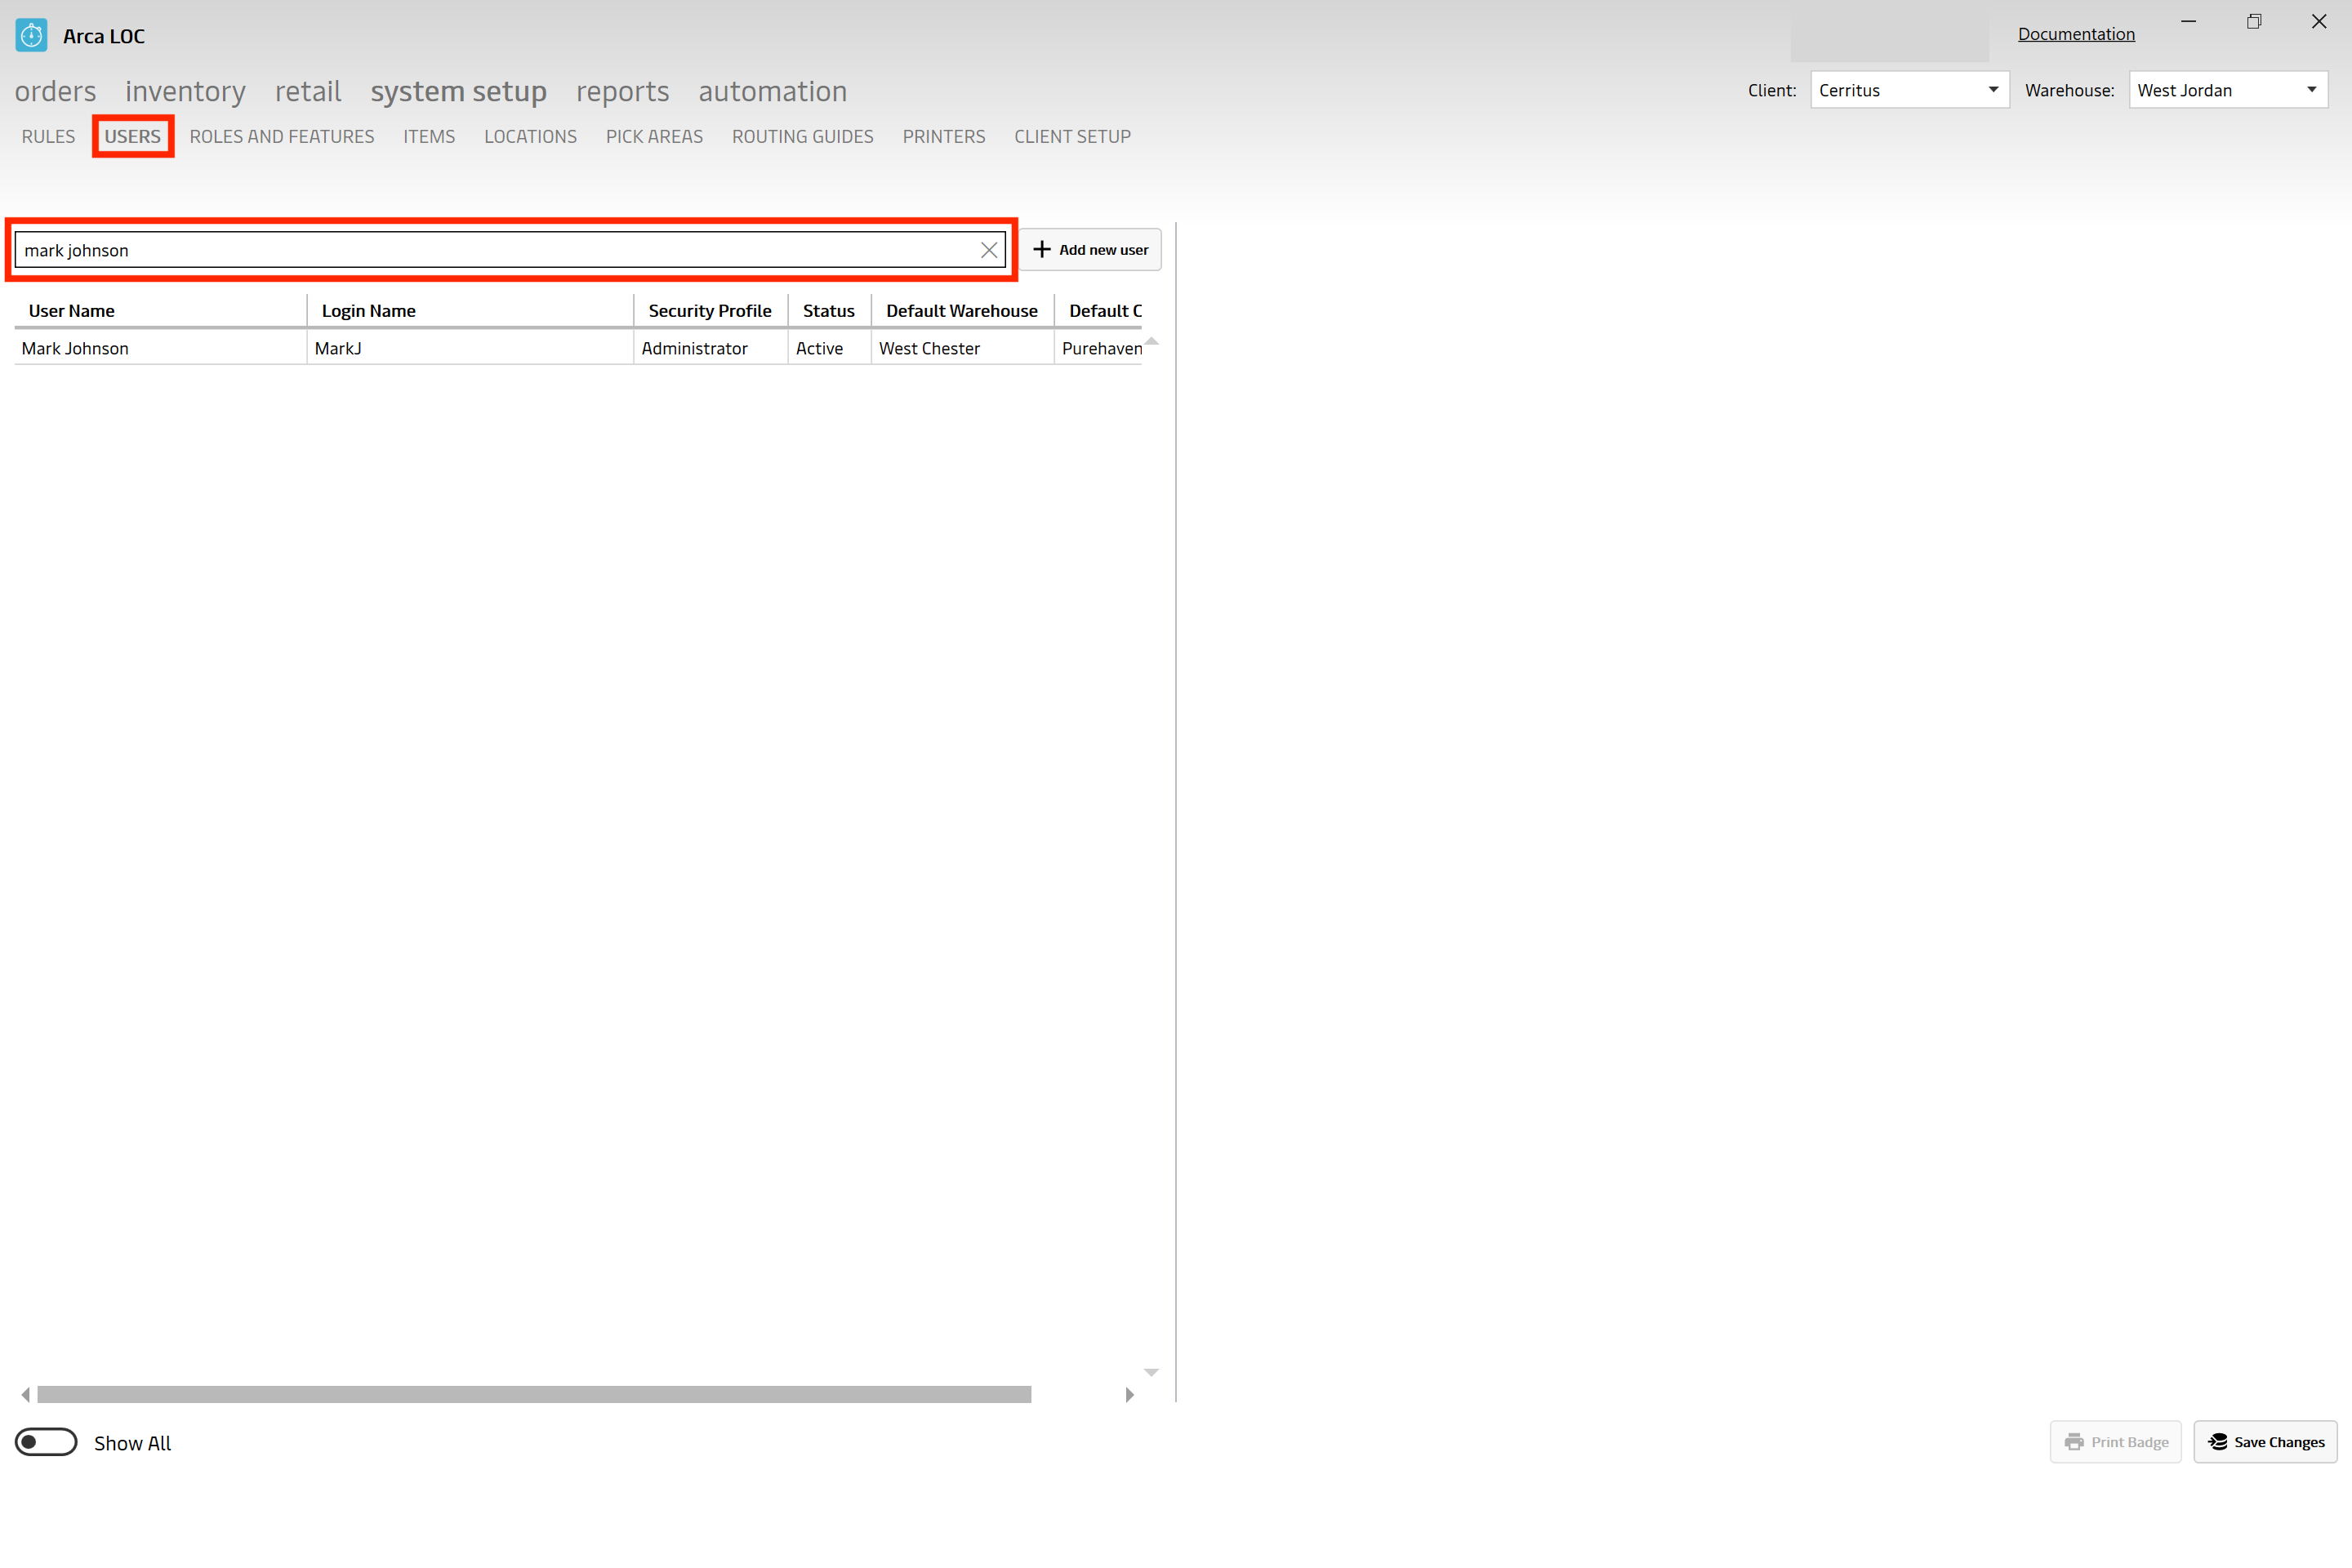
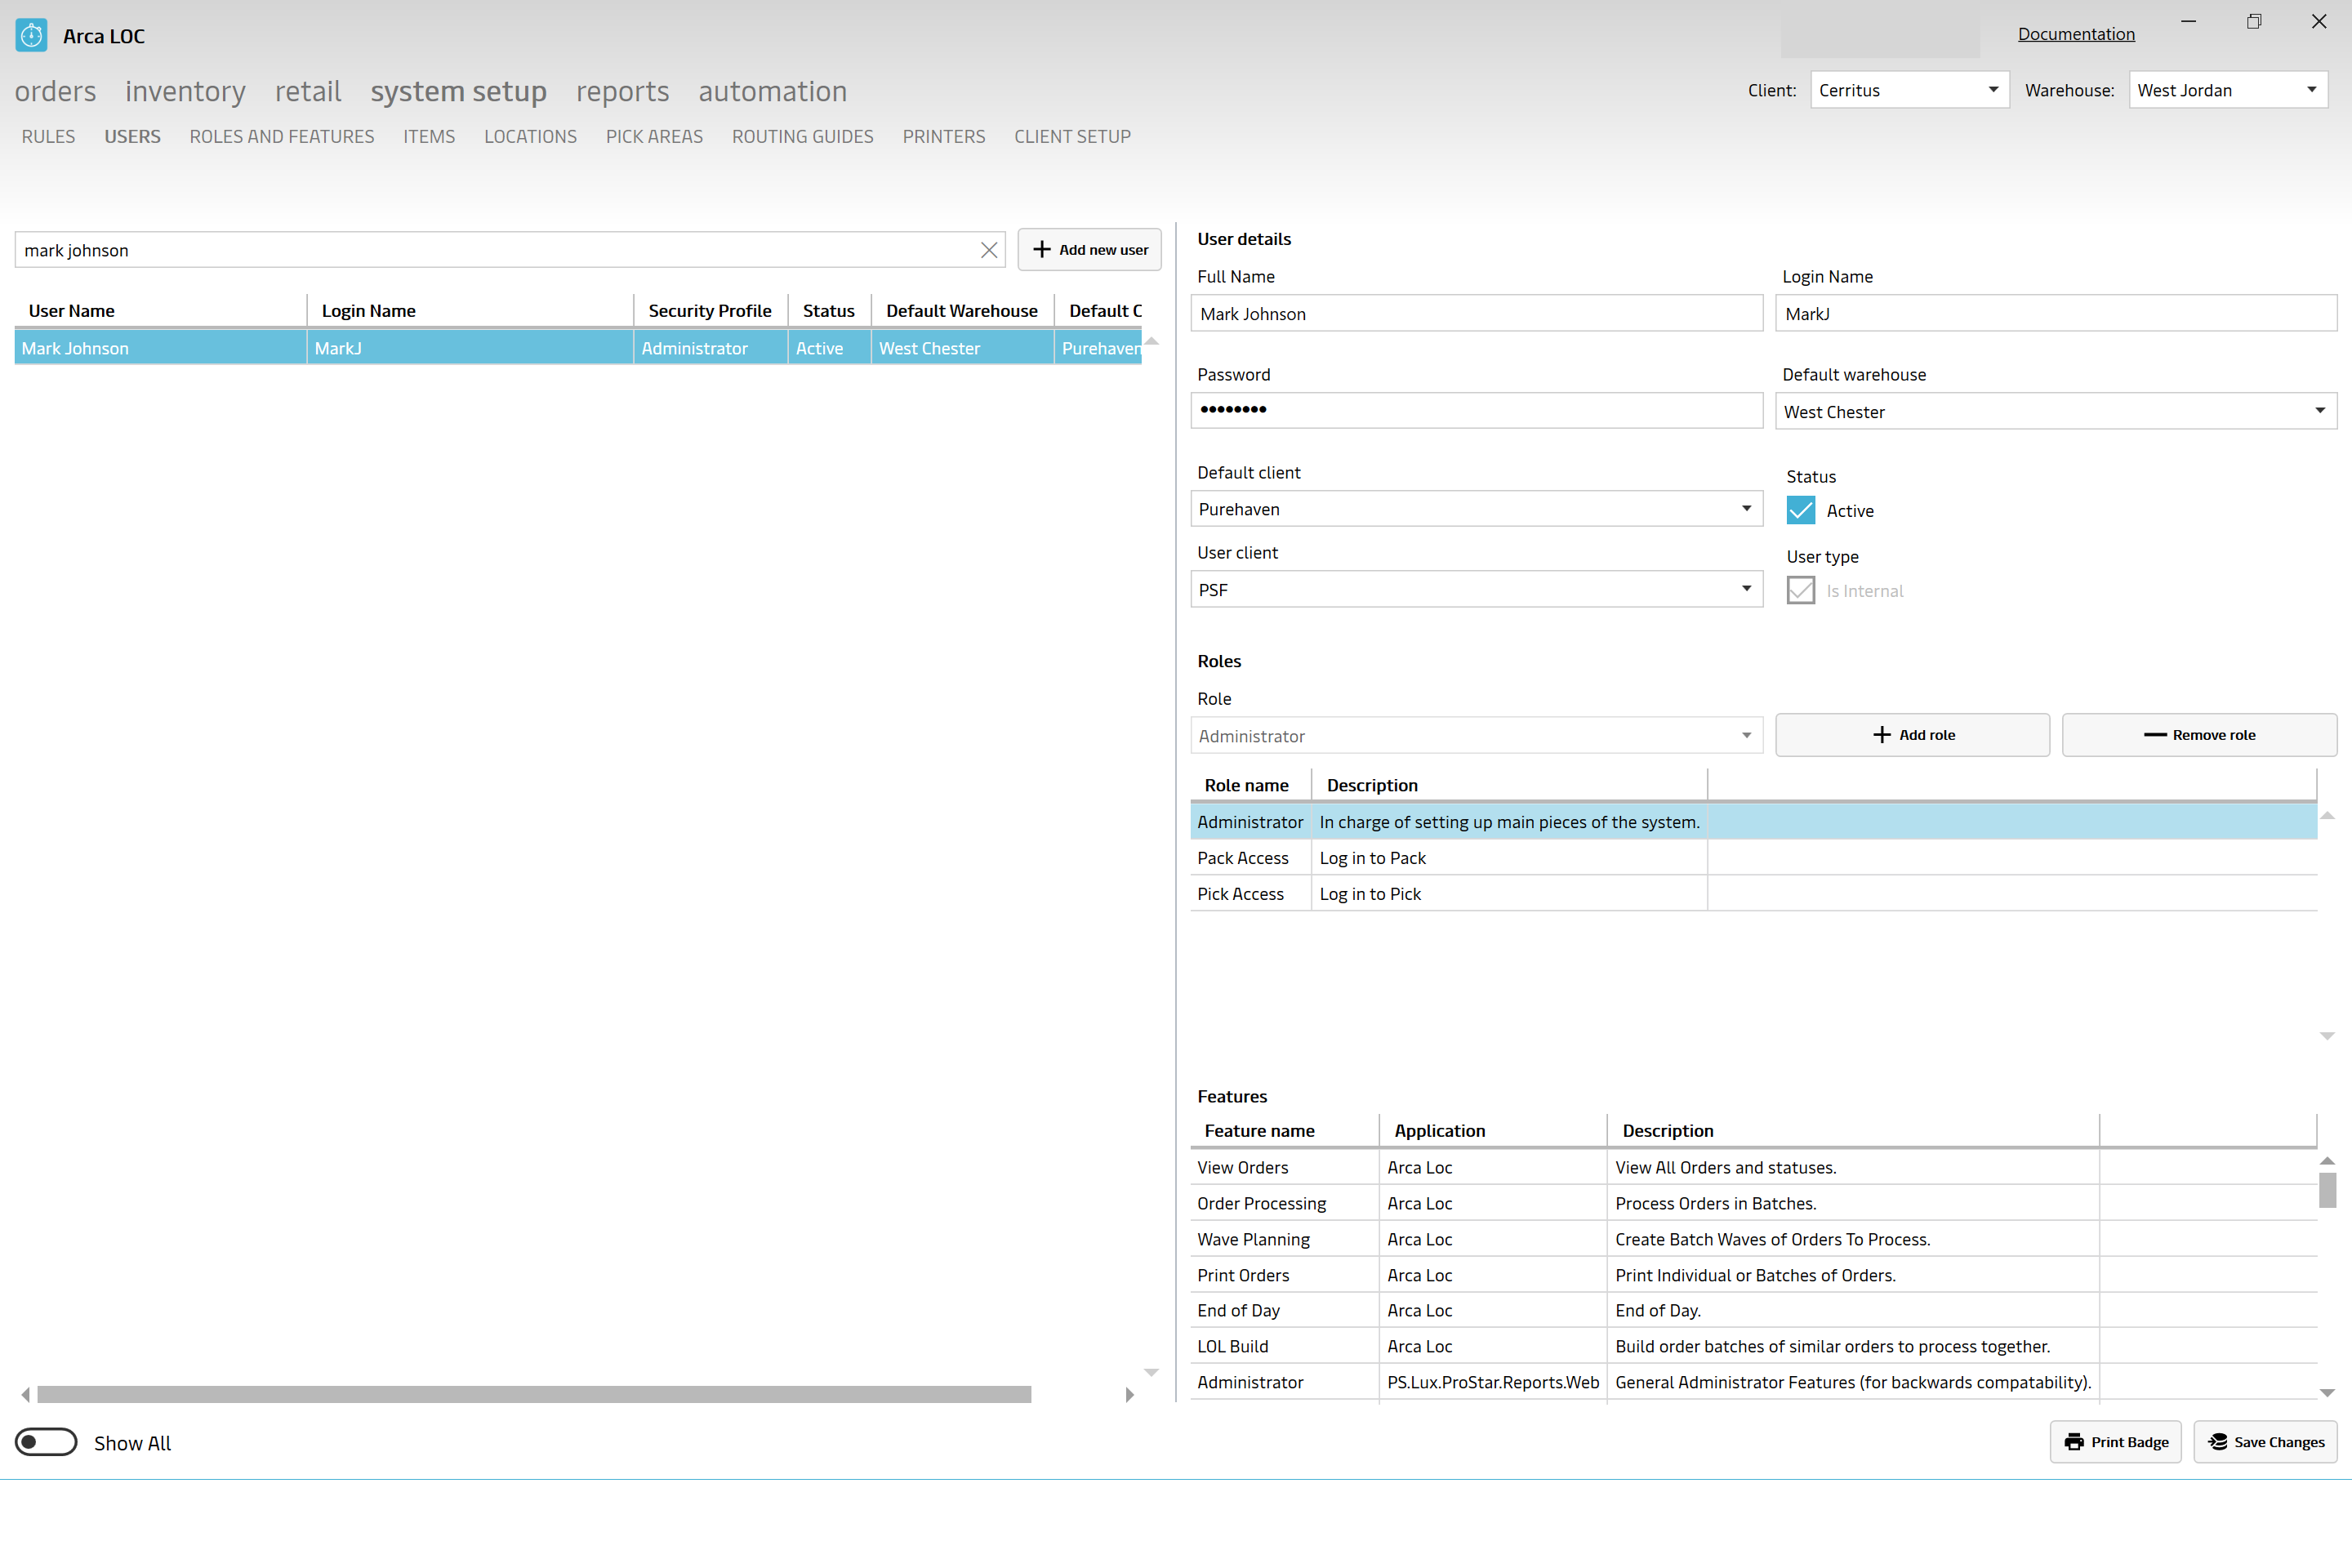
You are able to click on the user you are searching for and it will pull up all of the user details.
Roles and Features
Various roles can be created in this screen. Depending on a person's responsibilities in their job description a role can be setup with the appropriate access needed. A new role can be created by adding various features from different apps like Warehouse and LOC. Each feature depending on if the user has access or not will be enabled/disabled when the user logs into the app with their credentials. At any time, features can be added or removed. You just need to click on the add or remove buttons then save the changes once the desired options have been selected.
Also any new role that has been created can be edited or deleted.
To start off, everyone will be given admin rights. So, the manager will need to make the adjustments as needed in order to remove access from users that do not require all admin access.
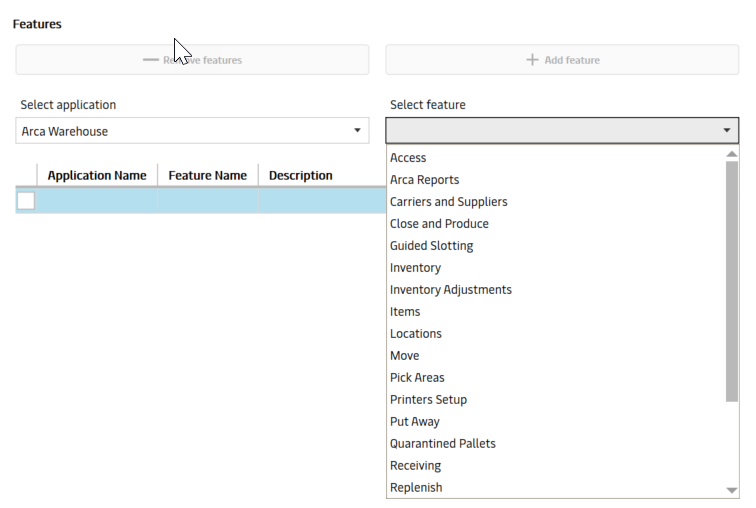
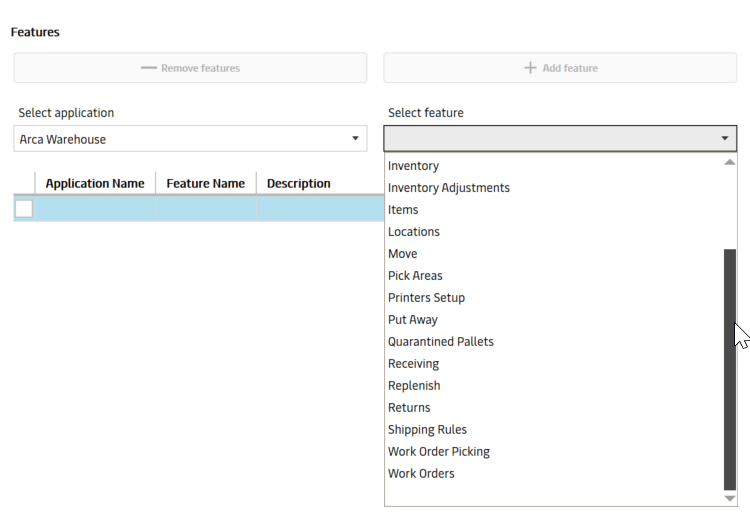
Click on Create Role
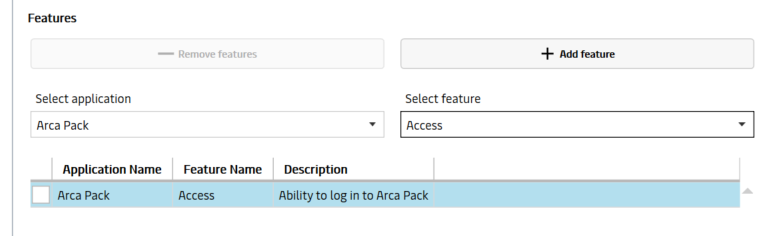
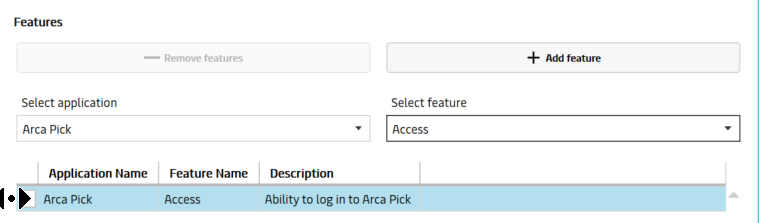
Add Name and Description then click on Add feature button
Will need to select the application then select the feature
Save the changes

Remove Features
Select the check box under the application name then click on remove features.
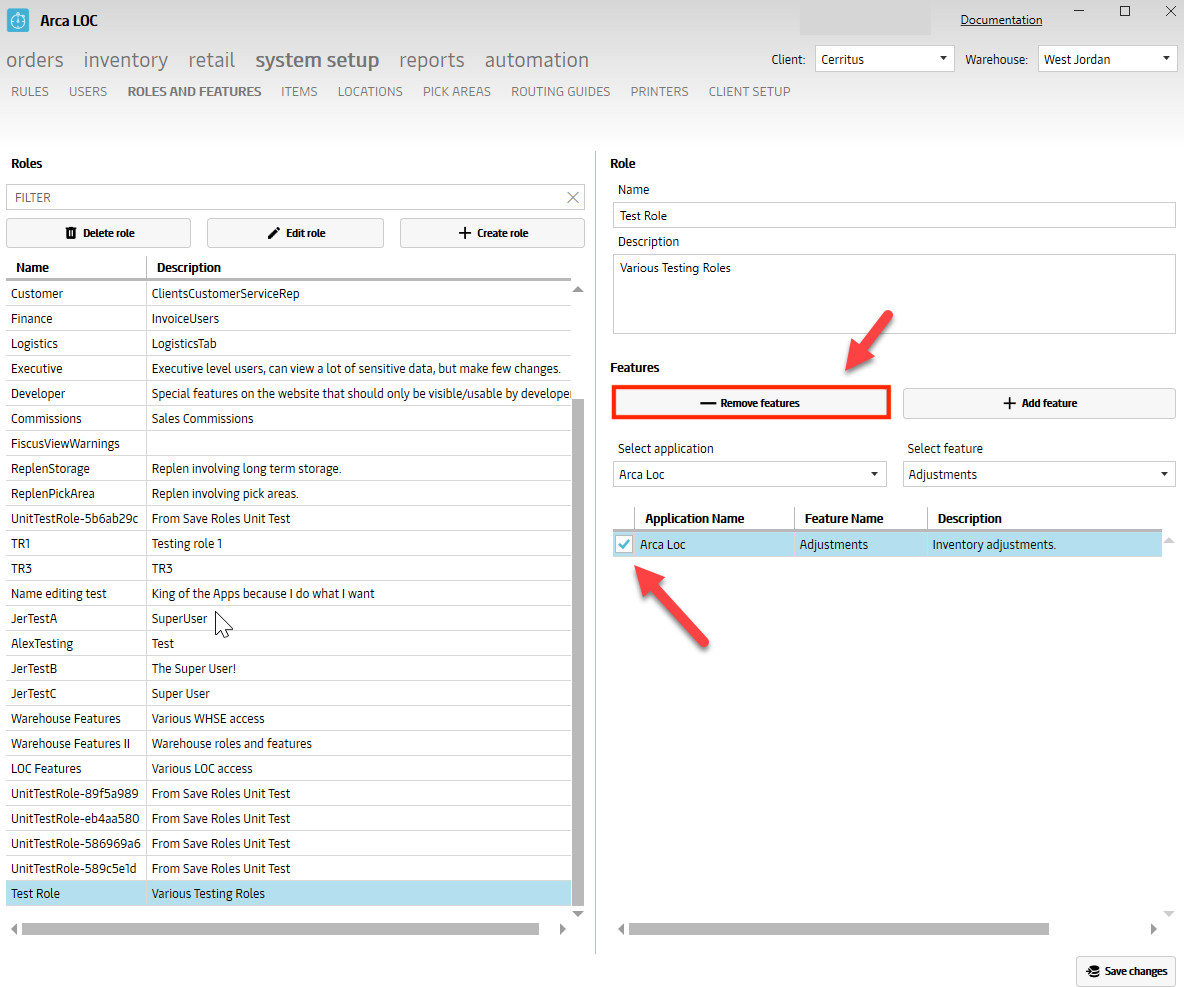
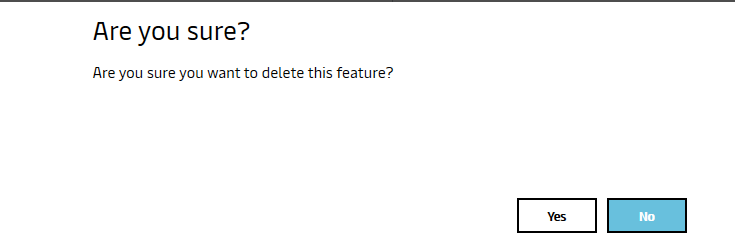
A message will display to verify that the user wants to delete the feature, click yes.
Feature will be removed, then user has to click save changes.
Edit Role
Click on Edit Role button, make the changes then save changes.
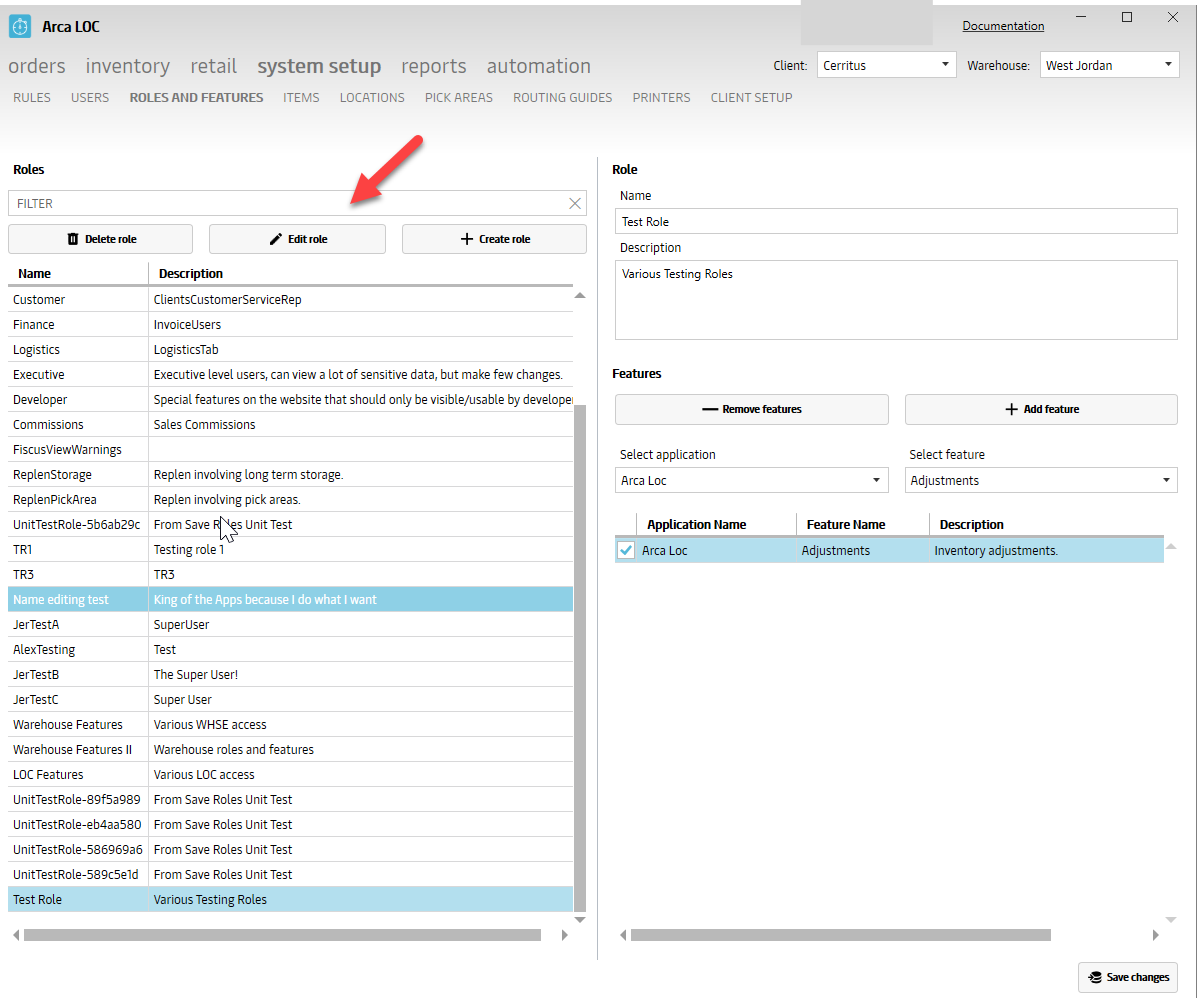
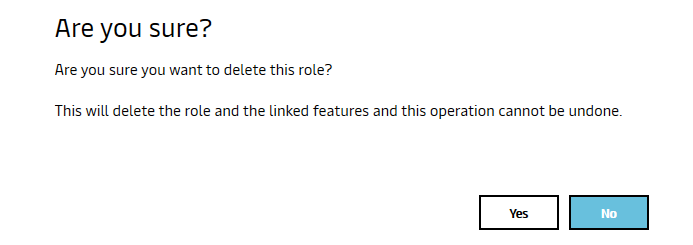
Delete Role
Click on Delete Role, message will be displayed if you would like to proceed with this removal, click yes and the role will be removed.
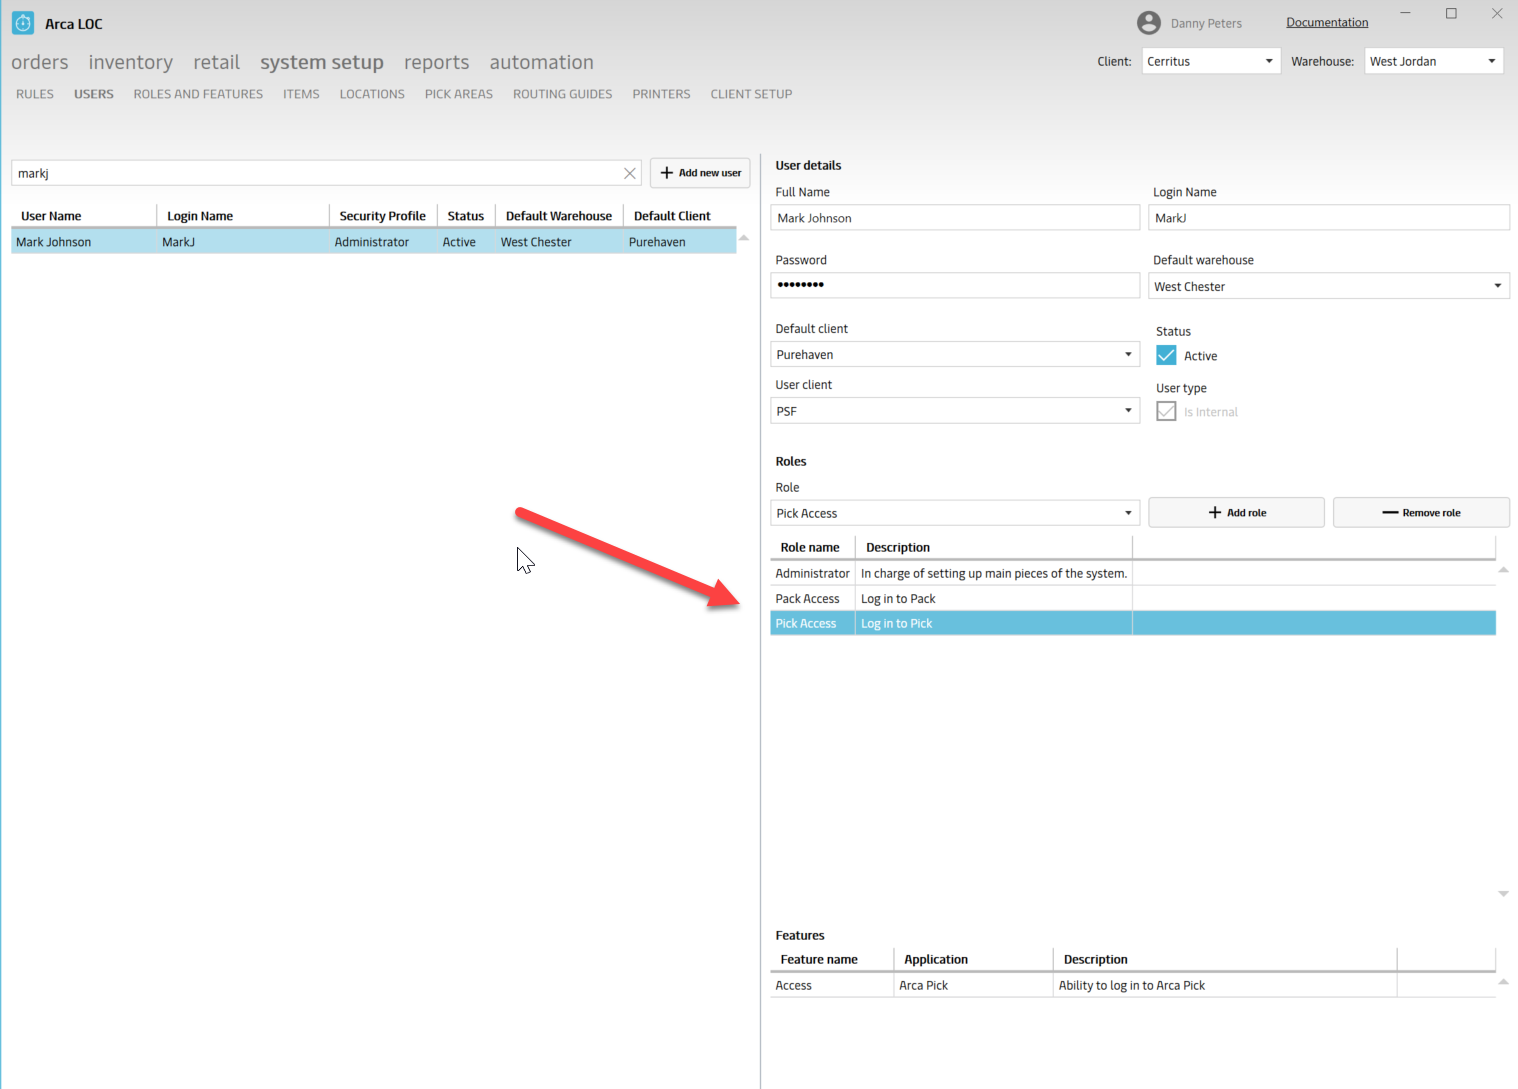
After the new roles have been created, a new user can be added to fit the appropriate role. We have various users in the warehouse where we would like to add/restrict access to certain features depending on their role.
Here is where we set them up with a login name, password, client, default warehouse along with active status. Multiple roles can be set up for a user. New roles can be added and removed at any time. You are also able to edit a user by making the changes then saving.
There is also a Show All toggle to display all users or just active users.
App Features
LOC
Once the features are setup for each application, they will need to be added to each user in order to have access.
For the Pick and Pack apps, they are access only which allows a user to be able to log in. They will all need to be set up for each environment (staging, test and live). They will just need to be added to each user.
The name of the role is Pick and Pack access.
For example, if Inventory was not selected as a feature, the user would have Inventory menu item as disabled.


Warehouse
Pack App
Only has access as a selected feature. This will allow the user to be able to login in.
Pick App
Only has access as a selected feature. This will allow the user to be able to login in.
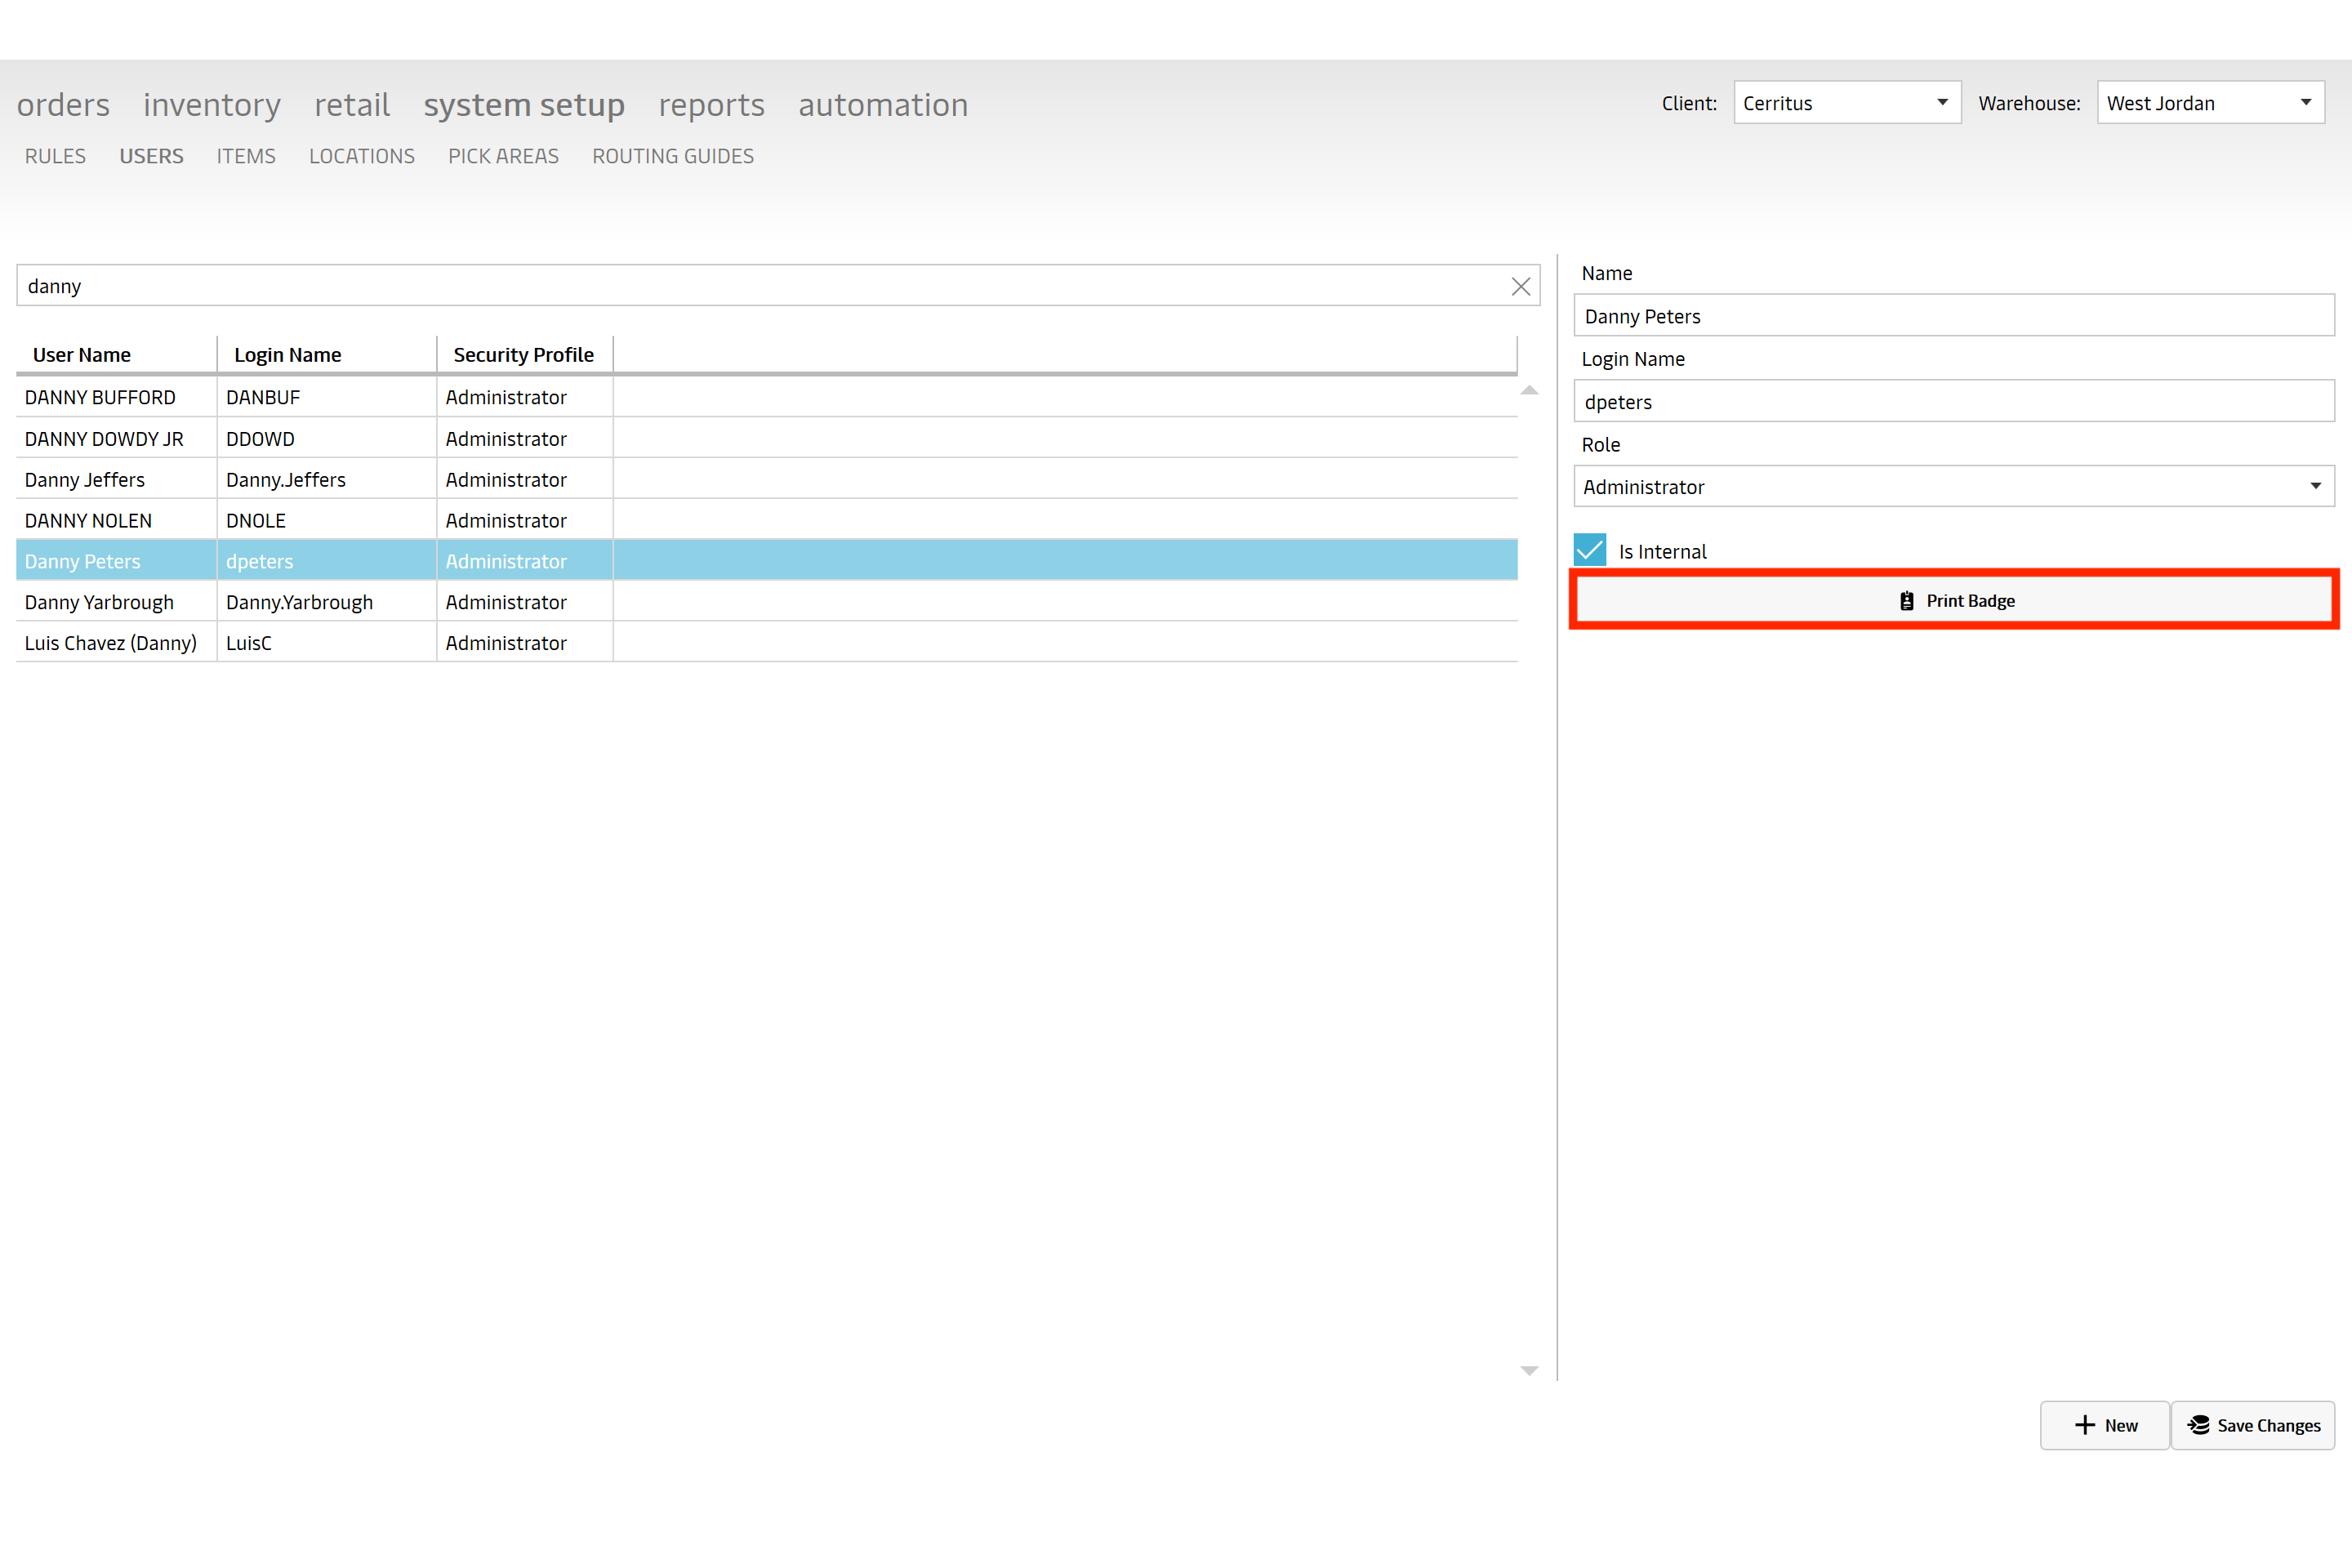
Badge Print Button
This is a new button that will print a barcode which when scanned, contains a user’s login name and password.
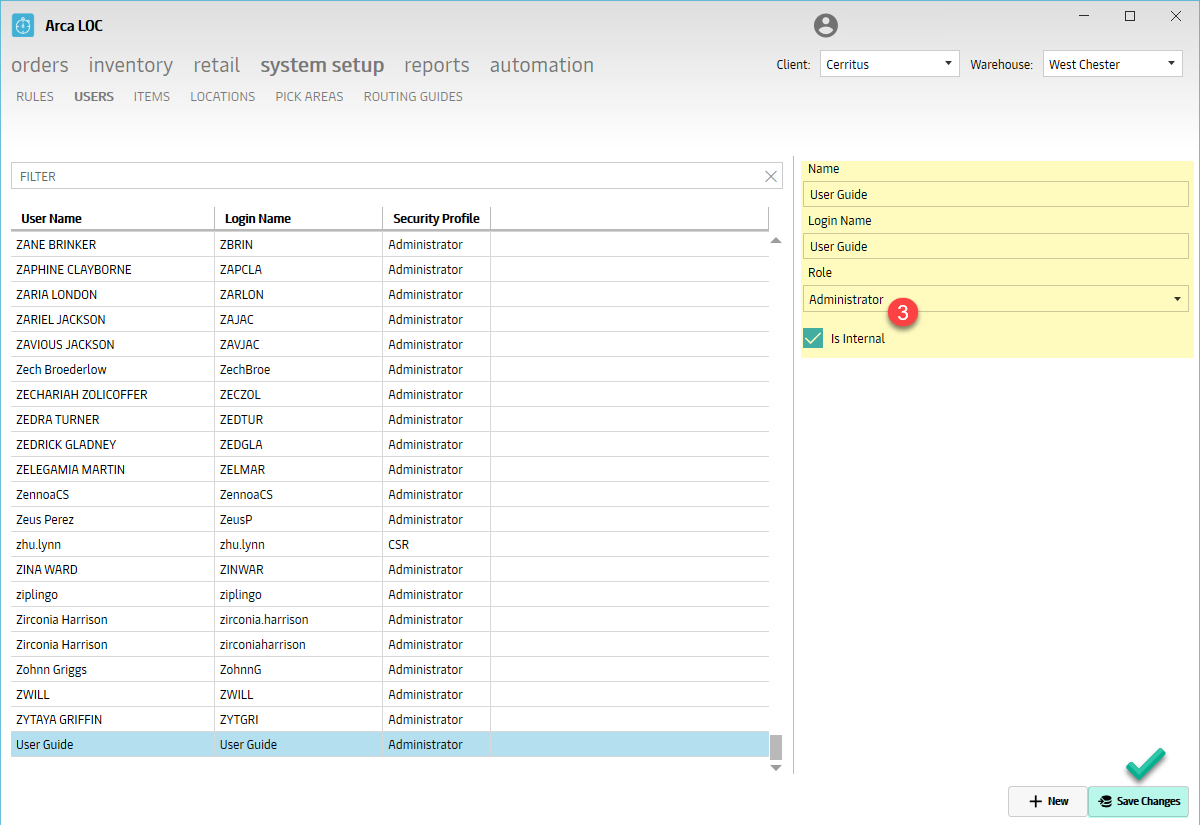
Edit User
Once you have clicked on the User, you may edit the following fields:
- Name - the end-user's name
- Login Name - the end-user's personal login name
- Role - the end-user's working role; select an option from the pull-down menu, ie. Administrator, Client, CSR, Manager, etc.
- Internal - ability to toggle ON/OFF if the end-user is an internal user, or employee
- Click SAVE CHANGES before you exit.

New User
- To create a new user, click on the NEW icon on the bottom right corner of the screen.
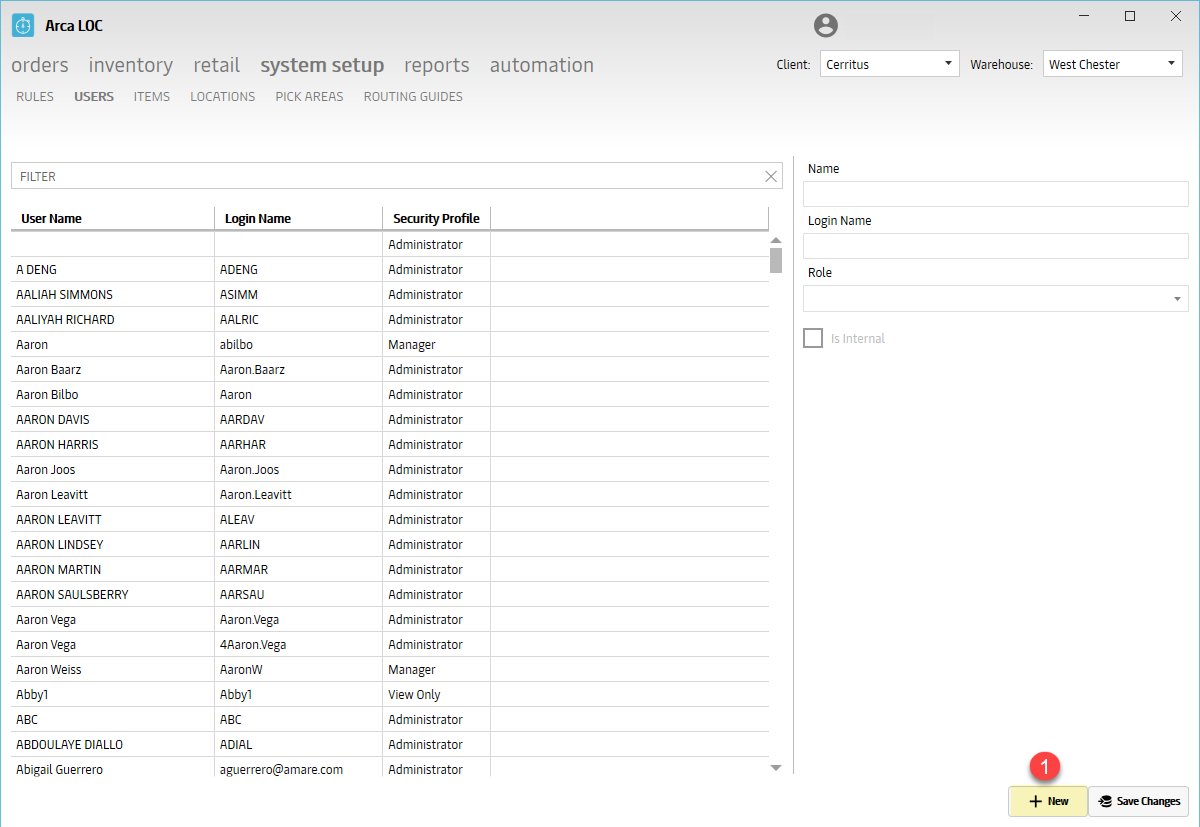
- Create the USERNAME and PASSWORD, then click OK.

- Review, and/or update, the following fields:
- Name - the end-user's name
- Login Name - the end-user's personal login name
- Role - the end-user's working role; select an option from the pull-down menu, ie. Administrator, Client, CSR, Manager, etc.
- Internal - ability to toggle ON/OFF if the end-user is an internal user, or employee
- Click SAVE CHANGES before you exit.
API Calls
- UserClientListGet
- UserLogin
- UsersGet
- UsersGetAll
- UsersSave
Items
The "Items" portion of ARCA LOC System Setup is designed to display item information for orders, including pictures and relevant descriptive information. You will be able to search for item, edit items or add a brand new item, manually or with a .csv file upload.
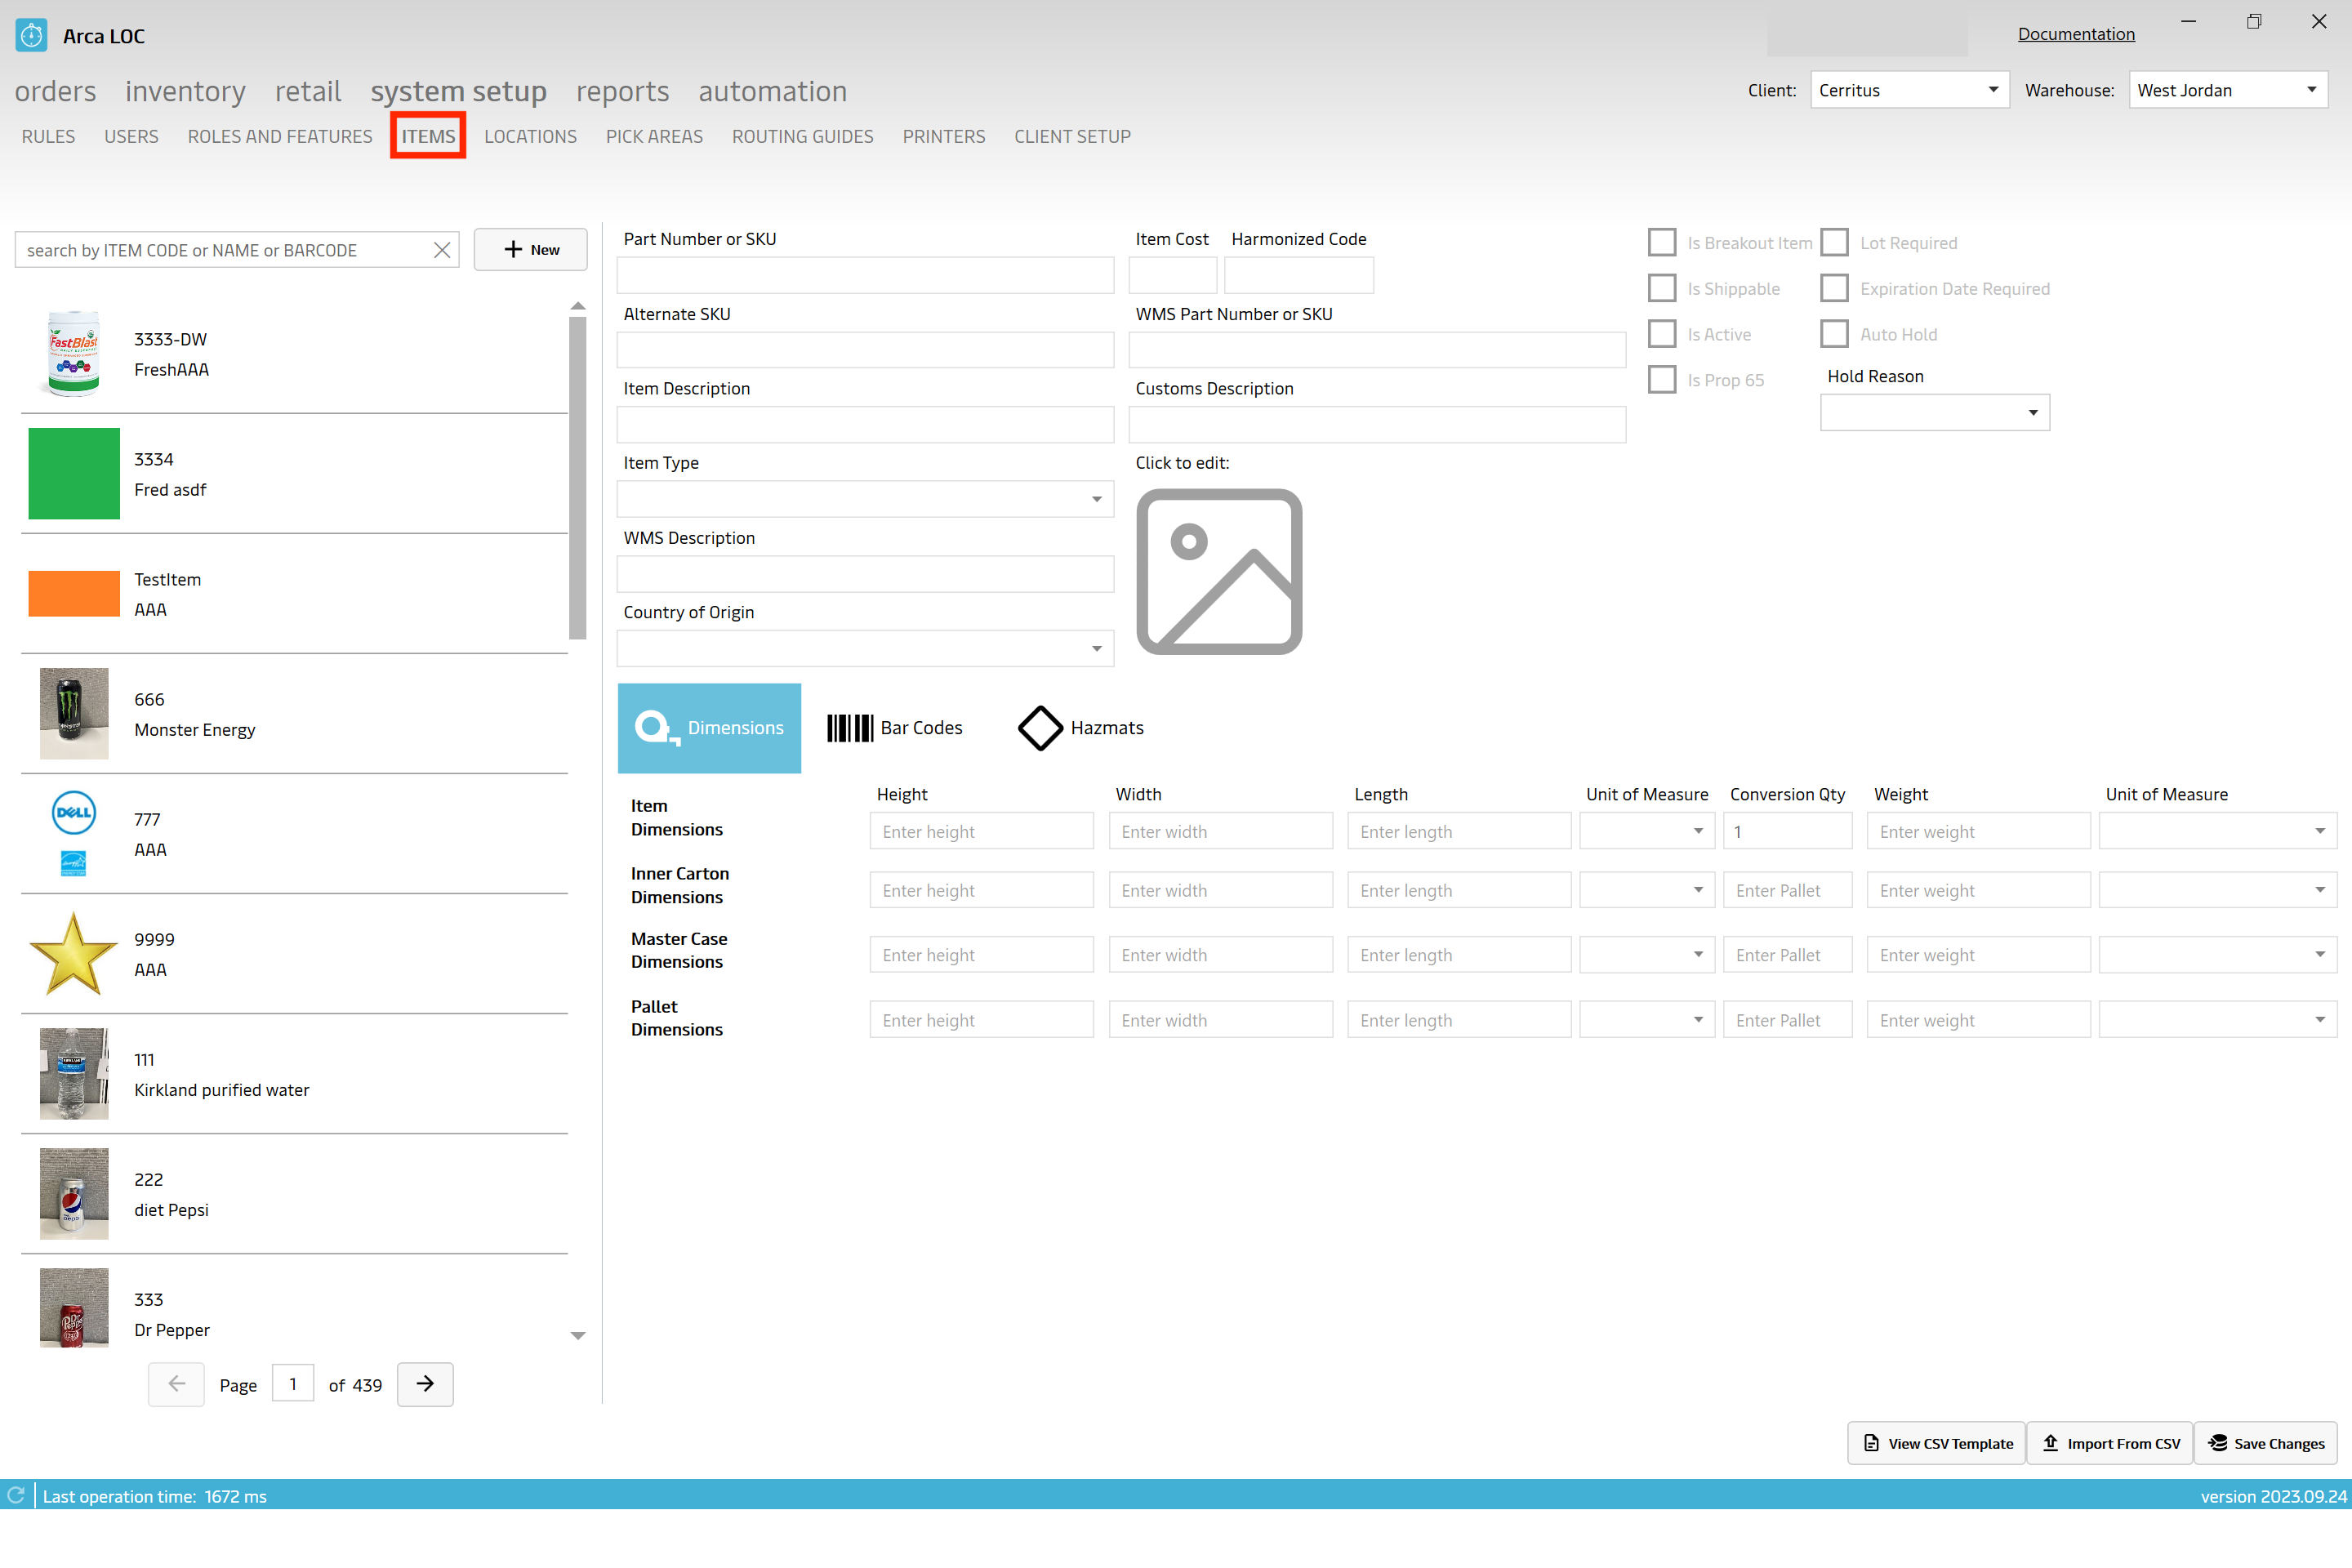
Find an Item
To find an item, you may search using the following criteria:
- Item Code - customer part number
- Name - customer item name
- Barcode - customer item UPC
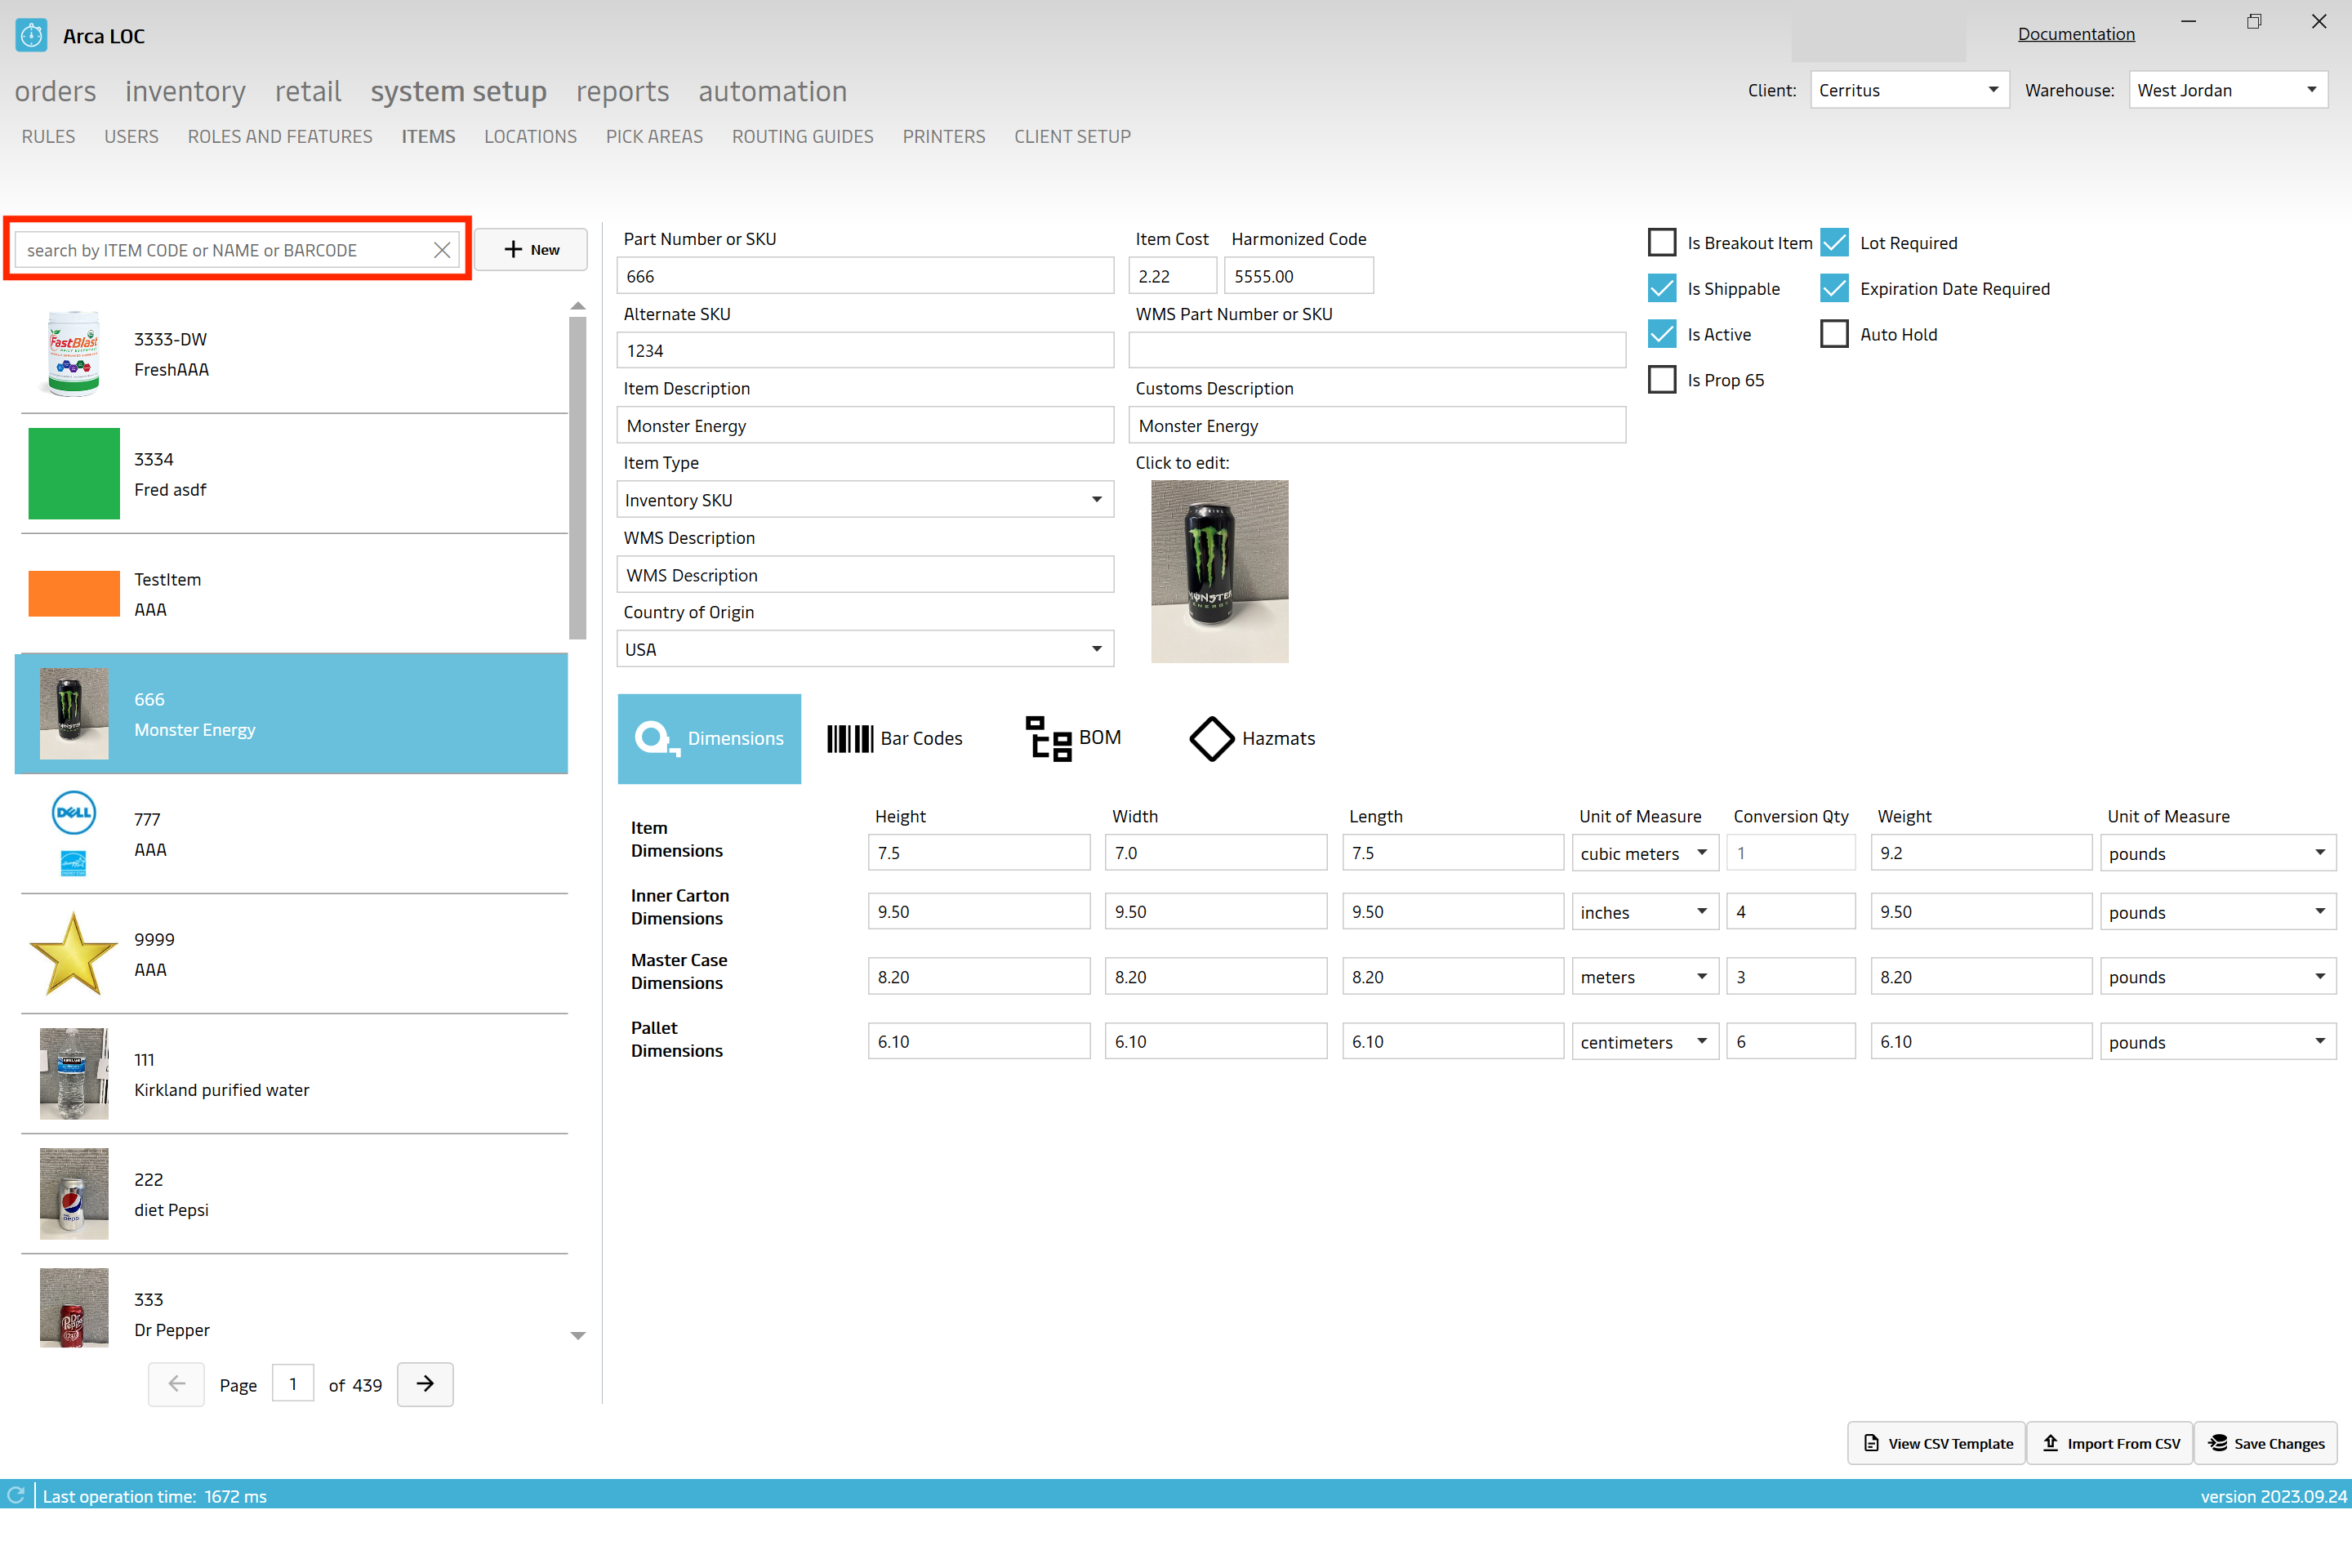
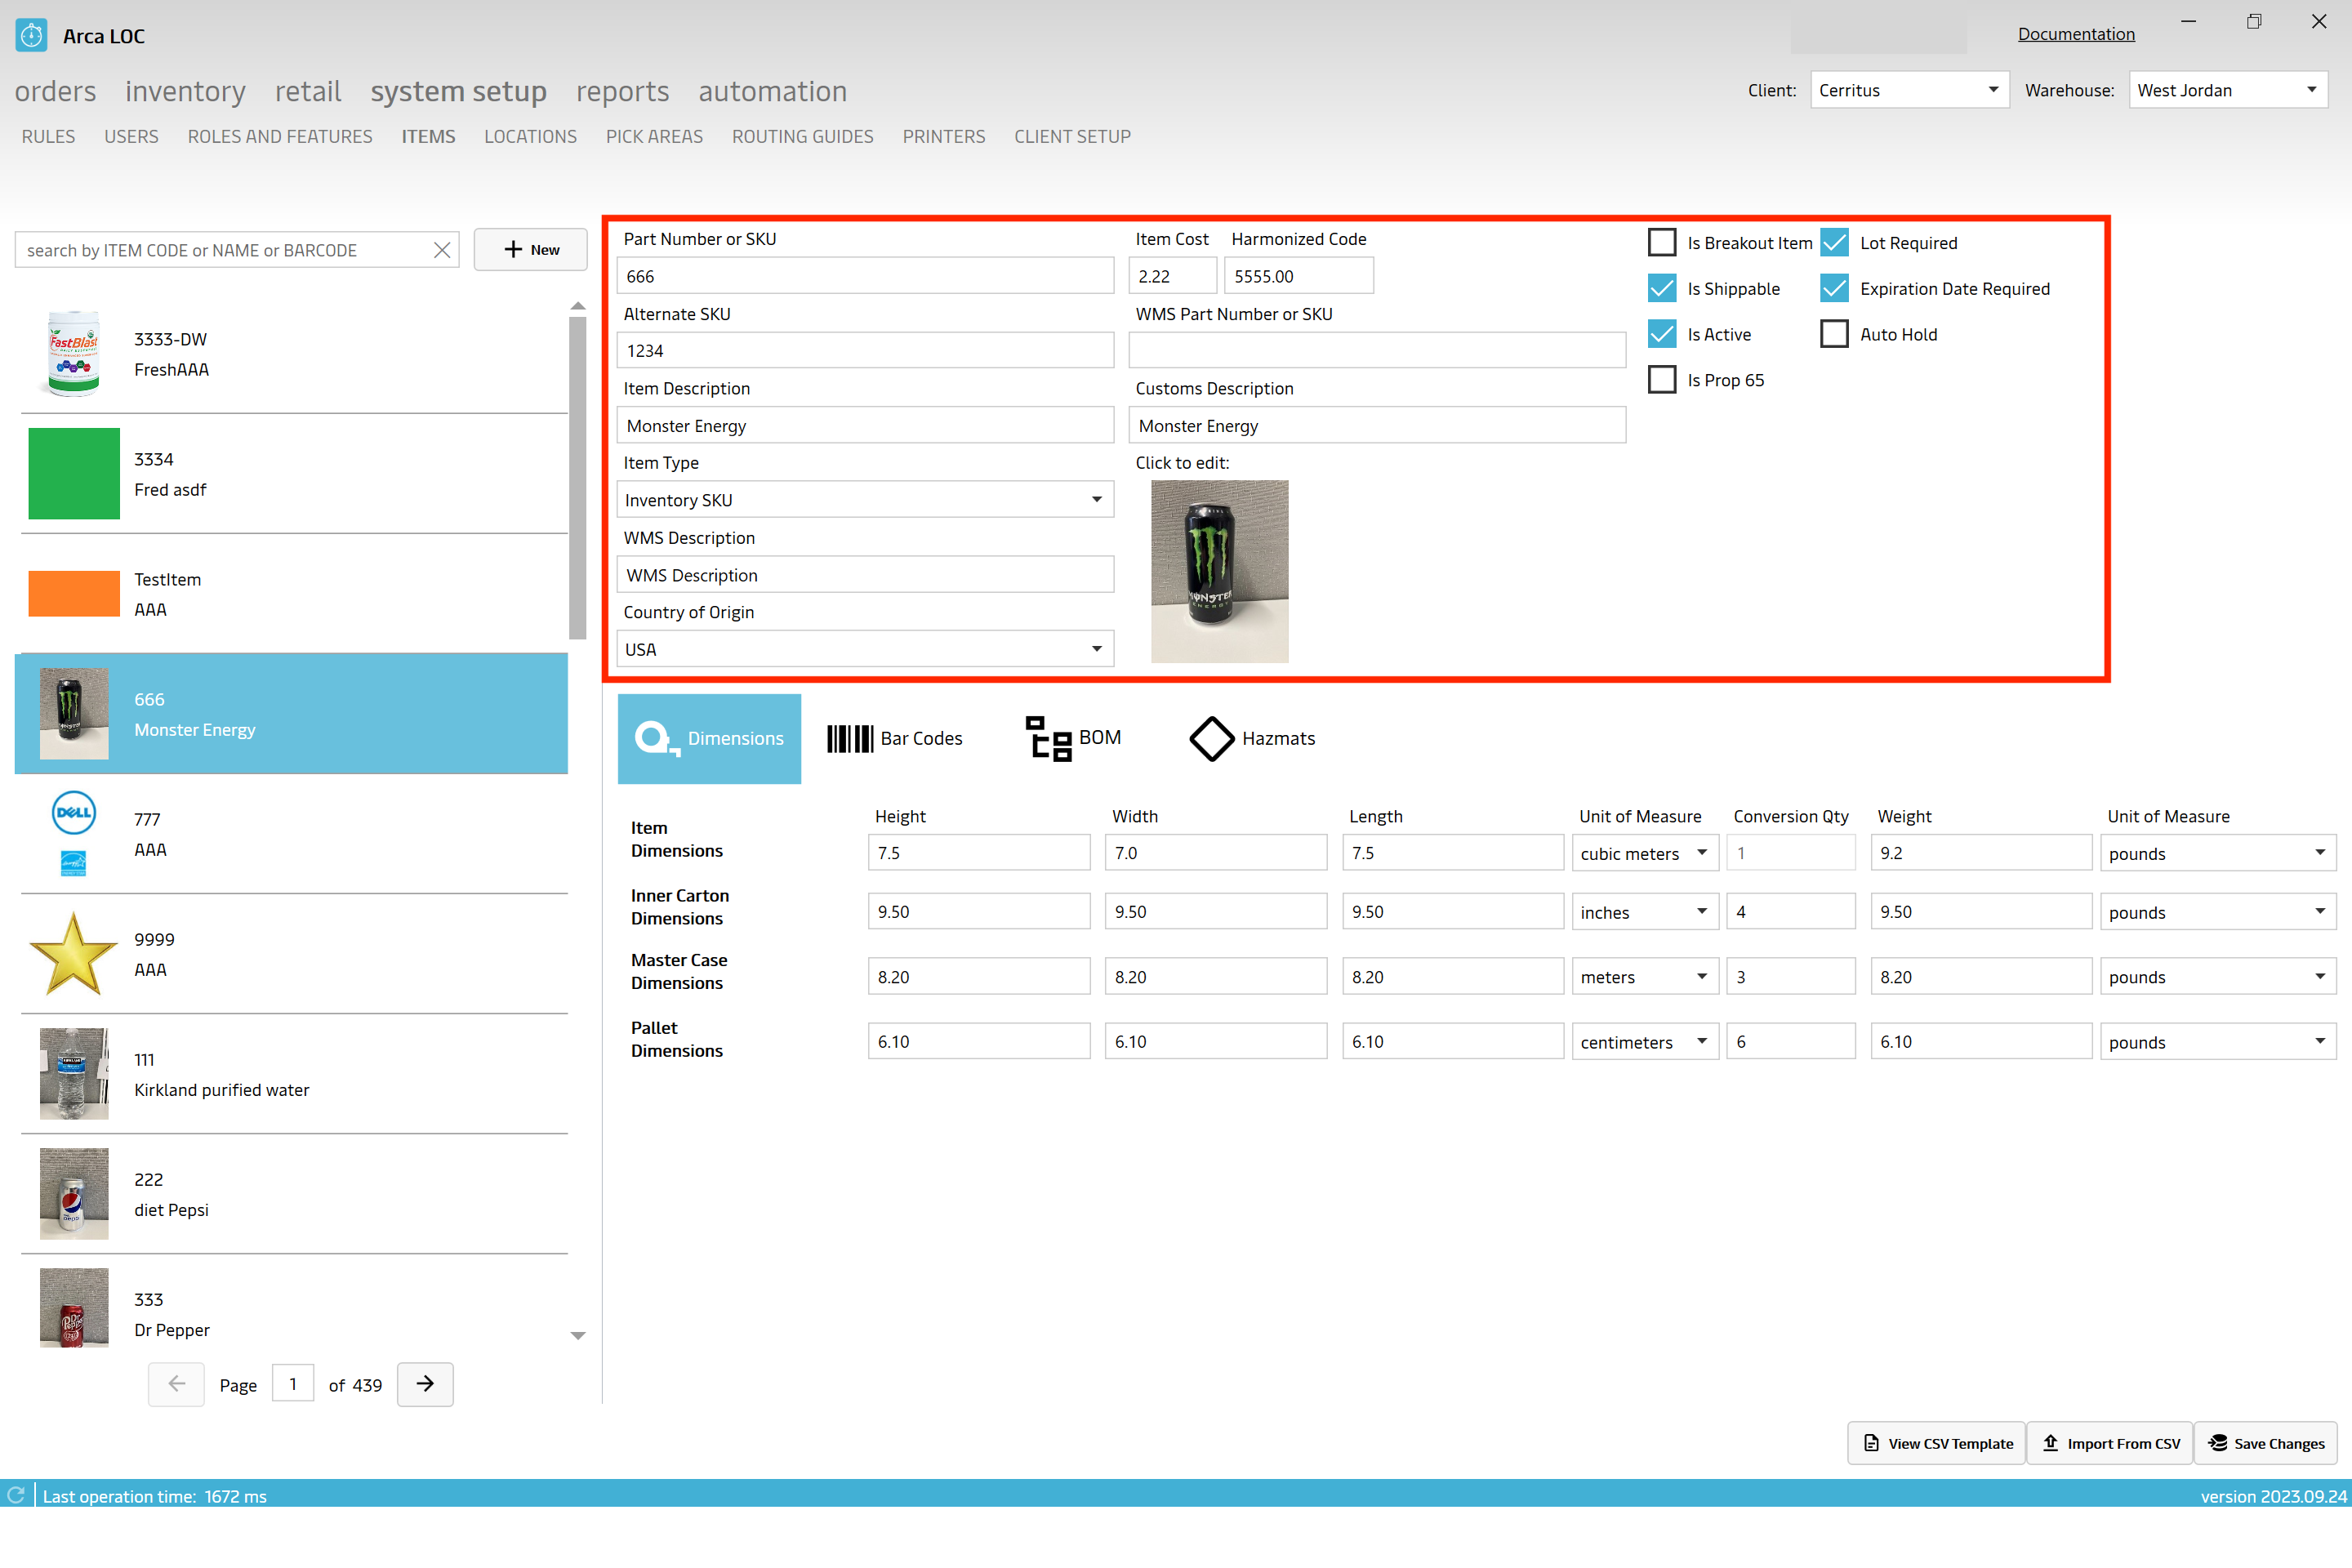
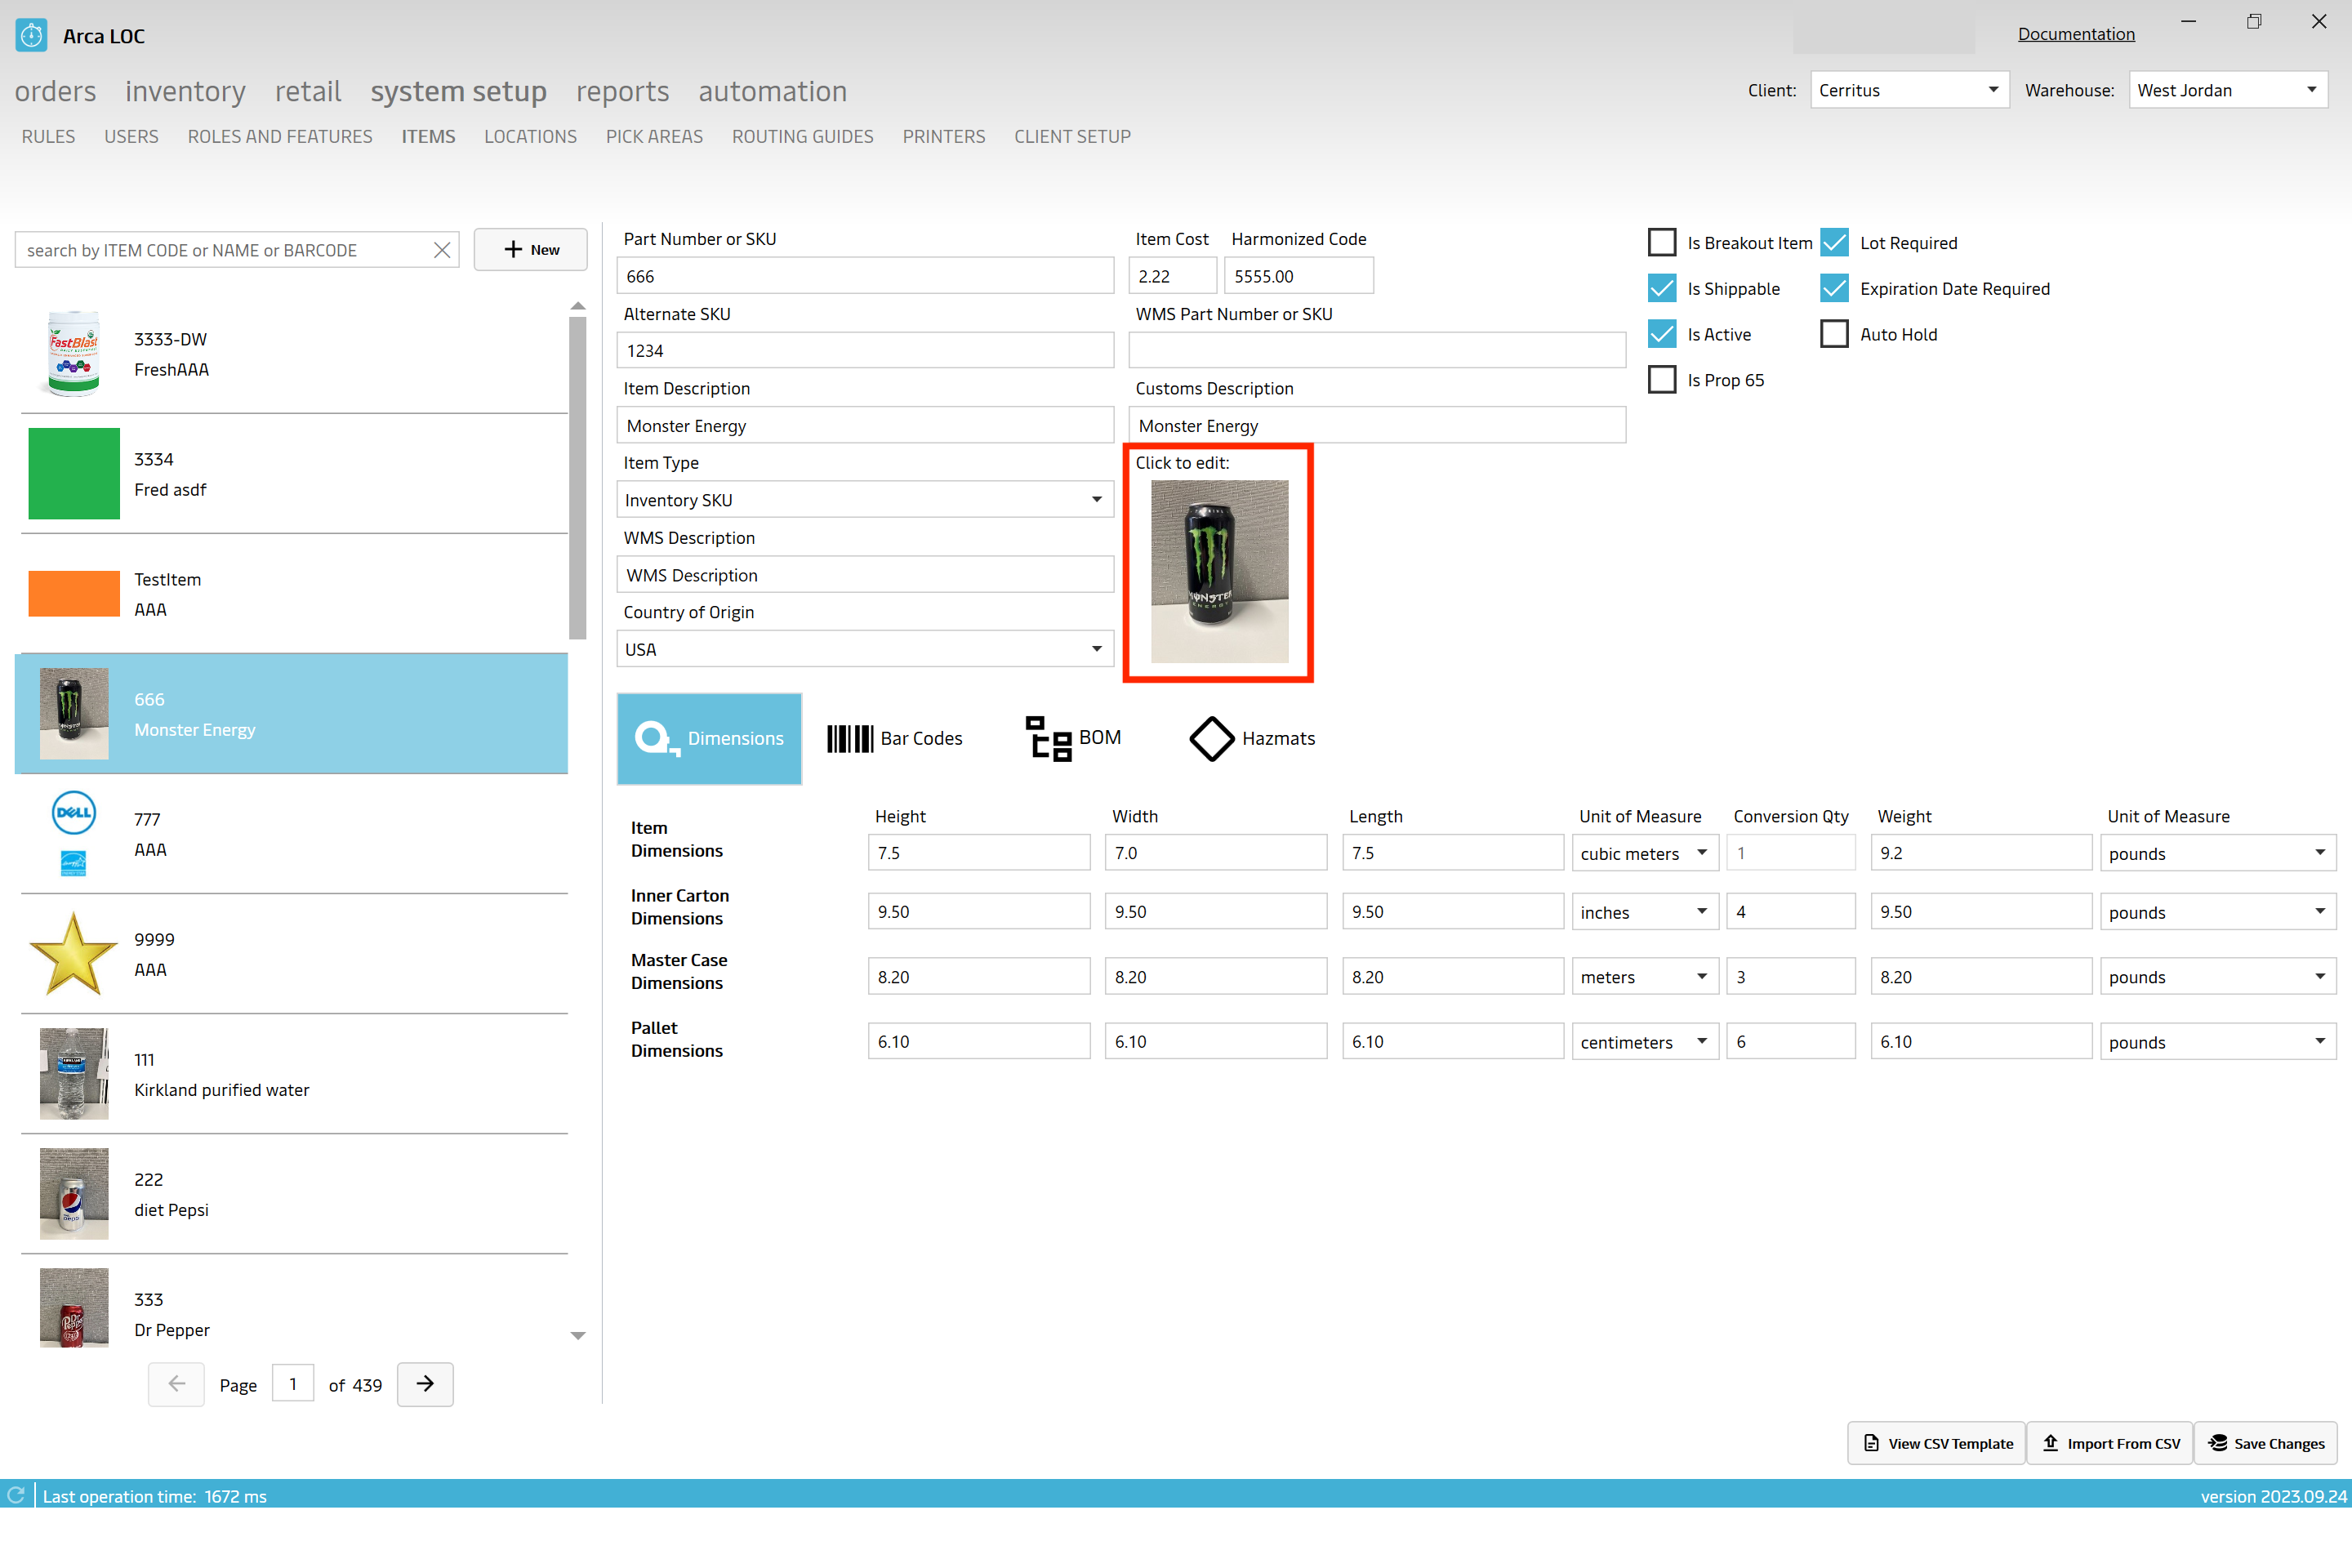
Item Details
Once an item is selected, you will be able to view the item details - see the following fields below:
- Part Number or SKU - The SKU stands for “stock keeping unit” and is a number (usually eight alphanumeric digits) that retailers assign to products to keep track of stock levels.
- Item Description - The customer item description
- Item Type - Defines the group type determined by the item attribute or purpose, ie. Inventory SKU, Insert, Service, Promotional, etc.
| Item Type | Description |
|---|---|
| Stocked Kit | Pre-assembled kits that are kept in inventory and ready for immediate fulfillment. |
| Non-Stocked Kit | Kits that are assembled on demand, not kept in inventory. |
| Inventory SKU | Unique identifiers for each item in the inventory, used for tracking and management. |
| Raw Material | Basic materials used to create products or kits. |
| Insert | Additional materials included in packages, such as promotional flyers or instruction manuals. |
| Box | Items of this type will appear in the box selection drop-down menu inside of the Arca Pack app. |
| Third Party Item | Products sourced from external suppliers and included in the inventory. *Excluded from order processing. |
| Virtual Kit | A collection of items that are grouped together for sale but not physically assembled until ordered. *Excluded from order processing. |
WMS Description - warehouse item description
Harmonized Code - A Harmonized Commodity Description and Coding System (HS Code) is a code used to describe merchandise that is shipped internationally.
Country of Origin - The country of origin refers to the destination from which the goods are being imported or simply the country of manufacture, production, or growth where the goods comes from.
Item Cost - The Item Cost is what a retailer owes a supplier for an item the retailer has sold and needs fulfilled to its customer. The Item Cost is also the basis for setting the retail price.
Weight - The weight of an item/product without the addition of the packaging or container weight.
Discontinued Date - The date that the availability of the product was discontinued; no longer available or produced.
Alternate SKU - An alternative product definition, name, image, description, etc., for an existing inventory item. An alternate SKU creates a secondary SKU for an existing inventory item keeping the same product definition.
WMS Part Number or SKU - The warehouse stock keeping unit that is assigned to products to keep track of internal stock levels.
Customs Description - item description given by custom authorities
Order Quantity Limit - The order quantity limit is the maximum number of units allowed to be purchased at one time.
Order Quantity Interval - Order interval is the minimum time interval (in days or hours) between two successive planned orders.
Case Quantity - Case Quantity can be used on Wholesale orders, similar to the Case Quantity on purchase orders. Purchasing by case means you can buy quantities by the case from a vendor and sell those products as individual units
Box Quantity - Box Quantity is the quantity in one box. For example, if the item has 48 units in one case, and the minimum order number is 1 case, the pack quantity should be 48 and standard packing should be 1.
Pallet Quantity - The quantity of items stored on a pallet. A pallet is a flat transport structure made of wood or plastic (and in a few cases metal) which can support a variety of goods in a stable fashion while being lifted by any mobile forklift device. The goods are placed on top of the pallet, and can be secured to it by straps or stretch-wrapped plastic film.
Height - the measurement from base to top.
Length - the measurement or extent of something from end to end.
Width - the measurement or extent of something from side to side.
Click Save Changes to save any changes.
Add/Edit Image
To add or edit an image, click on the field to upload an image file (BMP, JPG, PNG):
Additional Settings
There are additional settings that can be toggled ON/OFF:
Do not allow to import: need definition
Is Breakout item: need definition
Is Shippable: This flag determines if an item is shippable or not. If the flag is turned off, then new orders containing this item will not be imported into Arca and any active orders containing this item will fail to ship confirm.
Is Active: item active in system and able to be sold
Is Prop 65: Prop 65 is intended to provide California residents with information about compounds in the environment around them that might be harmful (i.e. have been linked to cancer, reproductive harm, or developmental defects). A sticker will need placed on the shipping carton.
Click Save Changes to save changes.
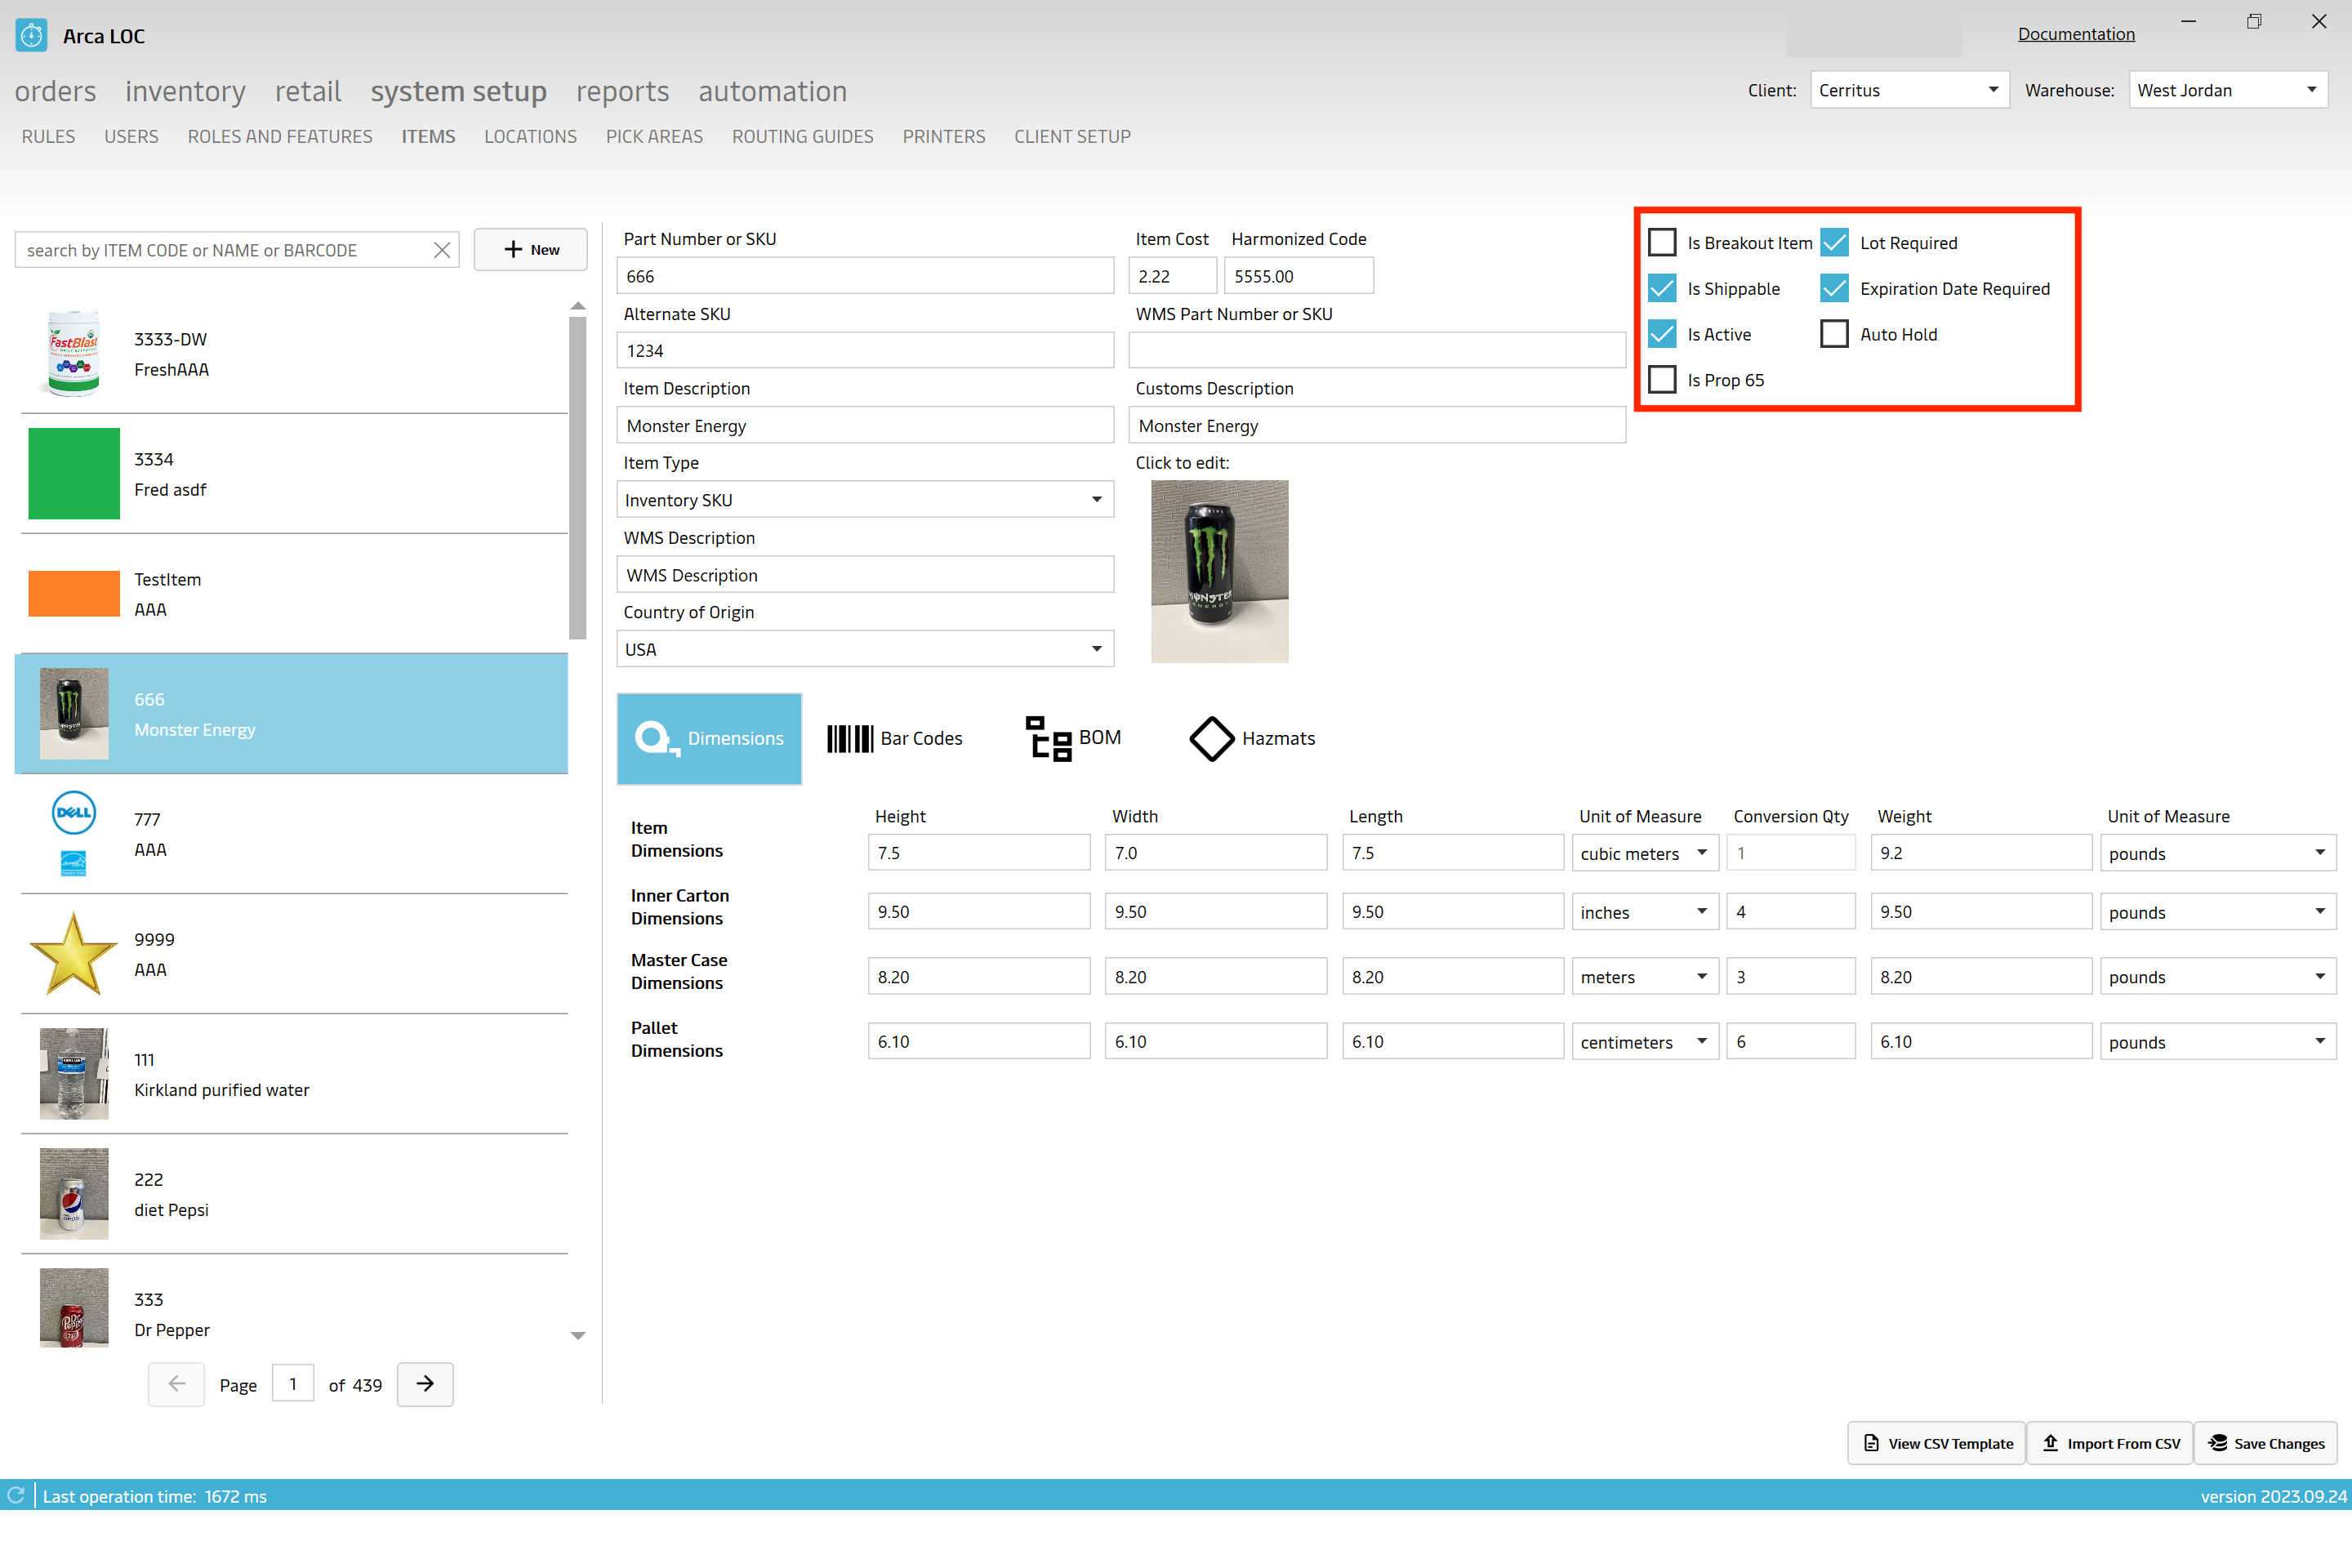
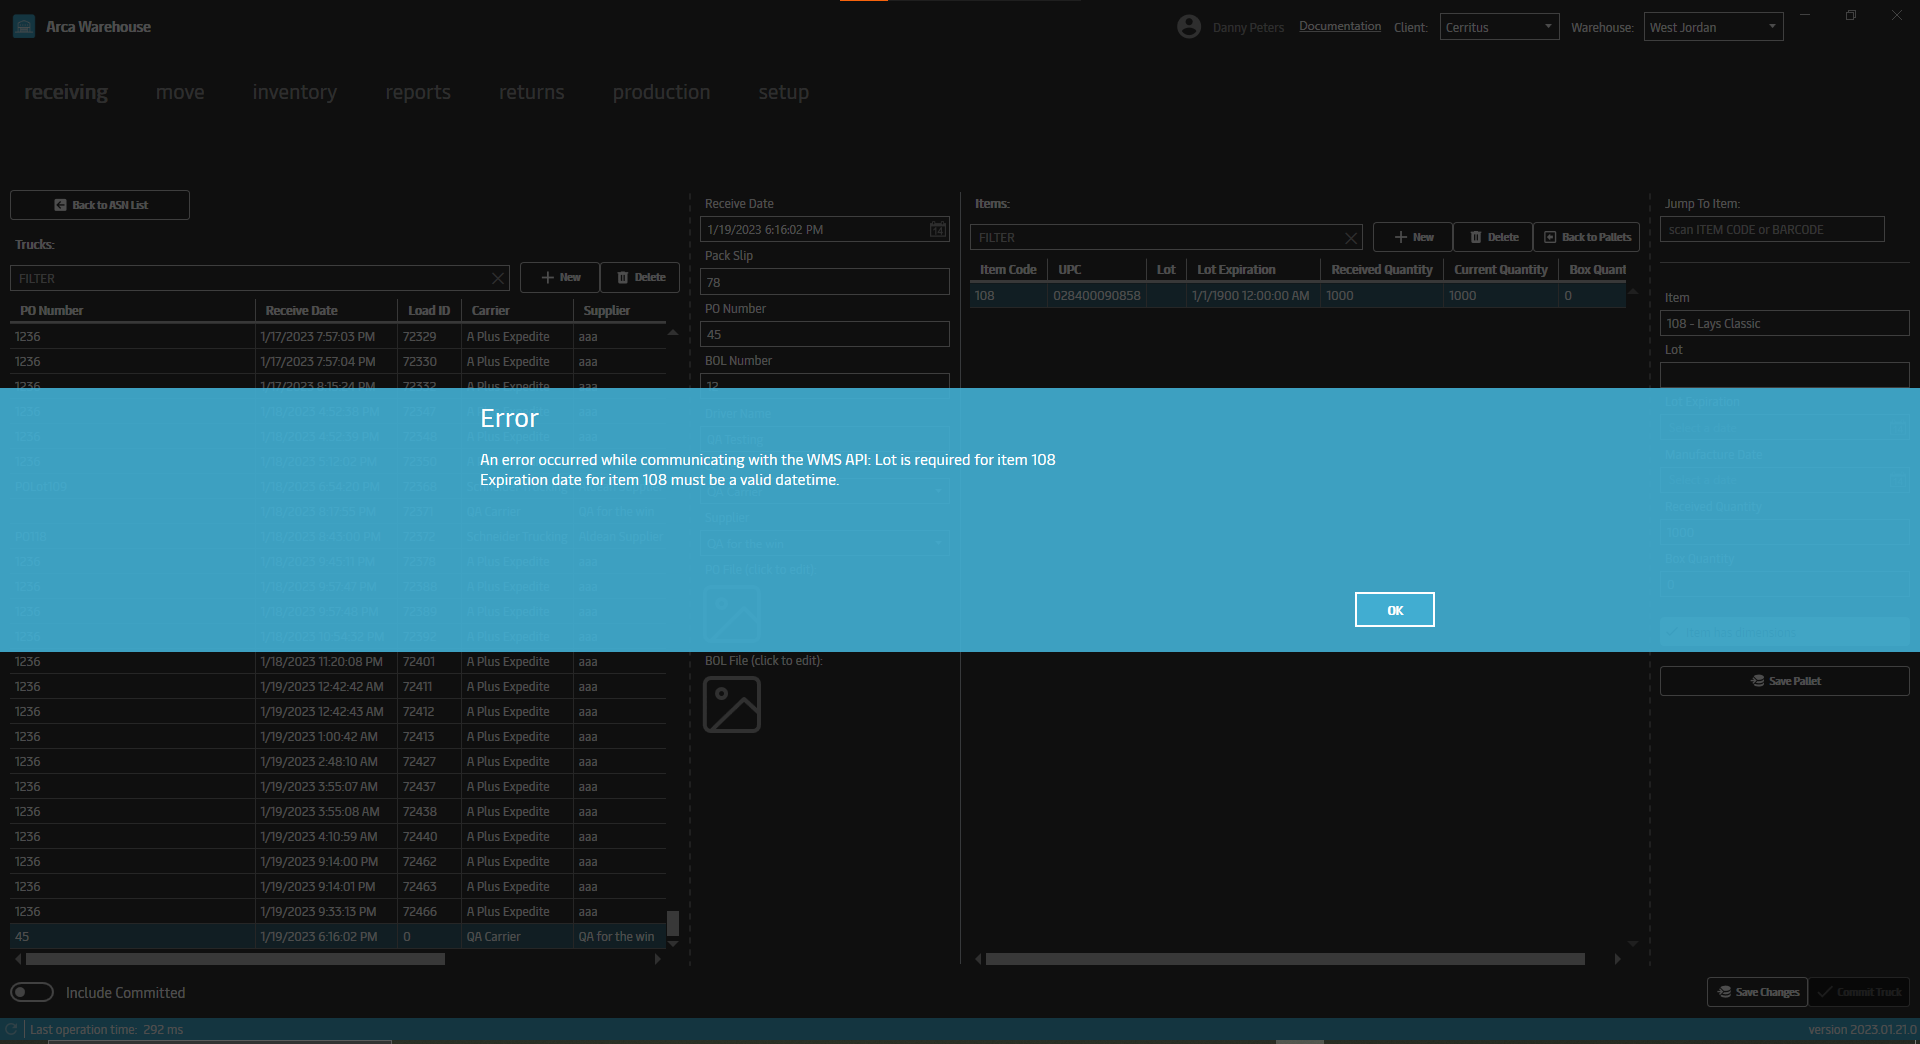
Check Boxes for Lot Control
On the Item screen we’ve added a few new check box items that are designed around lot control. Lot required, expiration date required and item auto hold reason. If lot required is checked, then when you’re doing a truck receive a user is required to enter the lot number for this item. Same for expiration required, you will not be allowed to save/commit a truck receive to inventory without entering an expiration date for the lot. New error messages will be displayed telling the user which item is missing either lot, expiration date or both. Auto hold reason comes with a new drop-down menu to select a hold reason from; Bad, Damaged, Quarantined or Reserved. If the item you’re receiving is marked as auto hold and the reason is Bad, then when a user is committing a truck receive to inventory the pallet with that item will automatically default to a pallet status of quarantine. We have used the pallet status quarantine to umbrella all of the ‘not good’ items. So an auto hold reason of bad or damaged will also result in your pallet defaulting to a pallet status of quarantined. This is because there really shouldn’t be a situation where pallet status’ are Bad or Damaged, quarantine will cover them all.

Barcodes
To add, edit or delete a barcode click on the "Bar Codes" icon.
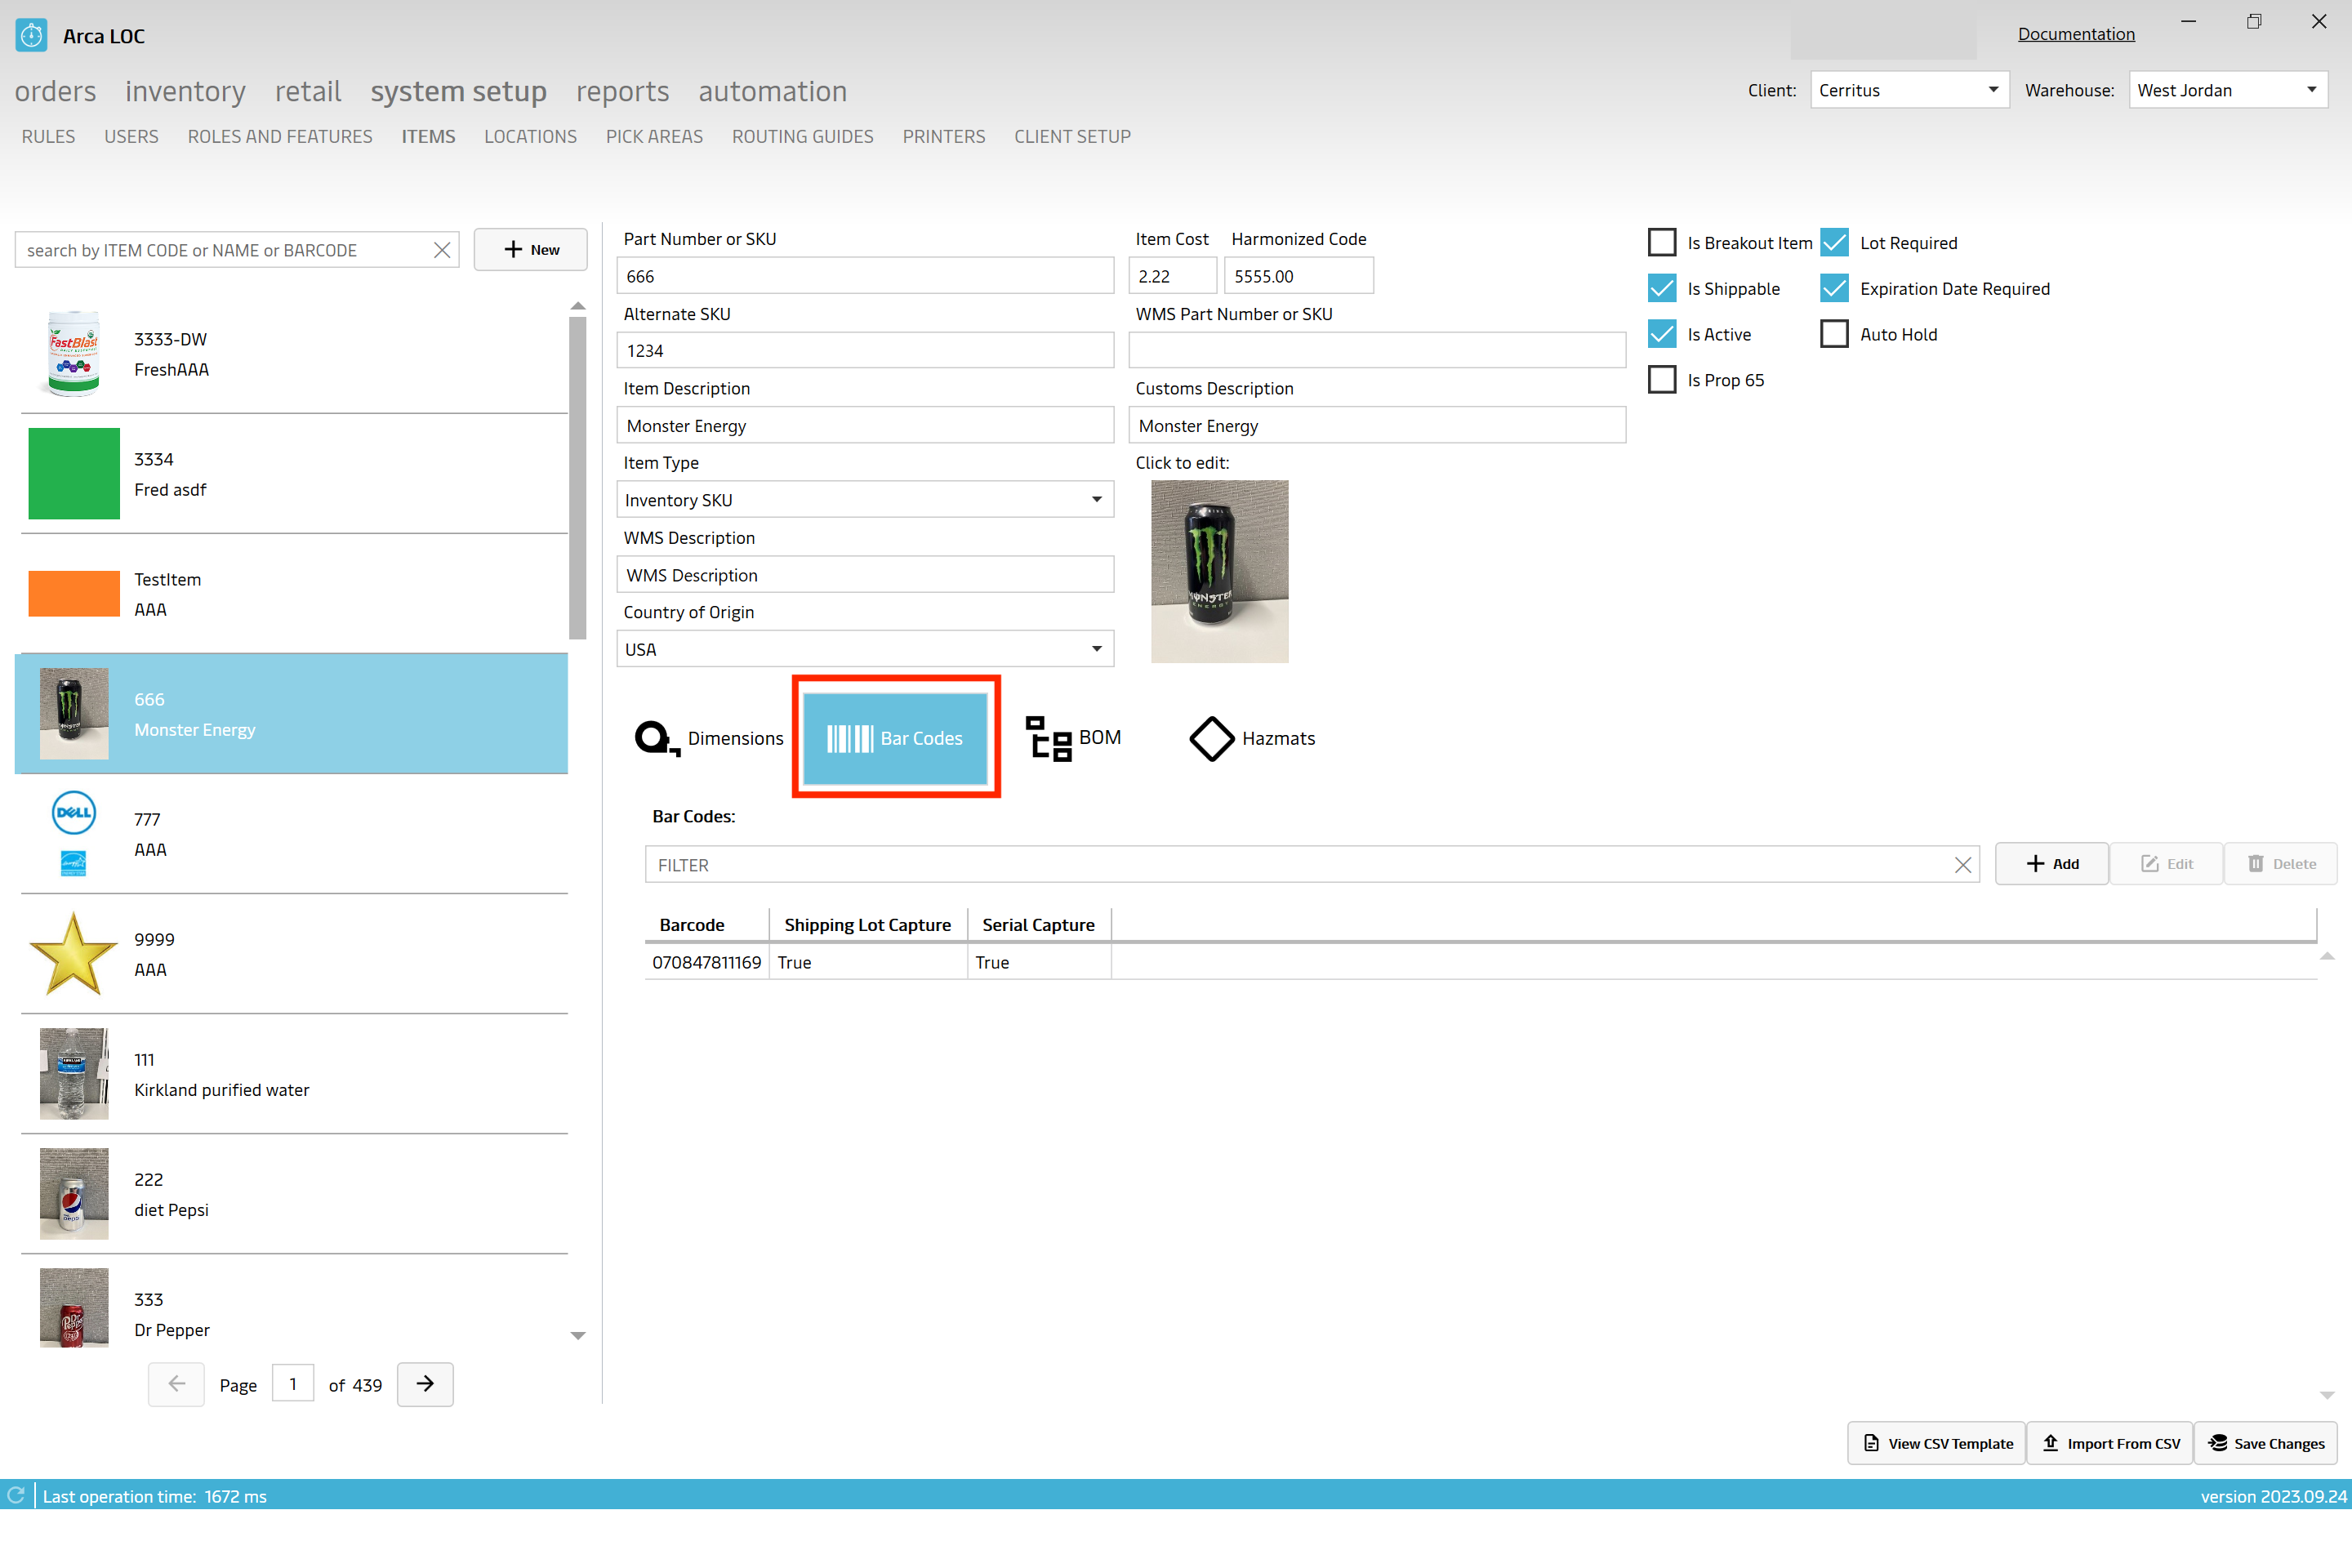
Find barcode
To find a barcode, you may search using the following criteria:
- Barcode - partial or full numeric search based on barcode number
- Serial Capture - True or False only
- Lot Capture - True or False only
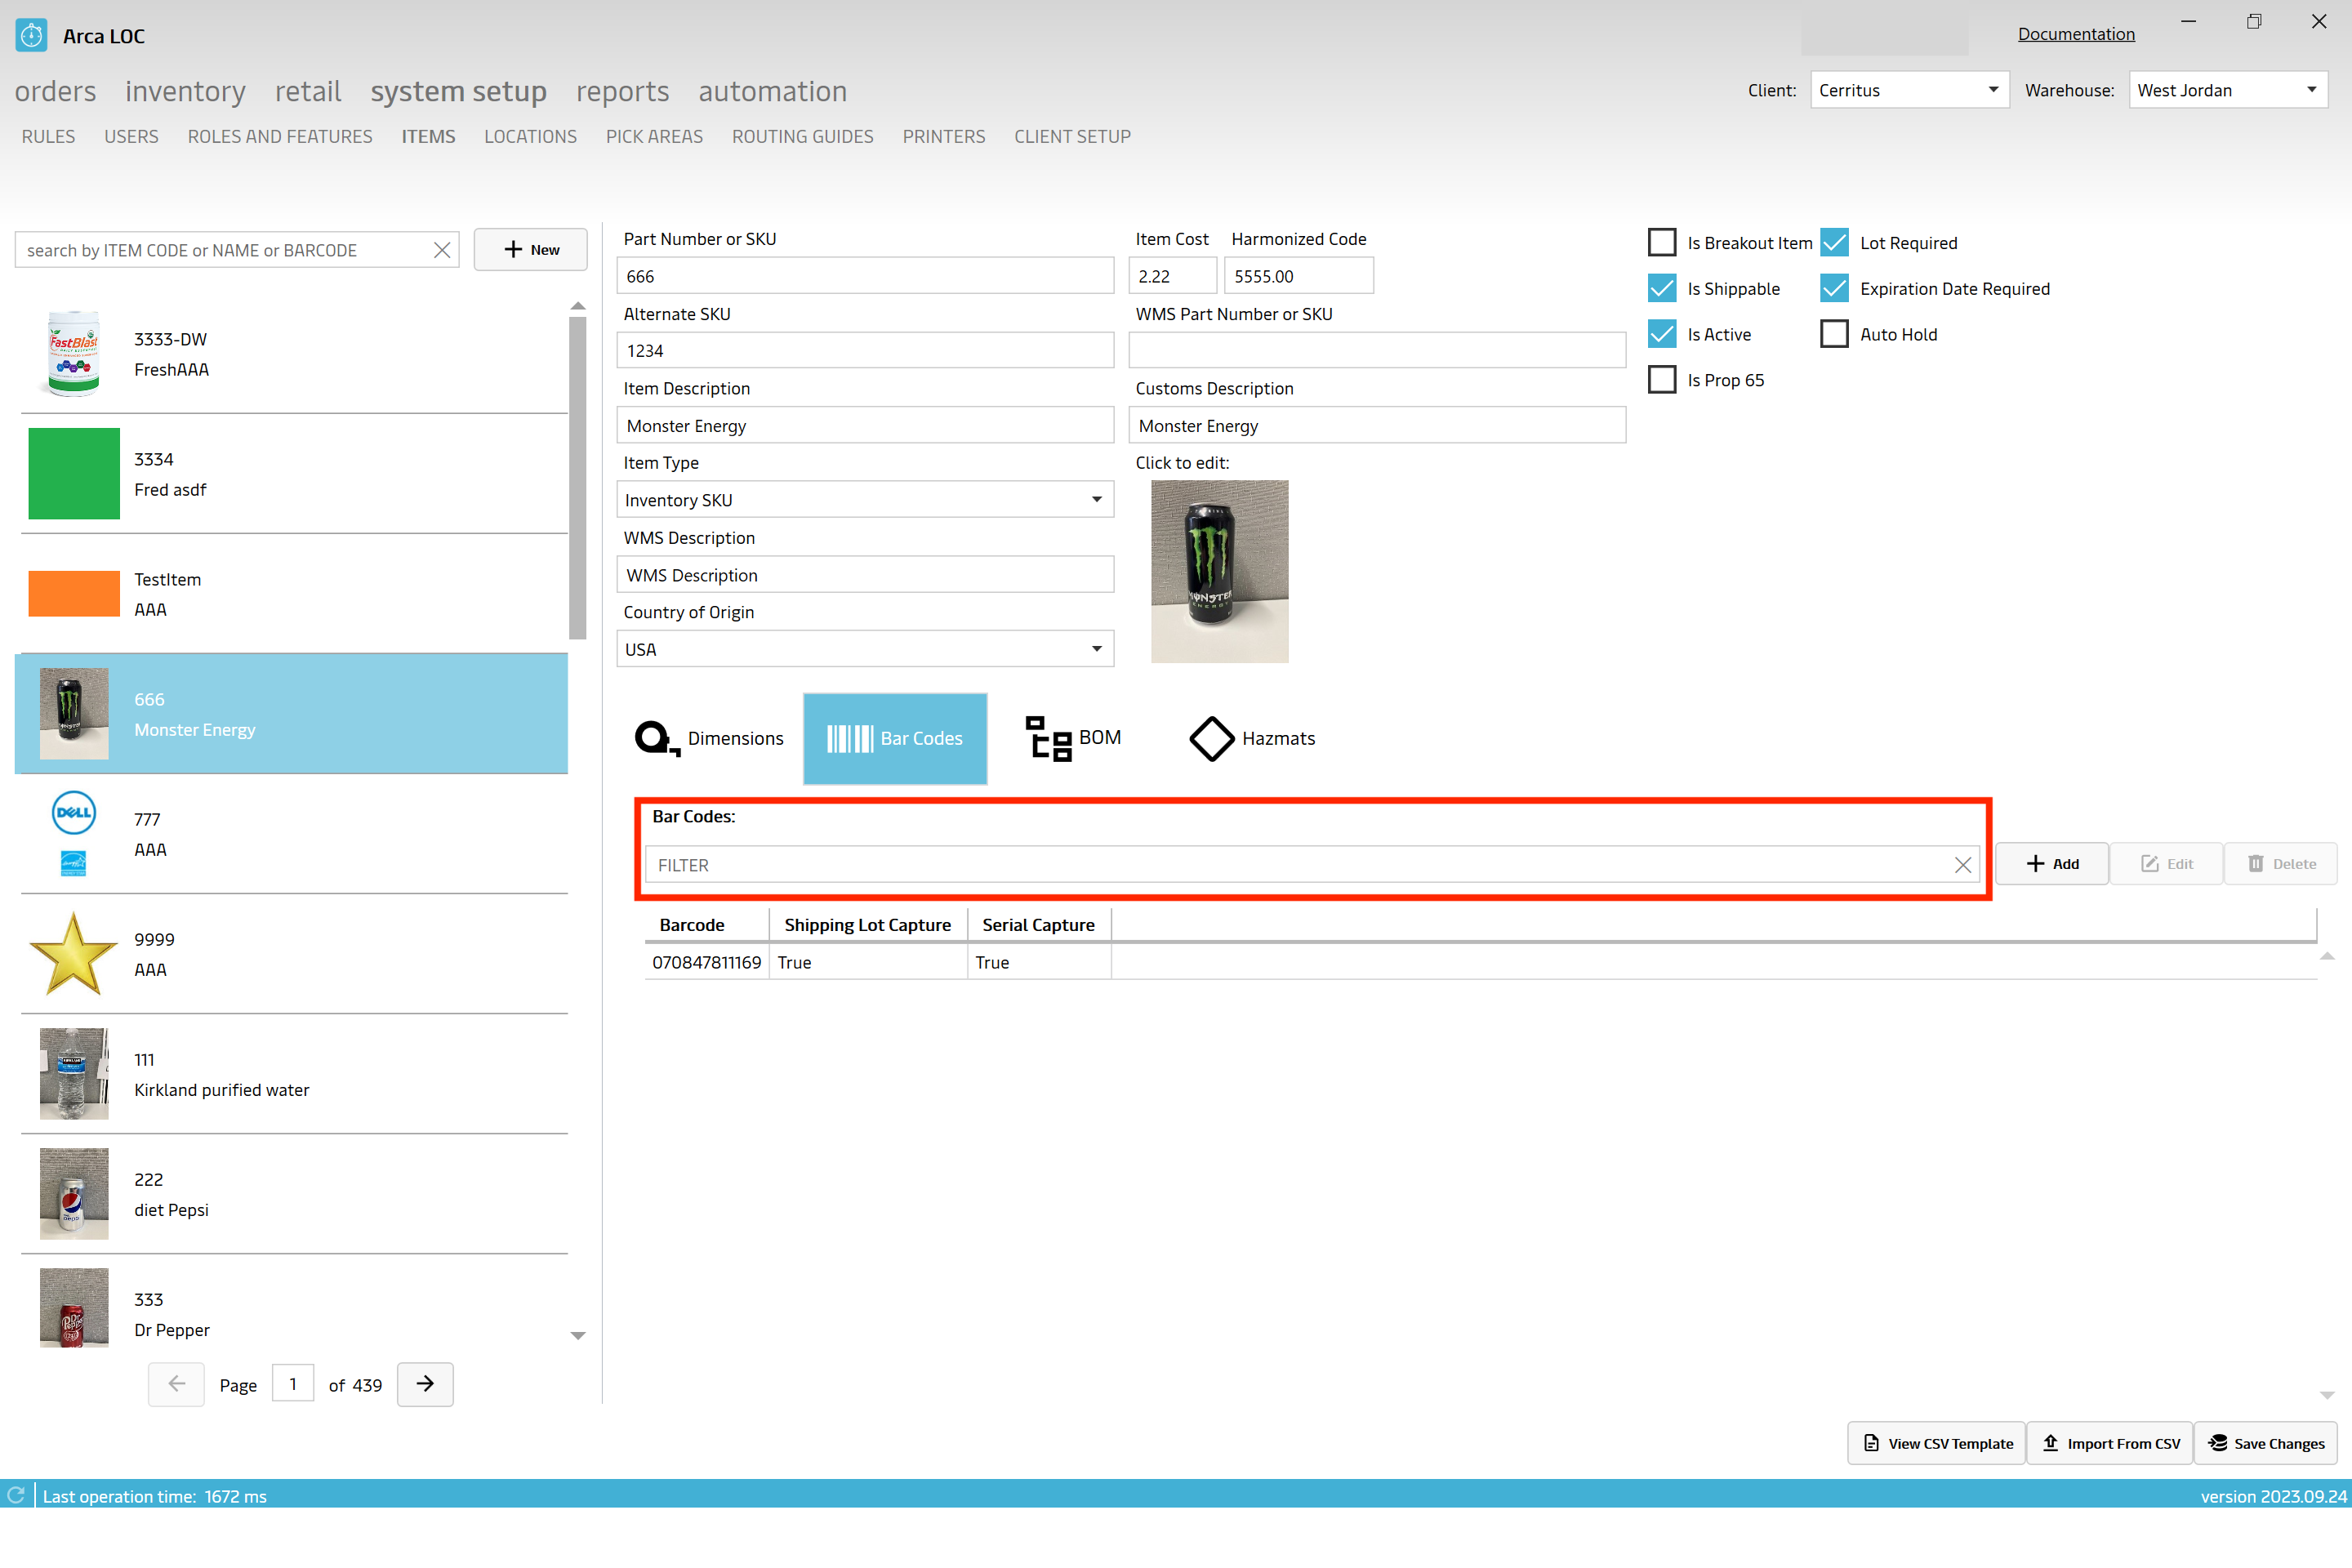
Add Barcodes
To add a new barcode, click on the icon marked "+Add".
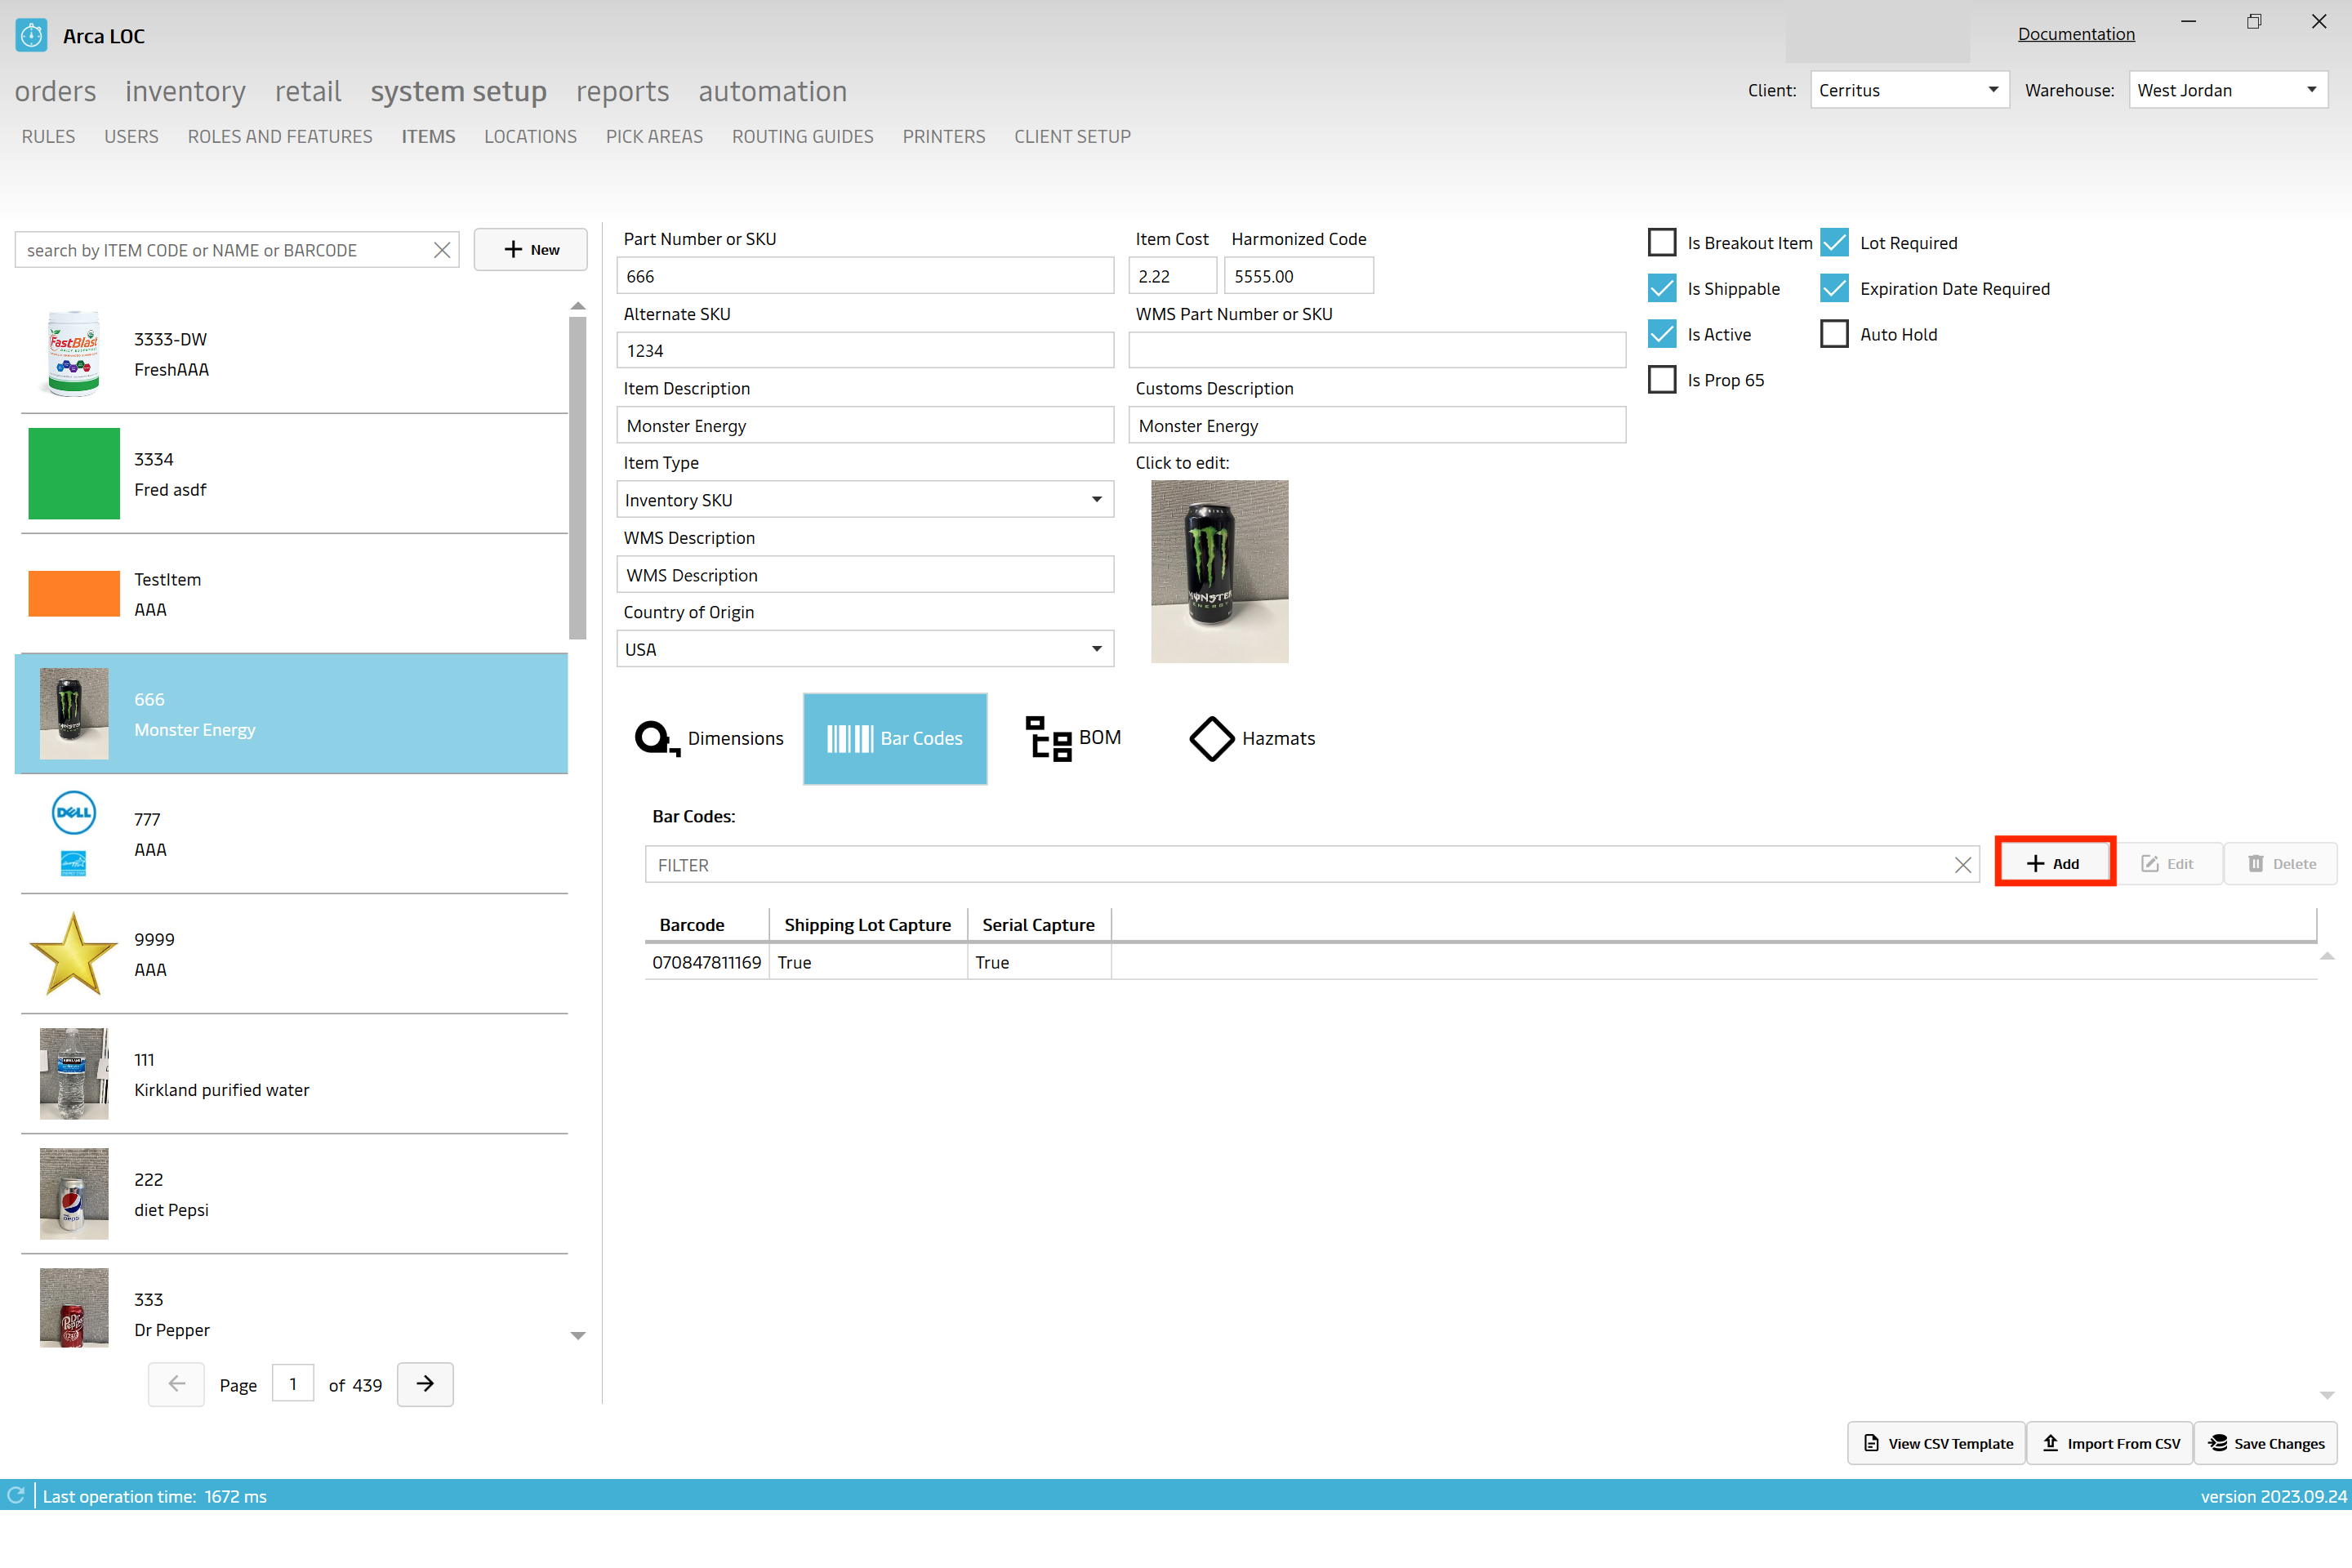
Once the barcode screen loads, you may populate the following criteria:
- Barcode - Populate the item barcode, in which to use for item scanning
- Serial Capture - Mark parameter TRUE to capture the serial number during item scanning, or FALSE to not capture
- Lot Capture - Mark parameter TRUE to capture the lot number during item scanning, or FALSE to not capture.
- Item Serial Mask - Mark parameter TRUE to capture the item serial mask during item scanning, or FALSE to not capture. When scanning this will capture the barcode as the prefix along with any additional digits. All item serial mask captures must start with the barcode saved under the items setup.
- Click DONE to complete the barcode setup
- Click EDIT to edit any of the 3 fields above
- Click Delete to remove a barcode, this will be done 1 at a time
- Click Save Changes to save changes
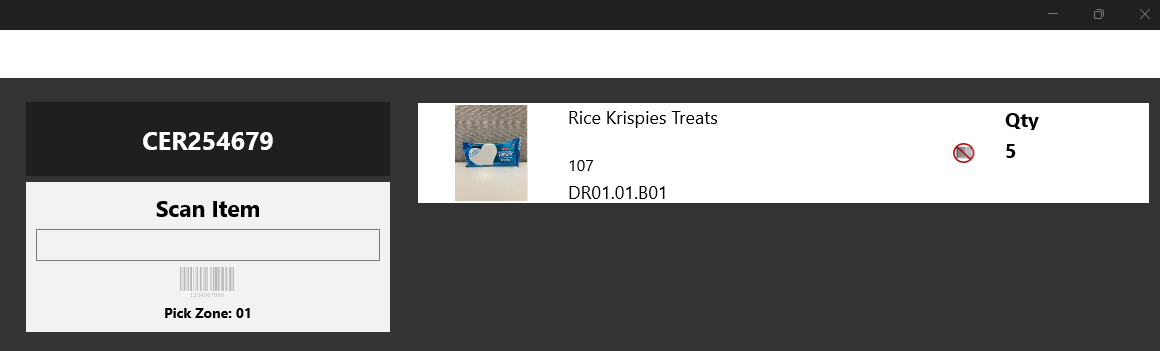
Non-Barcoded
A barcode is not required to save an Item. Items that do not have a barcode setup will be displayed with a no barcode symbol in the Arca Pick app. To pick these items, the user will tap on the item using the touch screen at the station to select that item and pick it from the list.
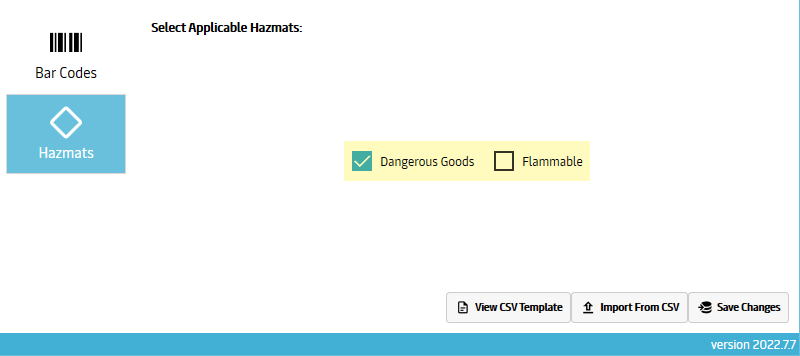
Hazmats
To mark an item as a Hazmat item, click on the icon marked "Hazmats".
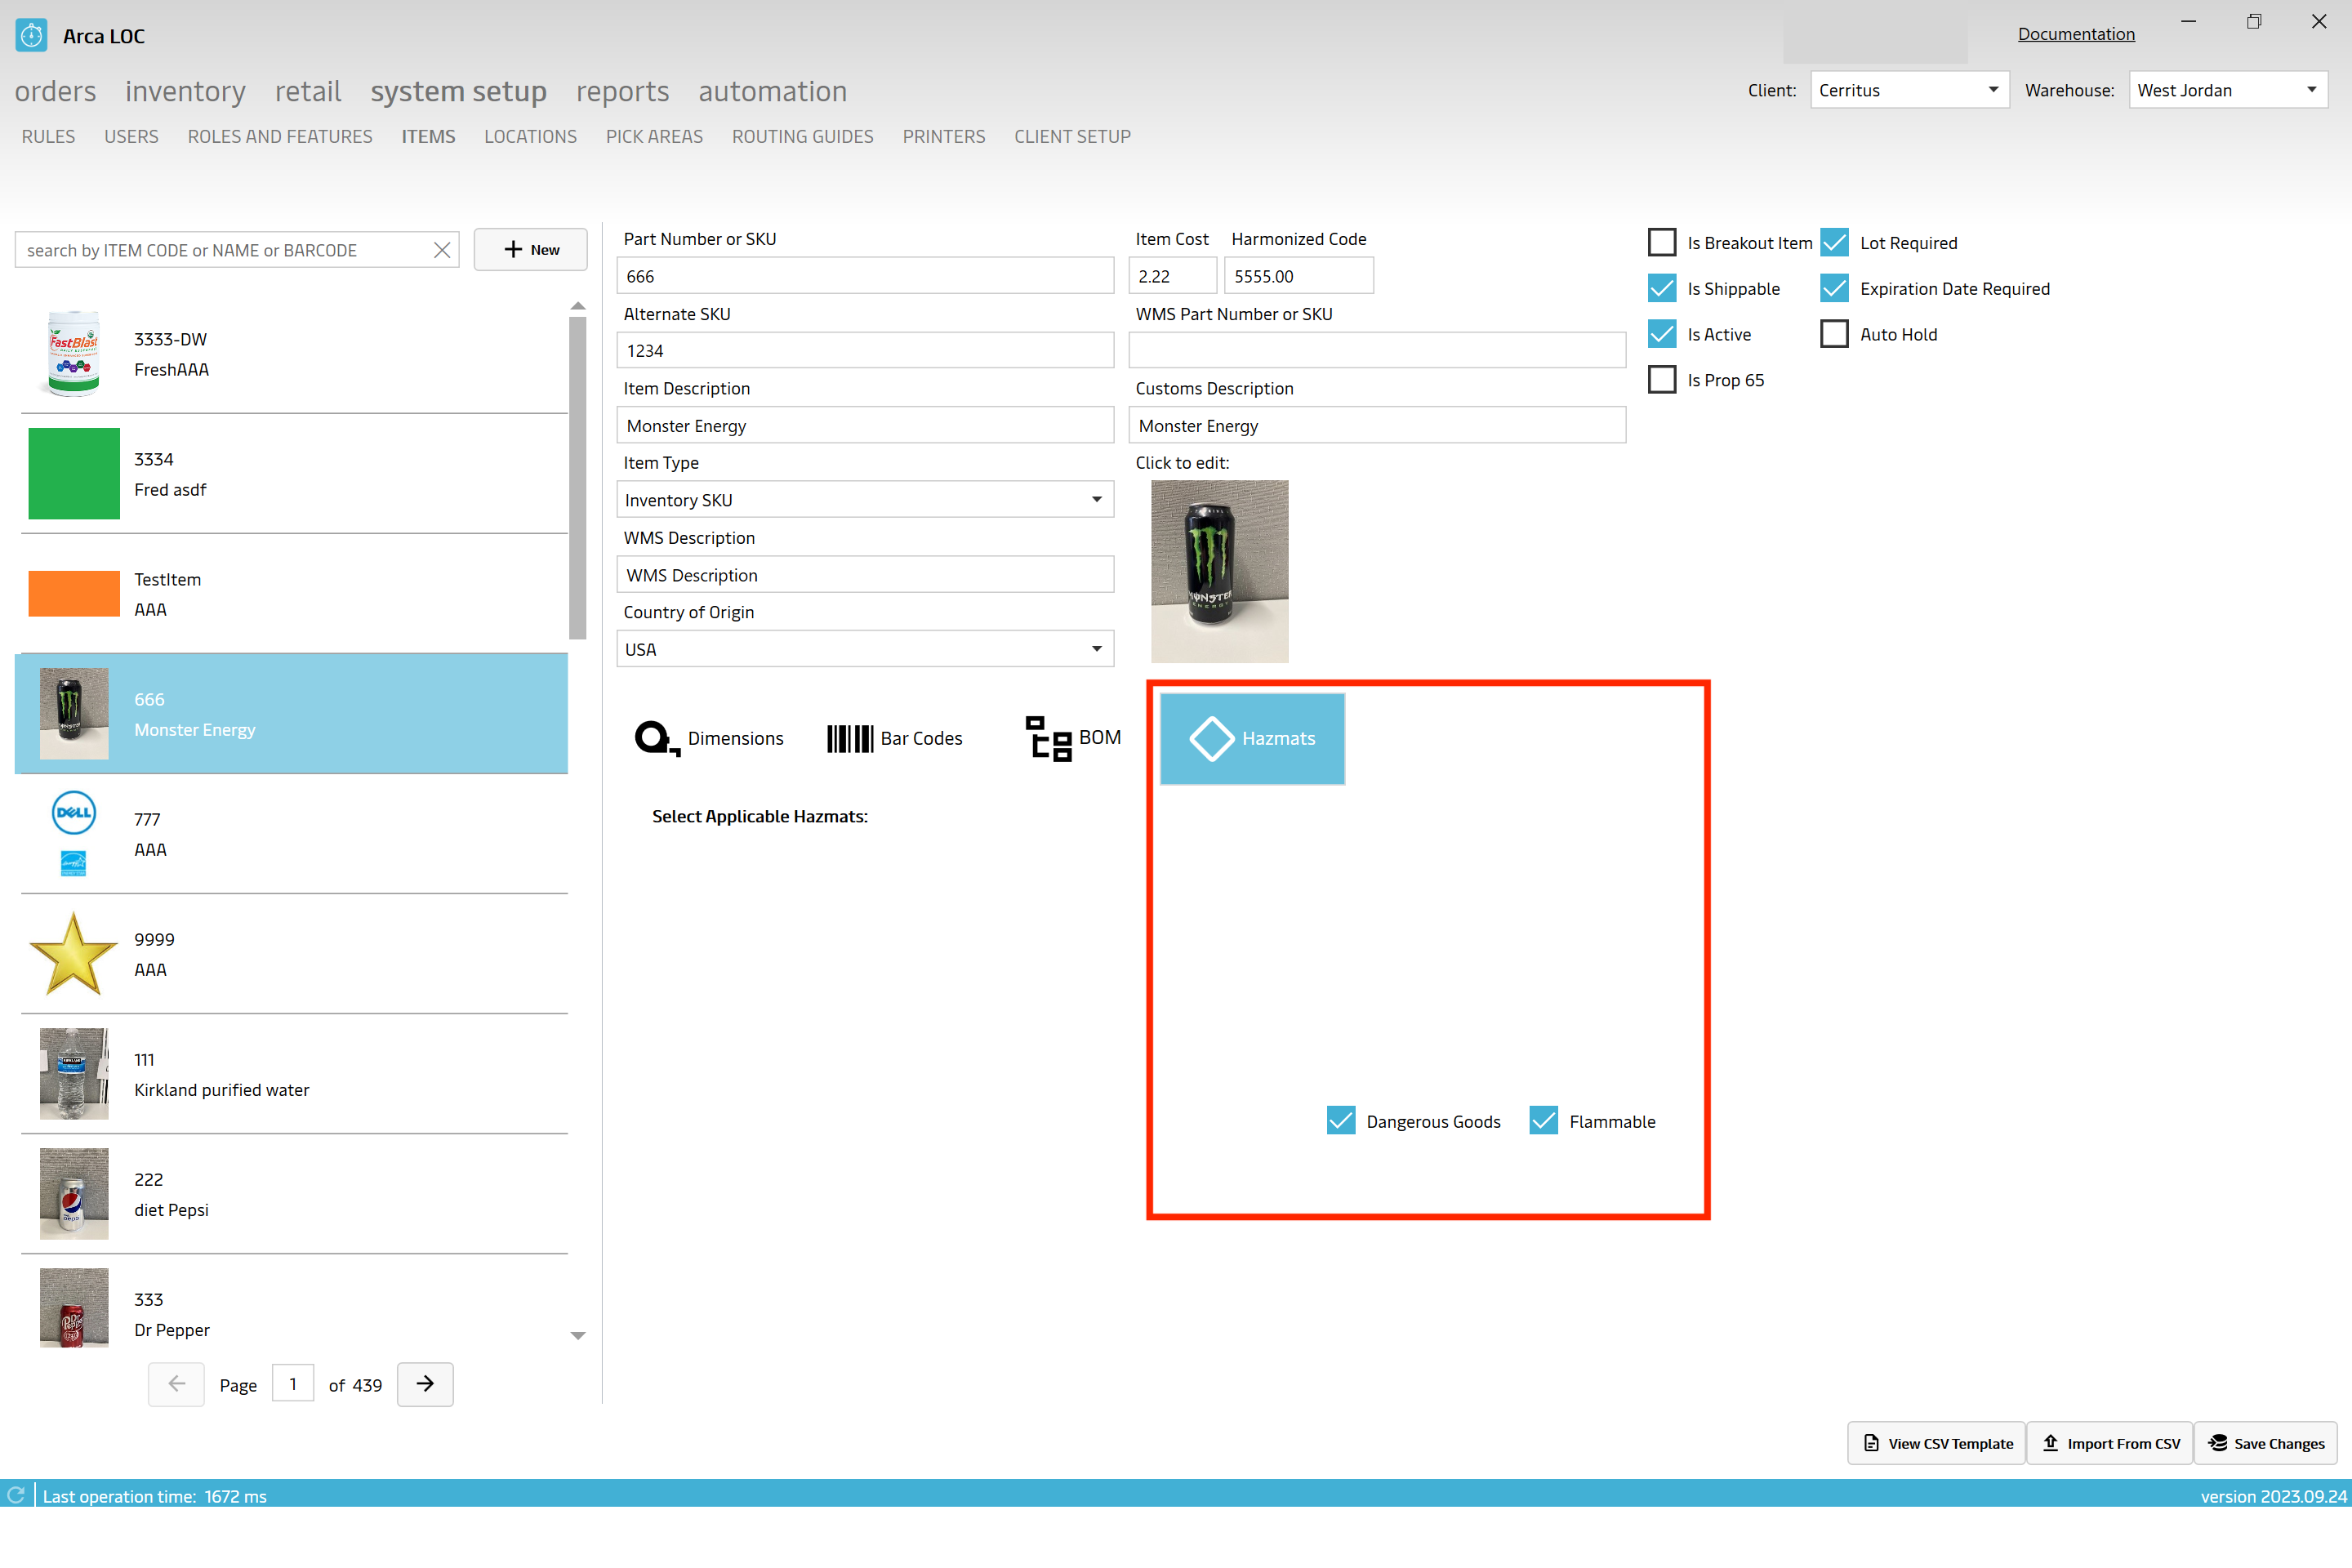
You may then add/edit/delete the hazmat selections. Choose from the following:
- Dangerous Goods
- Flammable
Note
An item can be marked for 1 hazmat, more than 1 or none.
BOM
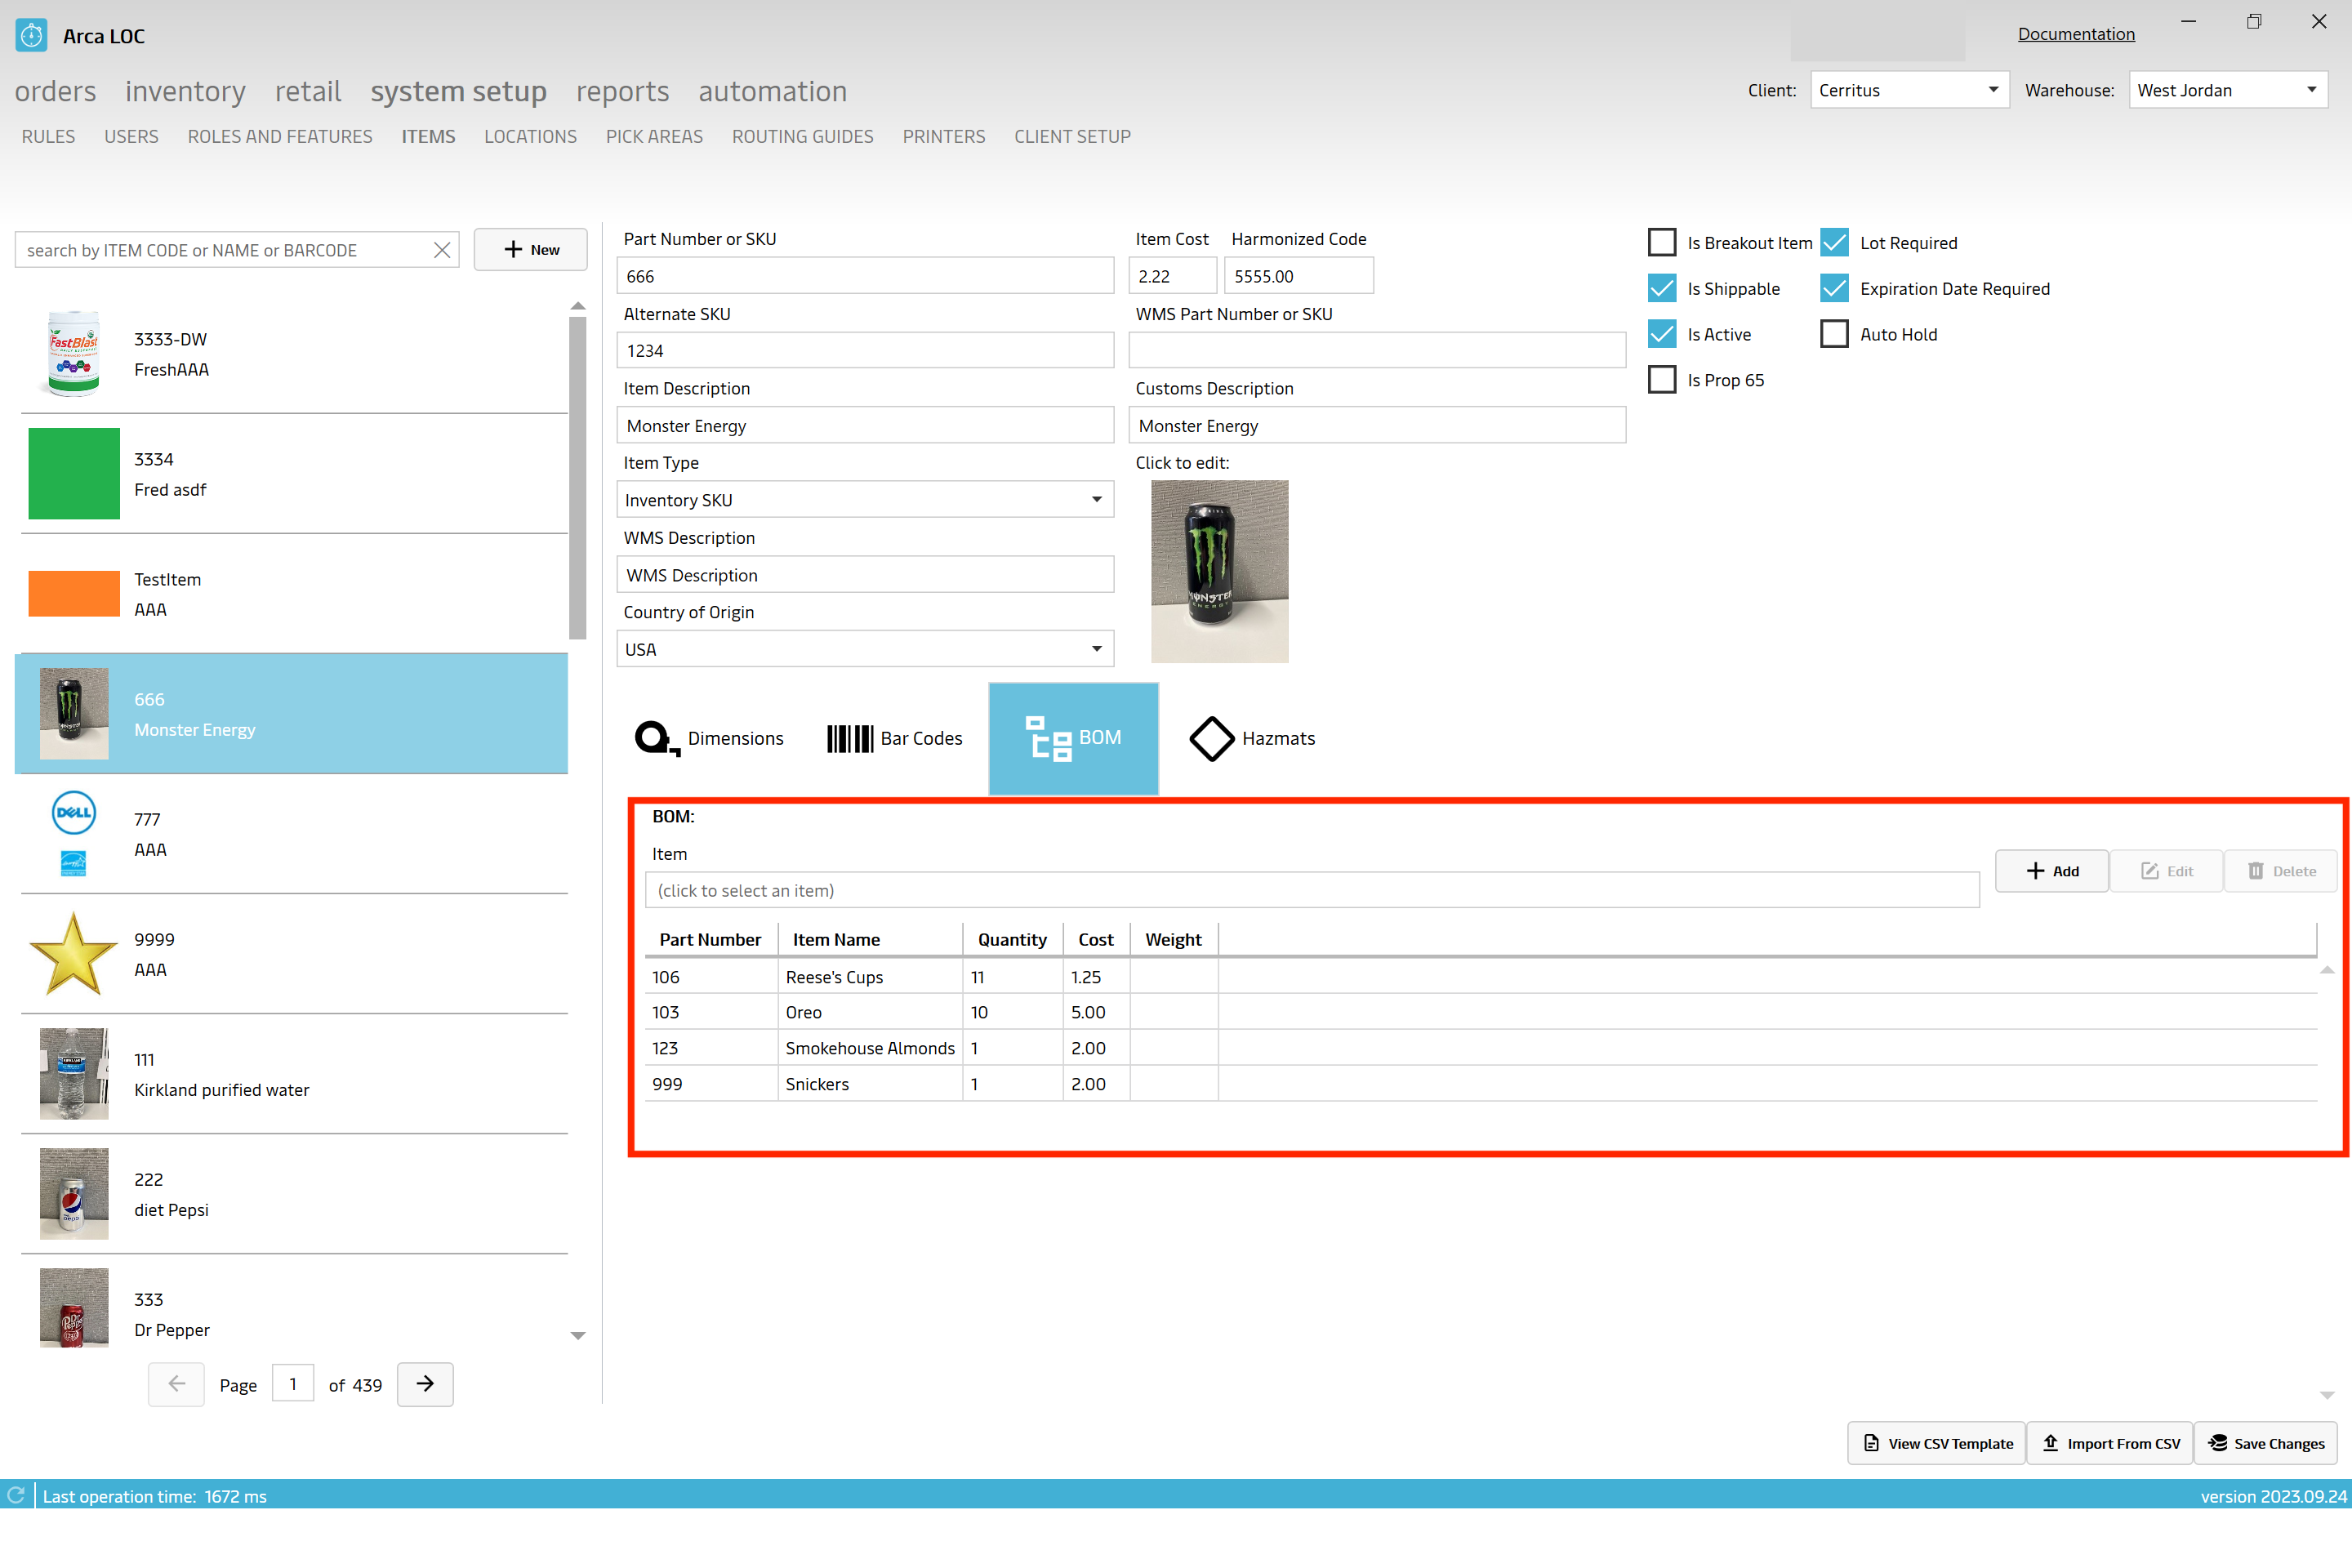
- Item Type = Non Stocked Kit will create a BOM
ALWAYS have to click SAVE and DONE
Import Item
View CSV template, see the following fields below:
Part Number or SKU - The SKU stands for “stock keeping unit” and is a number (usually eight alphanumeric digits) that retailers assign to products to keep track of stock levels.
Item Description - The customer item description
Item Type - Defines the group type determined by the item attribute or purpose, ie. Inventory SKU, Insert, Service, Promotional, etc.
WMS Description - warehouse item description
Harmonized Code - A Harmonized Commodity Description and Coding System (HS Code) is a code used to describe merchandise that is shipped internationally.
Country of Origin - The country of origin refers to the destination from which the goods are being imported or simply the country of manufacture, production, or growth where the goods comes from.
Item Cost - The Item Cost is what a retailer owes a supplier for an item the retailer has sold and needs fulfilled to its customer. The Item Cost is also the basis for setting the retail price.
Weight - The weight of an item/product without the addition of the packaging or container weight.
Discontinued Date - The date that the availability of the product was discontinued; no longer available or produced.
Alternate SKU - An alternative product definition, name, image, description, etc., for an existing inventory item. An alternate SKU creates a secondary SKU for an existing inventory item keeping the same product definition.
WMS Part Number or SKU - The warehouse stock keeping unit that is assigned to products to keep track of internal stock levels.
Customs Description - item description given by custom authorities
Order Quantity Limit - The order quantity limit is the maximum number of units allowed to be purchased at one time.
Order Quantity Interval - Order interval is the minimum time interval (in days or hours) between two successive planned orders.
Case Quantity - Case Quantity can be used on Wholesale orders, similar to the Case Quantity on purchase orders. Purchasing by case means you can buy quantities by the case from a vendor and sell those products as individual units
Box Quantity - Box Quantity is the quantity in one box. For example, if the item has 48 units in one case, and the minimum order number is 1 case, the pack quantity should be 48 and standard packing should be 1.
Pallet Quantity - The quantity of items stored on a pallet. A pallet is a flat transport structure made of wood or plastic (and in a few cases metal) which can support a variety of goods in a stable fashion while being lifted by any mobile forklift device. The goods are placed on top of the pallet, and can be secured to it by straps or stretch-wrapped plastic film.
Height - the measurement from base to top.
Length - the measurement or extent of something from end to end.
Width - the measurement or extent of something from side to side.
Click Save Changes to save any changes.
Import From CSV -Prompts for file upload
API Calls
- ItemDelete
- ItemGet
- ItemSave
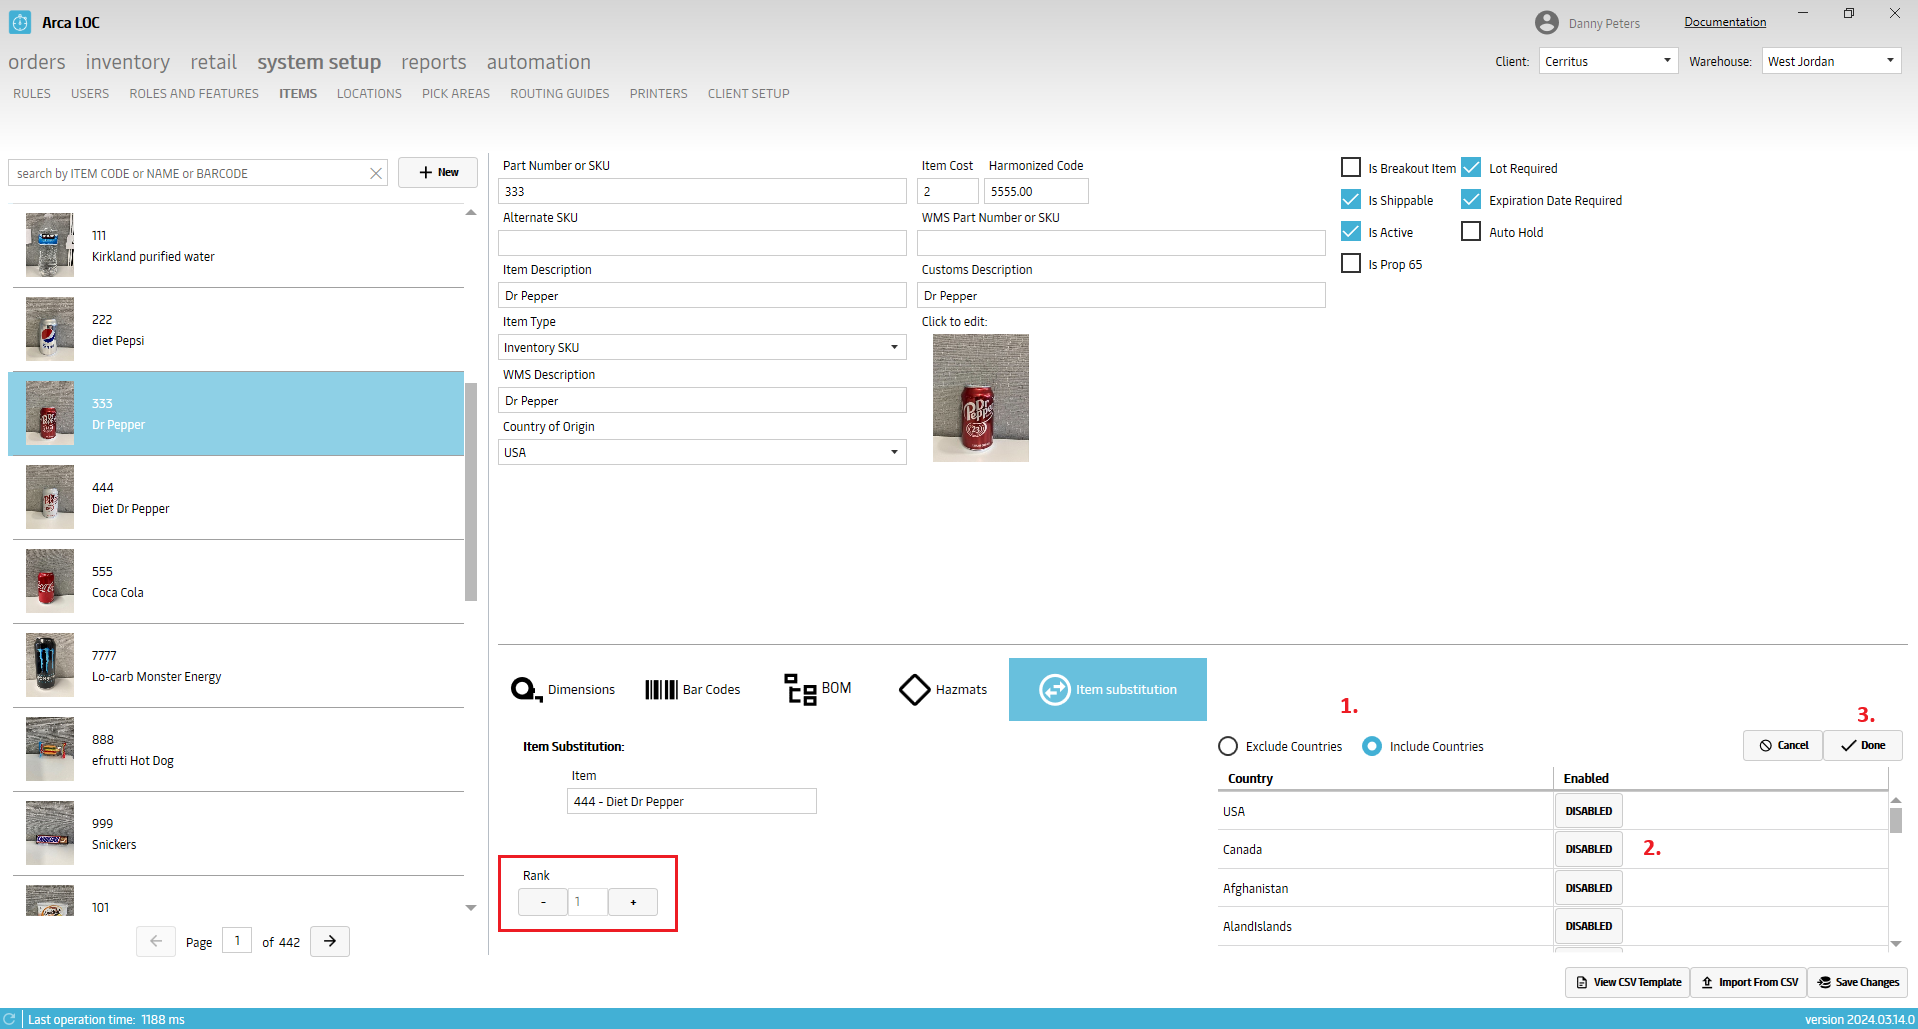
Item Substutions
Item Substitution. ** Disclaimer, Item substitutions require the business rule to be enabled for this functionality to work.
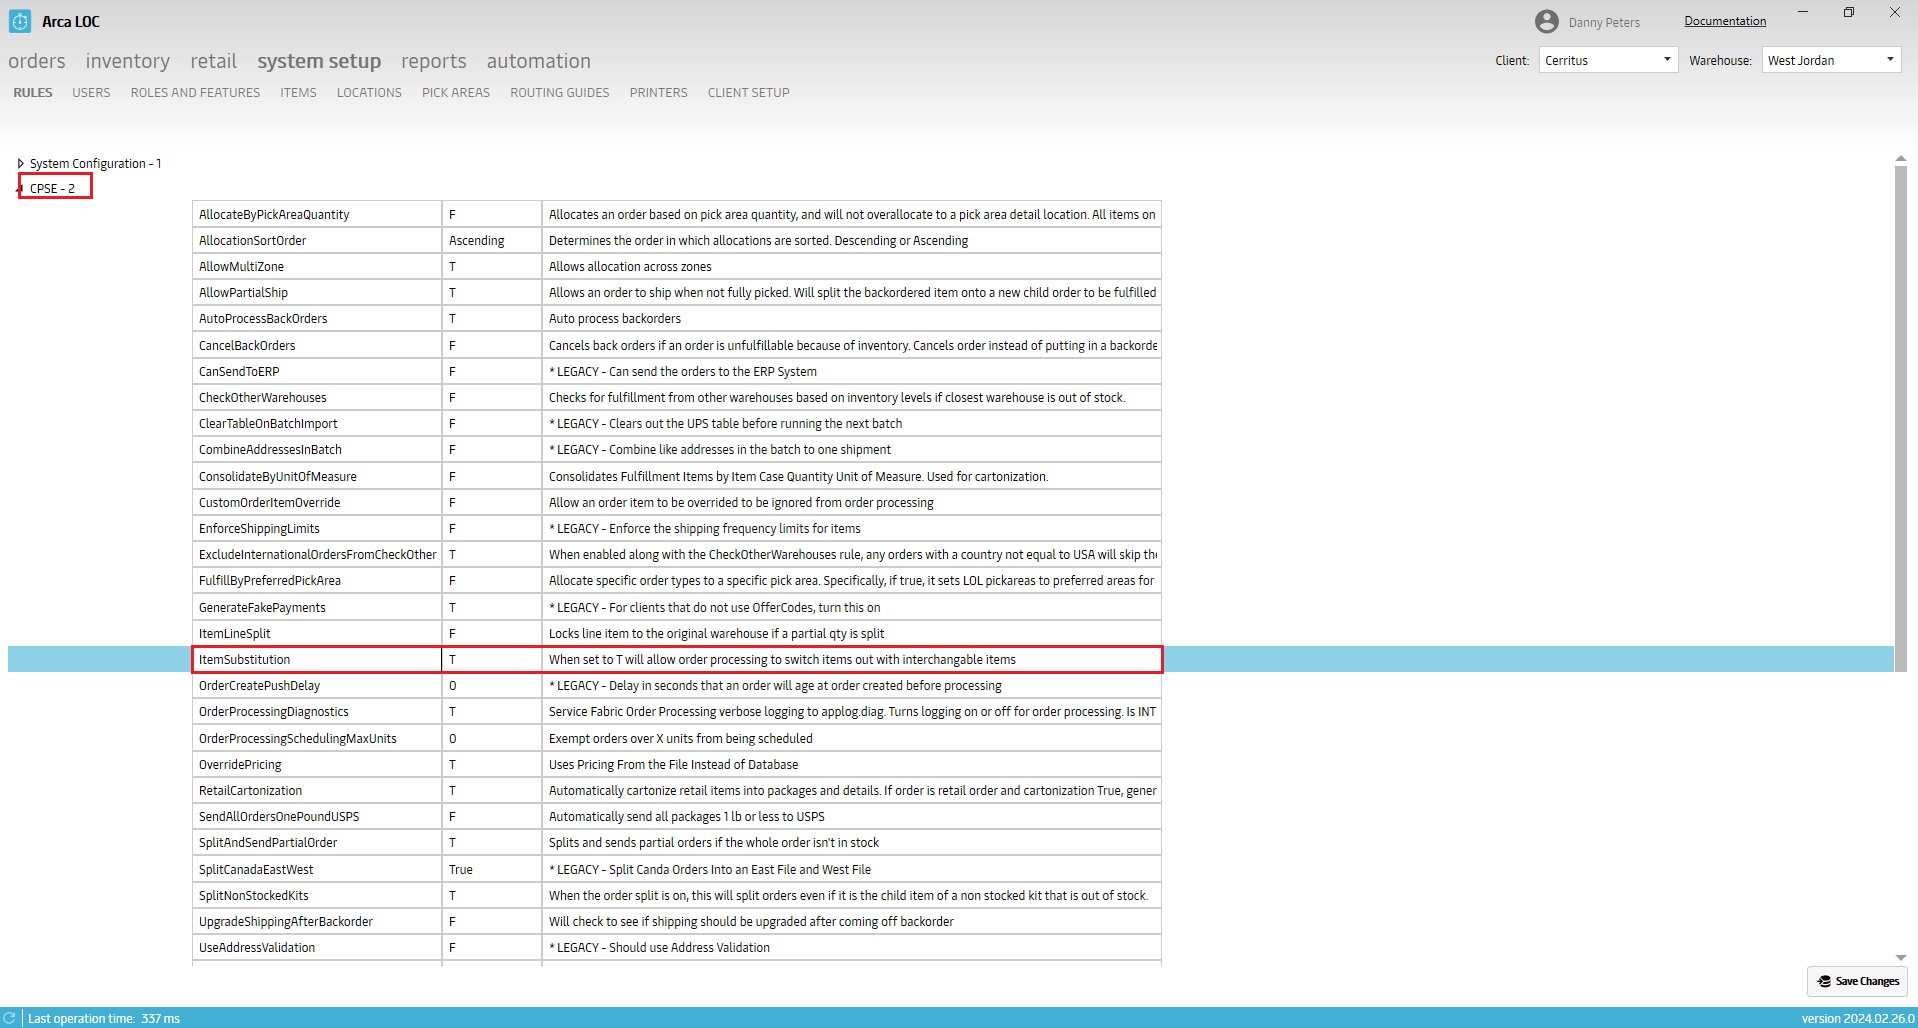
Items that are set up with substitution parts can switch parts to fulfill an order. During order processing the system checks for the items available quantity. When an item can’t be fulfilled but one of its substitution parts has available balance, then the system will change the order to use the substituted part that is in stock.
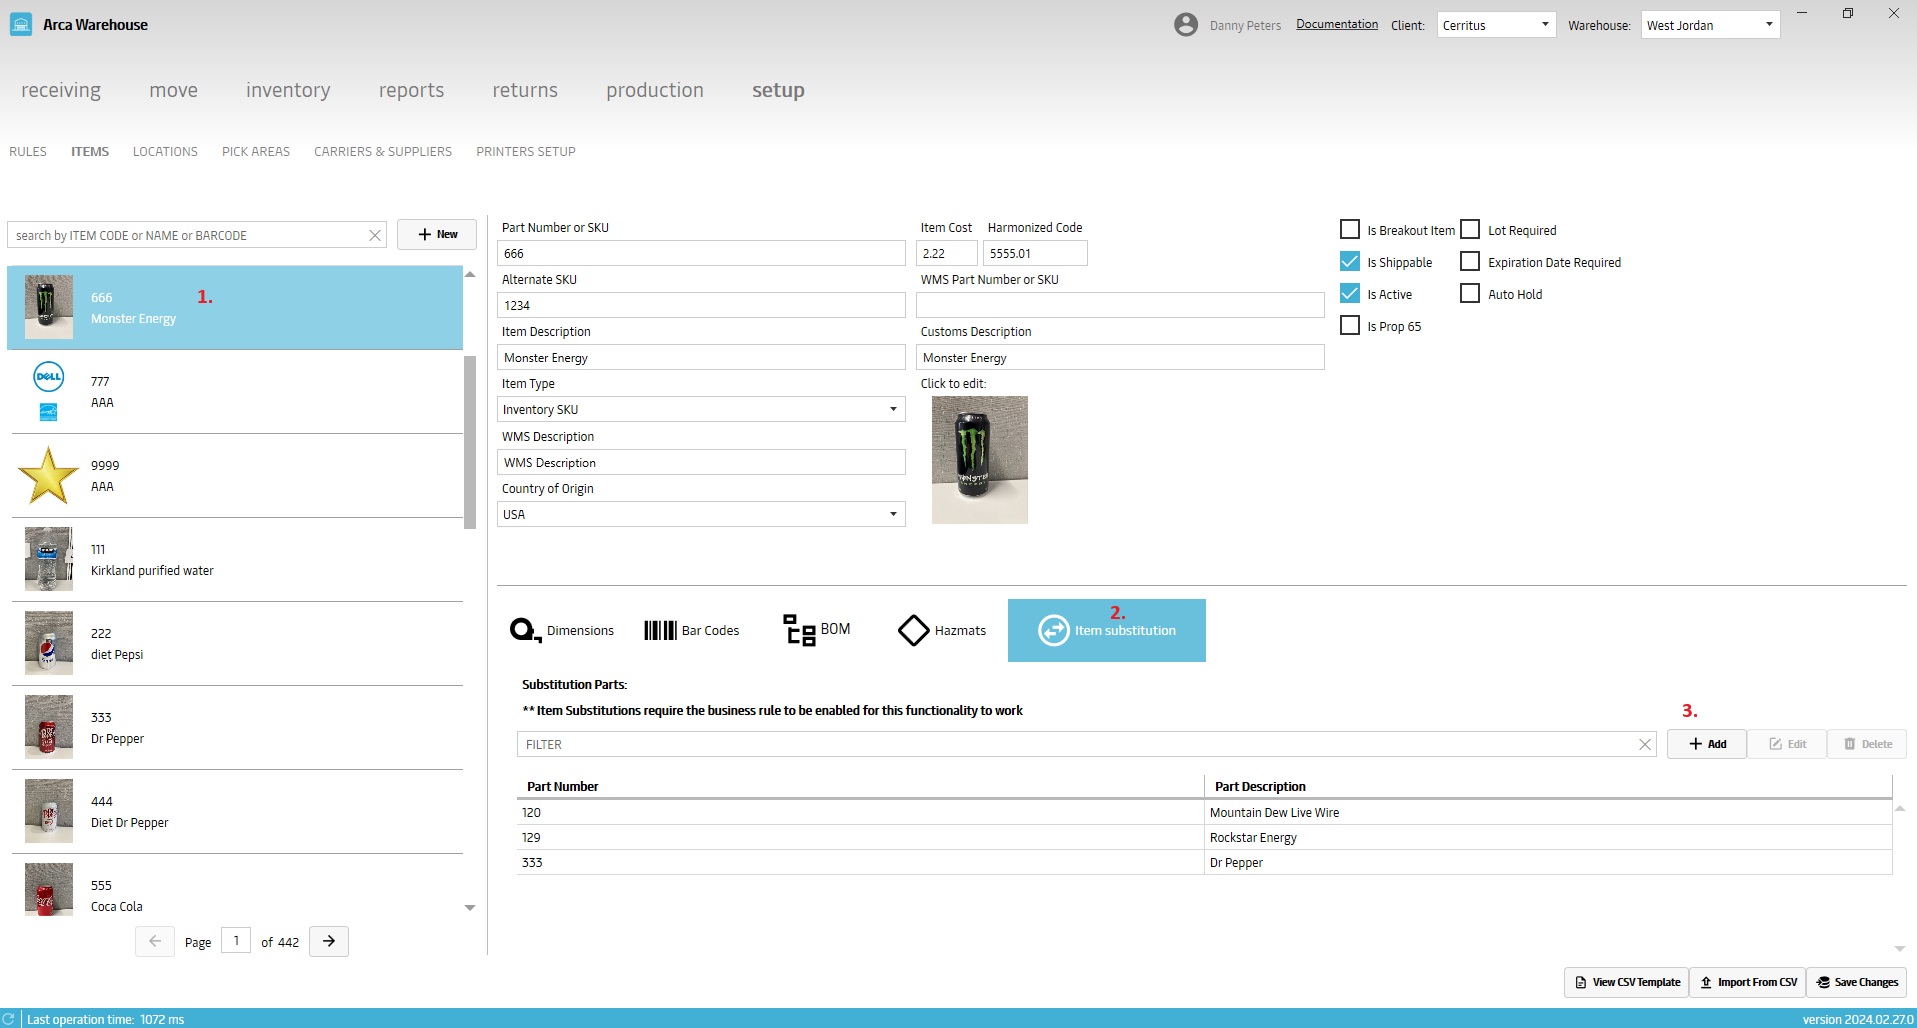
- Select an item on the left to populate the information on the right side of the screen.
- Click the item substitution tab.
- Click + Add to attach a new substitution part.
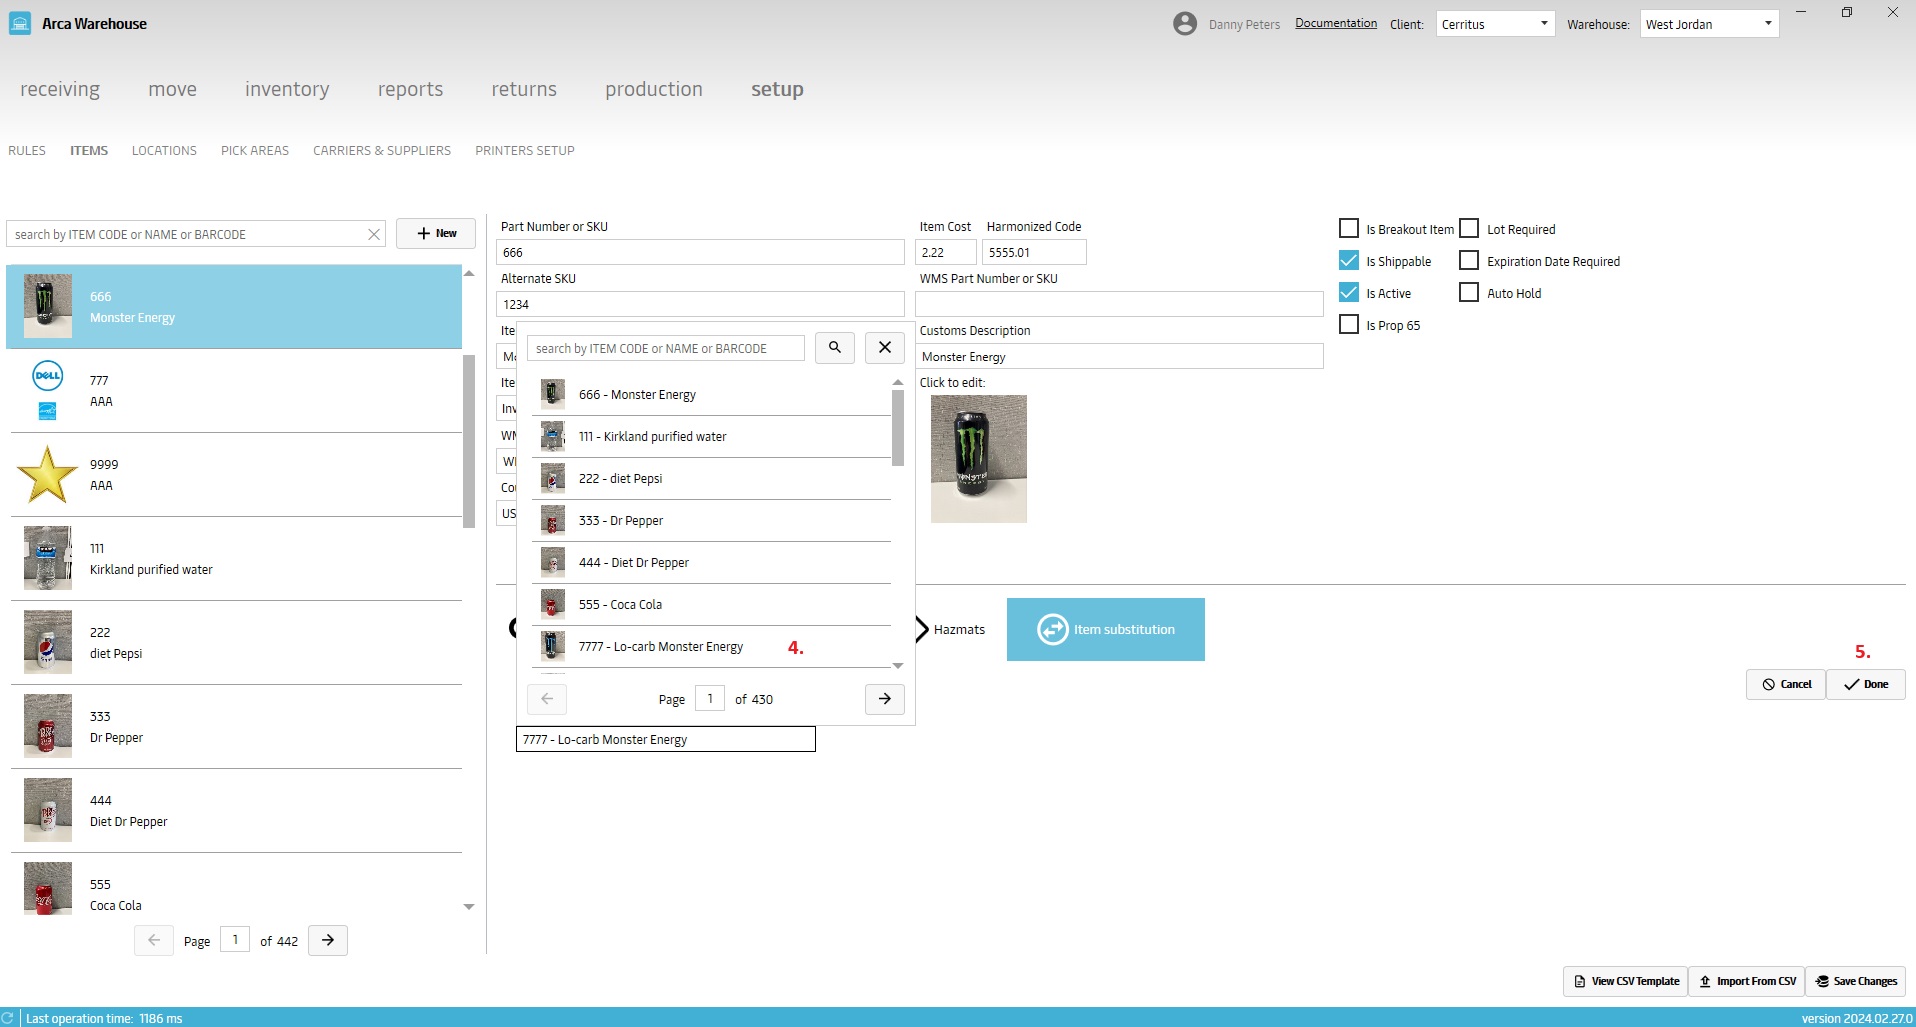
- Search for the part in the new item window. The substitution part that is being added must previously exist in the system as an available item.
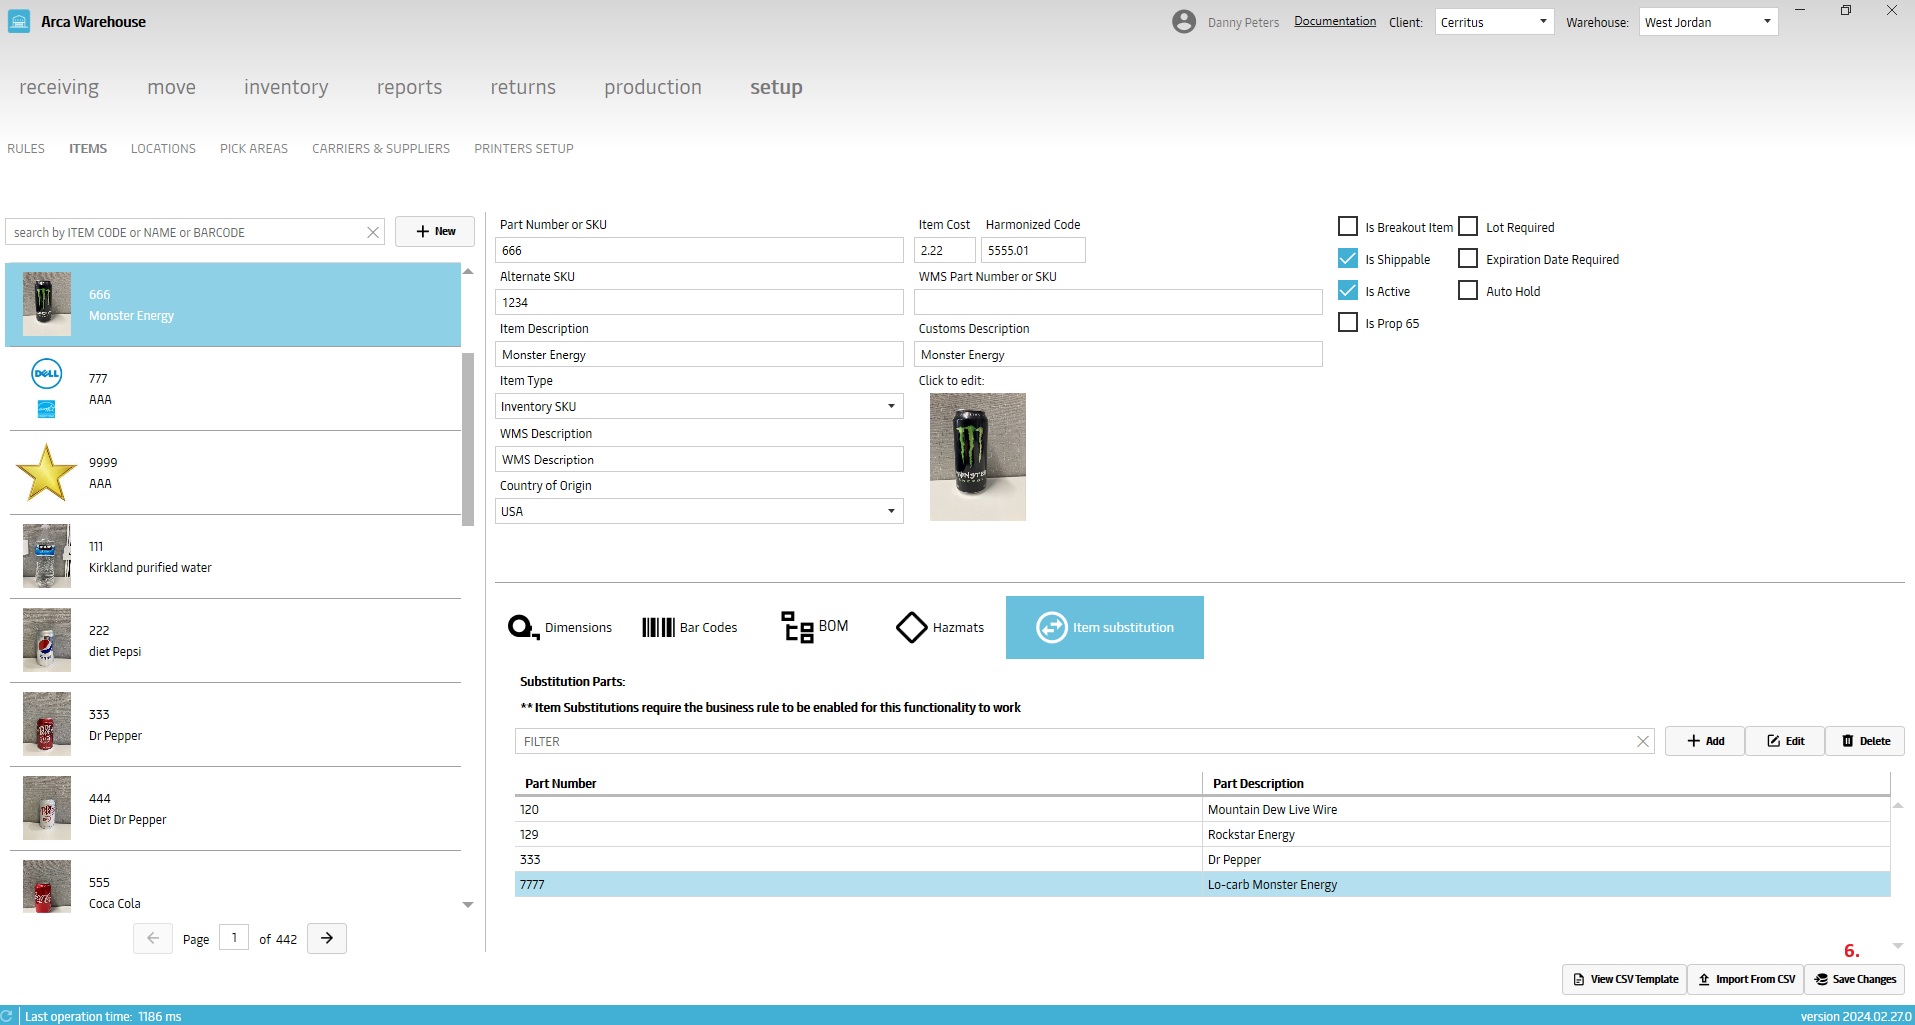
- Click Done.
- Click Save changes.
Substitution feature update. There are two additional selections, Rank and Country. They are available when adding or editing a substitution. Rank will determine the priority of which substitution part will be chosen to fulfill the order. Use the +/- buttons to set the rank. For an item that has multiple substitutions, the rank must be unique. You cannot set two substitutions to be Rank 1. Country selection will specify what countries the orders containing these items will ship to. First select one of the two circle buttons for Exclude Countries or Include Countries, these will select all the countries in the list. Enable or disable specific countries one at a time using the buttons.
Examples:
- Select Exclude Countries. In the Country list find Canada and click on the enable/disable button. Click done to exit the edit tab, save these changes and the country column now displays as exclude Canada. Orders containing this item will not be able to ship to address in Canada.
- Select Include Countries. In the Country list find USA and click on the enable/disable button. Click done to exit the edit tab, save these changes and the country column now displays as Include USA. Orders containing this item will only ship to address inside the USA.
- Select Include Countries. Do not make individual enable/disable selections. Click done to exit the edit tab, save these changes and the country column now displays as Global. Orders containing this item will ship globally with no restrictions.
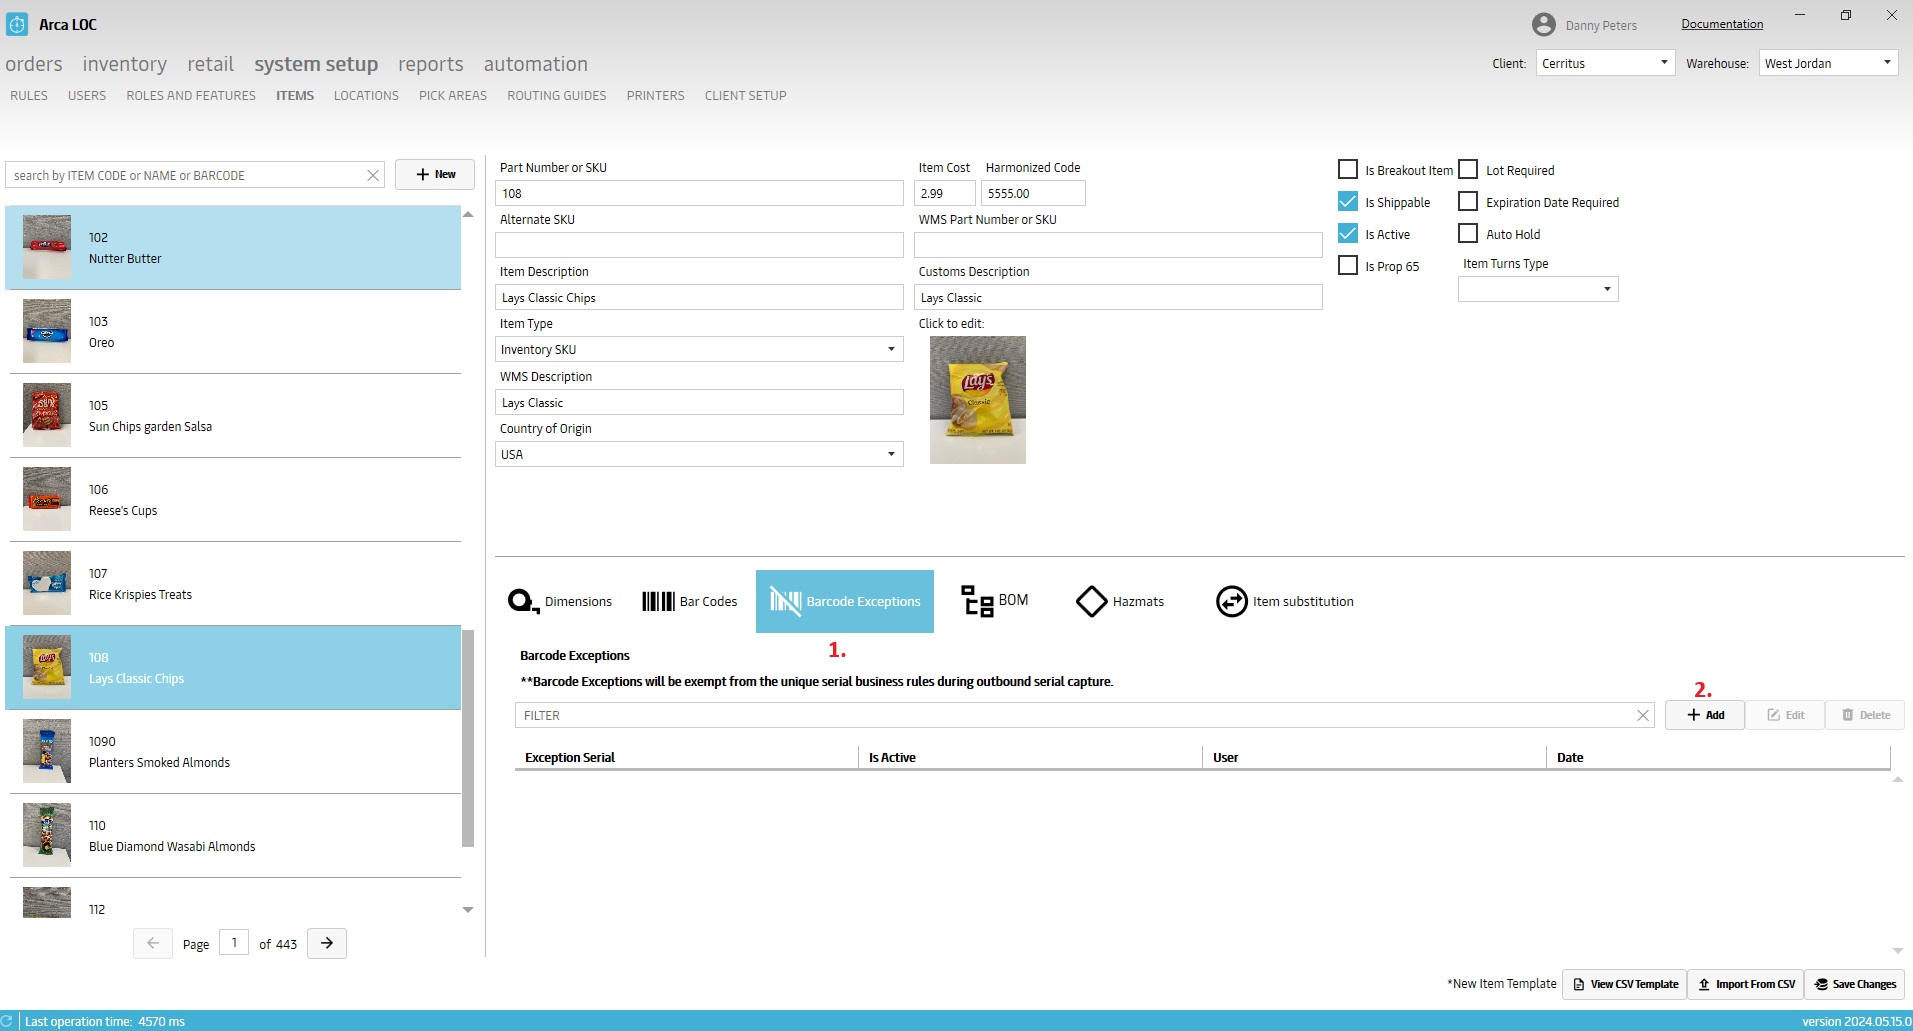
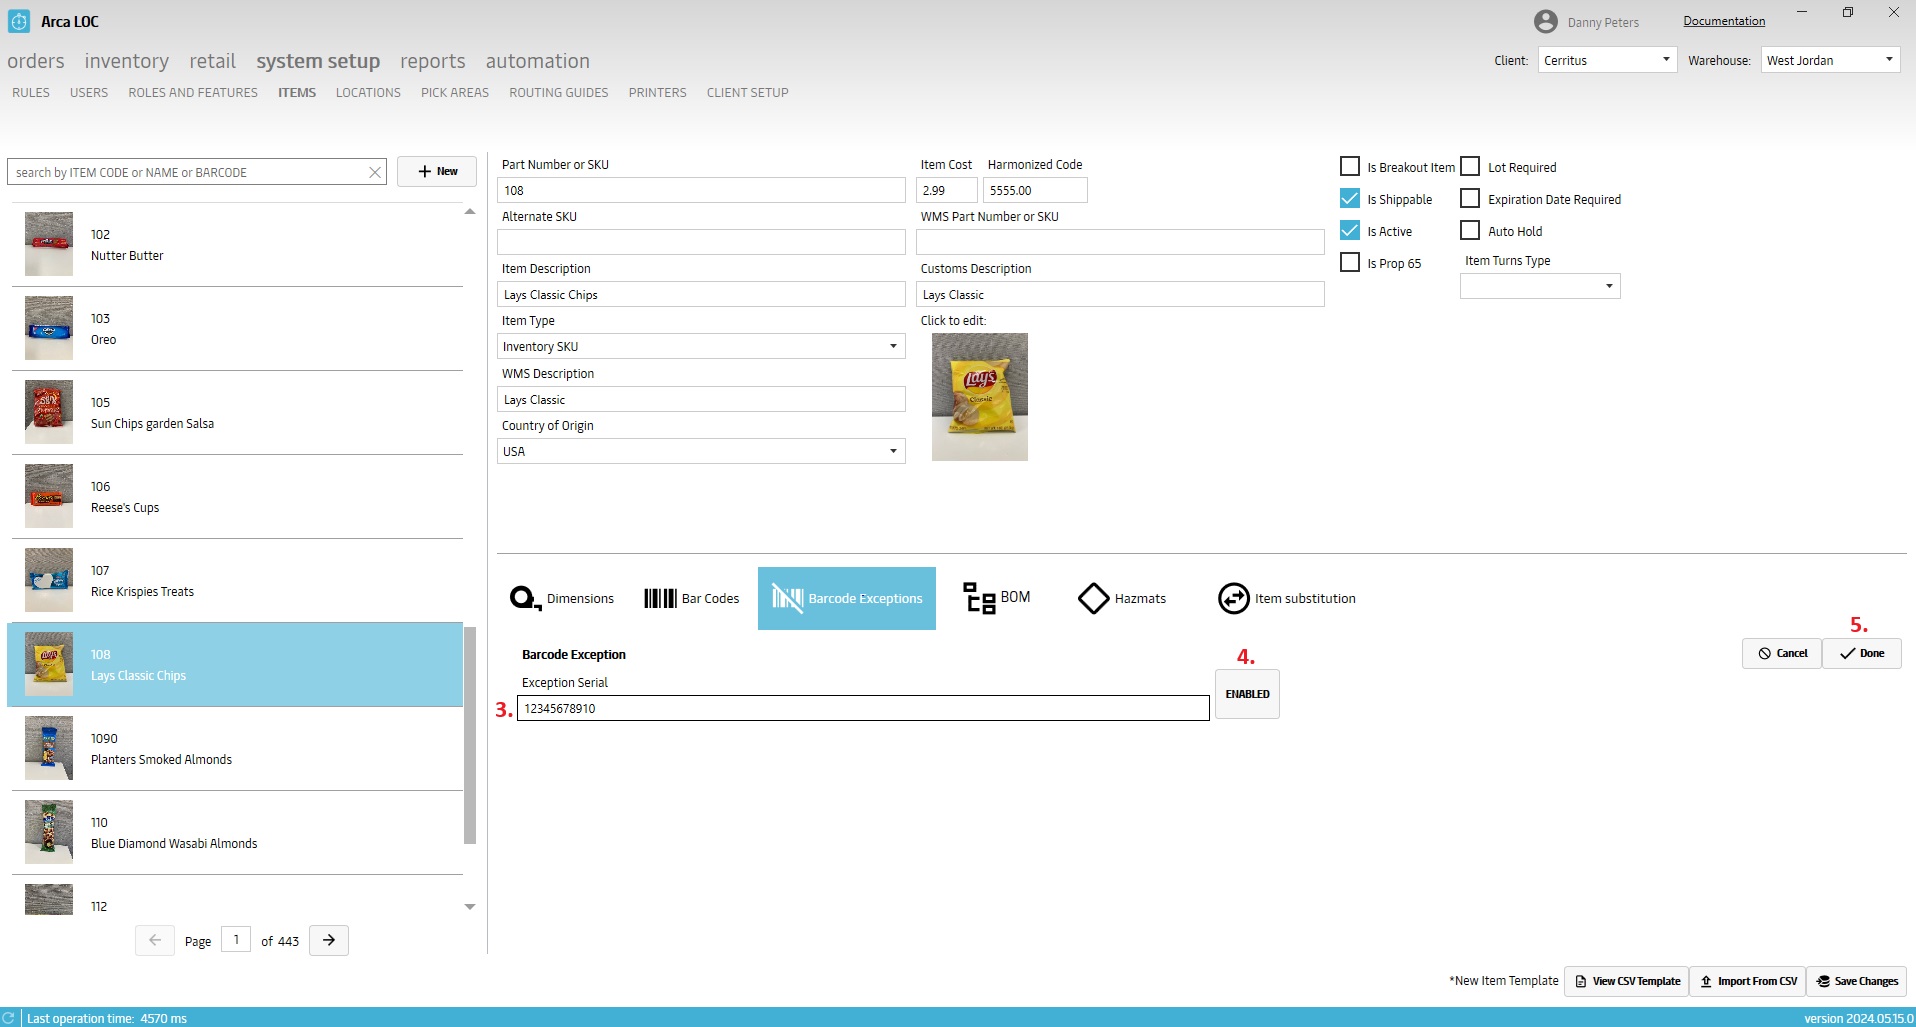
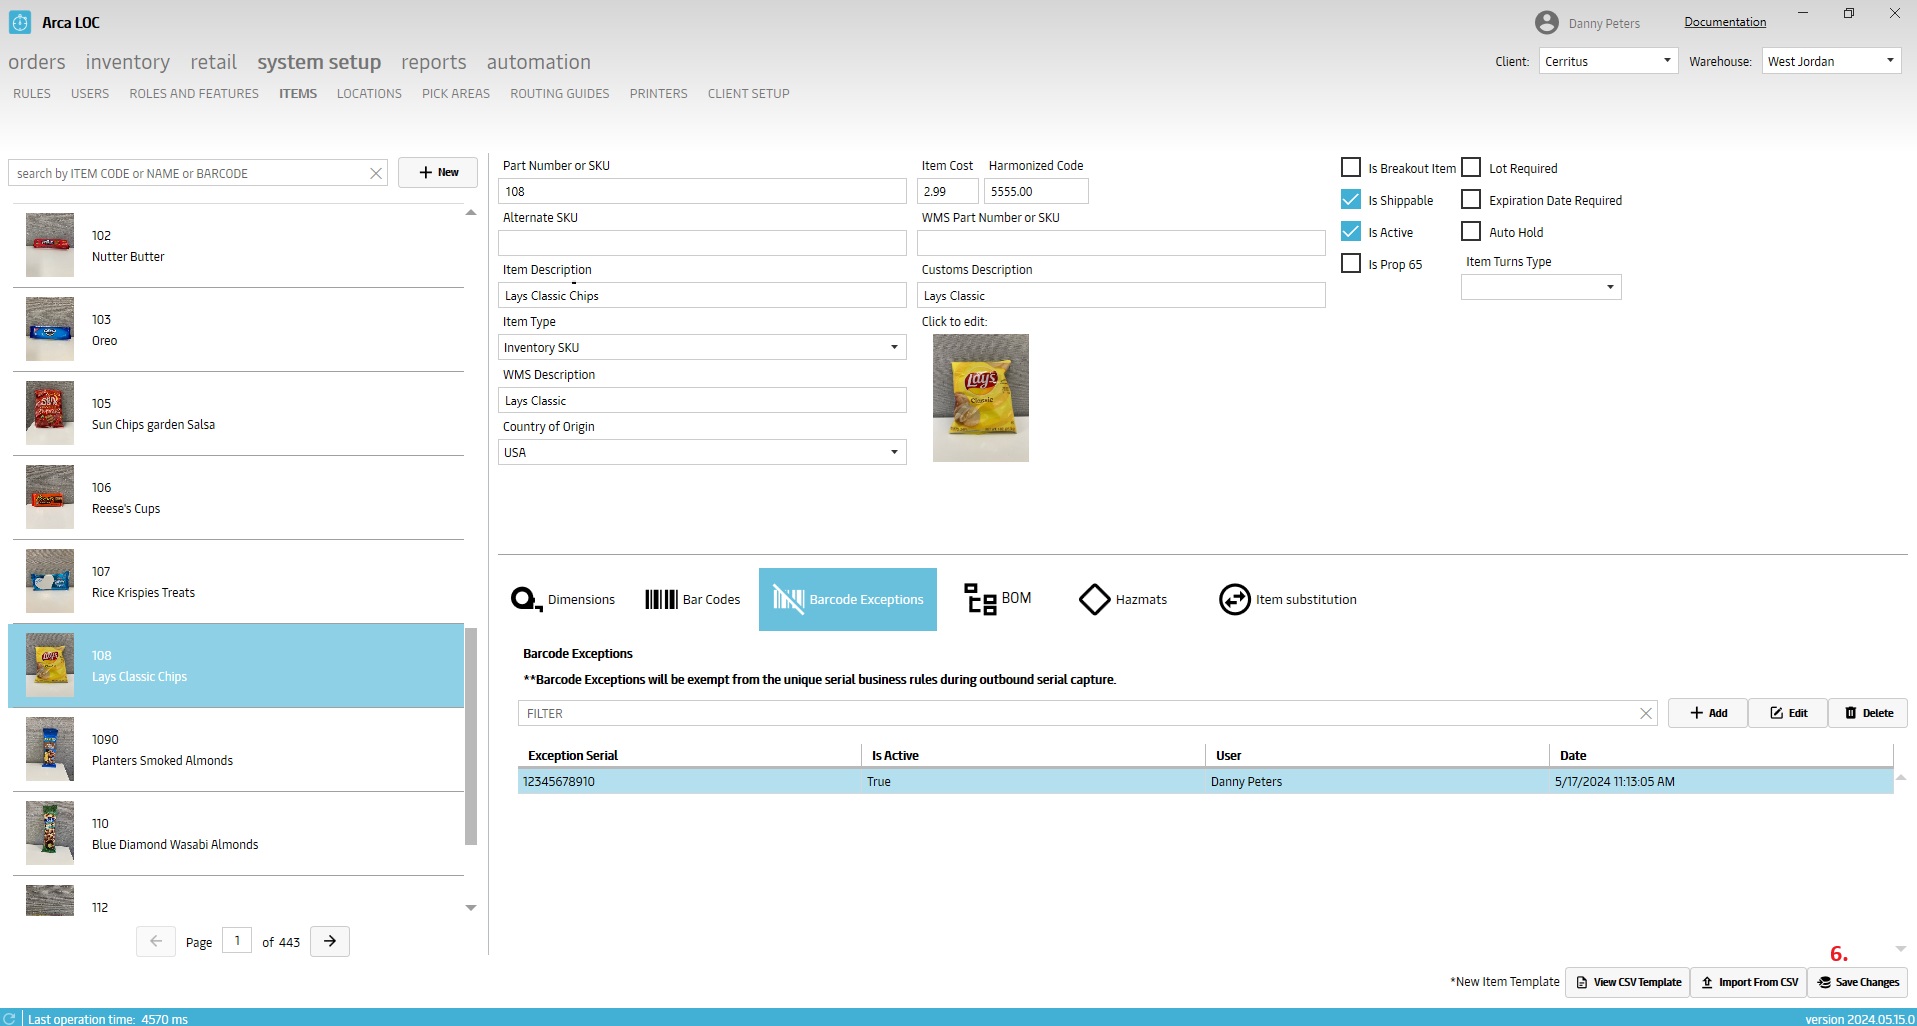
Barcode Exceptions
** Disclaimer, Barcode Exceptions will be exempt from the unique serial business rules during outbound serial capture. This will allow a user to set up exceptions on barcodes. When these exceptions are active, a user will be allowed to scan the same barcode multiple times in the same order, and they will be able to scan the same barcode that was used on a previous order. These exceptions are going to bypass the two business rules designed to enforce unique serial numbers, ExistingSerialUnique and SerialUniqueInWarehouseOrderPickDetails.
- Select the new barcode exceptions tab.
- Click on Add new.
- Type in the barcode that will be the exception.
- Toggle enable/disable button to set the exception as active or not.
- Click done to exit the editor.
- Click on save changes.
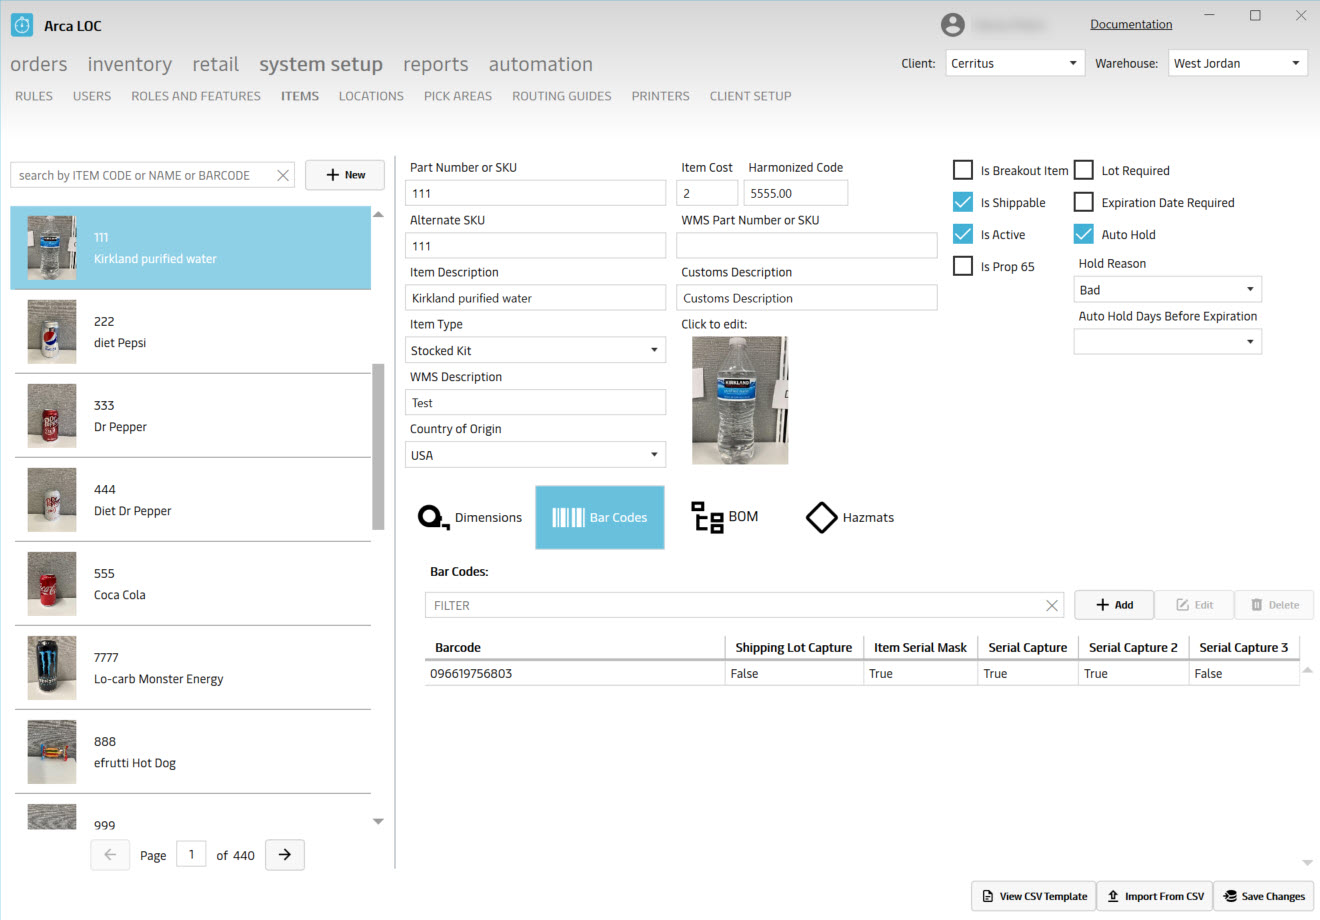
Auto Hold
From the item setup screen, check the box next to the Auto Hold option. This will expand the menu and present additional options for the user to select.
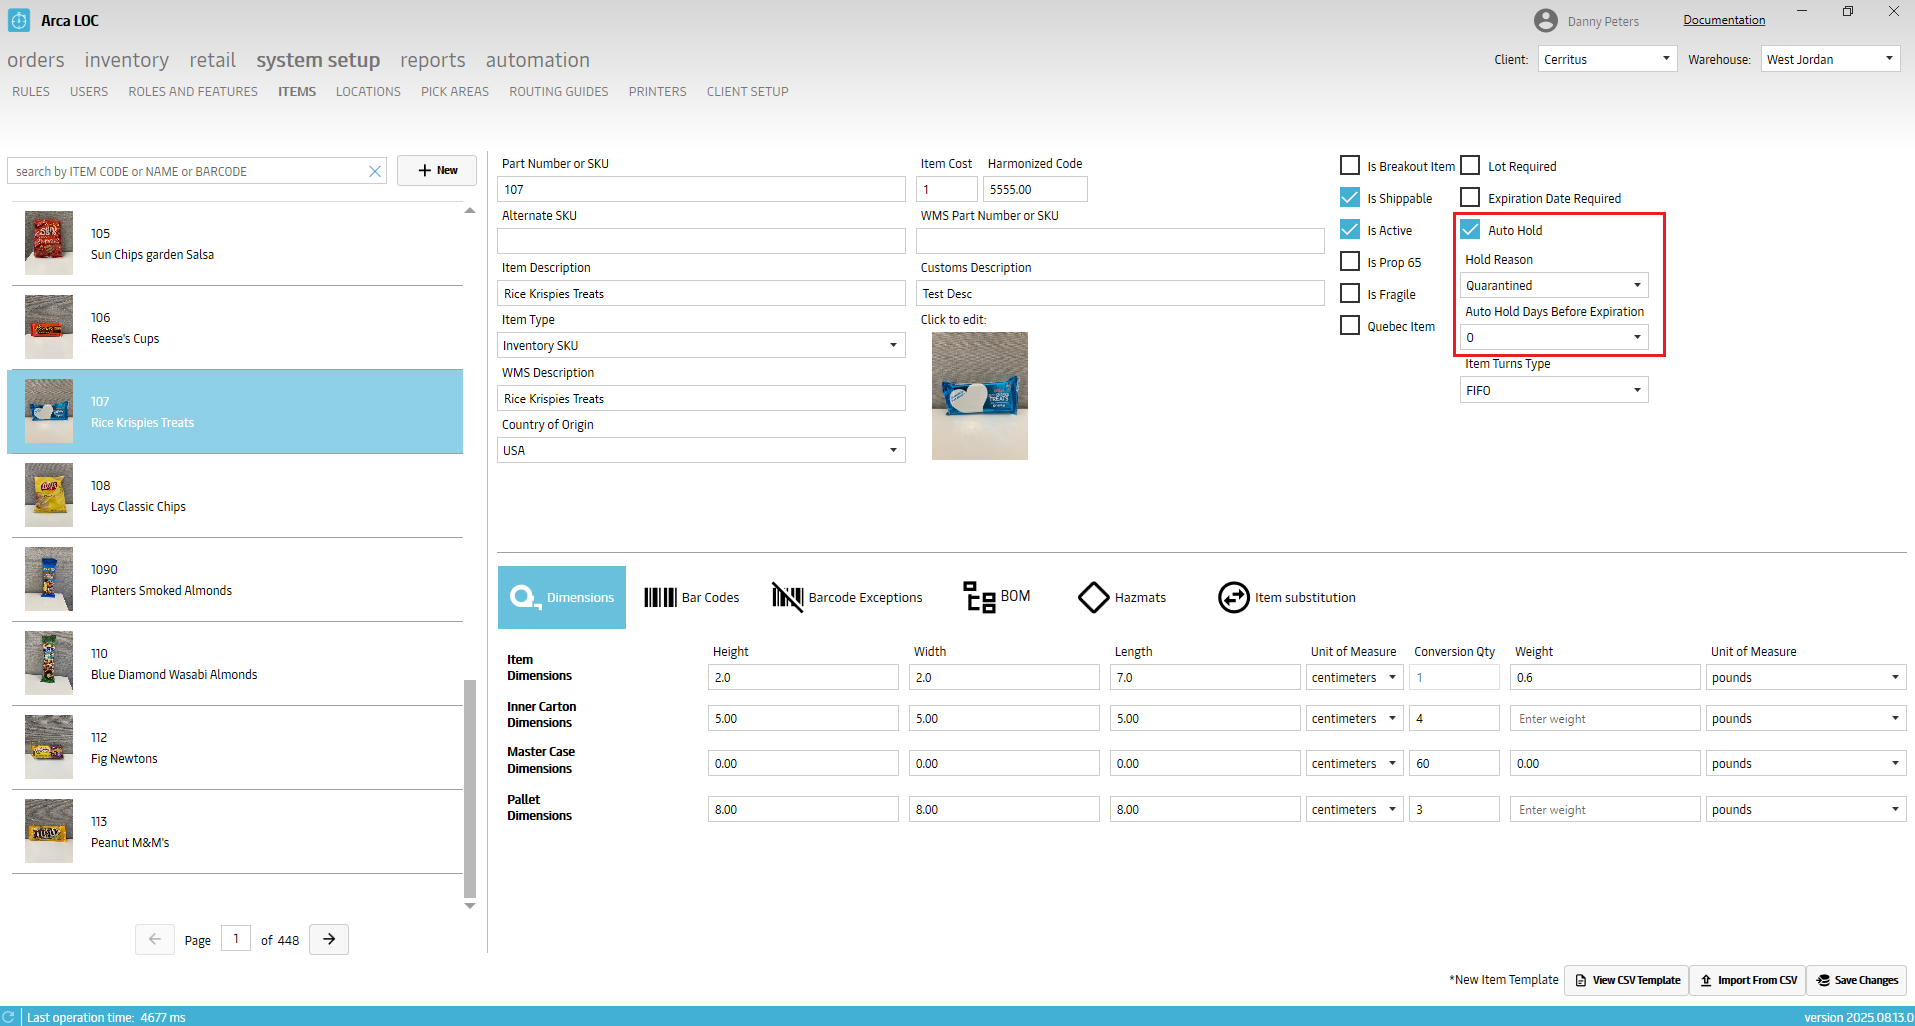
Hold Reason; this option will set the pallet’s status when a new pallet containing this item is entered into inventory. Choose from Bad, Damaged or Quarantined. This applies to all pallets received from ASNs/Trucks or manually created from the Inventory screen. Pallets created through the return process will still default to Quarantine unless being overridden by the ReturnToGoodInventory business rule.
Auto Hold days before expiration; this option works with the business rule MovePalletsToQuarantineForExpiredInventory, to automatically update existing inventory. Pallets must contain a valid expiration date. See Quarantine Expired Inventory for full details.
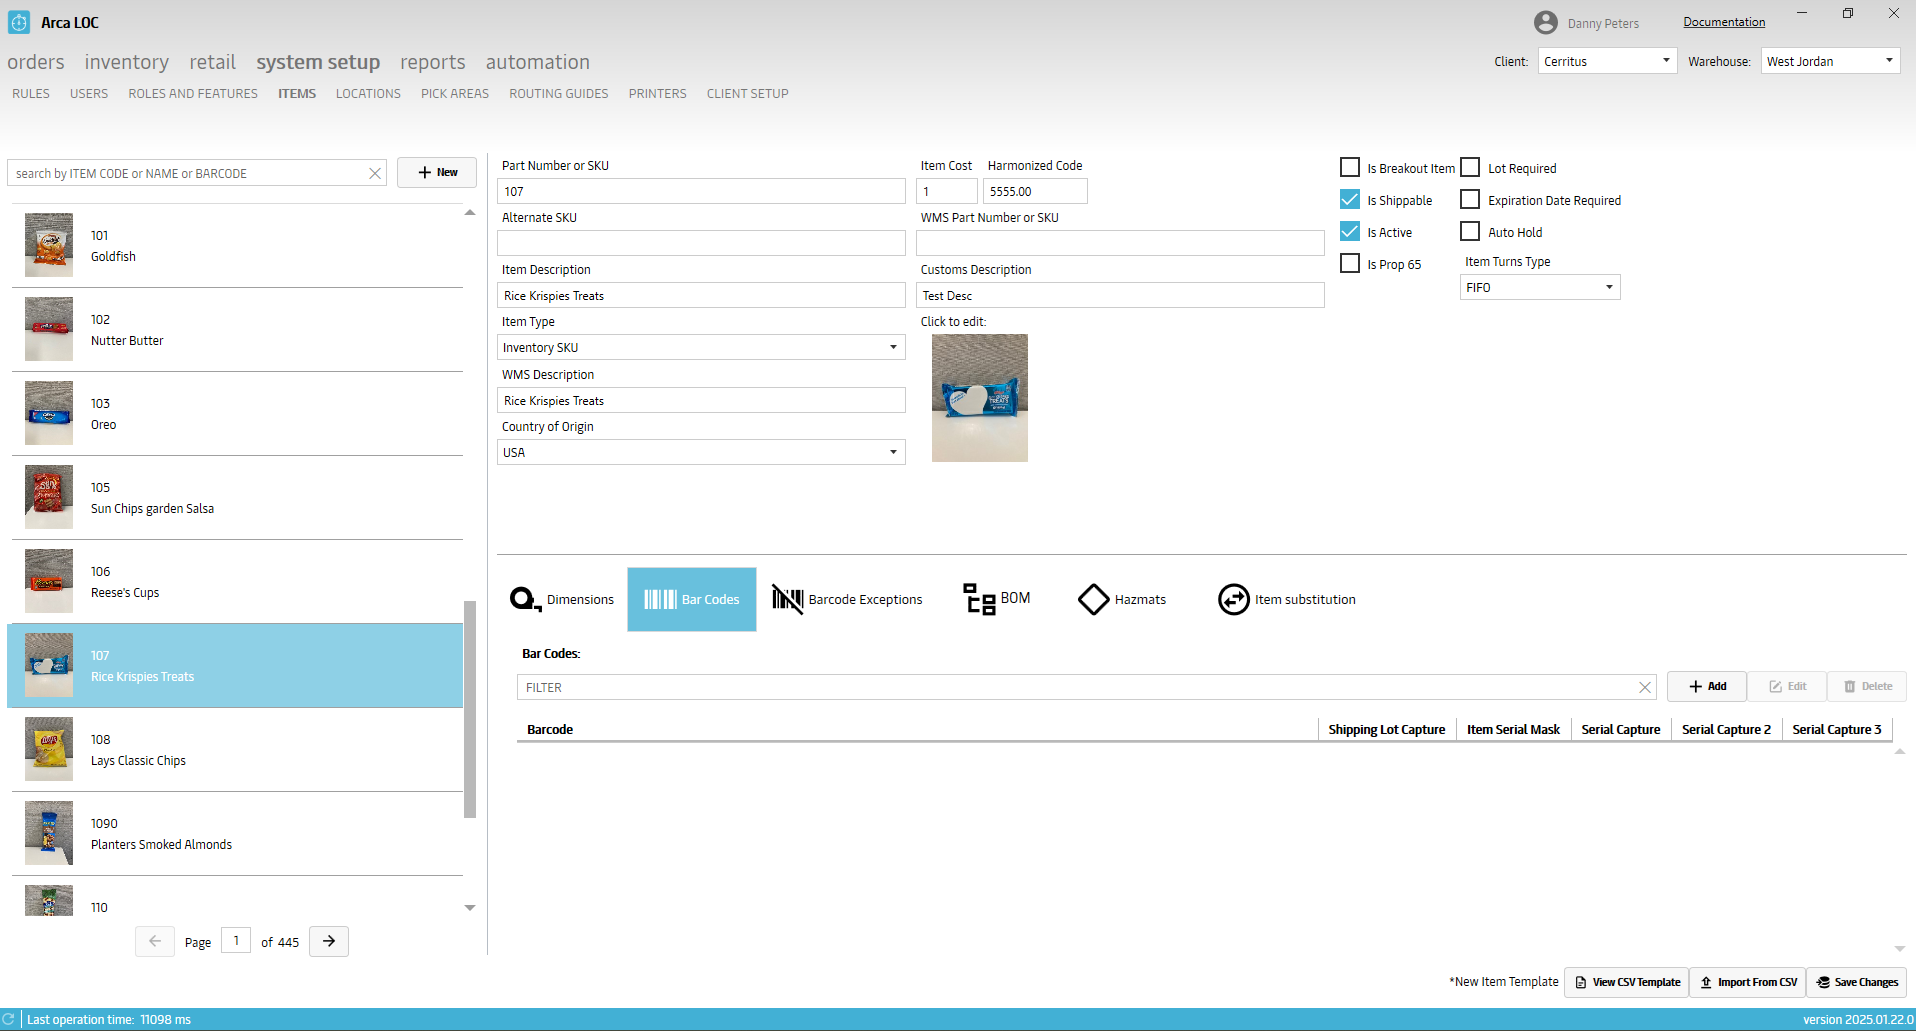
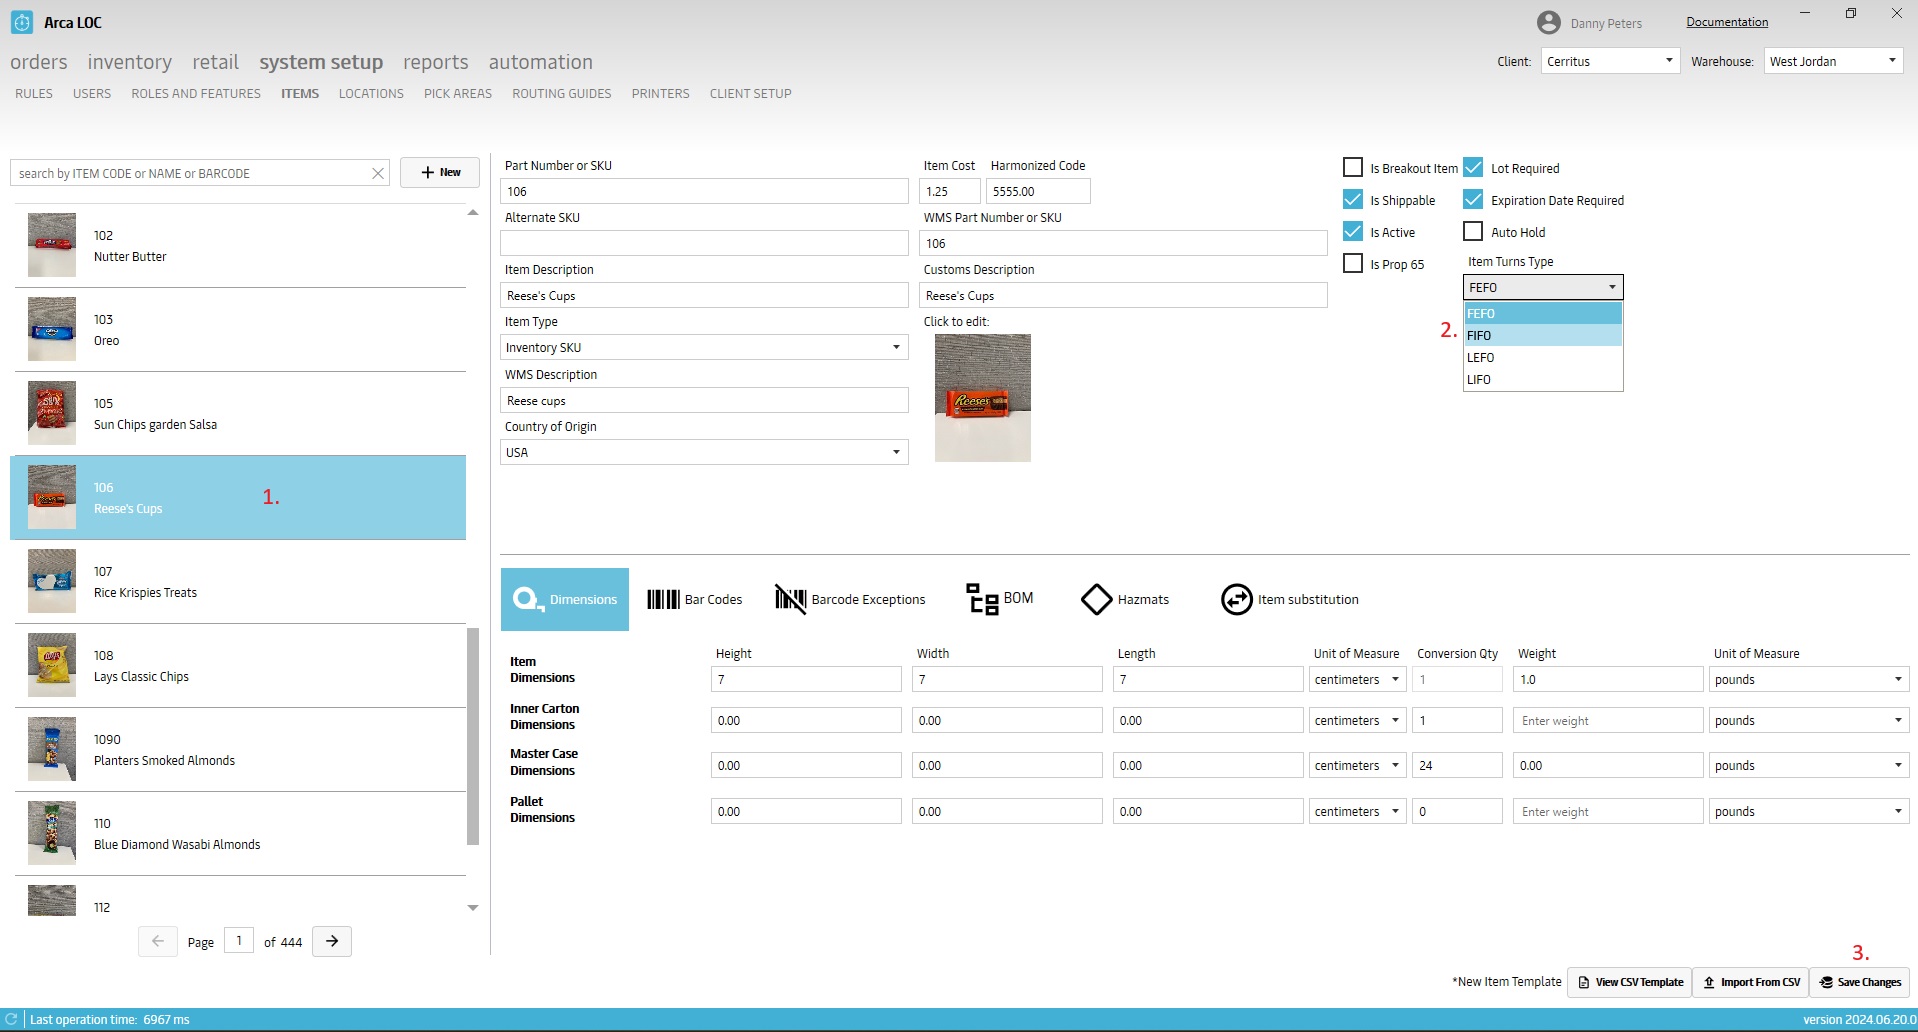
Item Turns Type
New drop-down menu that allows a user to specify the turns type of each item. There are four options to choose from. This type will work with the directed replenish screen in Arca Warehouse to determine the order of which pallets will be given to the user to pick and replenish from.
- FIFO First In First Out (oldest pallet receive date)
- FEFO First Expiration First Out (newest pallet expiration date)
- LIFO Last In First Out (newest pallet receive date)
- LEFO Last Expiration First Out (latest pallet expiration date)
- Select an item to begin.
- Chose a turns type from the drop-down menu.
- Click on save changes.
Quarantine Expired Inventory
*Disclaimer. For this functionality to work you must have the business rule MovePalletsToQuarantineForExpiredInventory active, the item in question needs to be set up for auto hold and the pallets must have valid expiration dates.
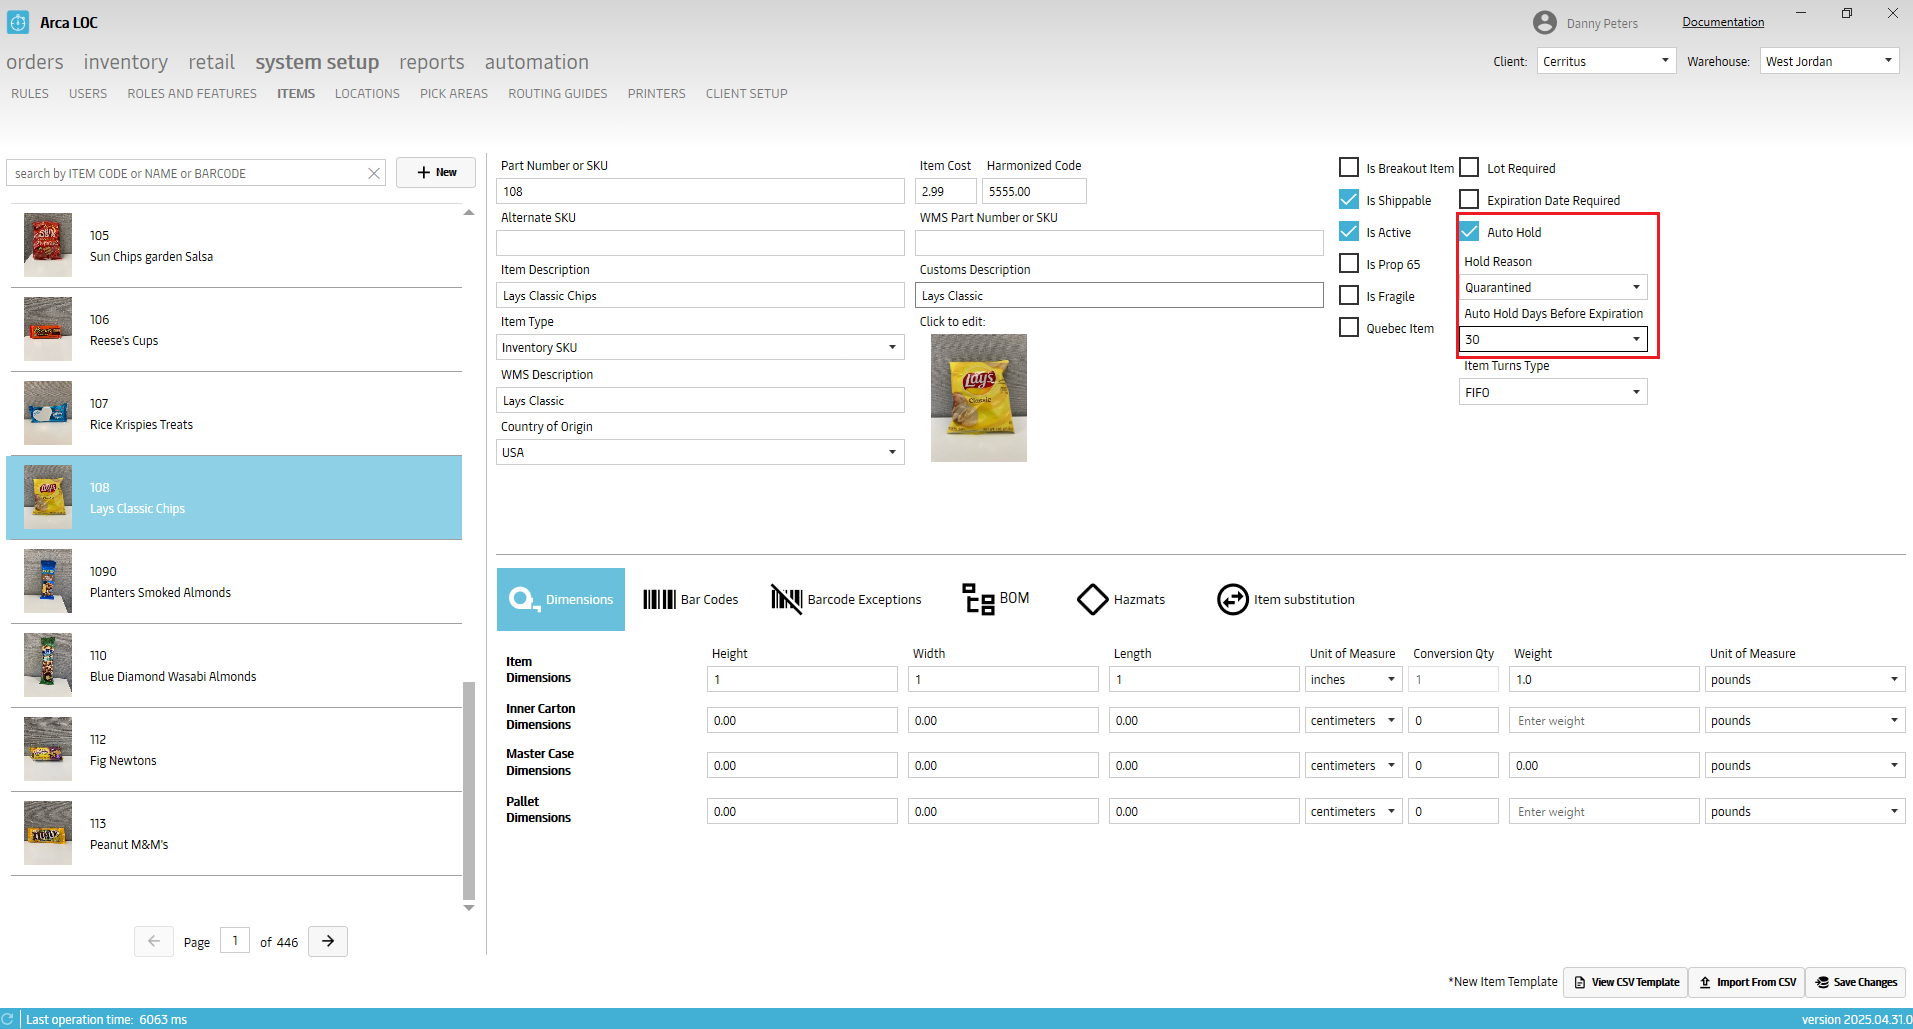
Select an item from the setup screen.
Check the box called Auto Hold.
Select quarantine as the hold reason from the drop-down menu.
Select the numbers of days from expiration to hold the pallets with this item.
Save changes.
There is an automated job that runs nightly. If the rule is active for the client, then it will check all the pallets in inventory to see if anything meets the requirements for quarantining. If the pallet’s item is set to auto hold, and the expiration date is within the days before expiration range you set, then the pallet’s status will be changed to quarantine.
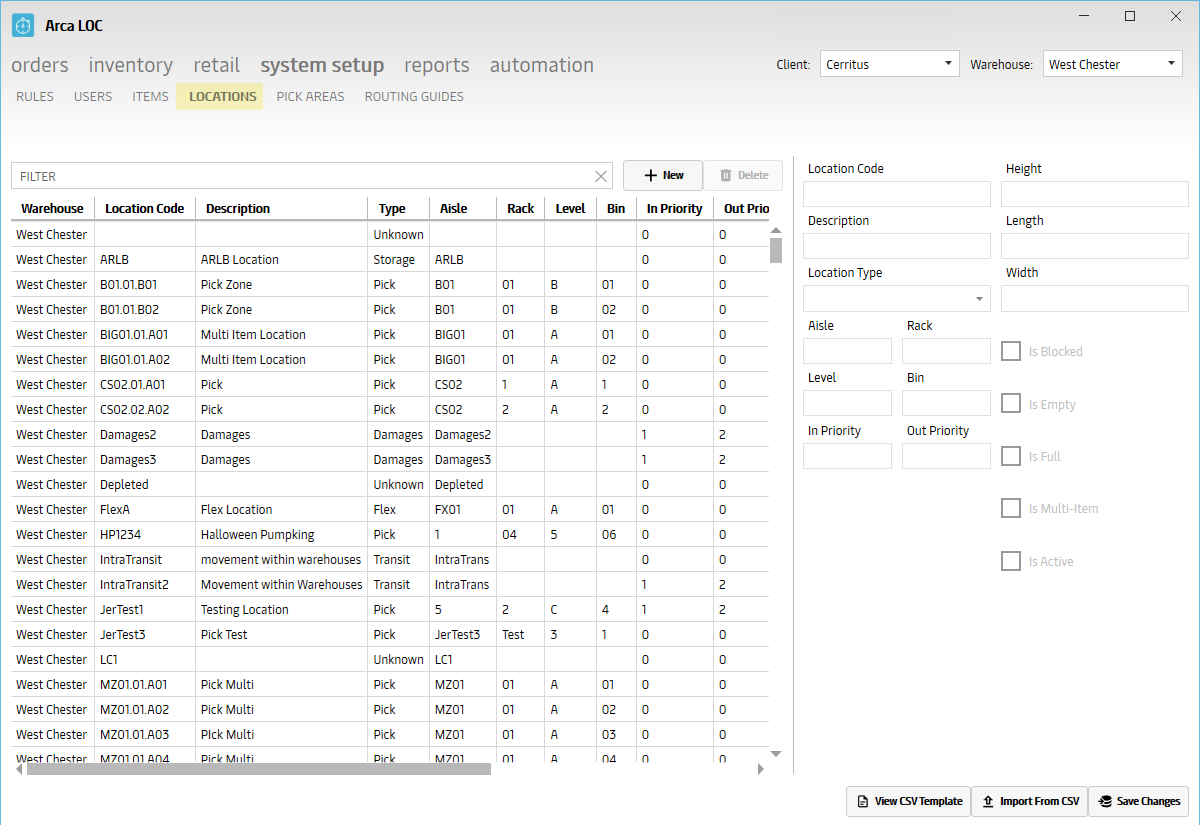
Locations
The "Locations" portion of ARCA LOC System Setup is used to setup and manage warehouse locations.
| Location Type | Description |
|---|---|
| Damage | This is for damaged goods that could happen during shipment, handling, or at any point during the warehouse/supply chain process. |
| Flex | This is a picking location where a user can put multiple items in a location in various pick areas. |
| Packaging | All picked items for an order is prepared for shipment to the customer. |
| Pick | These are pick locations in the warehouse where the worker fulfills the orders by going to certain pick areas/zones. |
| Pickup and Delivery | Loading or unloading of orders in the most convenient way. |
| Production Storage | Need definition |
| Receiving | When product is delivered and unloaded at a loading dock where counts are checked against an ASN for accuracy and then stored. |
| Receiving Hold | Holding goods until items are received and accurately accounted for. |
| Storage | After receiving can move goods into a storage location which maximizes the available space. |
| Transit | Items are stored temporarily in order to quickly access. |
| Unknown | Location type is not known. |
API Calls
- WarehouseLocationGetAll – get all warehouse locations
- WarehouseLocationSave – save warehouses
Pick Areas
The "Pick Areas" portion of ARCA LOC System Setup is used to setup and manage pick areas.
API Calls
- WarehousePickAreaGet
- WarehousePickAreaSave
- WarehousePickAreasGet
Routing Guides
The "Routing Guides" portion of ARCA LOC System Setup is used to manage routing guides.
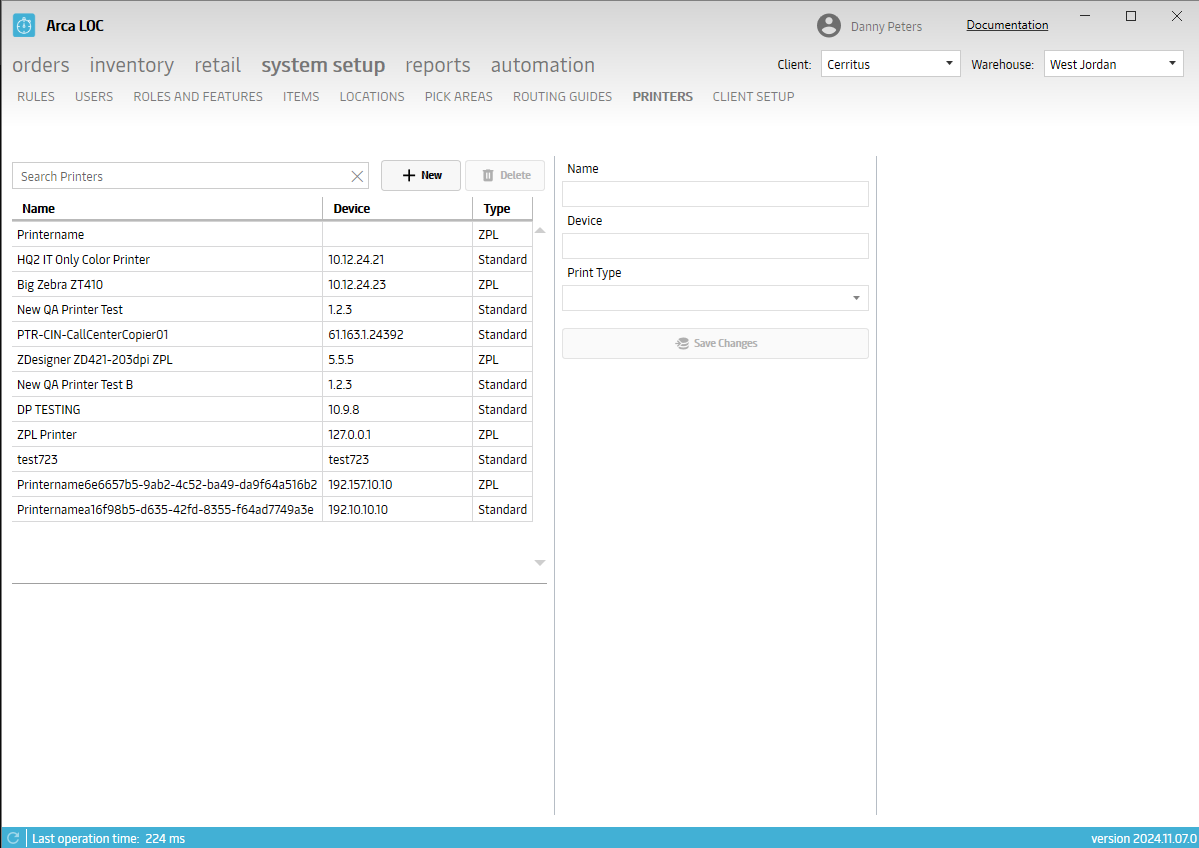
Printers
This screen is intended to work with the mobile version of Arca that is under development. This screen is only informational currently.
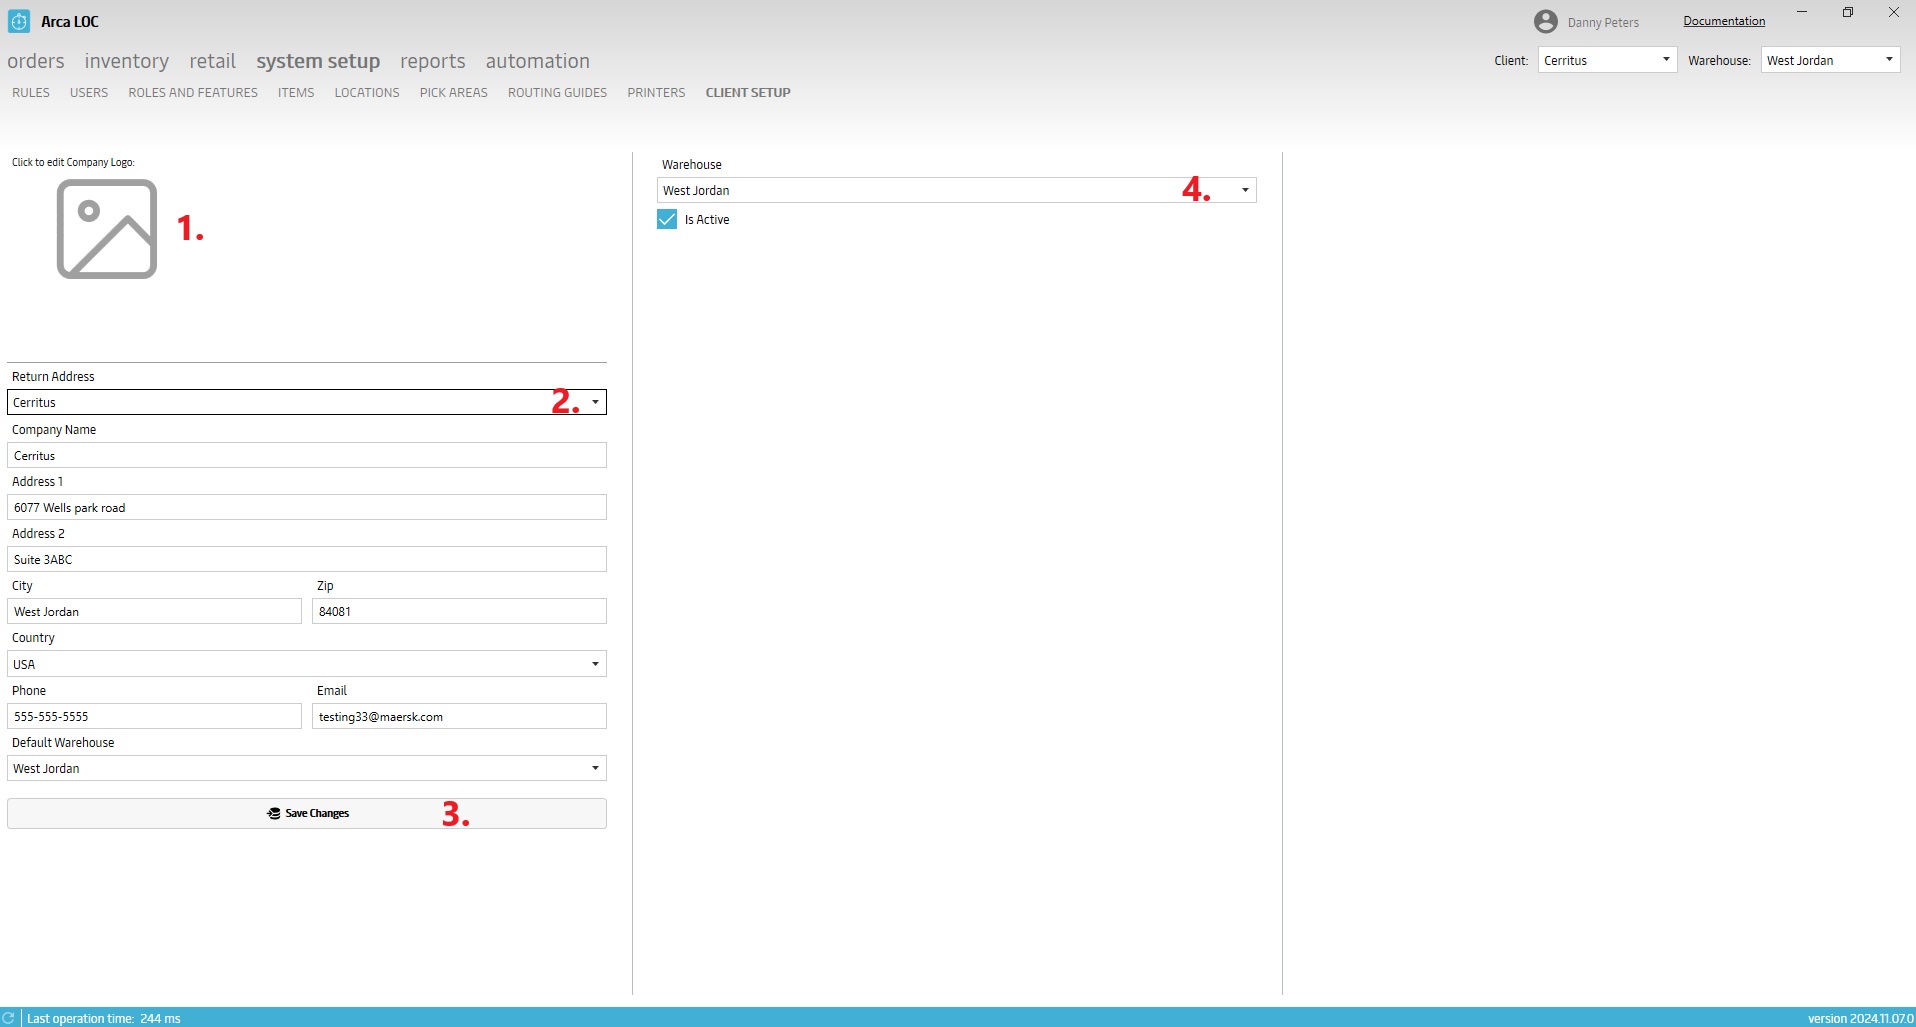
Client Setup
The Client Setup screen will allow users to edit and maintain client information such as company logo, return address and active warehouses.
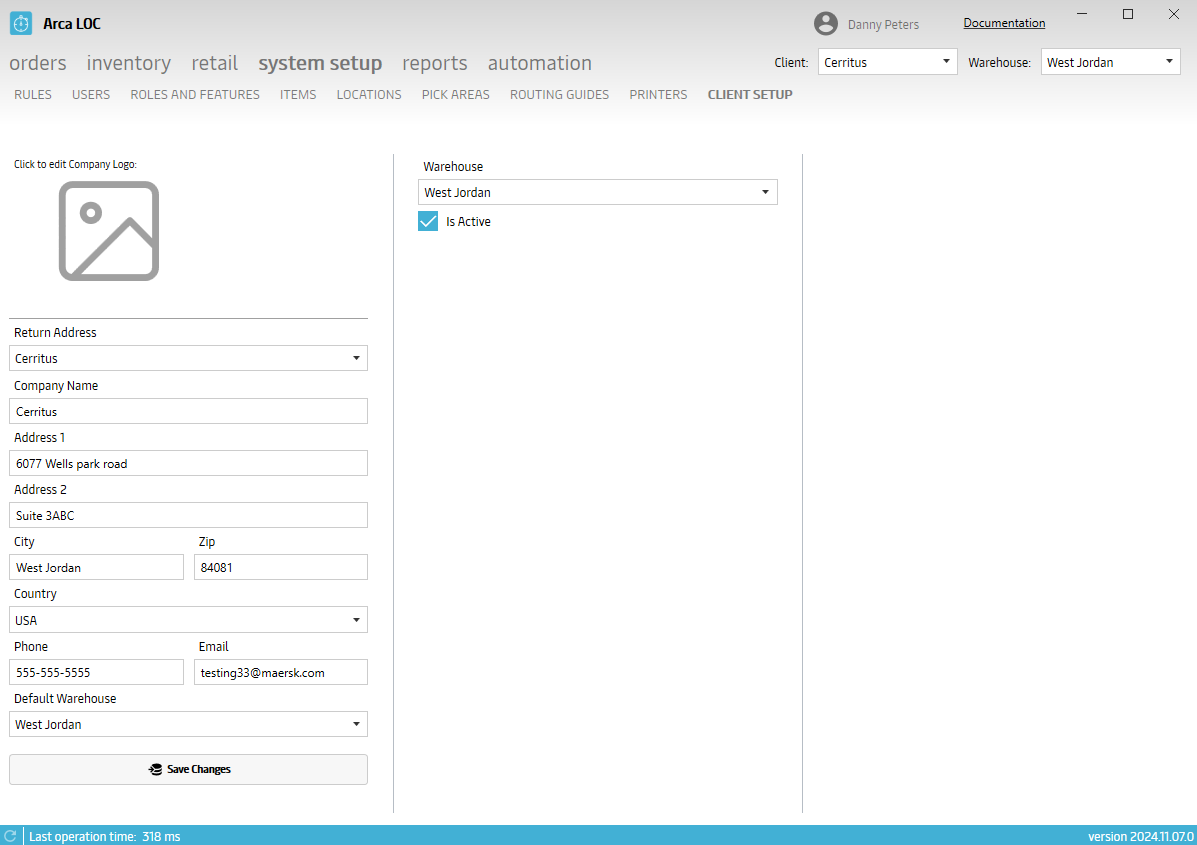
Click on the image button to upload or change the company logo.
Select an address to edit from the Return Address drop-down menu.
Fill out complete address information and then click on save changes.
The middle column in the screen will display the active warehouses for a client. Choose a warehouse from the drop-down menu and then check the Is Active box and save.
Pallet Label setup
This is the direct ZPL that controls the pallet license plate label. Users will now be able to edit and manage this on their own. Changes made here will be applied at the client level. Changes you make here may affect other warehouses.
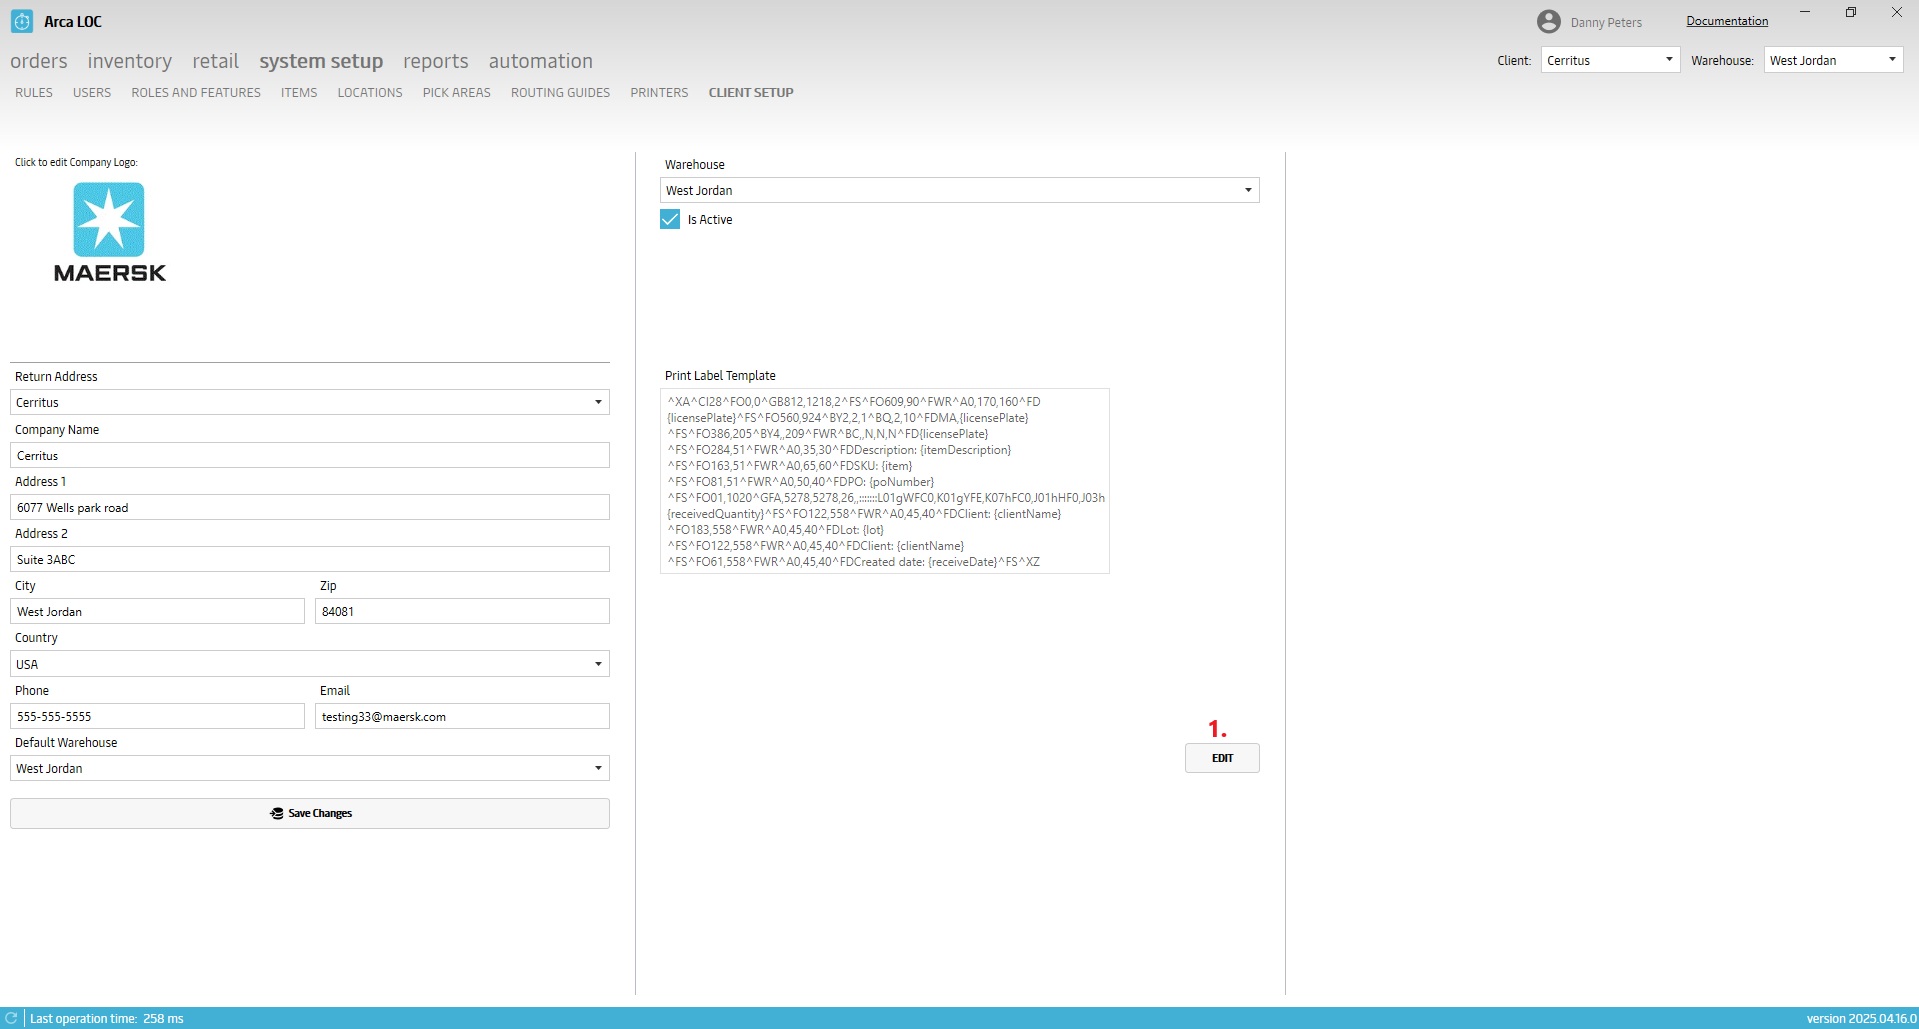
Click on edit to begin.
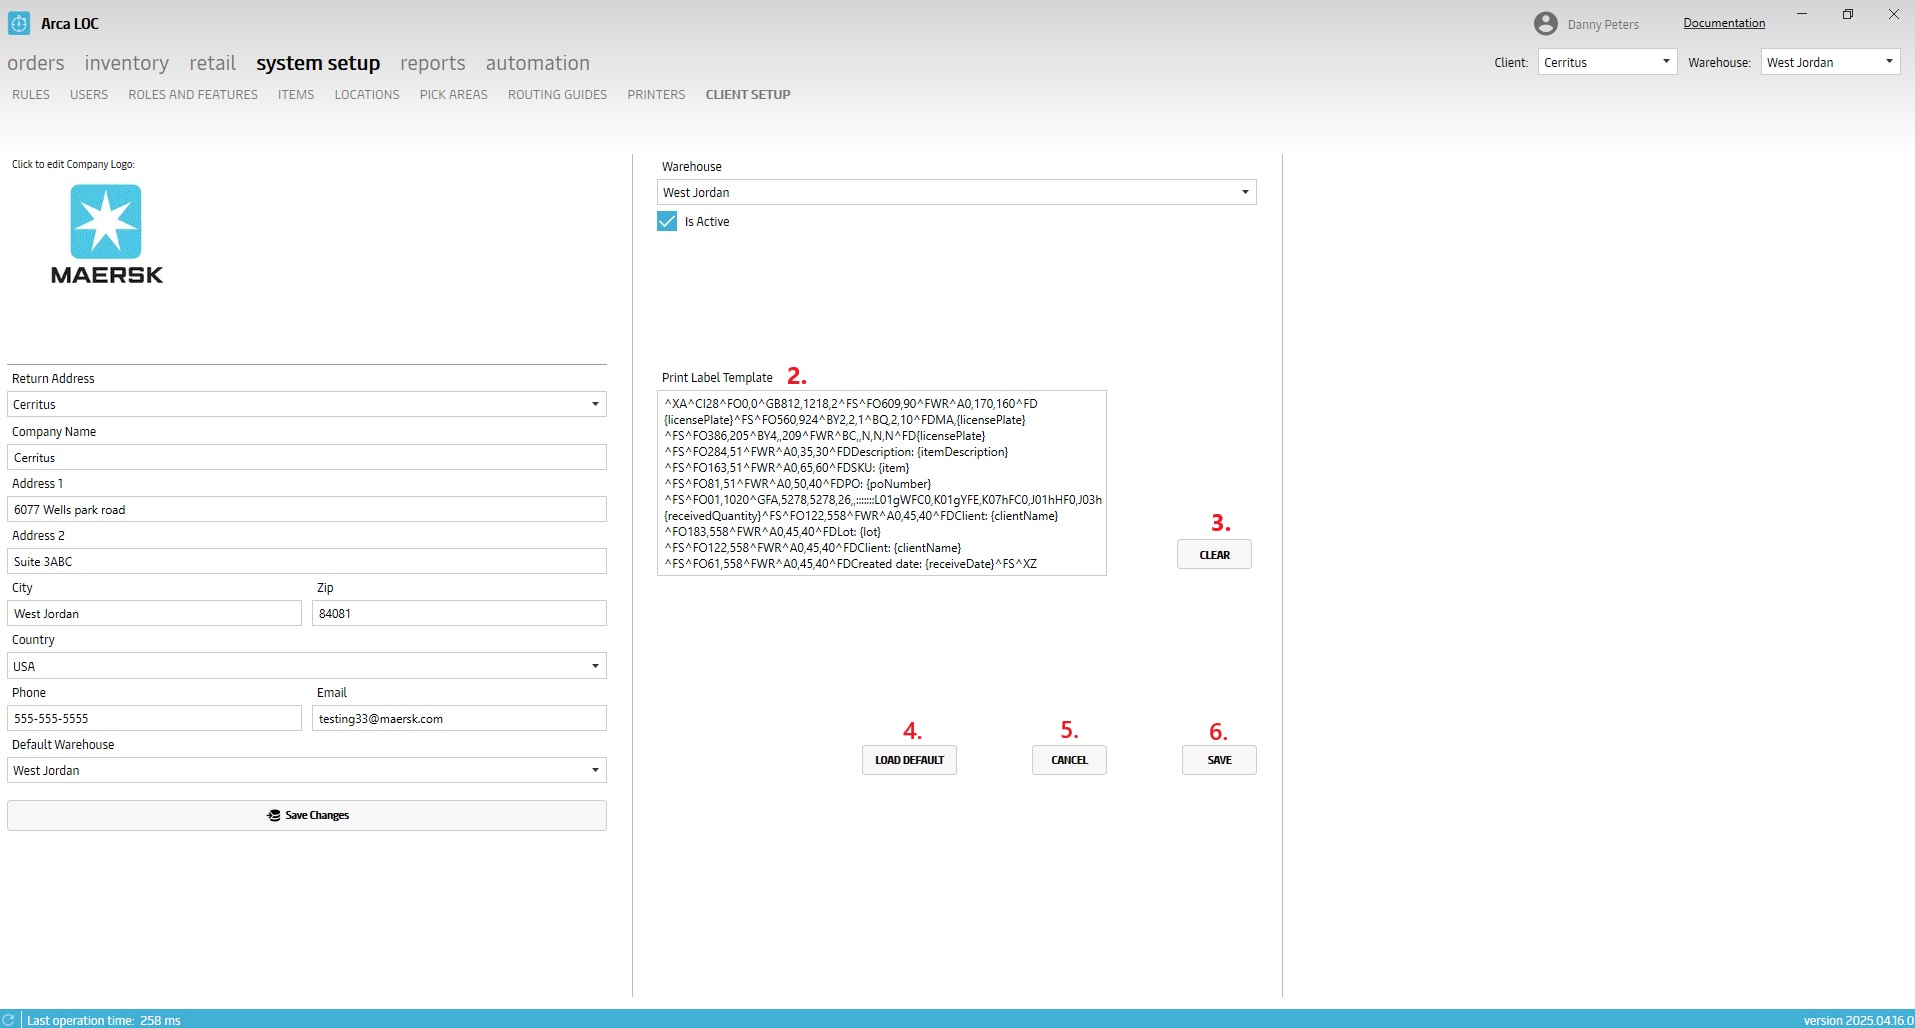
Paste in new zpl code to change the existing pallet label.
Clicking on clear will erase all existing zpl code.
Click on load default to replace the existing zpl code with the default template.
Click on cancel to exit the editor without saving any changes.
Click on save, to save changes and exit the editor.
Reports
Orders
Under the "Orders"* section of ARCA LOC, you will be able to access the following reports.
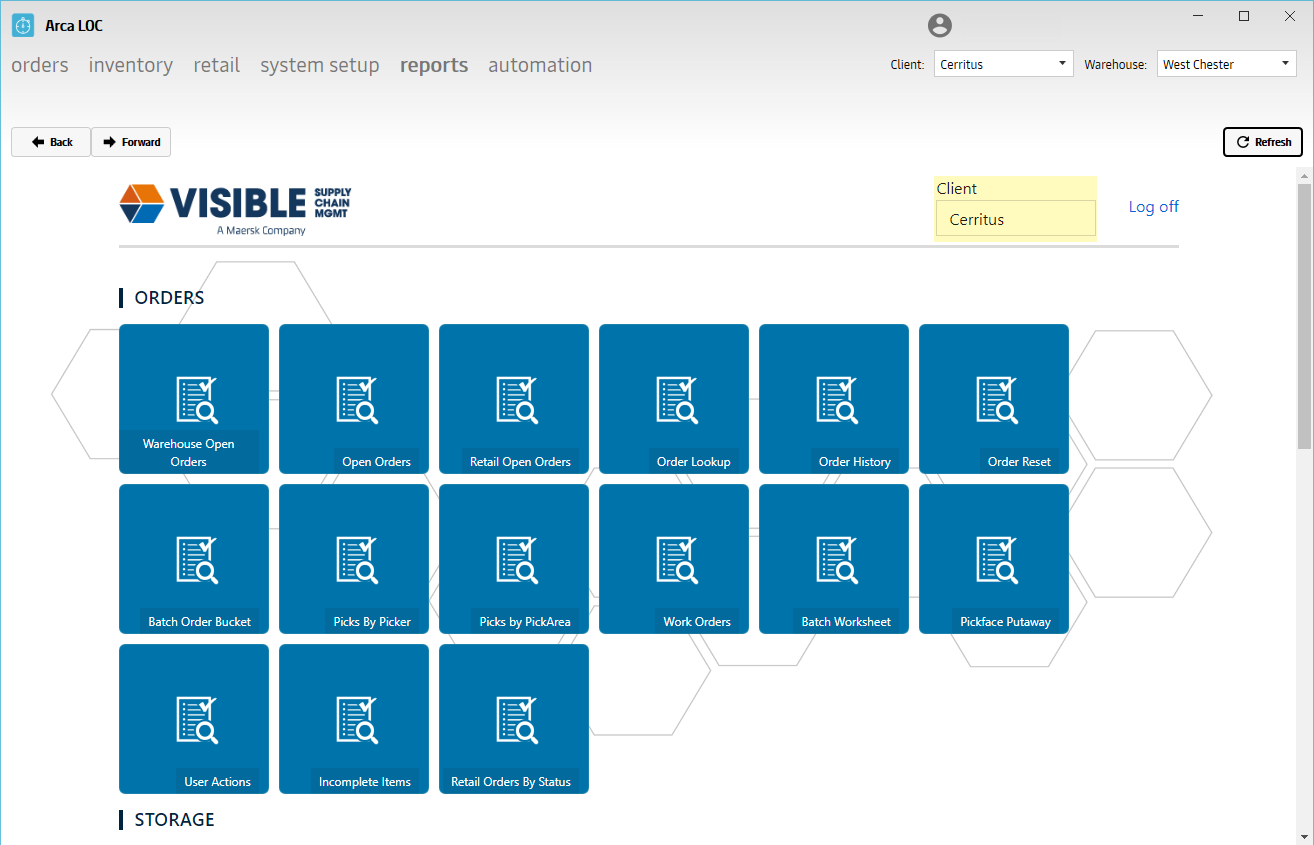
Warning
The client will default back to the first in the list, you must reselect your client within the reports section and click Refresh.
| Report | Description |
|---|---|
| Warehouse Open Orders | Gives a summary of open orders per client, with details on customer order statuses. |
| Open Orders | The open Orders Report will return all orders for a specific Client and Warehouse including all order statuses except Cancelled and Completed Orders. |
| Retail Open Orders | Gives a summary of open orders per store, with details on order statuses. |
| Order Lookup | Ability to pull up order details; such as license number, customer number, item number, item quantity, order status, import date, etc. |
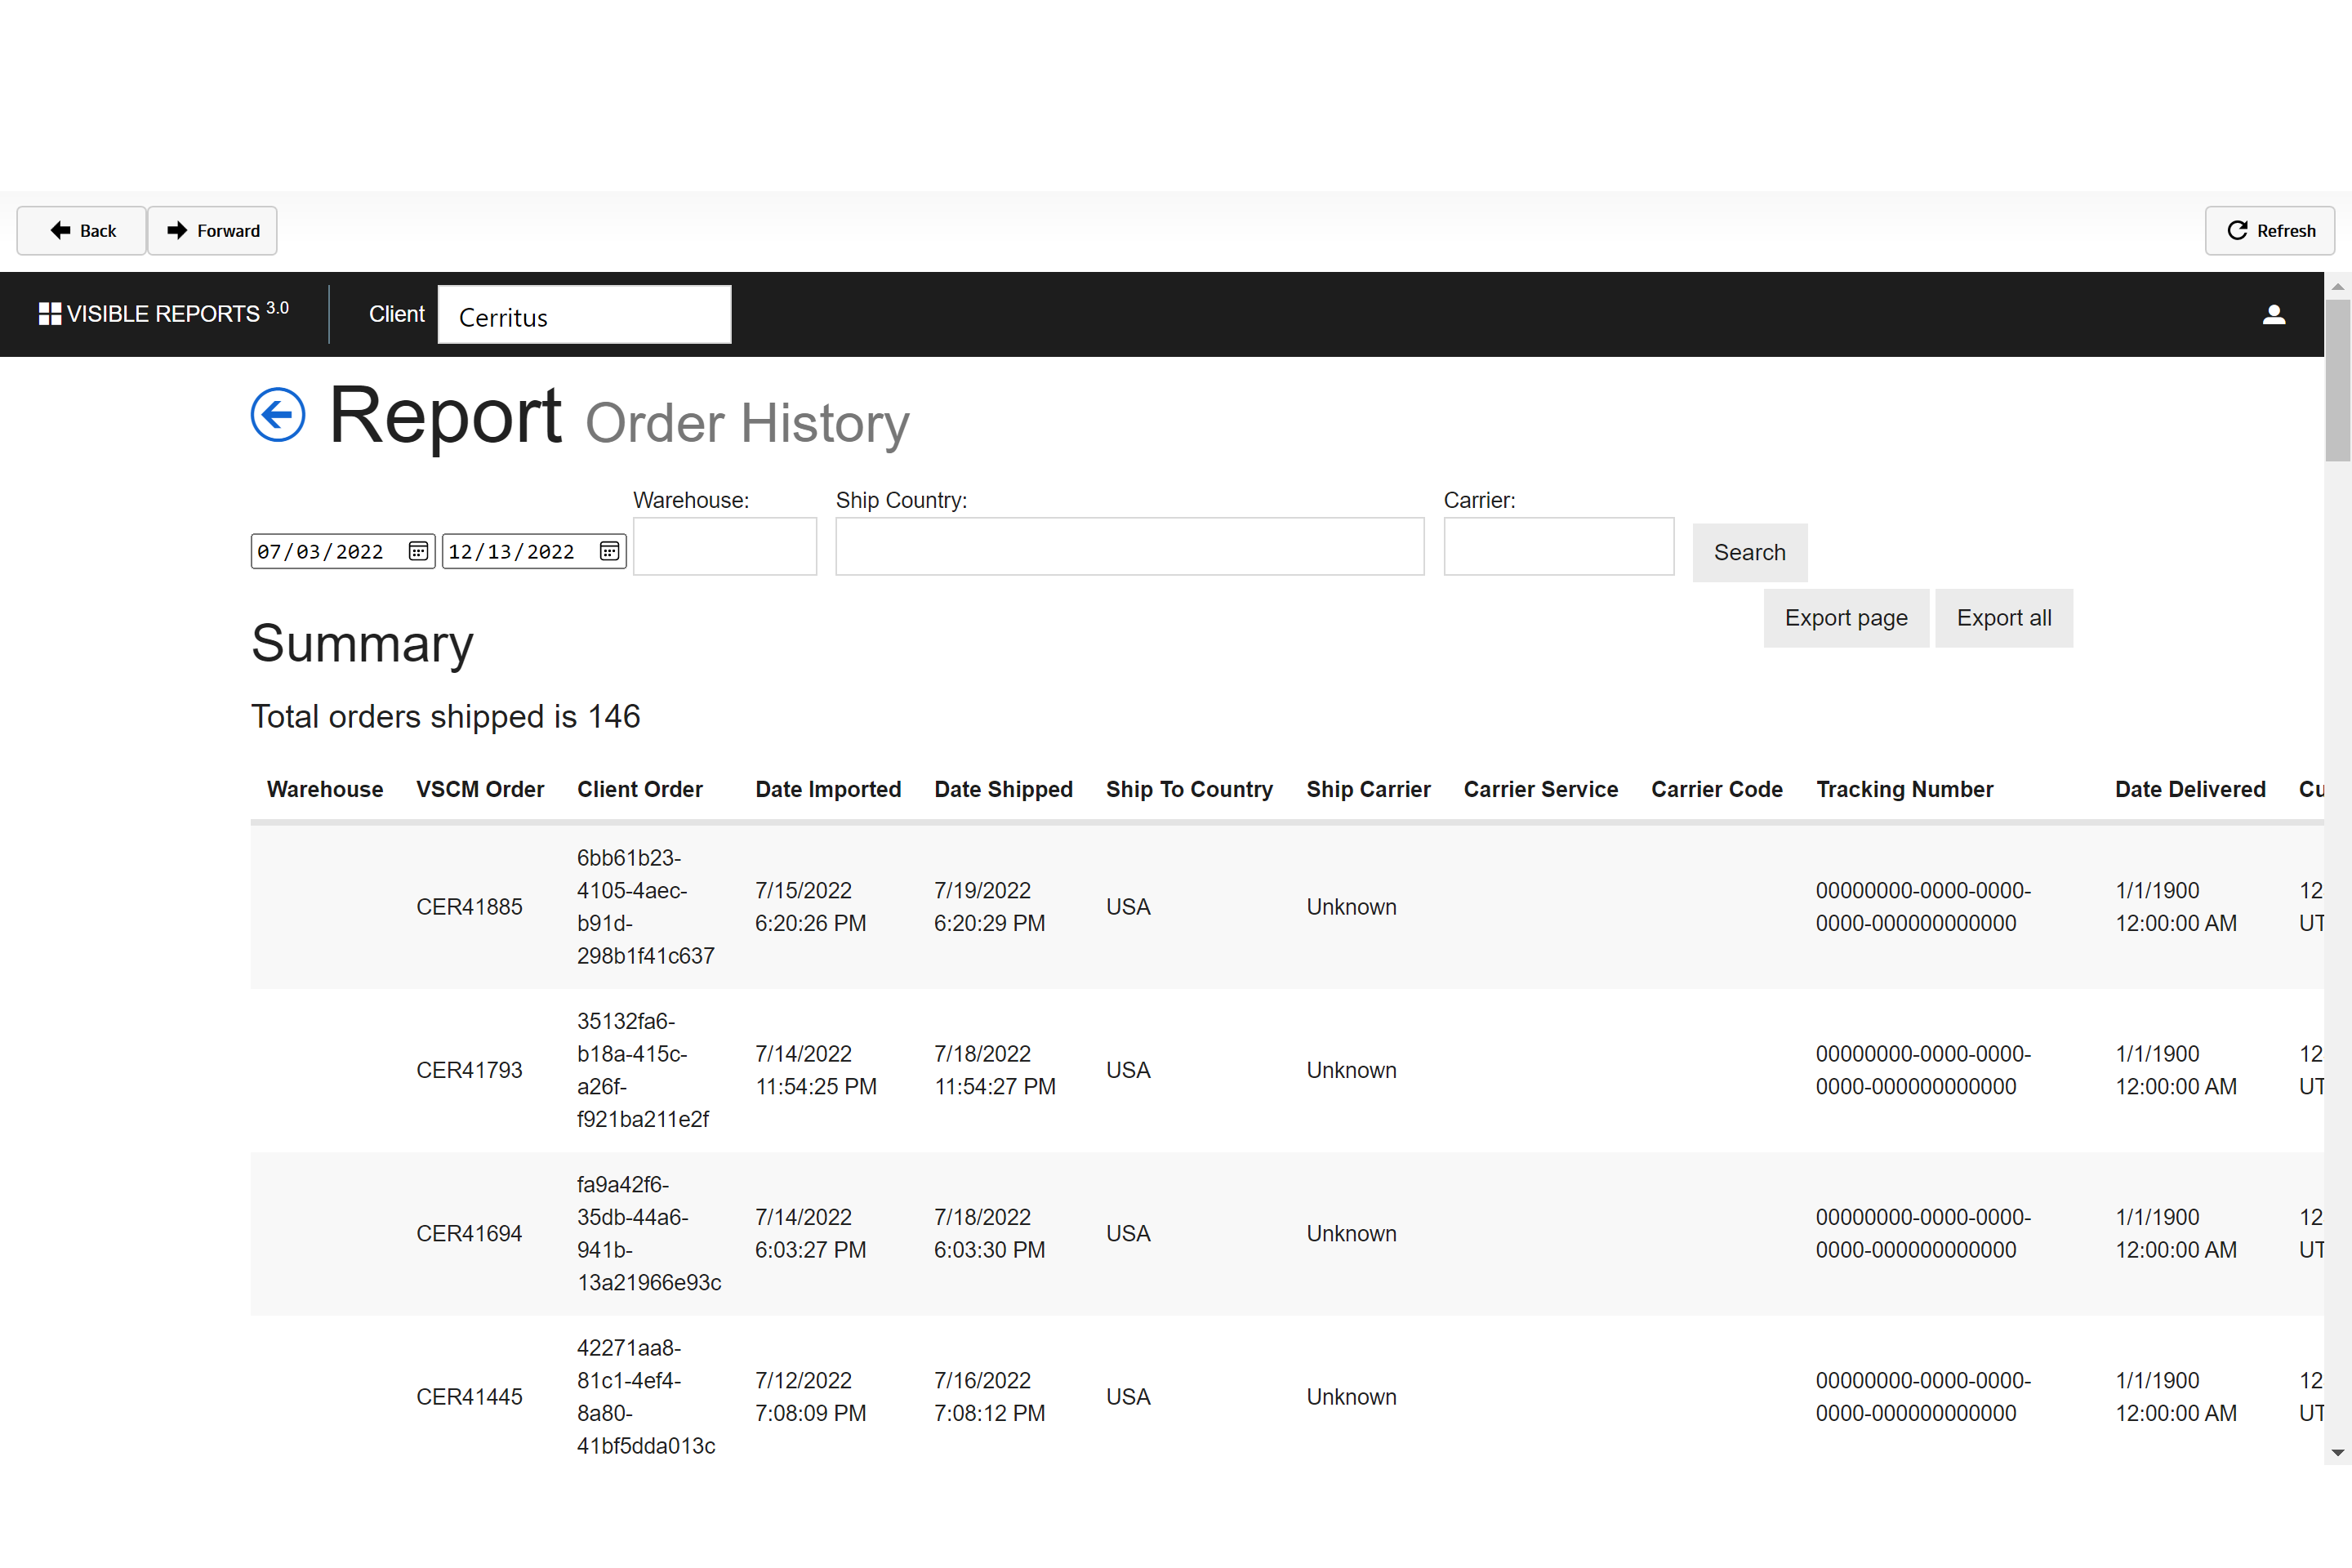
| Order History | A look into the history of shipment actions the completed order has taken, such as shipping date, tracking number, delivery date, etc; |
| Order Reset | Ability to update the order status back to "Order Created". It will only allow the update if the status is Ready to Print or Released to Fulfillment; it will not let you reset an order status if it has any completed picks. |
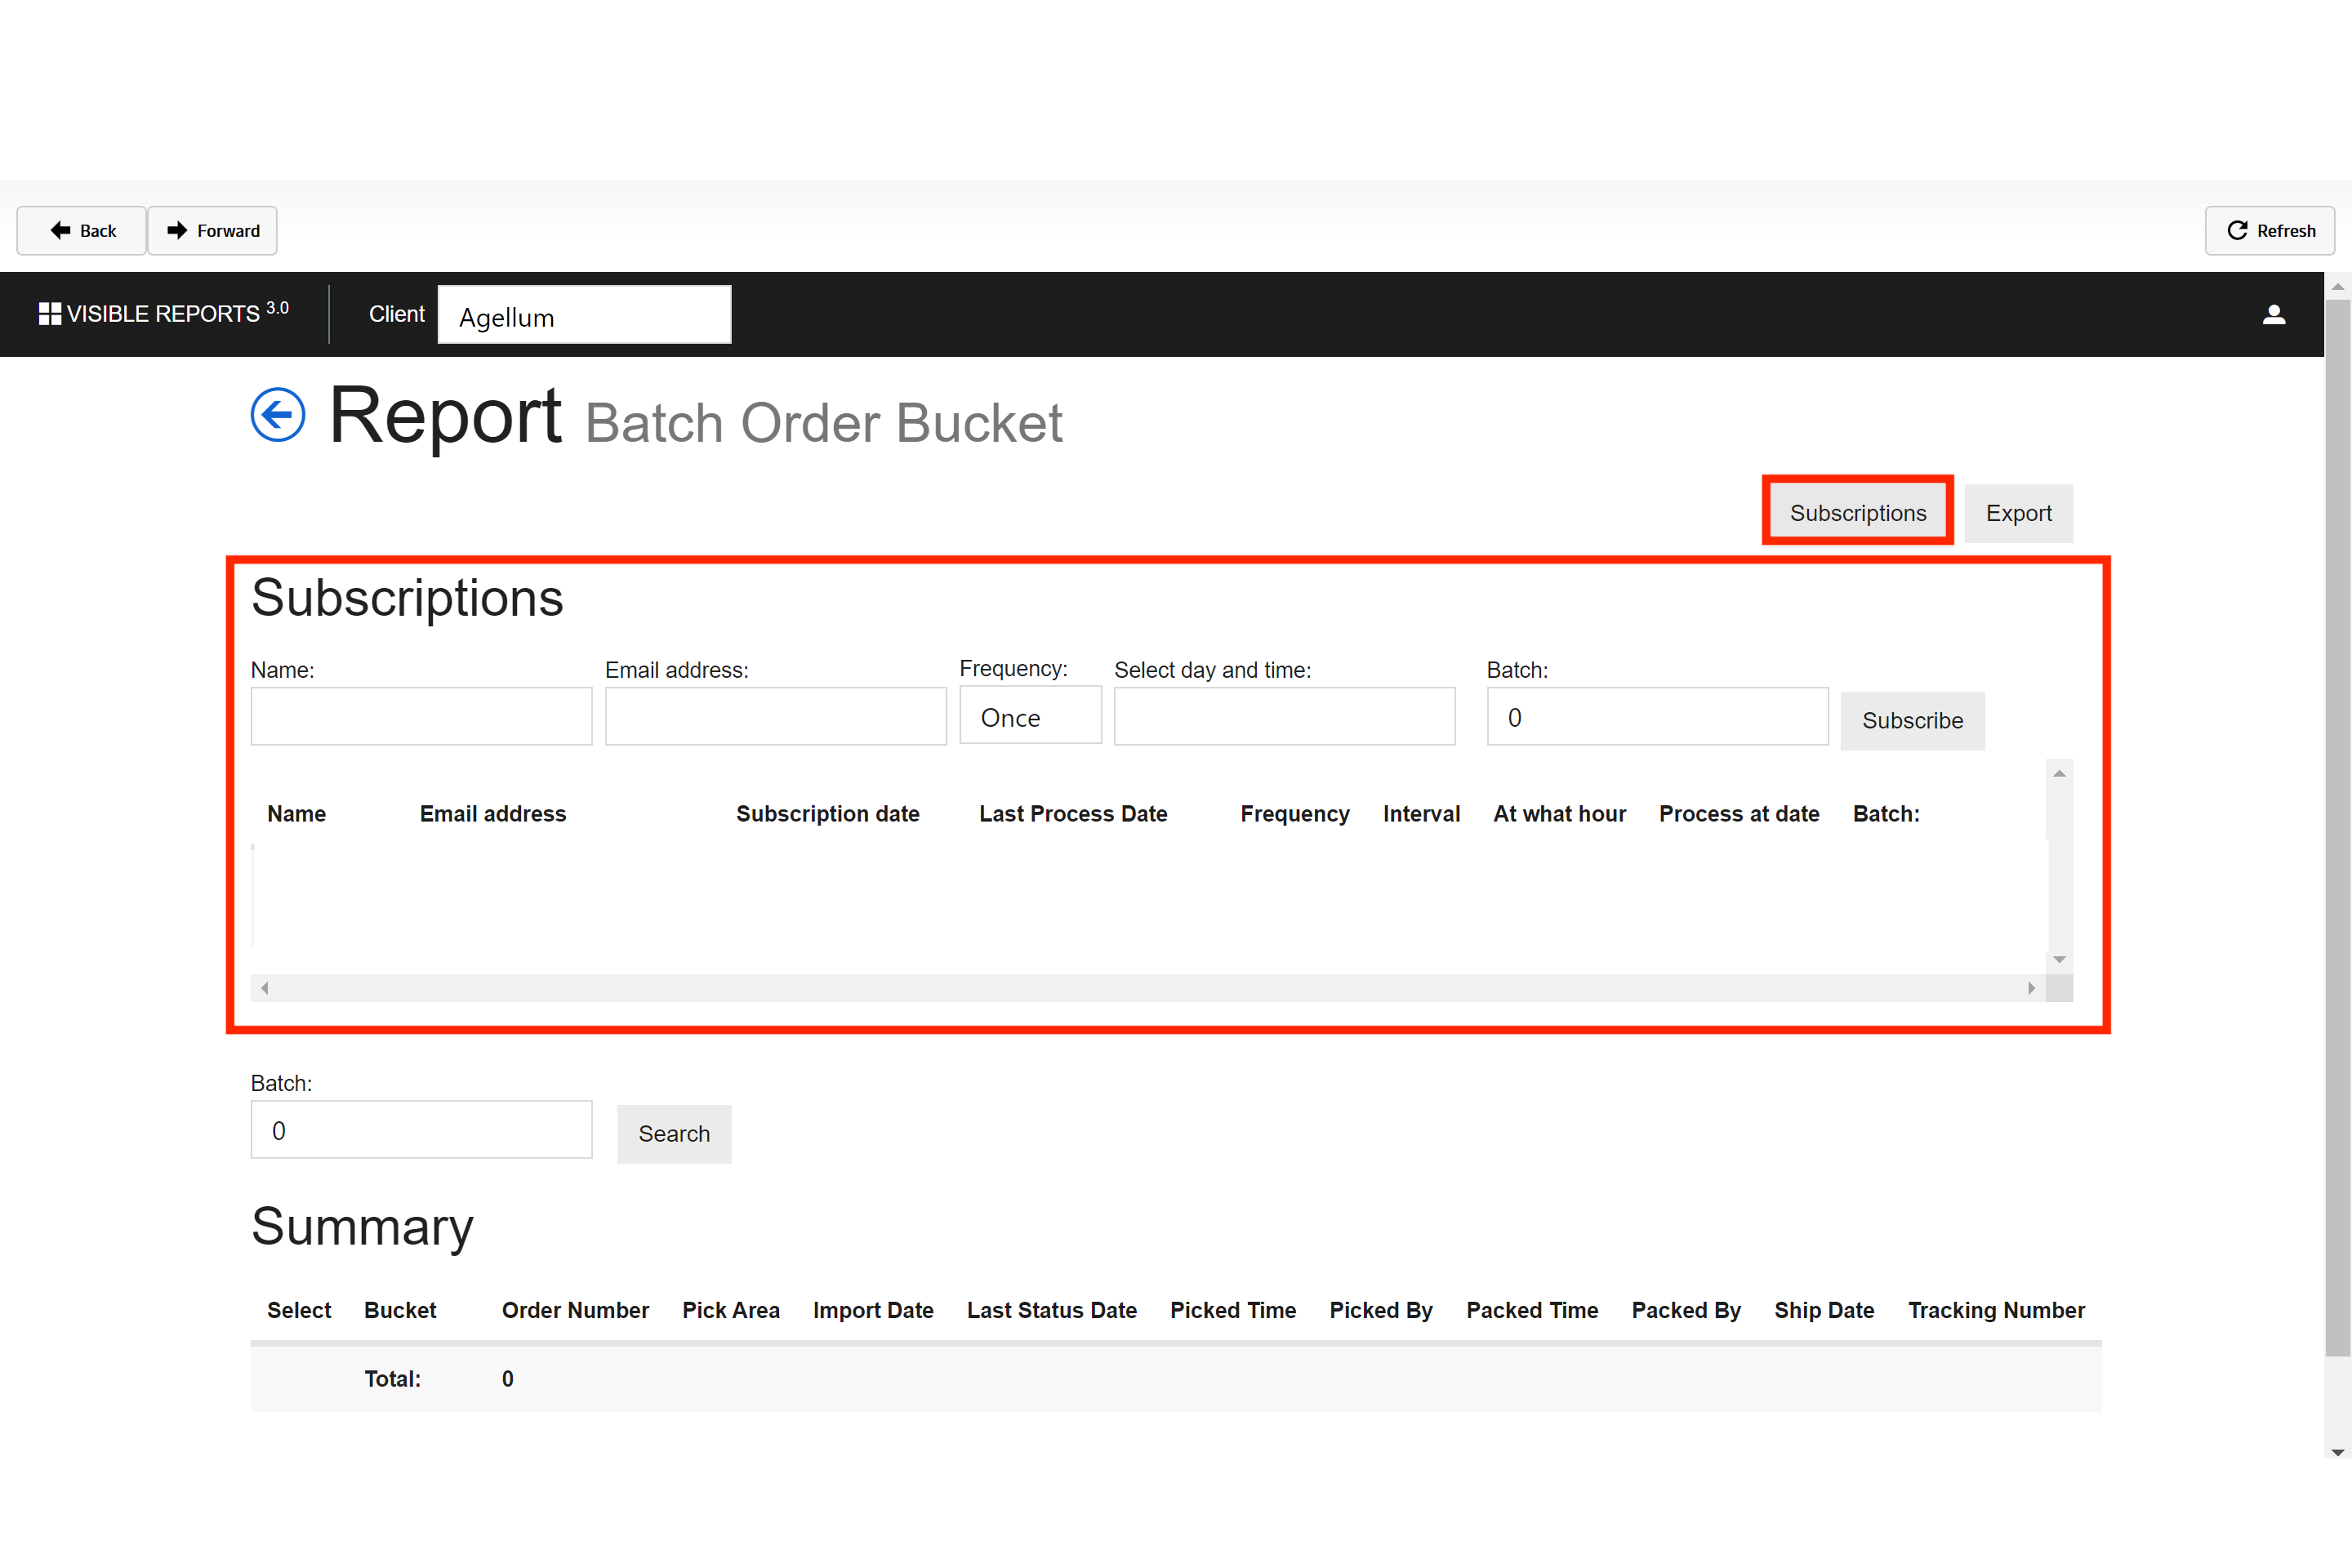
| Batch Order Bucket | Allows you to search for orders associated to the batch (shipment wave). It will display such information as Order number (shipping license plate order number), ARCA order number (website order), import date, picked date, picker ID, etc |
| Picks by Picker | Summary of picks per employee, including picks per day, average picks per hour etc. |
| Picks by Pick Area | Summary of employee picks per pick area; including average unit, average orders, total units and total orders. |
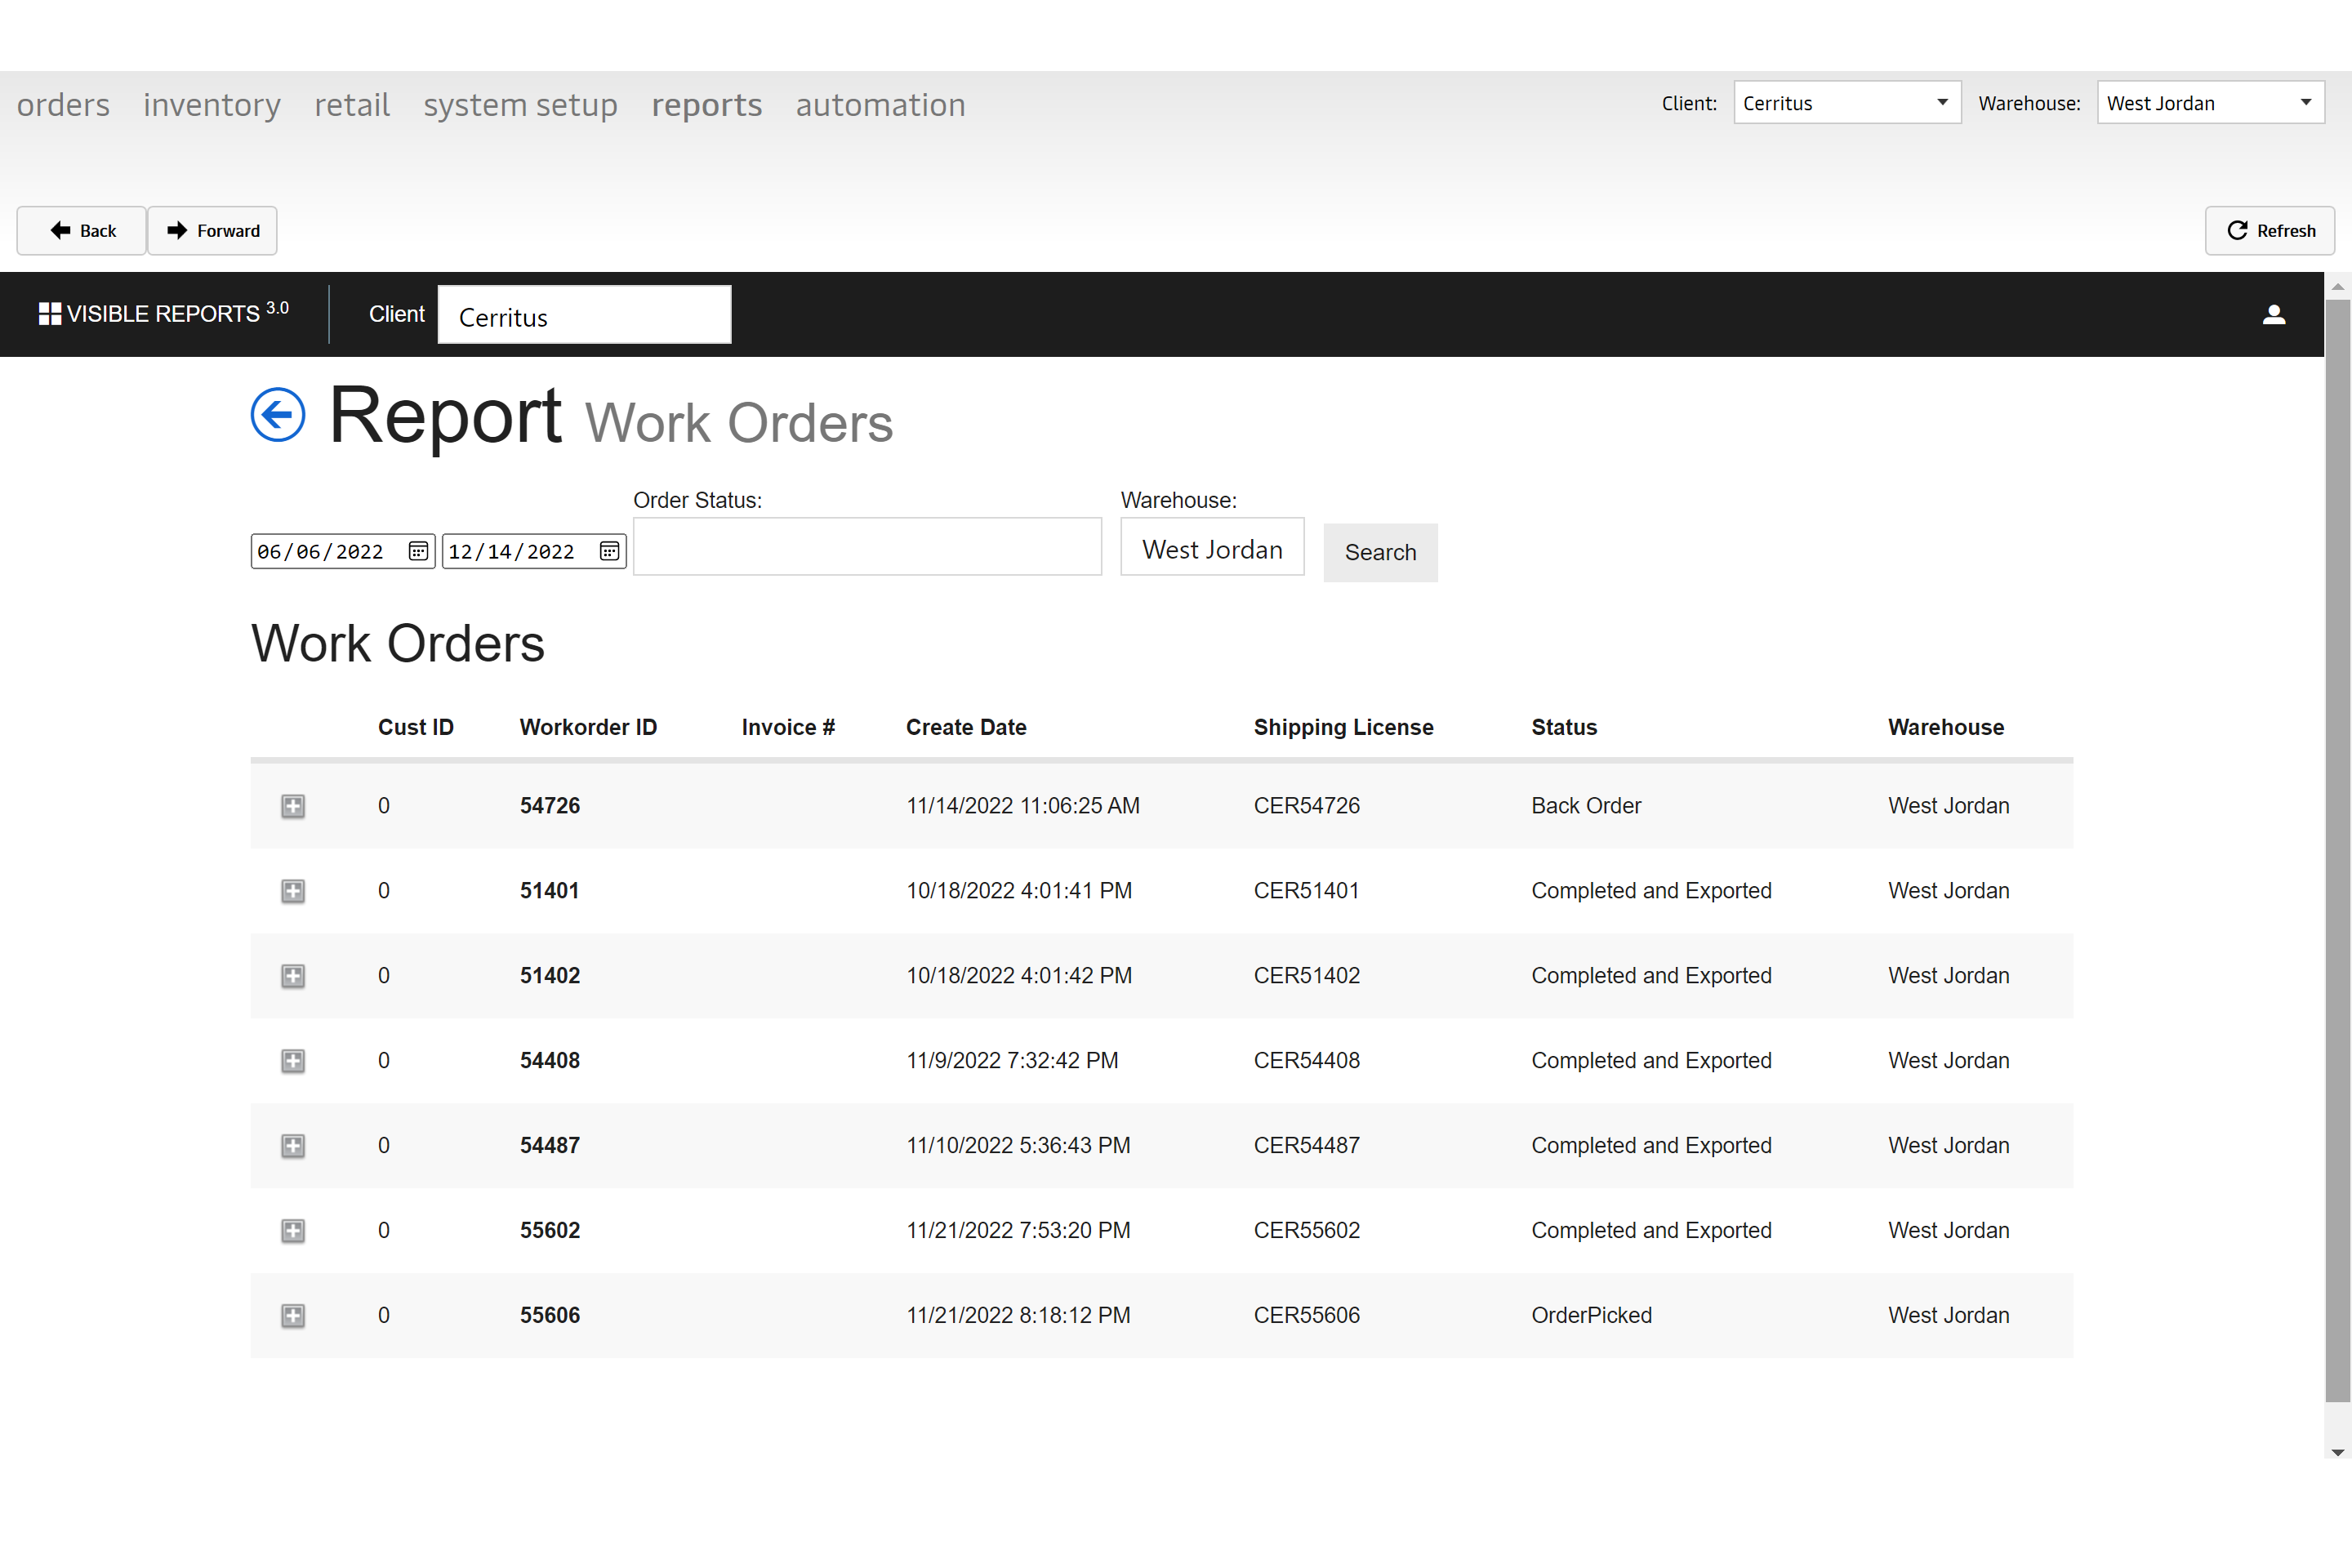
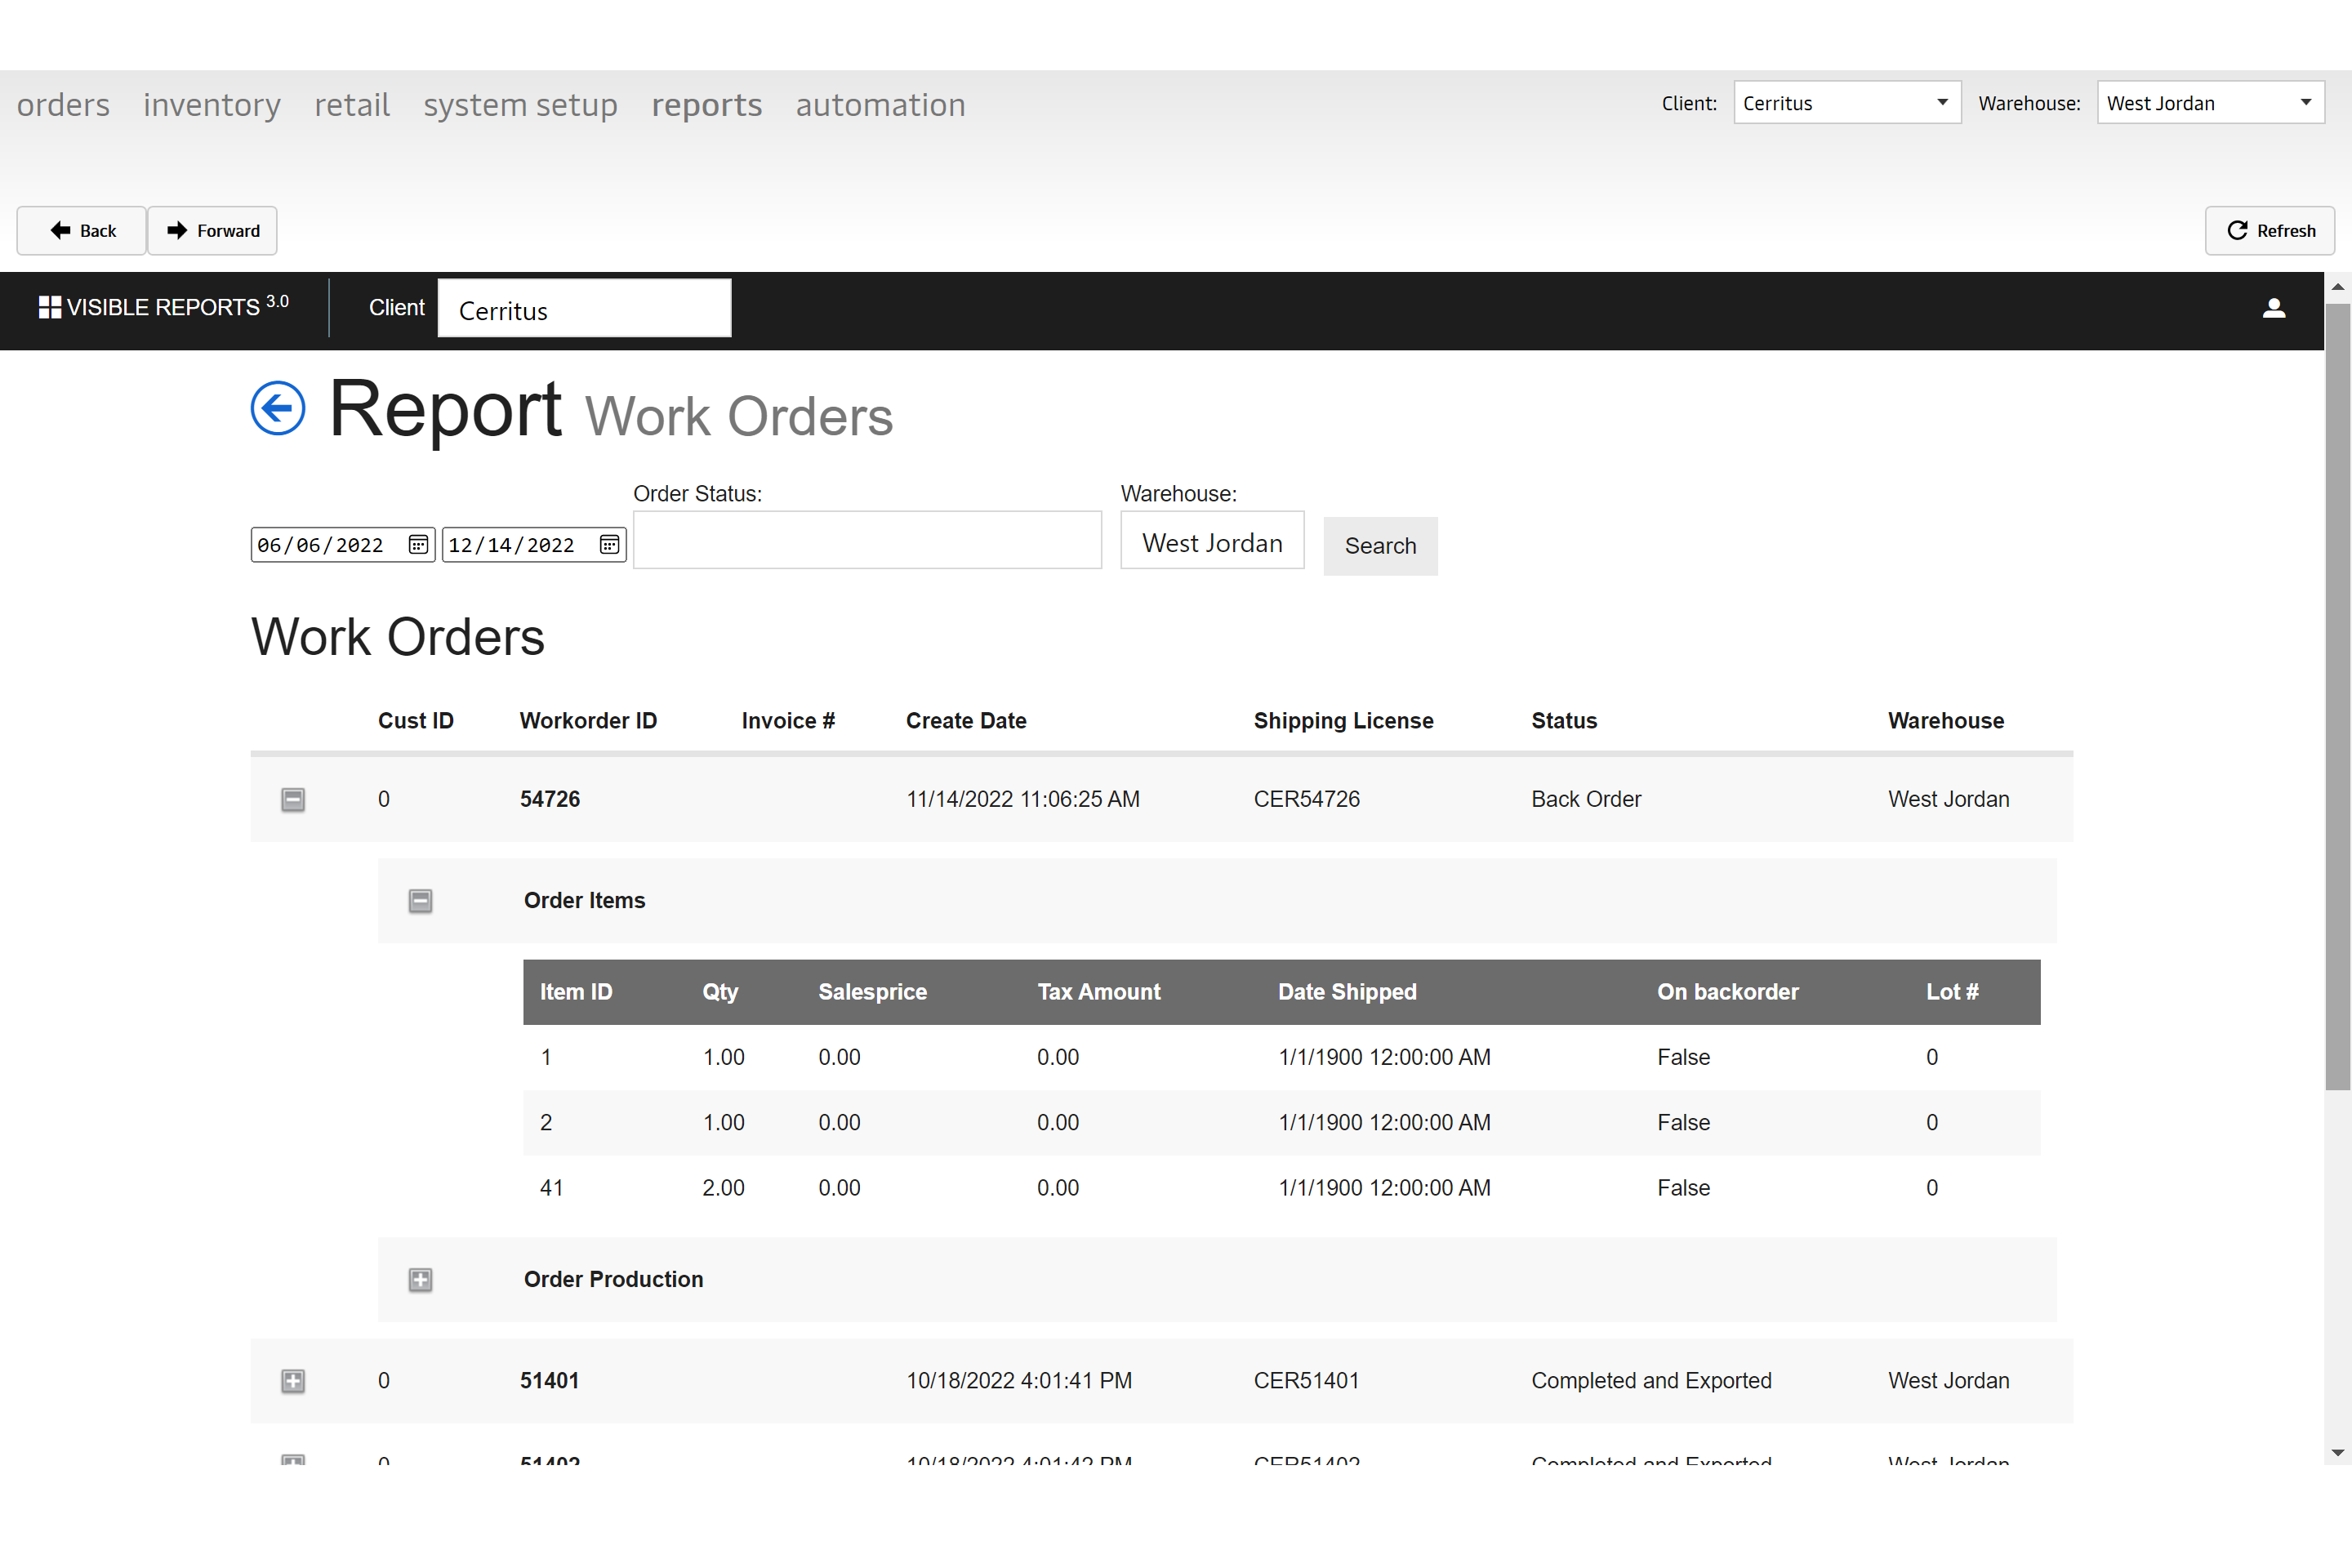
| Work Orders | The Work Orders Report will display specific work order ids and their various statuses per warehouse (Order Created, Allocated, Released to Fulfillment, Order Picked….etc). A work order is a task from a customer purchase order that initiates a process to create a product. There usually are special instructions on a start date and completion date. An example would be to create a kit with various part numbers and quantities. |
| Batch Worksheet | It will display details of the items per pick area within that batch; the batch needs to be in "Released to Fulfillment" status and not picked yet. |
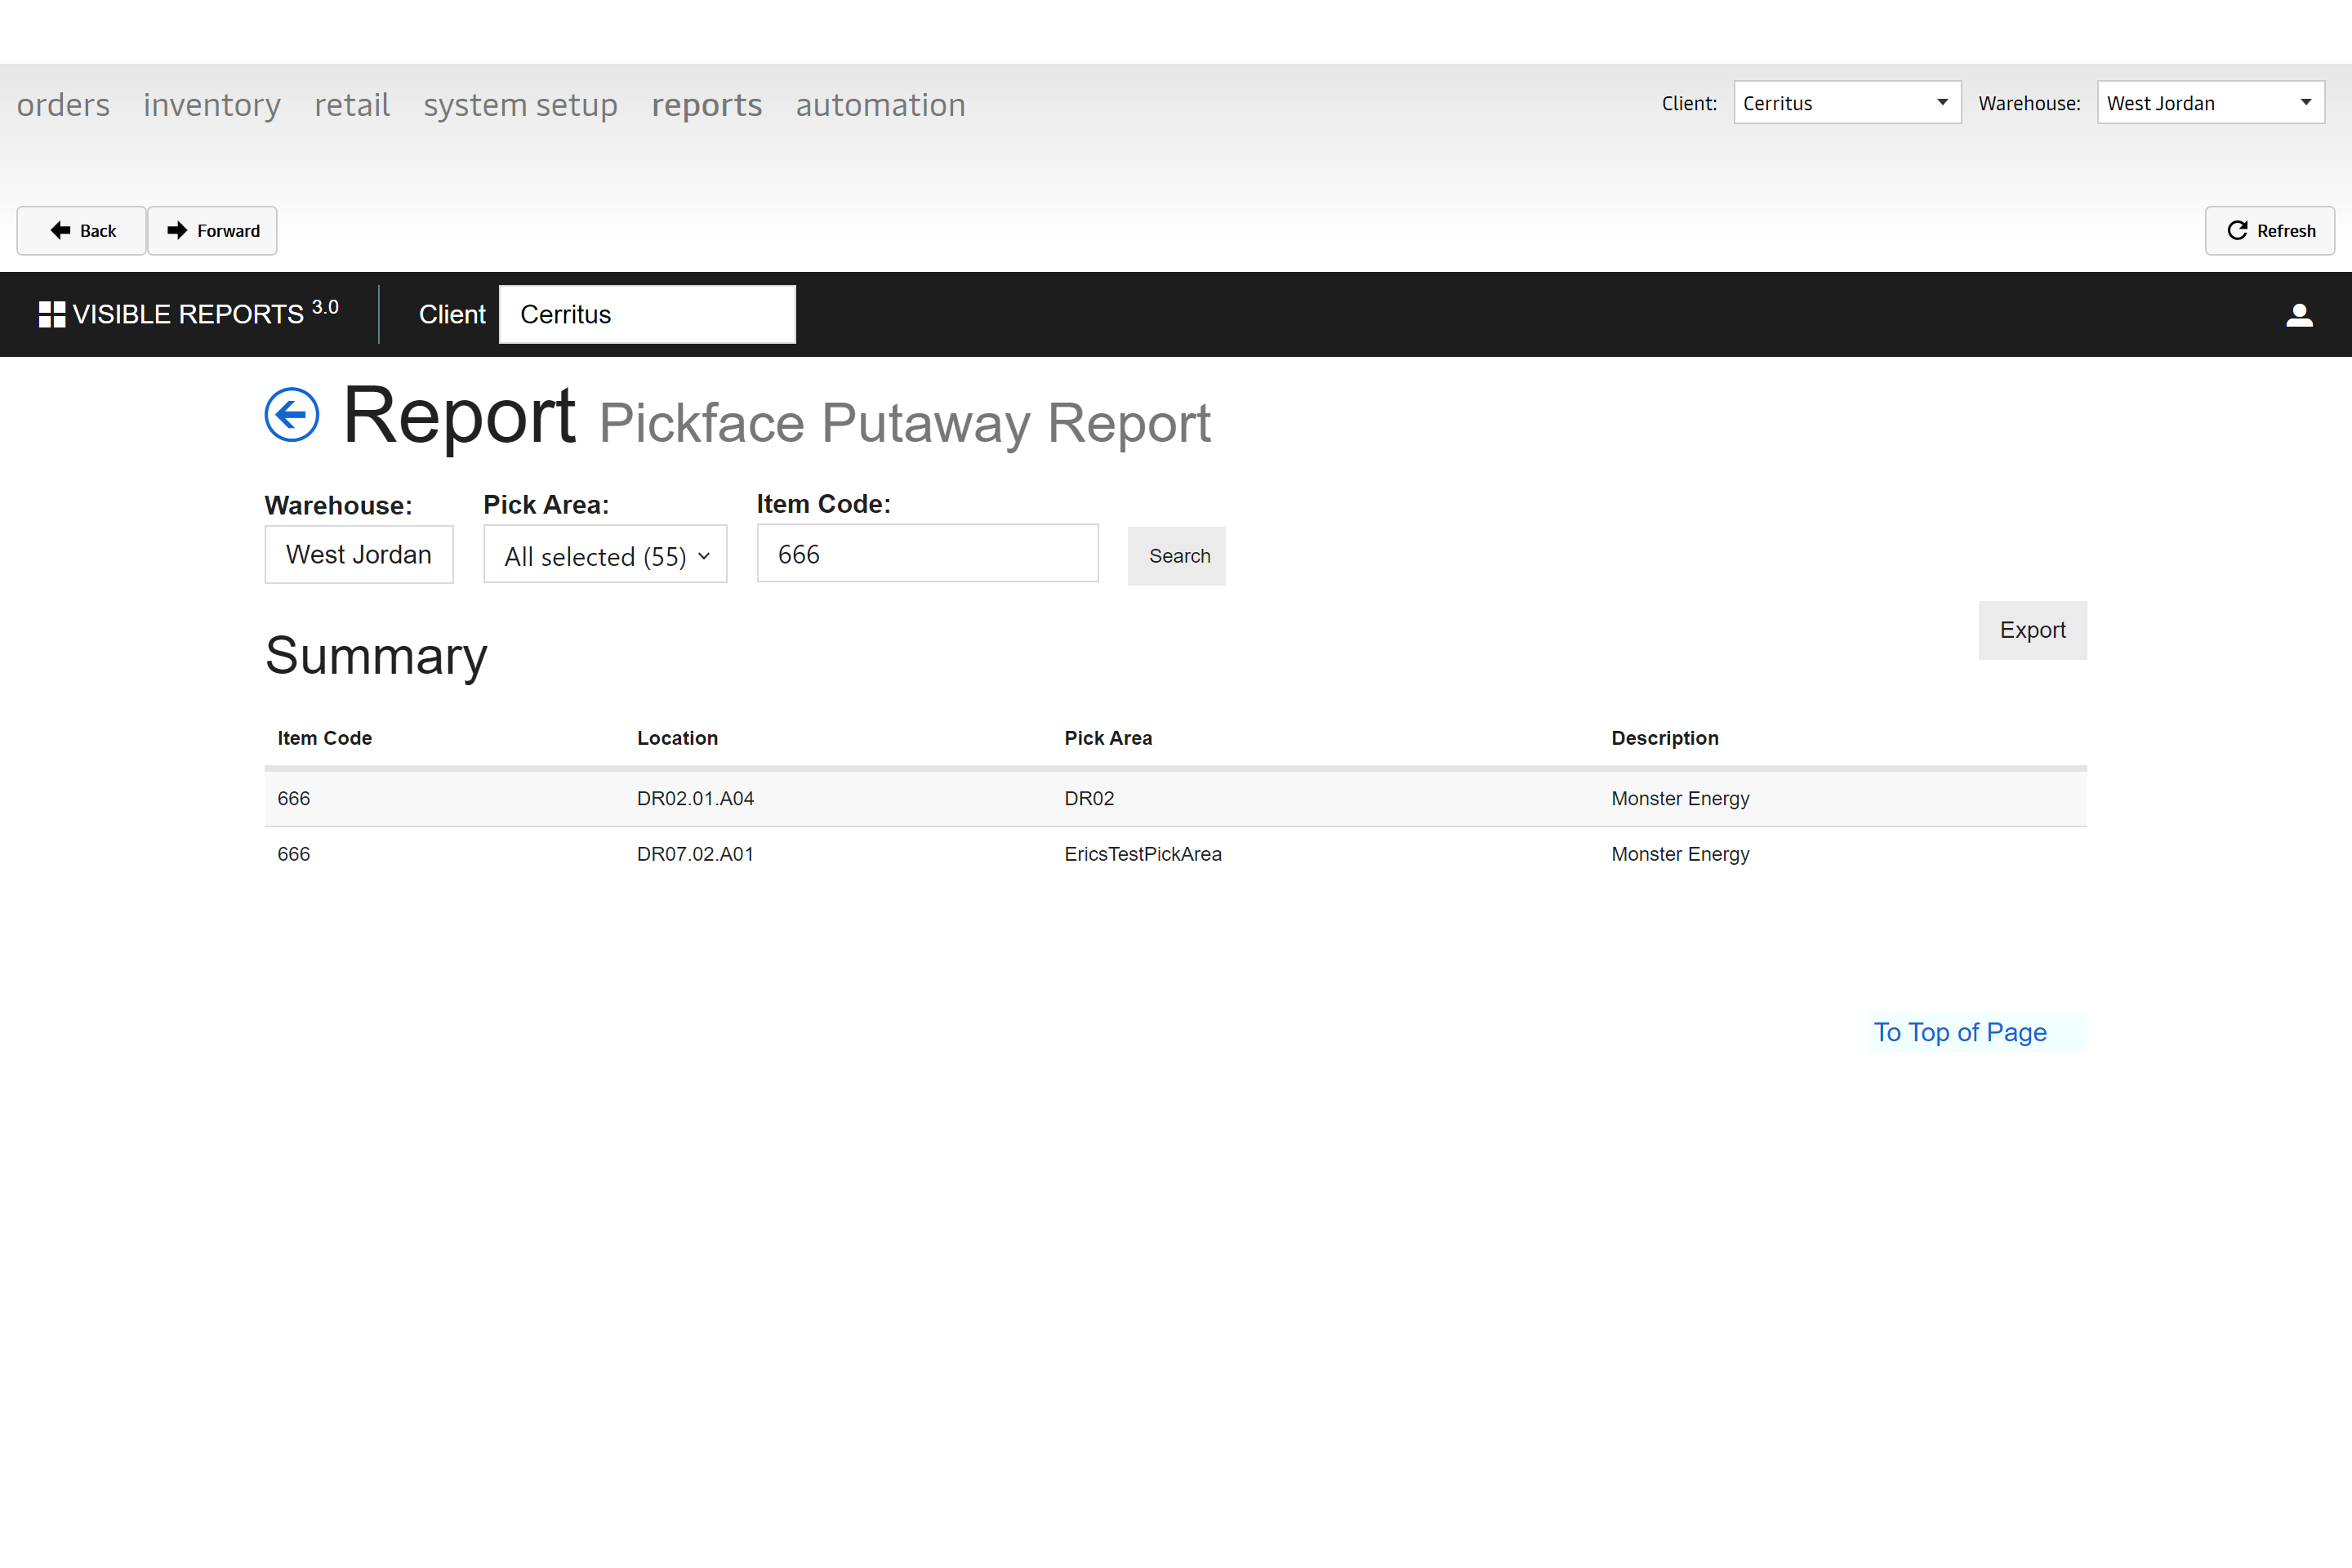
| Pickface Putaway | Shows a list of inventory on-hand; lists items with respect to their location and pick area. |
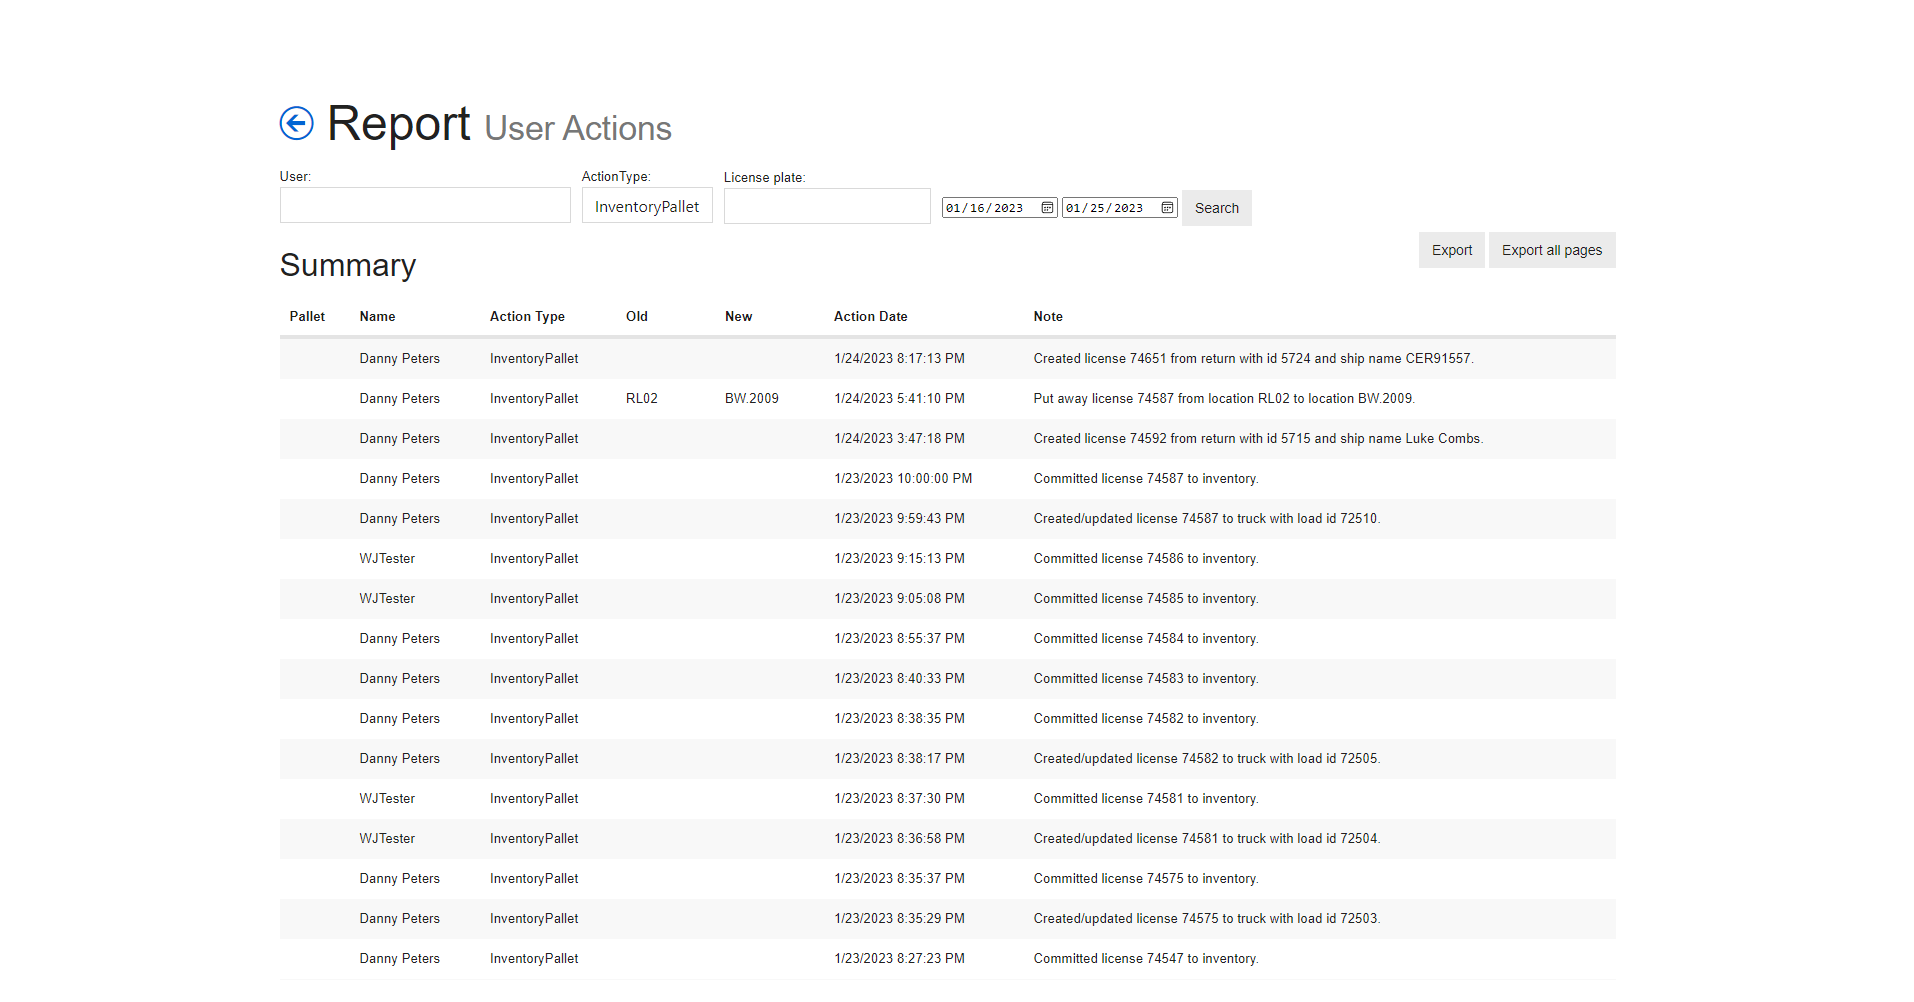
| User Actions | Gives a summary of the actions taken by a user; login timestamps and activities filtered by action type (scans for tasks such as inventory truck, shipping pallet, master balance, etc) |
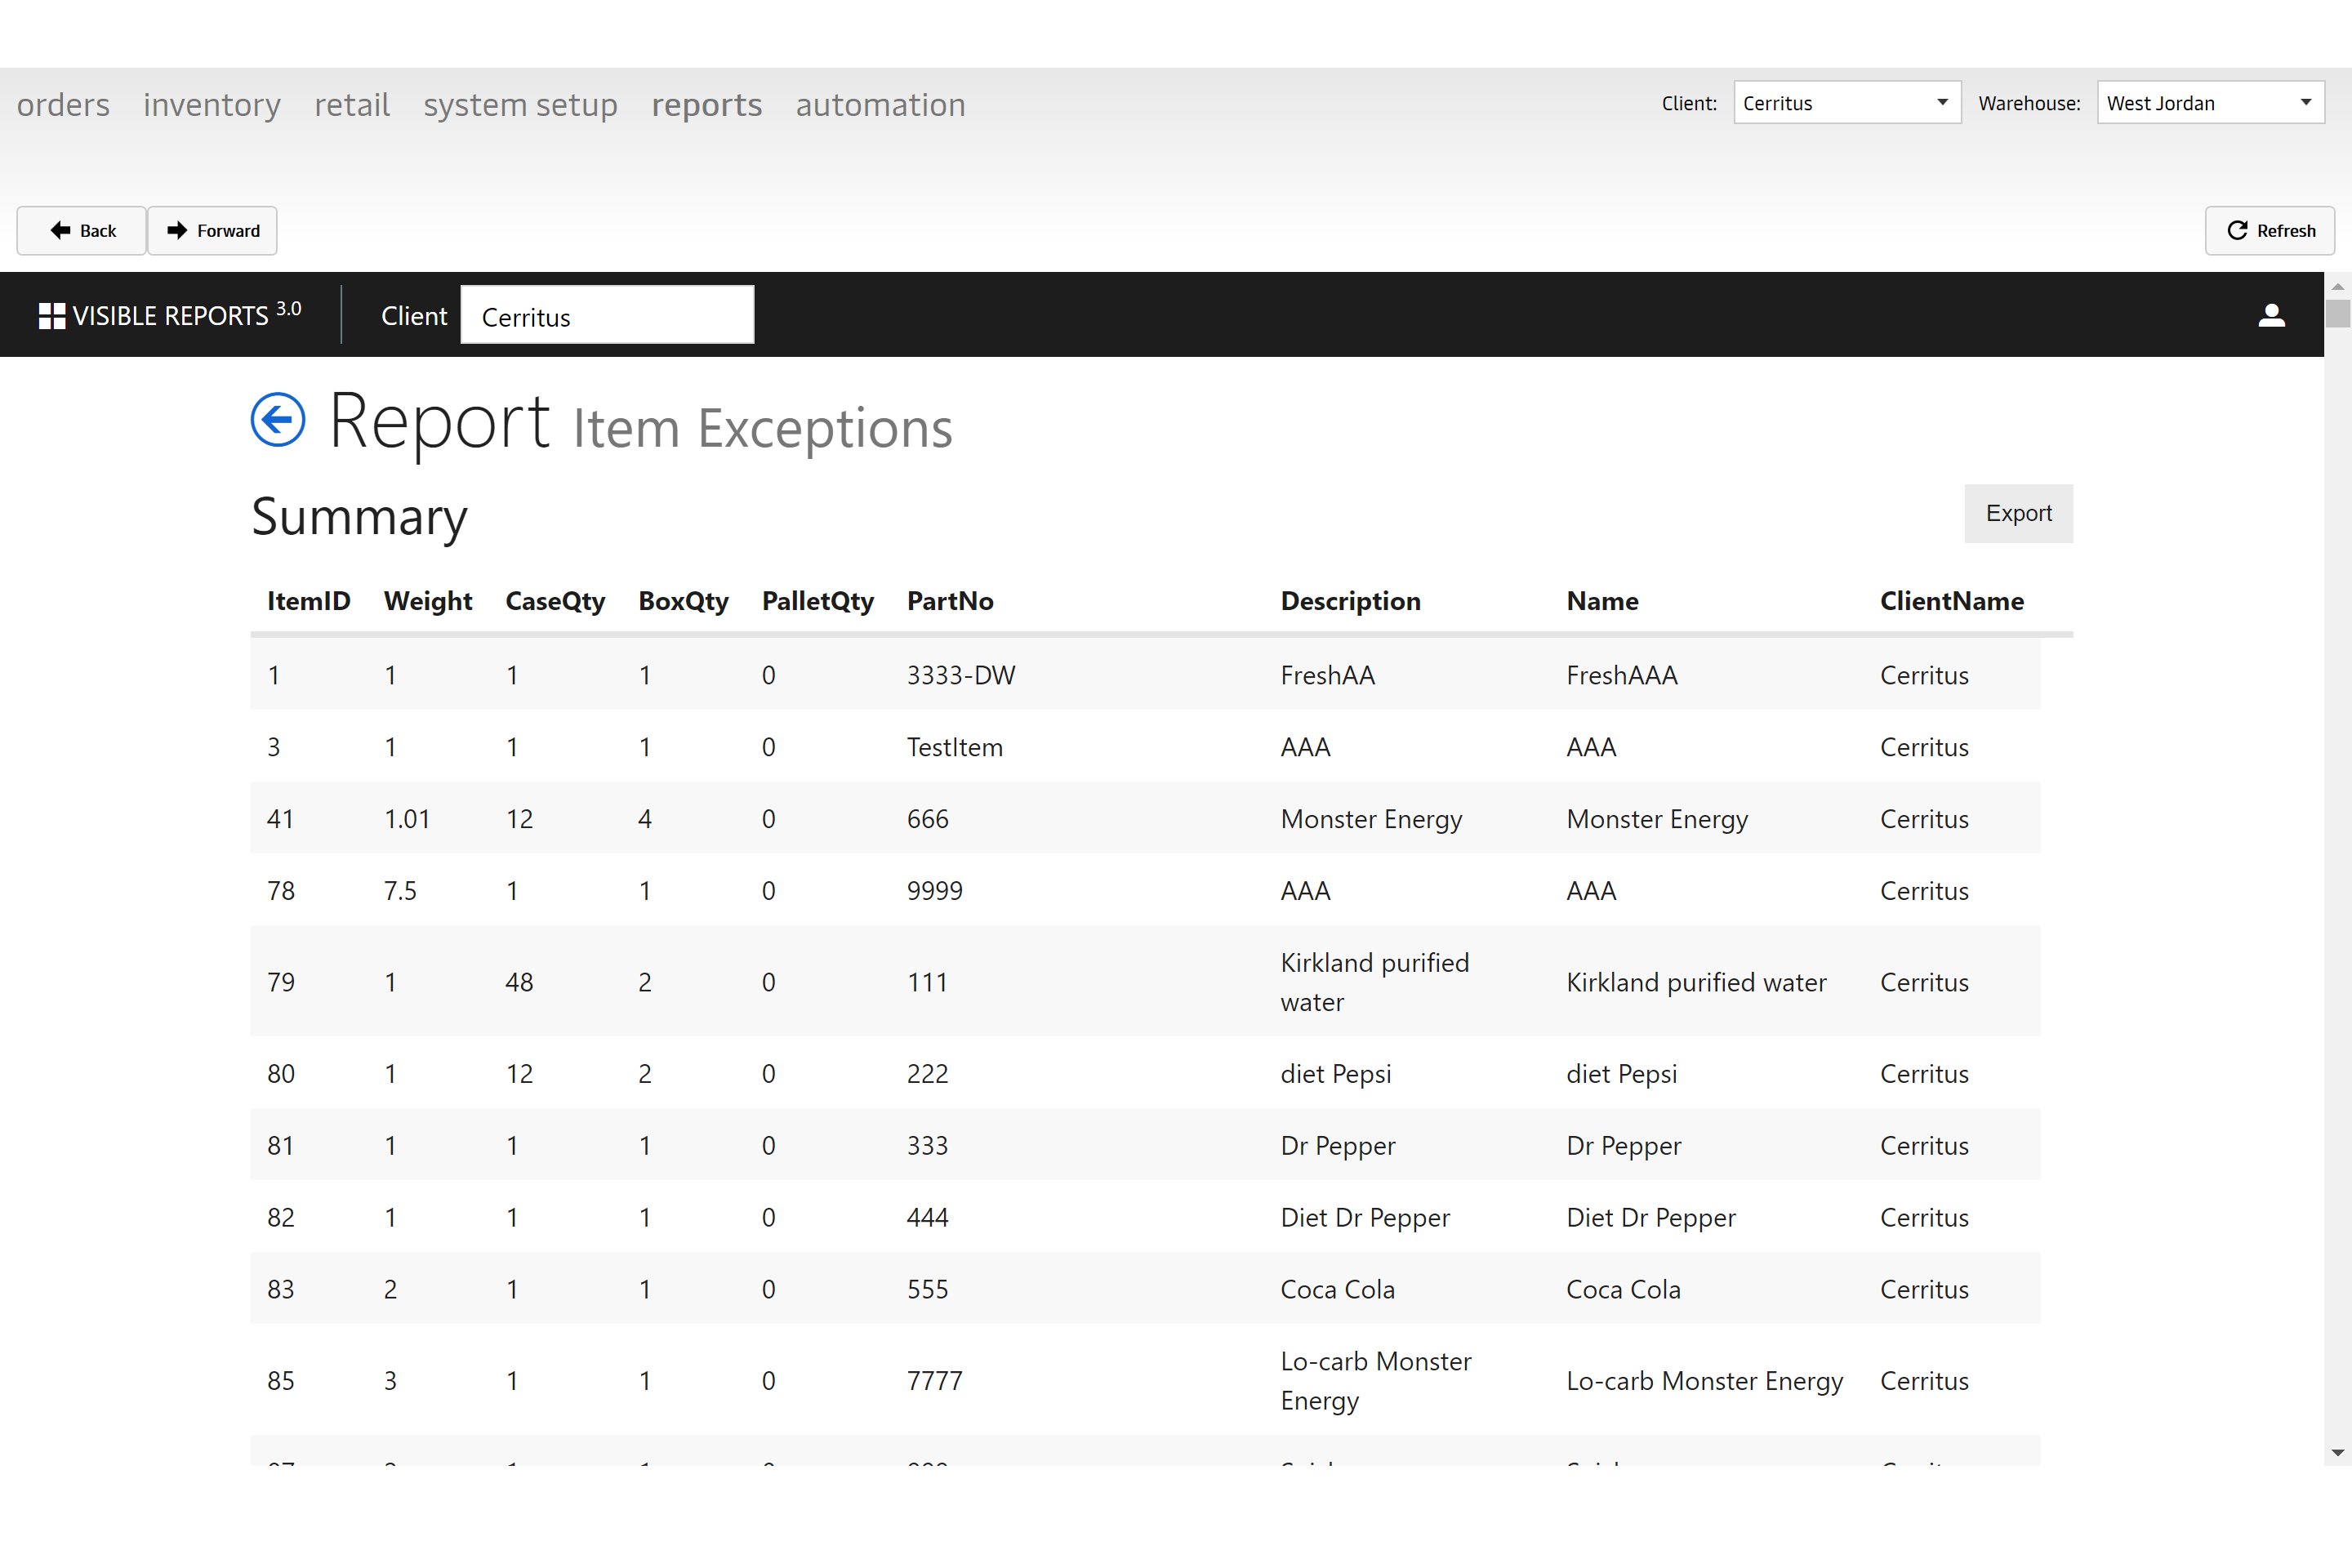
| Incomplete Items | Part Numbers/Items are displayed on this report if any of the fields are zero or empty (Weight, Case Qty, Box Qty and Pallet Qty) |
| Retail Order By Status | Summary of retail orders (store orders) broken out by status, per vendor (for example, SkullCandy will use vendors like Amazon, Best Buy, Target). |
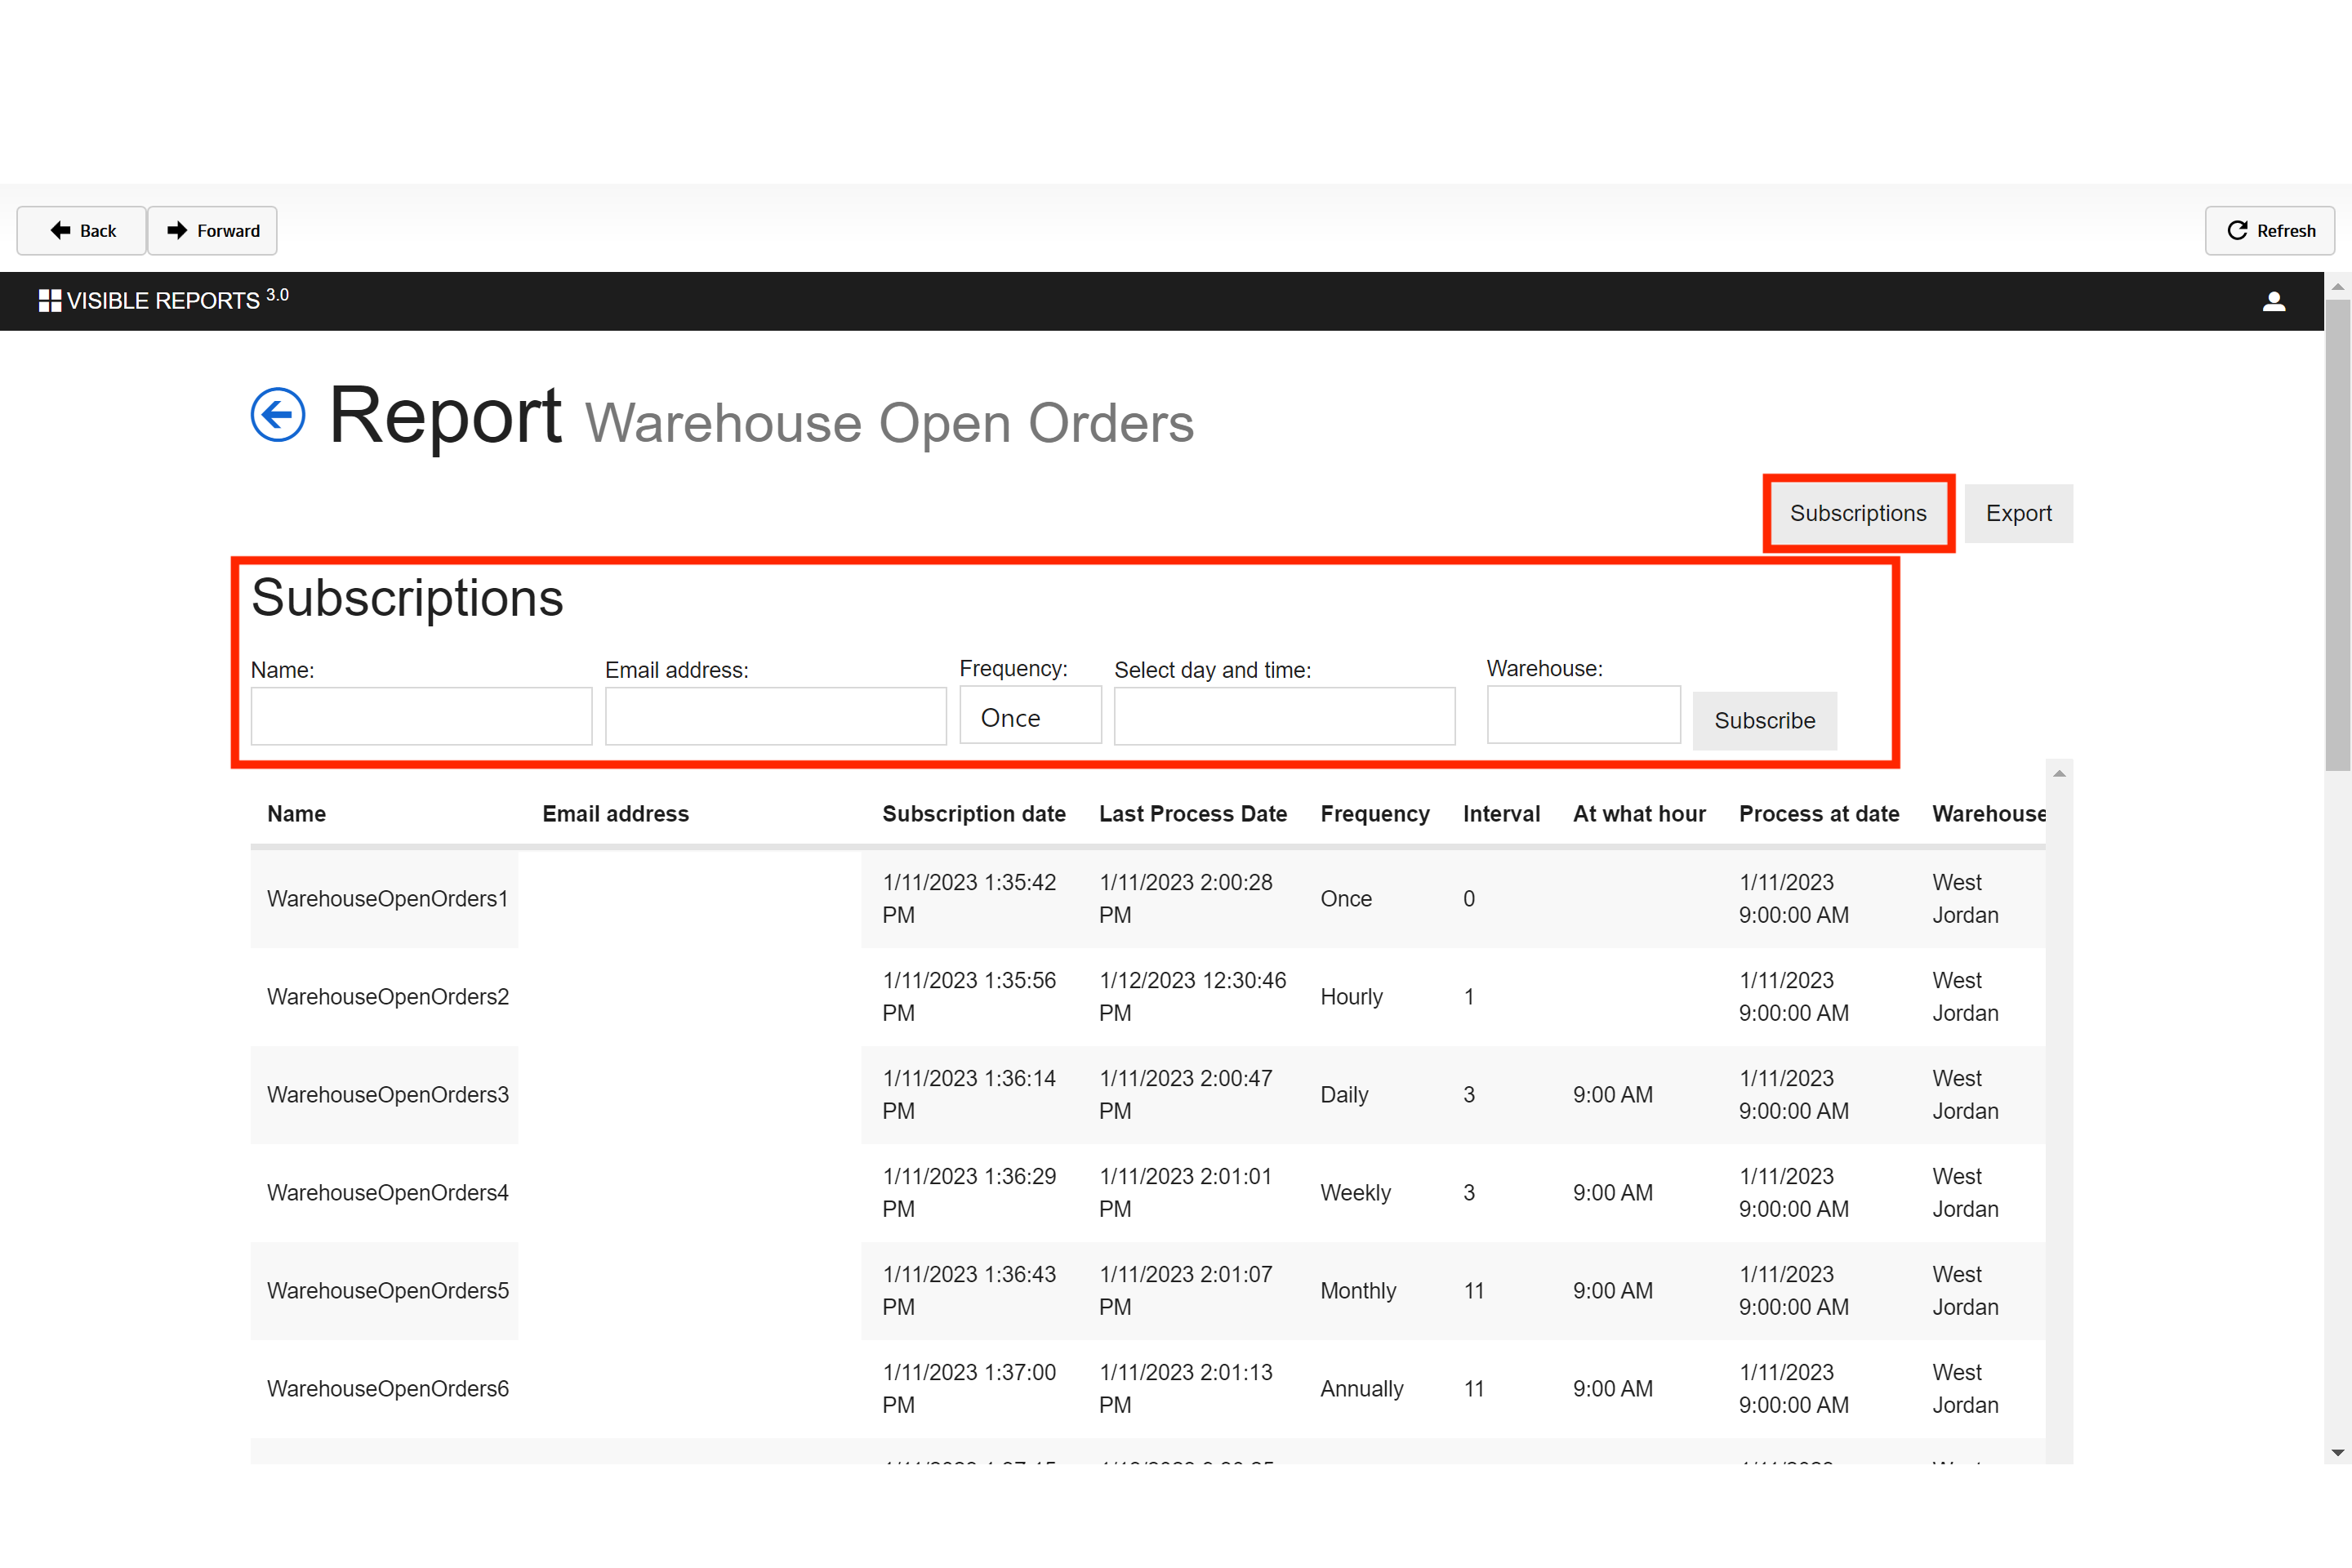
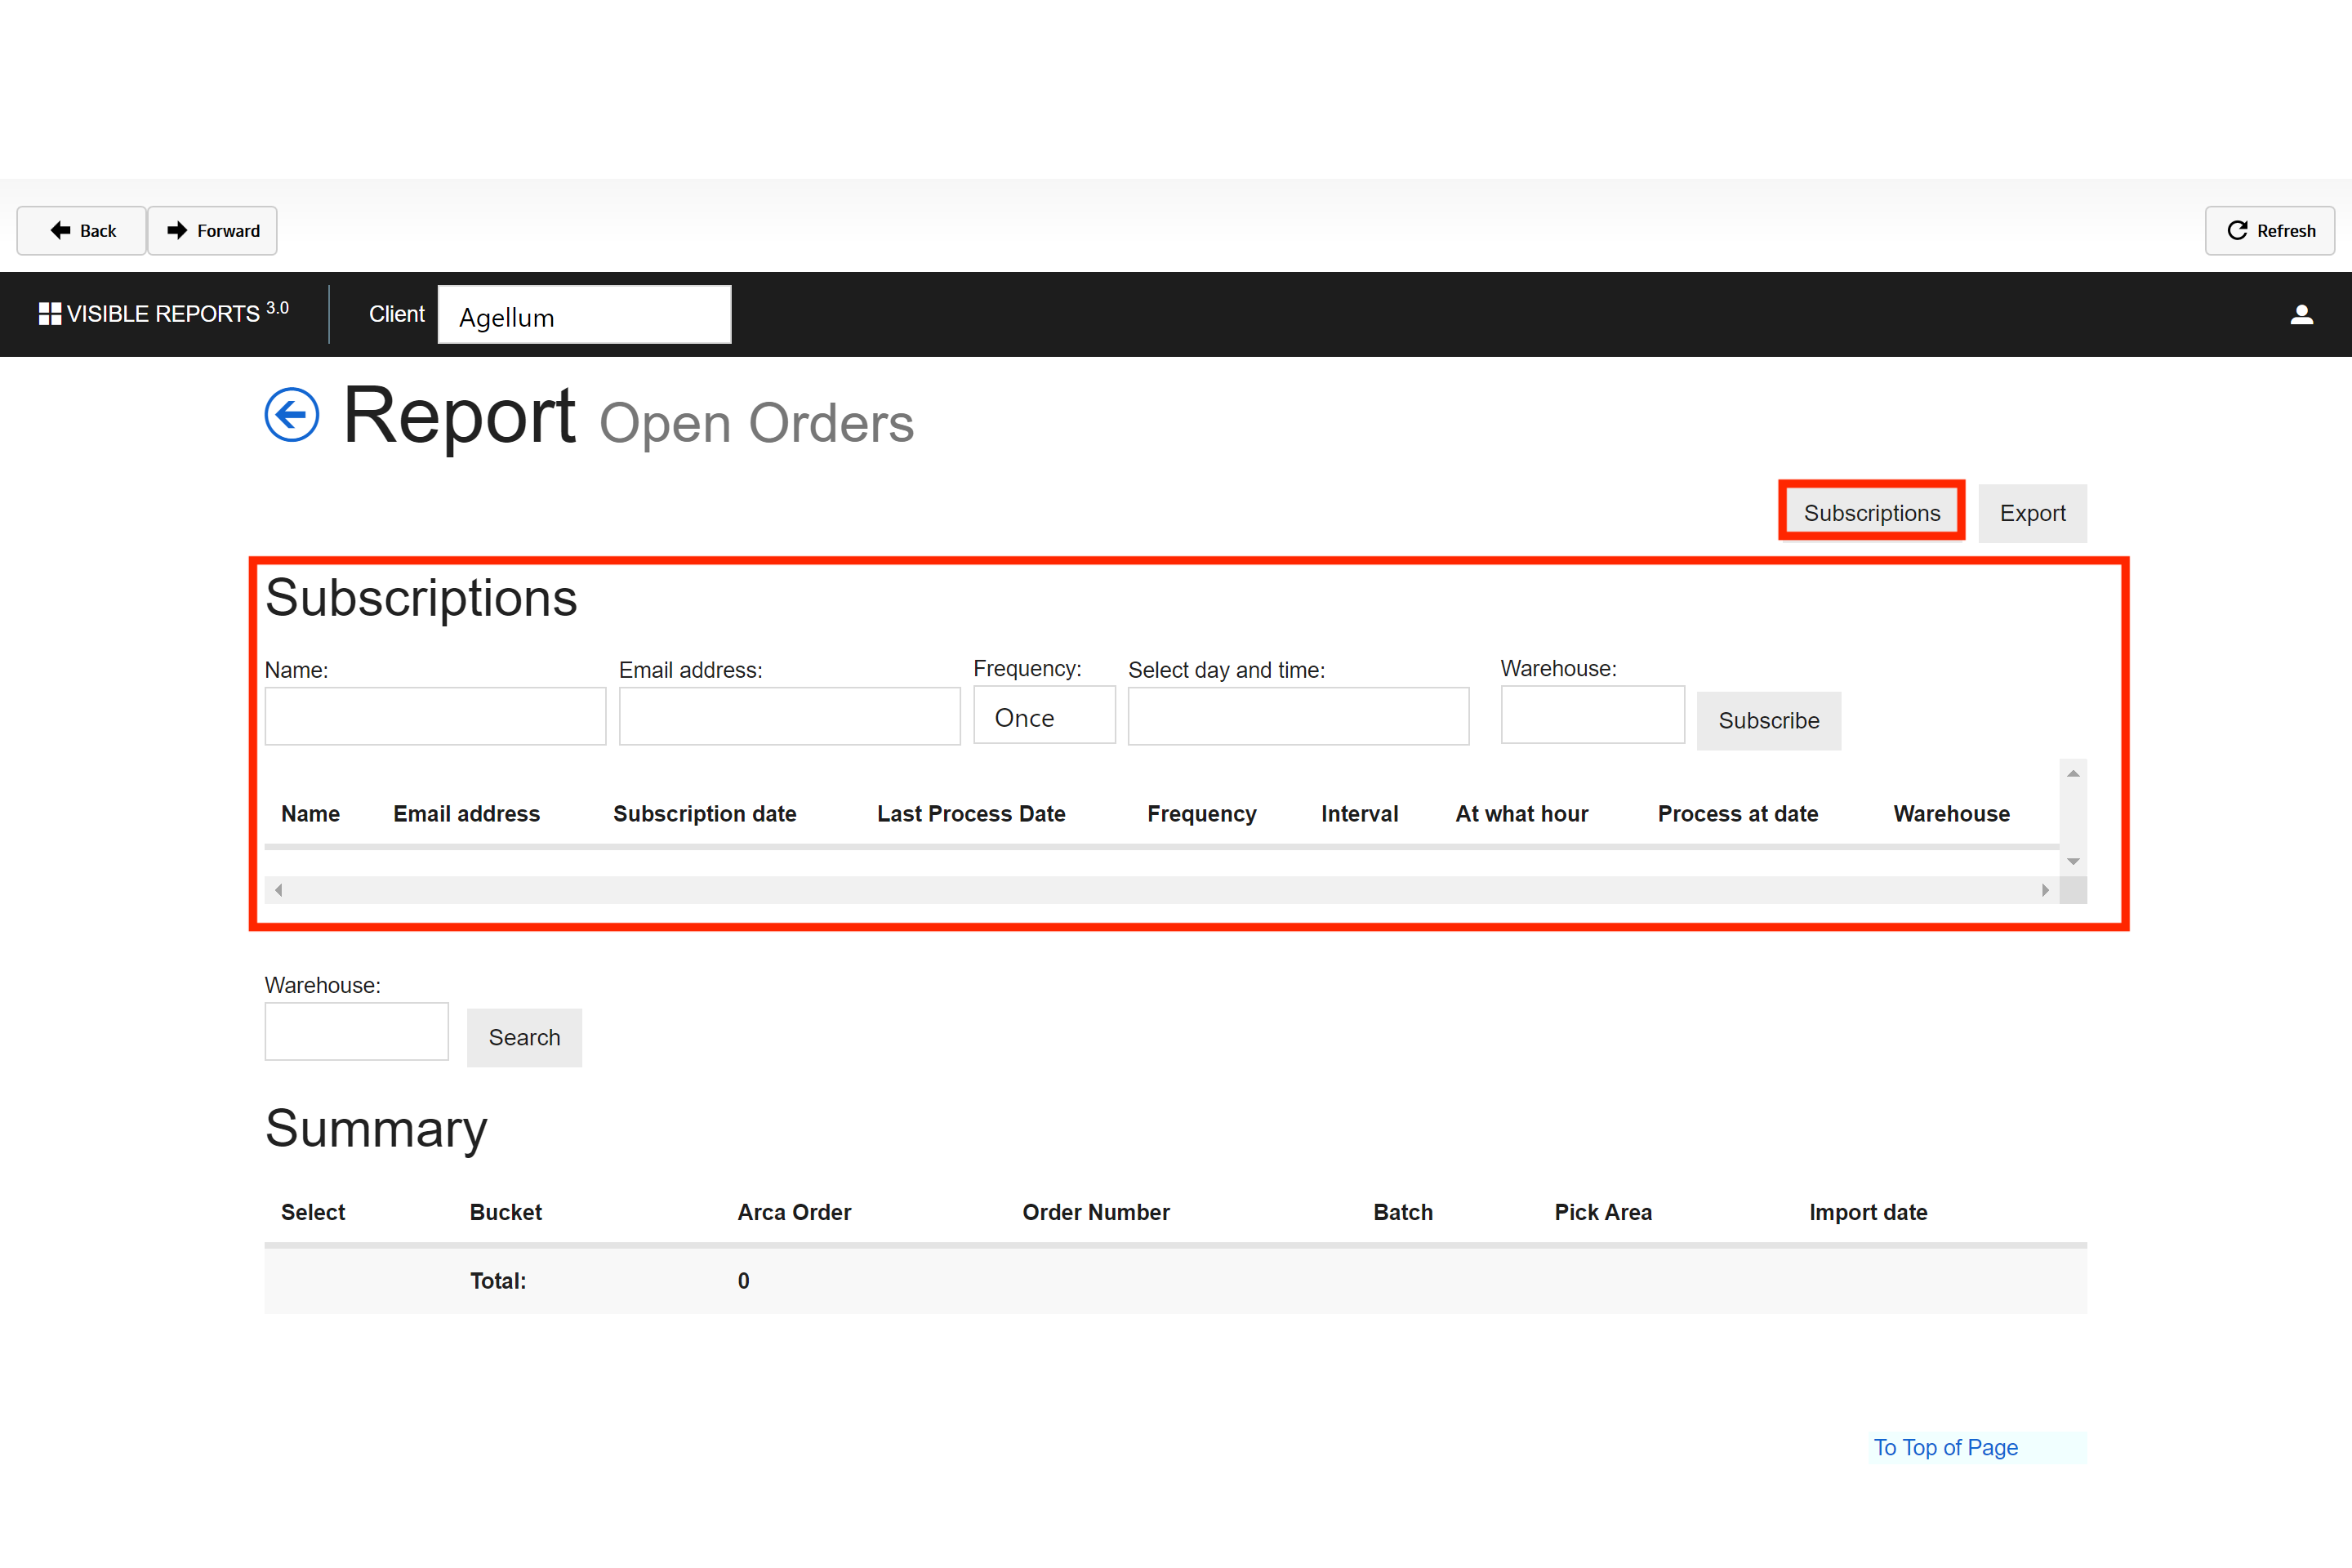
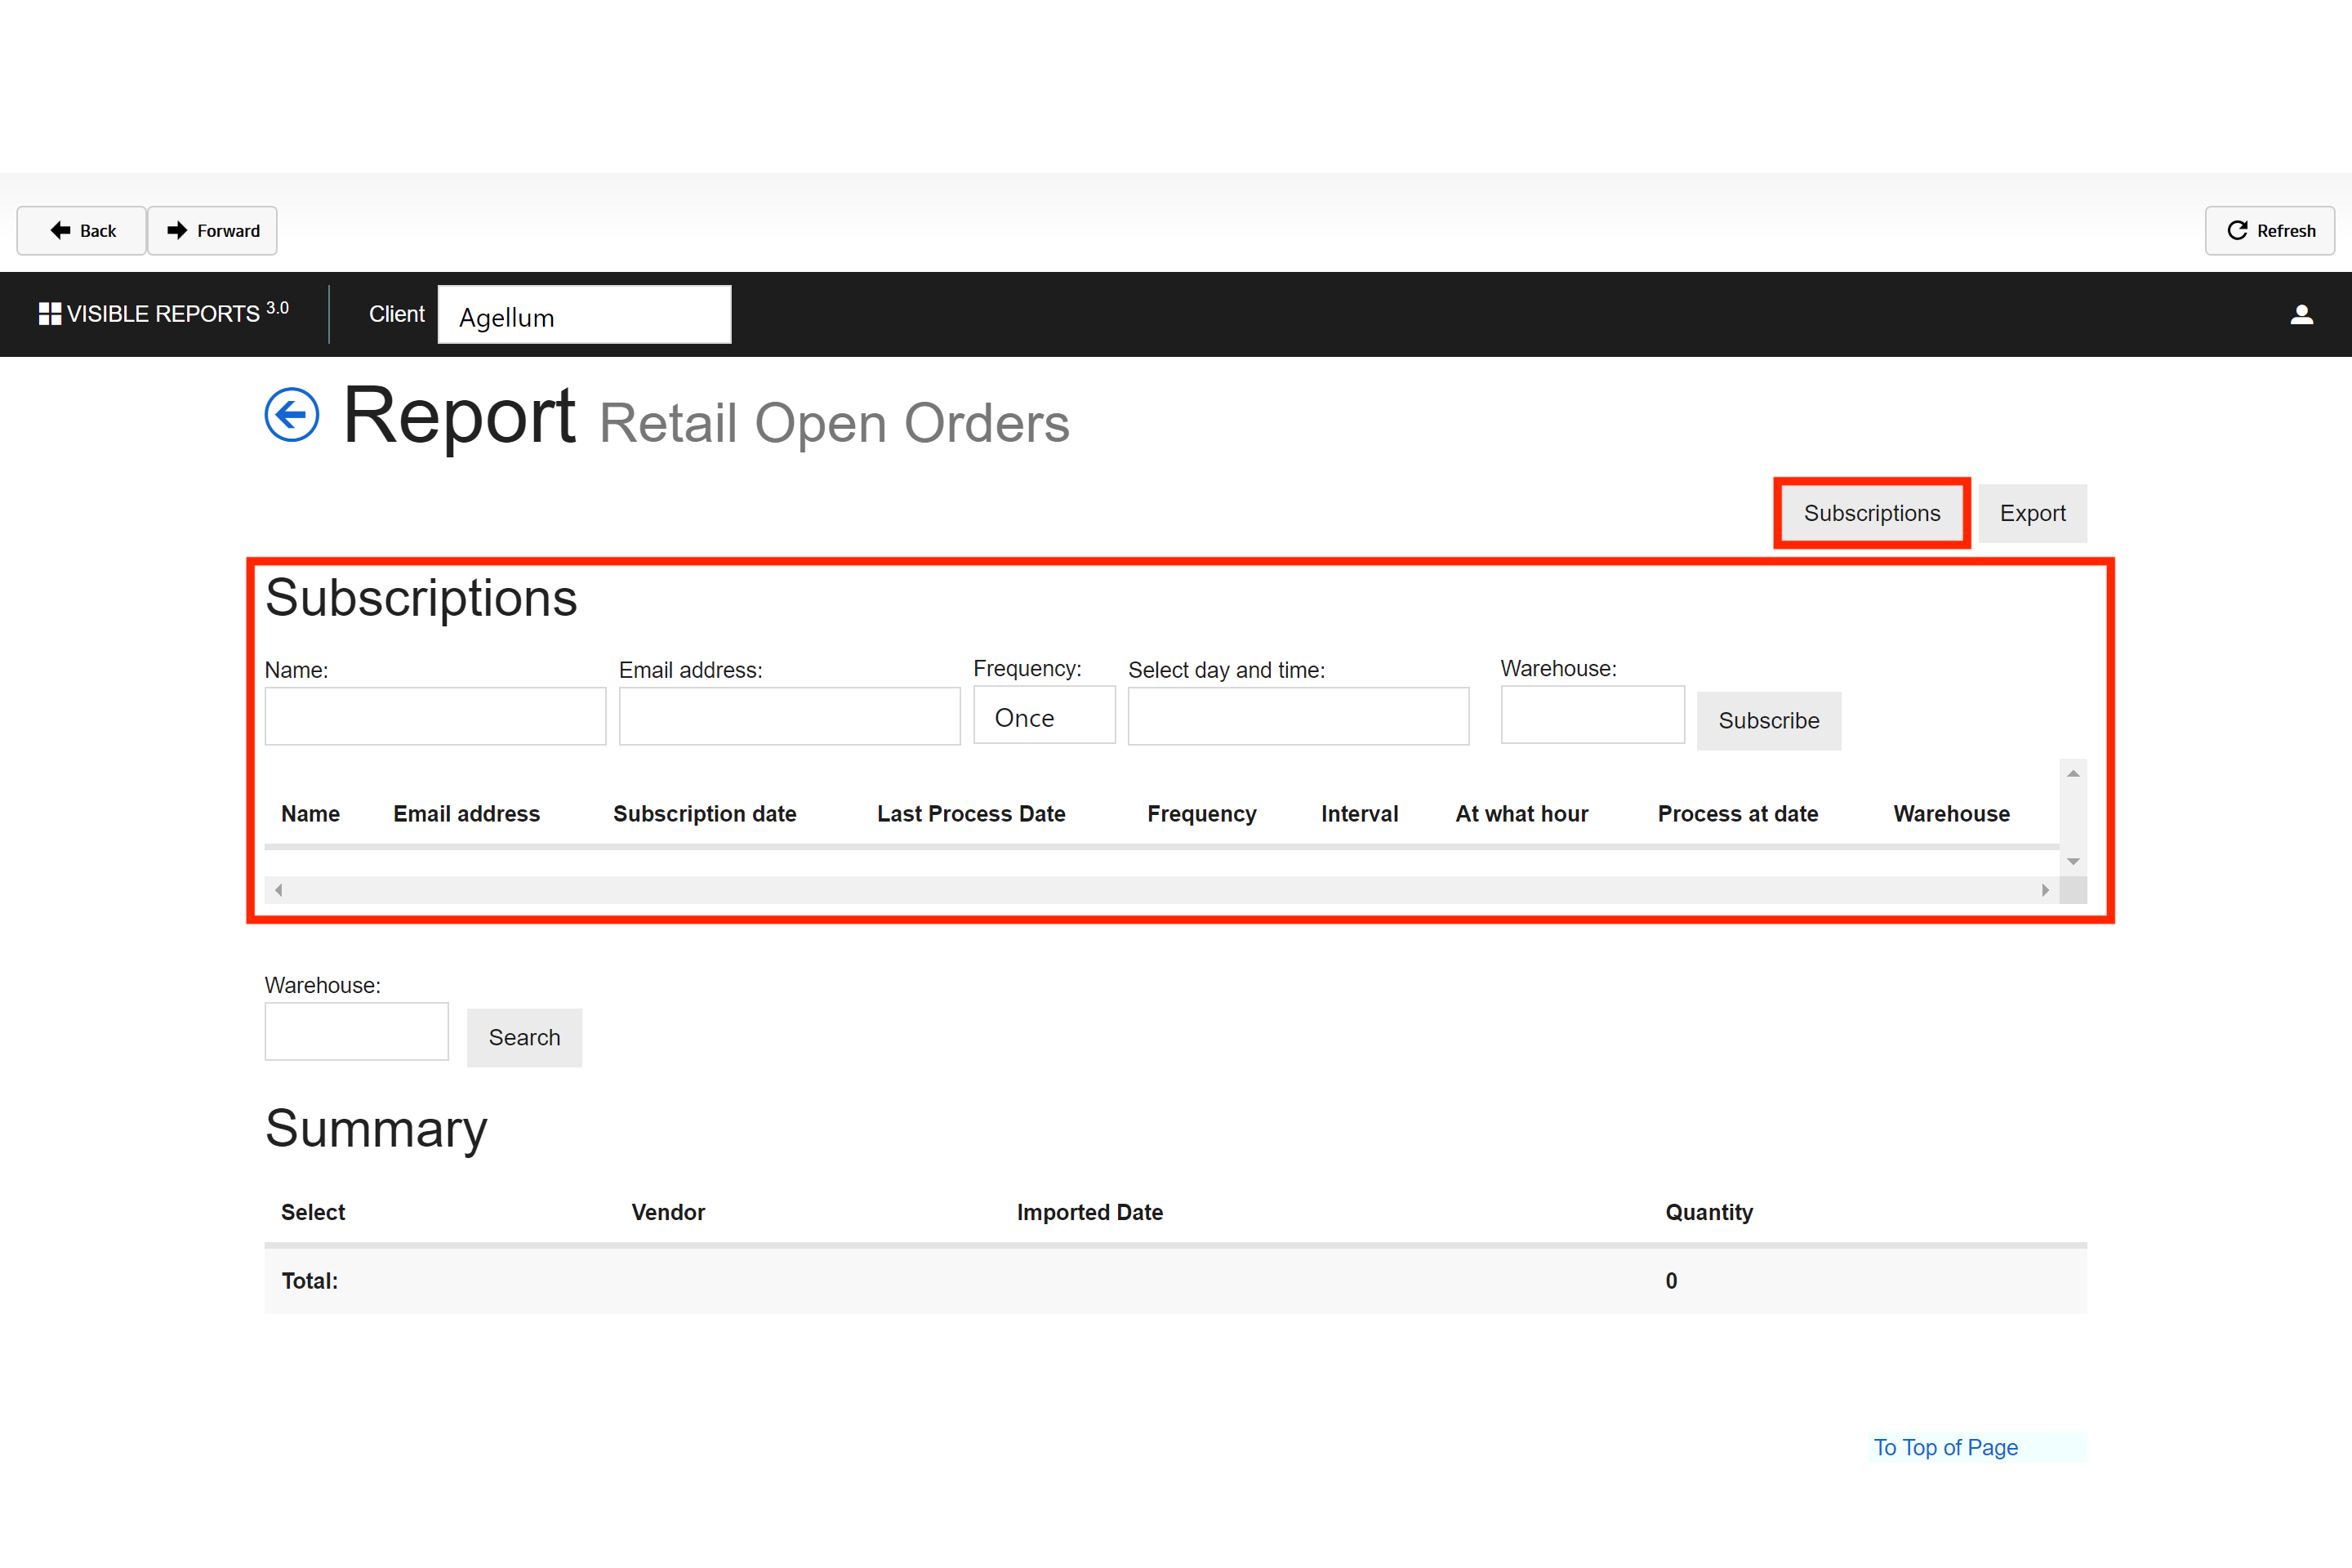
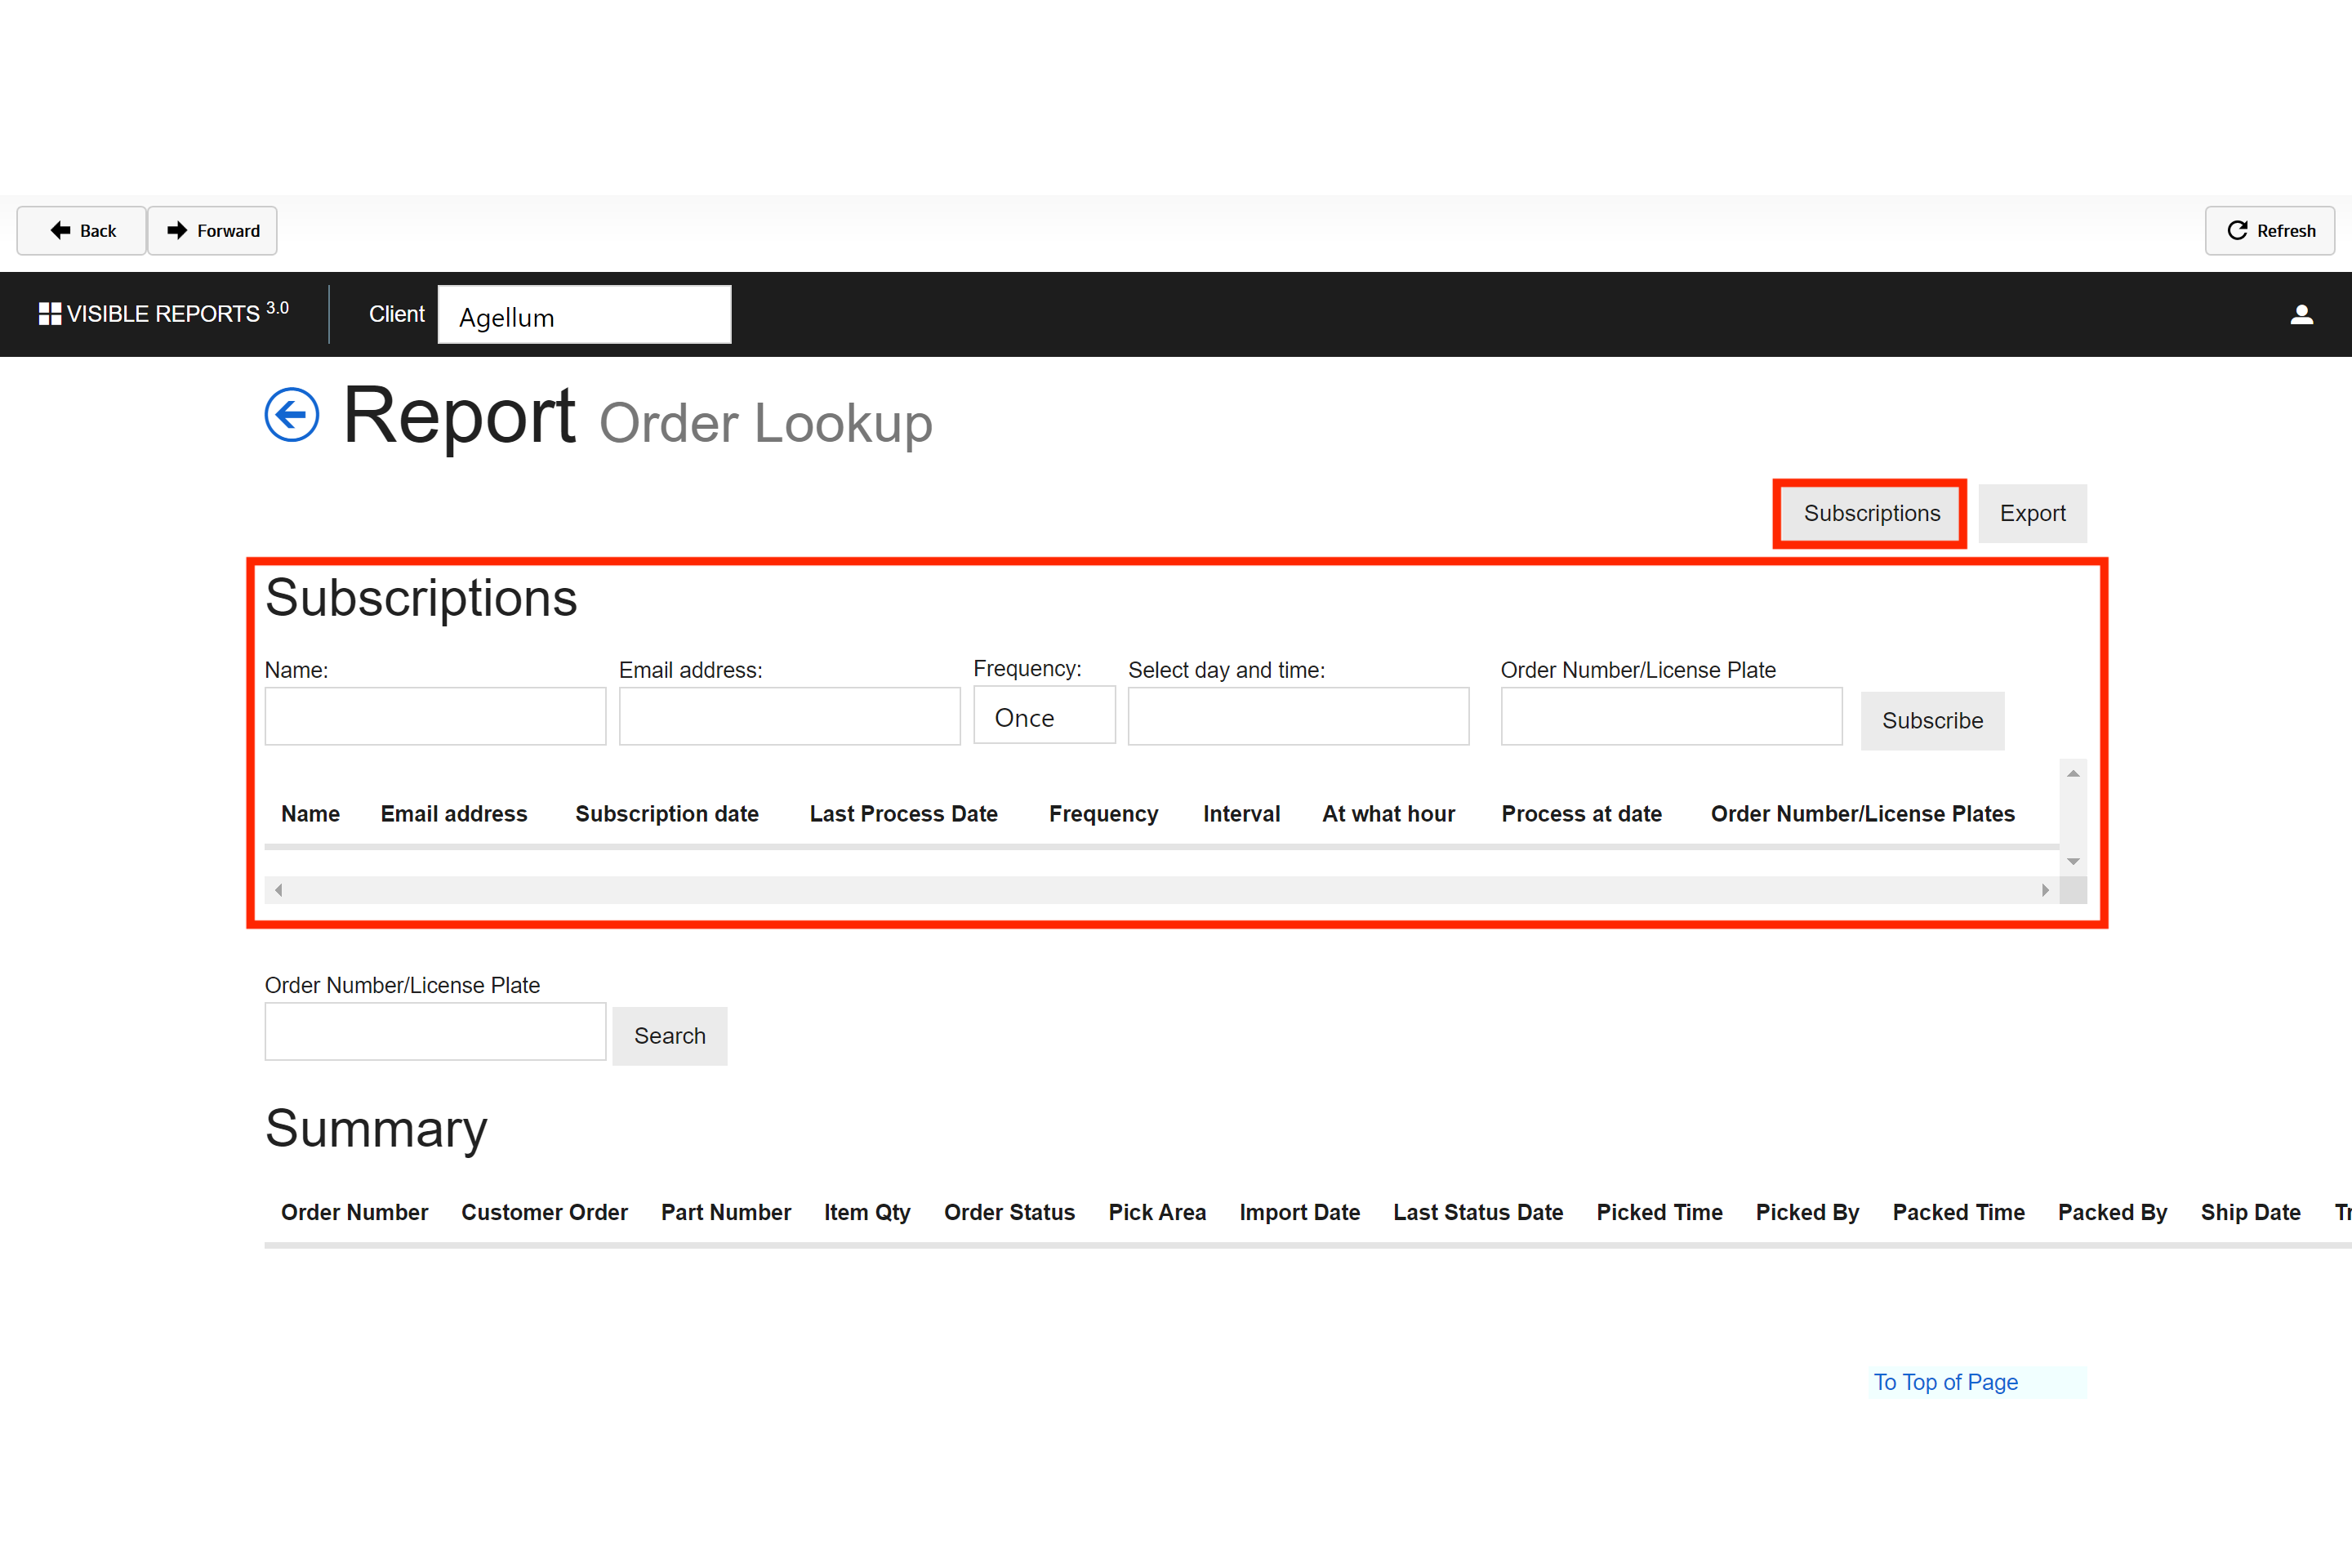
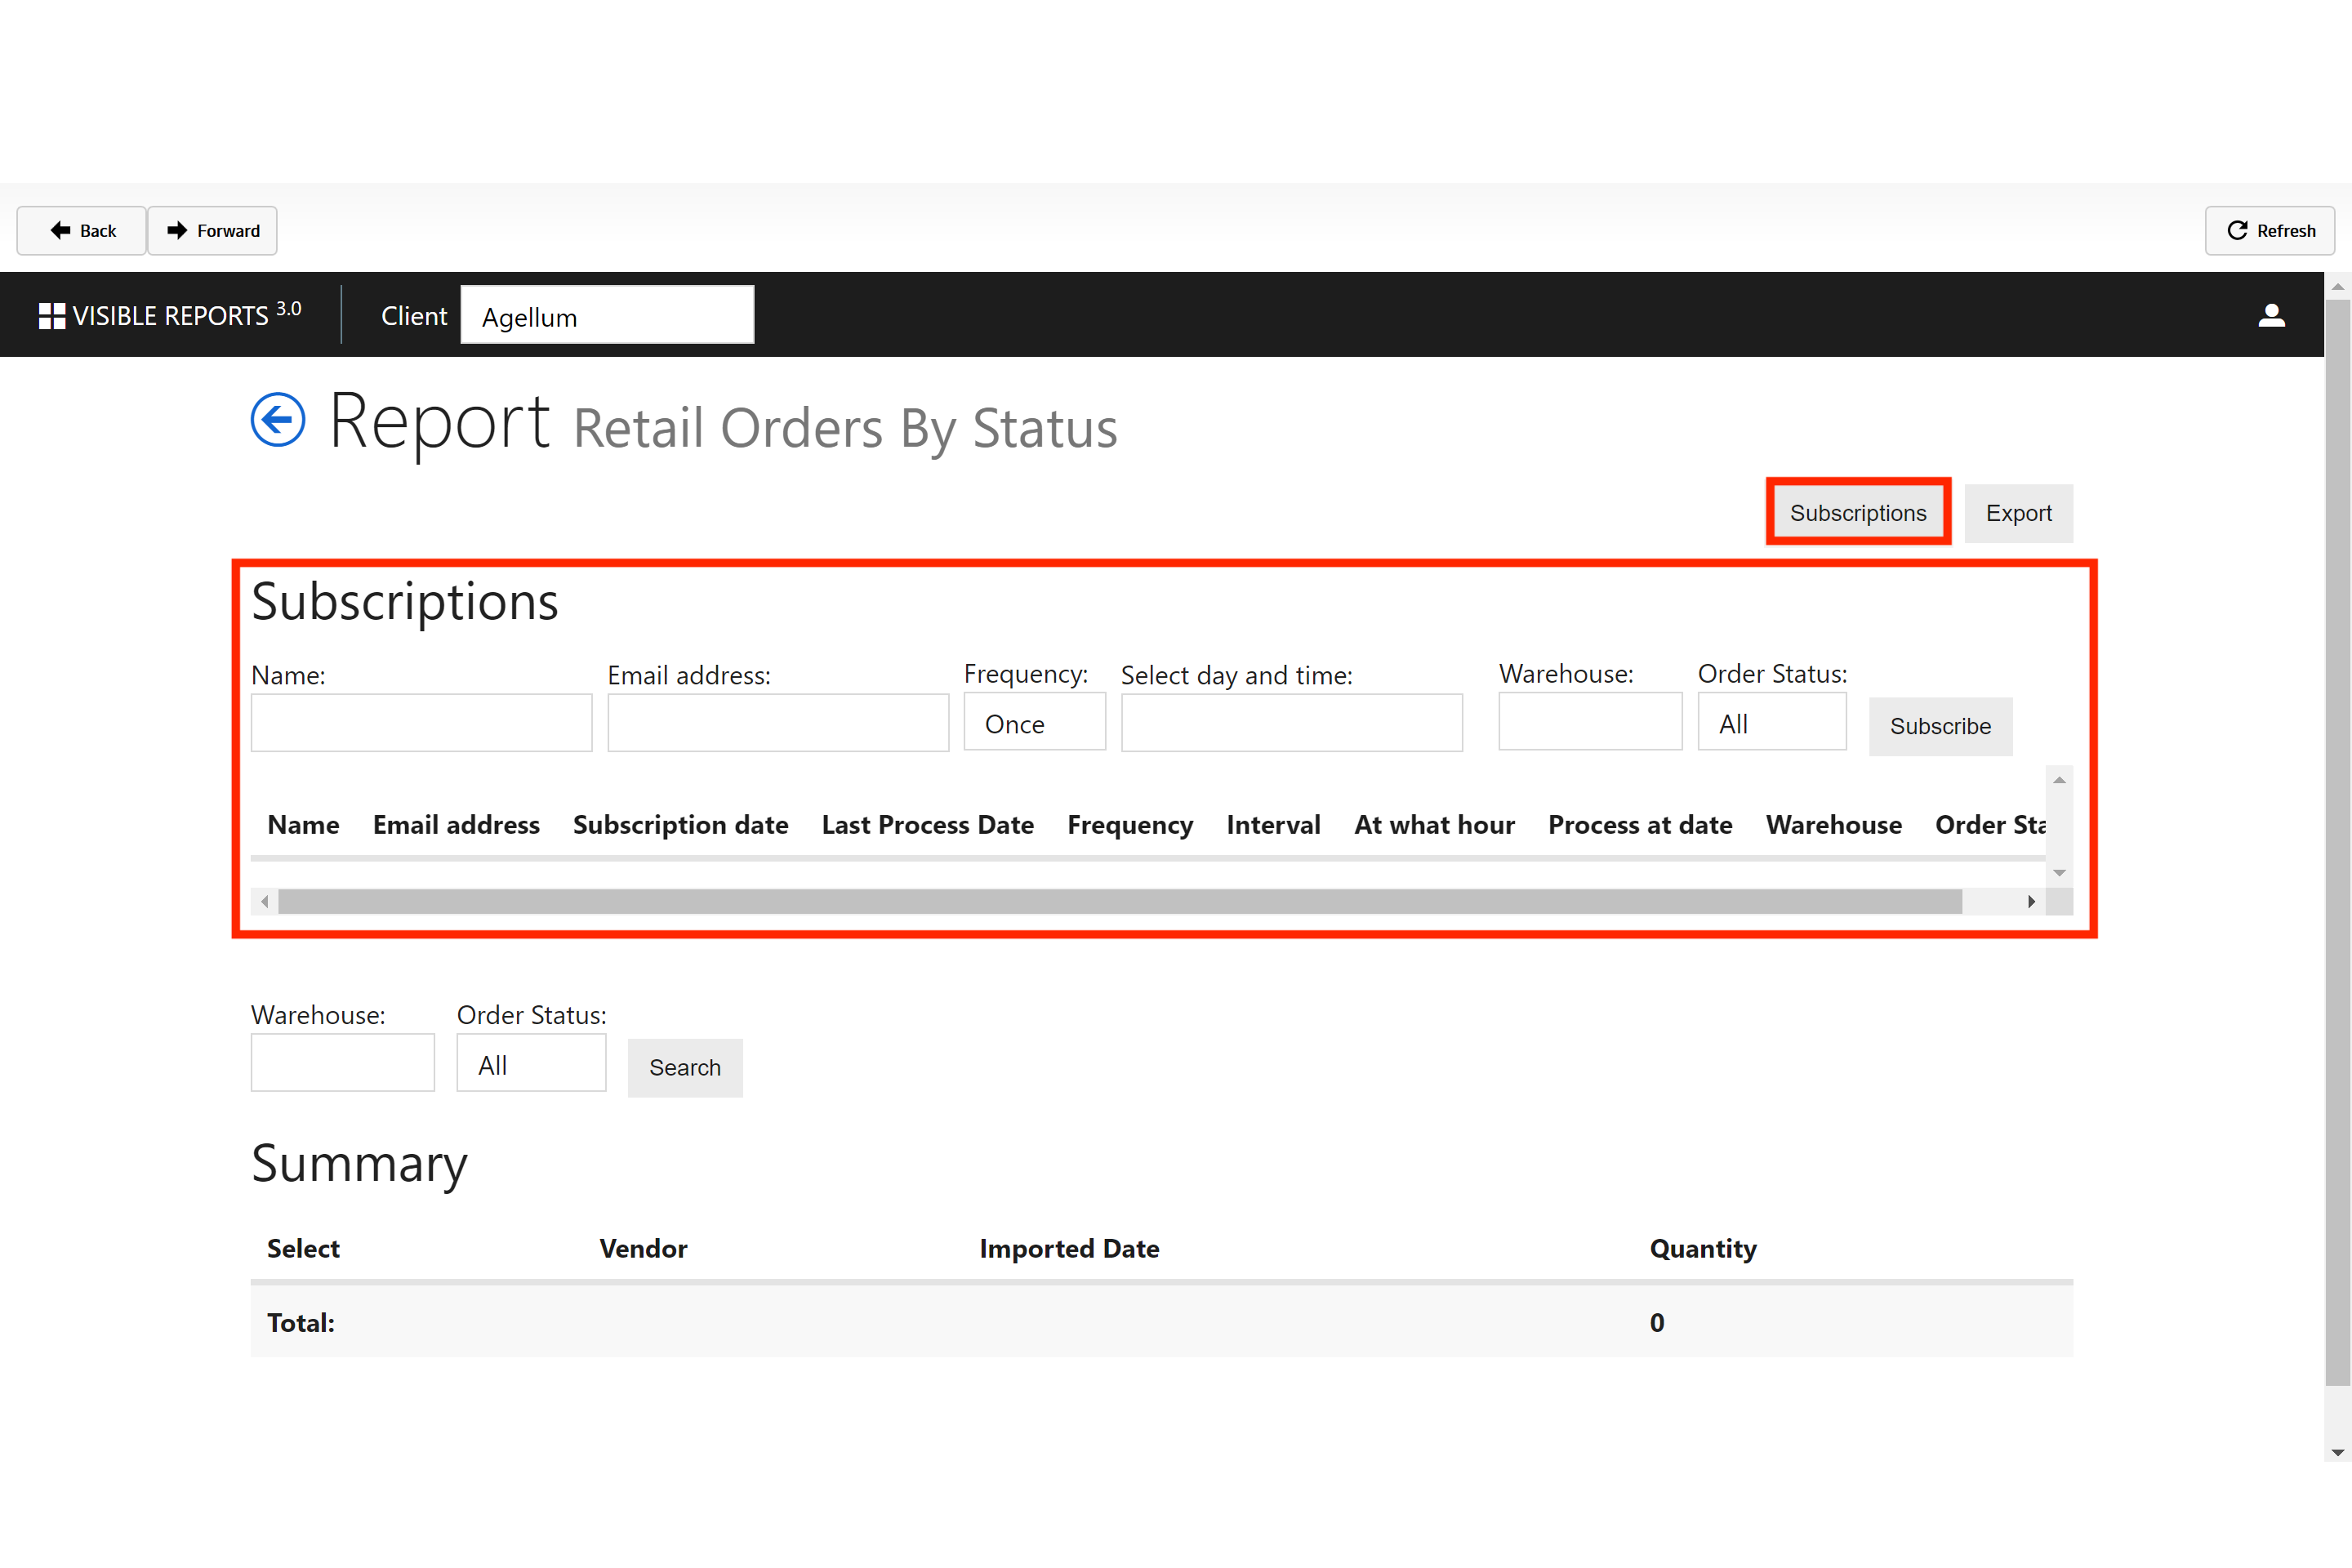
Subscription in Reports
This allows a user to have details for a report to be sent to them in an email on a scheduled basis depending on the frequency/time selected. There is an active/inactive flag. If the flag is green it is active. If the flag is yellow it is inactive. There is also a delete option to remove the subscription.
The reports that will have subscriptions available for right now are:
- Returns
- Inventory Needed
- Warehouse Open Orders
- Open Orders
- Retail Open Orders
- Order Lookup
- Order Reset
- Batch Order Bucket
- Batch Worksheet
- Retail Orders By Status
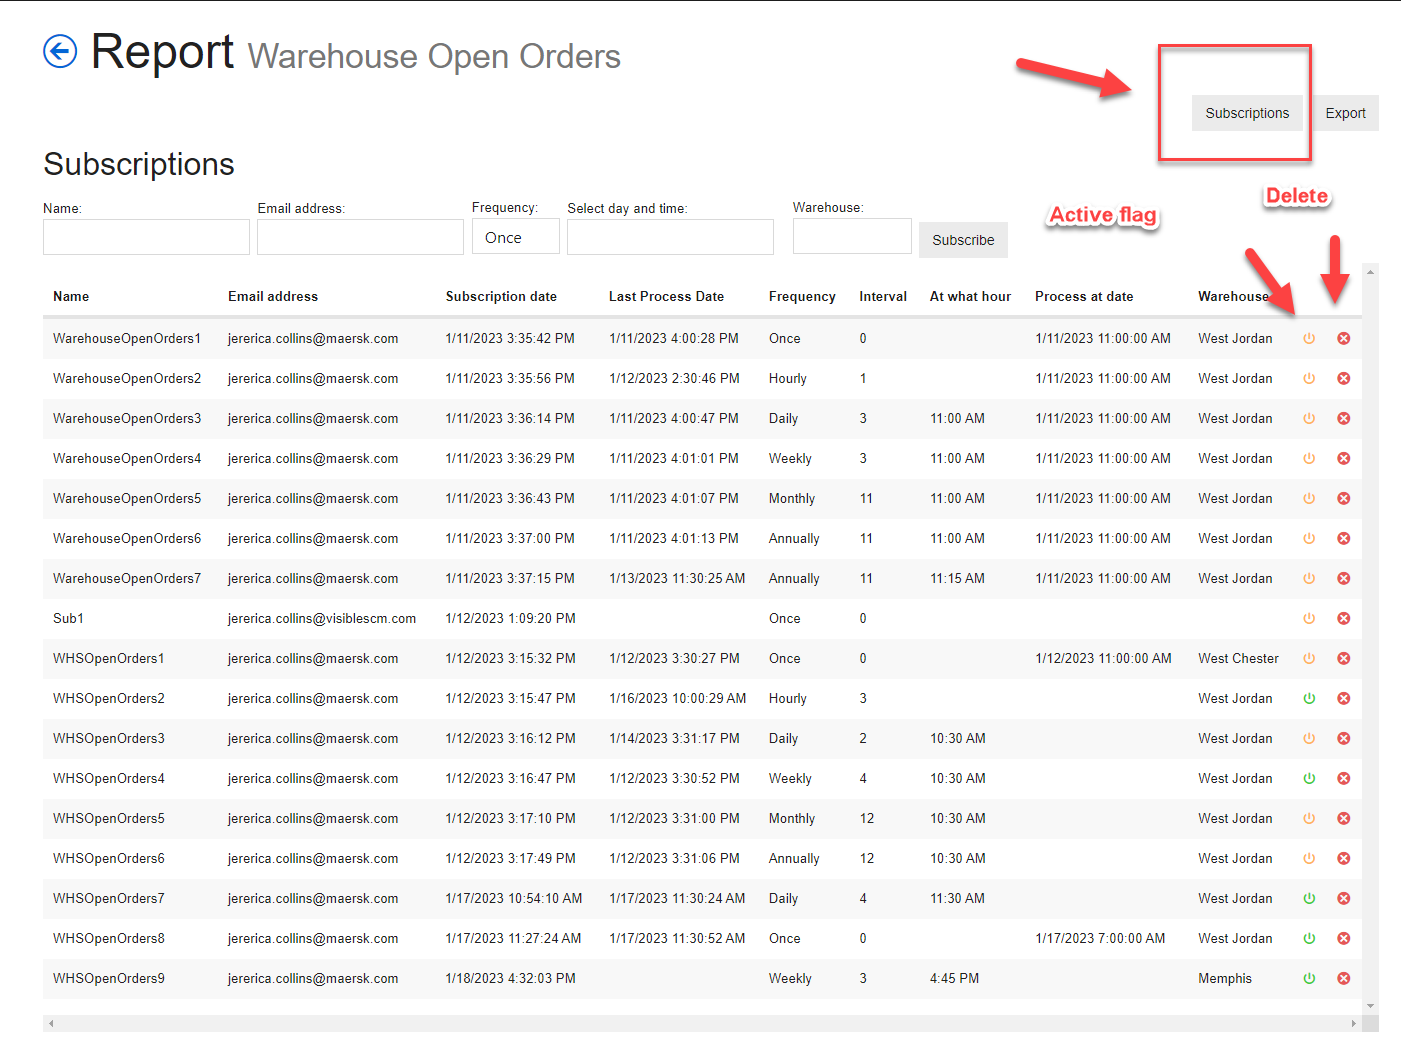
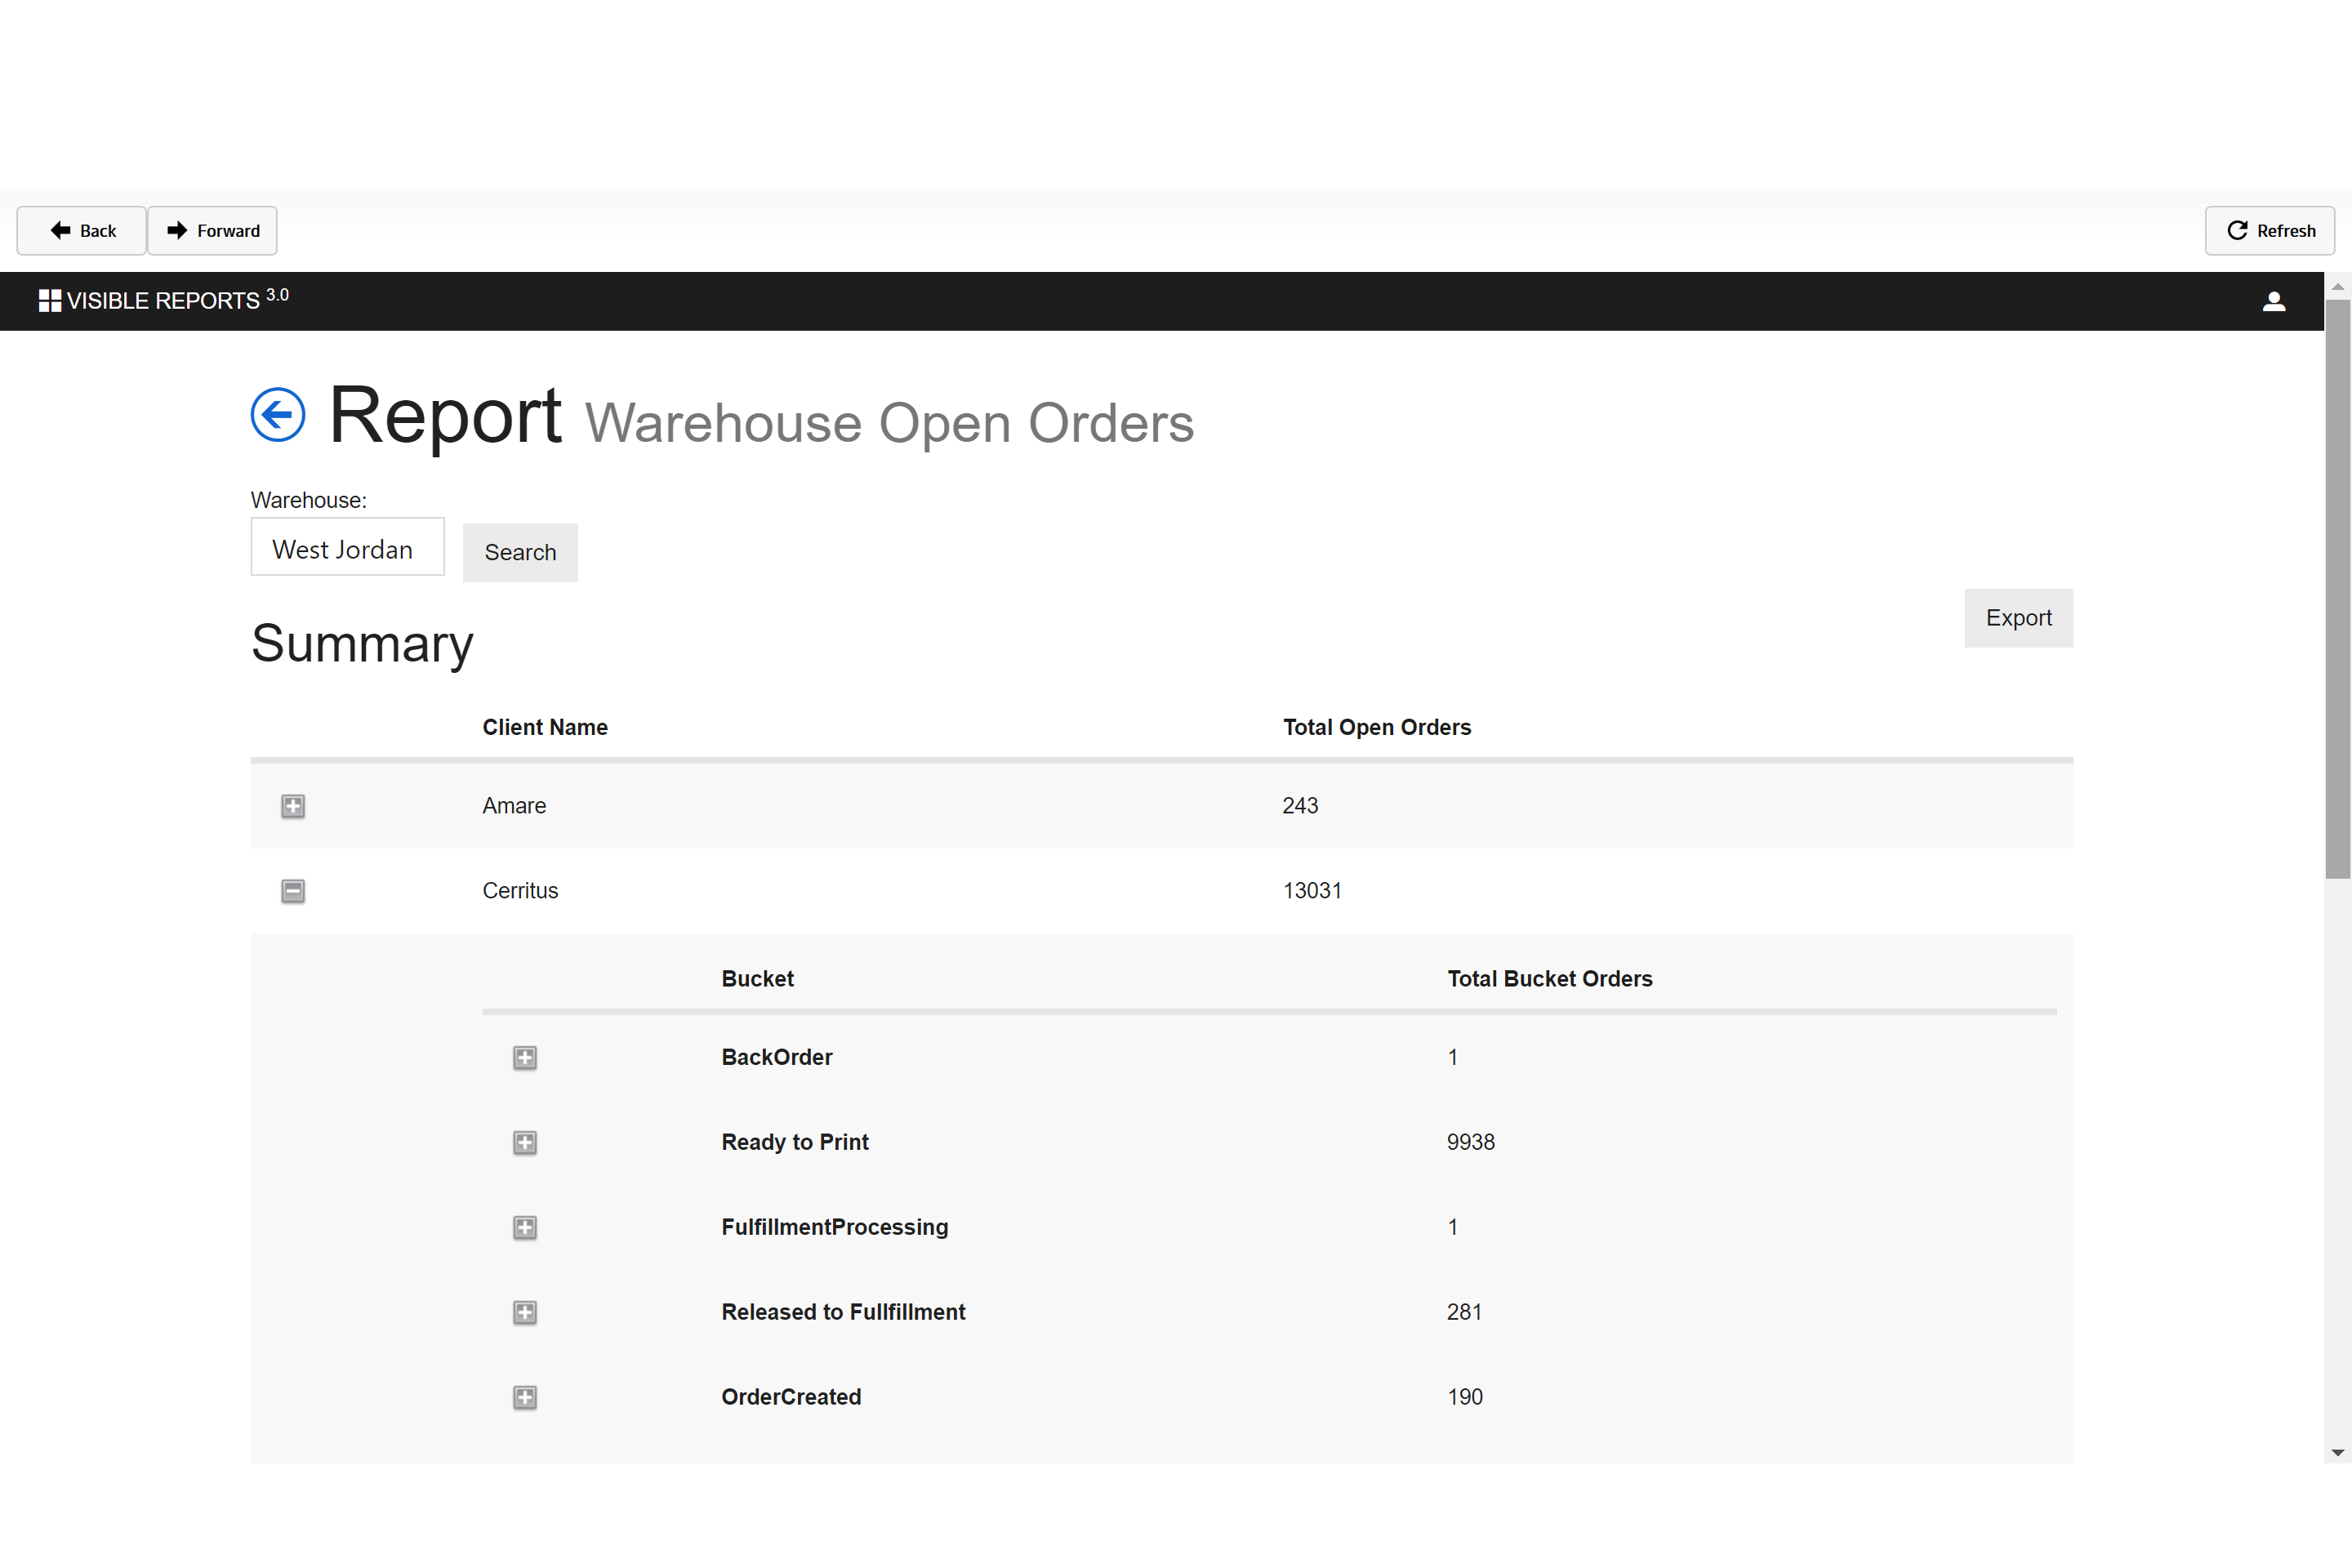
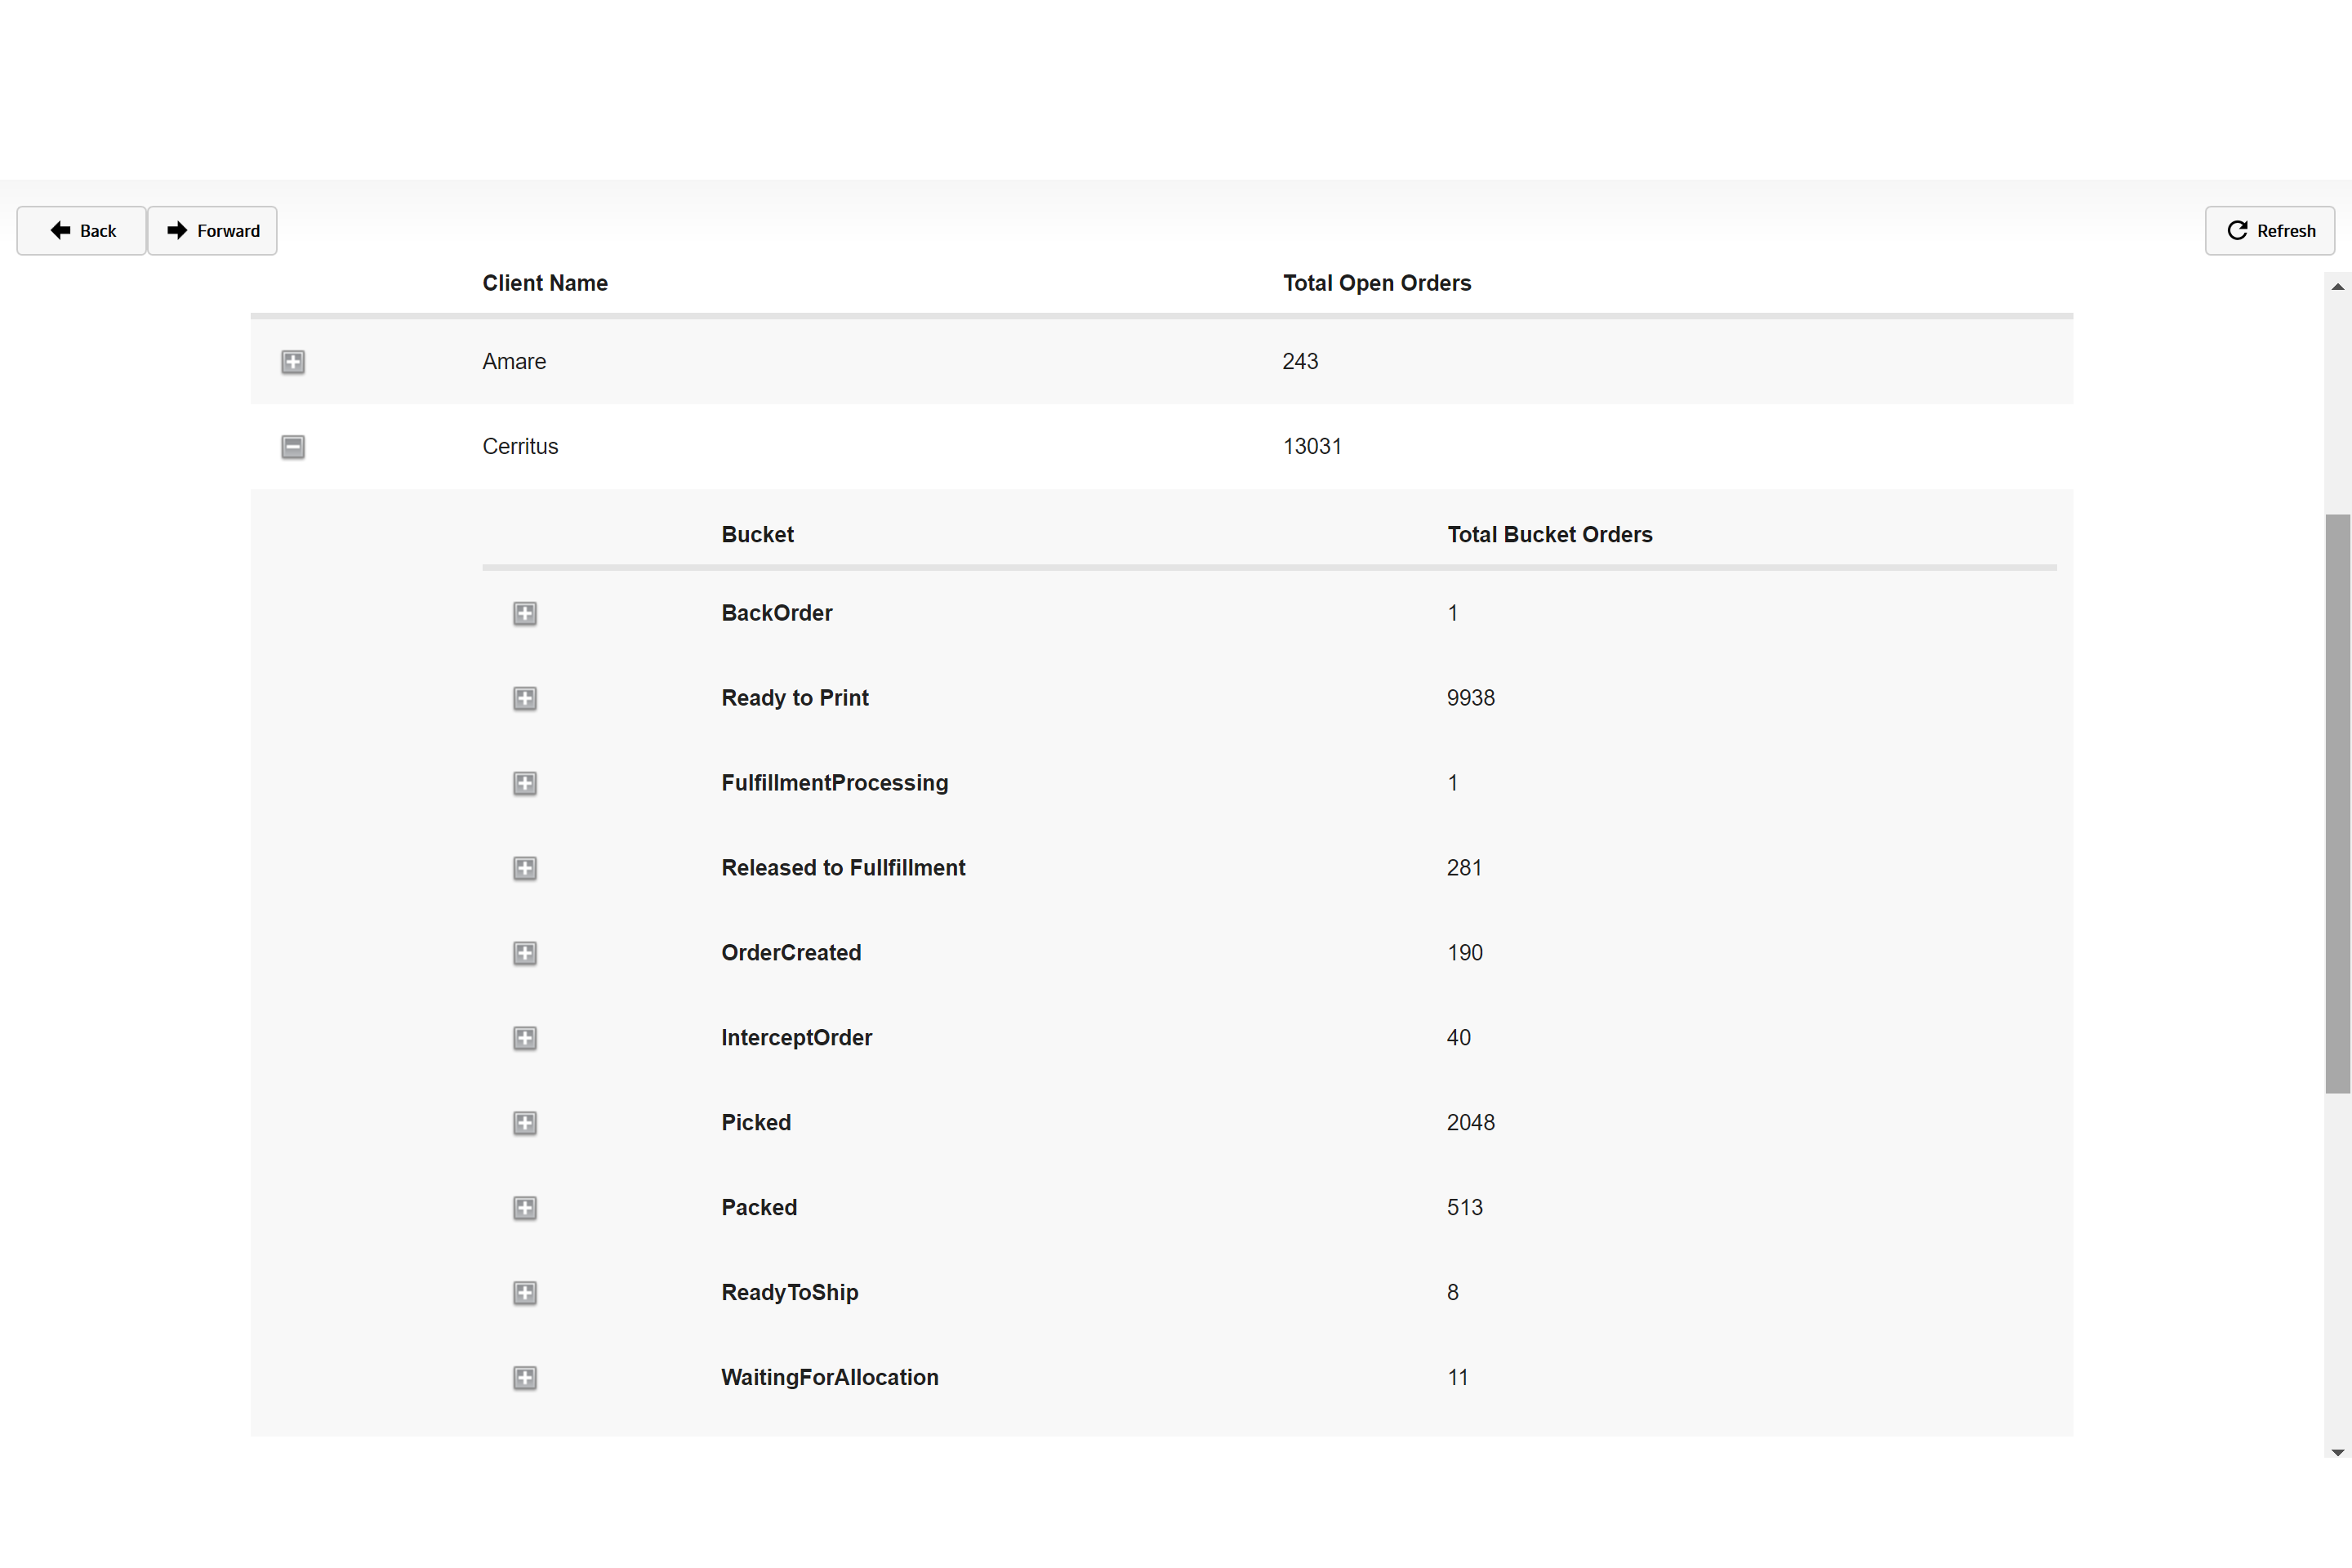
Warehouse Open Orders
Gives a summary of open orders per client, with details on customer order statuses.
You now have the ability to add an email subscription for Warehouse Open Orders Reports.
Open Orders
The open Orders Report will return all orders for a specific Client and Warehouse including all order statuses except Cancelled and Completed Orders.
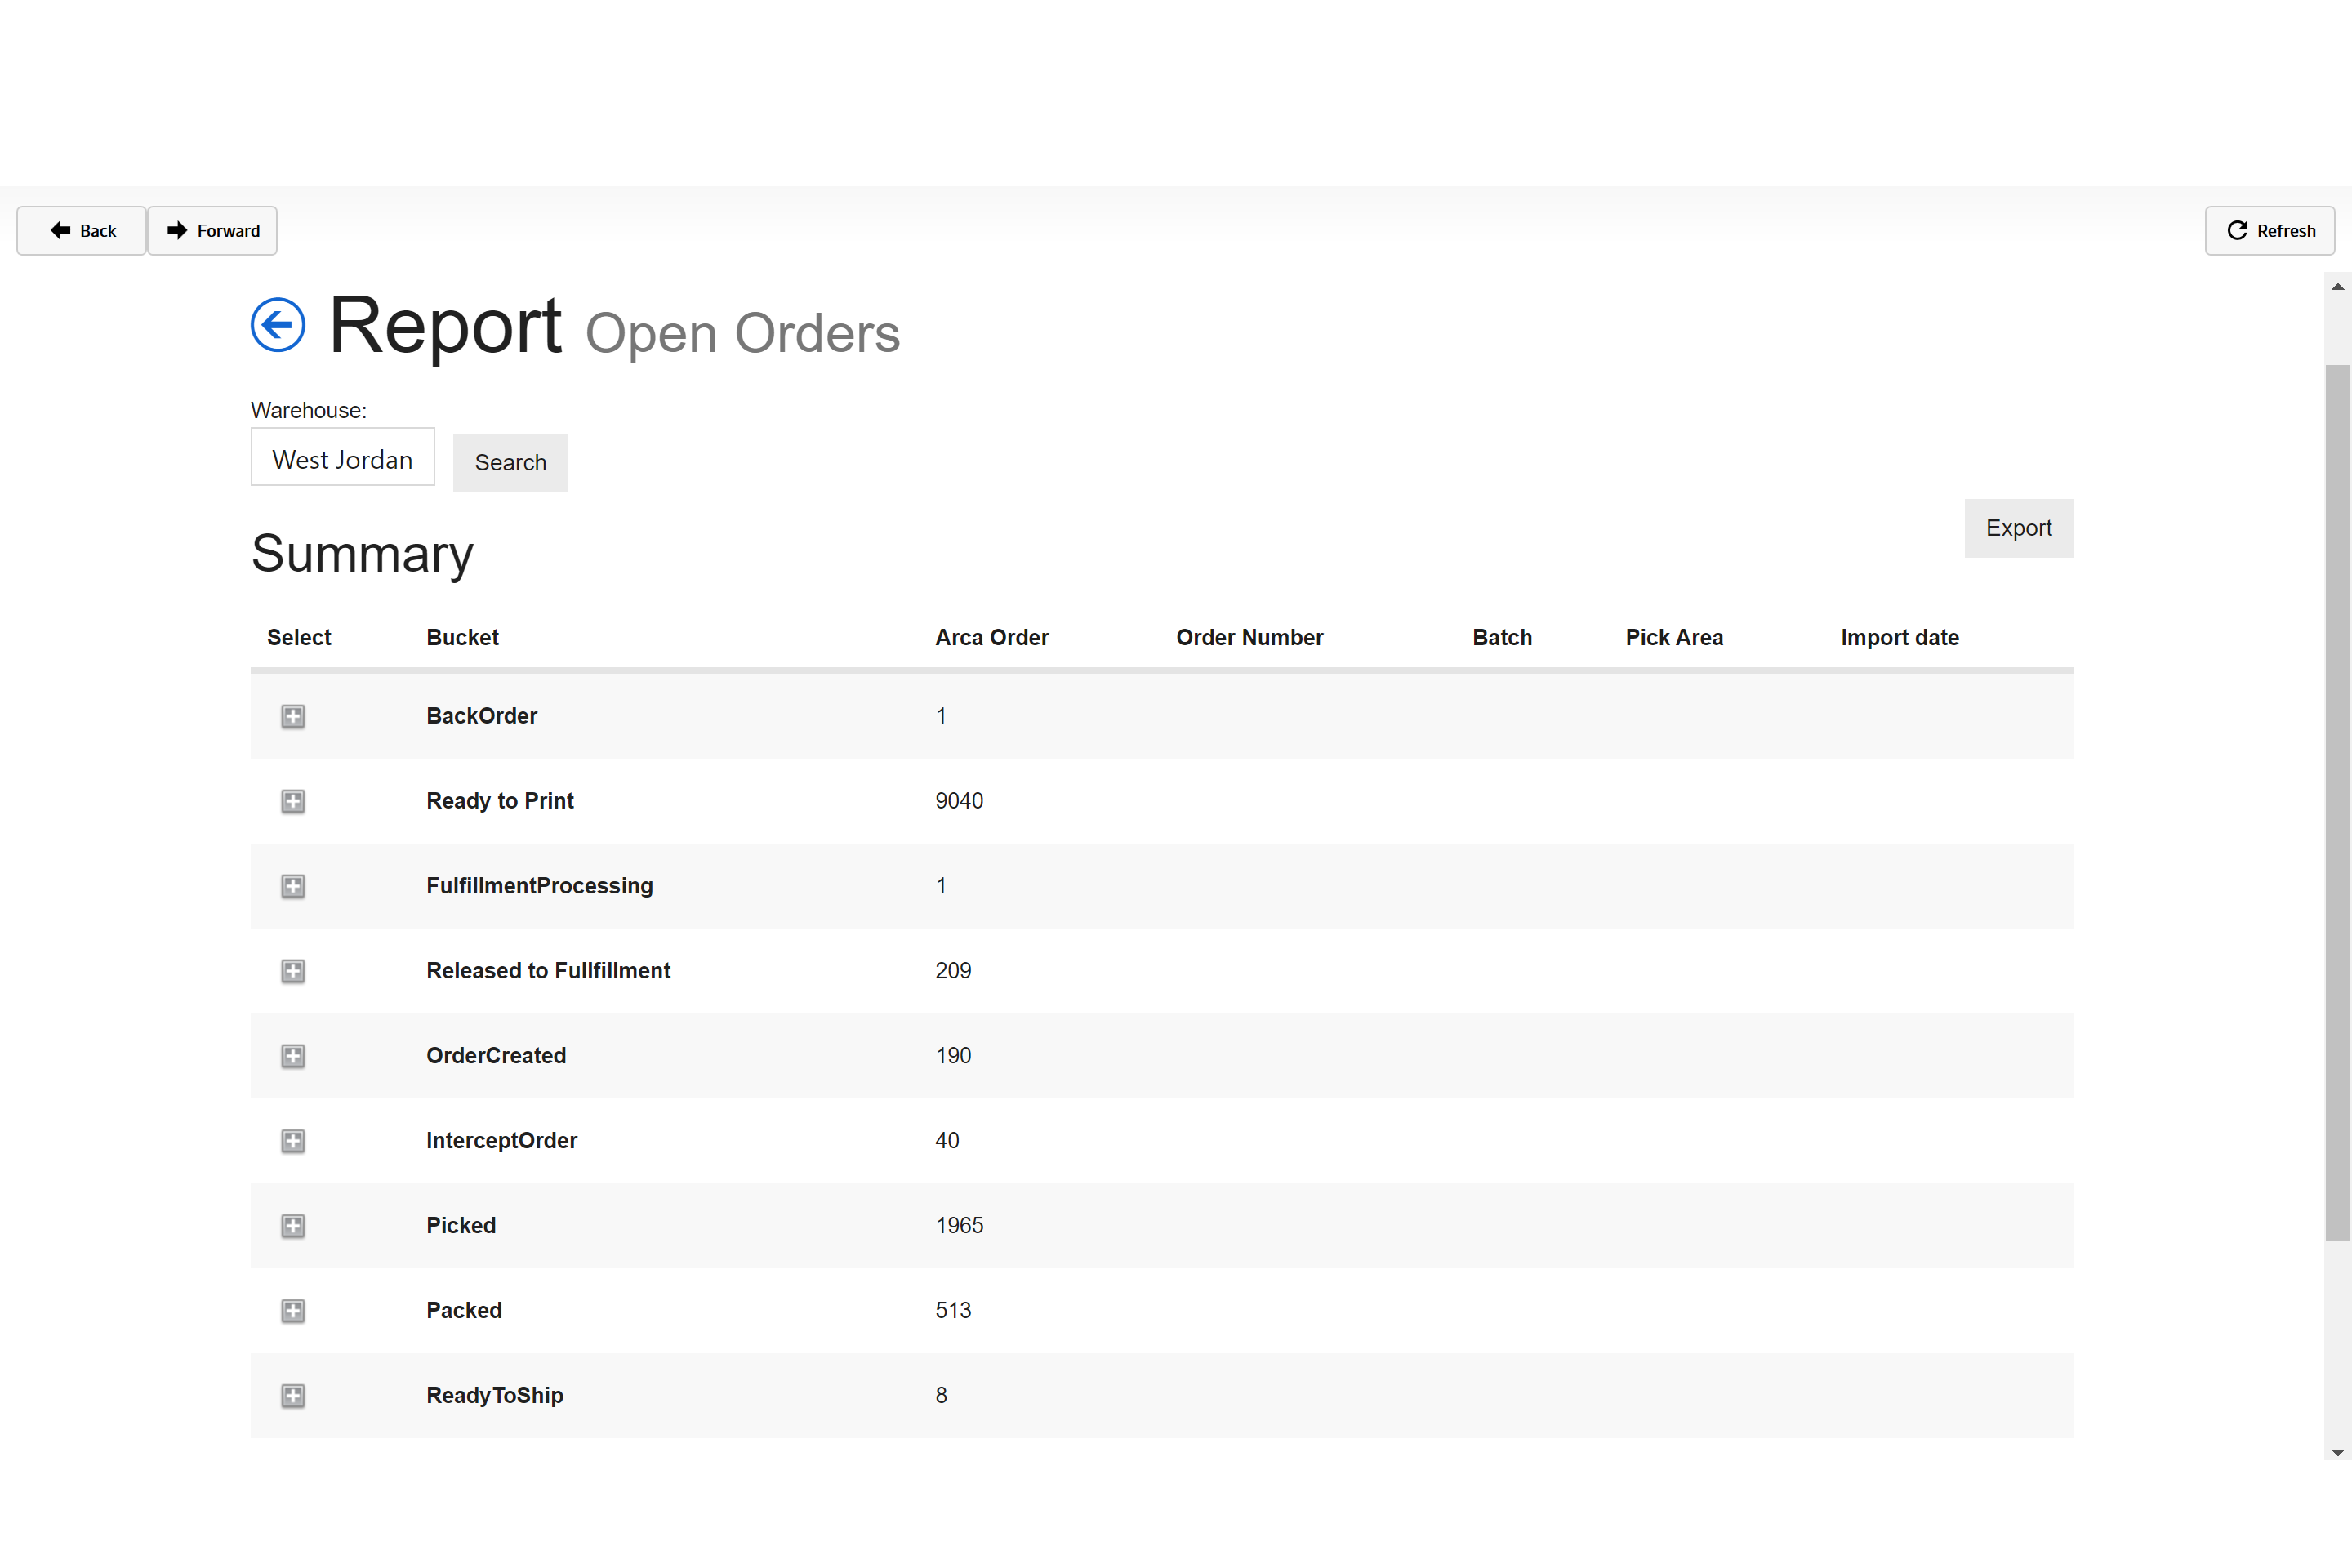
You now have the ability to add an email subscription for Open Orders Reports.
Retail Open Orders
Gives a summary of open orders per store, with details on order statuses.
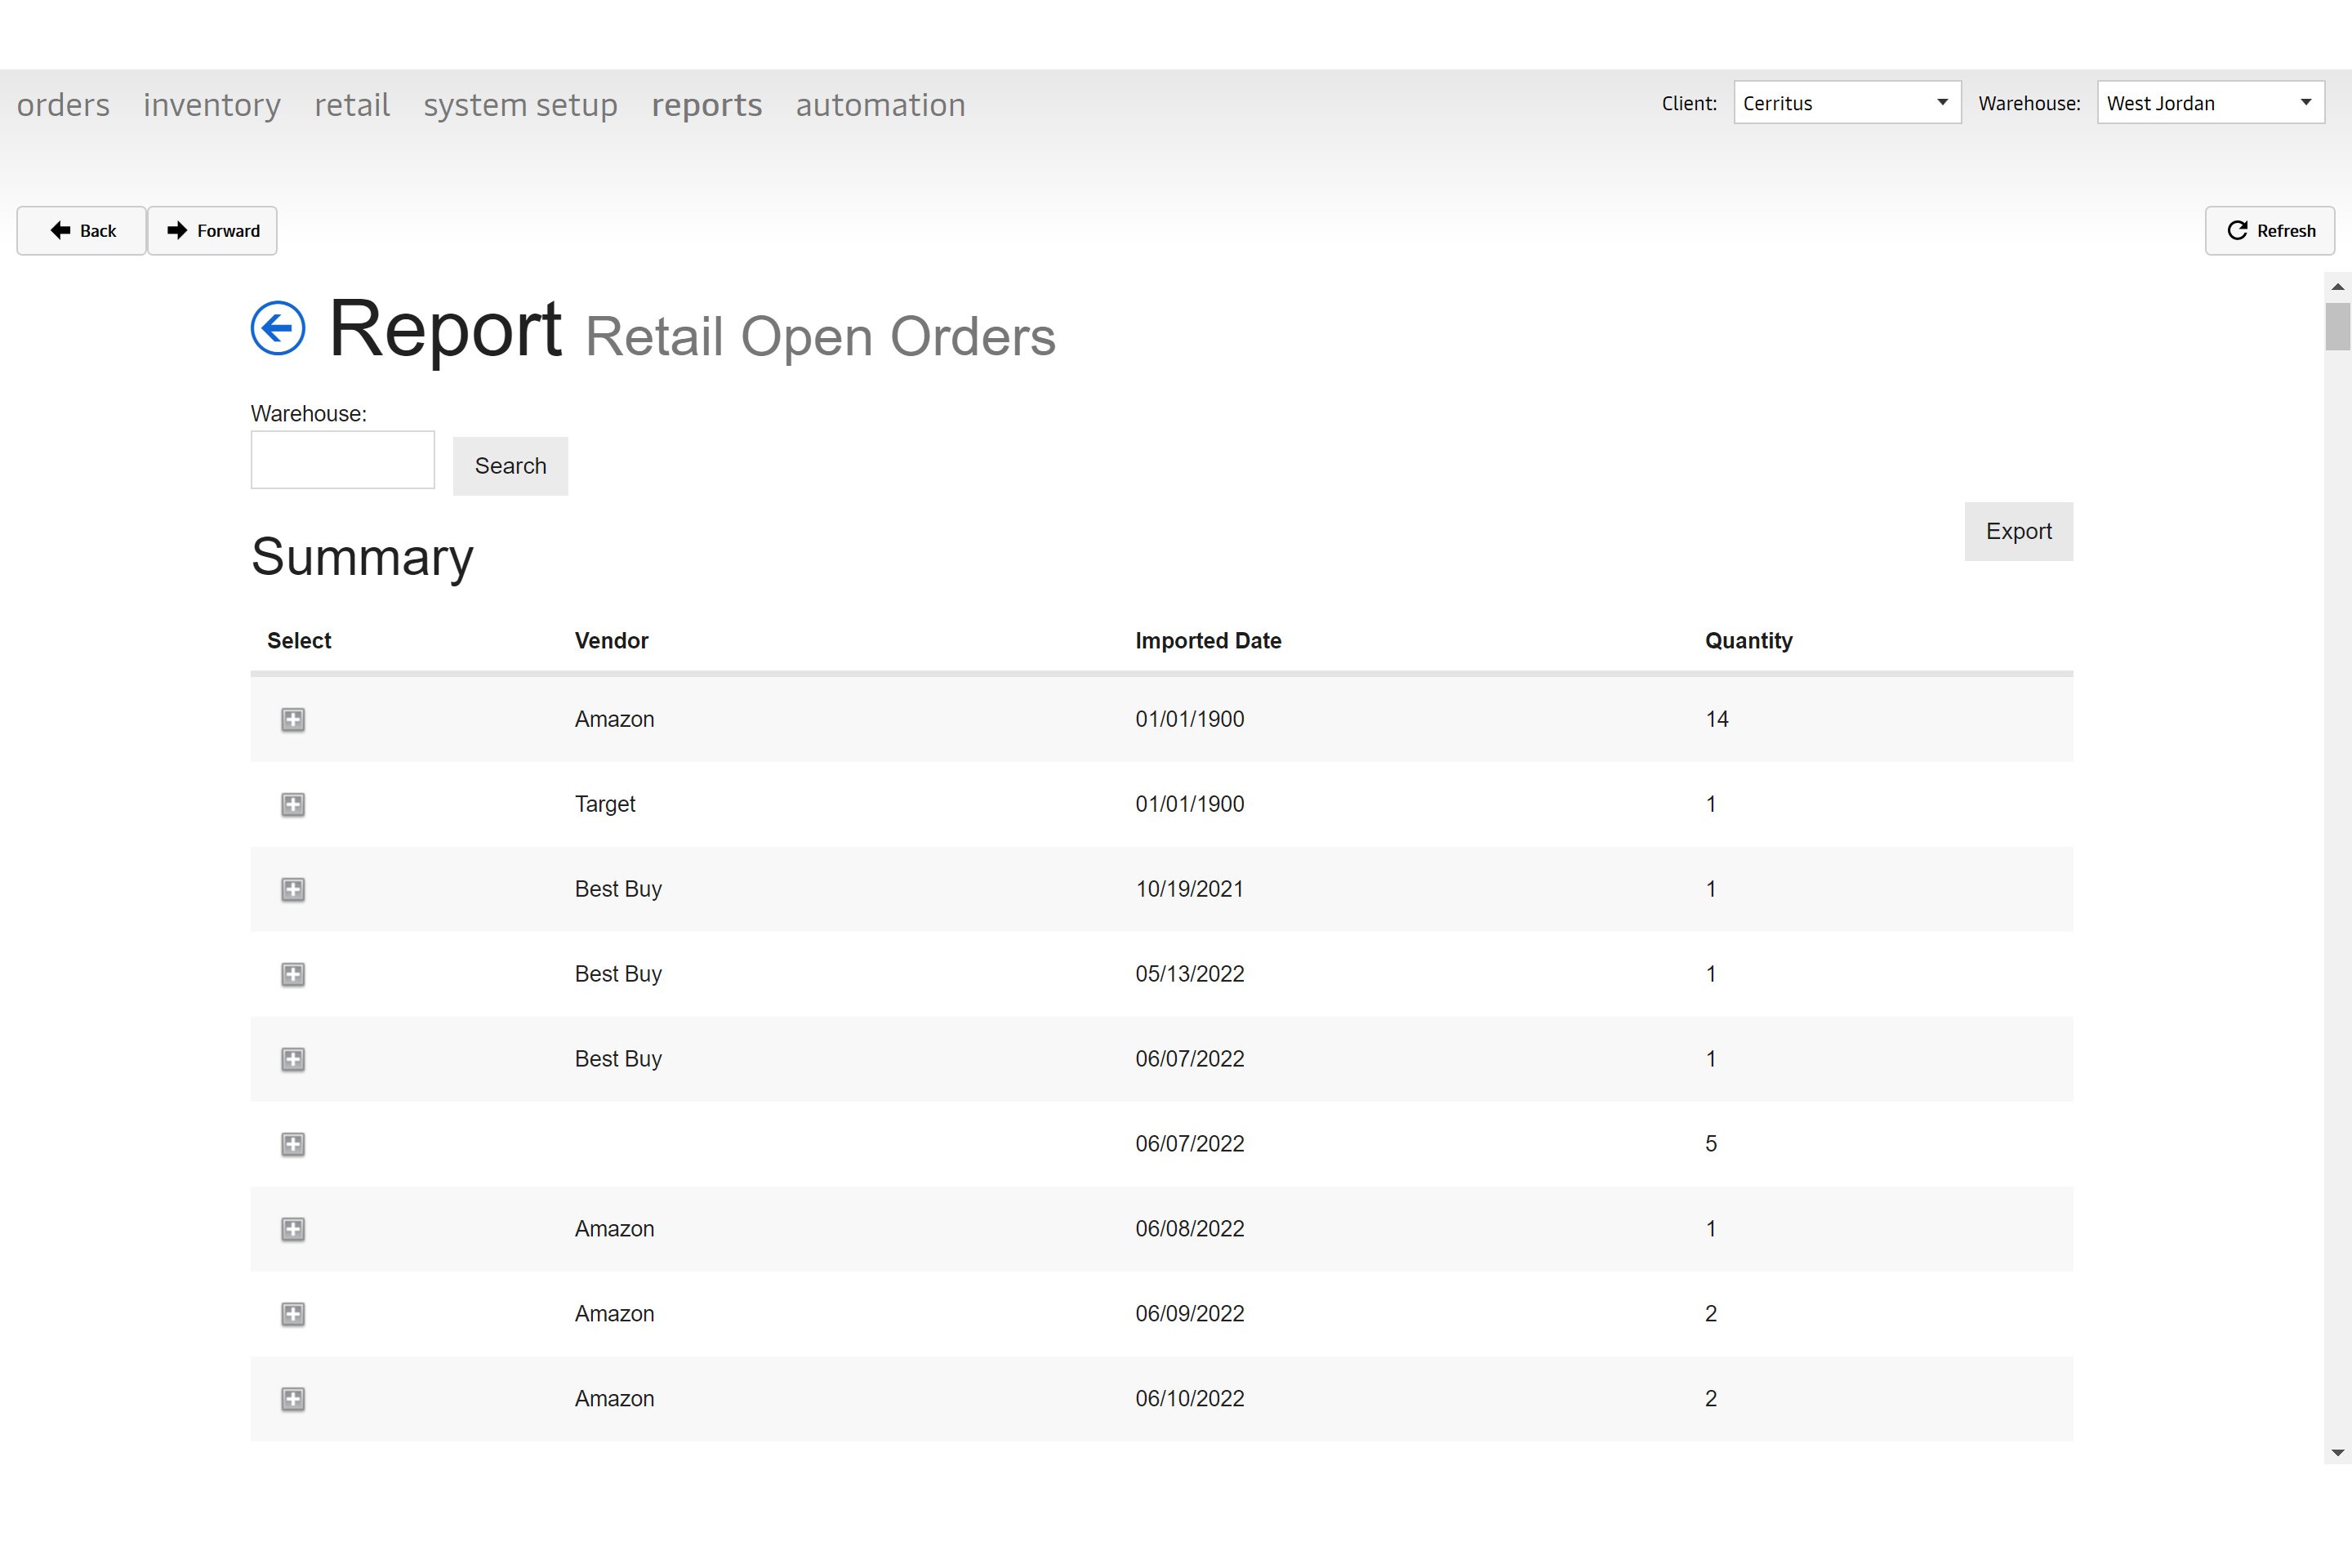
Here you are able to select on each vendor and see which orders are open for each.
You now have the ability to add an email subscription for Retail Open Orders Reports.
Order Lookup
Ability to pull up order details; such as license number, customer number, item number, item quantity, order status, import date, etc.
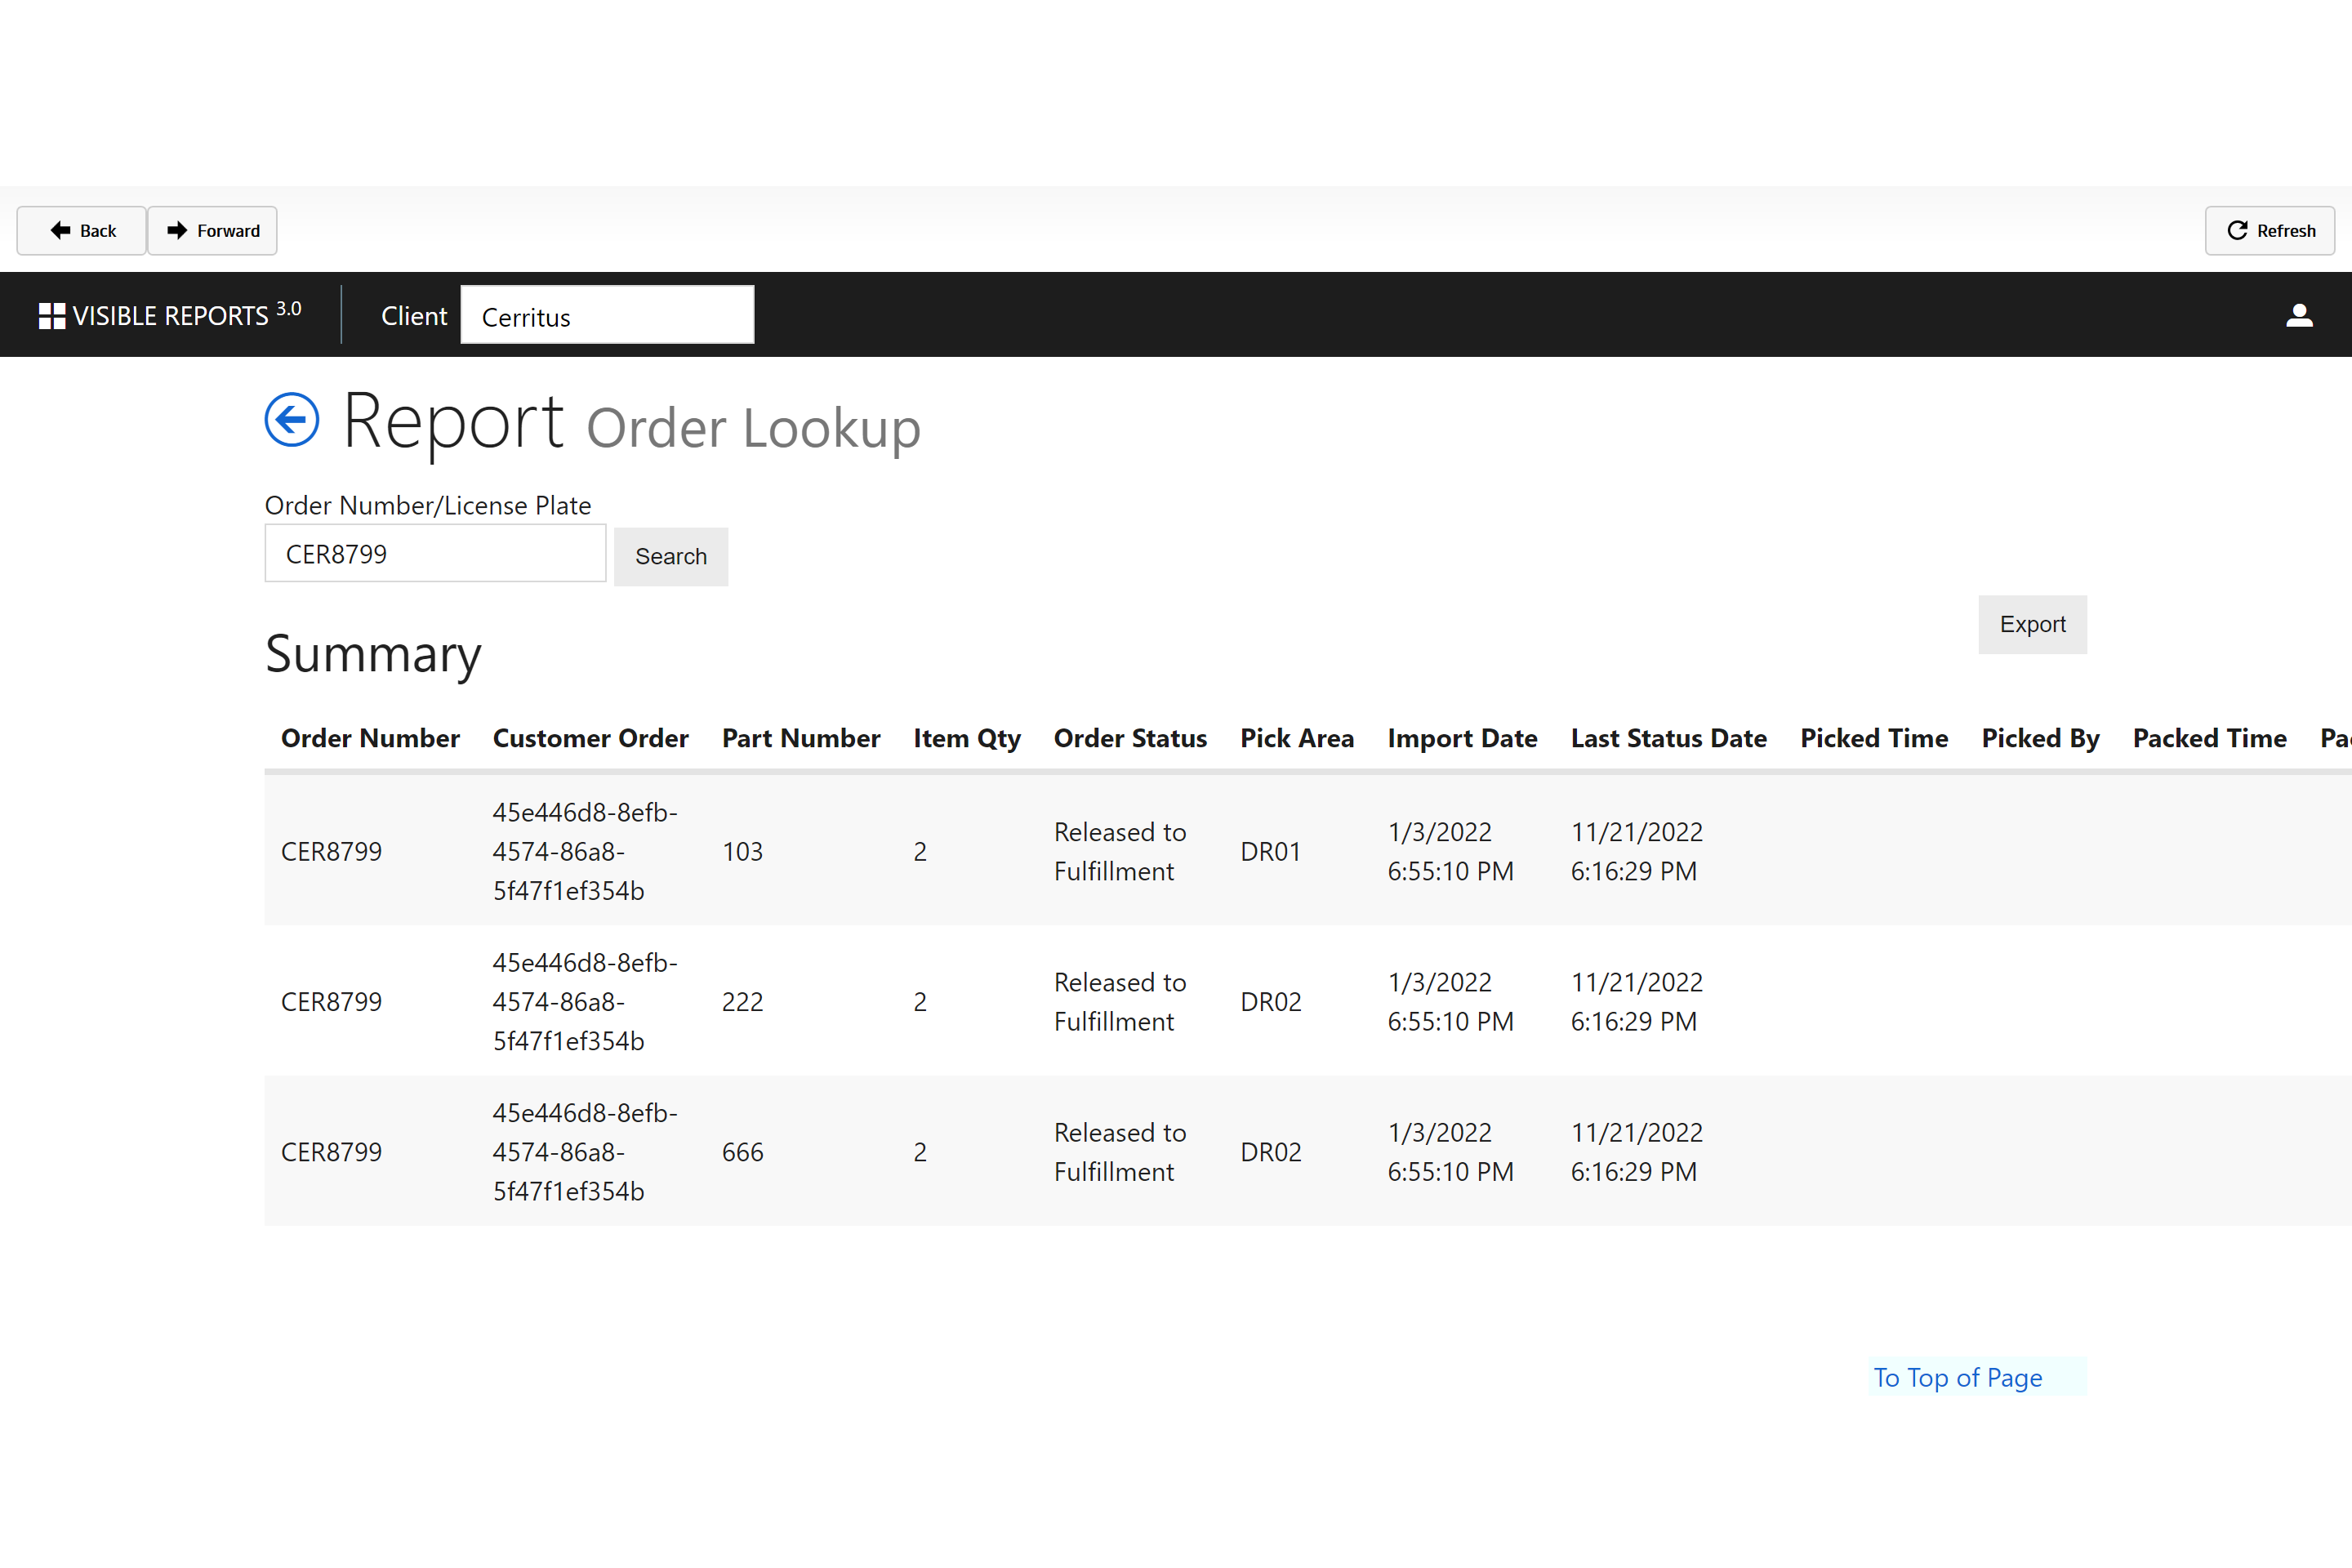
You now have the ability to add an email subscription for Order Lookup Reports.
Order History
A look into the history of shipment actions the completed order has taken, such as shipping date, tracking number, delivery date, etc.
Order Reset
Ability to update the order status back to "Order Created". It will only allow the update if the status is Ready to Print or Released to Fulfillment; it will not let you reset an order status if it has any completed picks.

Batch Order Bucket
Allows you to search for orders associated to the batch (shipment wave). It will display such information as Order number (shipping license plate order number), ARCA order number (website order), import date, picked date, picker ID, etc
You now have the ability to add an email subscription for Batch Order Bucket Reports.
Picks By Picker
Summary of picks per employee, including picks per day, average picks per hour etc.
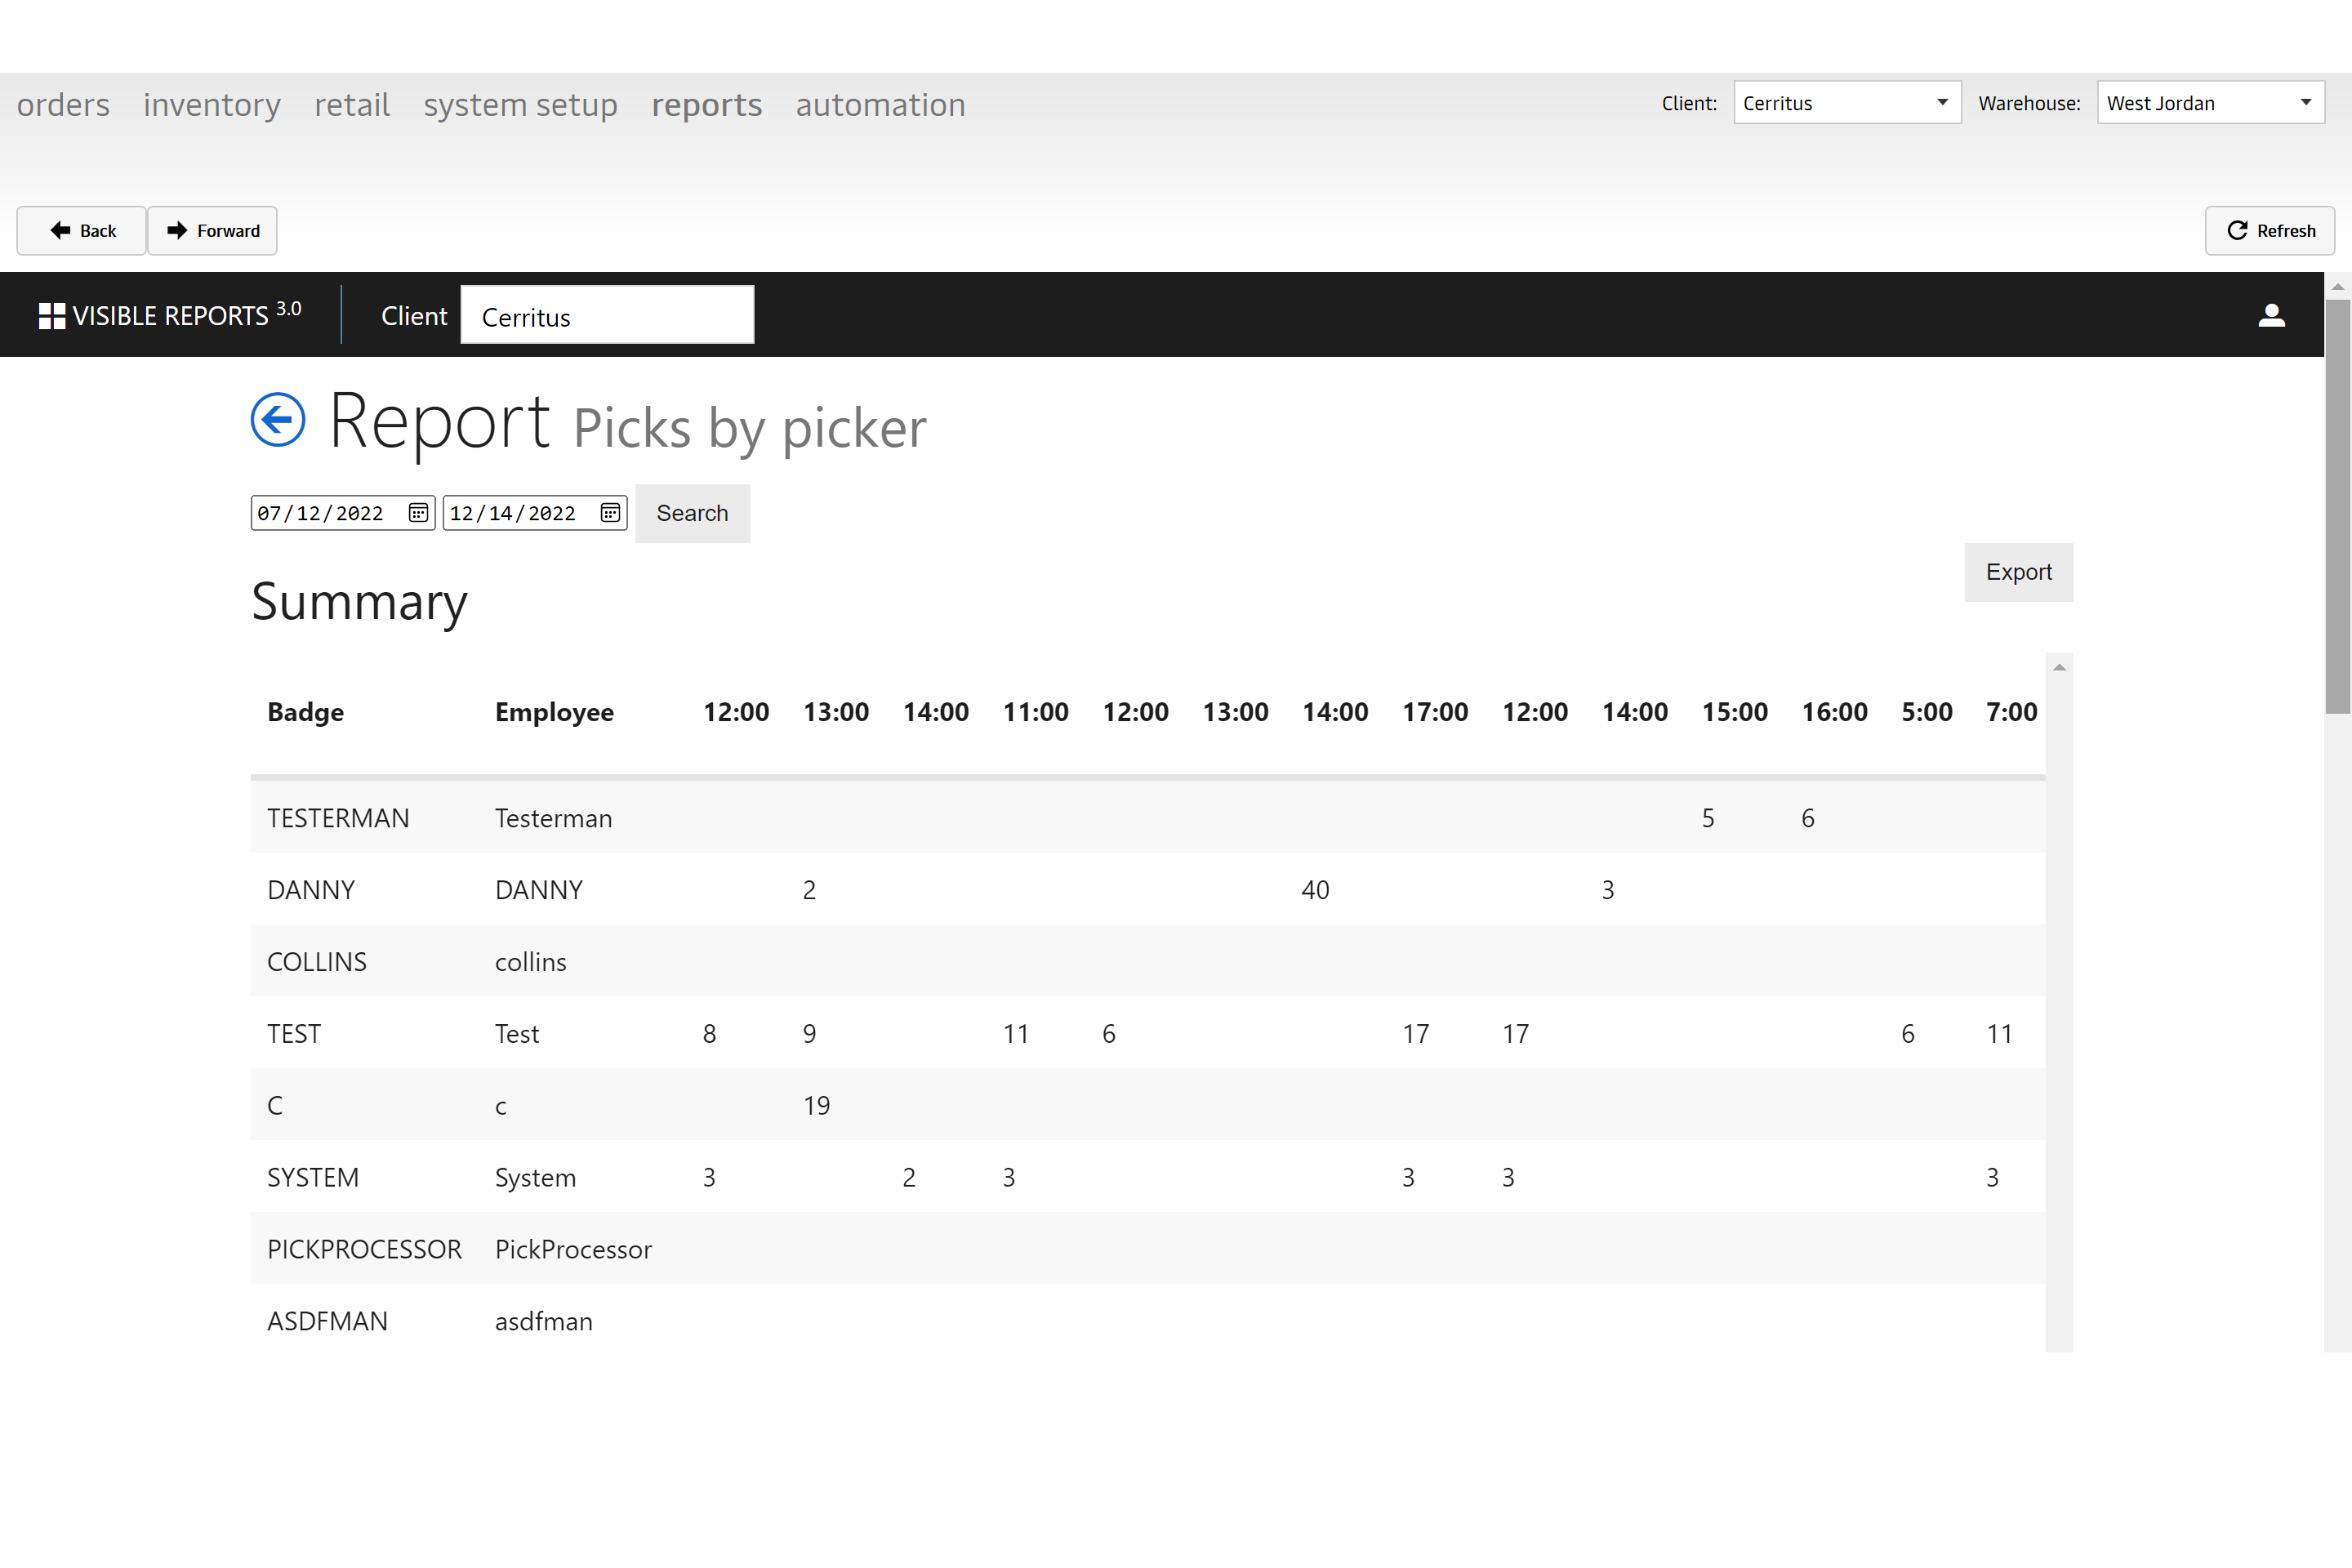
You also have the option to export this file as well.
Picks By Pick Area
Summary of employee picks per pick area; including average unit, average orders, total units and total orders.
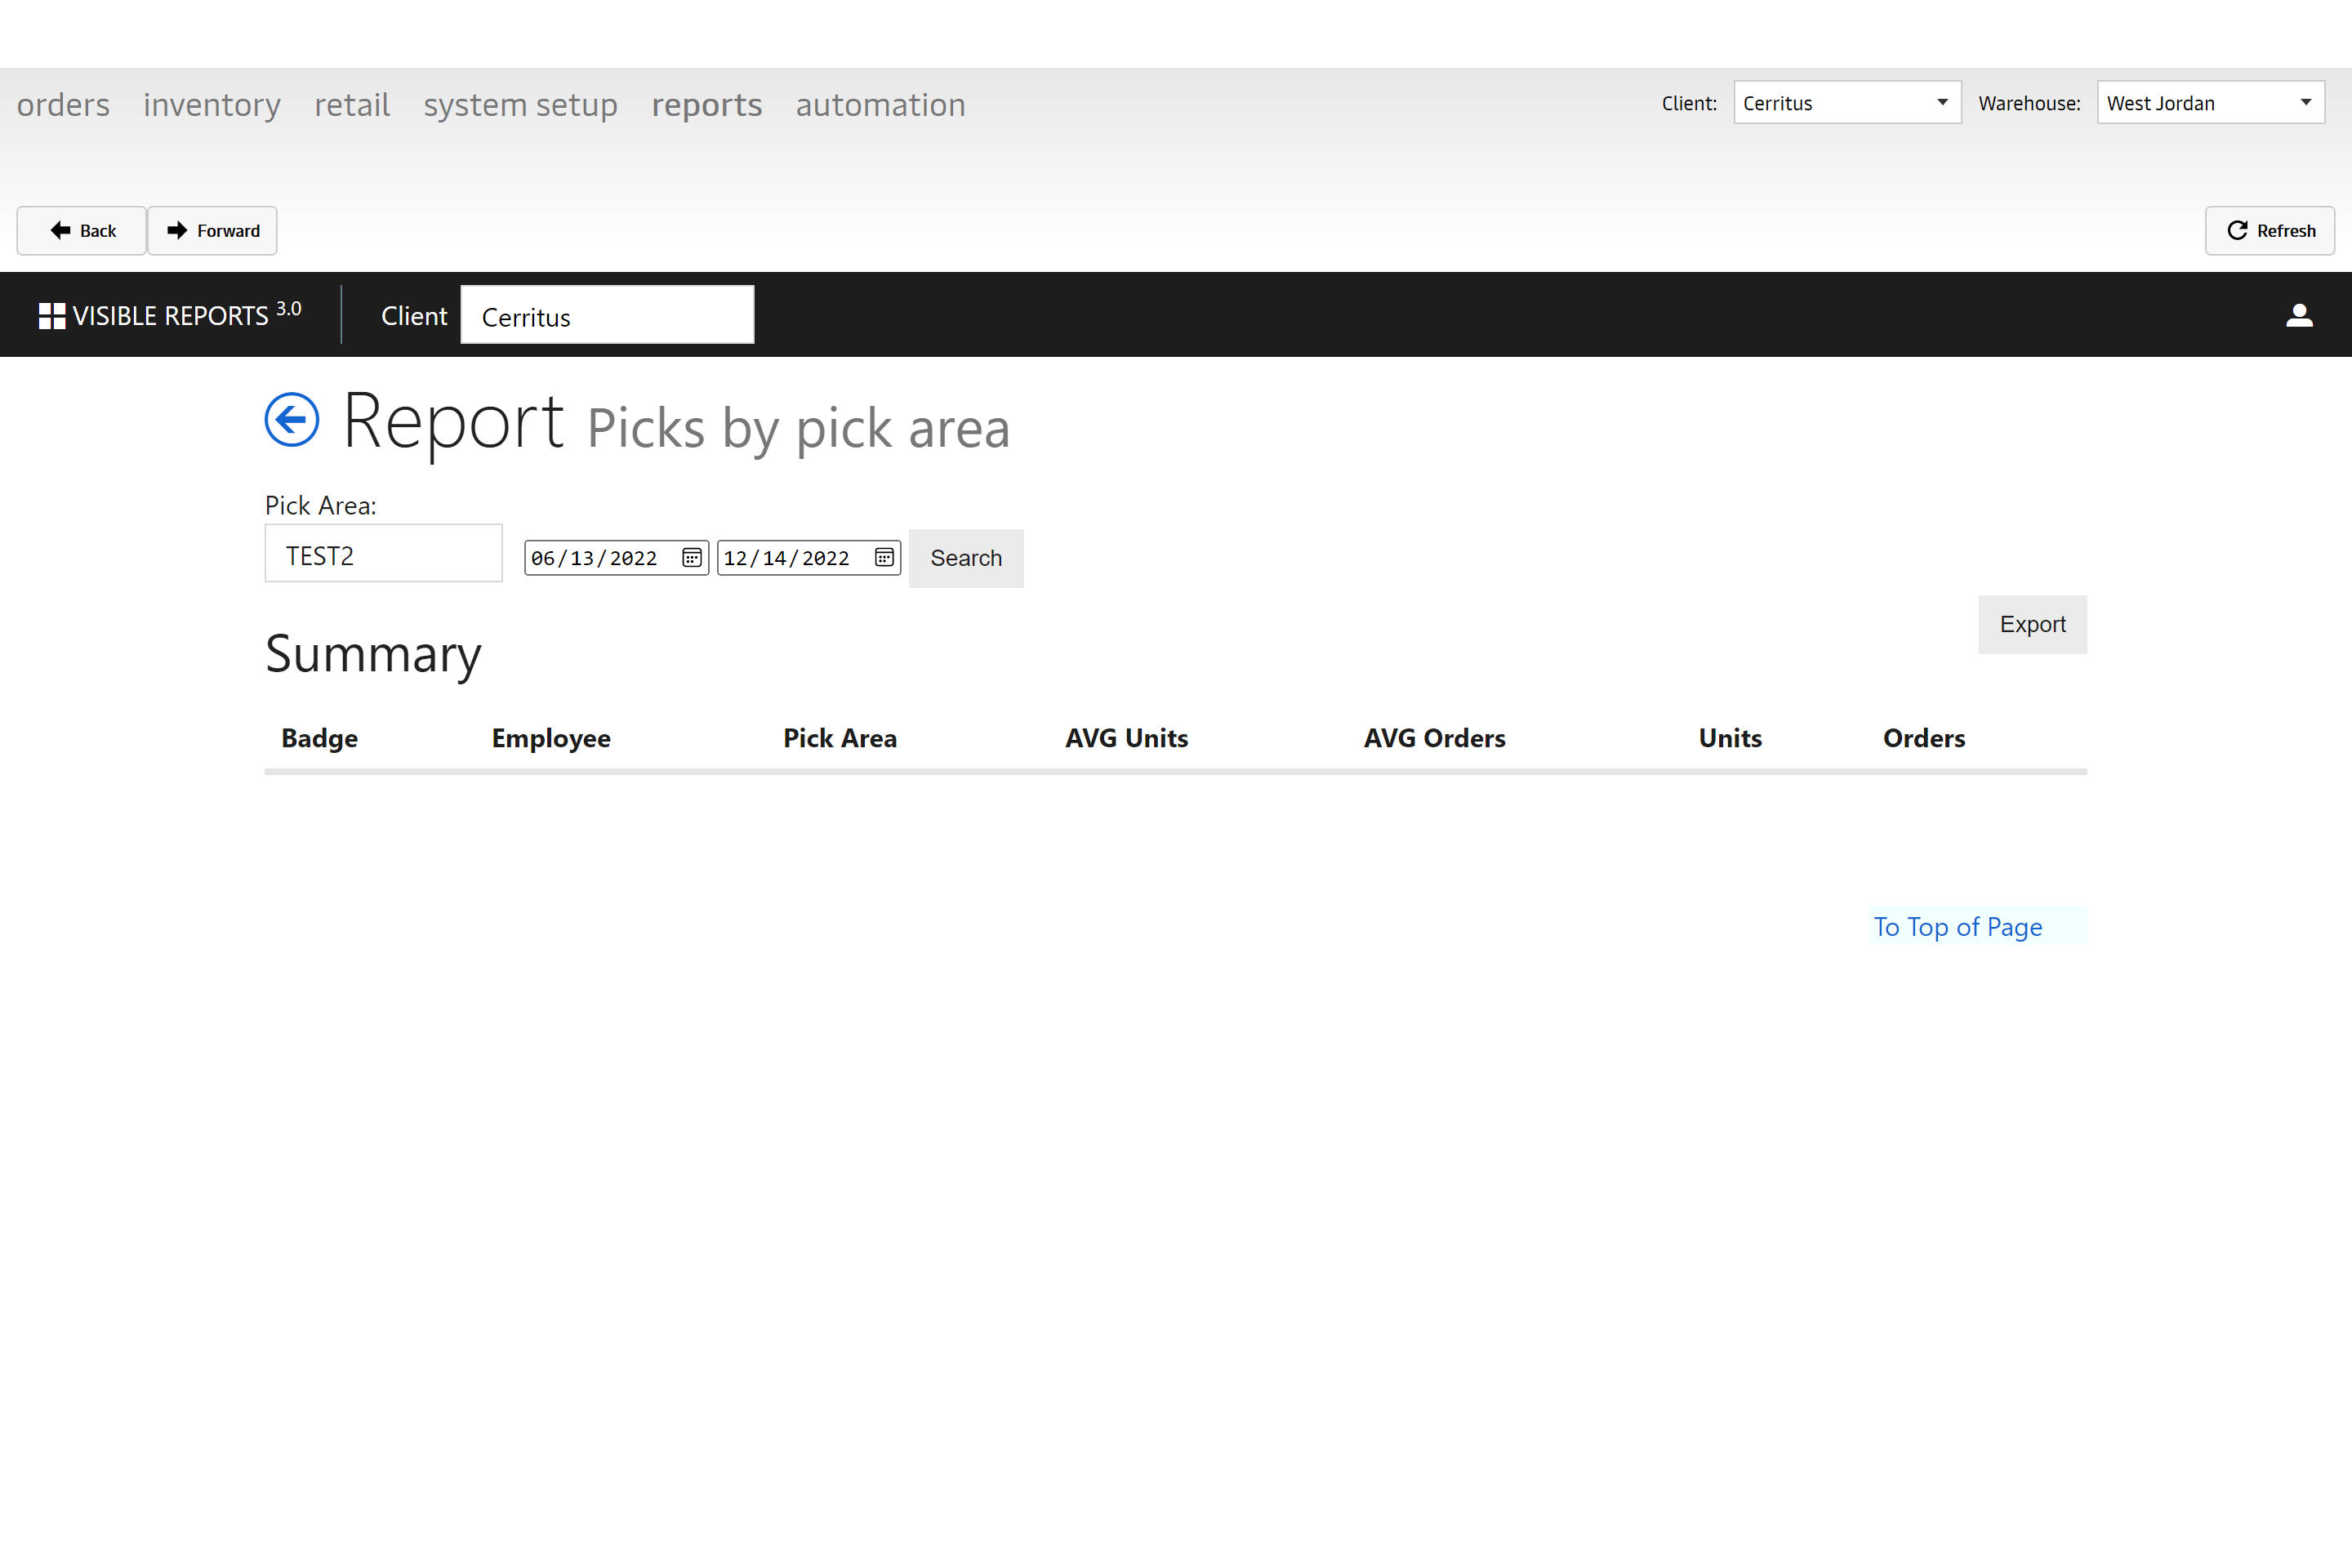
Just add in all of the relevant information and click "Search." You also have the option to export this file as well.
Work Orders
The Work Orders Report will display specific work order ids and their various statuses per warehouse (Order Created, Allocated, Released to Fulfillment, Order Picked….etc). A work order is a task from a customer purchase order that initiates a process to create a product. There usually are special instructions on a start date and completion date. An example would be to create a kit with various part numbers and quantities.
Batch Worksheet
It will display details of the items per pick area within that batch; the batch needs to be in "Released to Fulfillment" status and not picked yet.
Pickface Putaway
Shows a list of inventory on-hand; lists items with respect to their location and pick area.
User Actions
Gives a summary of the actions taken by a user; login timestamps and activities filtered by action type (scans for tasks such as inventory truck, shipping pallet, master balance, etc.)

| ID | Name | Description |
|---|---|---|
| 1 | InventoryPallet | Pallet in storage with inventory. |
| 3 | InventoryTruck | Truck for unloading inventory. |
| 4 | ShippingTruck | Truck for shipping orders. |
| 5 | User | System User |
| 6 | PalletDetail | Pallet detail tied to InventoryPallet. |
| 8 | RMA | Returned package from customer. |
| 9 | PickAreaDetail | Picking slot in pick area. |
Inventory Pallet
The inventory pallet action is going to show you any action that has been done regarding inventory. For example, creating, updating inventory, putting inventory away, etc.
Inventory Truck
Once you click on "Commit Truck" it will move into this status and will show you all actions regarding inventory being committed.
Shipping Truck
Any action taken that has to do with receiving in the warehouse will show up here.
User
This will show you logins by user.
Pallet Detail
Pallet Detail is also tied to Inventory Pallet. Anytime you are adjusting inventory, it will show up in this action type.
RMA
This is going to show you any action that has to do with returned packages.
Pick Area Detail
This action will show you replenishment and inventory adjustments.
Incomplete Items
Part Numbers/Items are displayed on this report if any of the fields are zero or empty (Weight, Case Qty, Box Qty and Pallet Qty)
Retail Order By Status
Summary of retail orders (store orders) broken out by status, per vendor (for example, SkullCandy will use vendors like Amazon, Best Buy, Target).
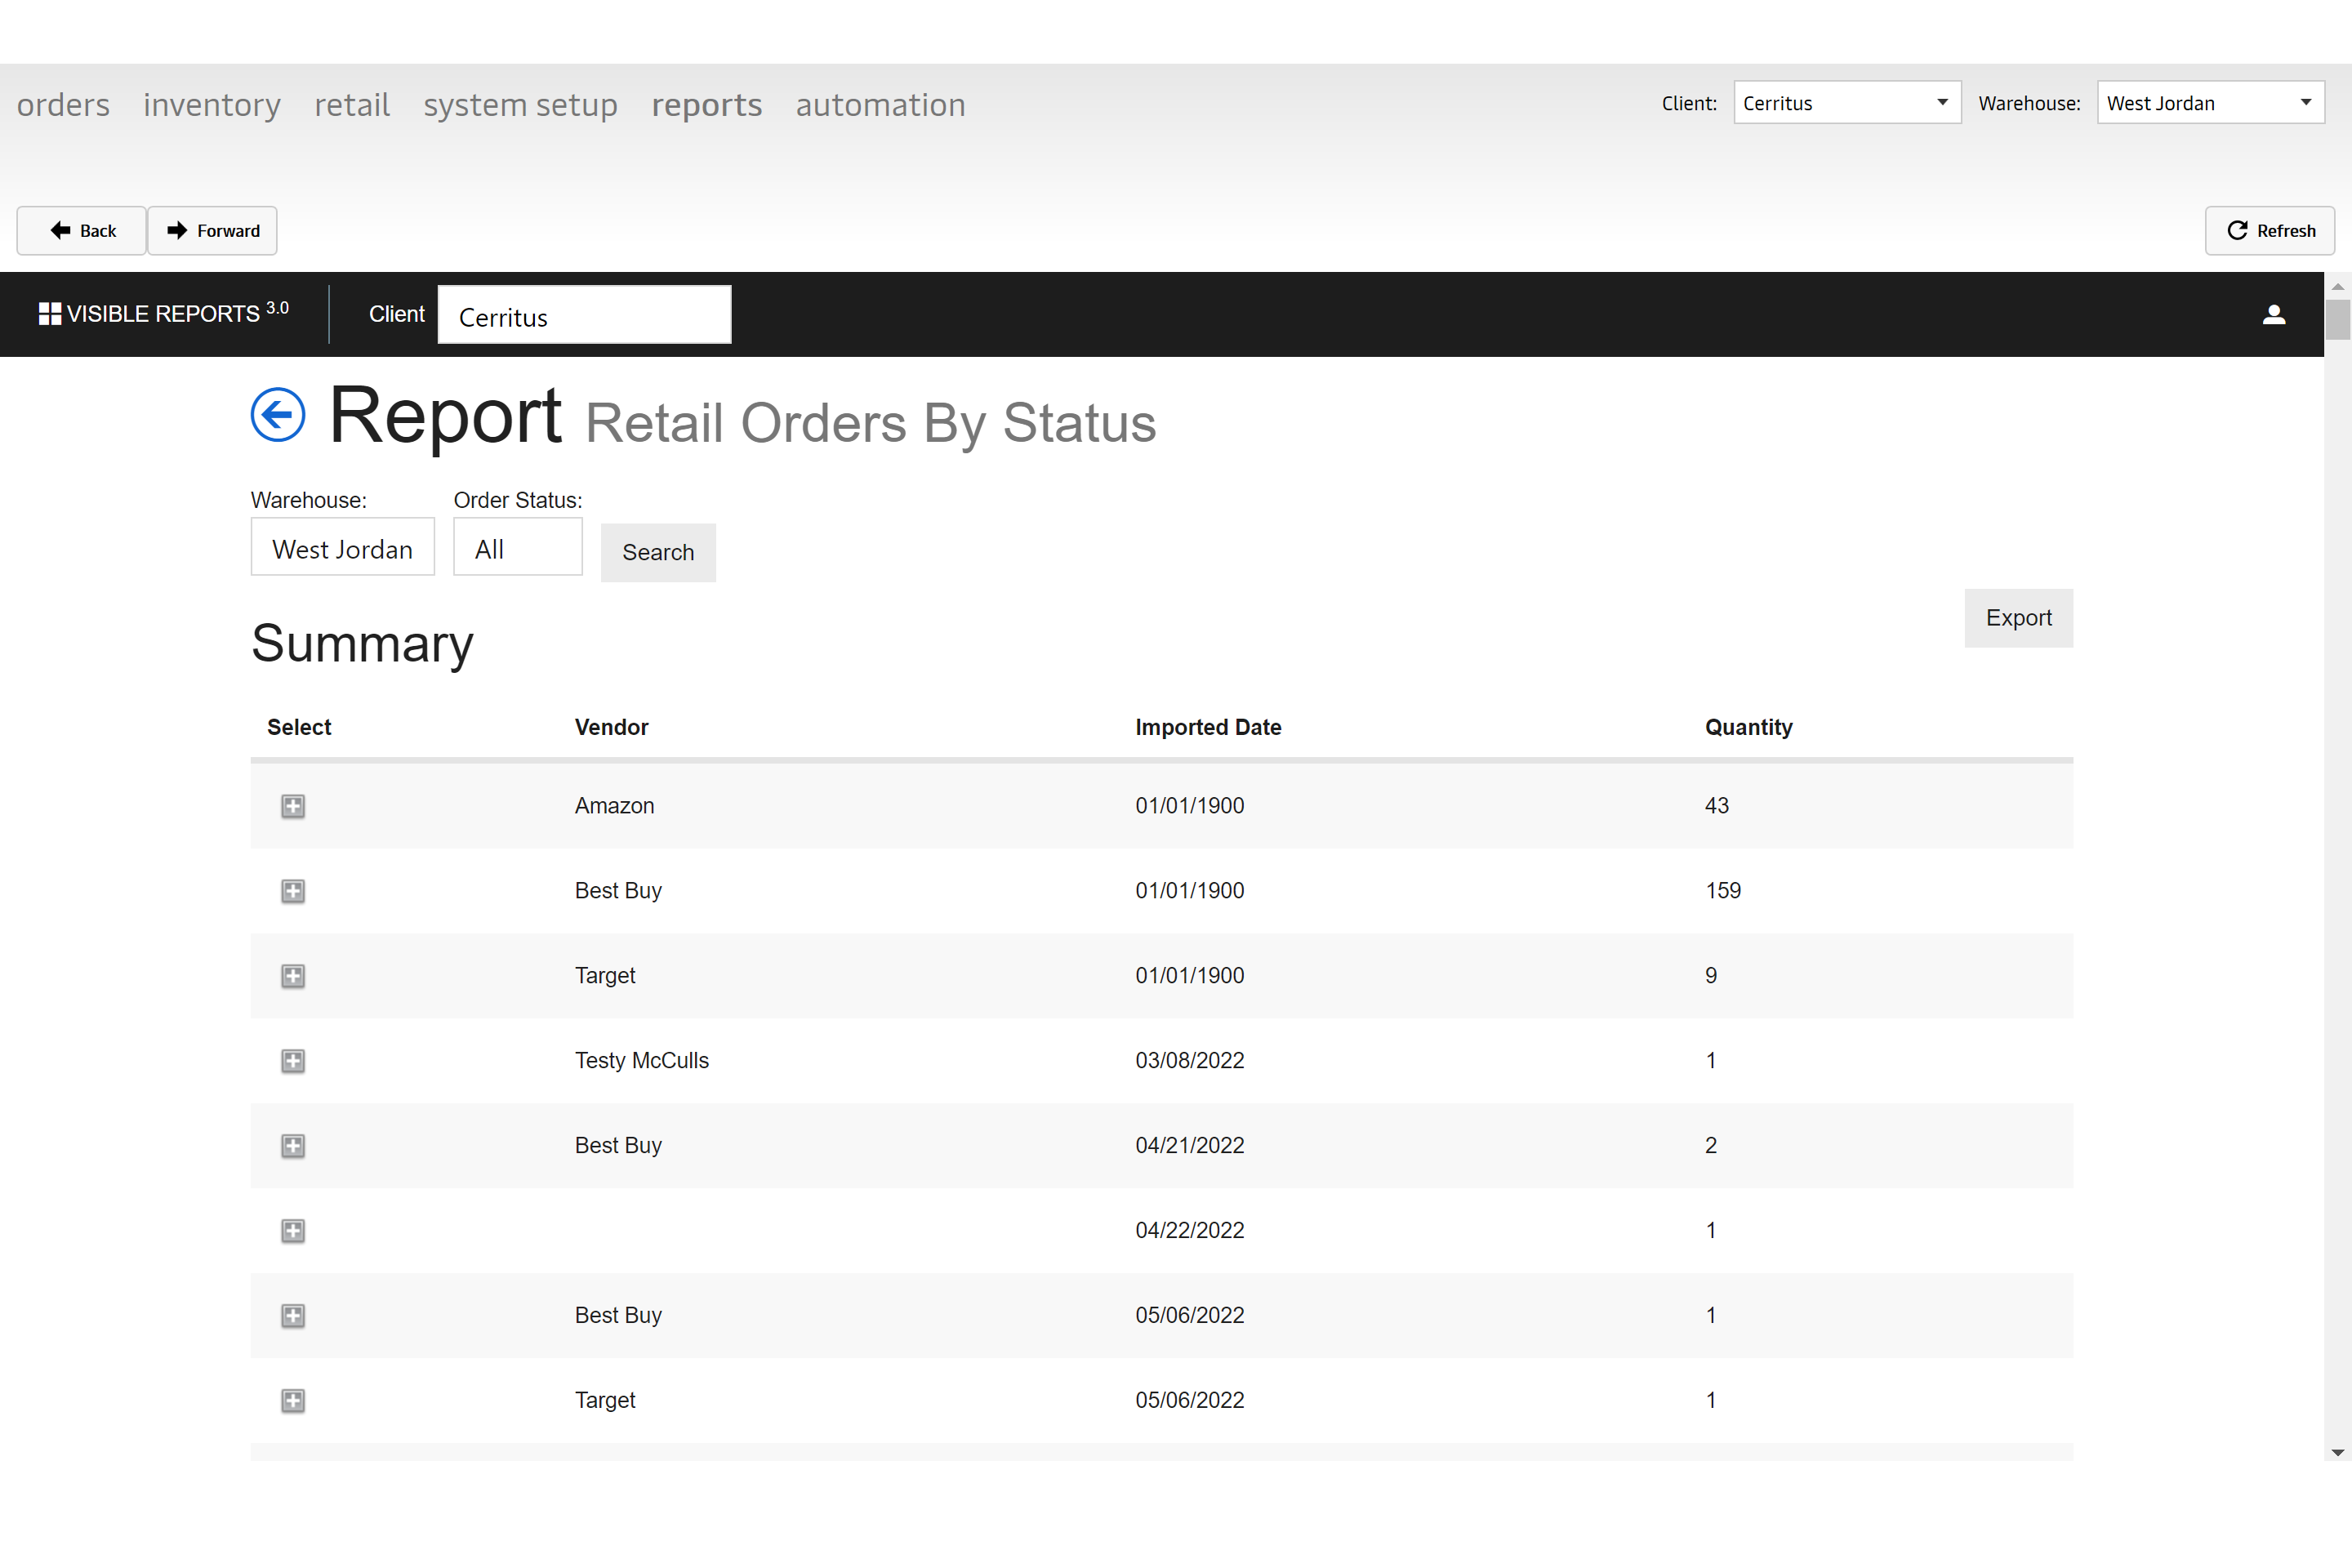
You now have the ability to add an email subscription for Retail Order by Status Reports.
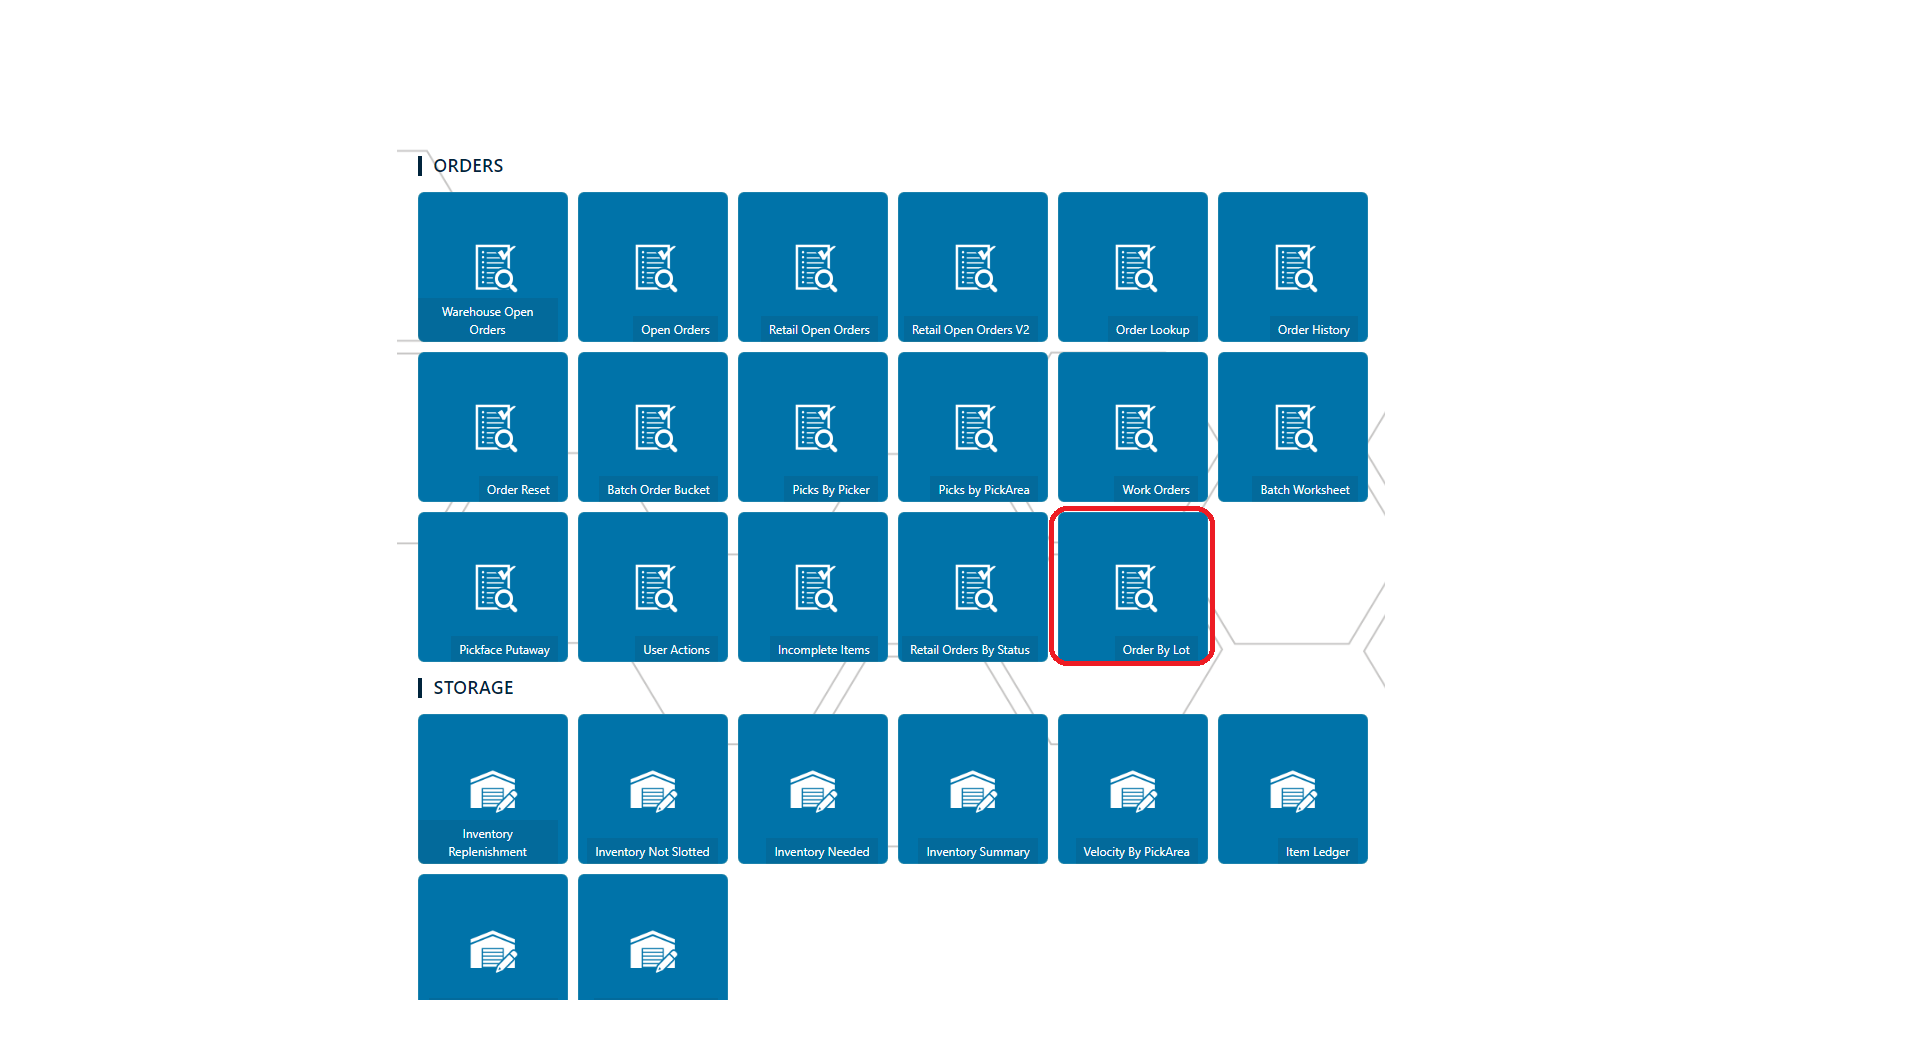
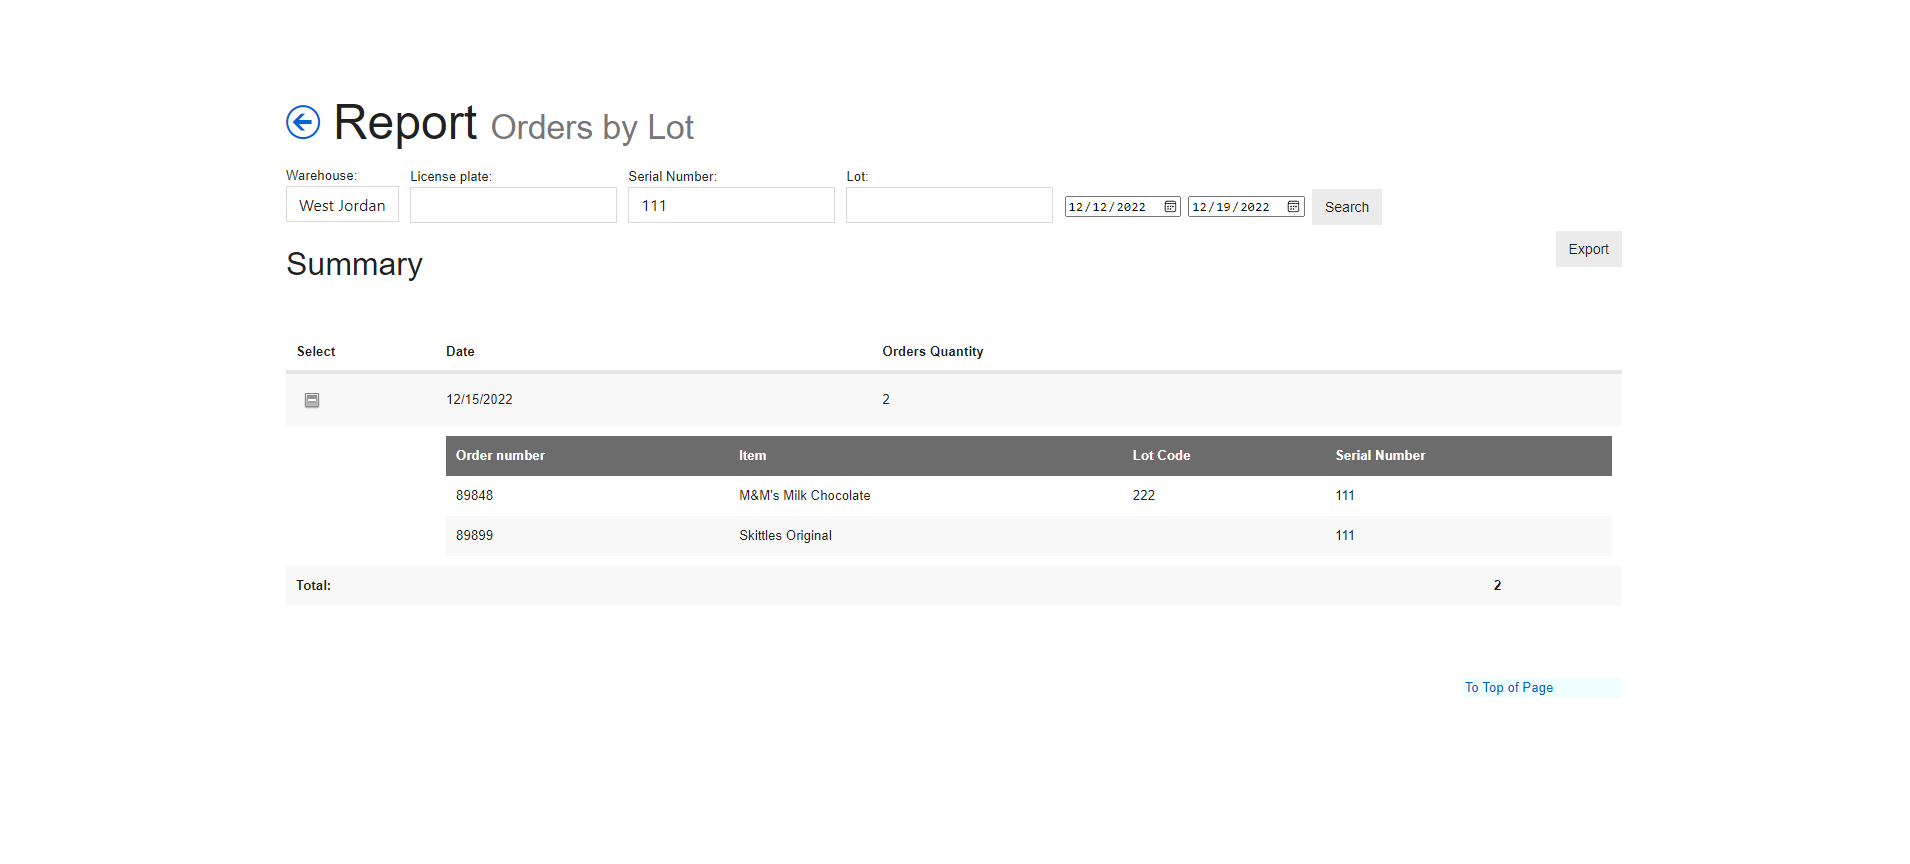
Orders By Lot
This one pulls from picked items that use Lot or Serial capture flags. So you can choose a warehouse and date range at minimum then search and it will return the order number and show you the items and lot or serial numbers that were entered when the item was picked. You can filter for specific License plate (that's the Maersk order number/shipping license plate like CER89848), Serial Number and Lot and it will return the orders that fall in the specific date range.
Storage
Under the "Storage"* section of ARCA LOC, you will be able to access the following reports.
Warning
The client will default back to the first in the list, you must reselect your client within the reports section and click Refresh.
| Report | Description |
|---|---|
| Inventory Replenishment | Loads all the pick area details that has been selected based on items that have less quantity than the value set in the stock balance. Then a lookup is done in the pallets to obtain which items in detail need to be replenished and in which pallet location along with quantity available. |
| Inventory Not Slotted | This will display all items and their description that are not in a picking area location by warehouse. |
| Inventory Needed | When orders are allocated, if the pick location does not contain enough inventory to fulfill those orders (but there is sufficient inventory in storage) this report provides those item codes. It is searchable by warehouse and pick area. |
| Inventory Summary | Pulls all inventory by warehouse which includes shippable, on-hand, committed and quarantined values. This will also drill down to expose the actual quantity in a specific pick area location. |
| Velocity By PickArea | This section obtains the fulfillment items of the selected warehouse and pick area within the range of dates. It is based on the date of the package and the total number of quantity of the fulfillment item specifically in that pick area. |
| Item Ledger | This will display all adjustments made to a specific SKU sorting by adjustment reason through a specific date. |
| Warehouse Locations | This displays all associated details of locations searchable by warehouse and zone. The locations include the exact location, dimensions and items which are linked to that area. User is also able to sort by empty locations. |
Inventory Replenishment
Loads all the pick area details that has been selected based on items that have less quantity than the value set in the stock balance. Then a lookup is done in the pallets to obtain which items in detail need to be replenished and in which pallet location along with quantity available.
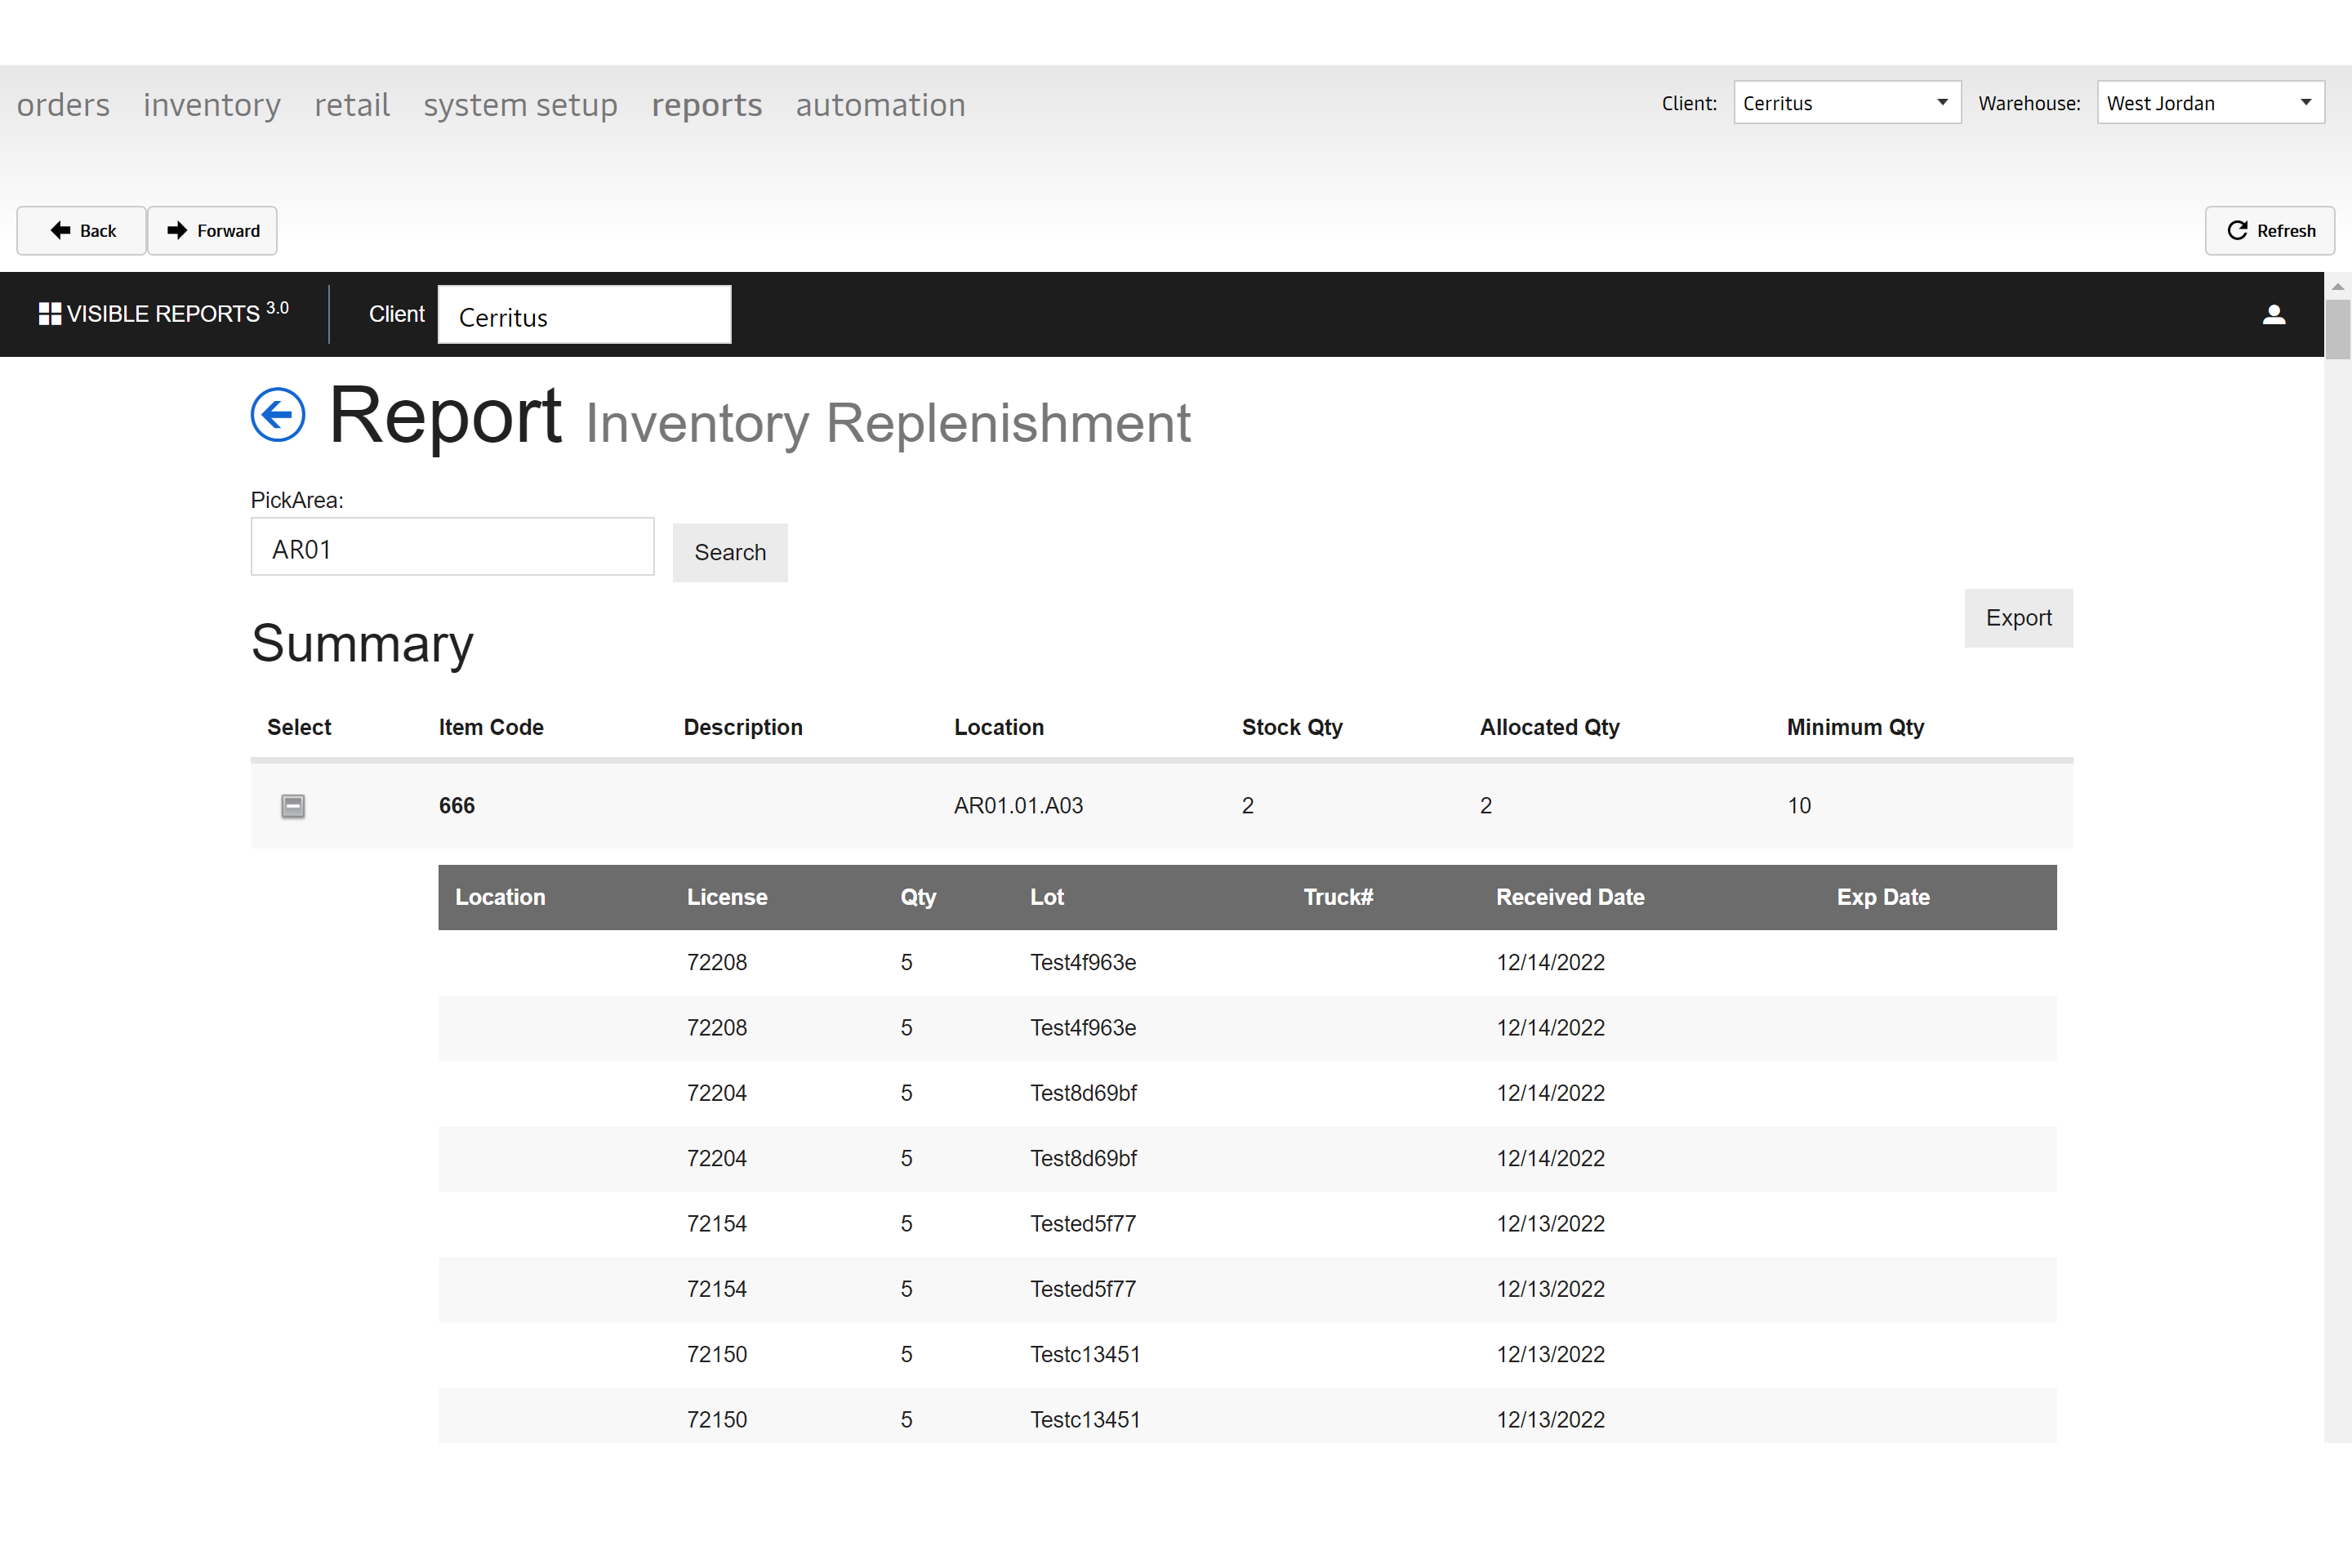
Inventory Not Slotted
This will display all items and their description that are not in a picking area location by warehouse.
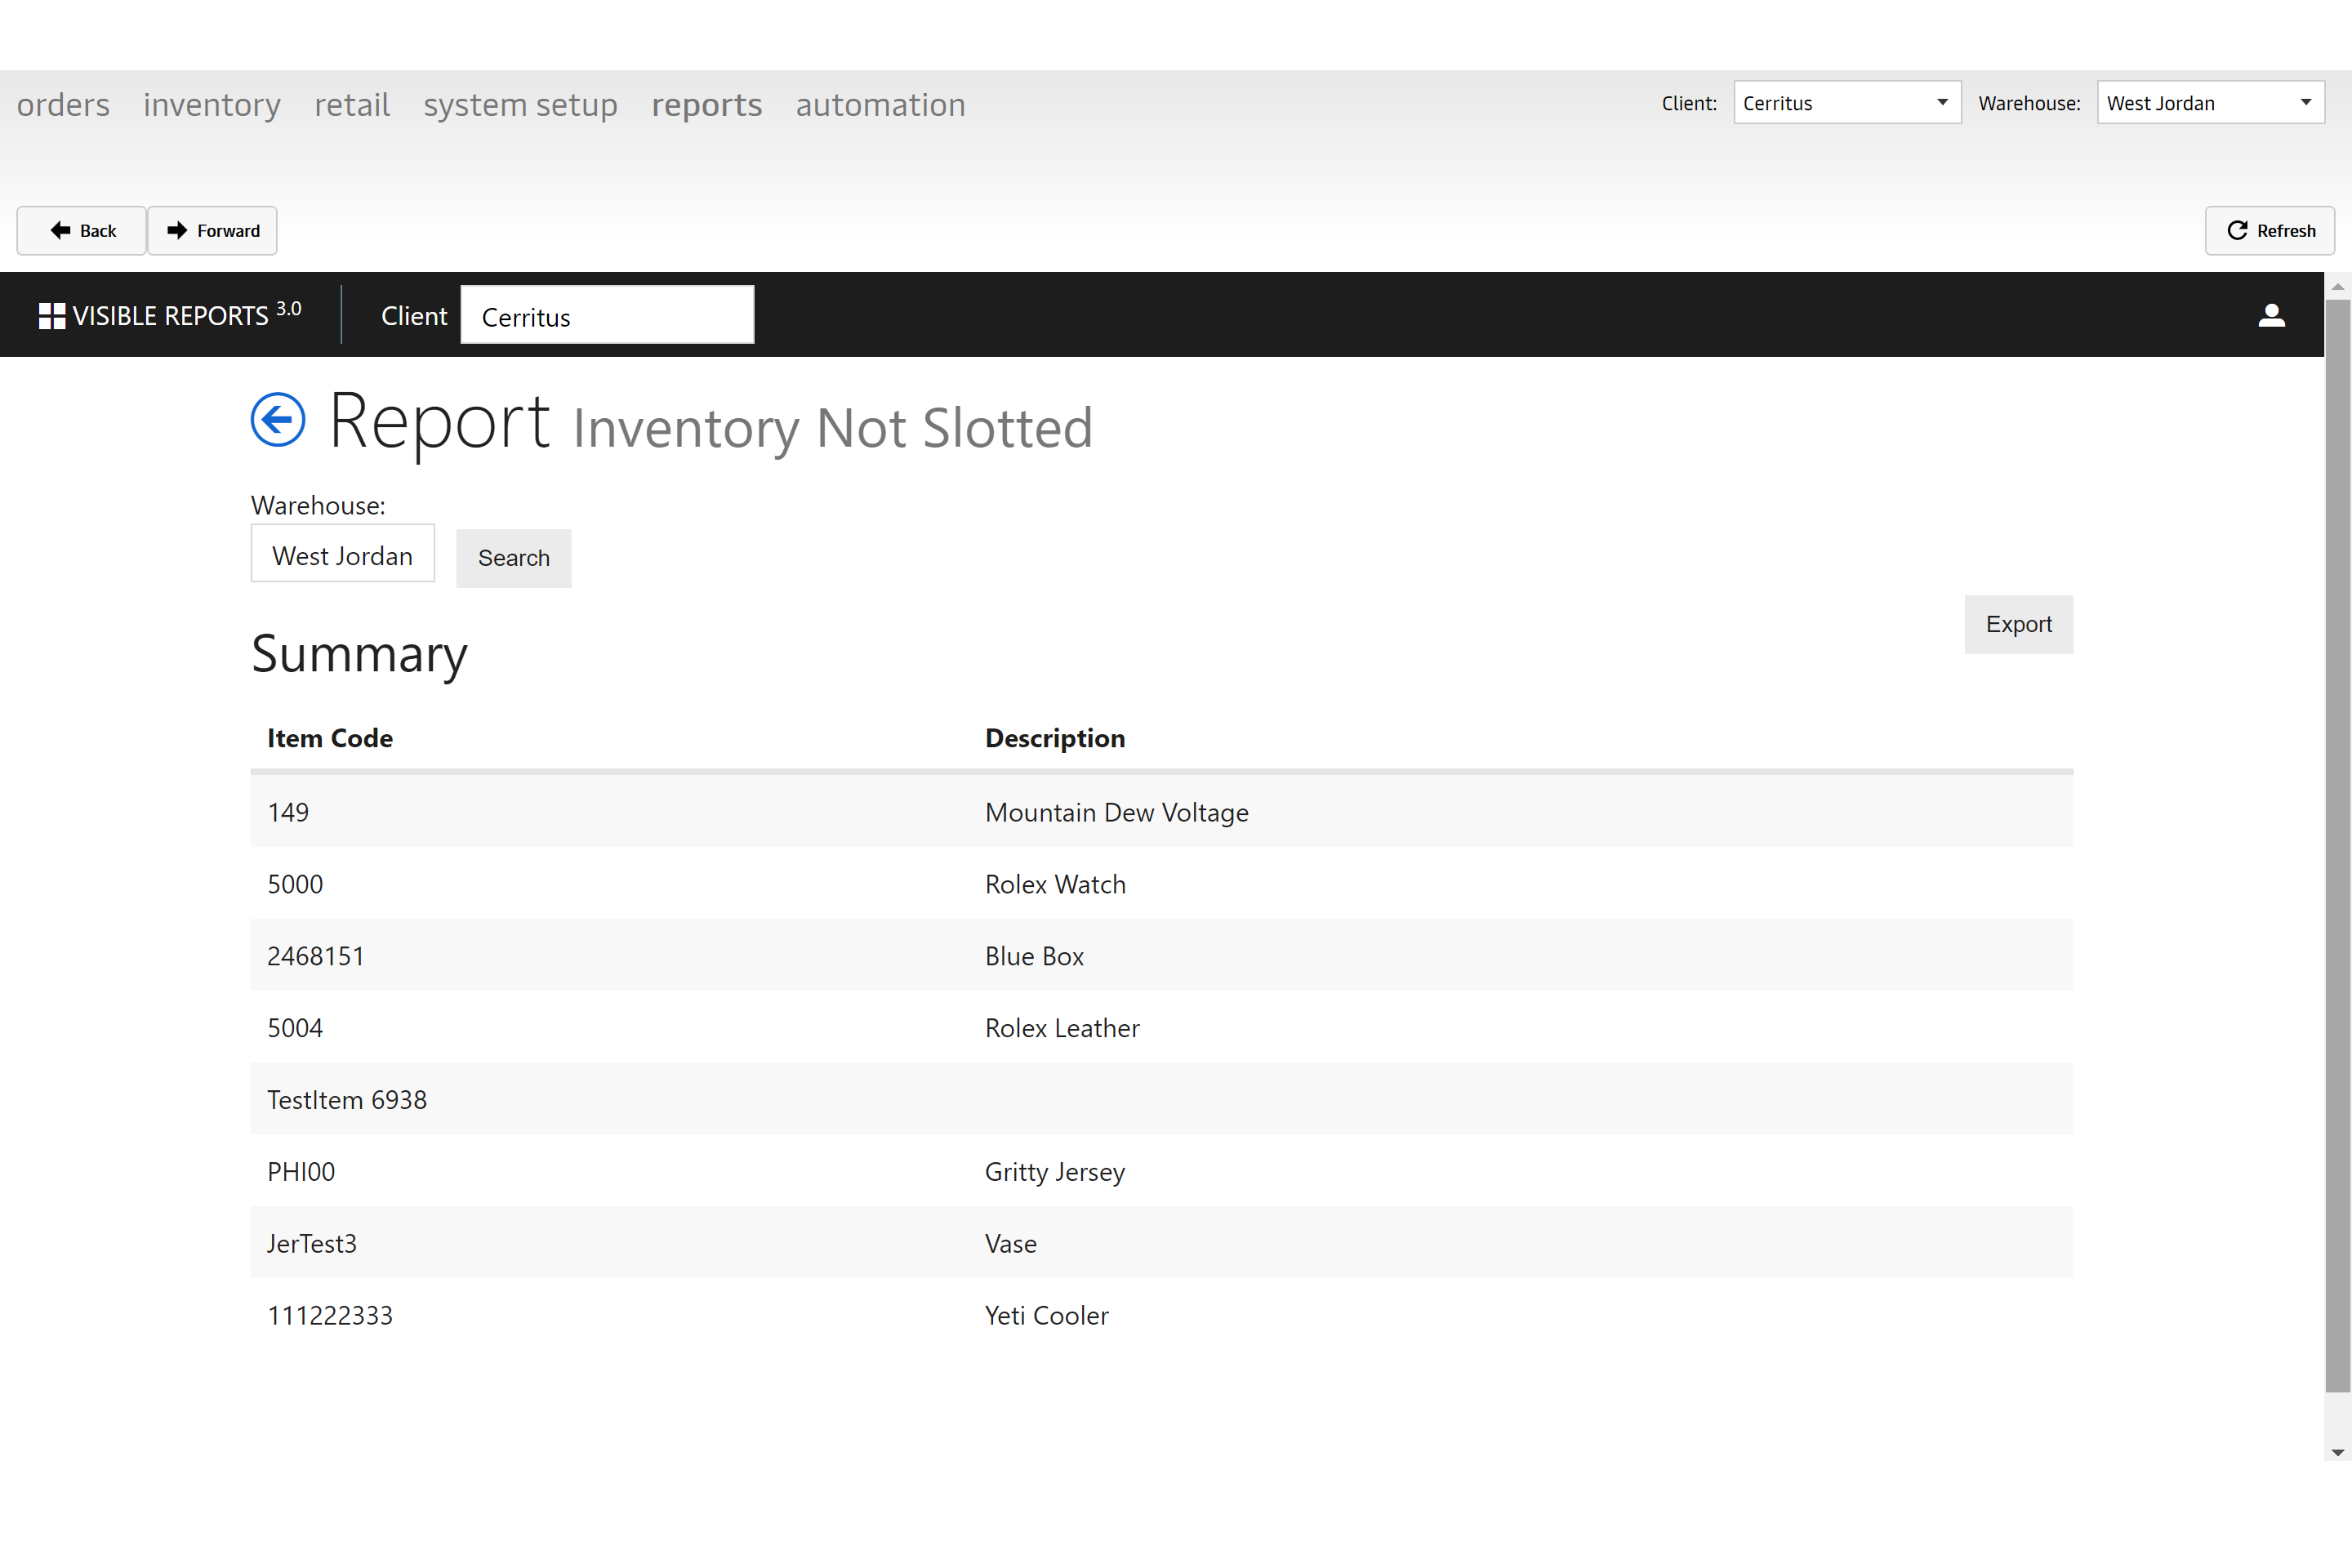
Inventory Needed
When orders are allocated, if the pick location does not contain enough inventory to fulfill those orders (but there is sufficient inventory in storage) this report provides those item codes. It is searchable by warehouse and pick area.
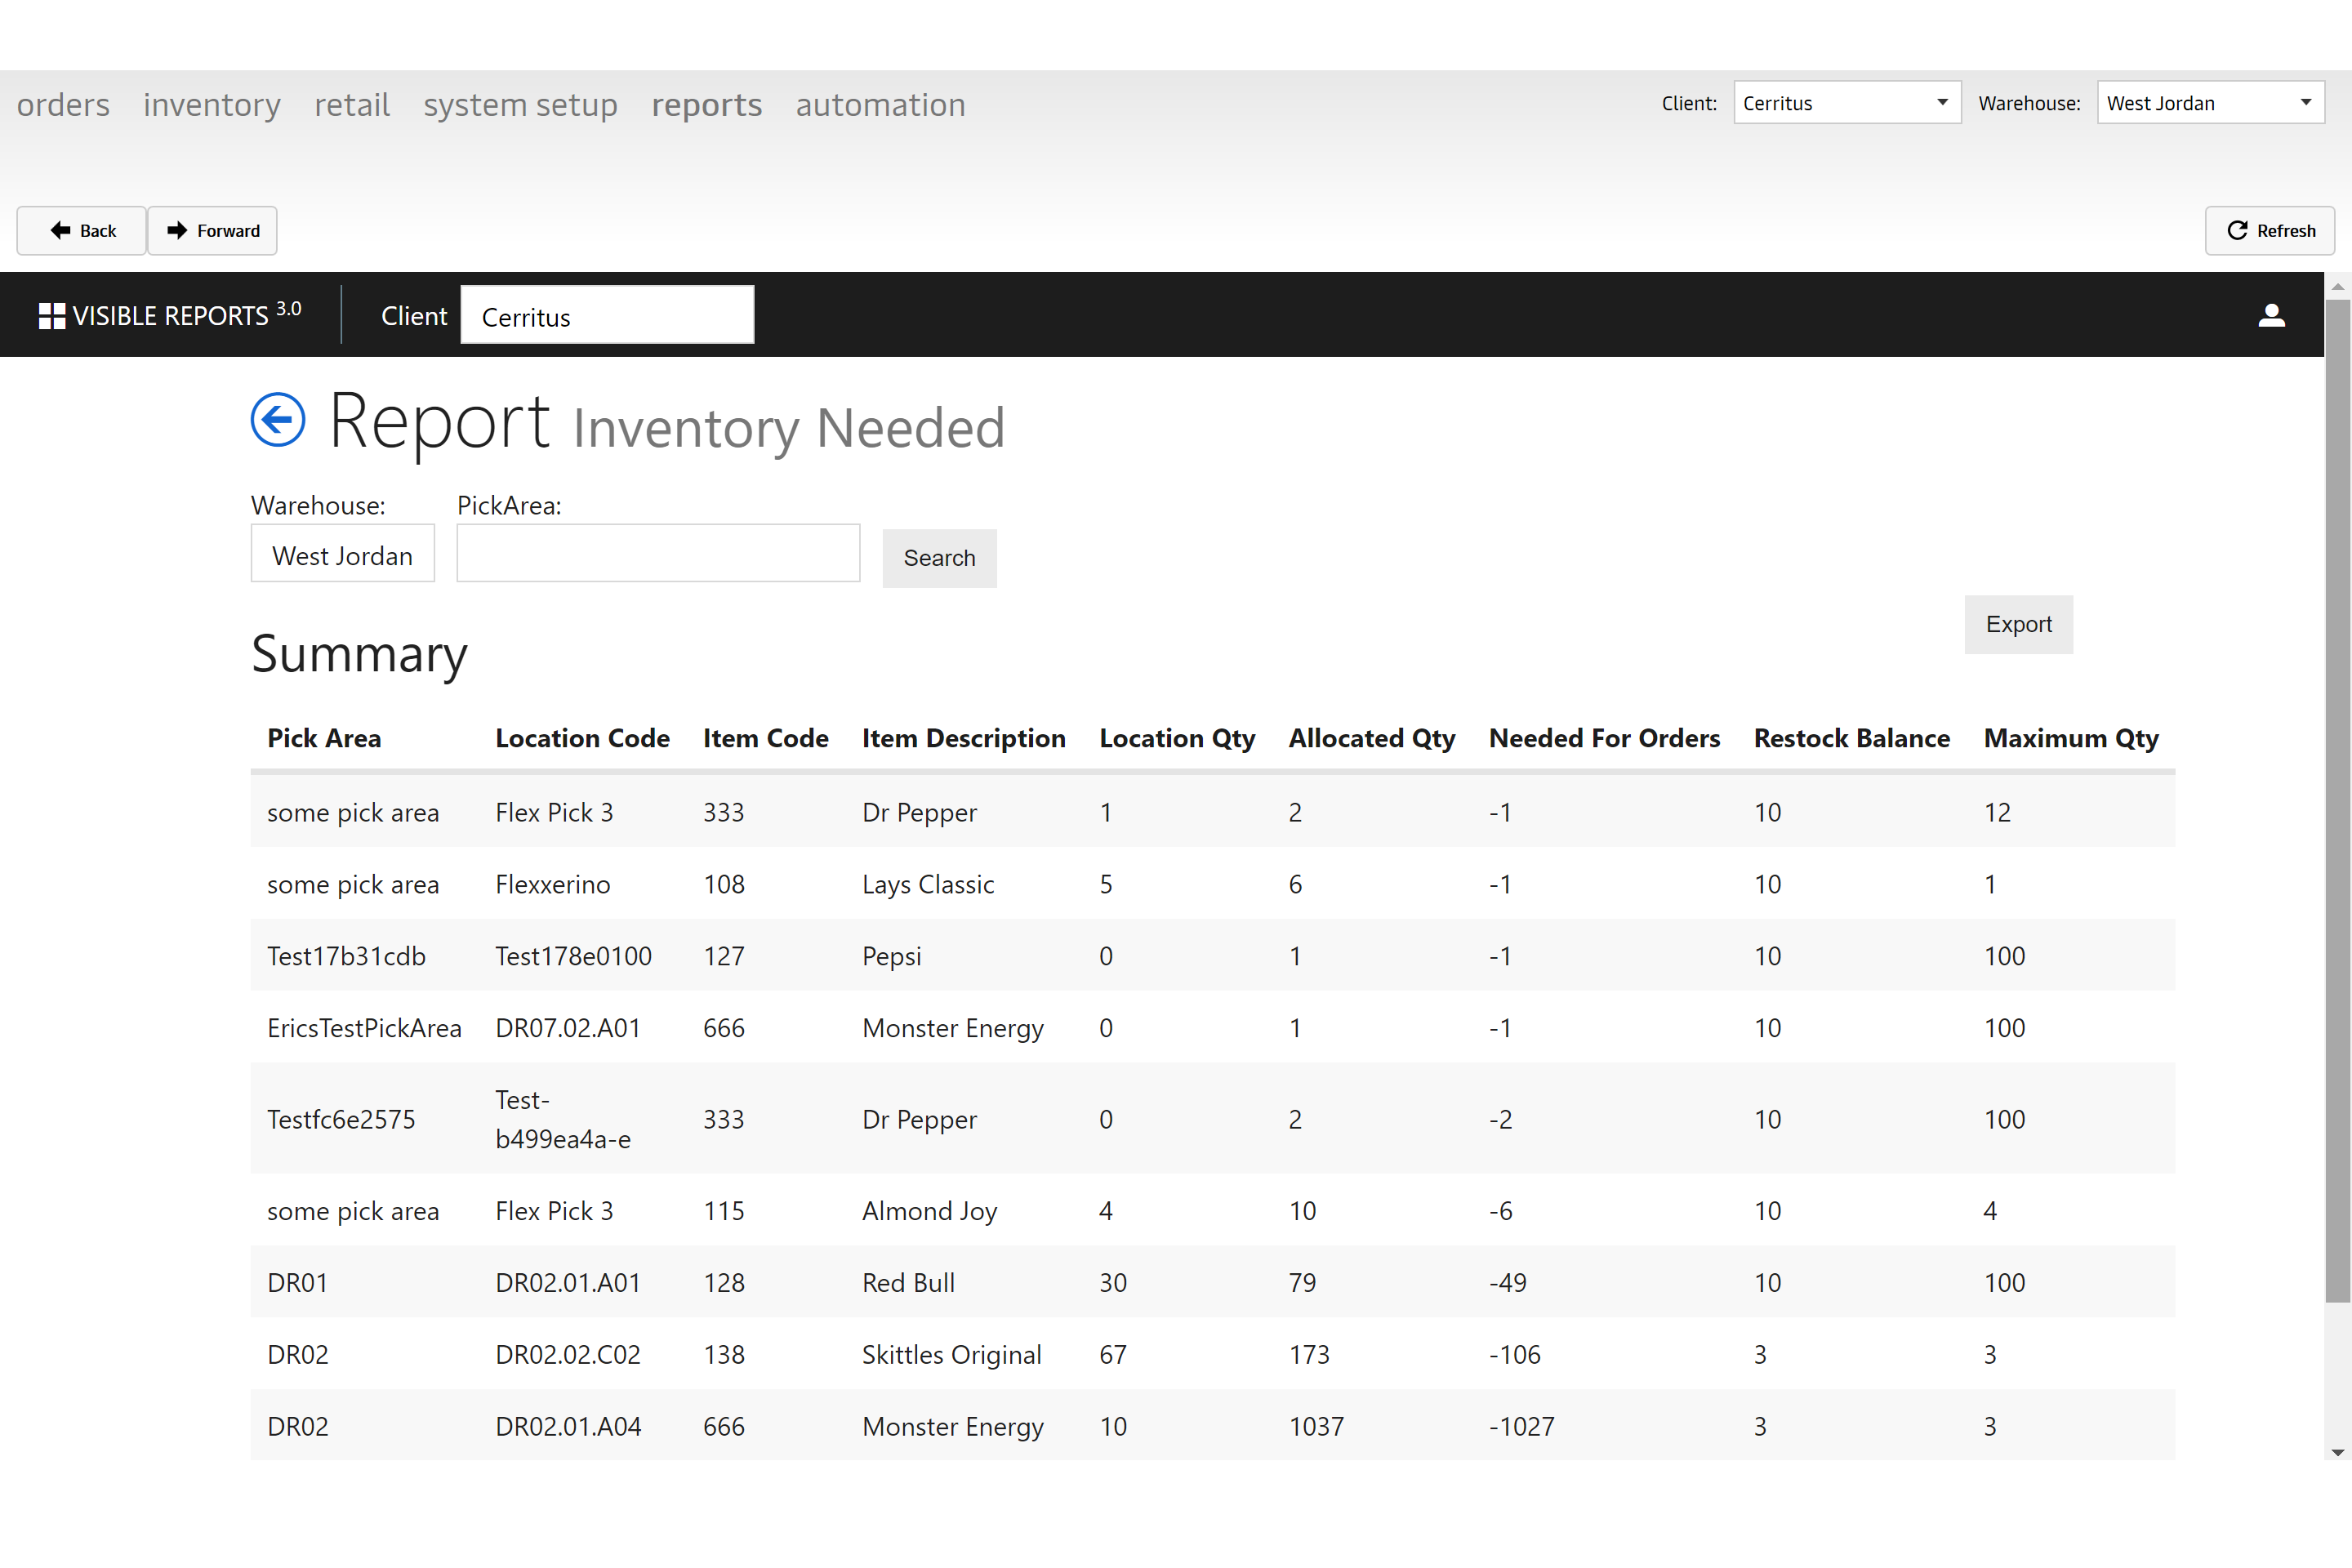
You now have the ability to add an email subscription for the return reports.
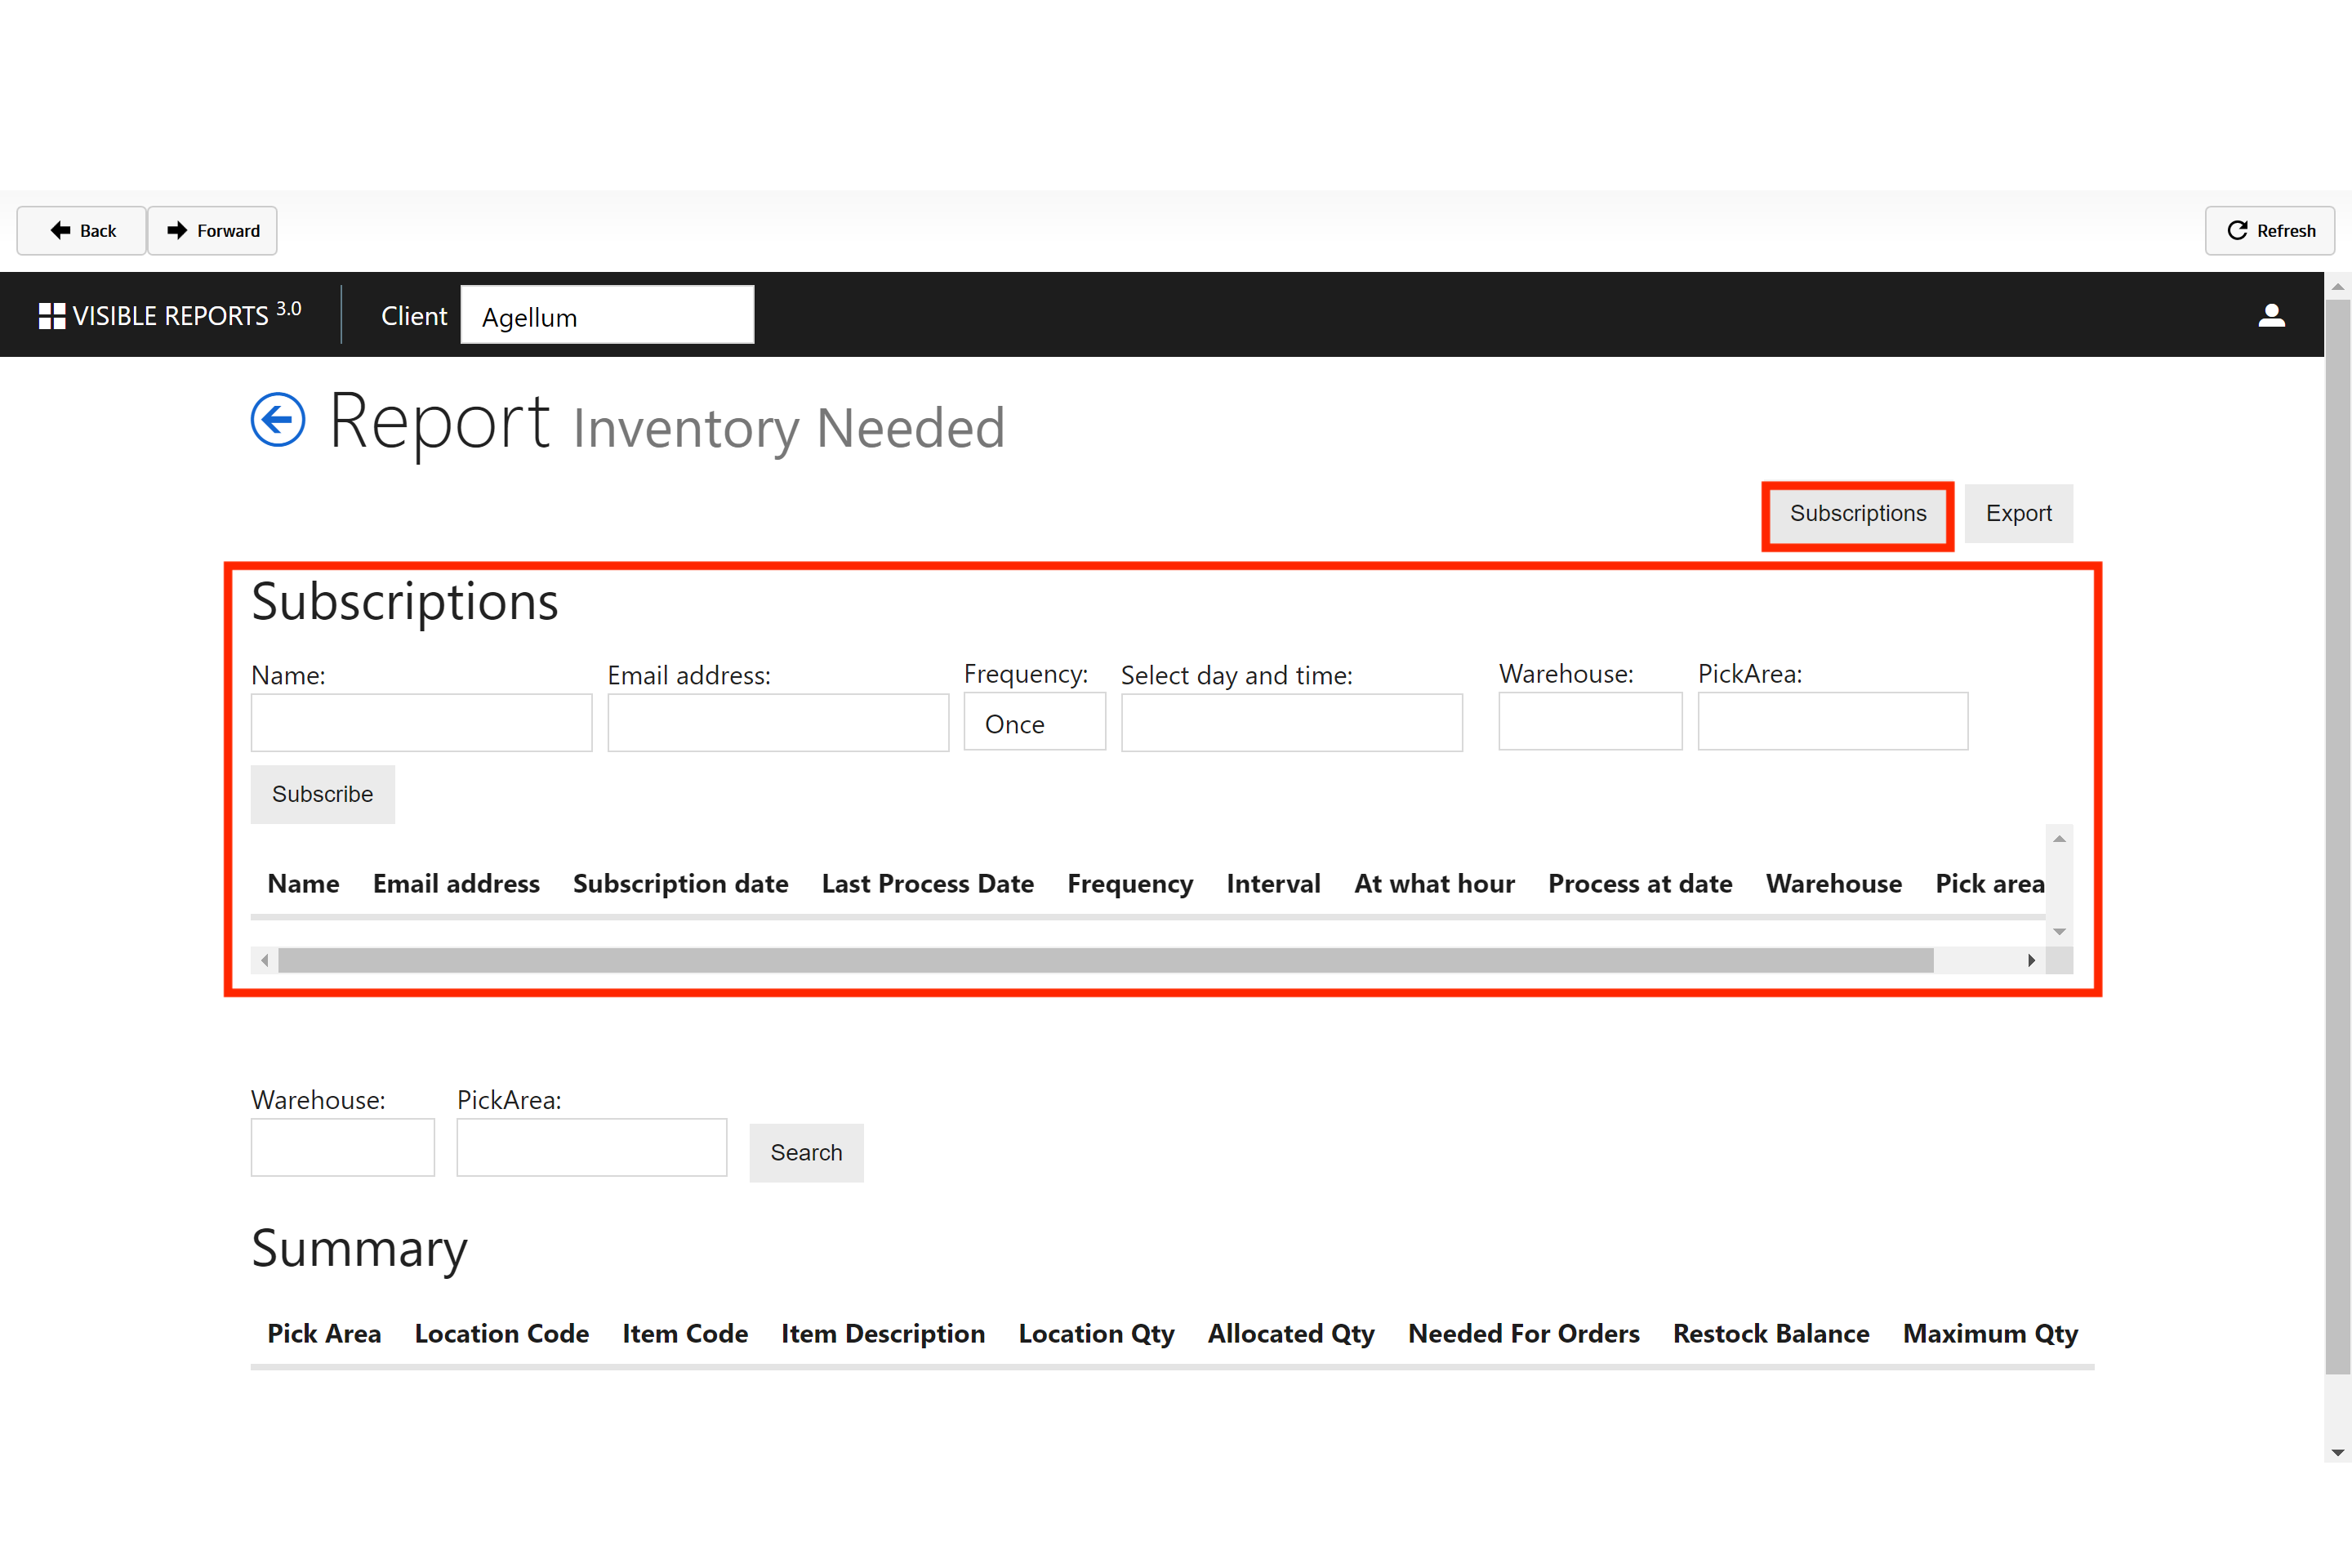
Inventory Summary
Pulls all inventory by warehouse which includes shippable, on-hand, committed and quarantined values. This will also drill down to expose the actual quantity in a specific pick area location.
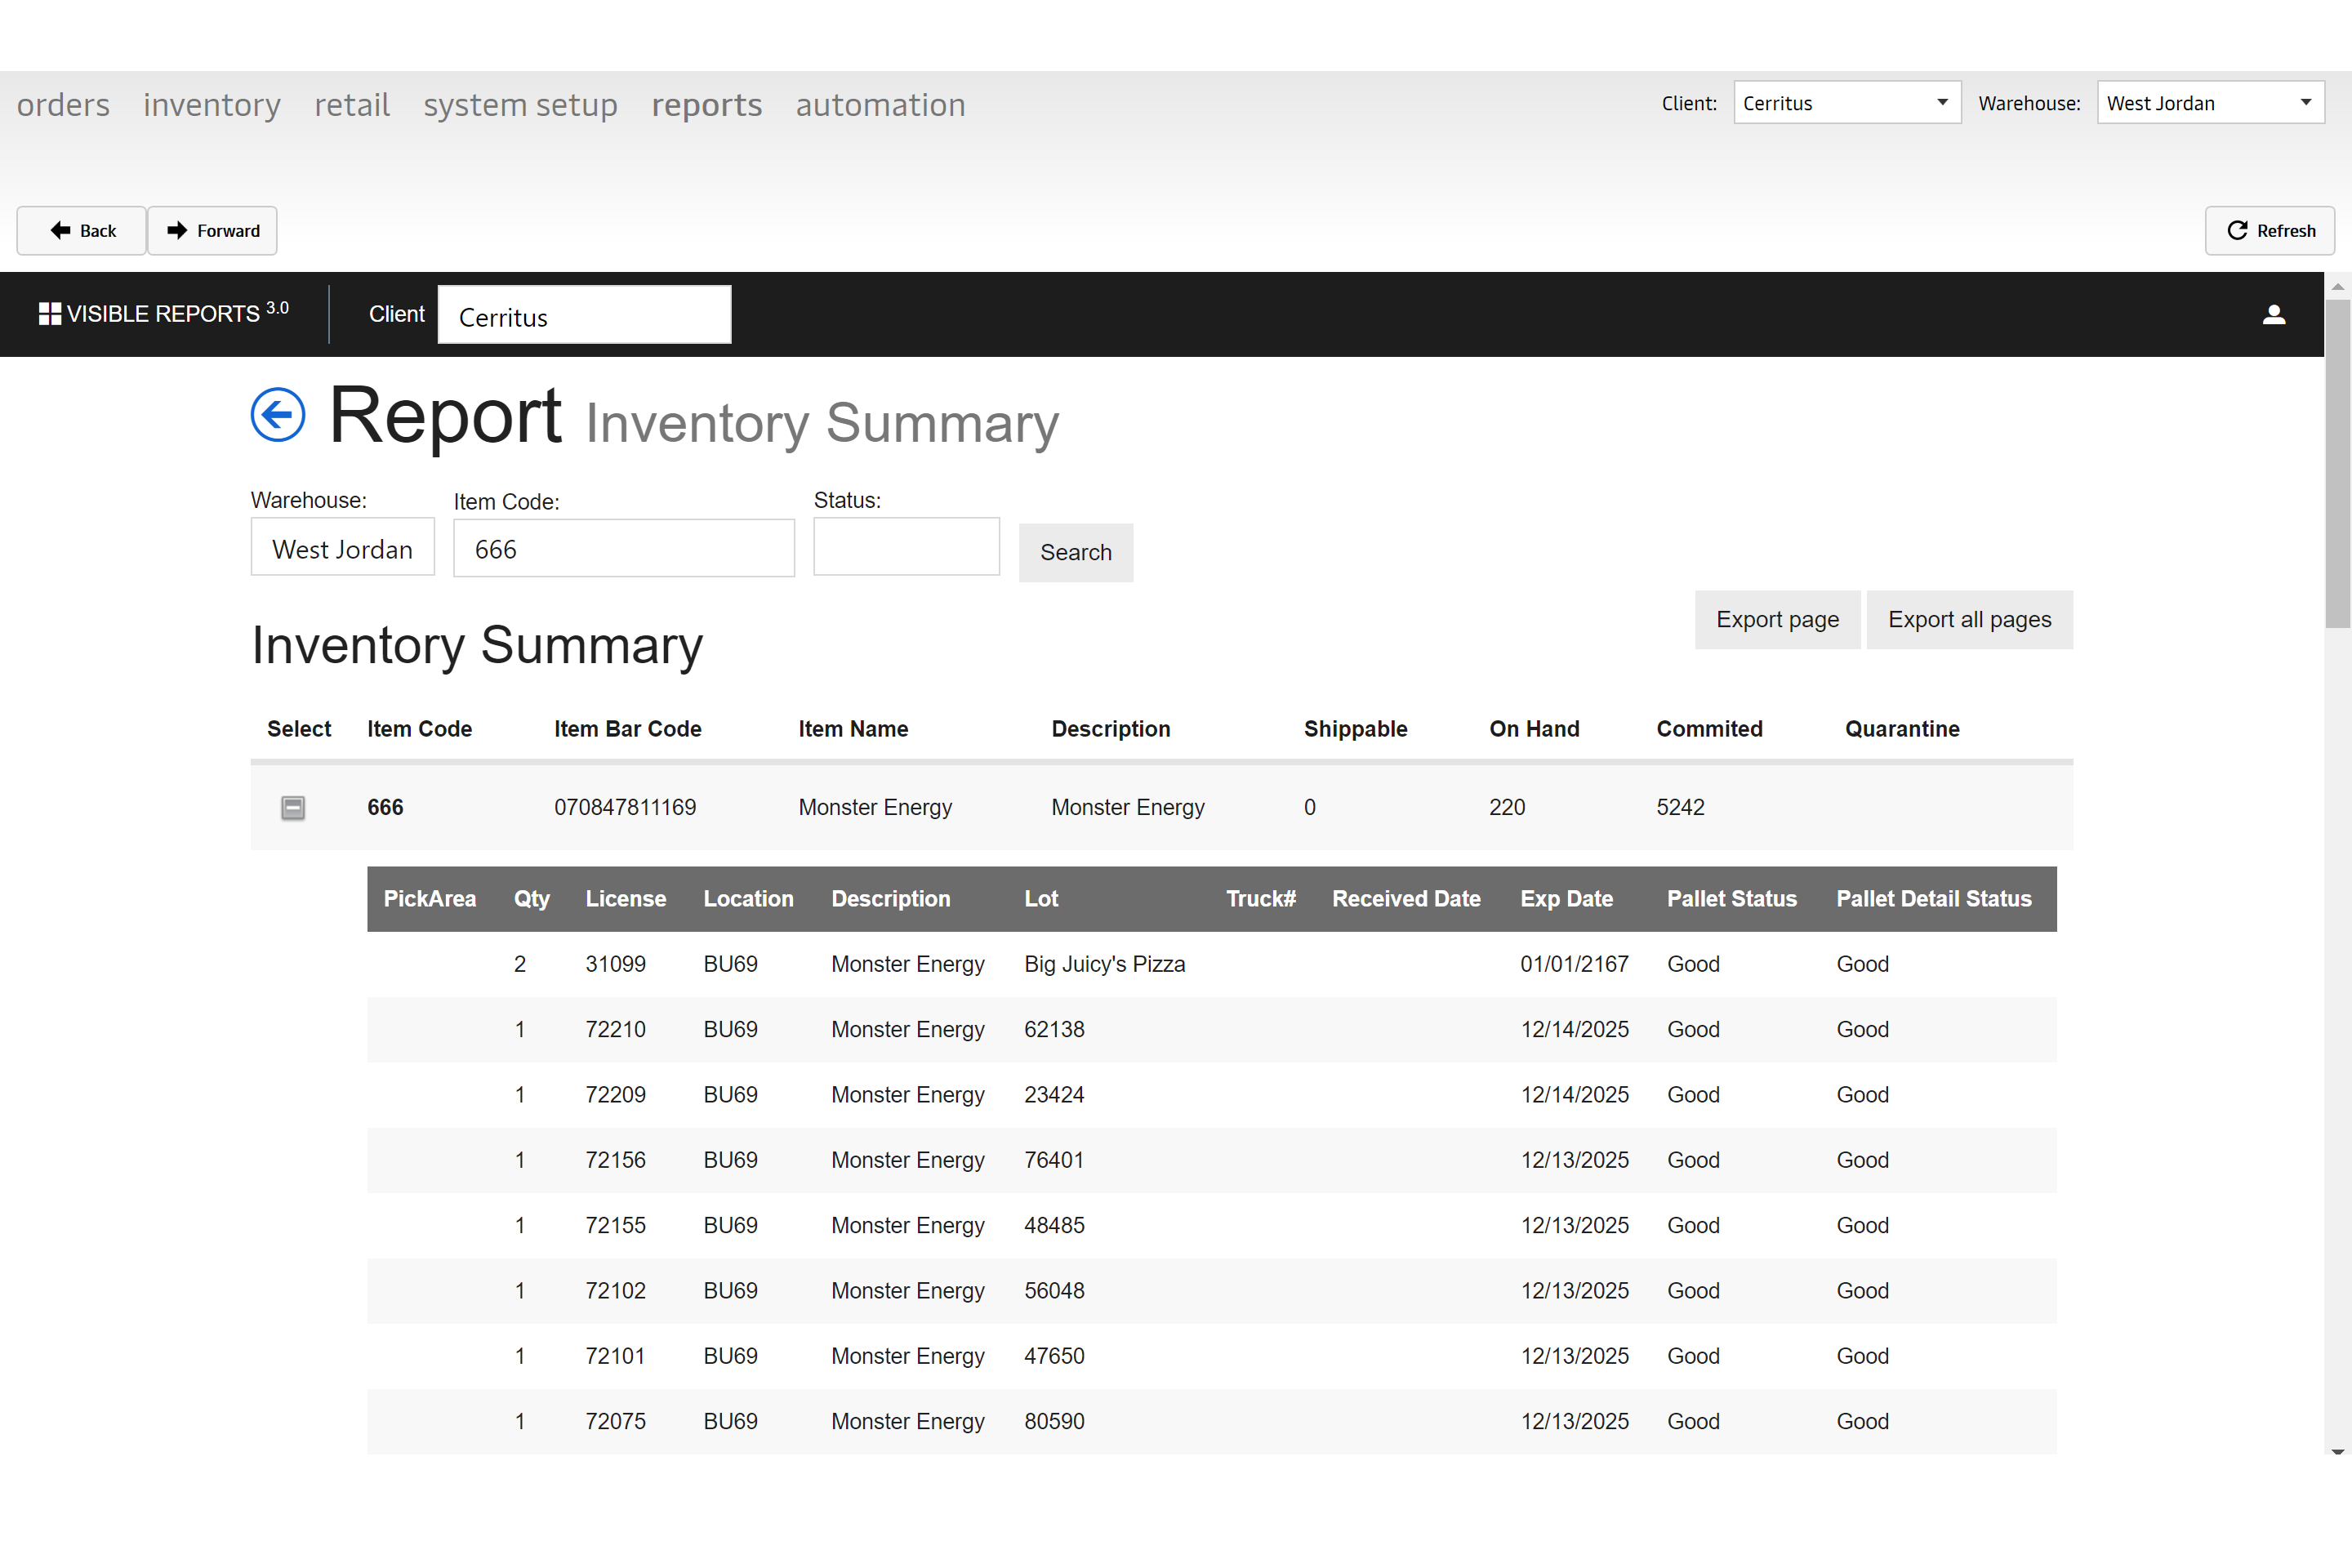
Velocity By Pick Area
This section obtains the fulfillment items of the selected warehouse and pick area within the range of dates. It is based on the date of the package and the total number of quantity of the fulfillment item specifically in that pick area.

Item Ledger
This will display all adjustments made to a specific SKU sorting by adjustment reason through a specific date.
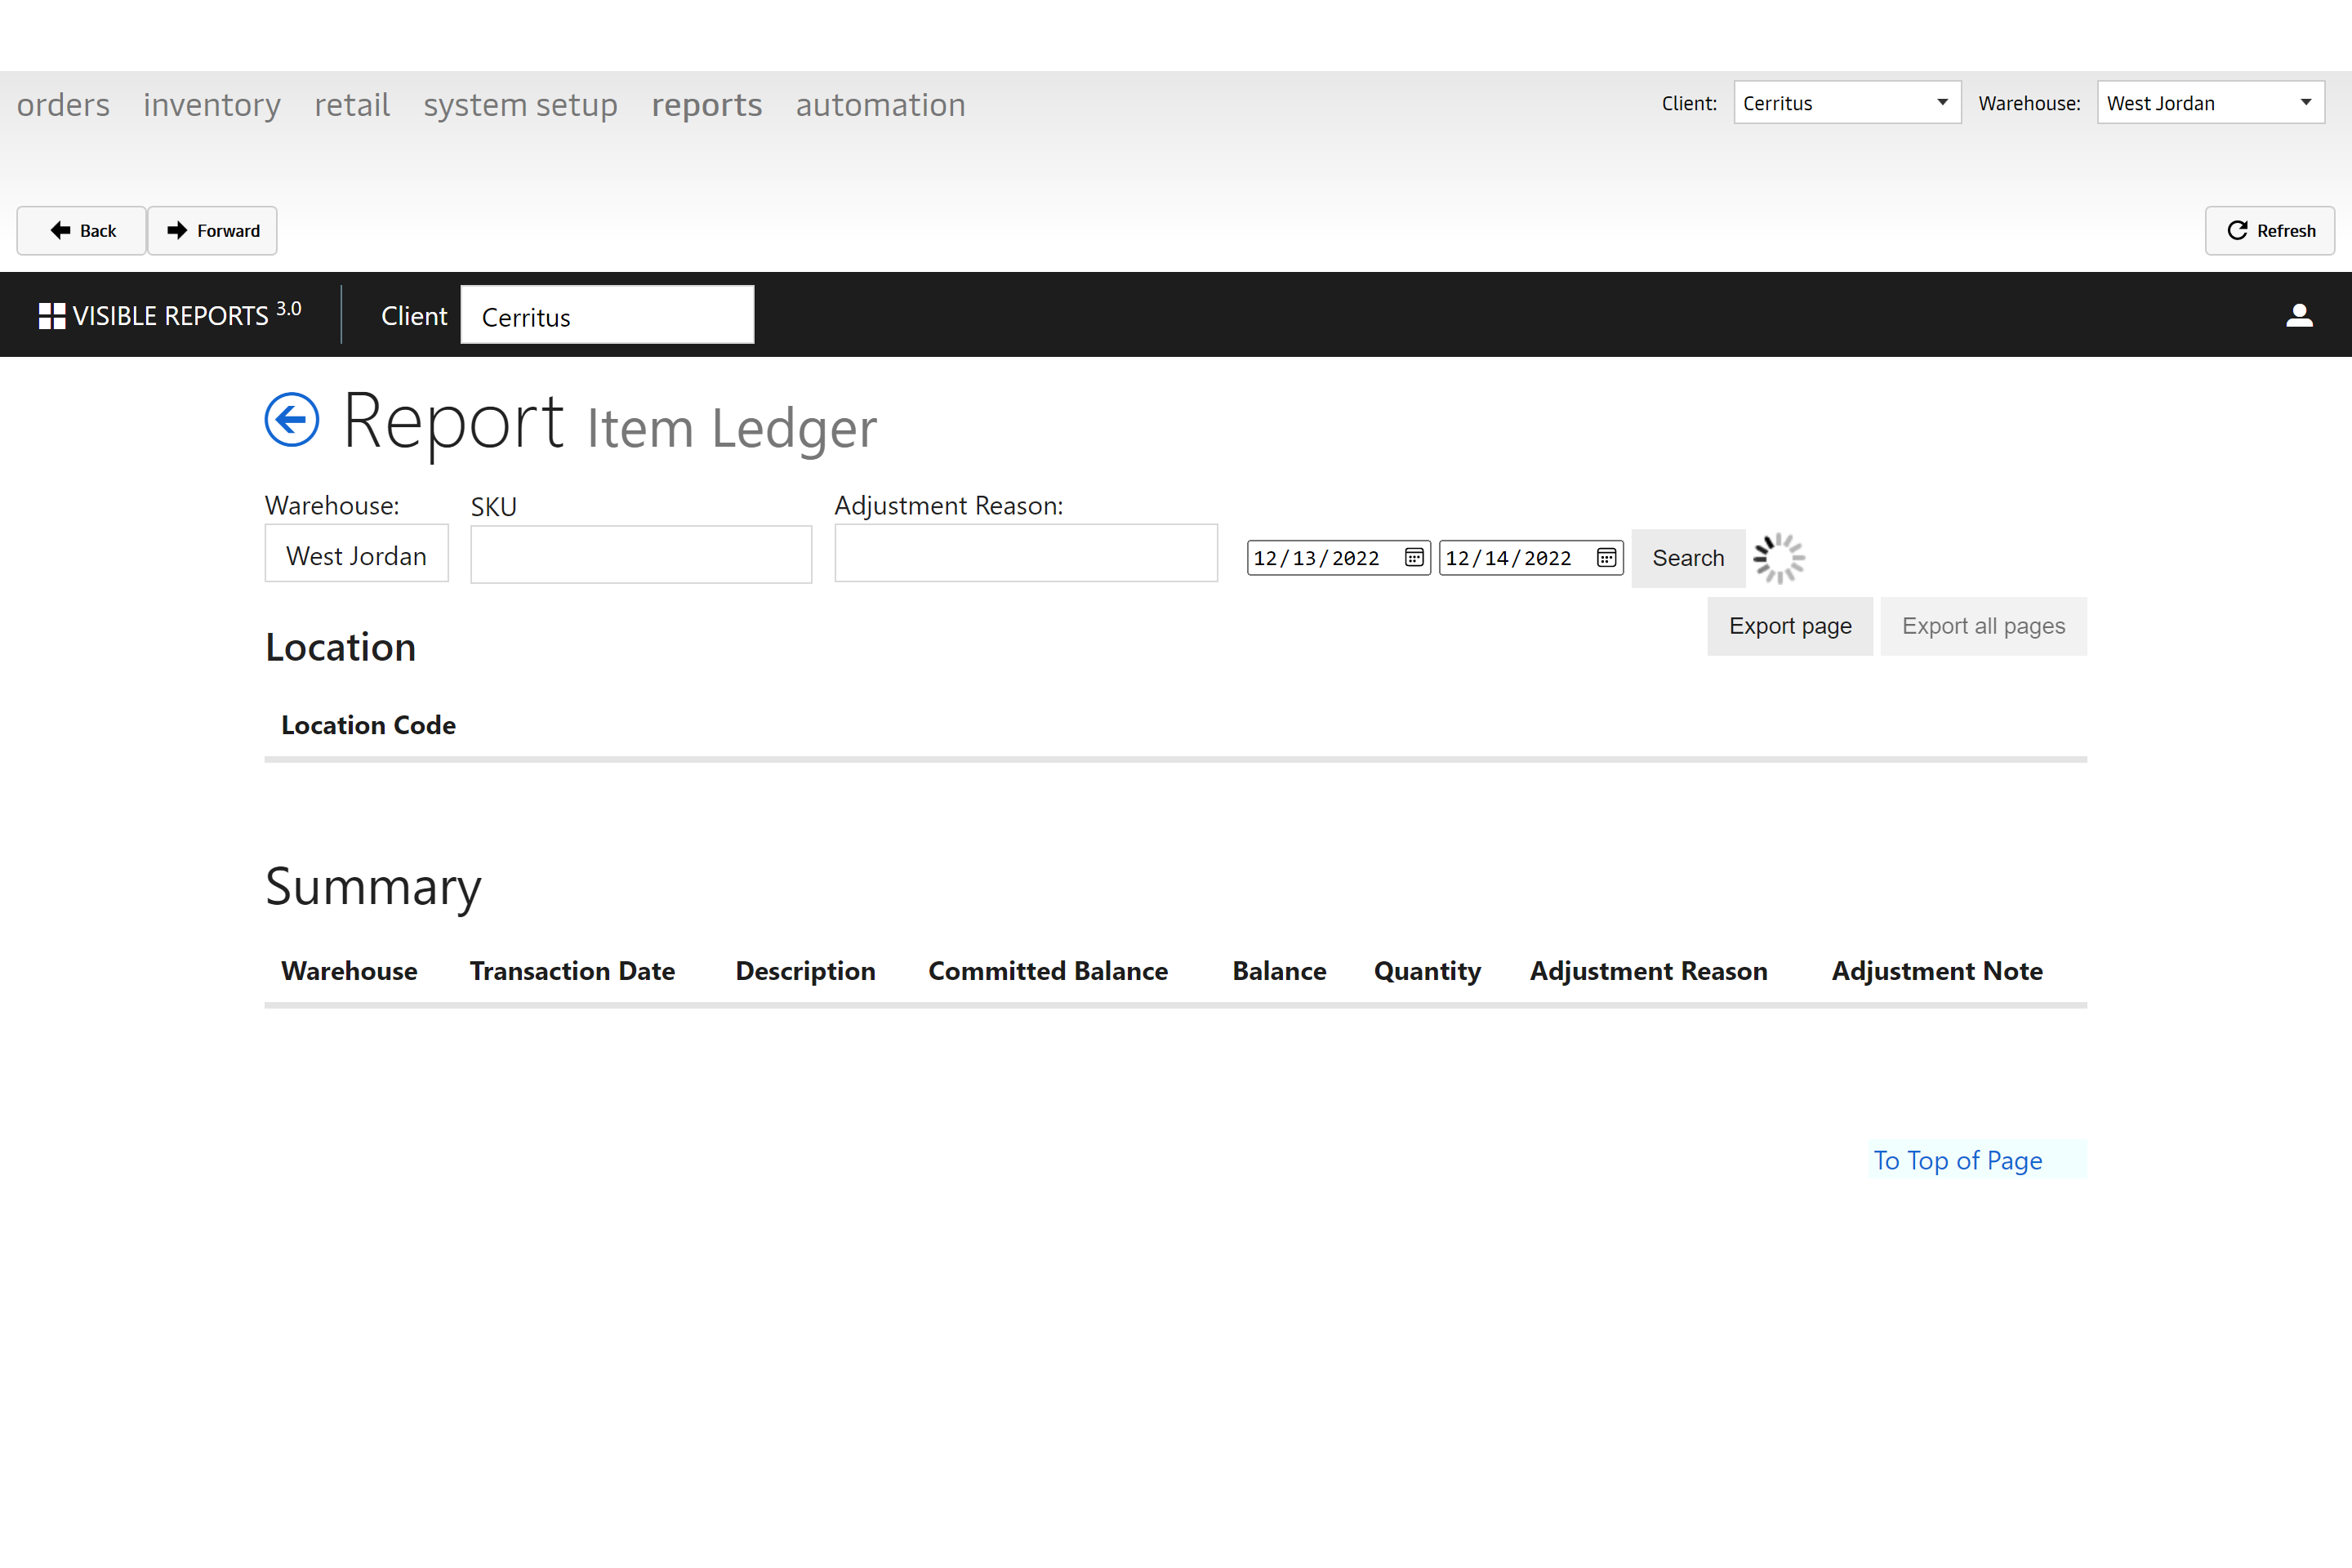
Warehouse Locations
This displays all associated details of locations searchable by warehouse and zone. The locations include the exact location, dimensions and items which are linked to that area. User is also able to sort by empty locations.
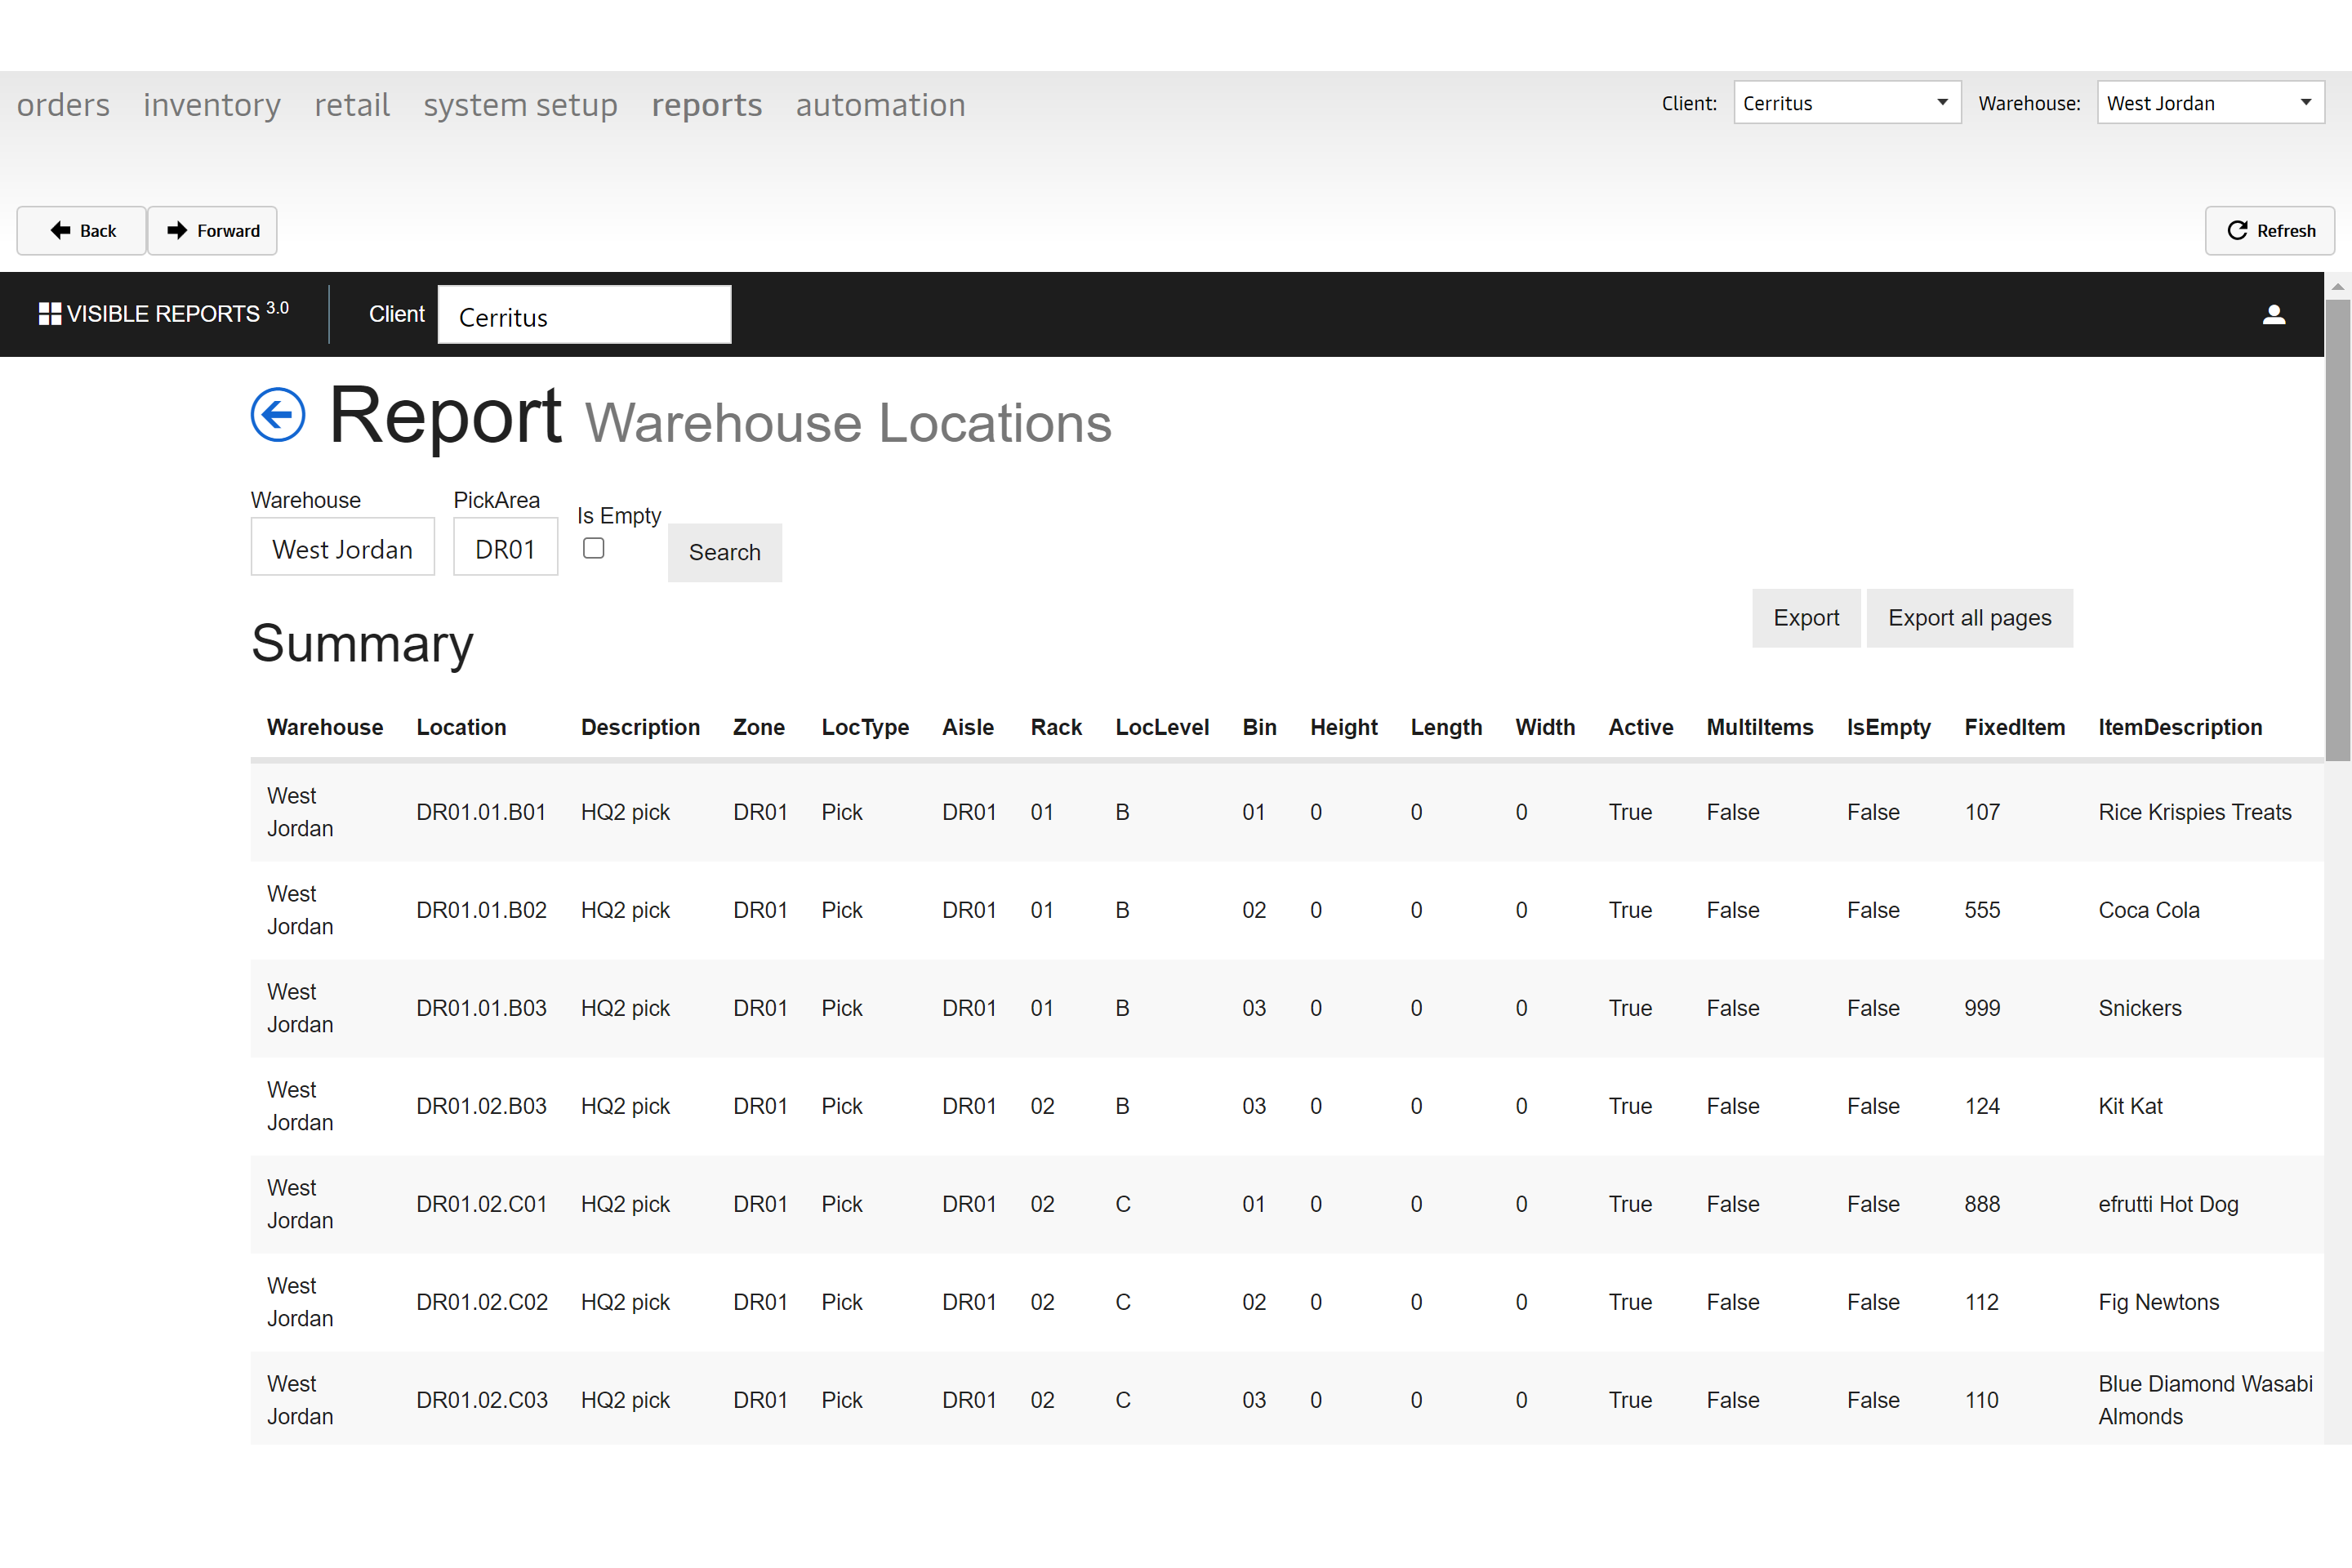
Receiving
Under the "Receiving"* section of ARCA LOC, you will be able to access the following reports.
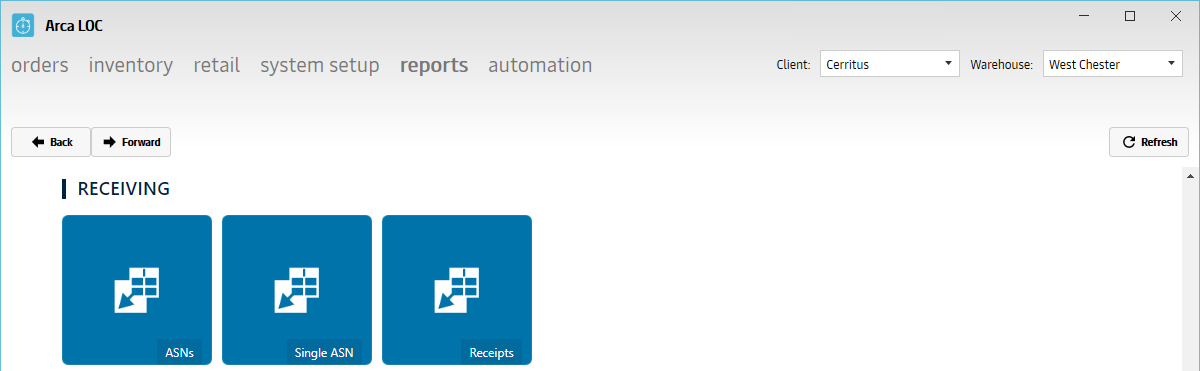
Warning
The client will default back to the first in the list, you must reselect your client within the reports section and click Refresh.
| Report | Description |
|---|---|
| ASNs | Pulls all purchase orders through a date range including item details, quantity, ASN status and vendor by warehouse. |
| Single ASN | Criteria displayed is specific to a particular purchase order. It will retrieve data searchable by a purchase order containing license, item details, quantity, date received and dimensions. |
| Receipts | This report allows a user to search for ASNs from a date range by warehouse and load id. Details by purchase order will show the amounts received including pallet status and expiration date if applies. |
ASNs
Pulls all purchase orders through a date range including item details, quantity, ASN status and vendor by warehouse.
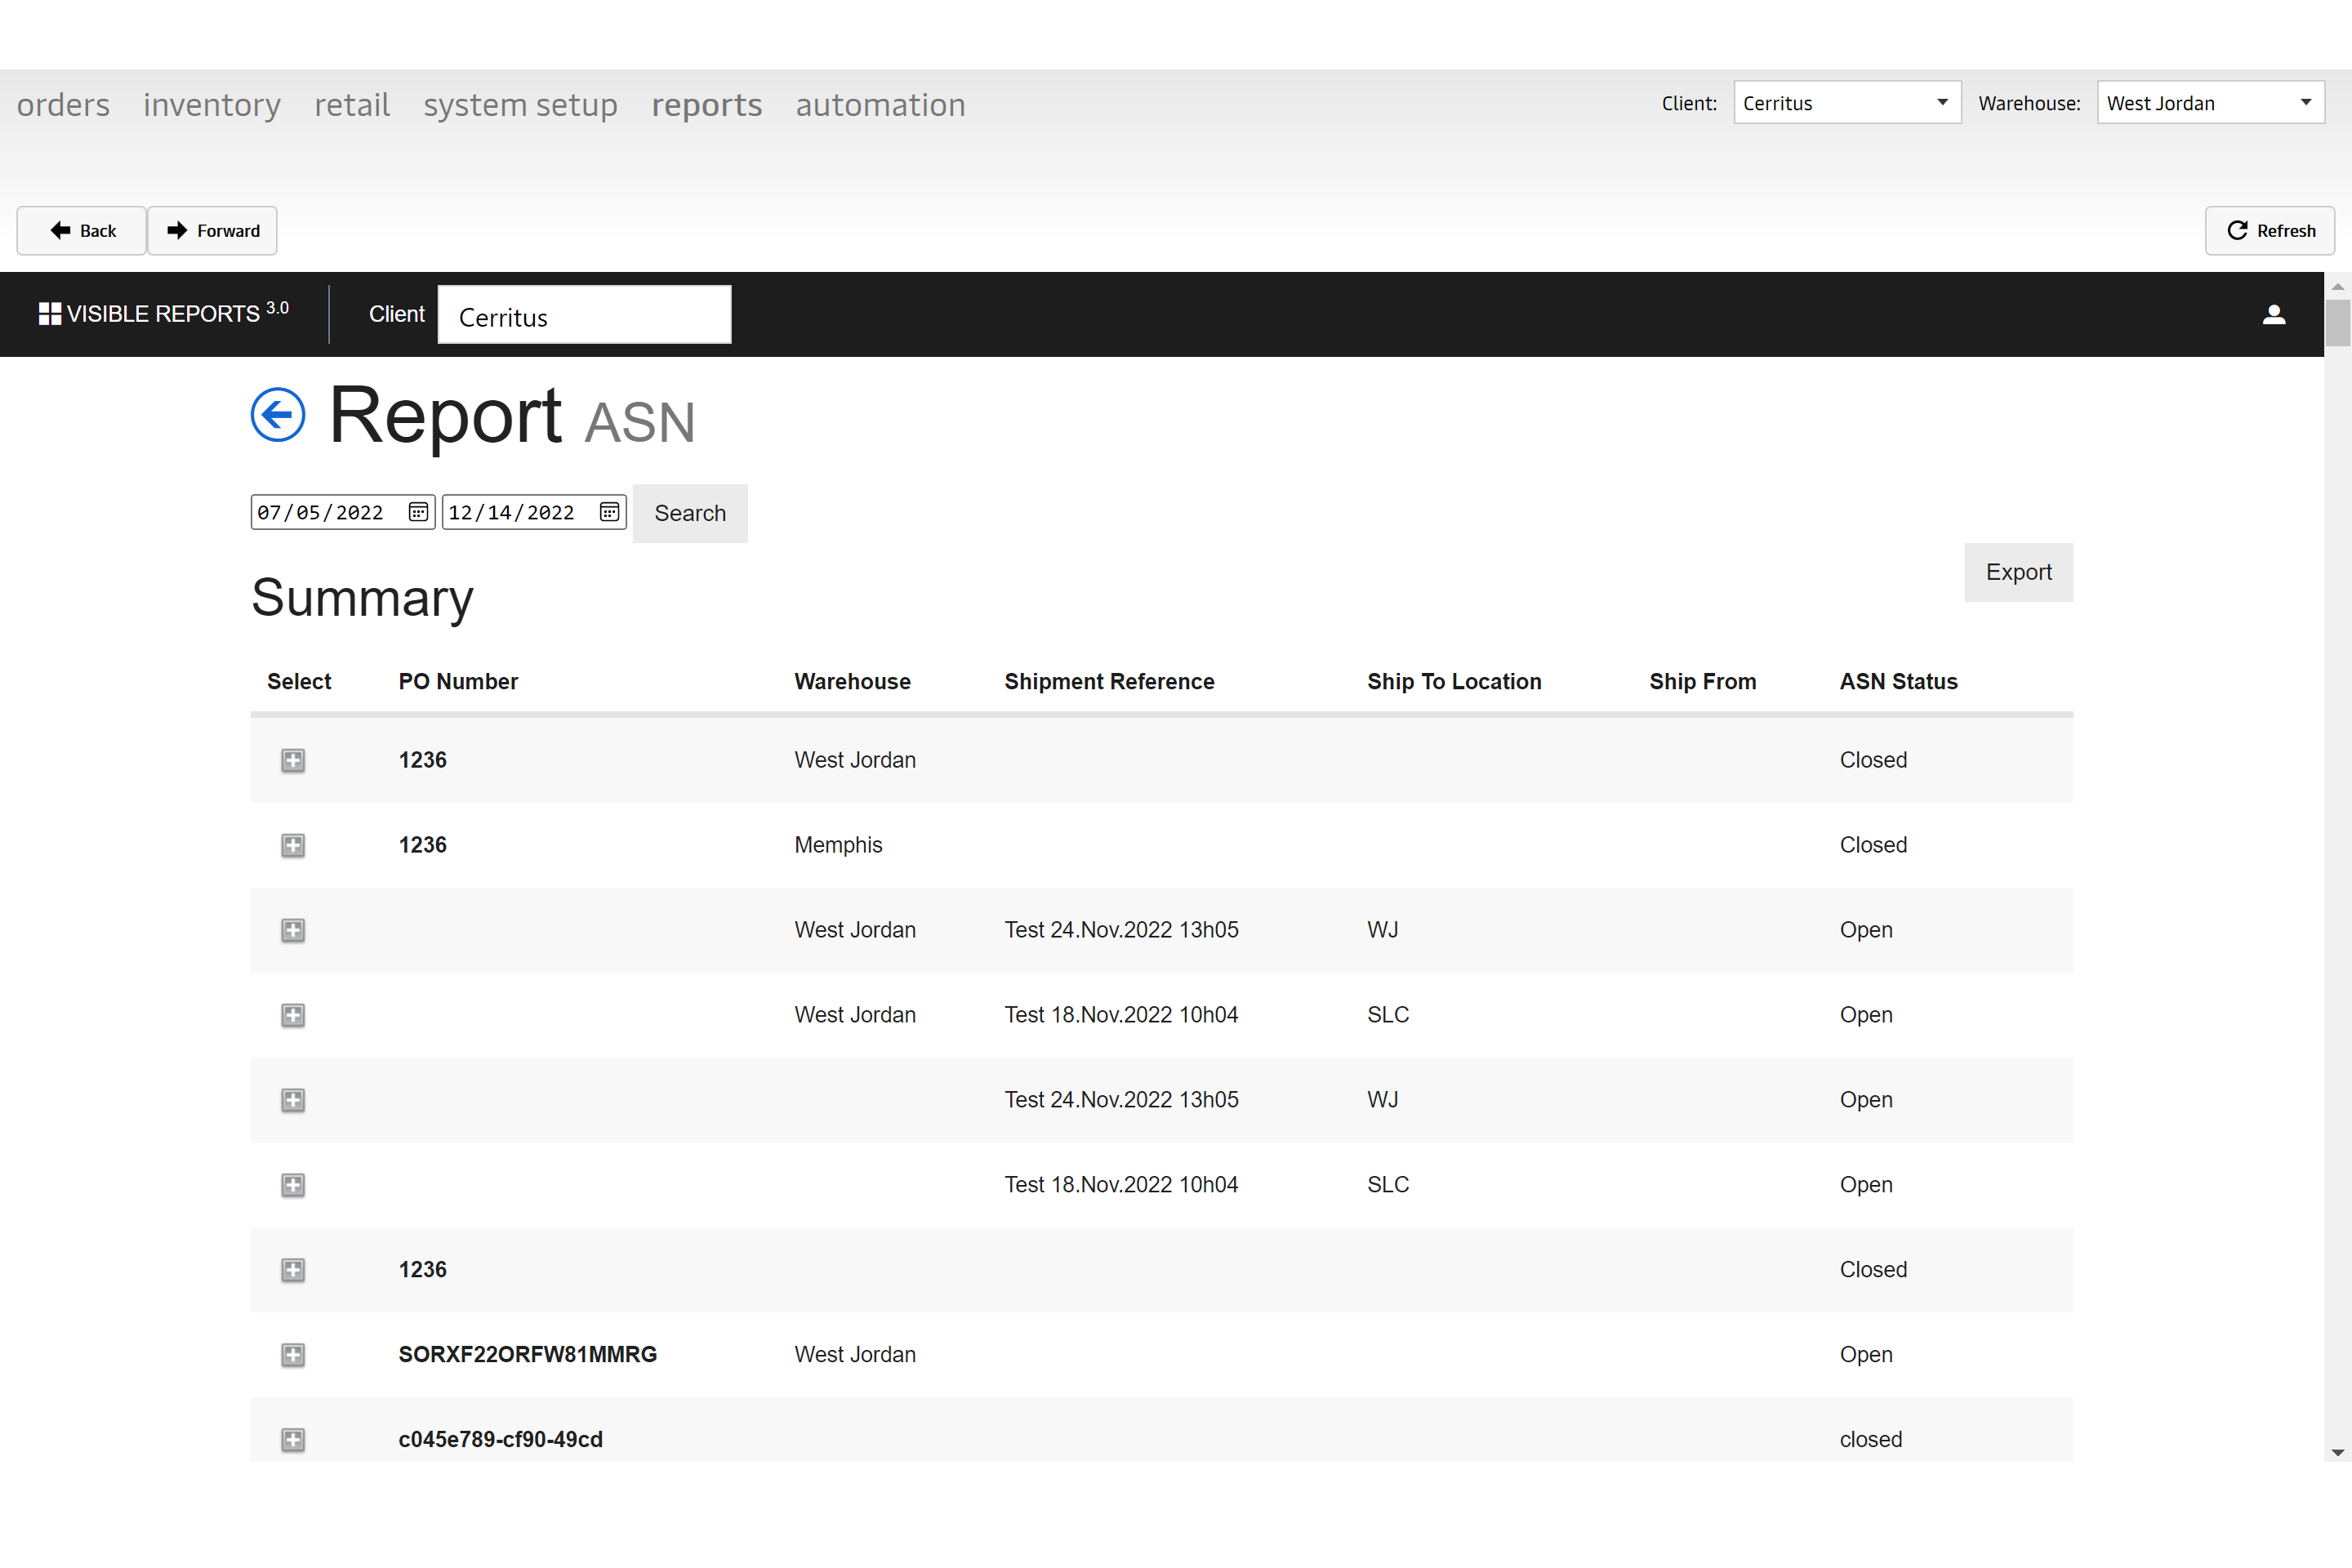
Single ASNs
Criteria displayed is specific to a particular purchase order. It will retrieve data searchable by a purchase order containing license, item details, quantity, date received and dimensions.
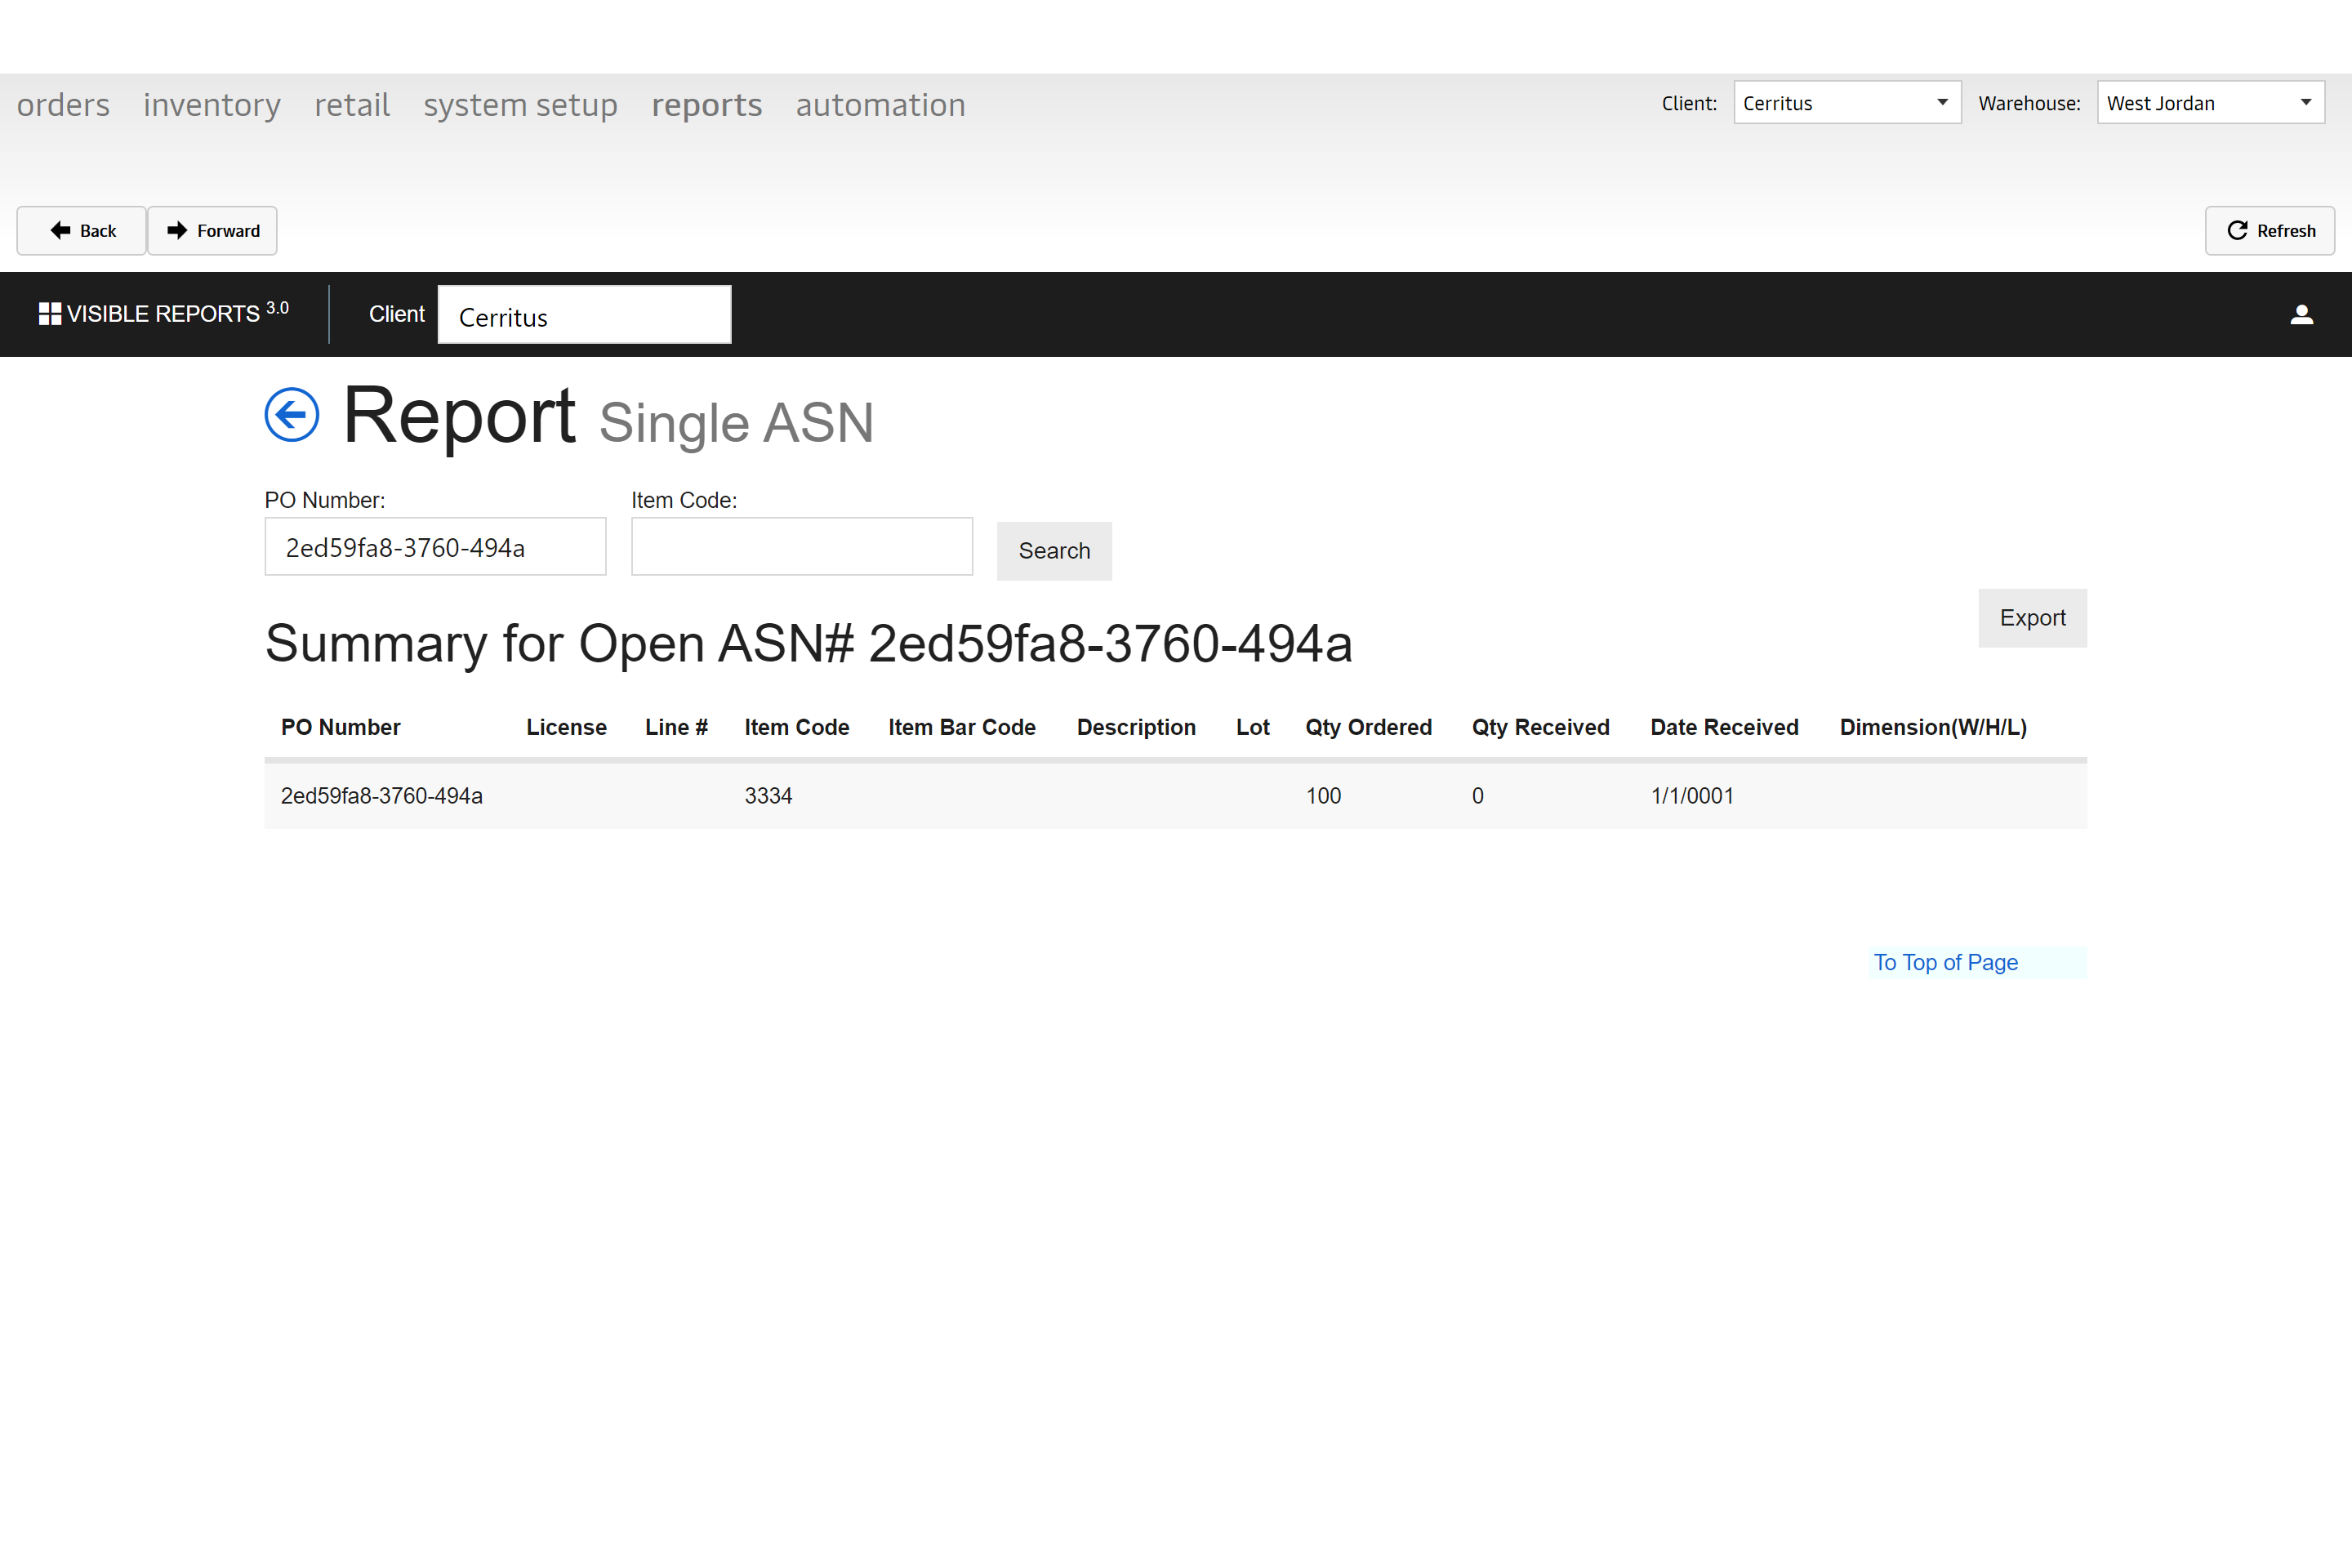
Receipts
This report allows a user to search for ASNs from a date range by warehouse and load id. Details by purchase order will show the amounts received including pallet status and expiration date if applies.
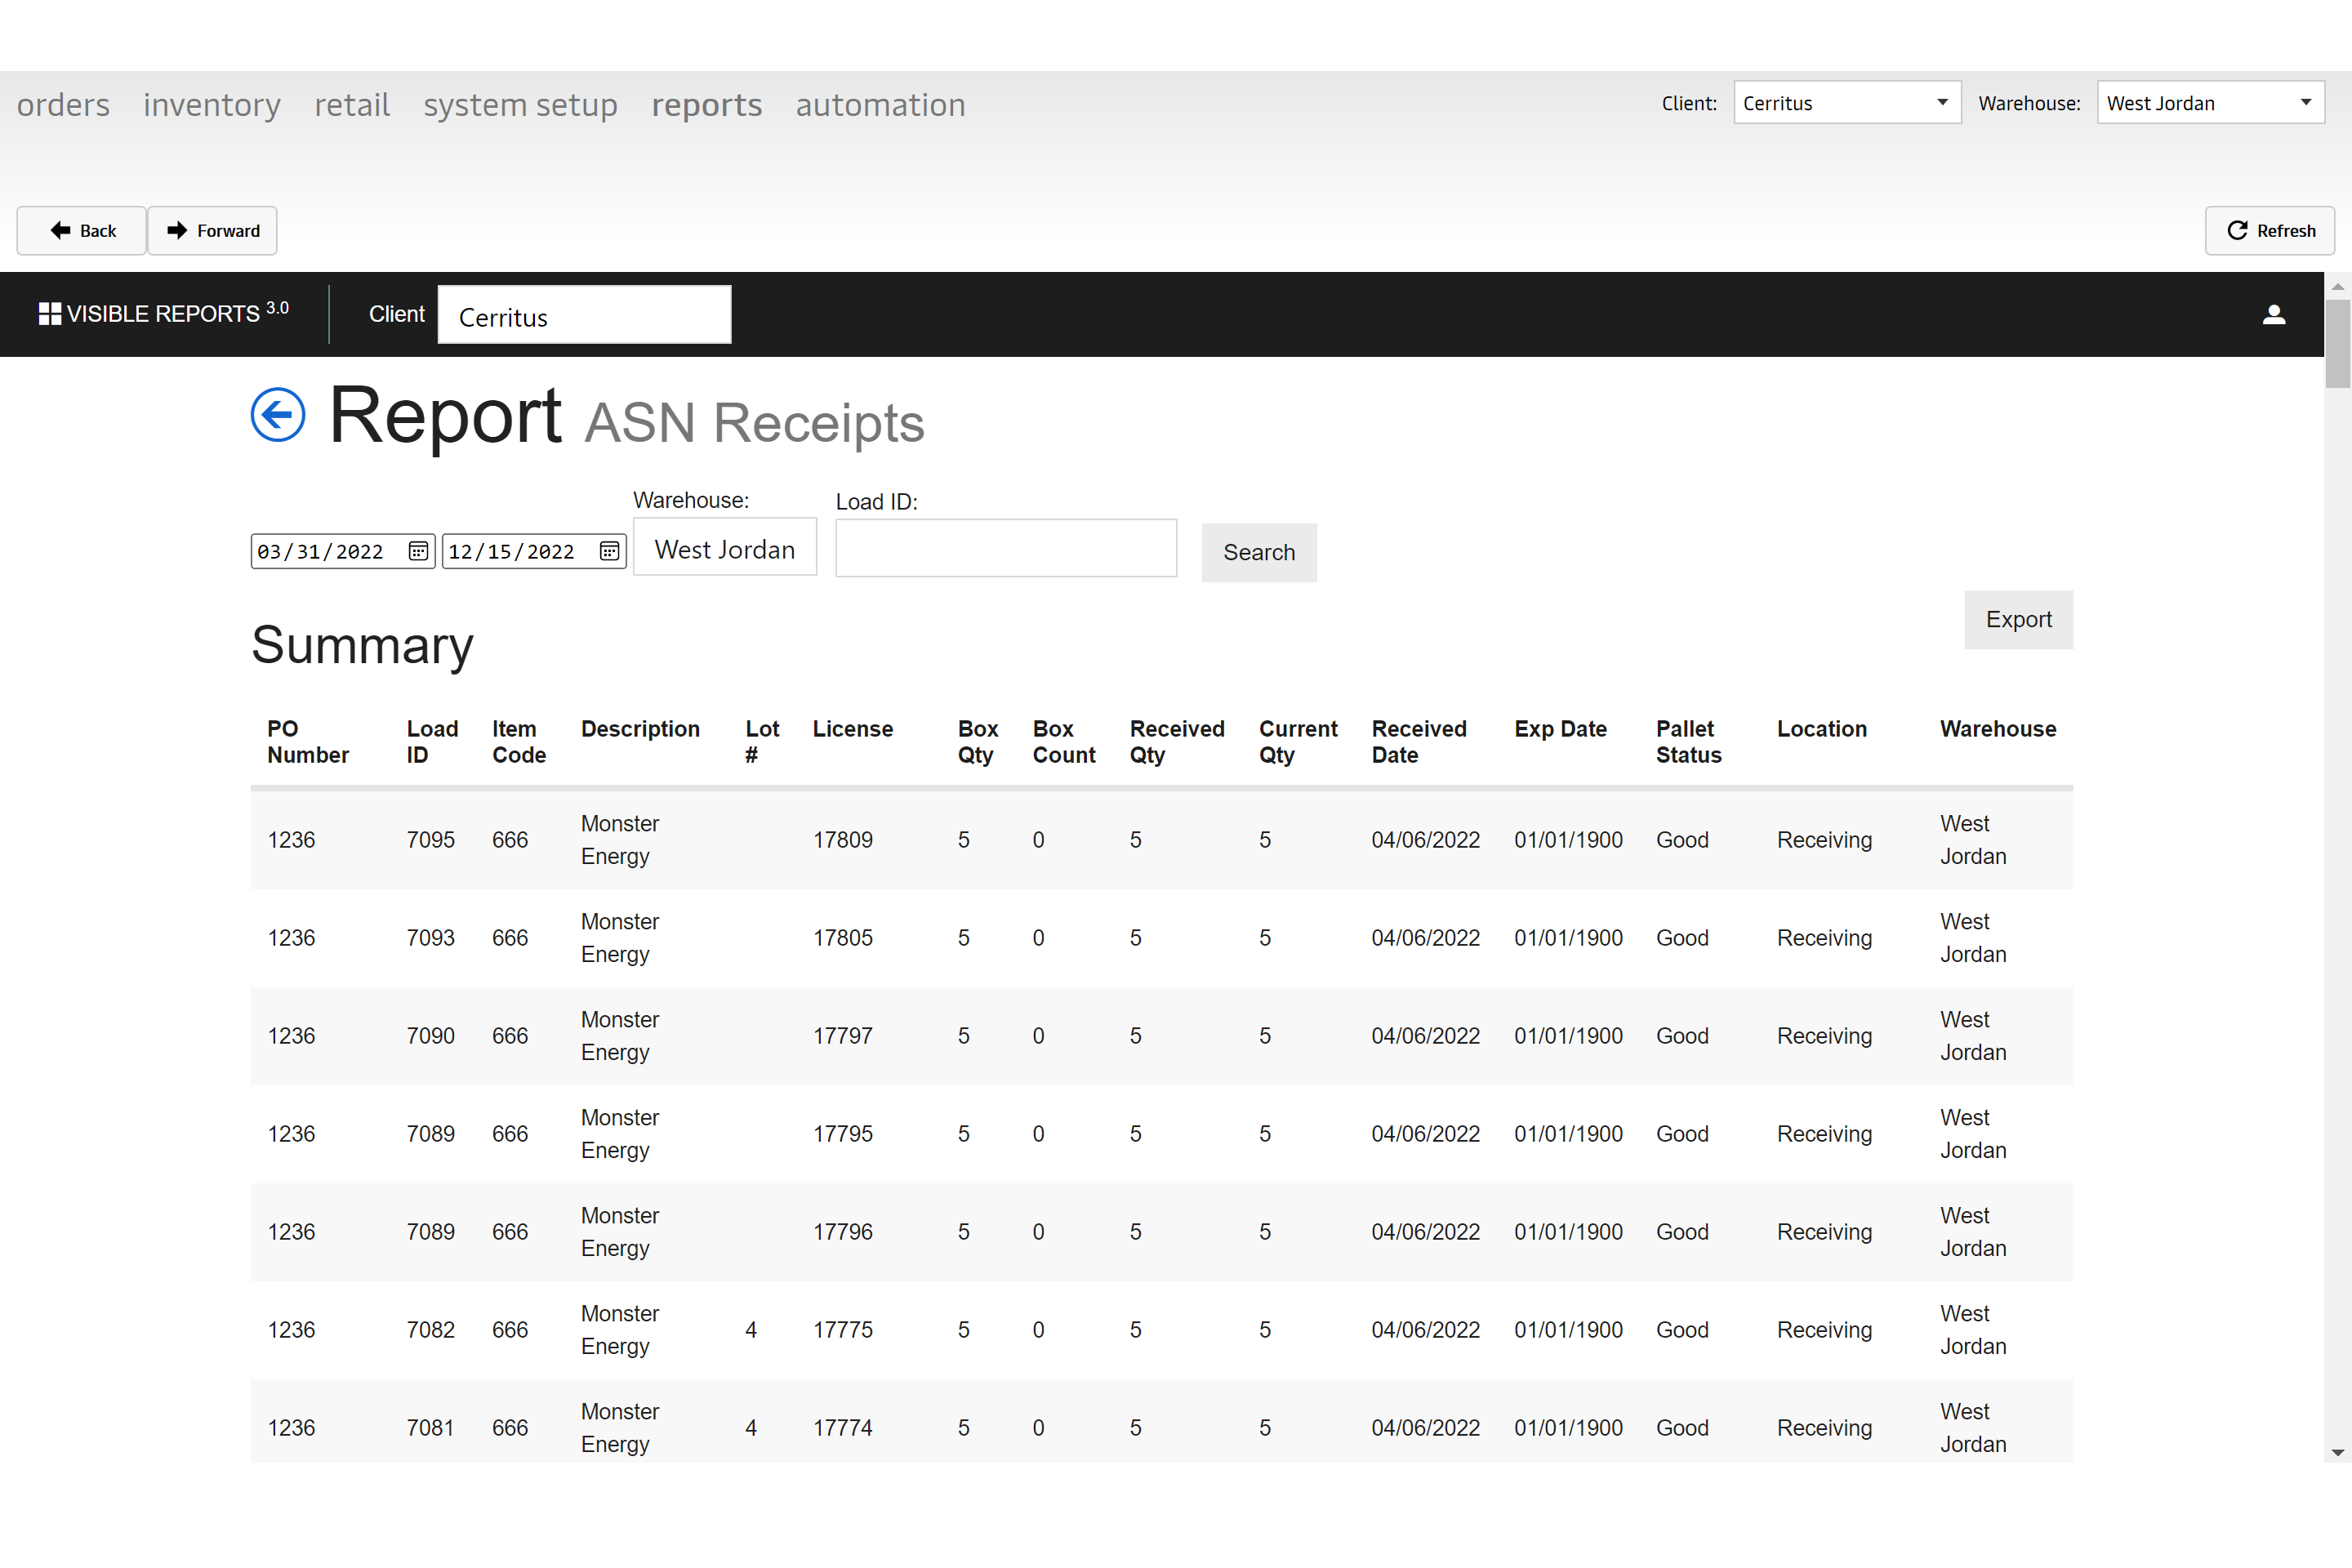
Pallet History
Enter a pallet license plate and search, the report returns the pallet detail history. So you can see when it moved locations or when the item quantity was reduced through replenishment.
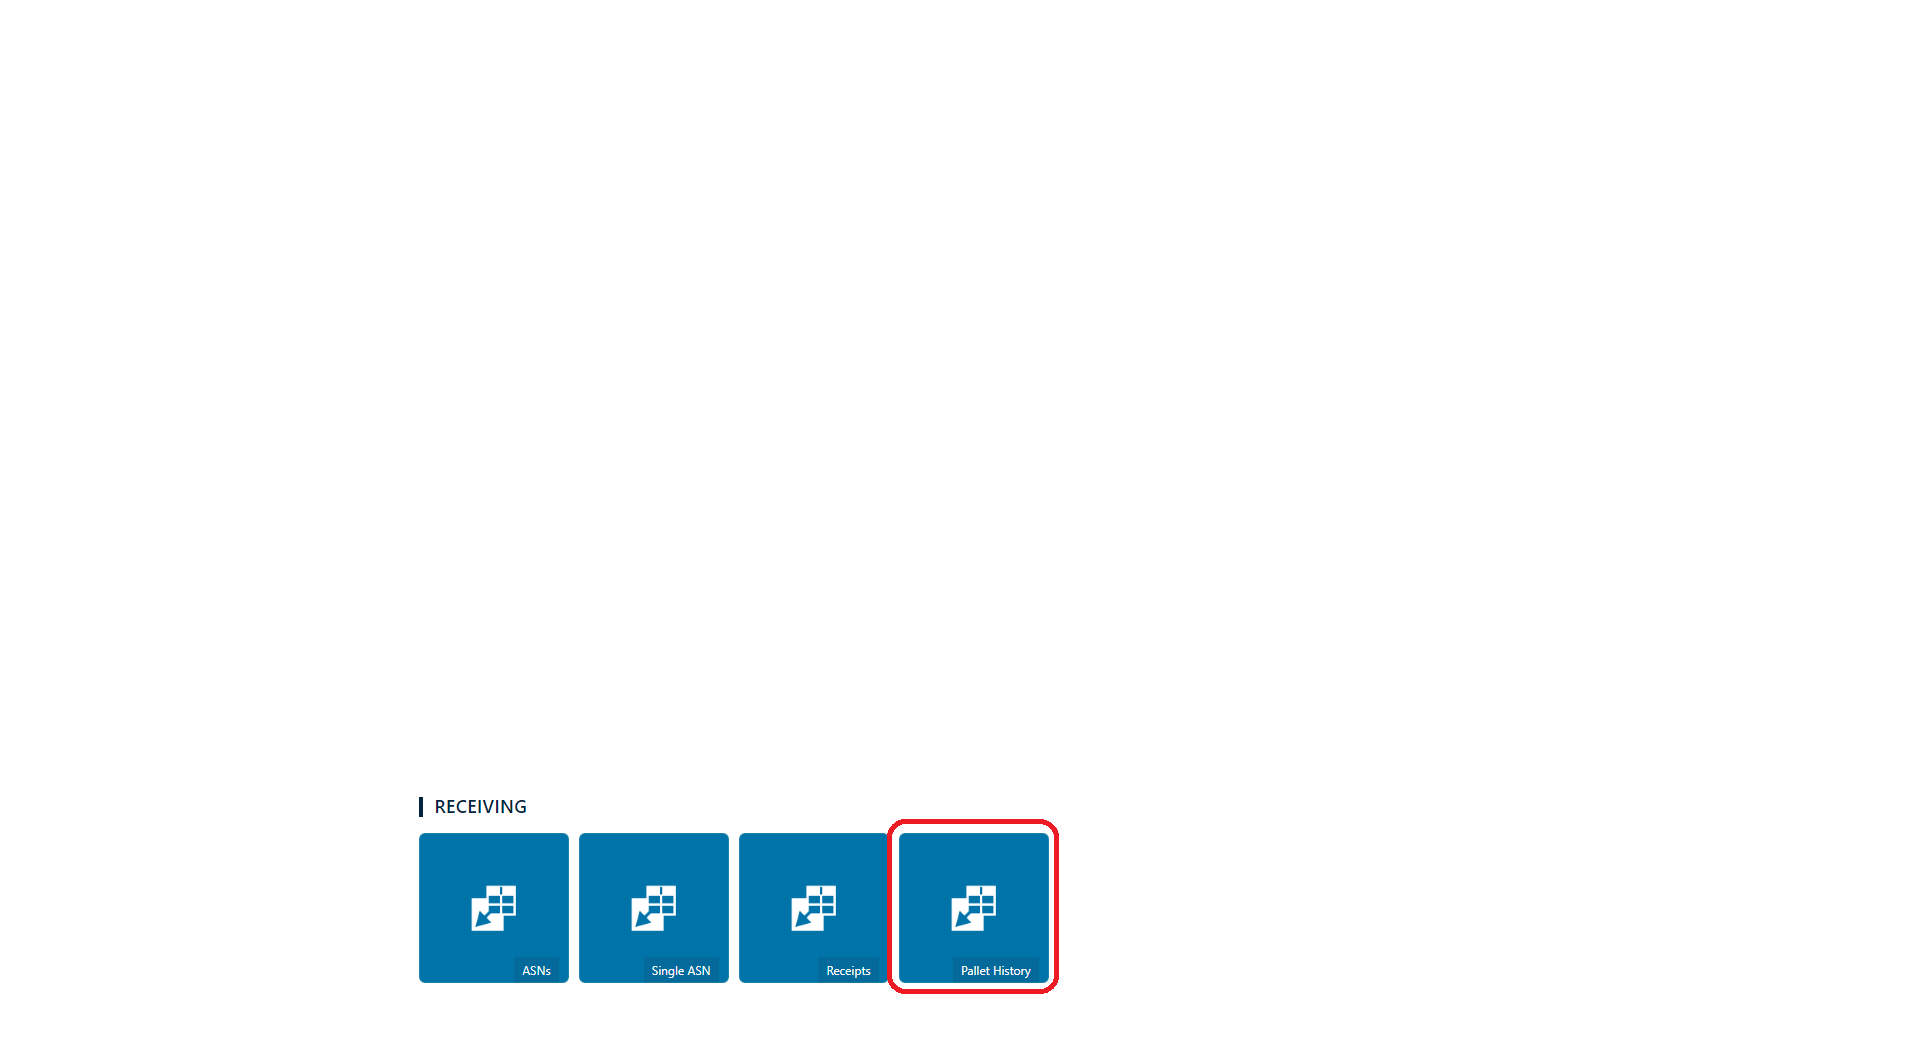
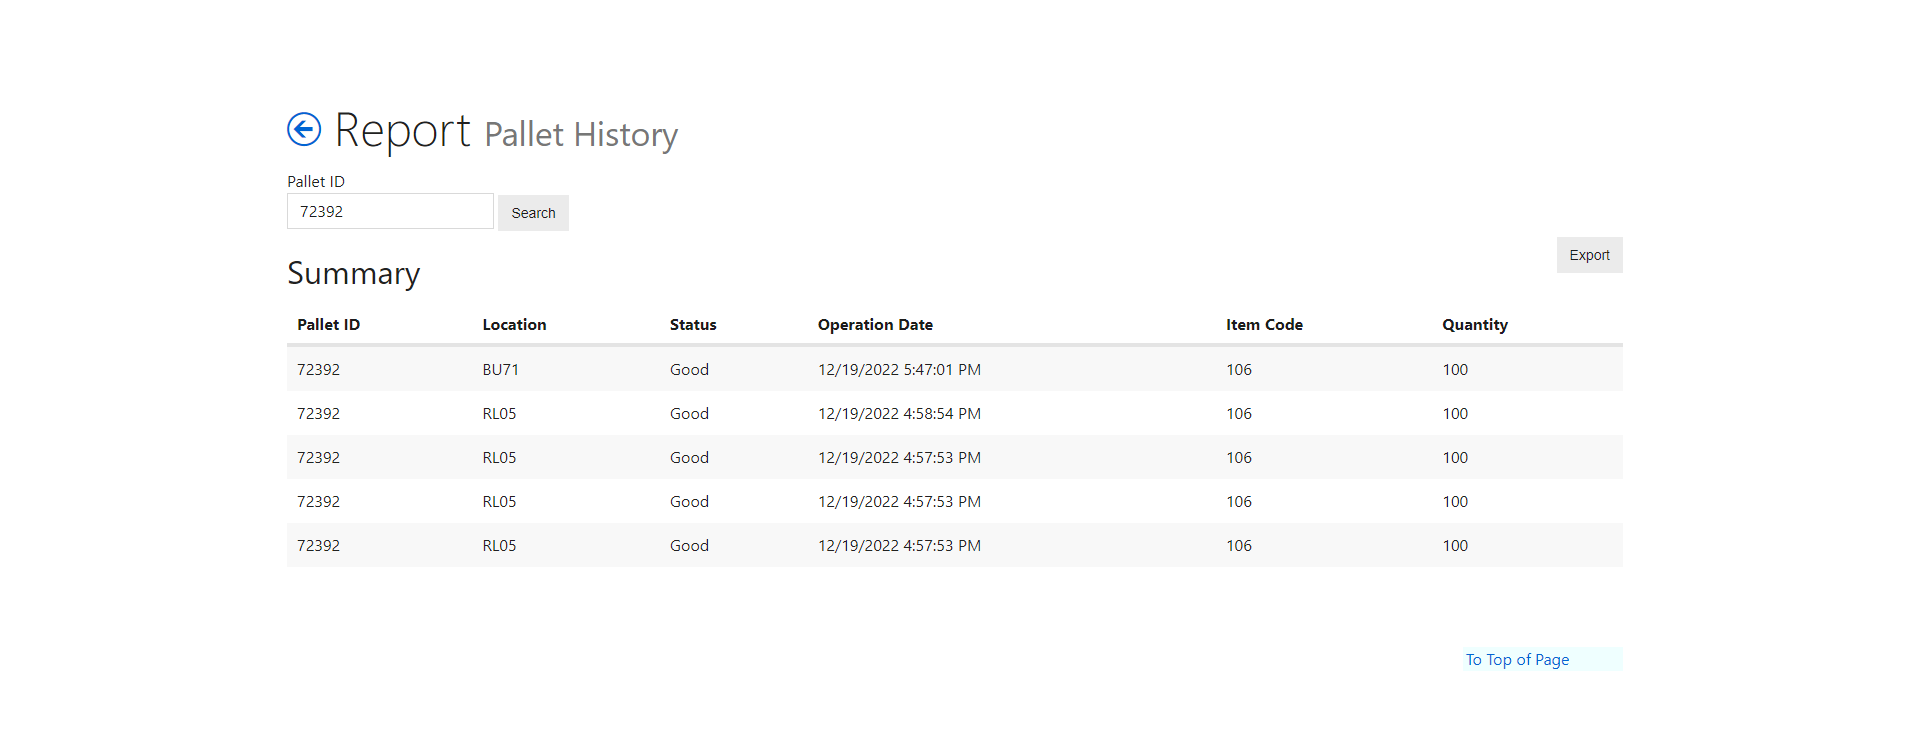
Returns
Under the "Returns"* section of ARCA LOC, you will be able to access the following reports.
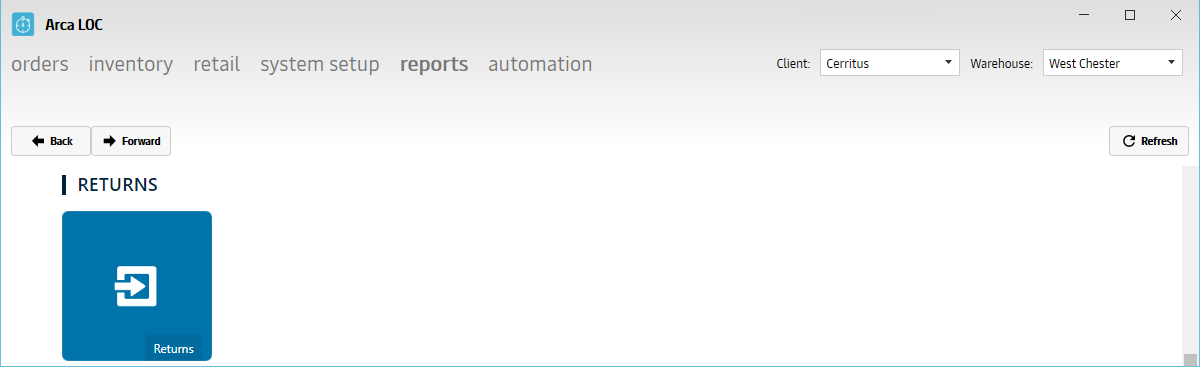
Warning
The client will default back to the first in the list, you must reselect your client within the reports section and click Refresh.
| Report | Description |
|---|---|
| Returns | Lists all returns by a given date associated to a specific order number displaying all items with their amounts returned and status. |
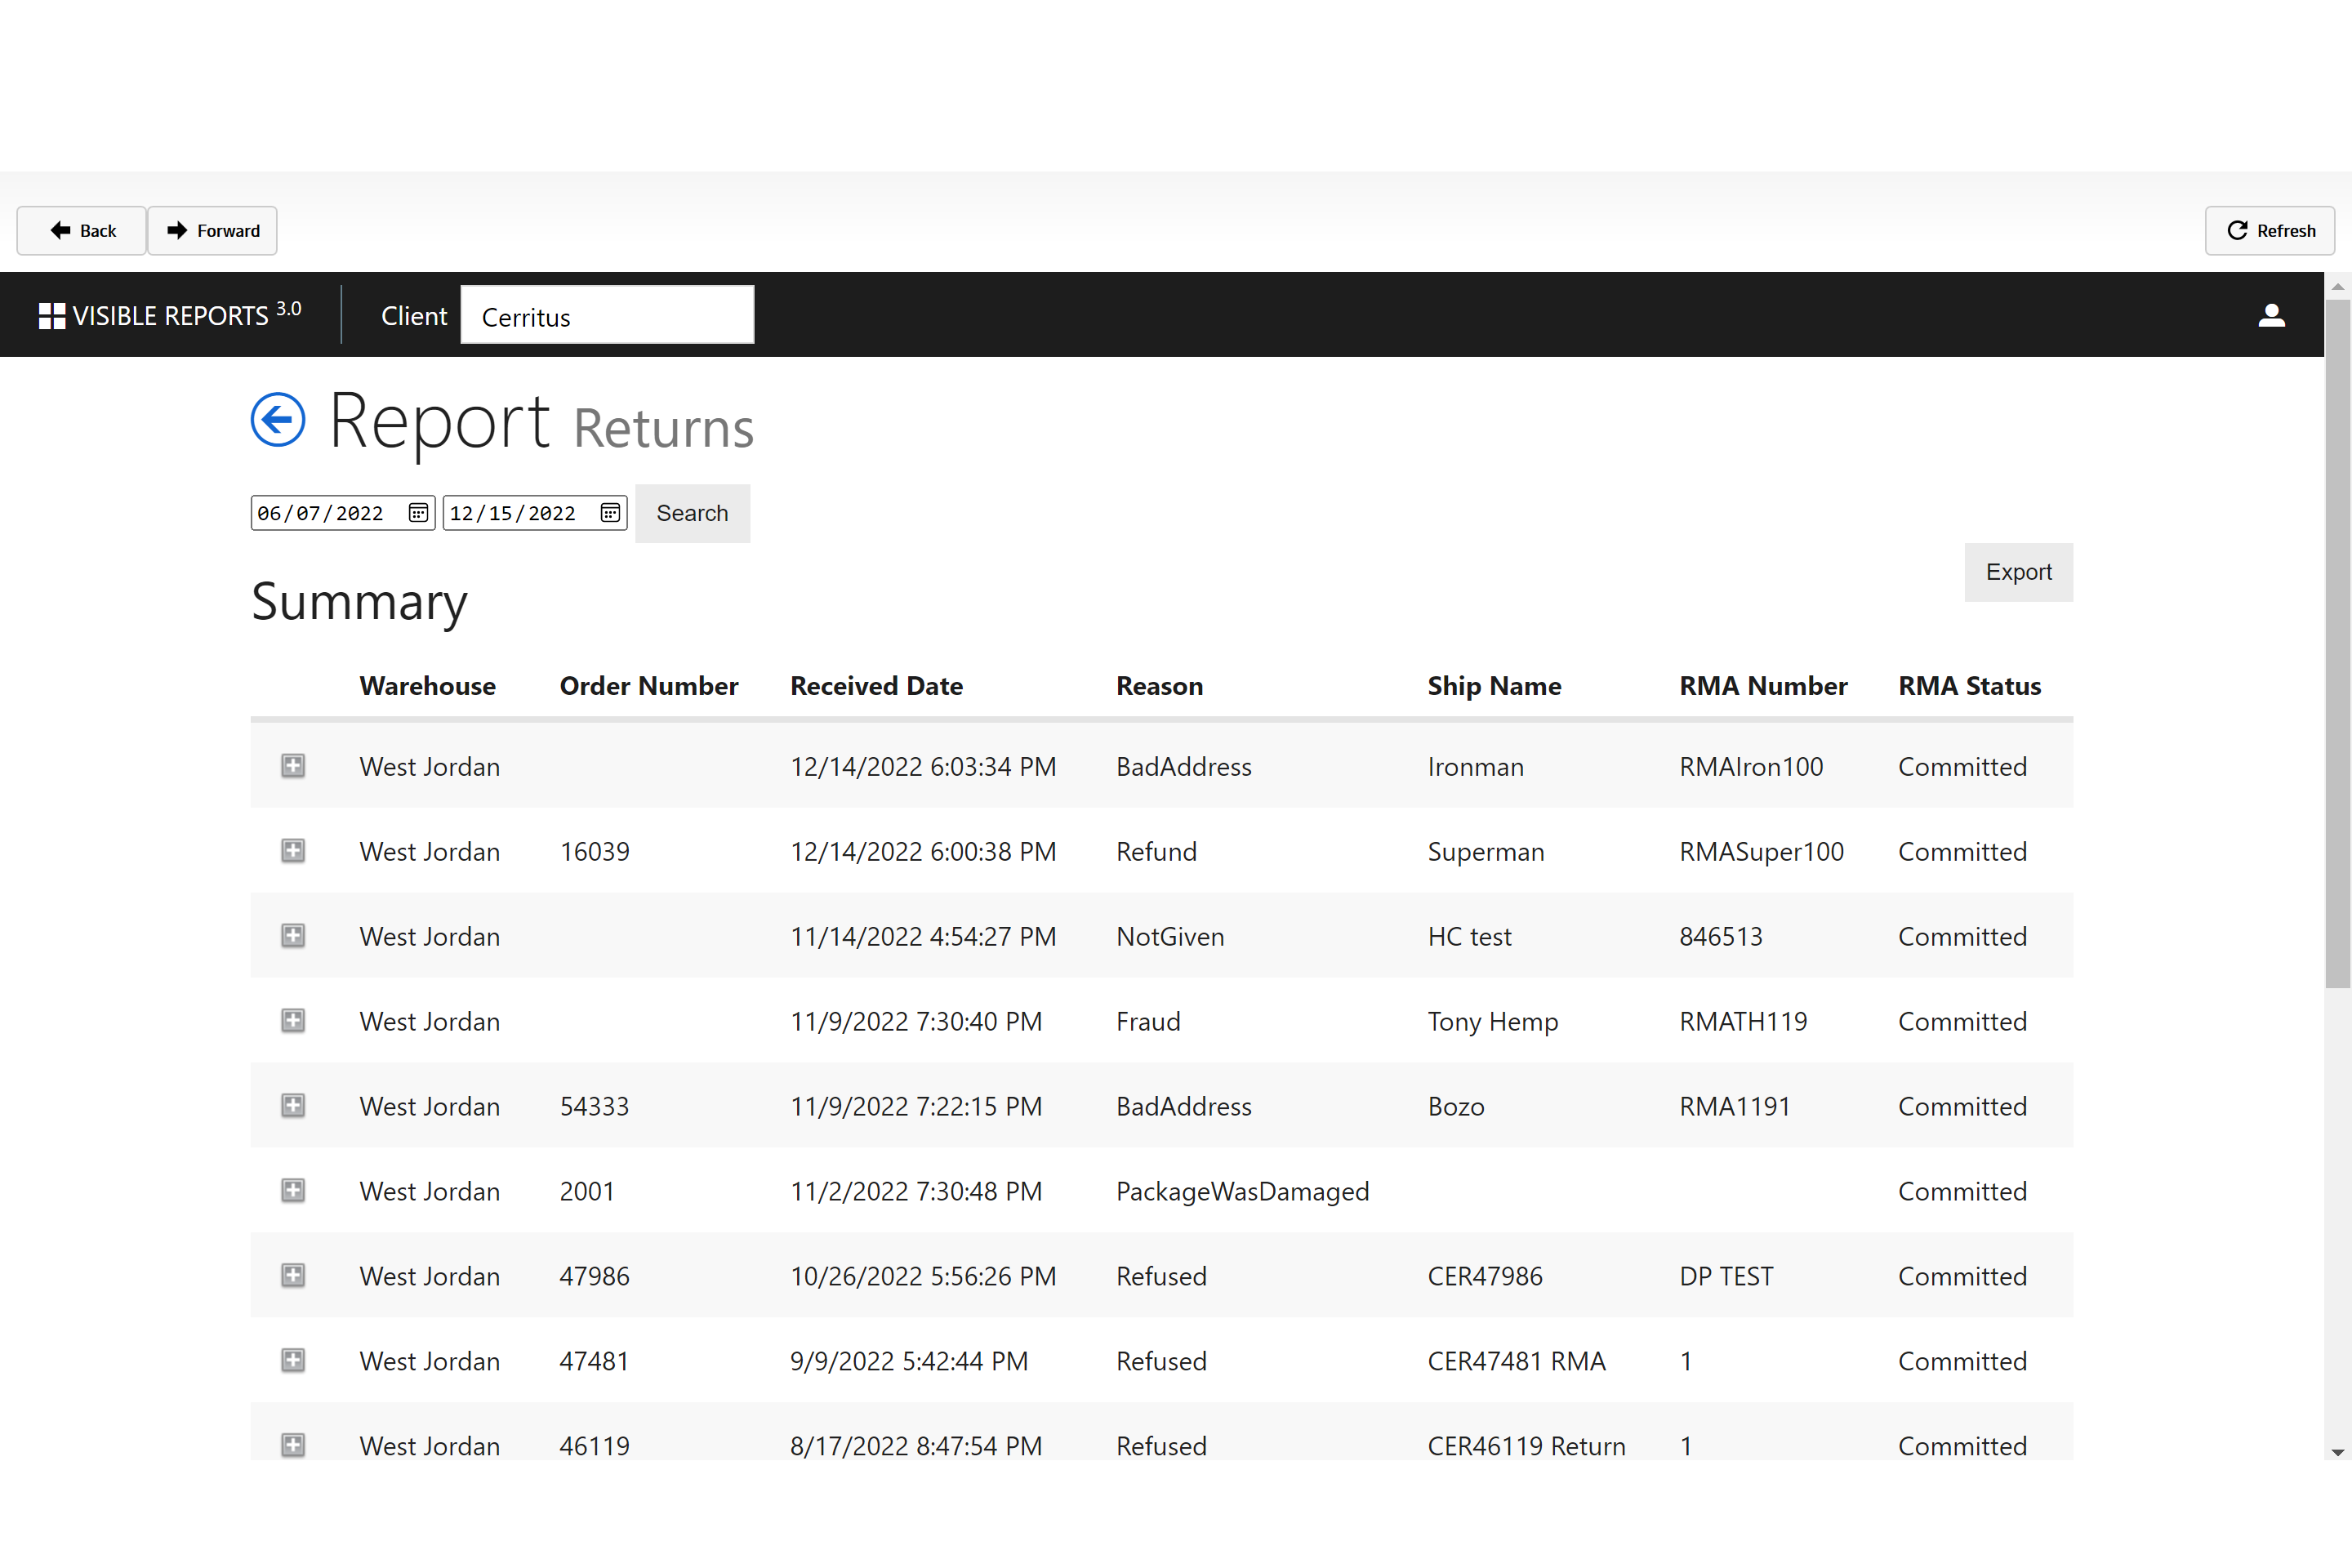
You now have the ability to add an email subscription for the return reports.
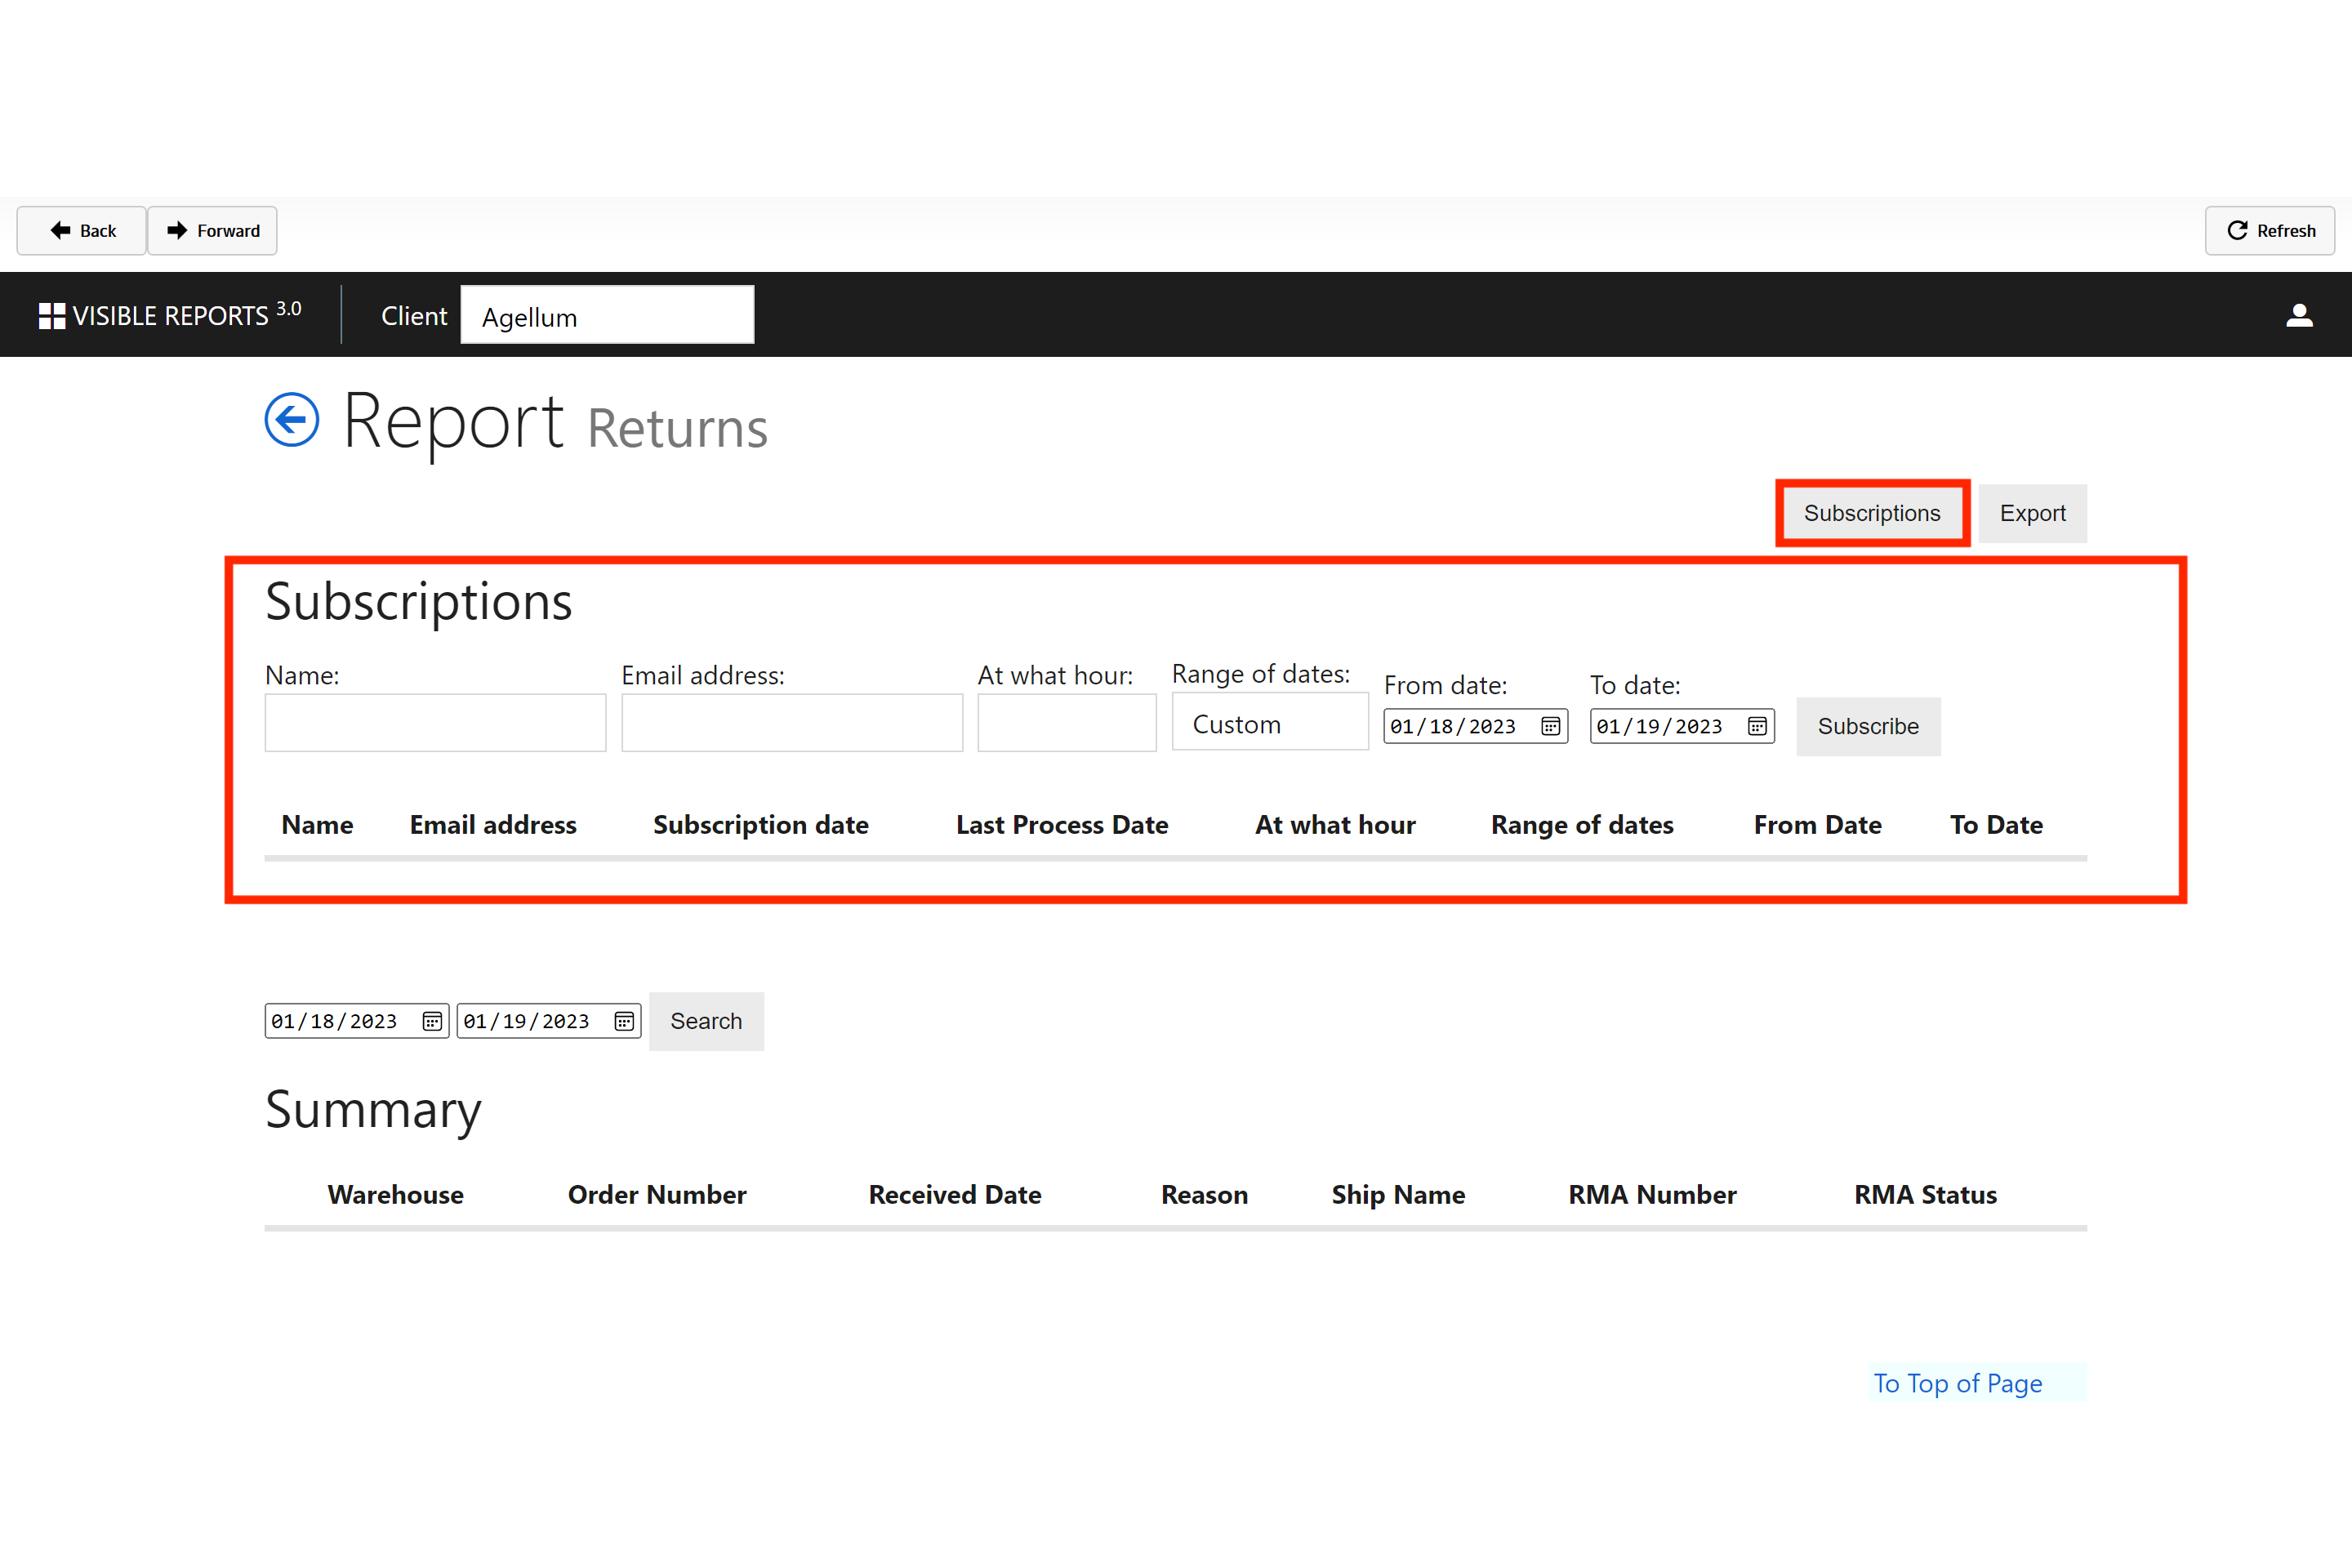
ARCA Go Scan
Under the "ARCA Go Scan"* section of ARCA LOC, you will be able to access the following reports.
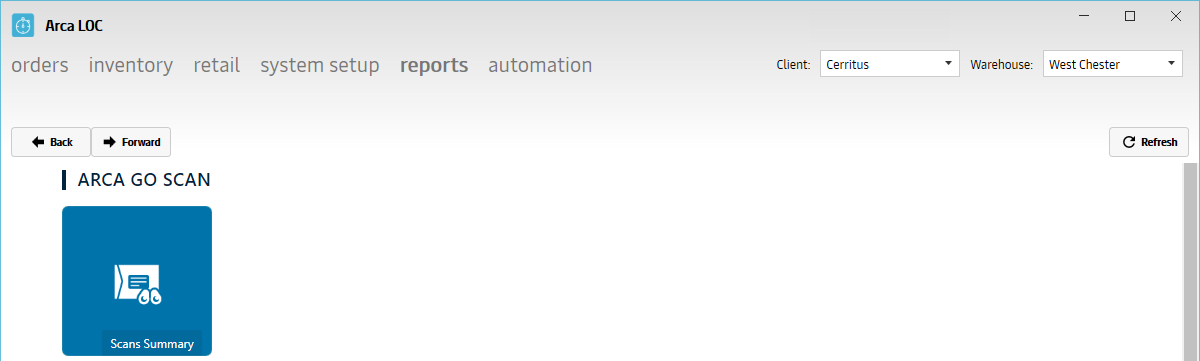
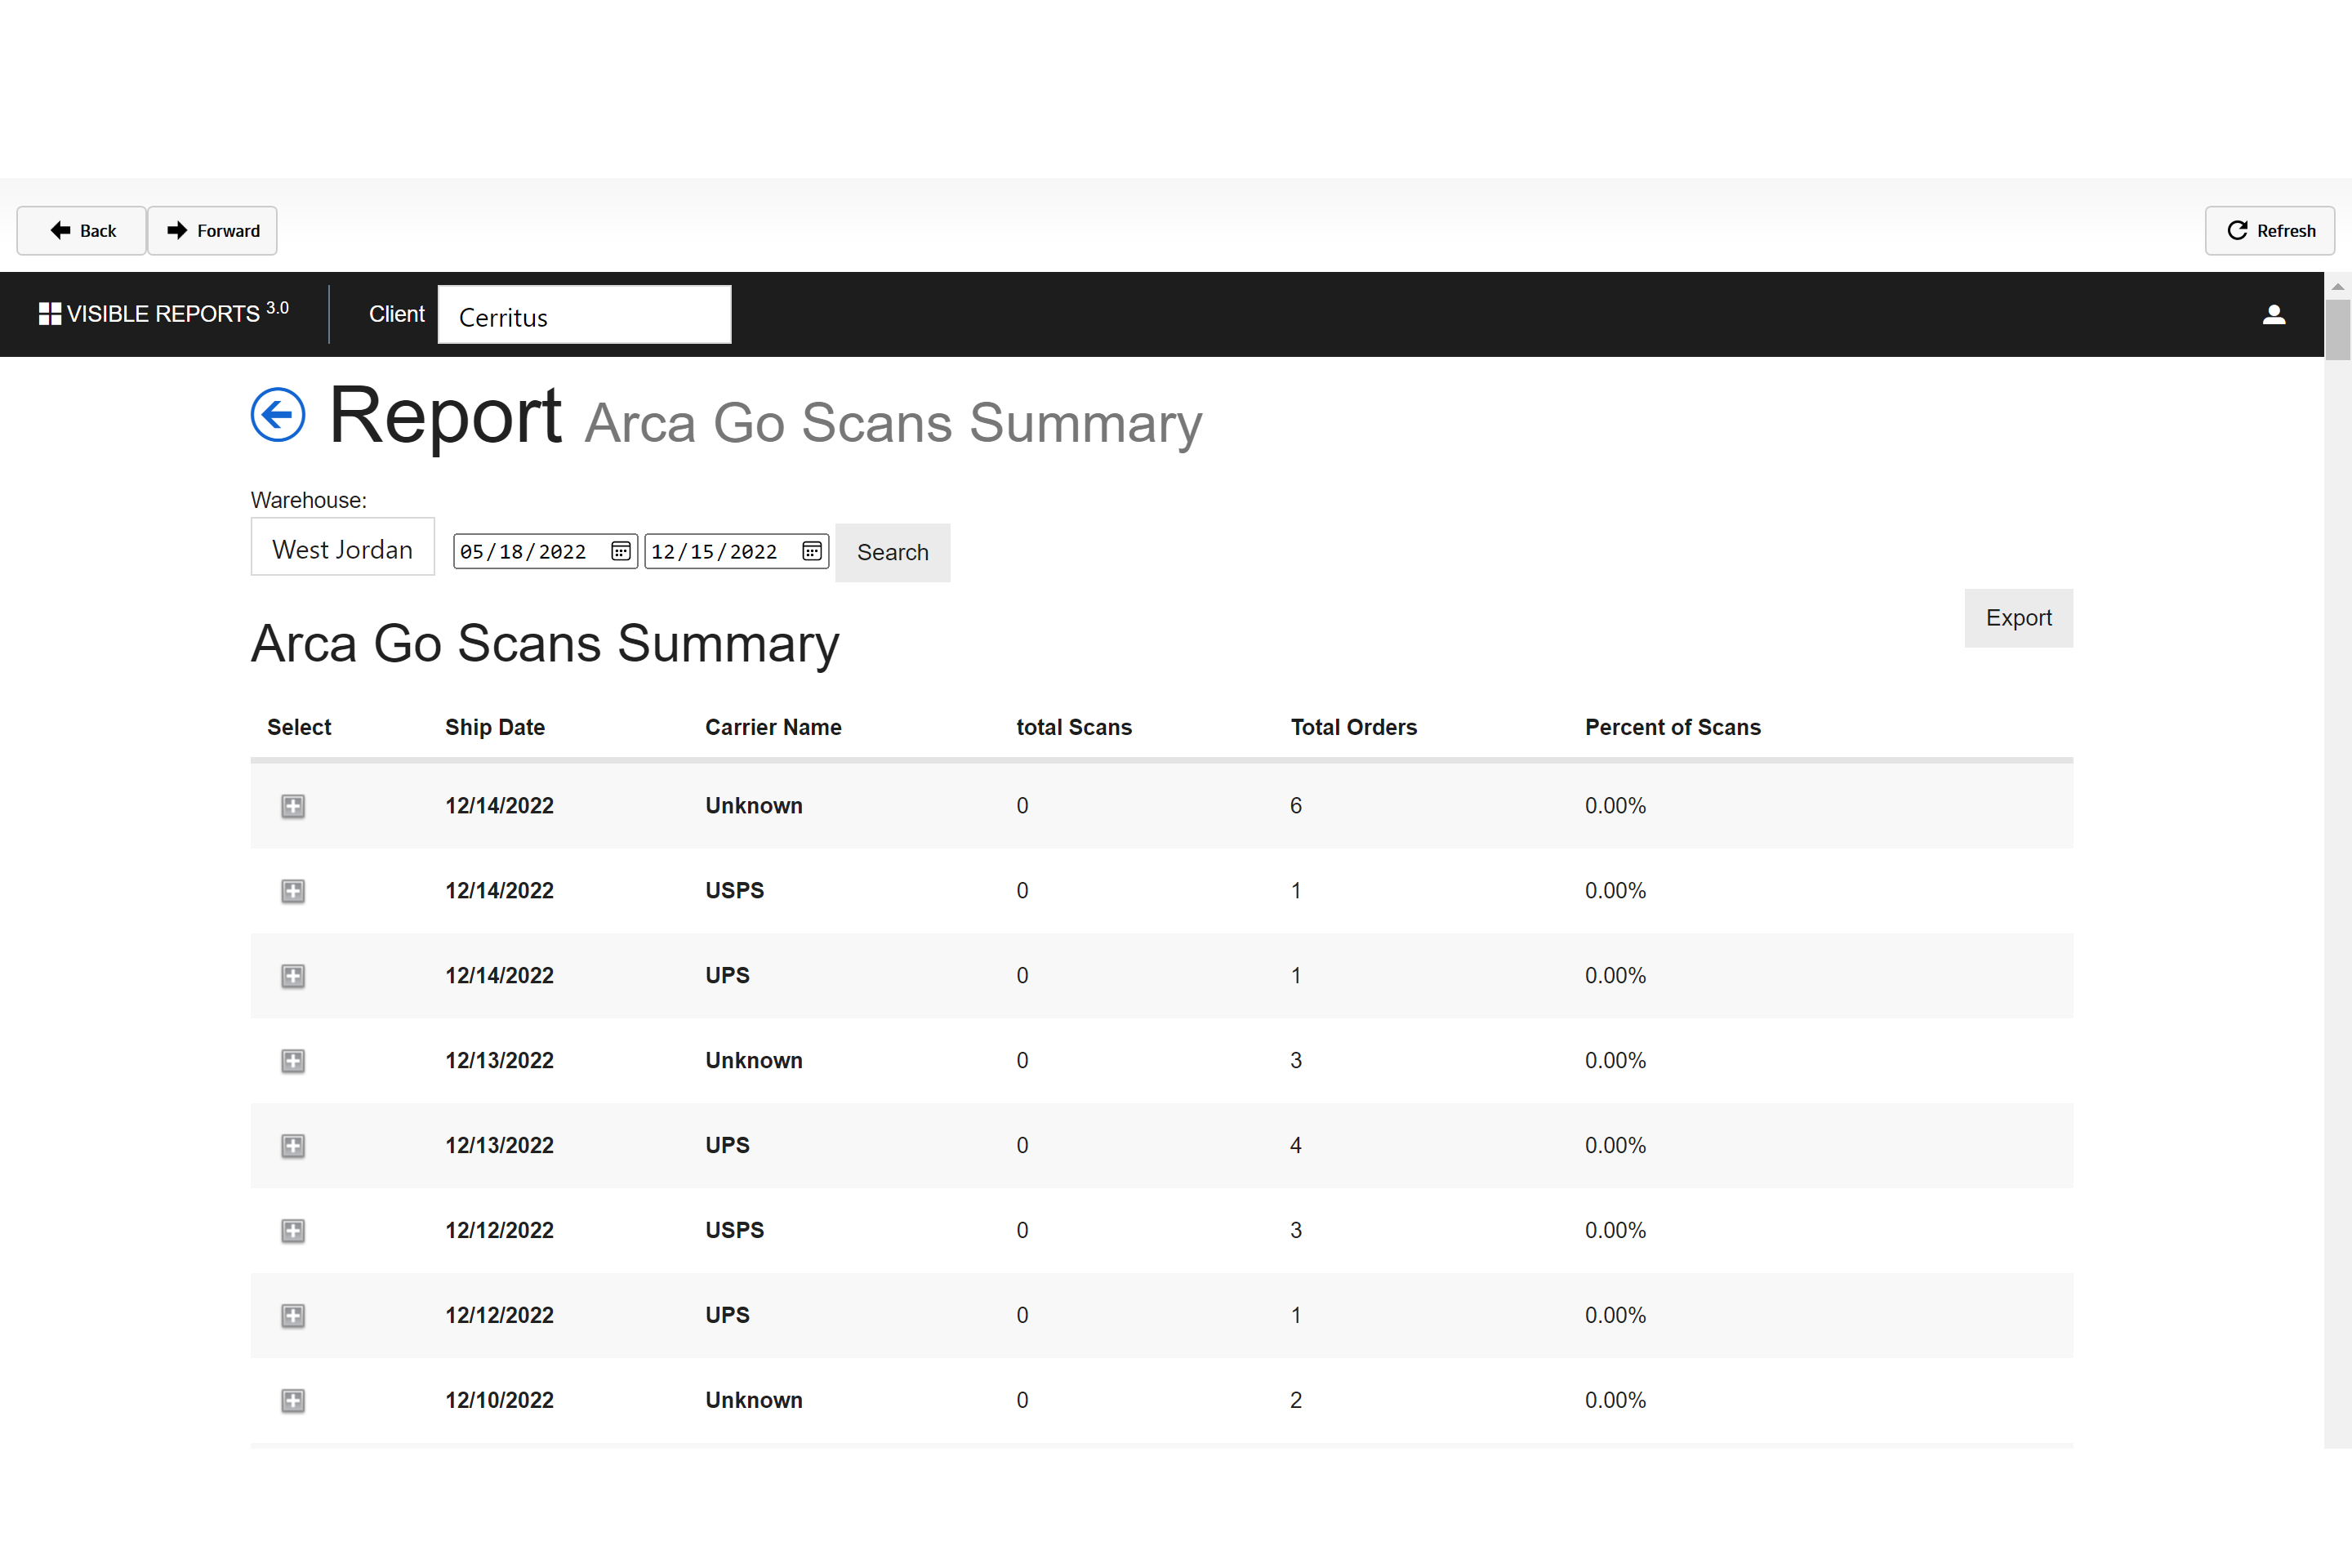
Warning
The client will default back to the first in the list, you must reselect your client within the reports section and click Refresh.
| Report | Description |
|---|---|
| Scans Summary | This report obtains all of the packages scanned including carrier tracking information along with how long it took to ship the order. |
Automation
Put Wall
This section of the User Guide will cover the "Put Wall" portion of ARCA LOC.
The screen will display all of the waves per date searched along with the totes associated. If the file has been sent by the put wall system the "Is Sent" box will be selected. Completing the wave will close out the wave.