ARCA Pack
Pack Station
ARCA Pack has several different functions for fulfilling client orders. This section will cover the "Pack Station" module of the application.
The intent of the module is to:
- Provide information on how Pack configuration is set up
- Explain how orders are packed
Settings
To fulfill orders properly, ARCA Pack must be set up correctly to validate that the orders being scanned in are associated with the respective warehouse and client.
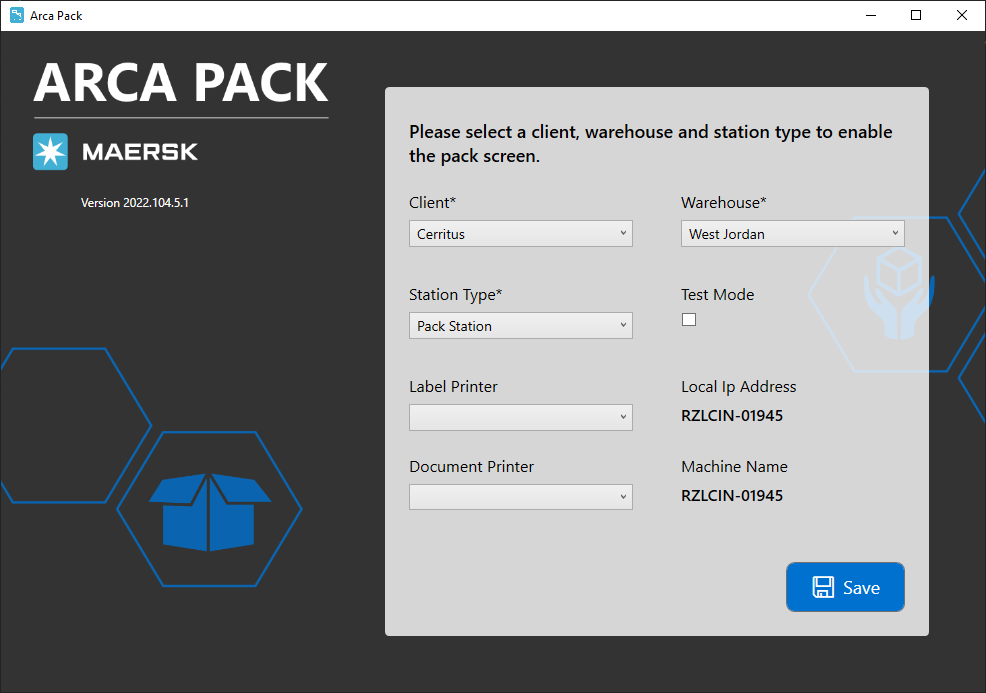
Before you start packing the order, the Settings menu should be configured as follows:
REQUIRED SETTINGS
- Change "Select Station Type" to "Pack Station".
- Set the "Select Warehouse" to the correct value, which depends on the client.
- Set "Select Client" to correct client value.
- Set "Label Printer" to the correct value.
- Set "Document Printer" to the correct value.
ADDITIONAL SETTINGS
- Set "Test Mode", optional. In some cases, ARCA Pack may need to be set up in a test mode. This is typically done for training purposes and should be coordinated through a supervisor. If the application does need to be set up for testing, select the this option.
Then "Save Settings".
Print Mode
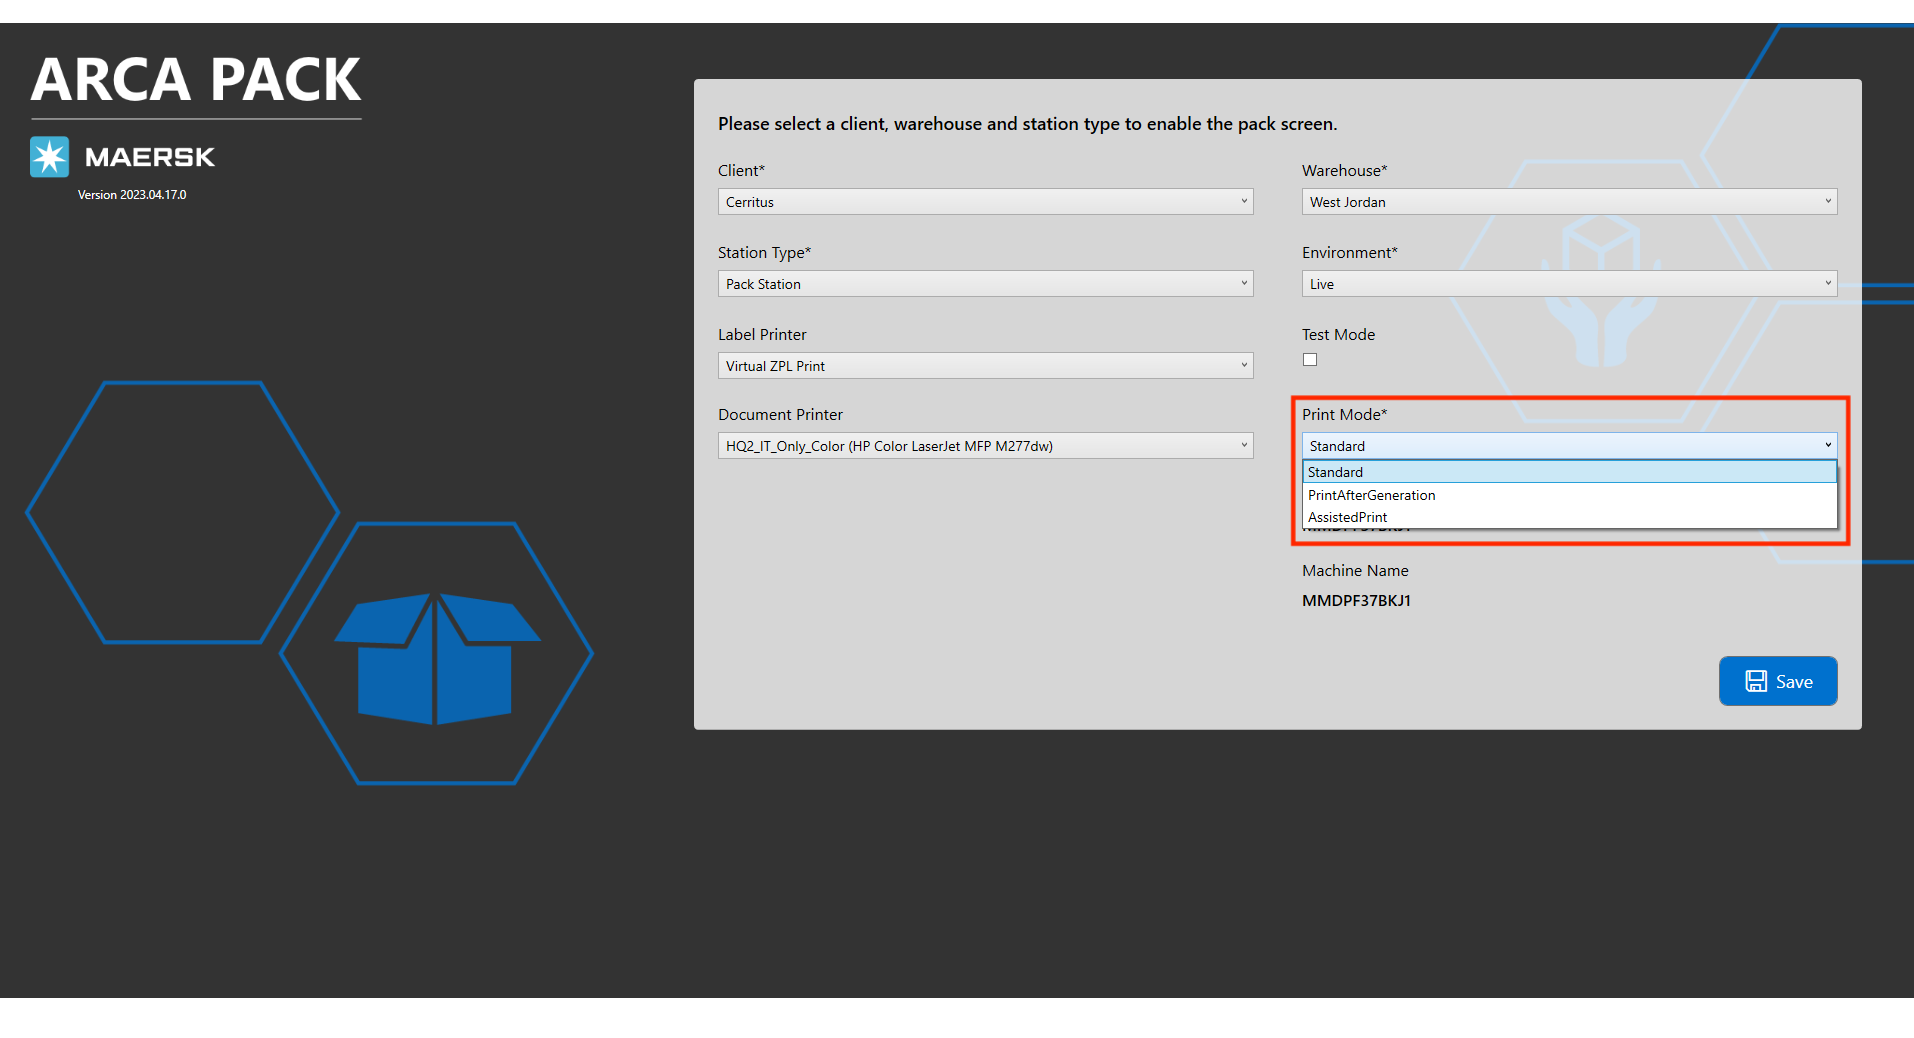
There are some new print mode options on the settings menu that will change how the wave print station will function. Standard, Print after generation and assisted print. Here's a breakdown of how those are going to work.
Standard: First you need to click on Generate Labels, once they are generated without problems and all shipments have passed to batch status Ready to Print, then we can print all the label by clicking Print Labels button.
PrintAfterGeneration: Clicking Generate Labels generates all labels it can, and prints all shipments that did not have an error when trying to generate their label automatically afterwards.
AssistedPrint: Clicking Generate Labels, it generates and prints labels shipment by shipment until an error appears in label generation, at that moment an error message appears indicating that the execution is paused and that the error must be solved to continue with it, after editing the shipment, the execution of generate-print continues where it had been left.
Scan Badge
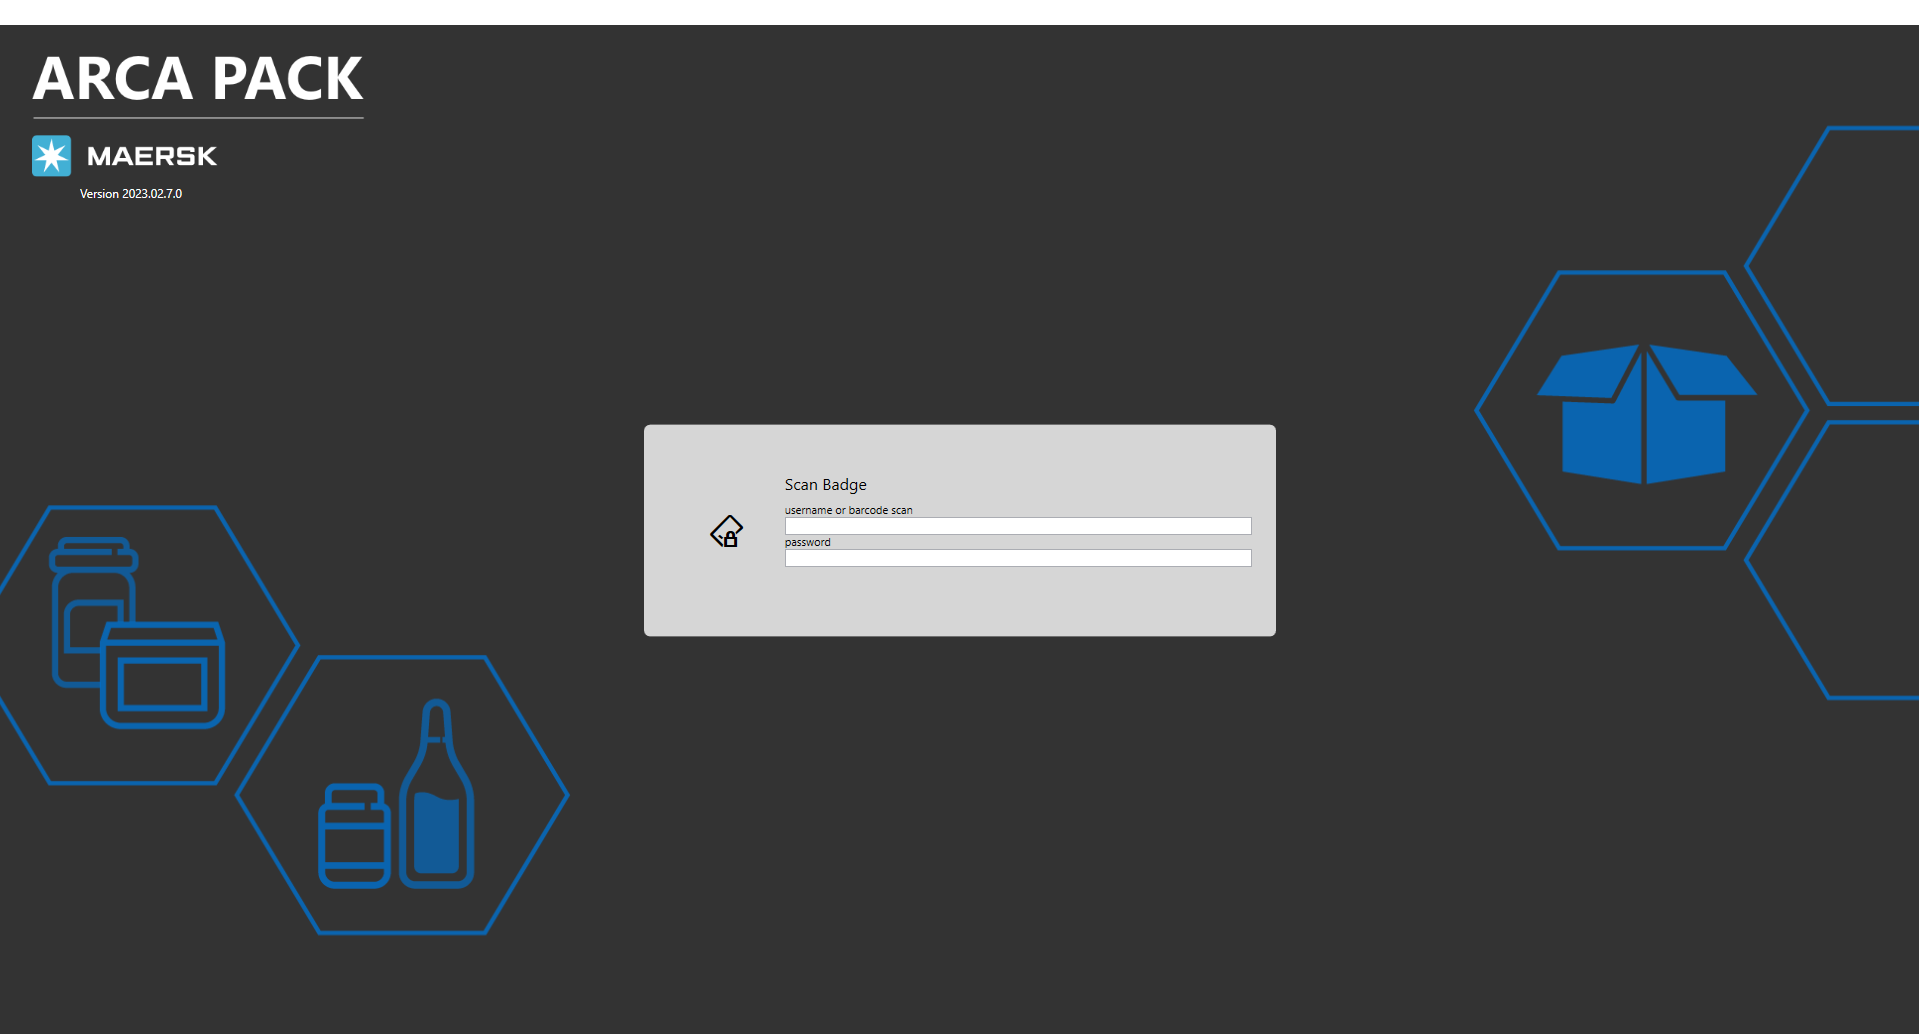
The pack log in screen will now require a badge scan for access to the app. Same as the recent change made to Arca Pick. You will scan your badge barcode to input username and password, or you can manually type them in.
Packing Items
After the settings have been configured, end-users will need to scan their badge to log into ARCA Pack and begin scanning orders to pack into boxes.
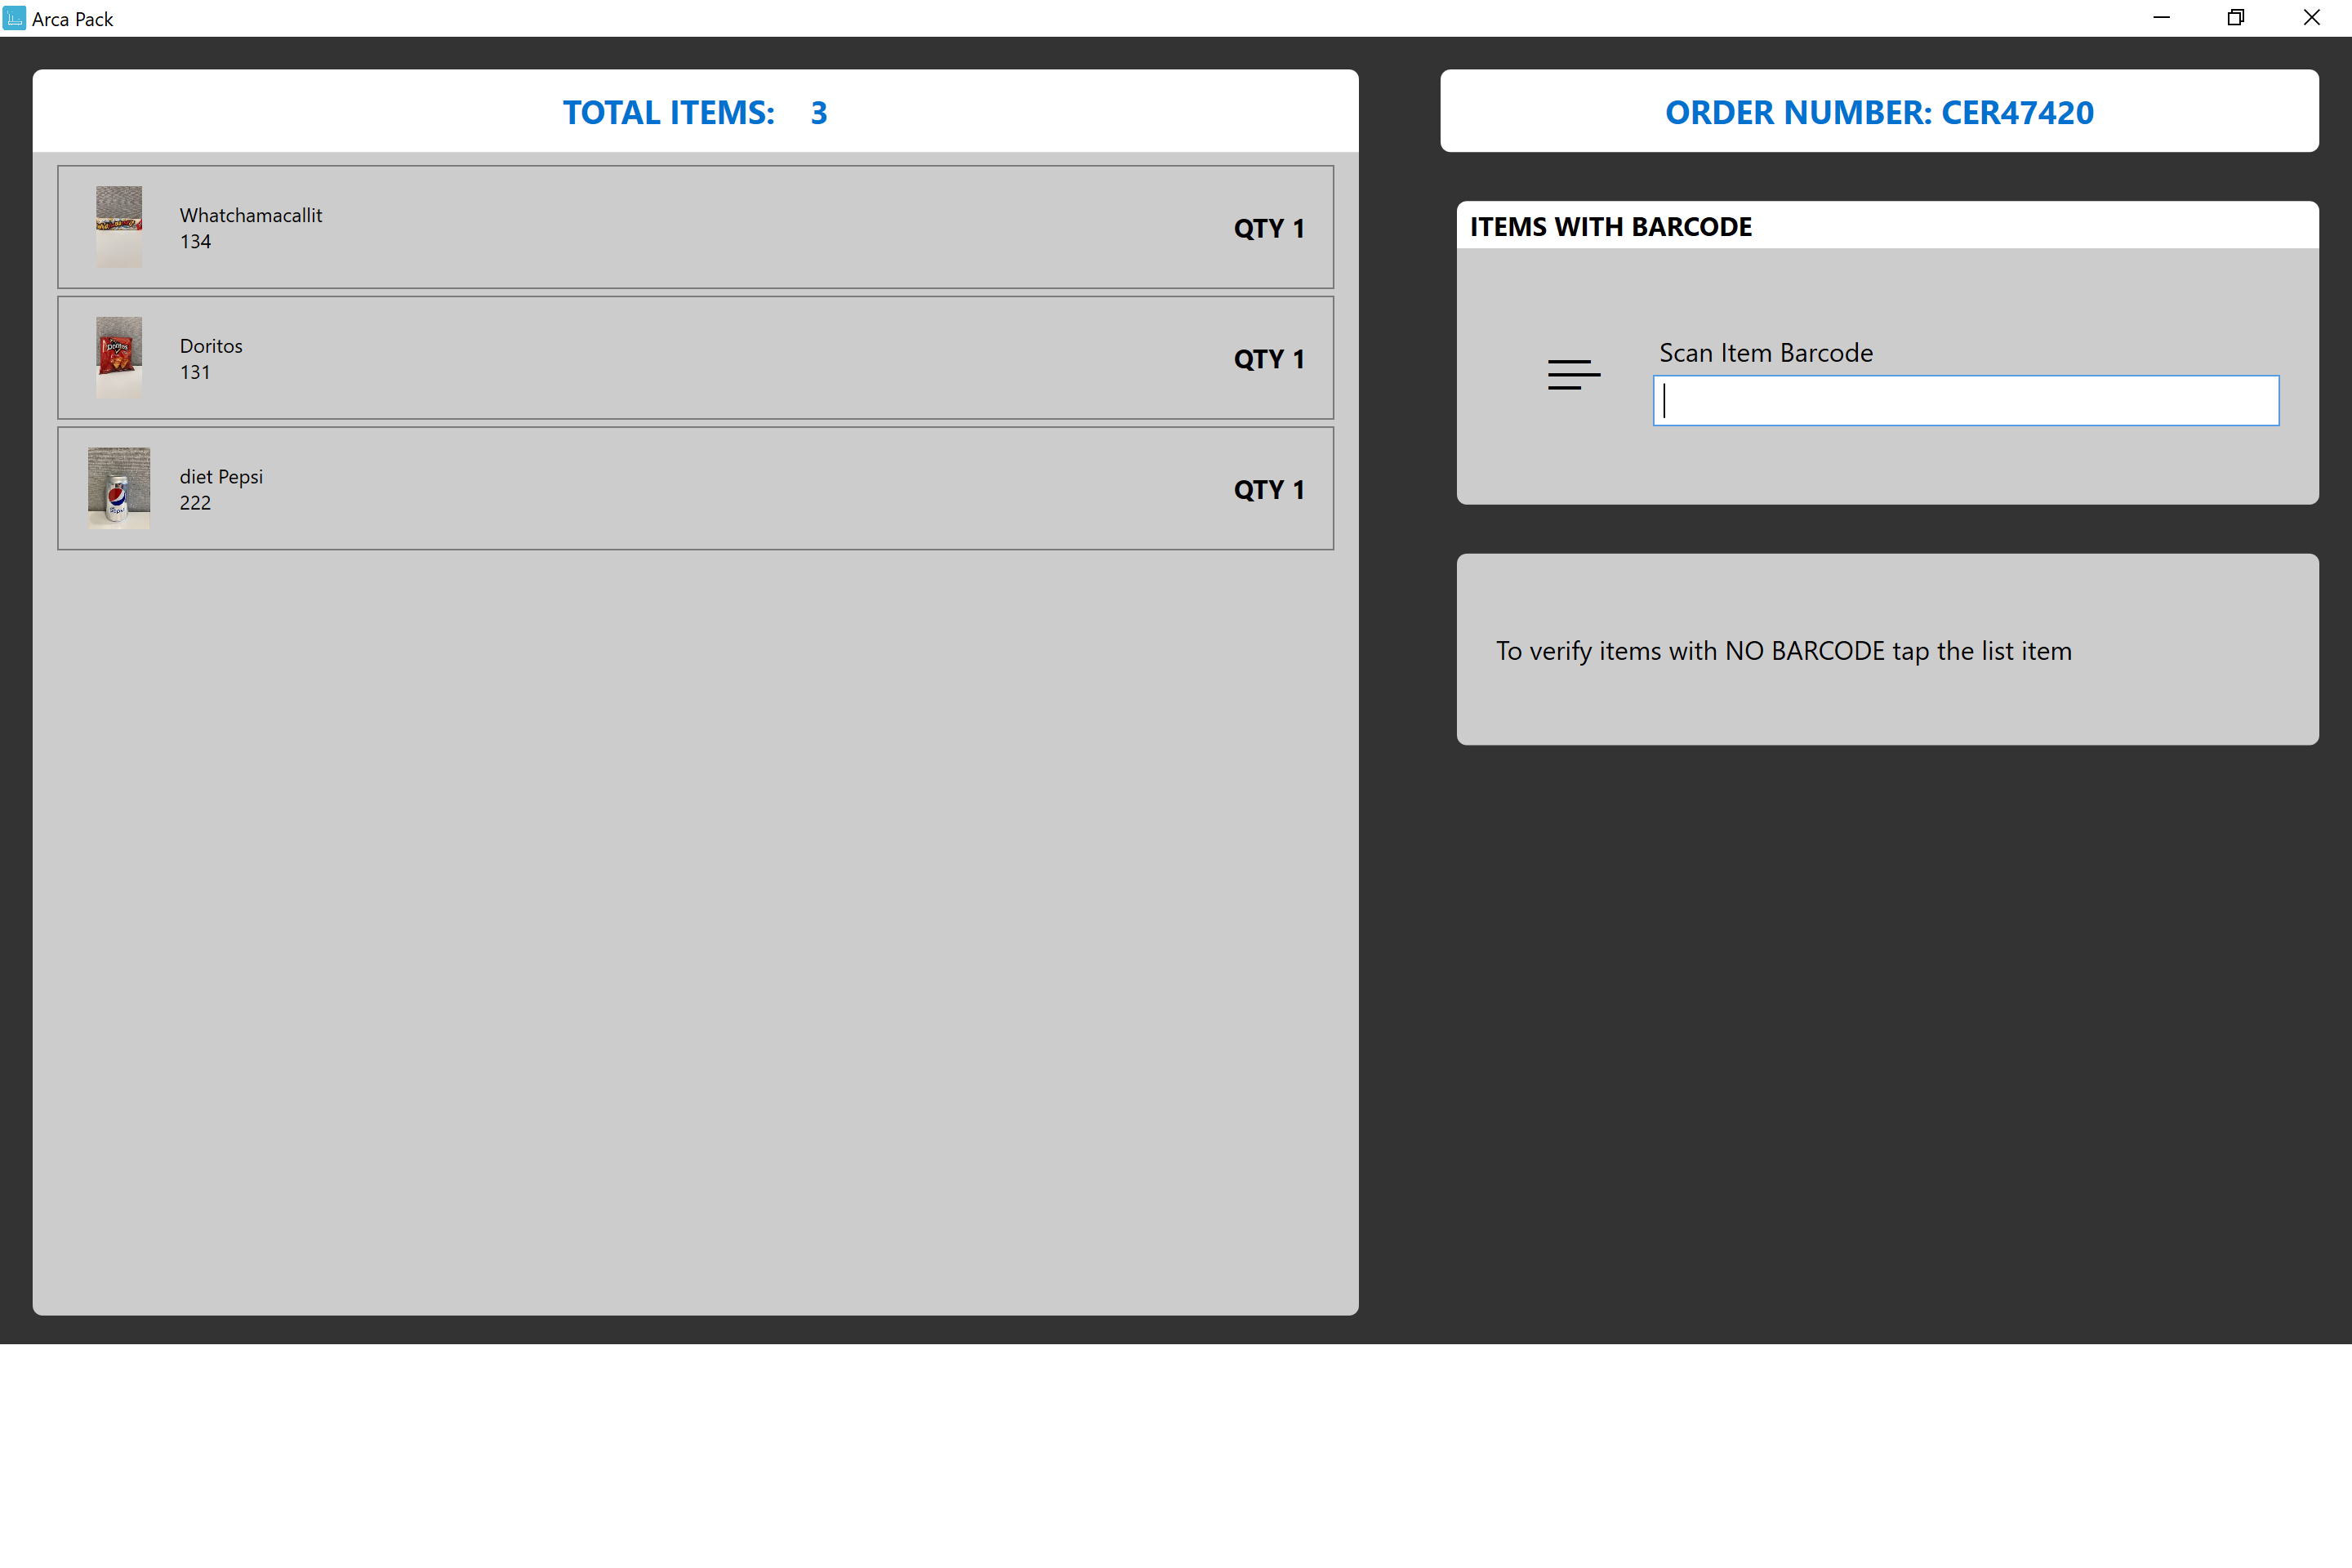
When the order has been scanned in, ARCA Pack will display the items to be packed:
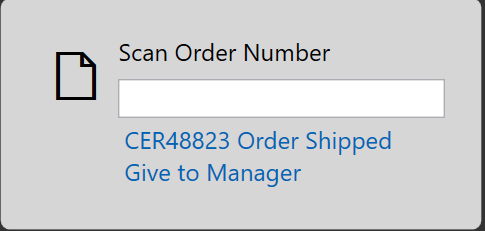
ARCA Pack will also notify end-users if order numbers have already been processed so that they are not shipped multiple times.
If this error displays on the screen, end-users should put the order aside and work with their manager or supervisor to research and resolve it. ARCA Pack will not allow orders to go through again. There isn't an override for this error because it is assumed that the order has been adjudicated.
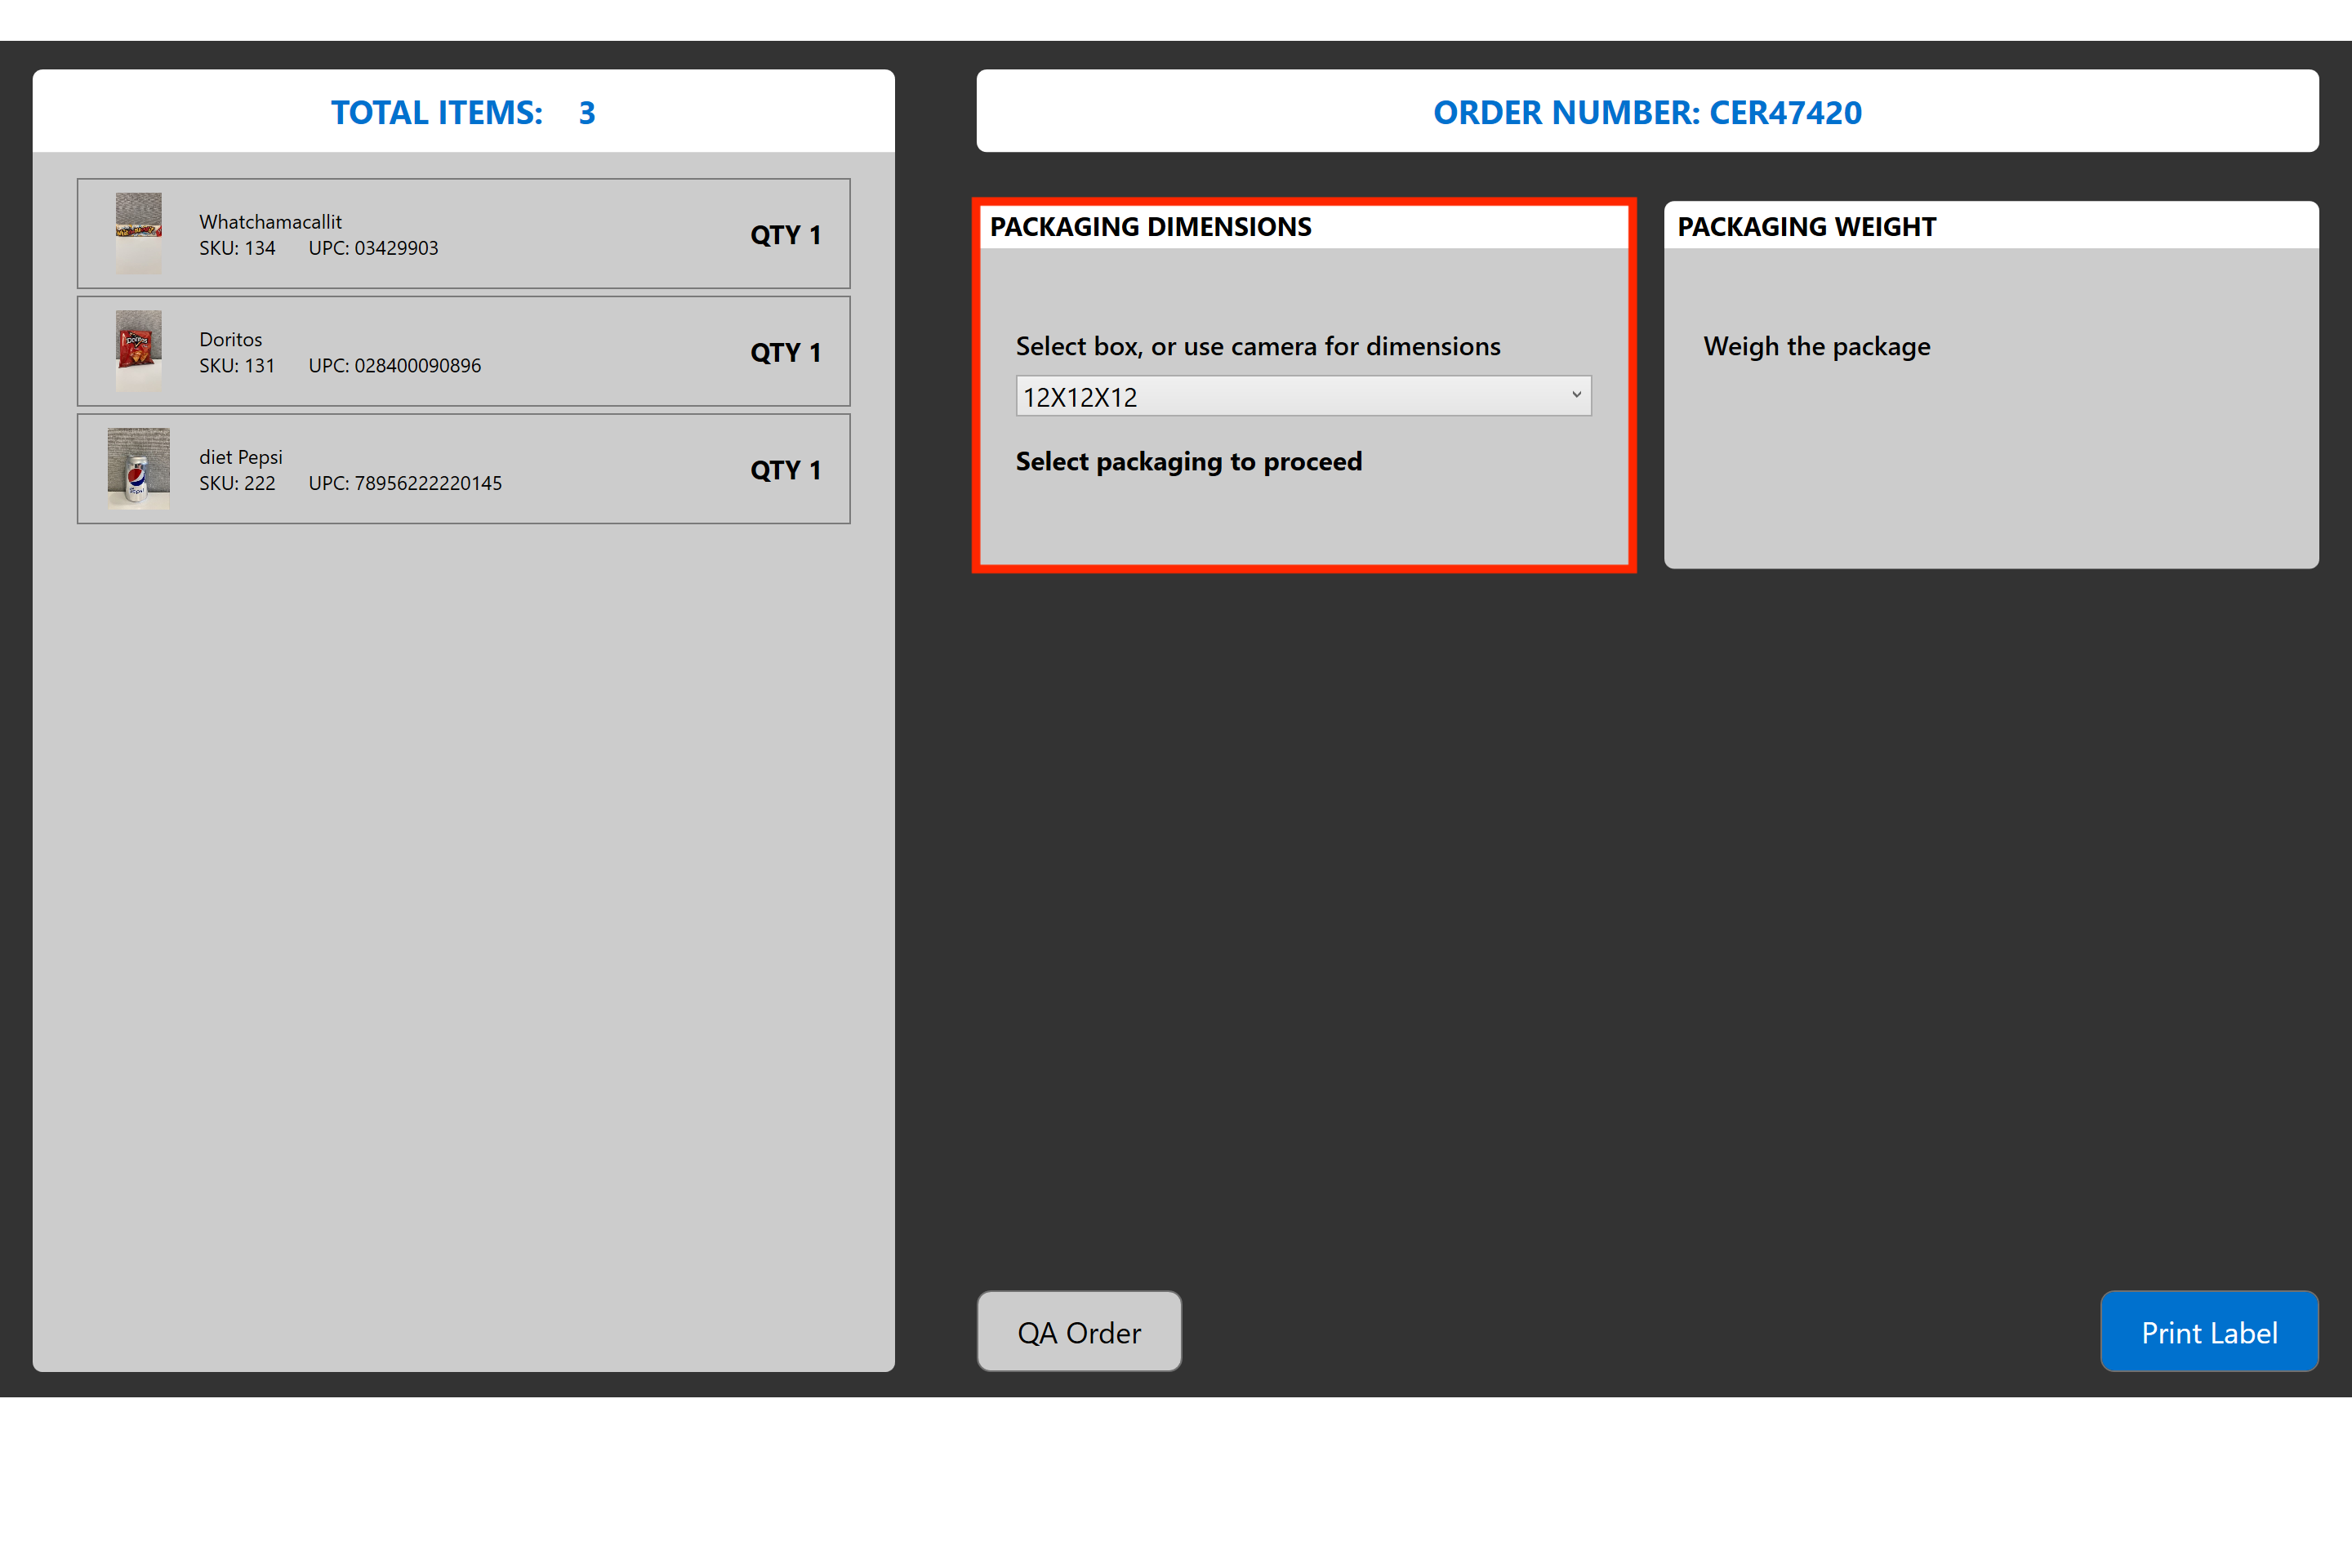
If the items are correct and can be processed, then the end-user must select the box that will be used to pack the items in the order:
 This part of the process assumes that the end-user understands how to pack an order correctly.
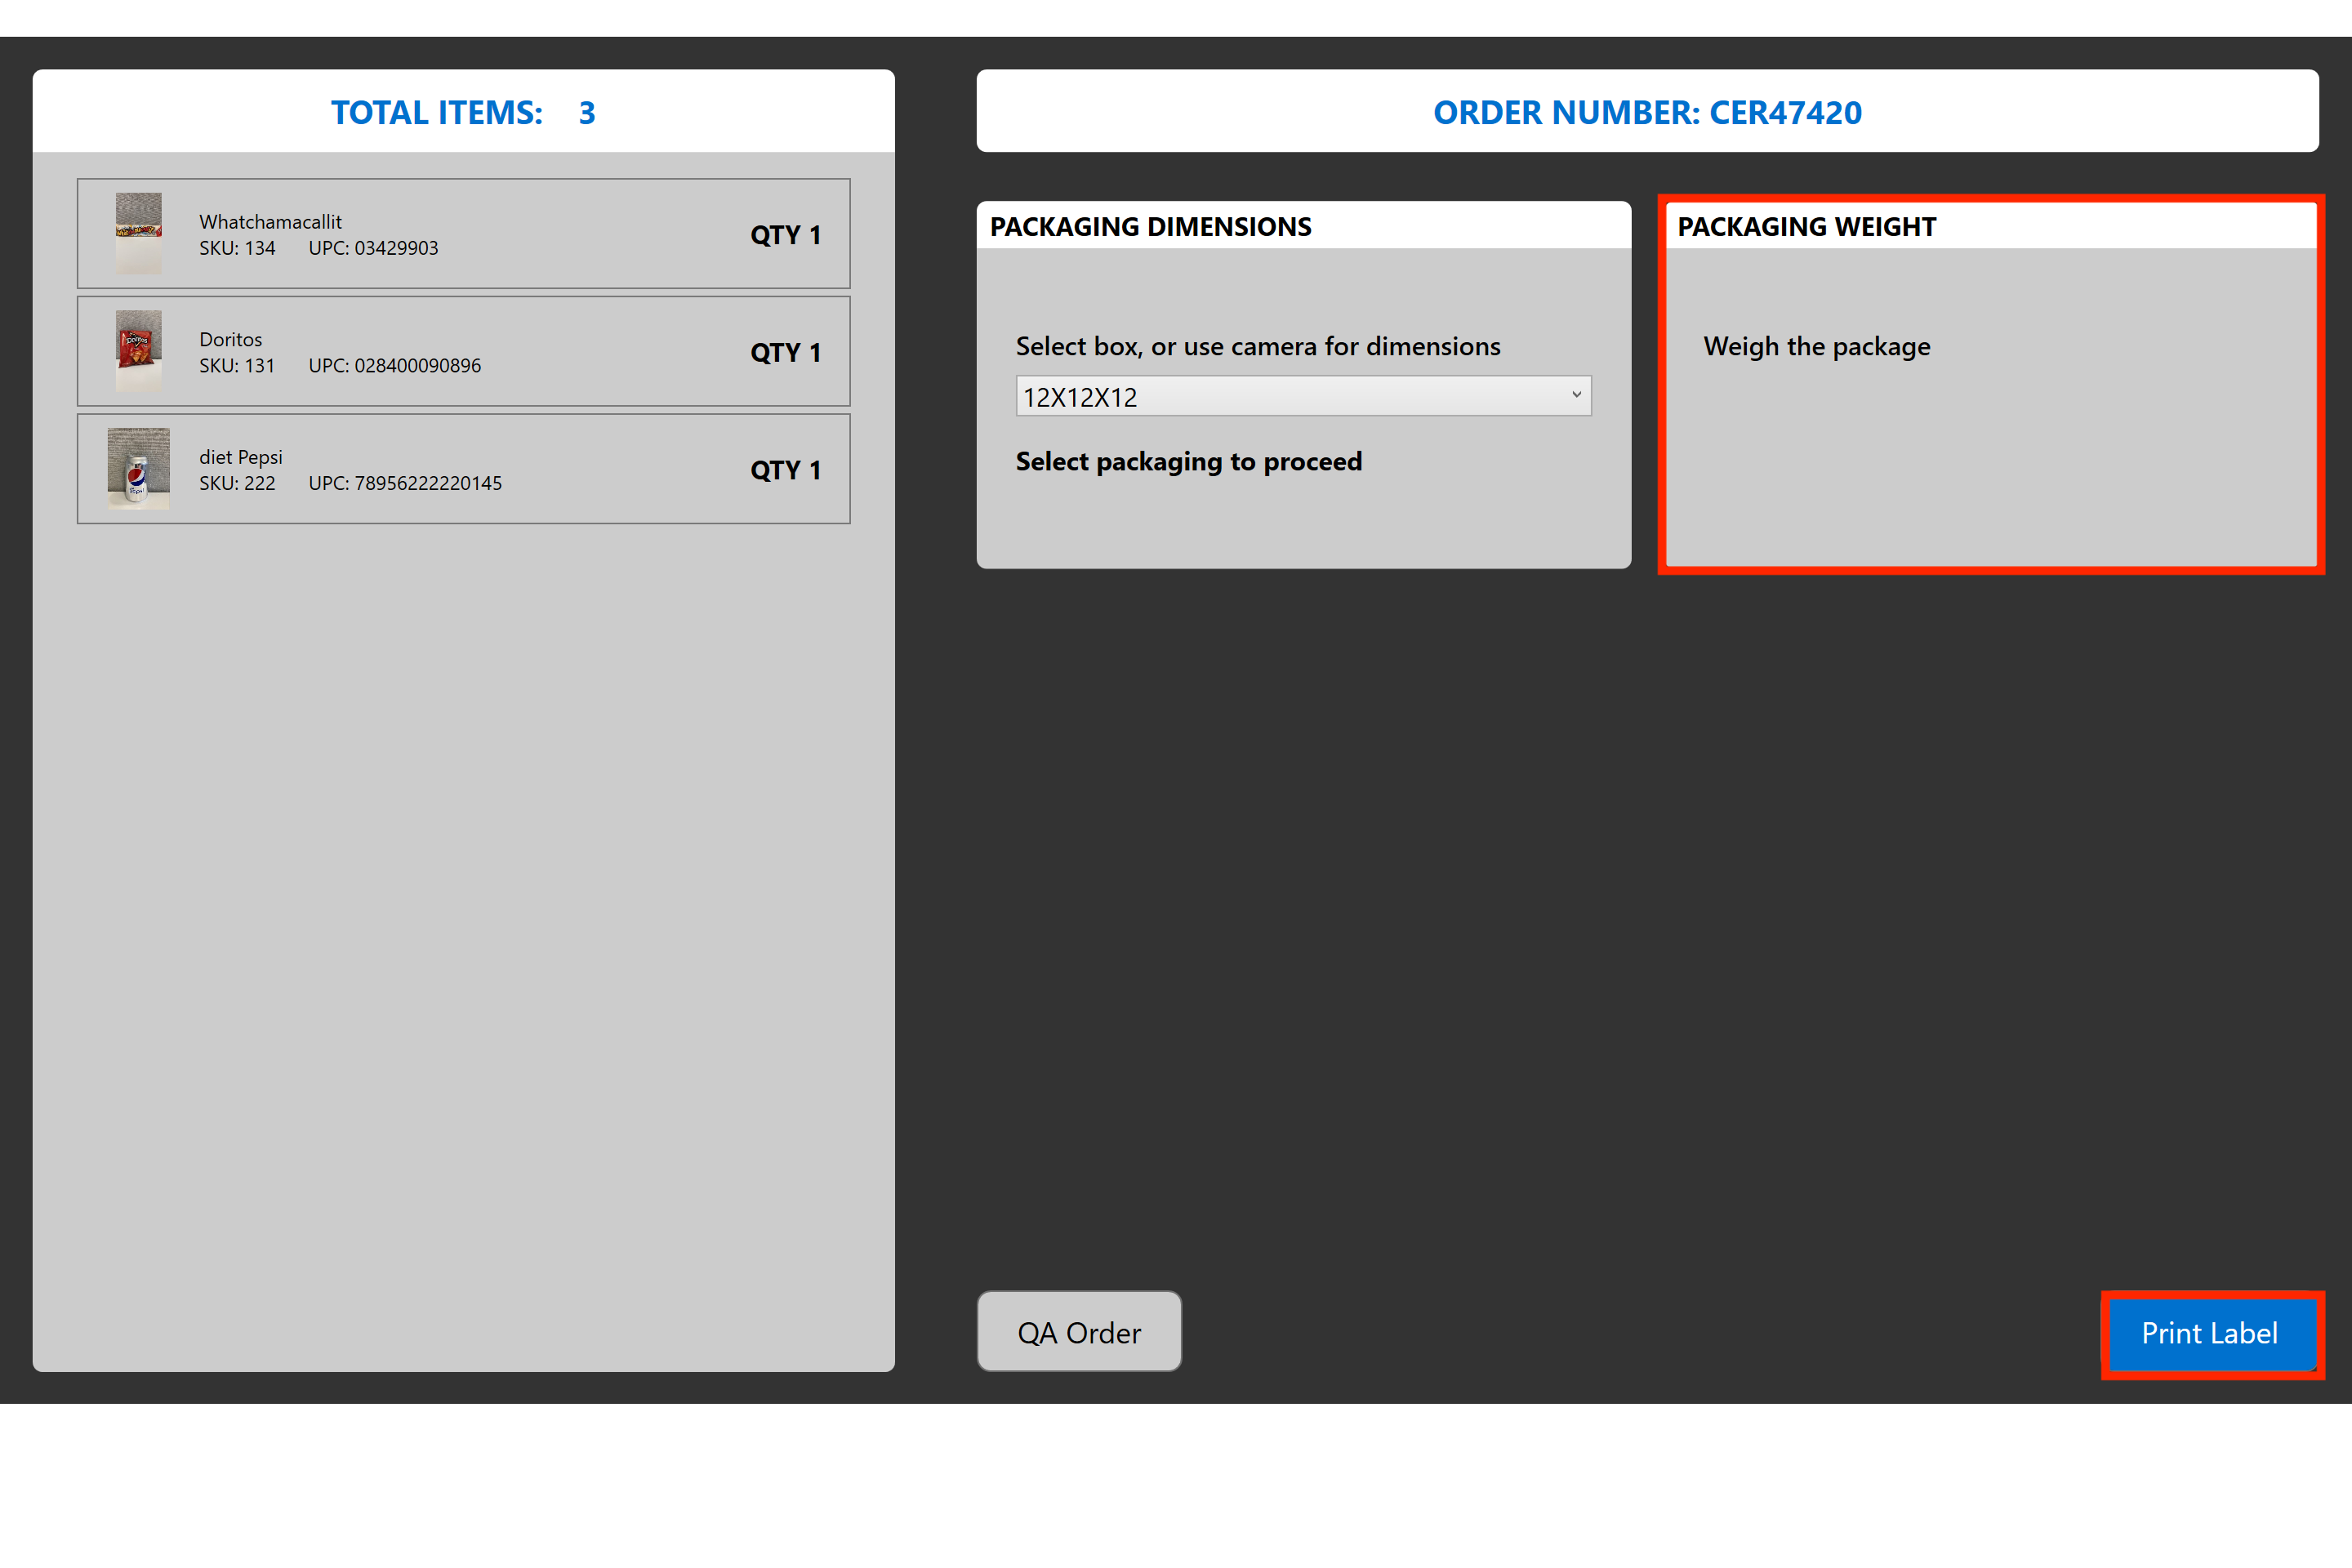
Once the box has been selected, the "Height", "Width", and "Length" fields will automatically populate with the values, which are based on the box type selected.
To print the label for the box, the end-user must place the box on the attached and configured scale:
Once the dimensions and weight have been accepted, the end-user can then select "Print Label". ARCA Pack will display a message that states the label is being printed:
The application will then return the end-user to the "Scan order number" page or the "Pack Complete" button can be selected for the same action.
At any time, the end-user can return to the "Settings" menu to log out or to set up the system for a different use.
QA Screen
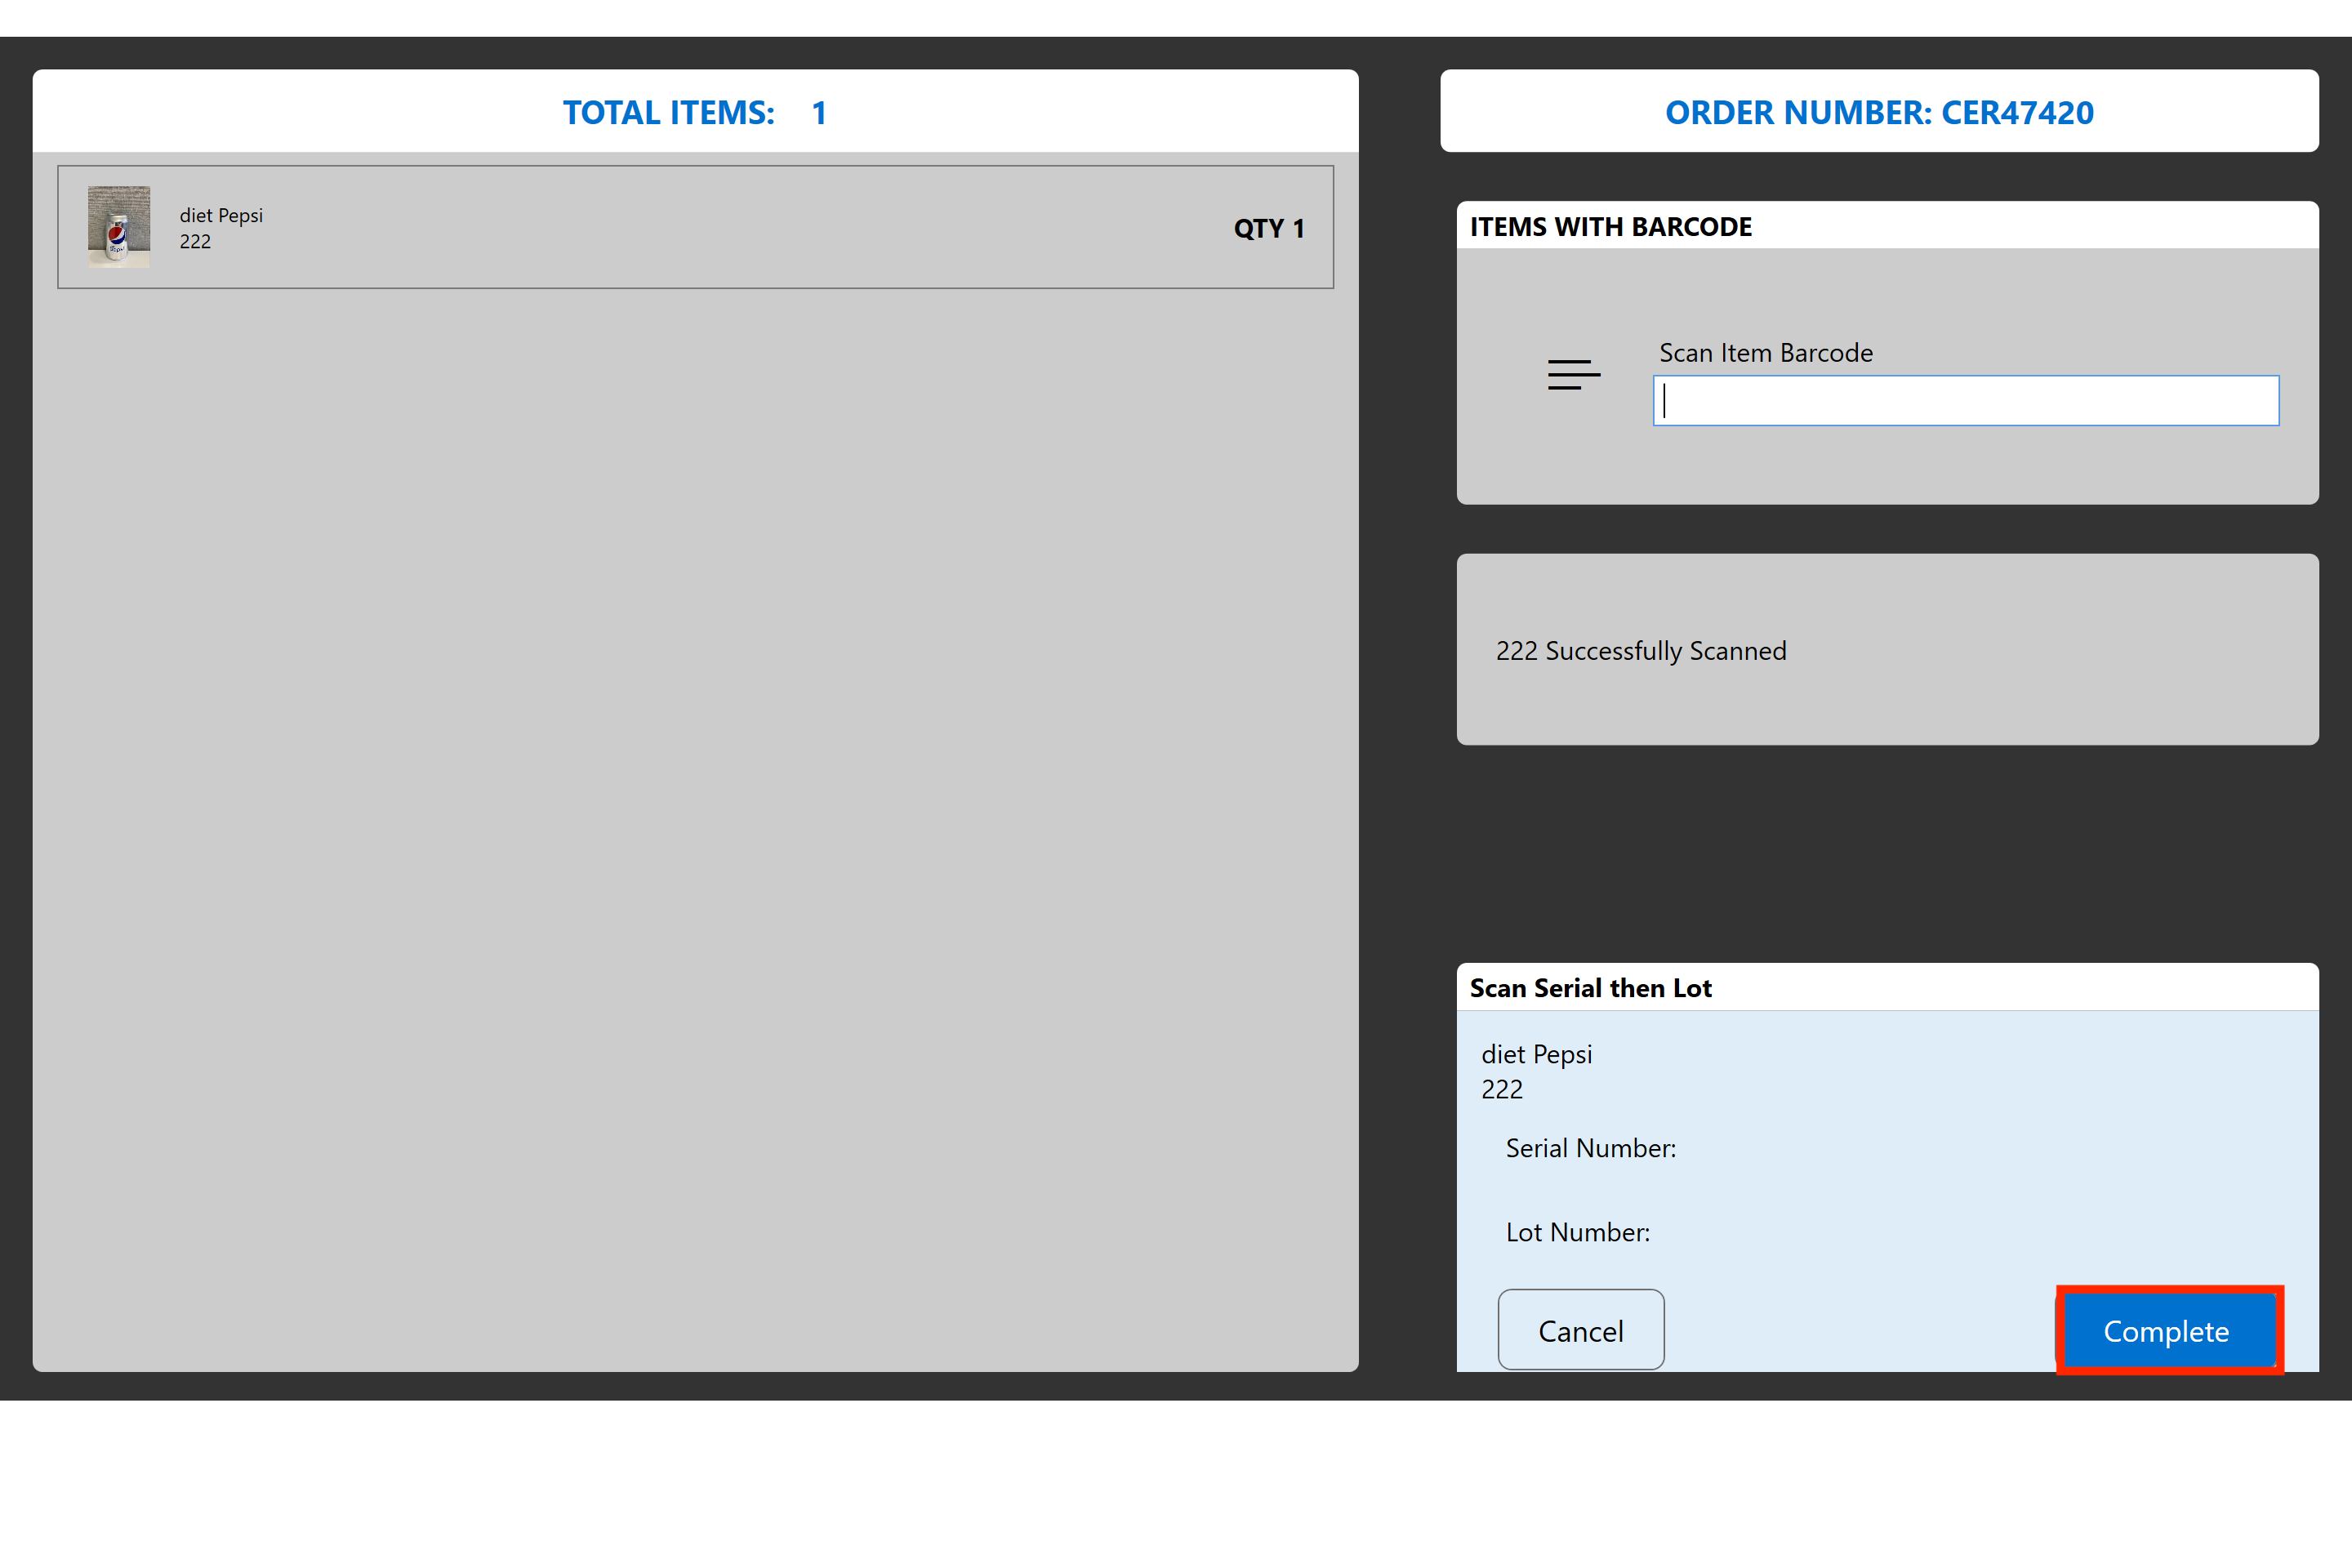
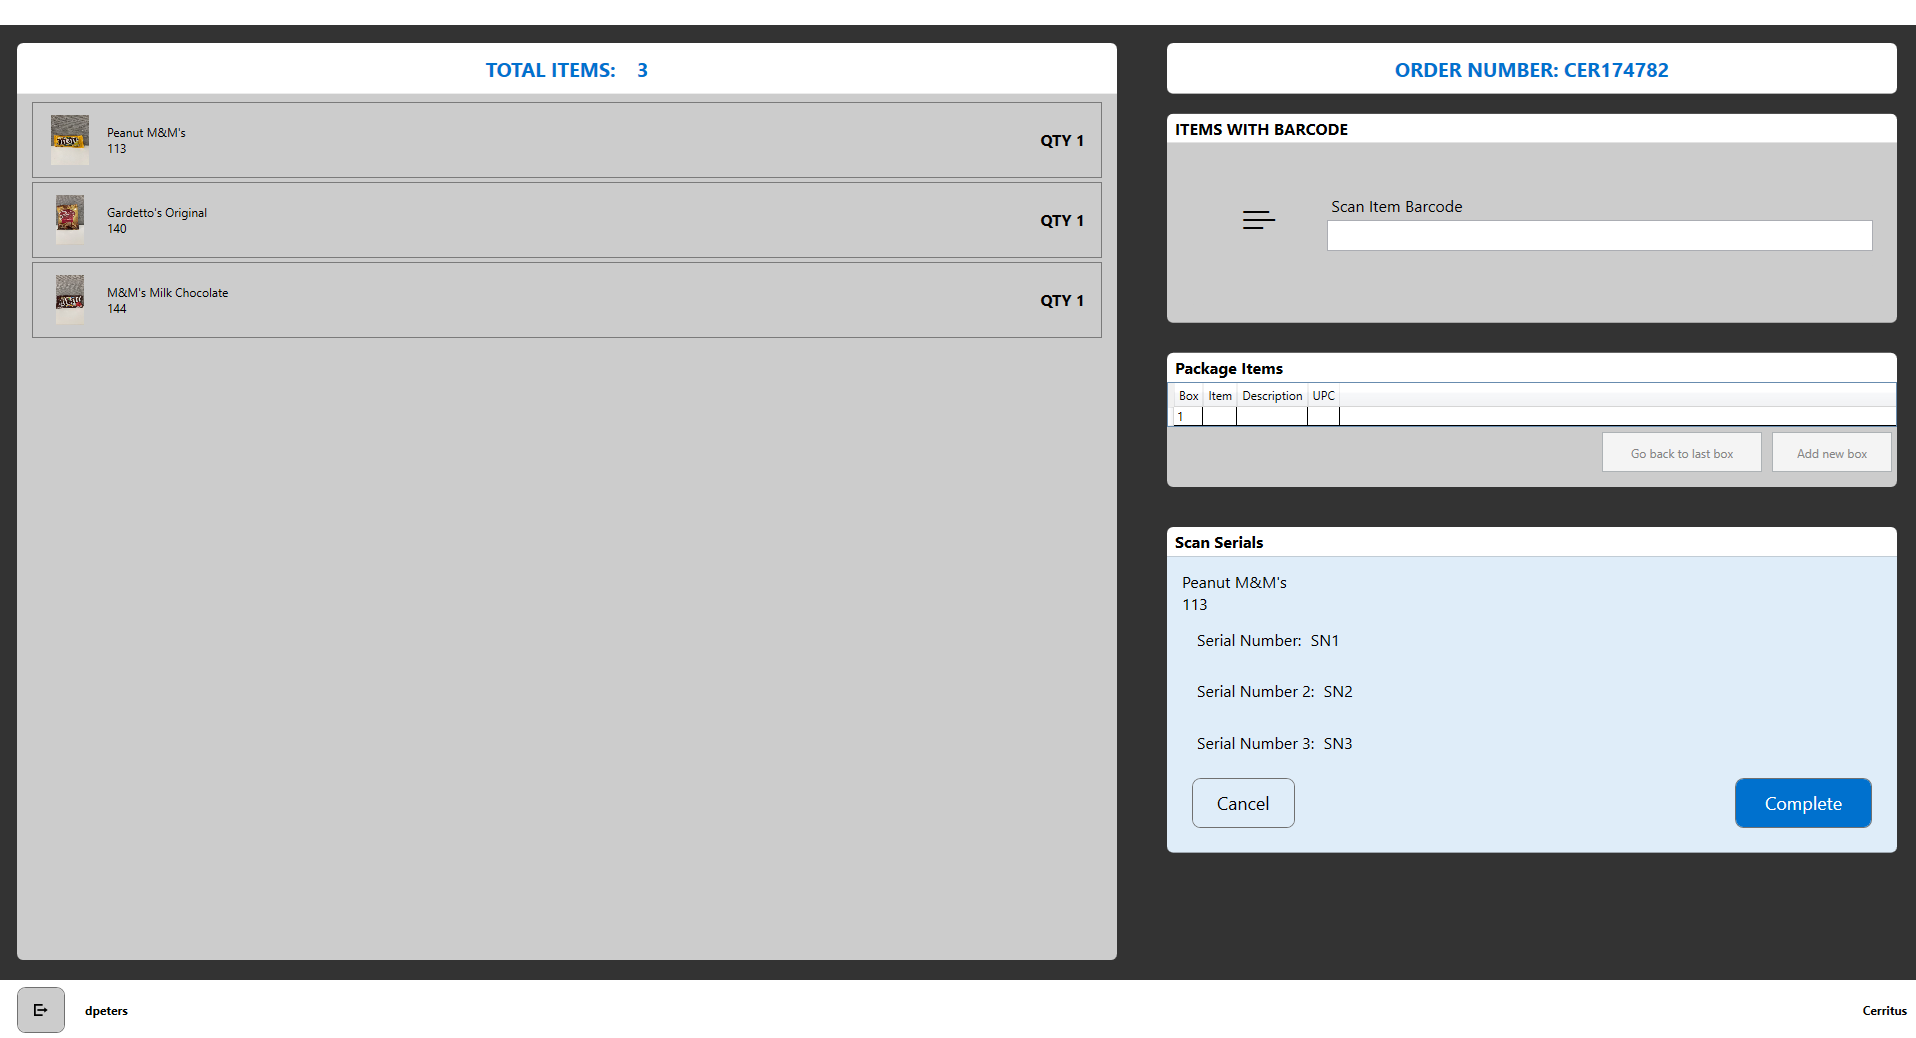
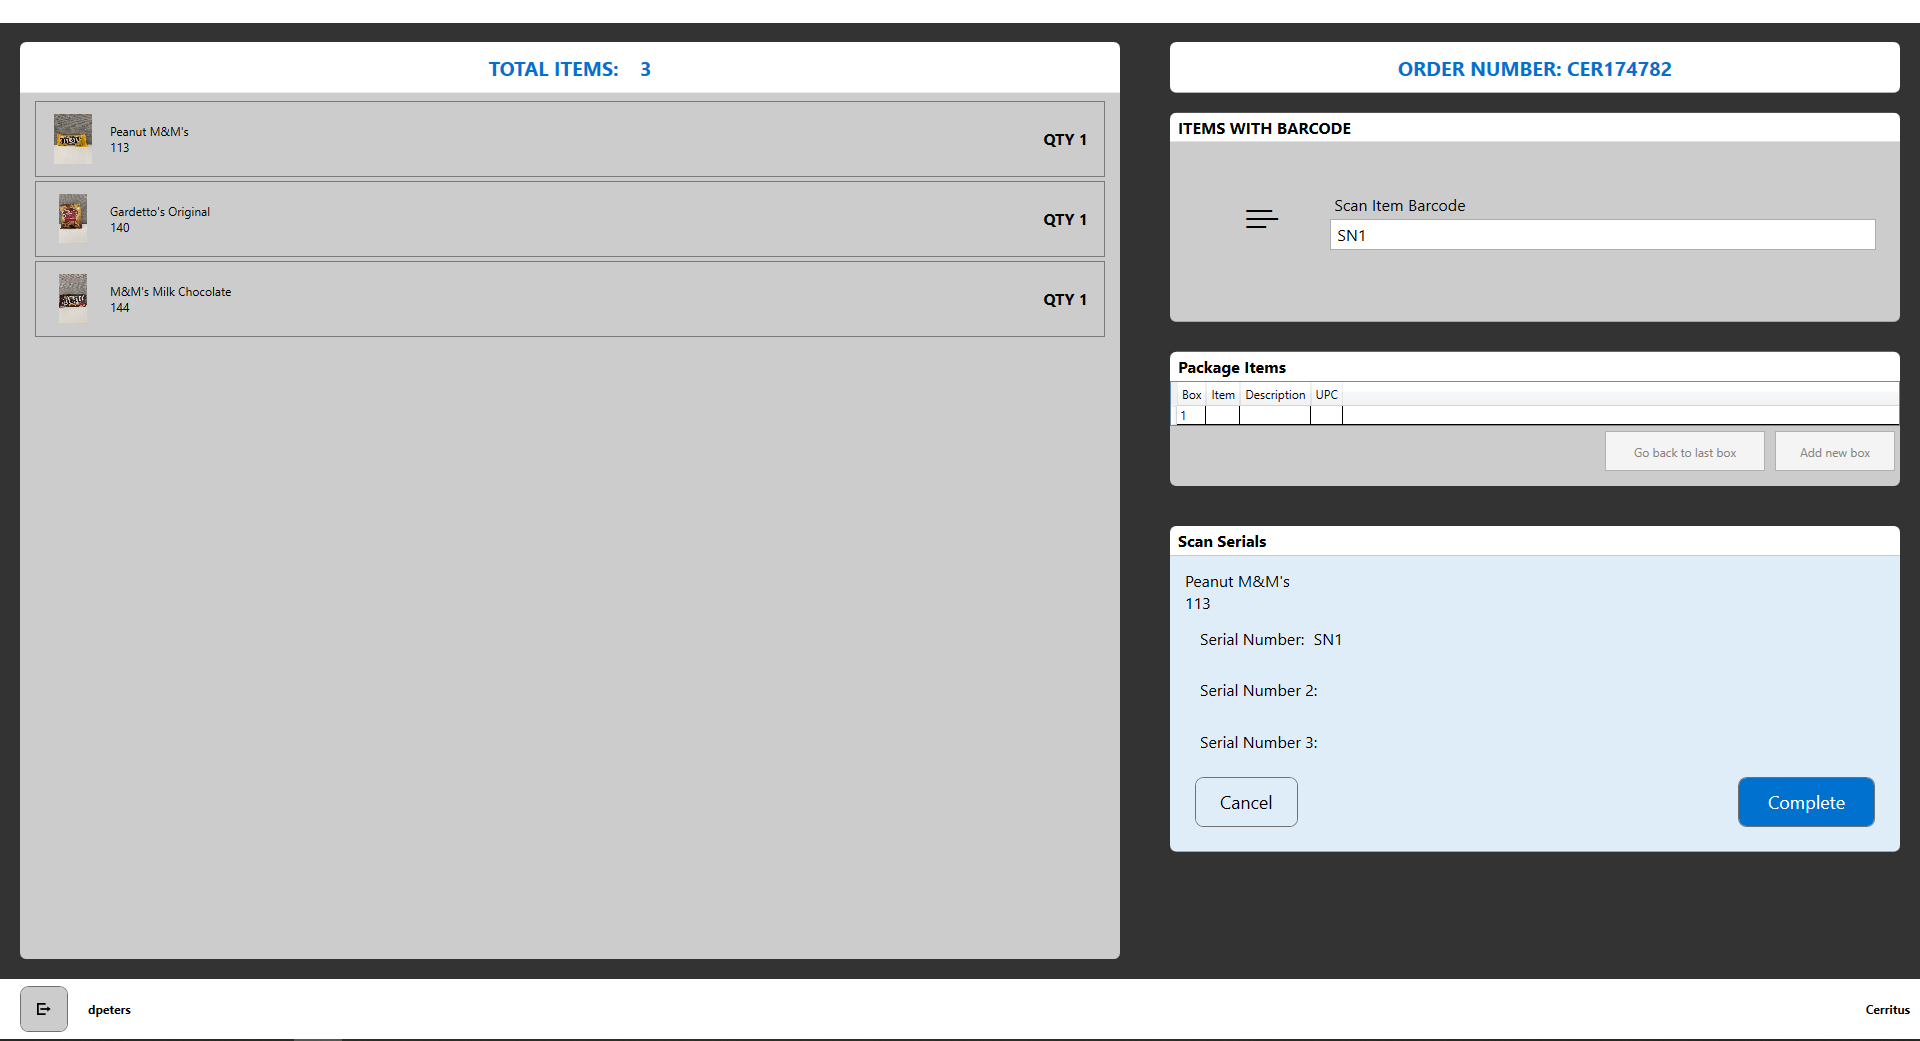
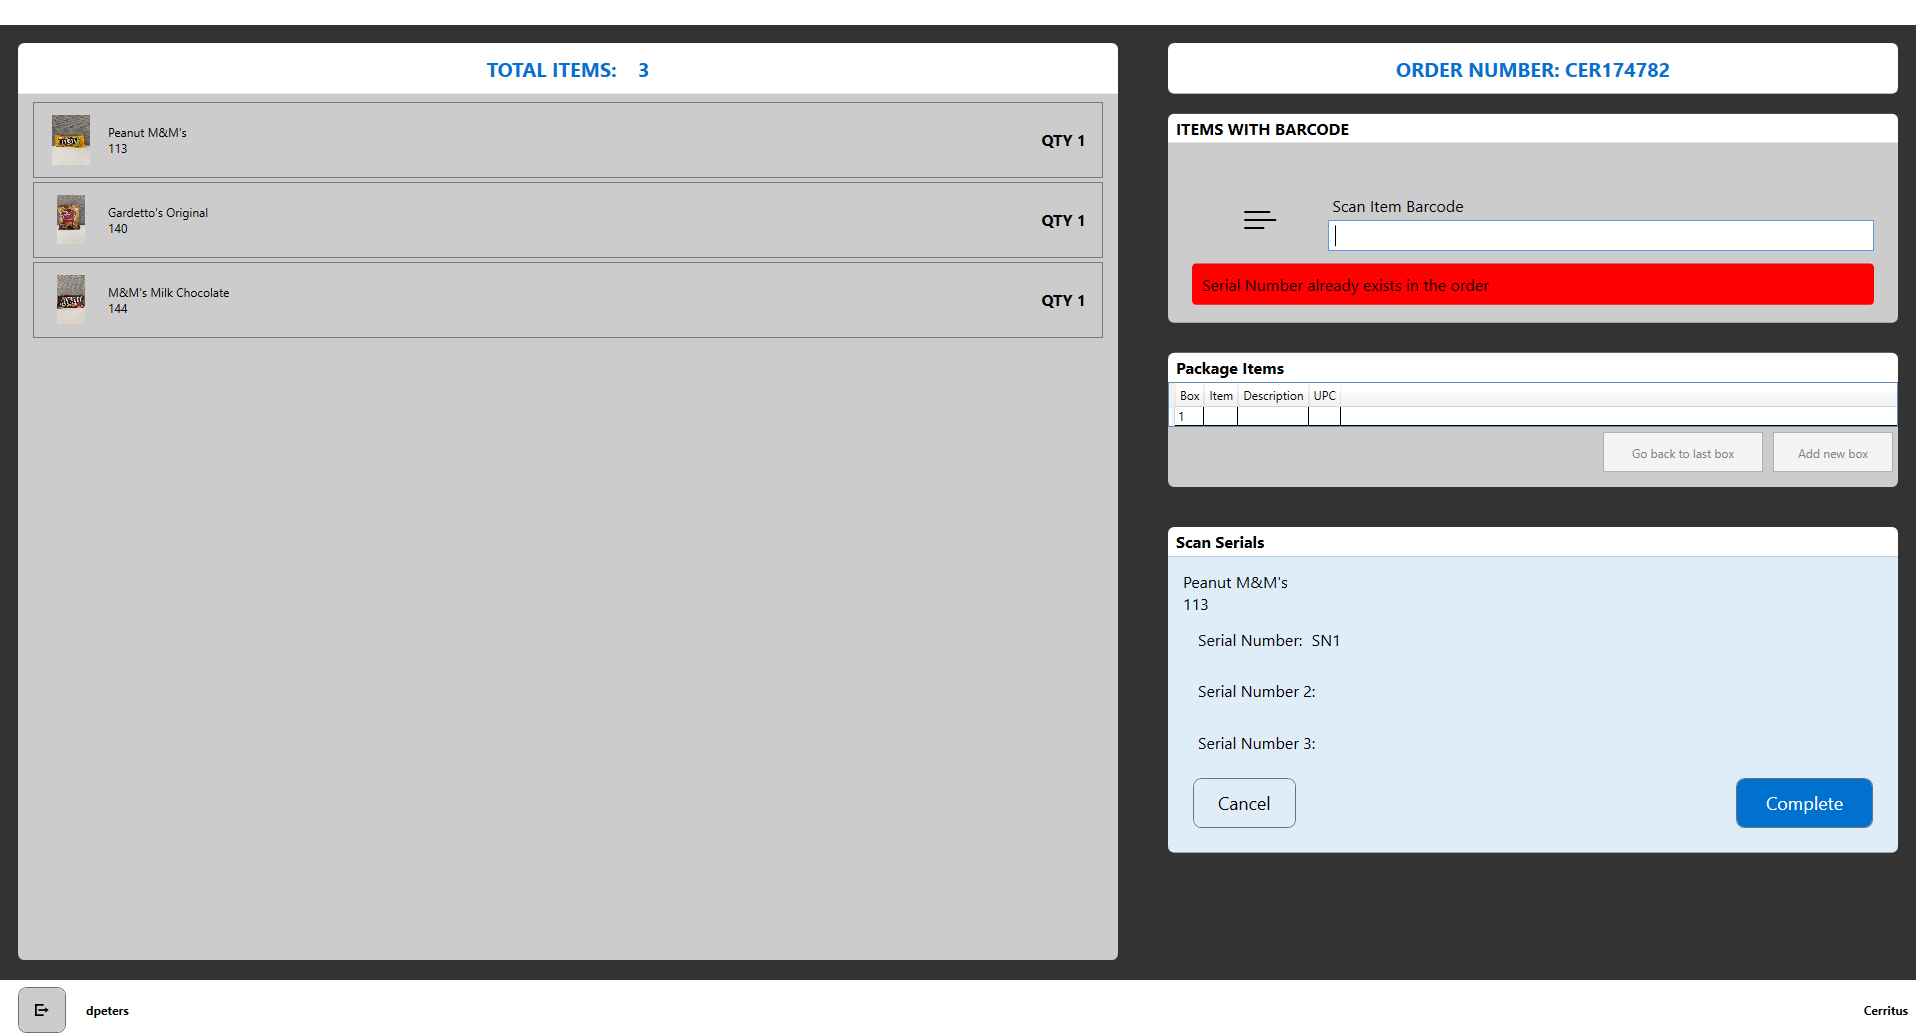
The QA order screen will now support items that require multiple serial numbers to be captured. These serial numbers are required to be unique. If you scan in a duplicate serial number, you will be shown an error that it already exists on the order. *Currently there is no way in the LOC/Warehouse apps for the warehouse to change serial 2 and serial 3 captures. Put in a ticket for support work with IT if items need to be updated.
Multi package setup
**Disclaimer, Enable the business rule called ScanItemtoBox to use this functionality. Once a business rule has been changed, you will need to resave the settings menu inside of Arca Pack for it to take effect.

When scanning items from the QA screen, a user will now be able to add multiple boxes to an order and specify what items were put into each box. If you don’t add additional boxes, then all items will be defaulted into a single box.
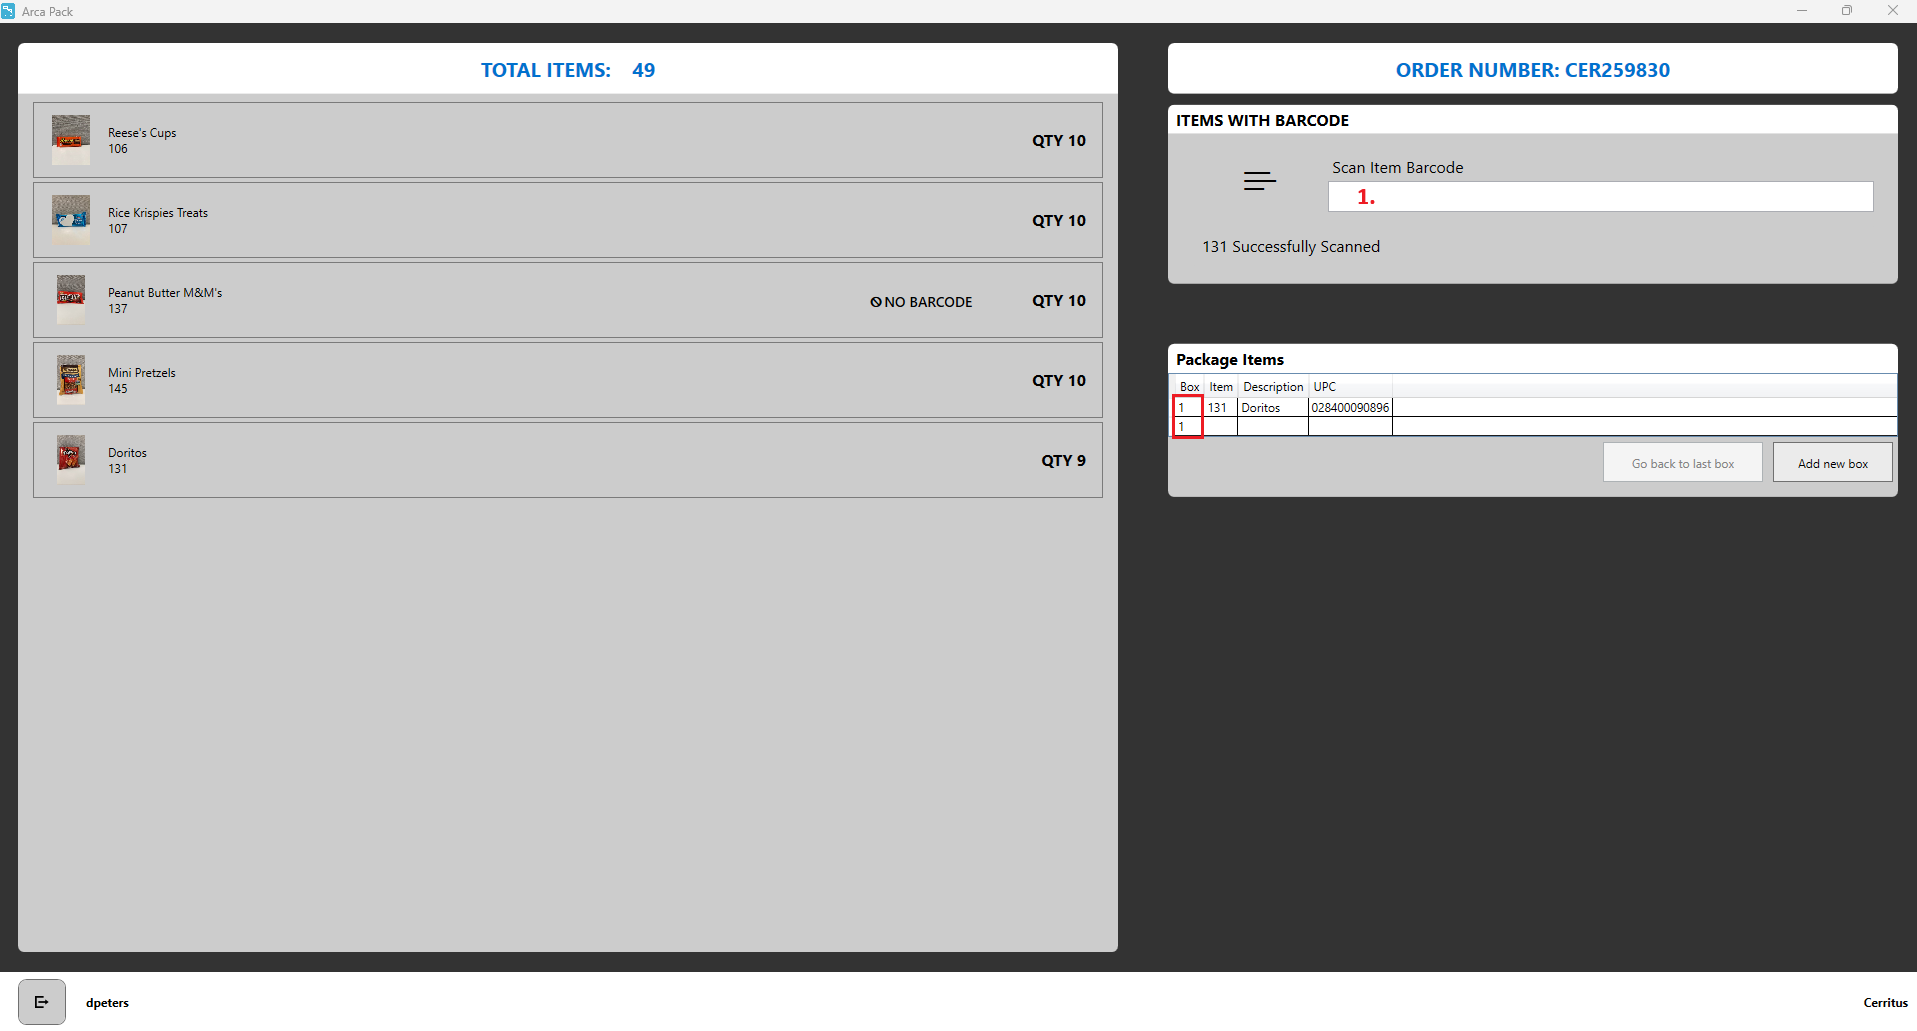
Scan first item. In the Package Items grid the item will be put into box 1.
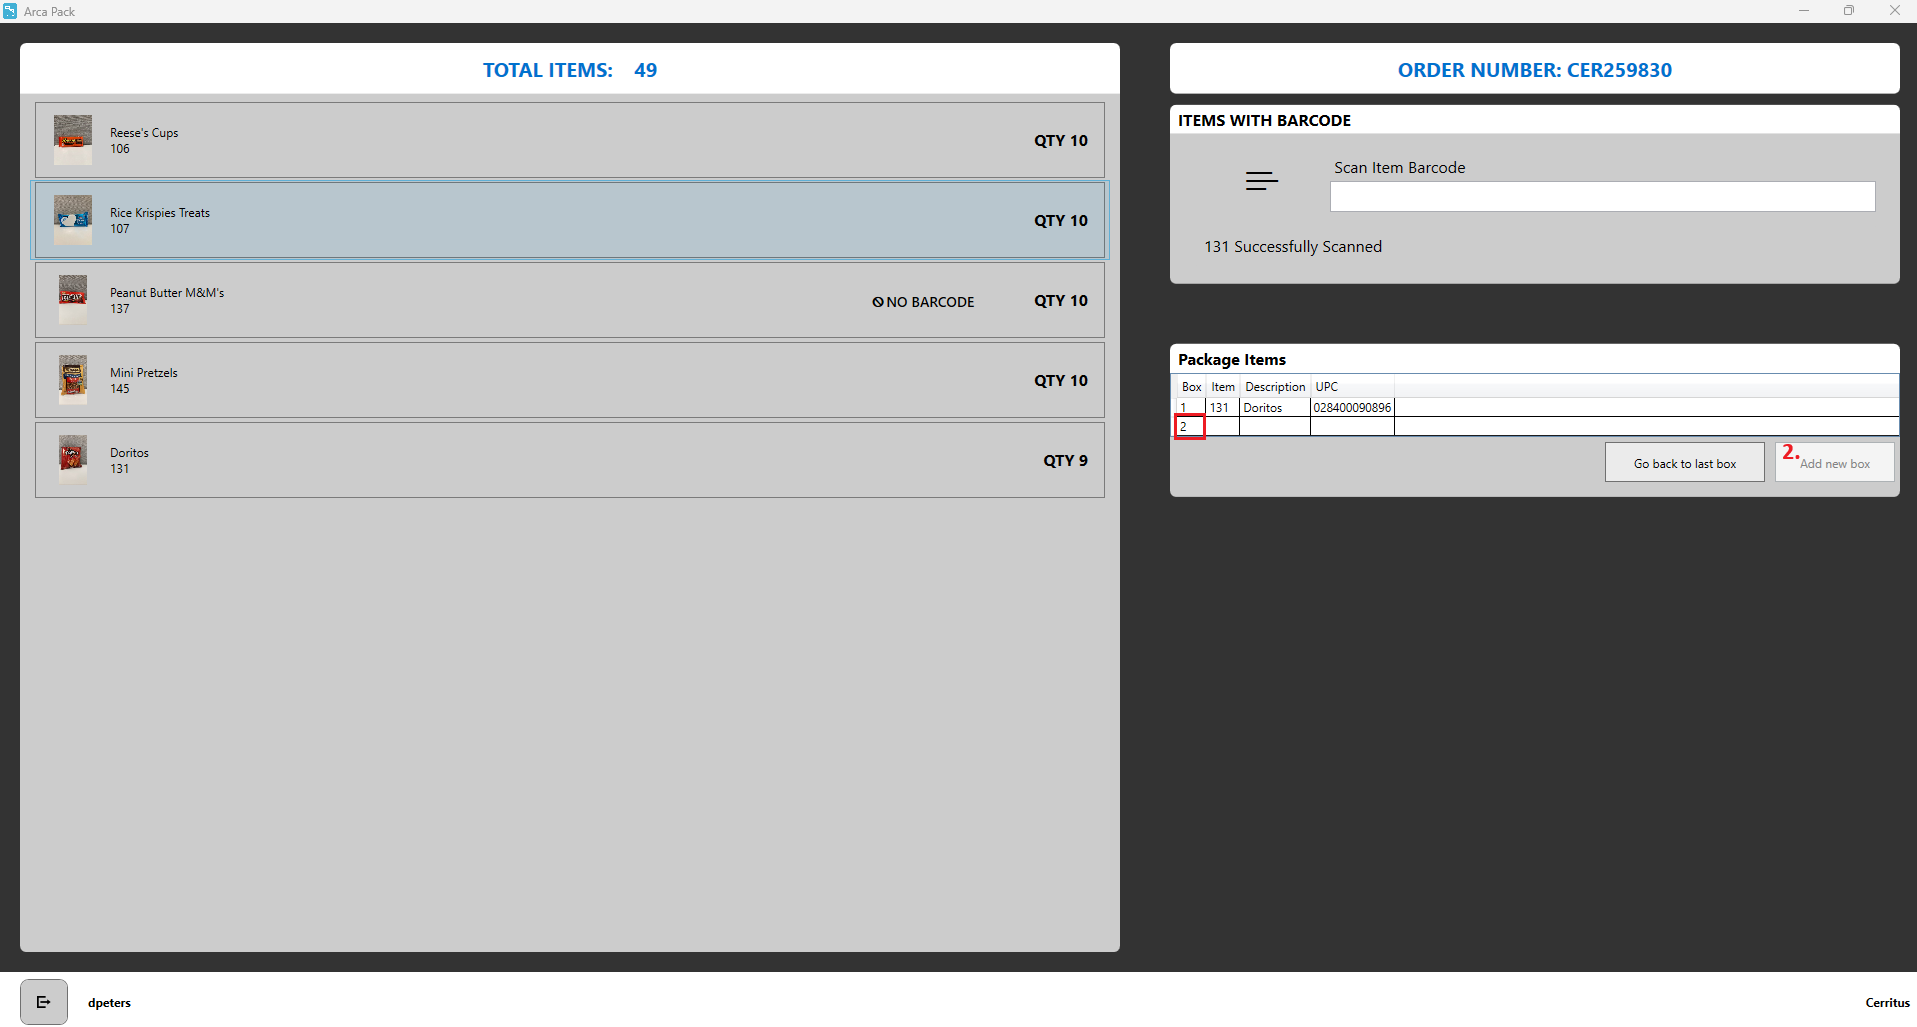
Click on the Add new box button. *Note, before scanning the next item the user will have limited access to the Go back to last box button. This is the only chance for you to go back to the previous box. Once you start scanning items into box 2, you will not be able to return and scan additional items into box 1.
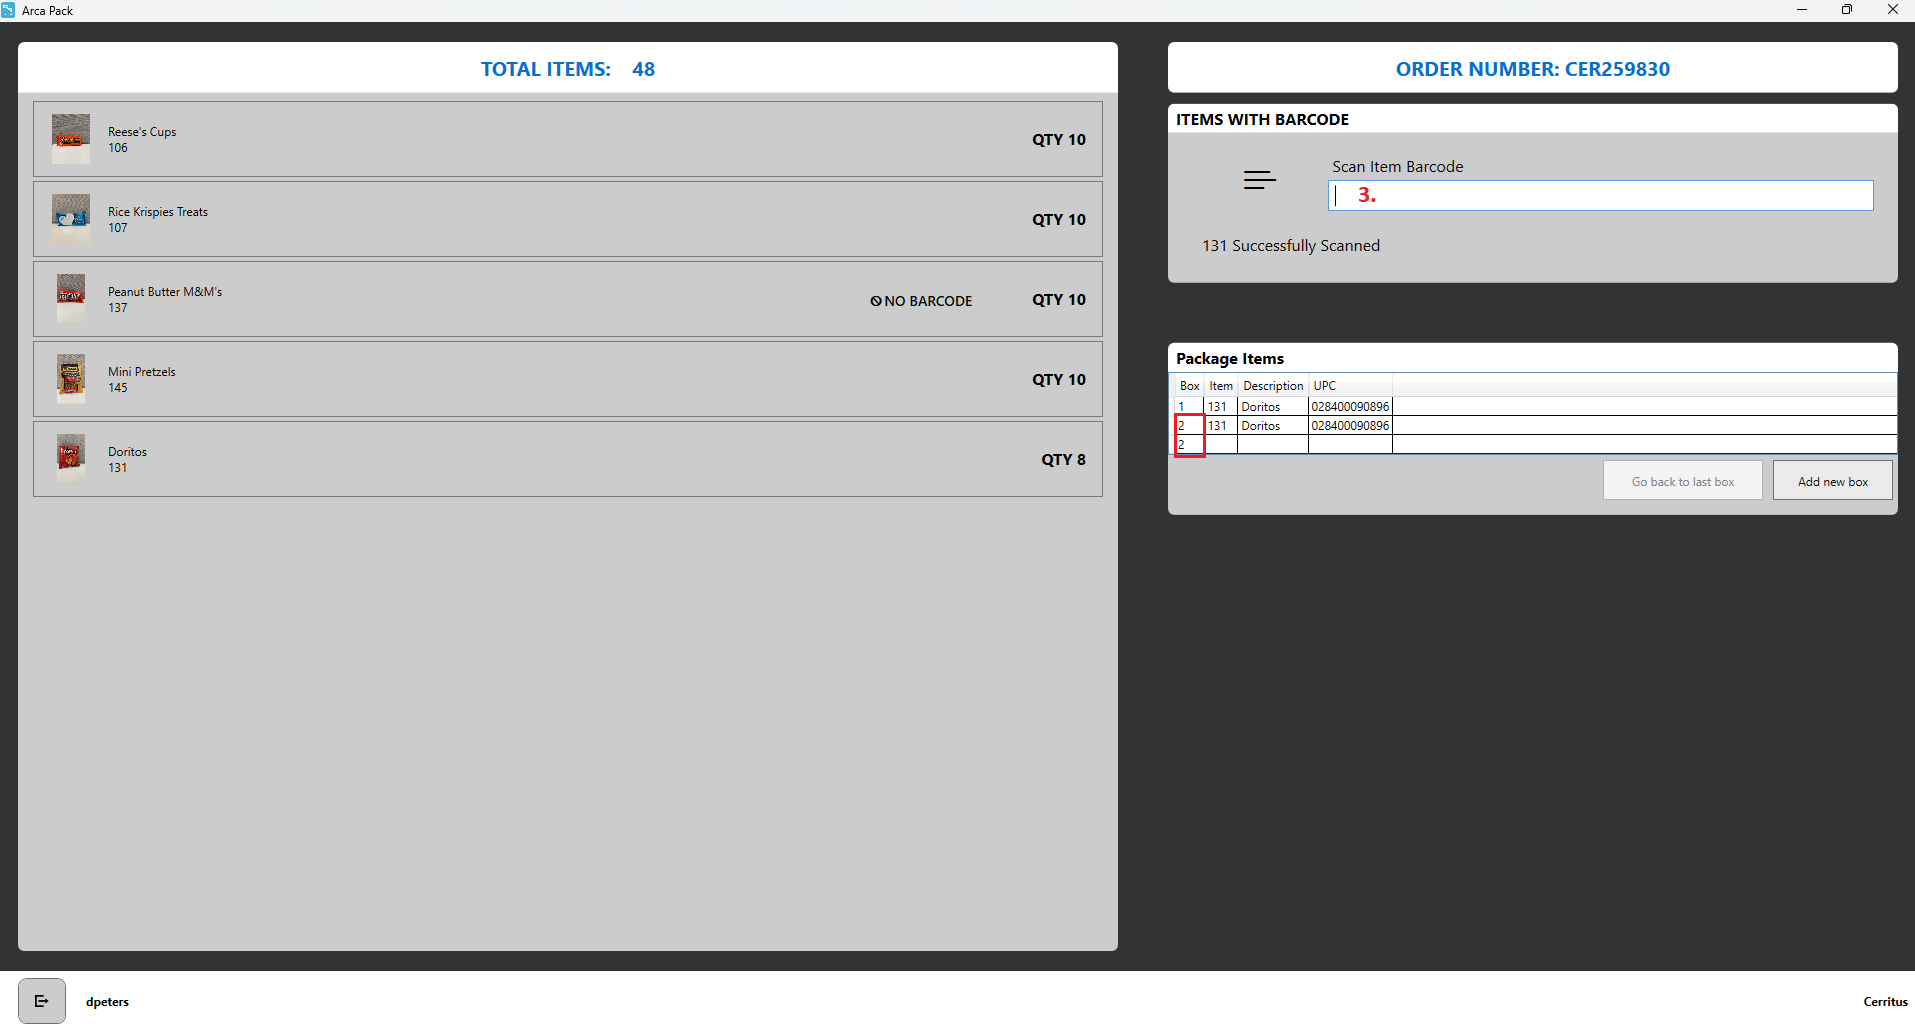
Scan next item. In the Package Items grid the item will be put into box 2.
Add additional boxes as needed.
Finish scanning all the items on the order to complete the QA screen and advance to the Pack screen.
From the Pack screen, click on QA Order button to return to the QA screen and start over. This is how you can rescan all the items and change box assignments.
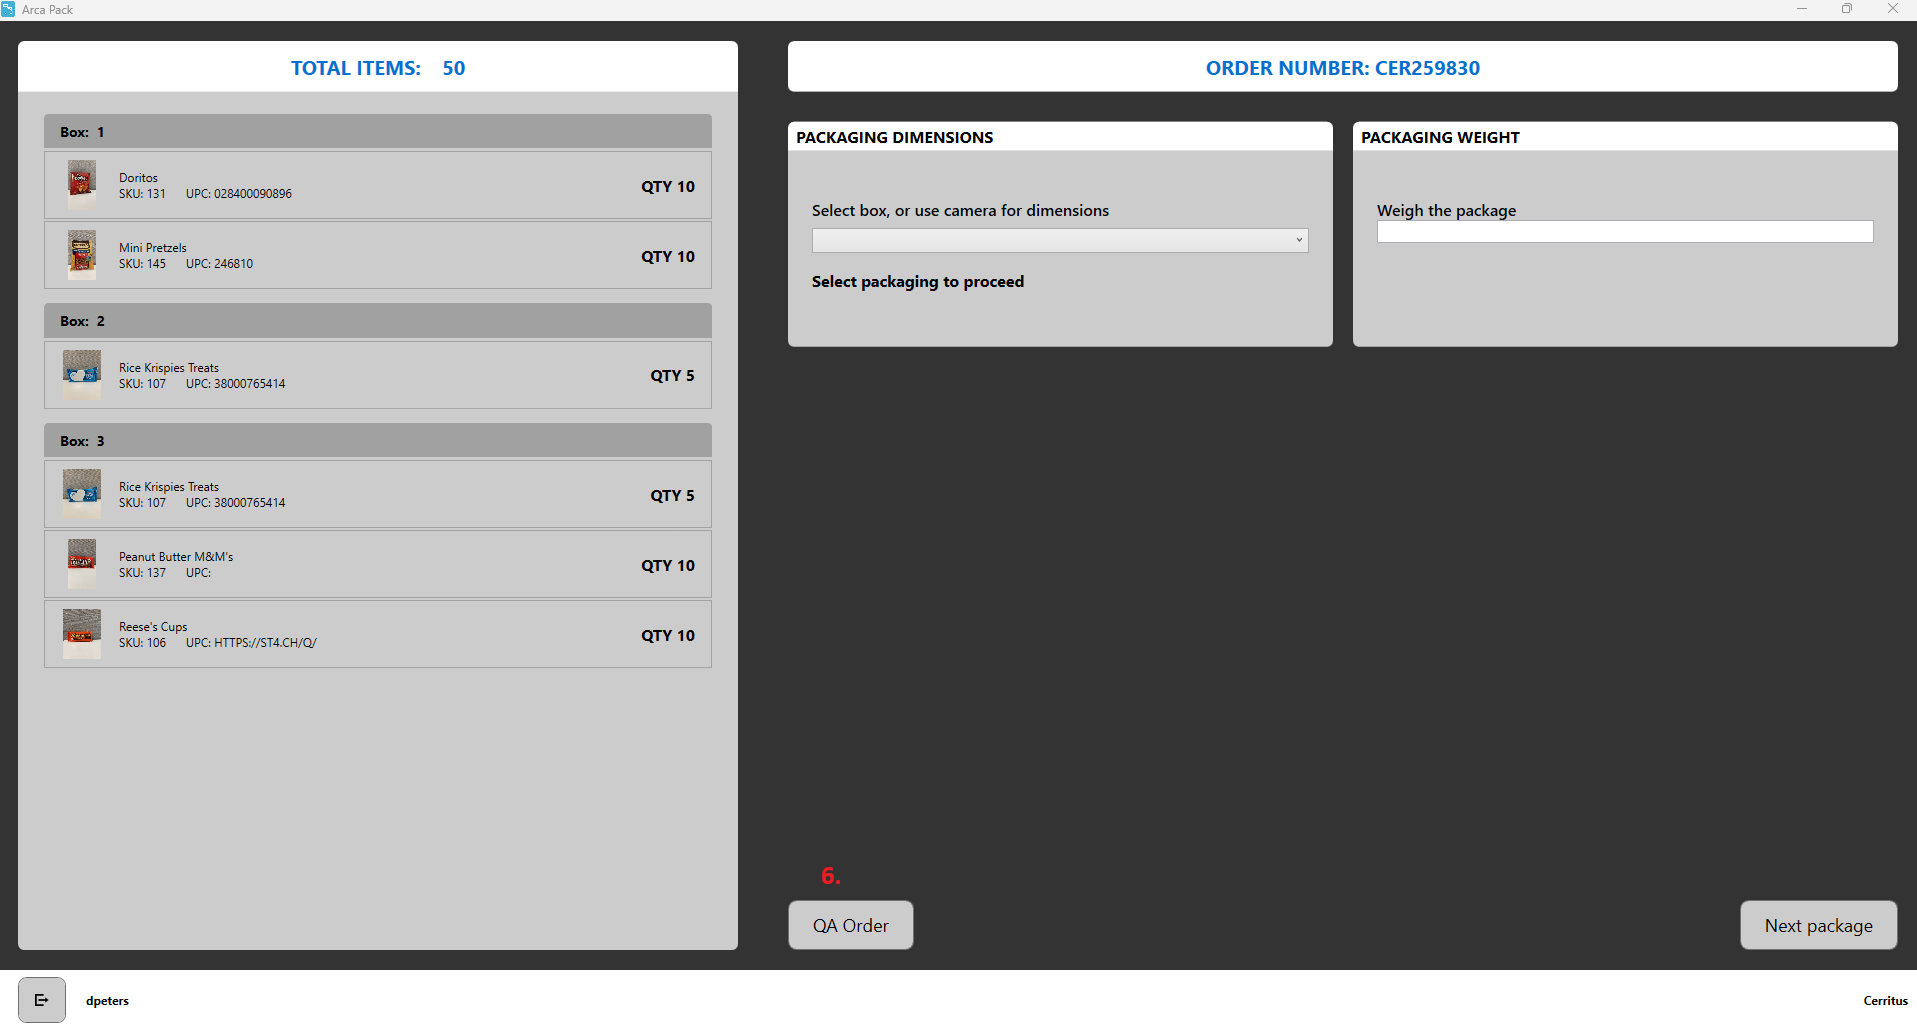
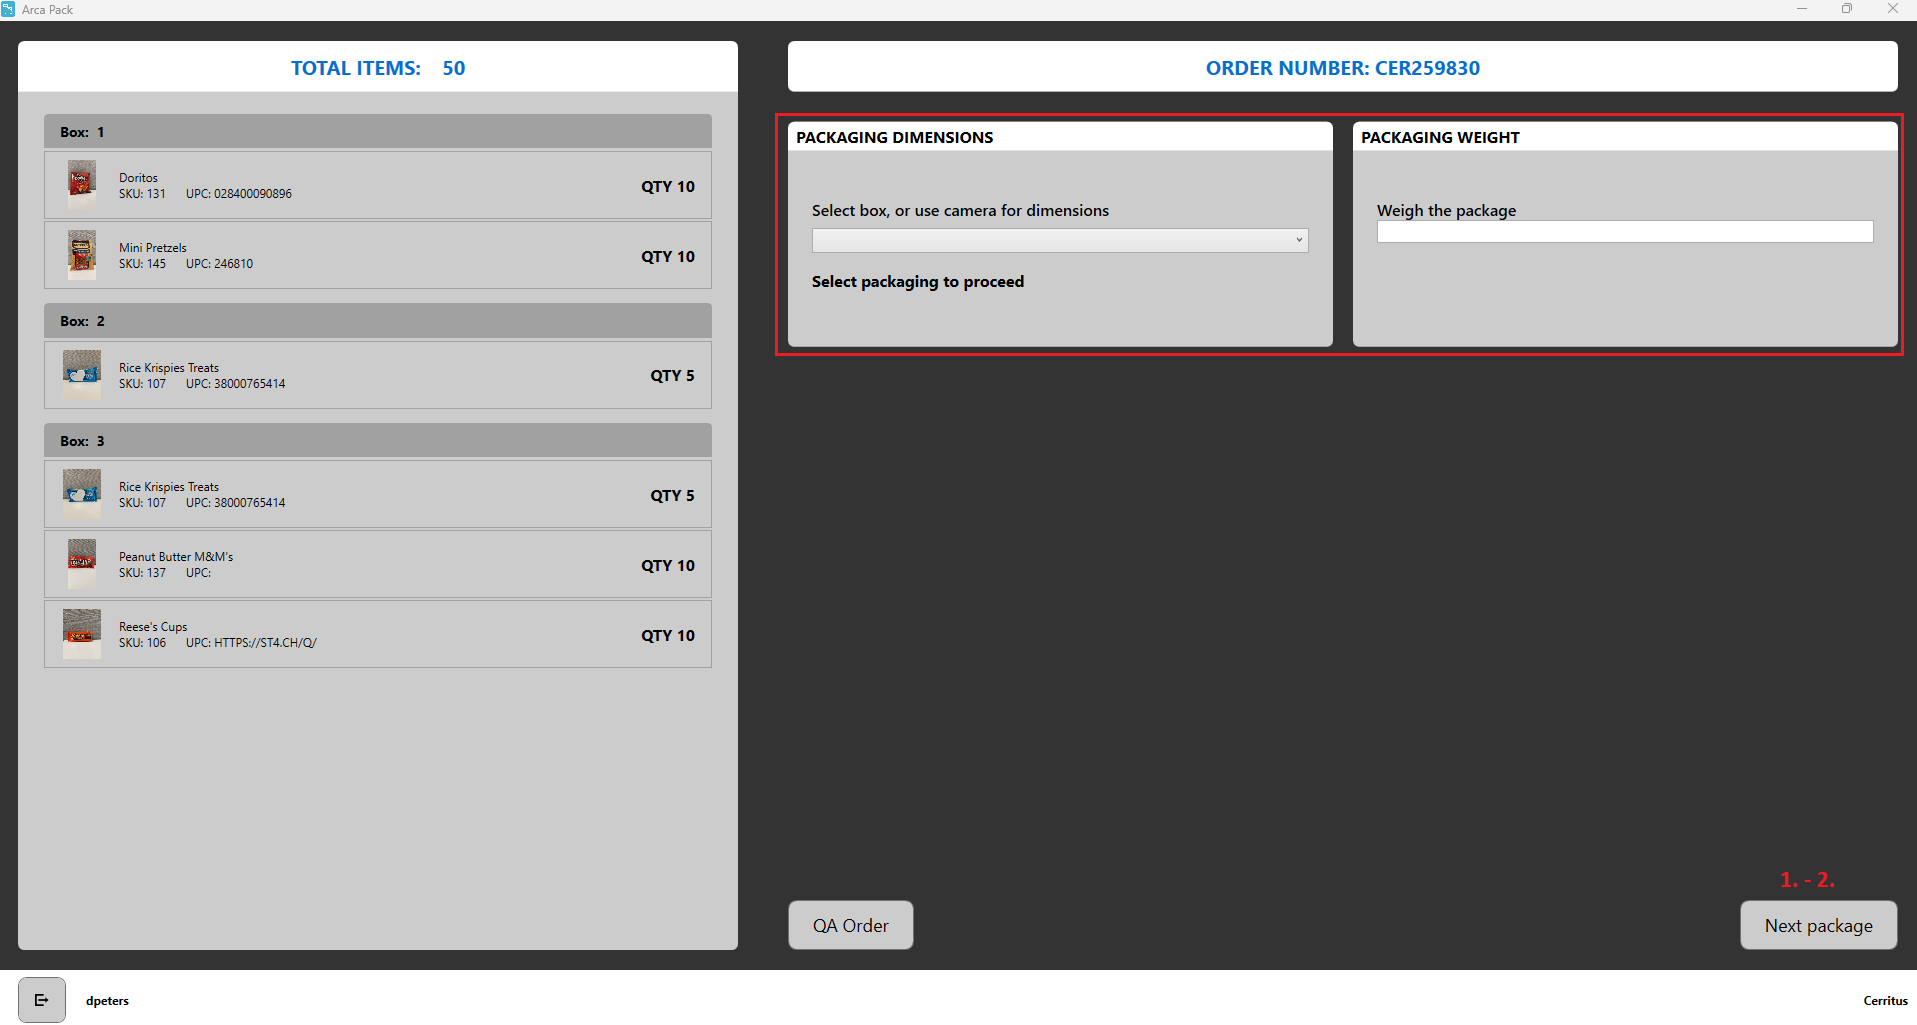
The pack station screen will now display all the boxes for the order that were setup in the QA screen. The flow changes slightly as the Print Label button is now replaced with a Next package button.
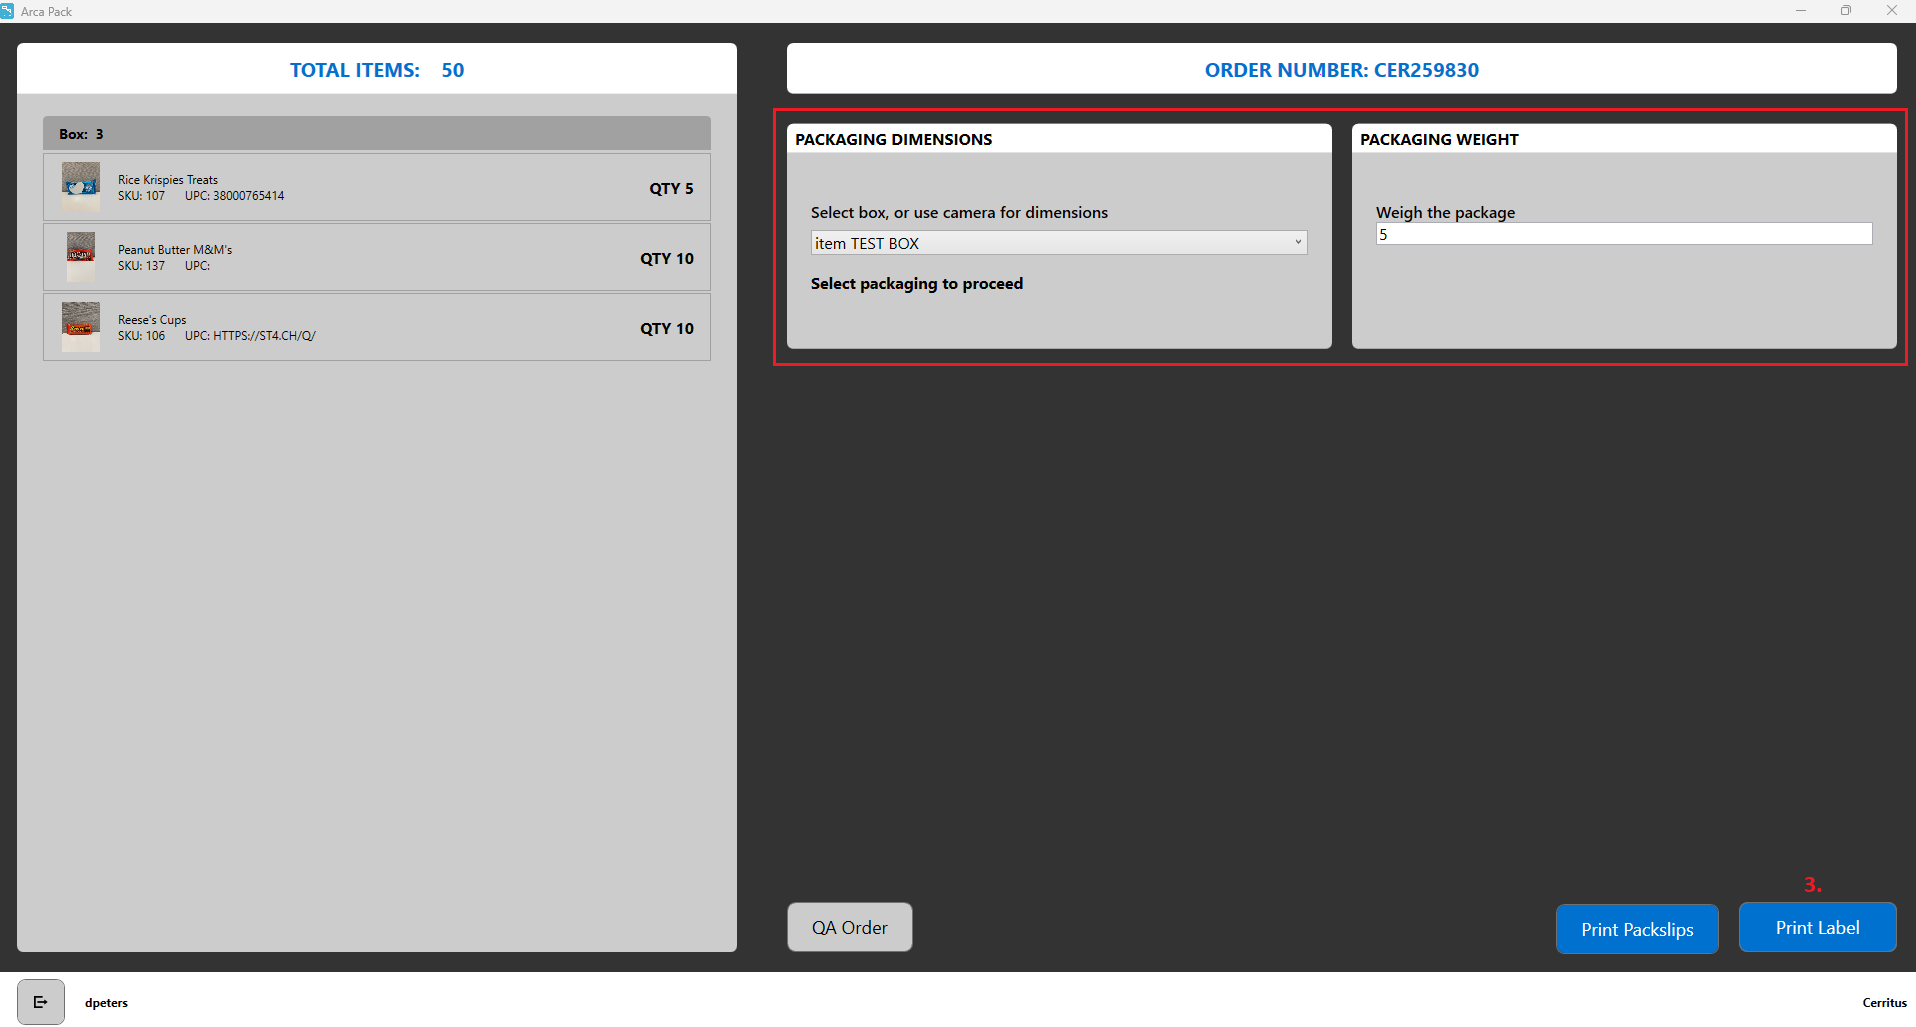
Enter the dimensions and weight of the first package and then click Next package. Box 1 will be removed from the list on the left.
Enter the dimensions and weight of the next package and then click Next package. Box 2 will be removed from the list on the left.
On the last package of the order, Next package button will change to Print Label. Clicking Print Label will now print all the labels for this multi package order.
Troubleshooting
- No Tracking Labels were received from the server.
If weights are not printing correctly for first class, the box dimensions need to be changed. This is because the dimensions are out of scope for first class rating.
Shipment Details Station
ARCA Pack has several different functions for fulfilling client orders. This section will cover the "Shipment Details Station" module of the application.
The intent of the module is to:
- Provide information on how Pack configuration is set up
- Explain how orders are packed
Settings
To fulfill orders properly, ARCA Pack must be set up correctly to validate that the orders being scanned in are associated with the respective warehouse and client.
Before you start packing the order, the Settings menu should be configured as follows:
REQUIRED SETTINGS
- Change "Select Station Type" to "Shipment Details Station".
- Set the "Select Warehouse" to the correct value, which depends on the client.
- Set "Select Client" to correct client value.
- Set "Label Printer" to the correct value.
- Set "Document Printer" to the correct value.
ADDITIONAL SETTINGS
- Set "Test Mode", optional. In some cases, ARCA Pack may need to be set up in a test mode. This is typically done for training purposes and should be coordinated through a supervisor. If the application does need to be set up for testing, select the this option.
Then "Save Settings".

Packing Items
After the settings have been configured, end-users will need to scan their badge to log into ARCA Pack as well as enter in the Wave number.
When the order has been scanned in, ARCA Pack will display the items to be packed:
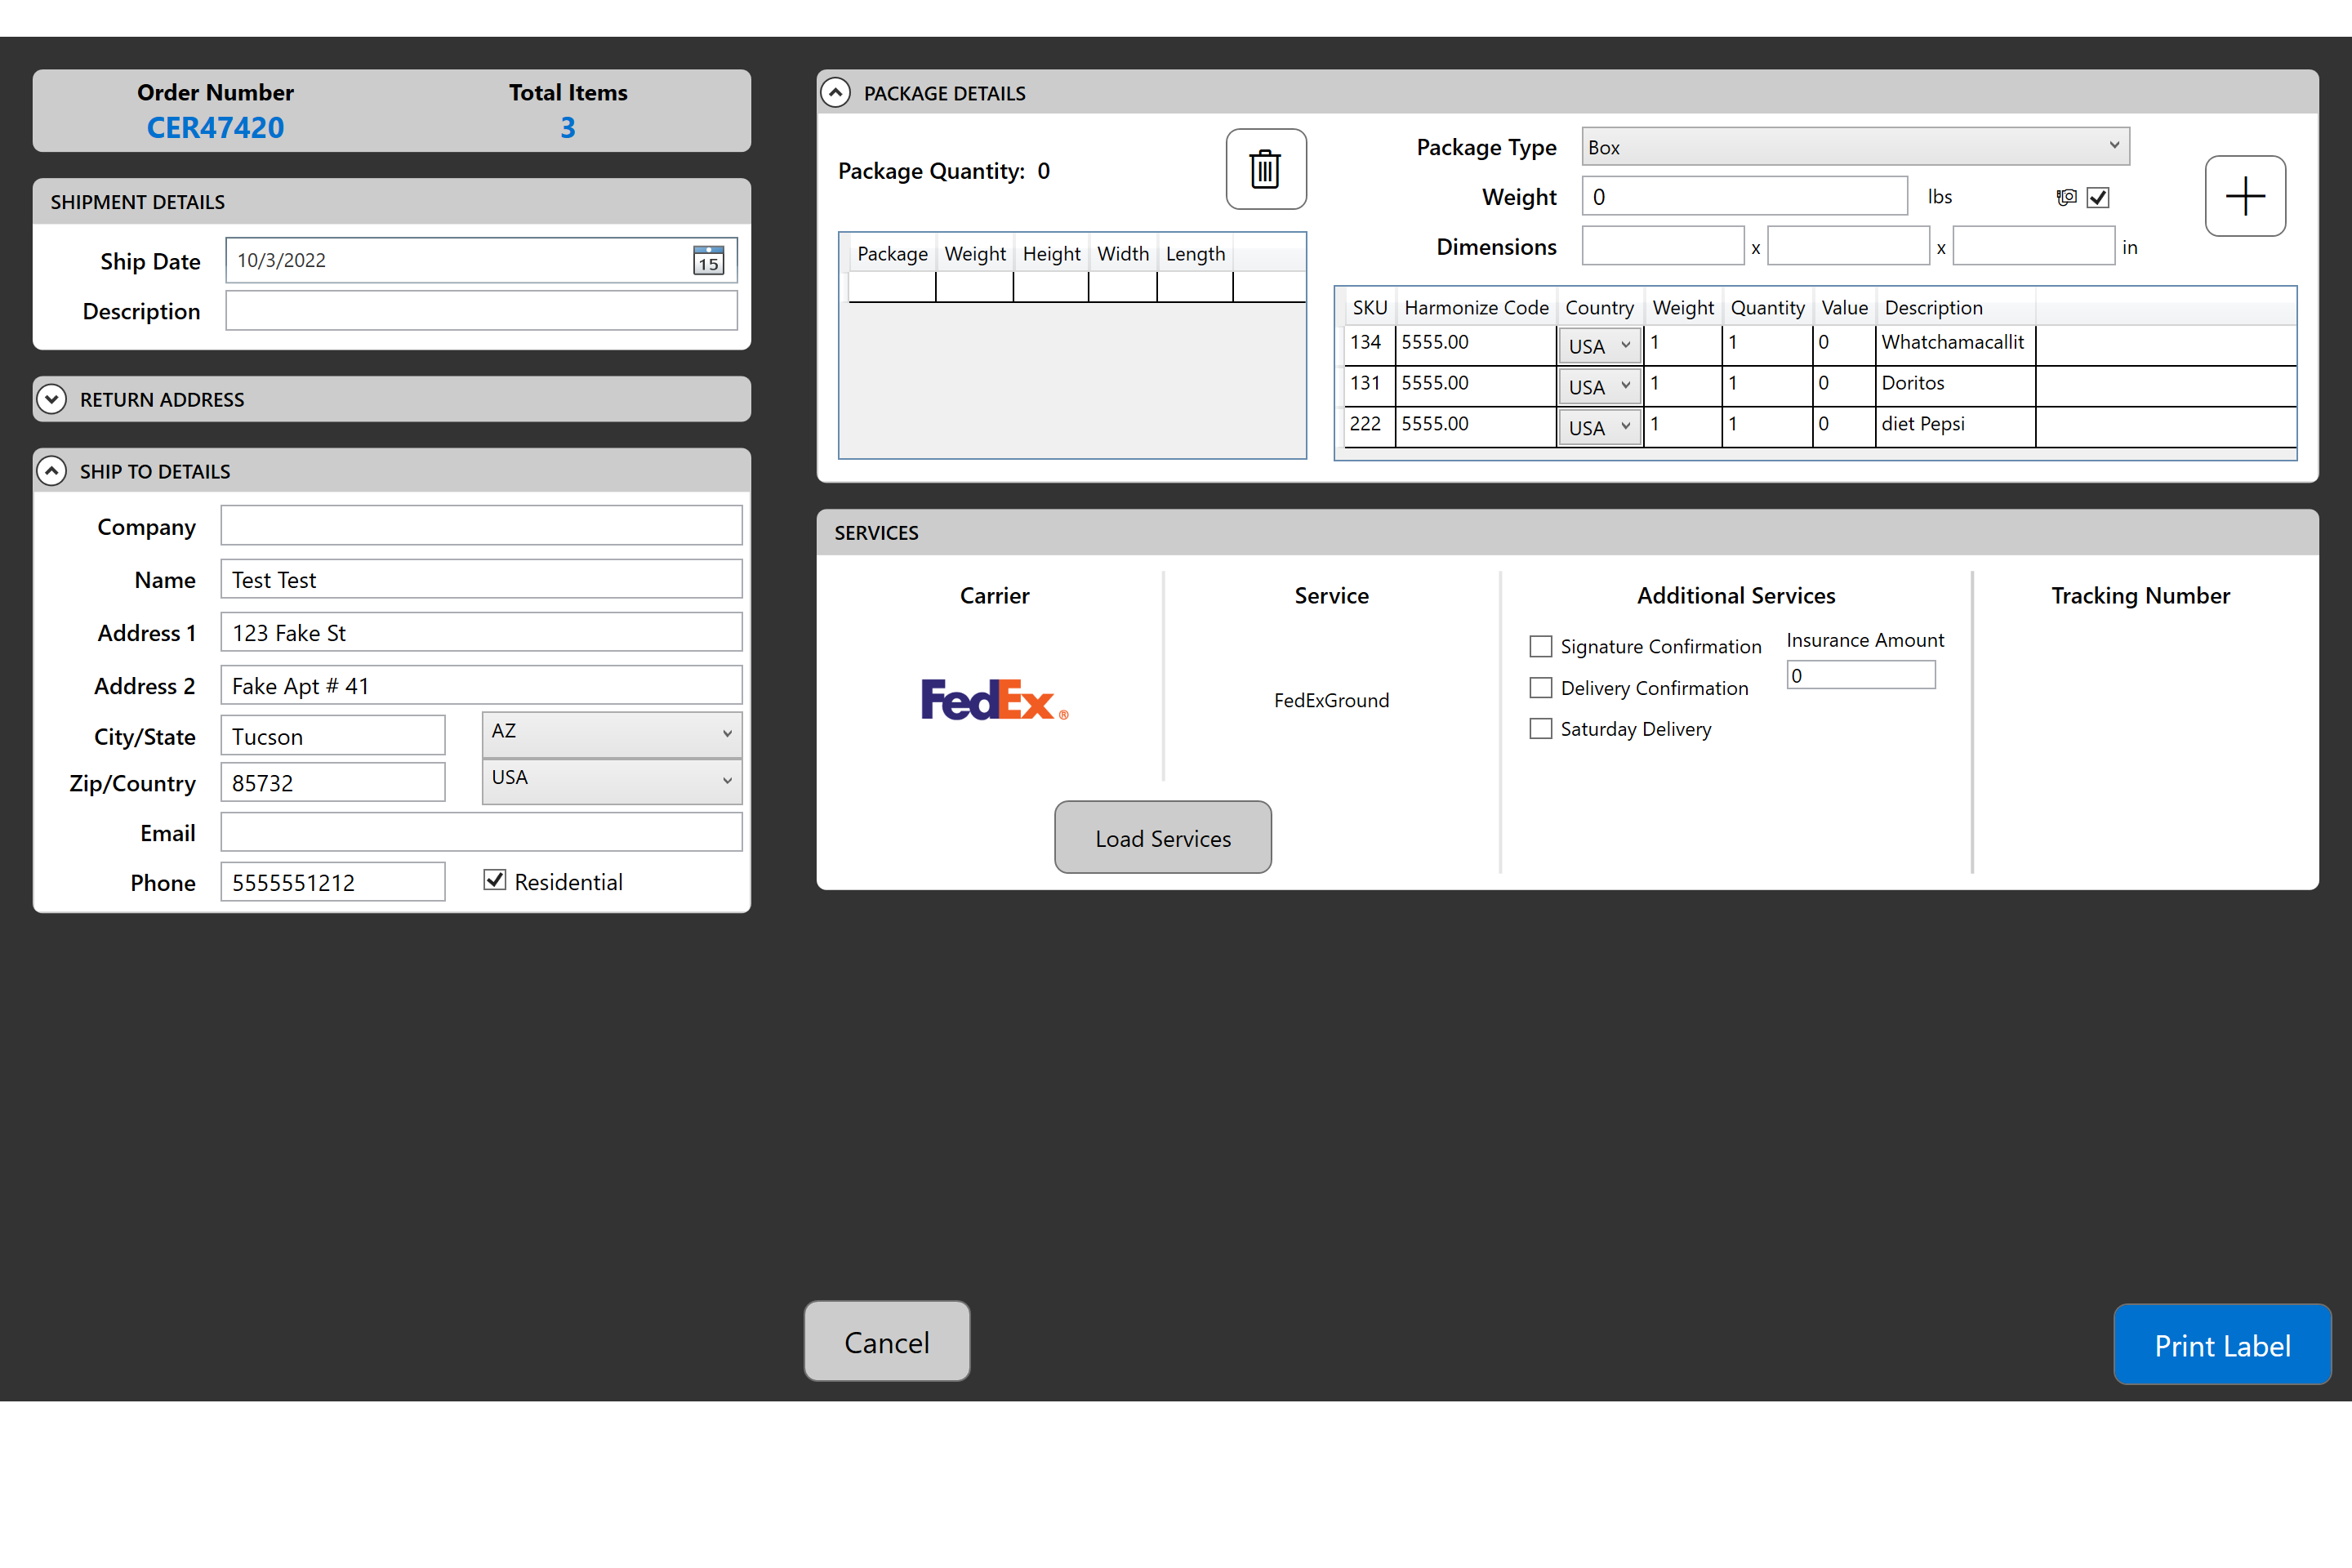
ARCA Pack will also notify end-users if order numbers have already been processed so that they are not shipped multiple times.
If this error displays on the screen, end-users should put the order aside and work with their manager or supervisor to research and resolve it. Arca Pack will not allow orders to go through again. There isn't an override for this error because it is assumed that the order has been adjudicated.

If the items are correct and can be processed, then the end-user must select the box that will be used to pack the items in the order:
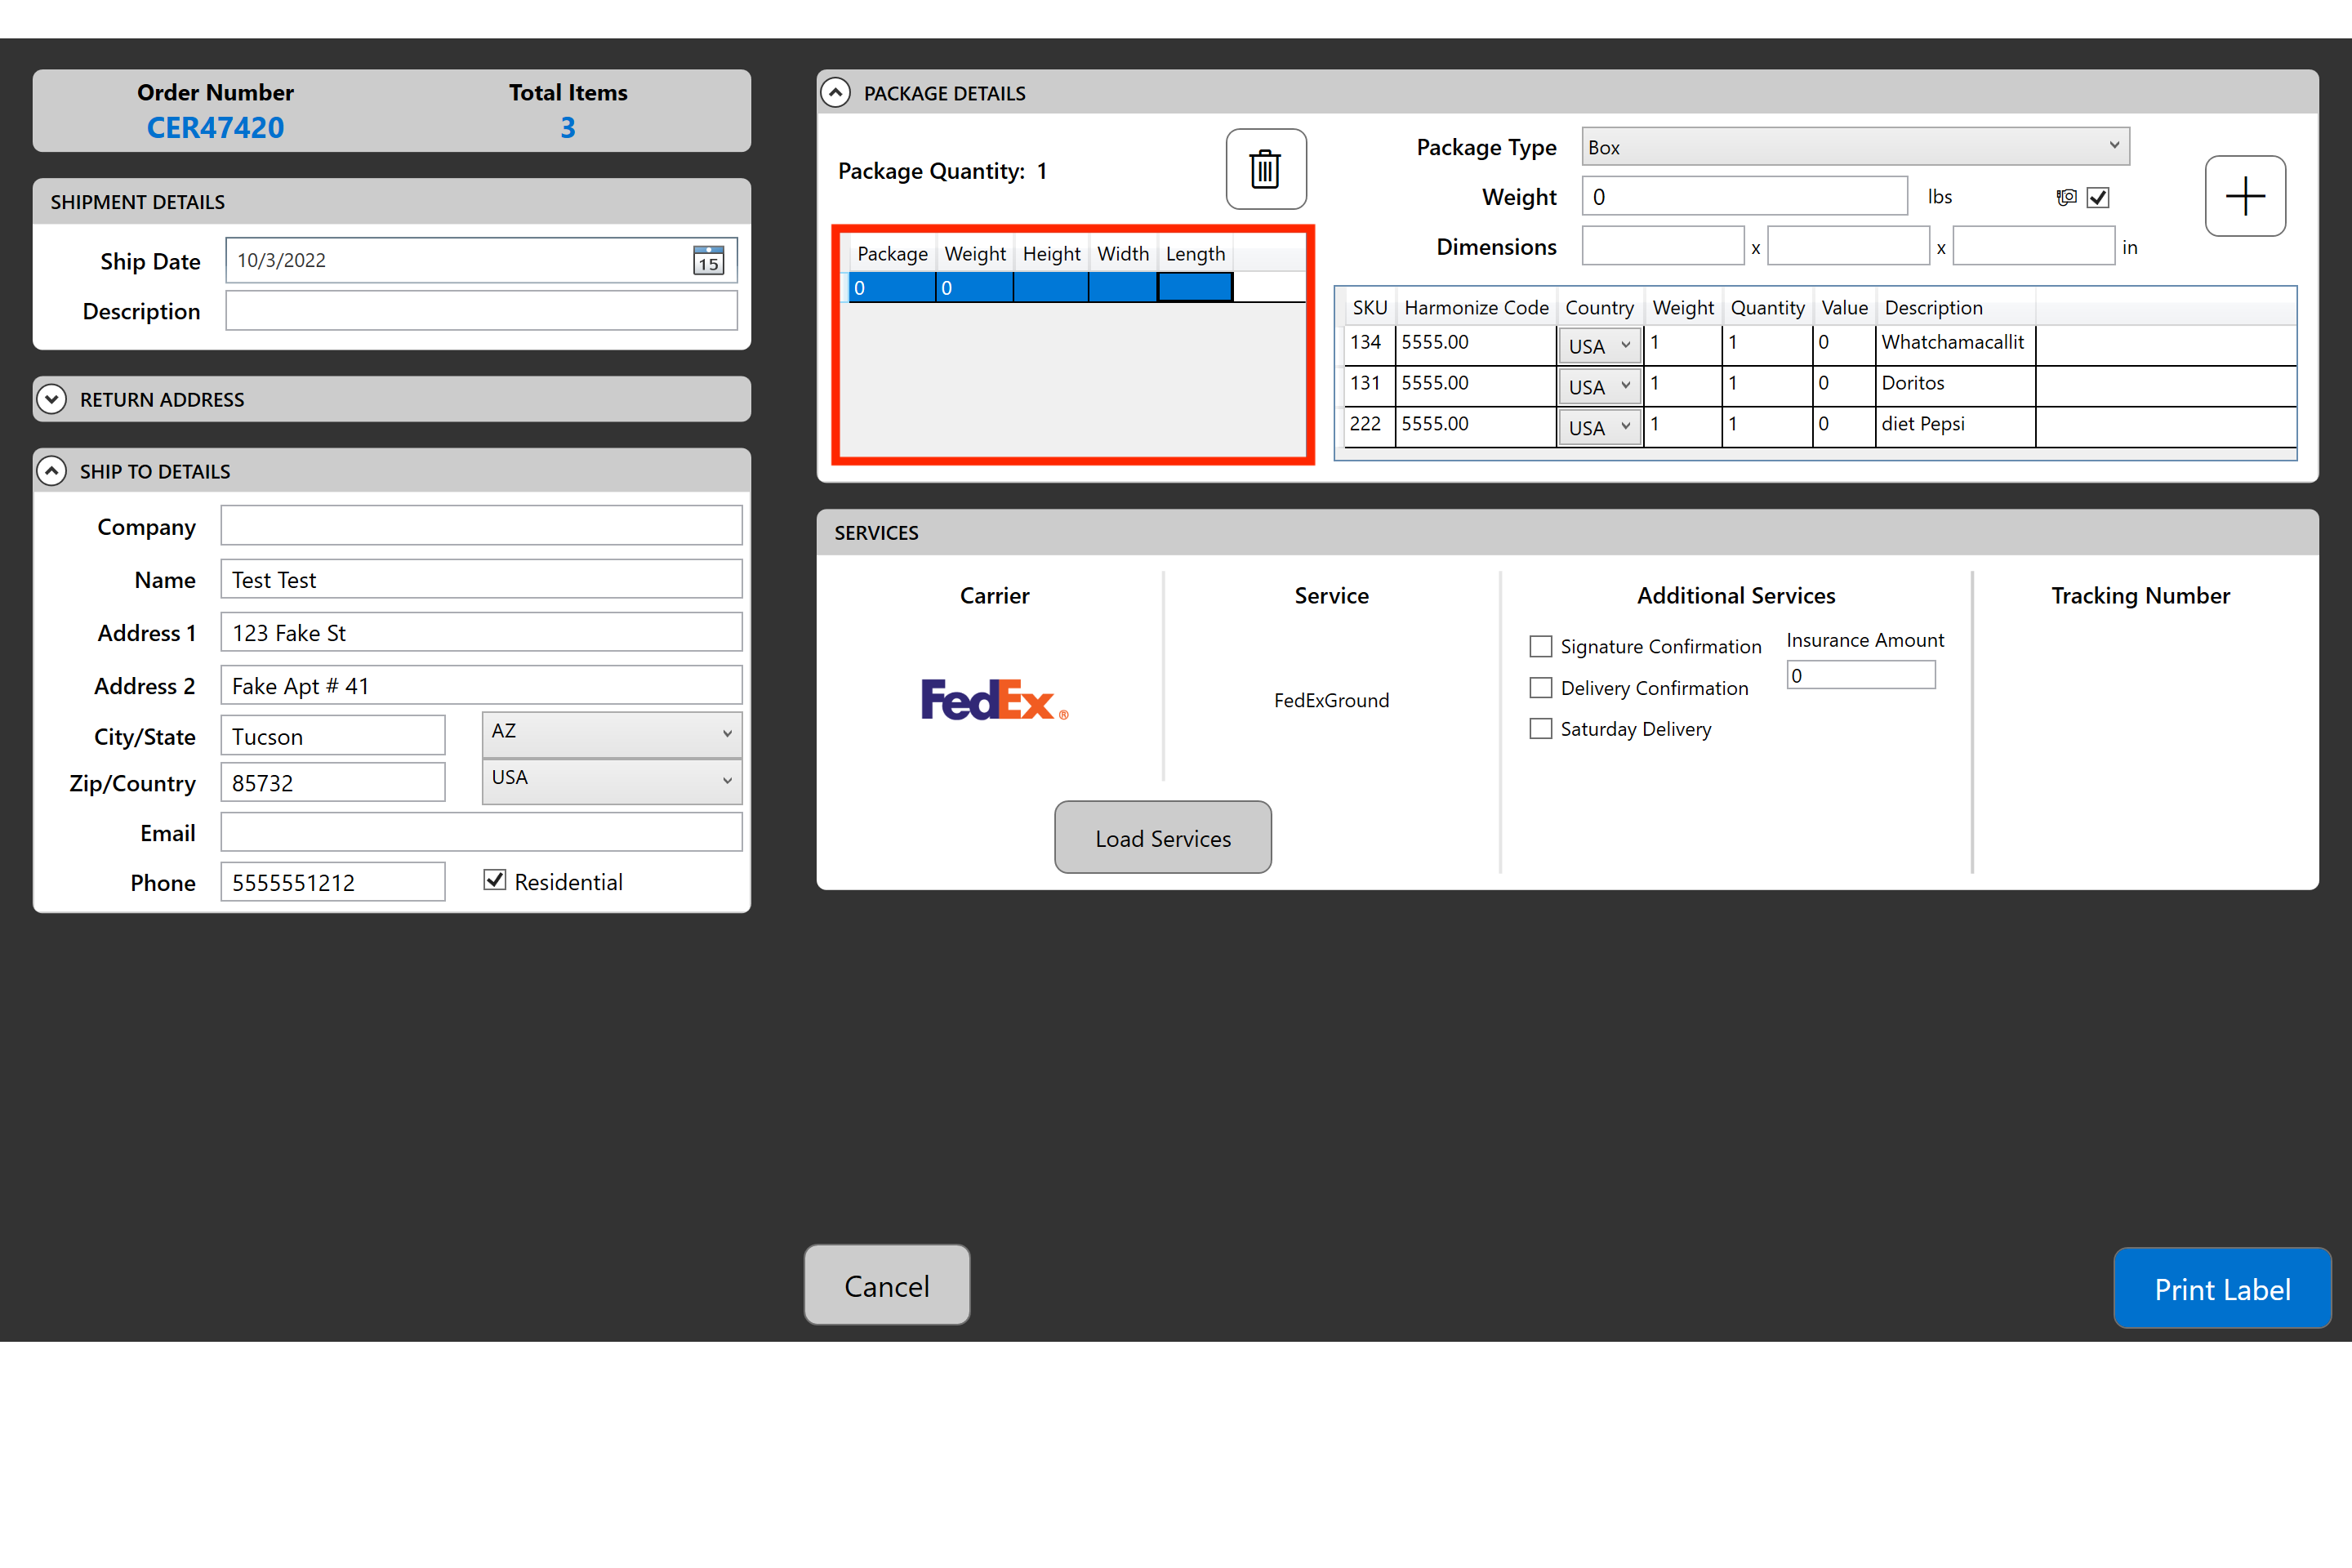
This part of the process assumes that the end-user understands how to pack an order correctly.
Once the box has been selected, the "Height", "Width", and "Length" fields will automatically populate with the values, which are based on the box type selected.
To print the label for the box, the end-user must place the box on the attached and configured scale.
Once the dimensions and weight have been accepted, the end-user can then select "Print Label". ARCA Pack will display a message that states the label is being printed:
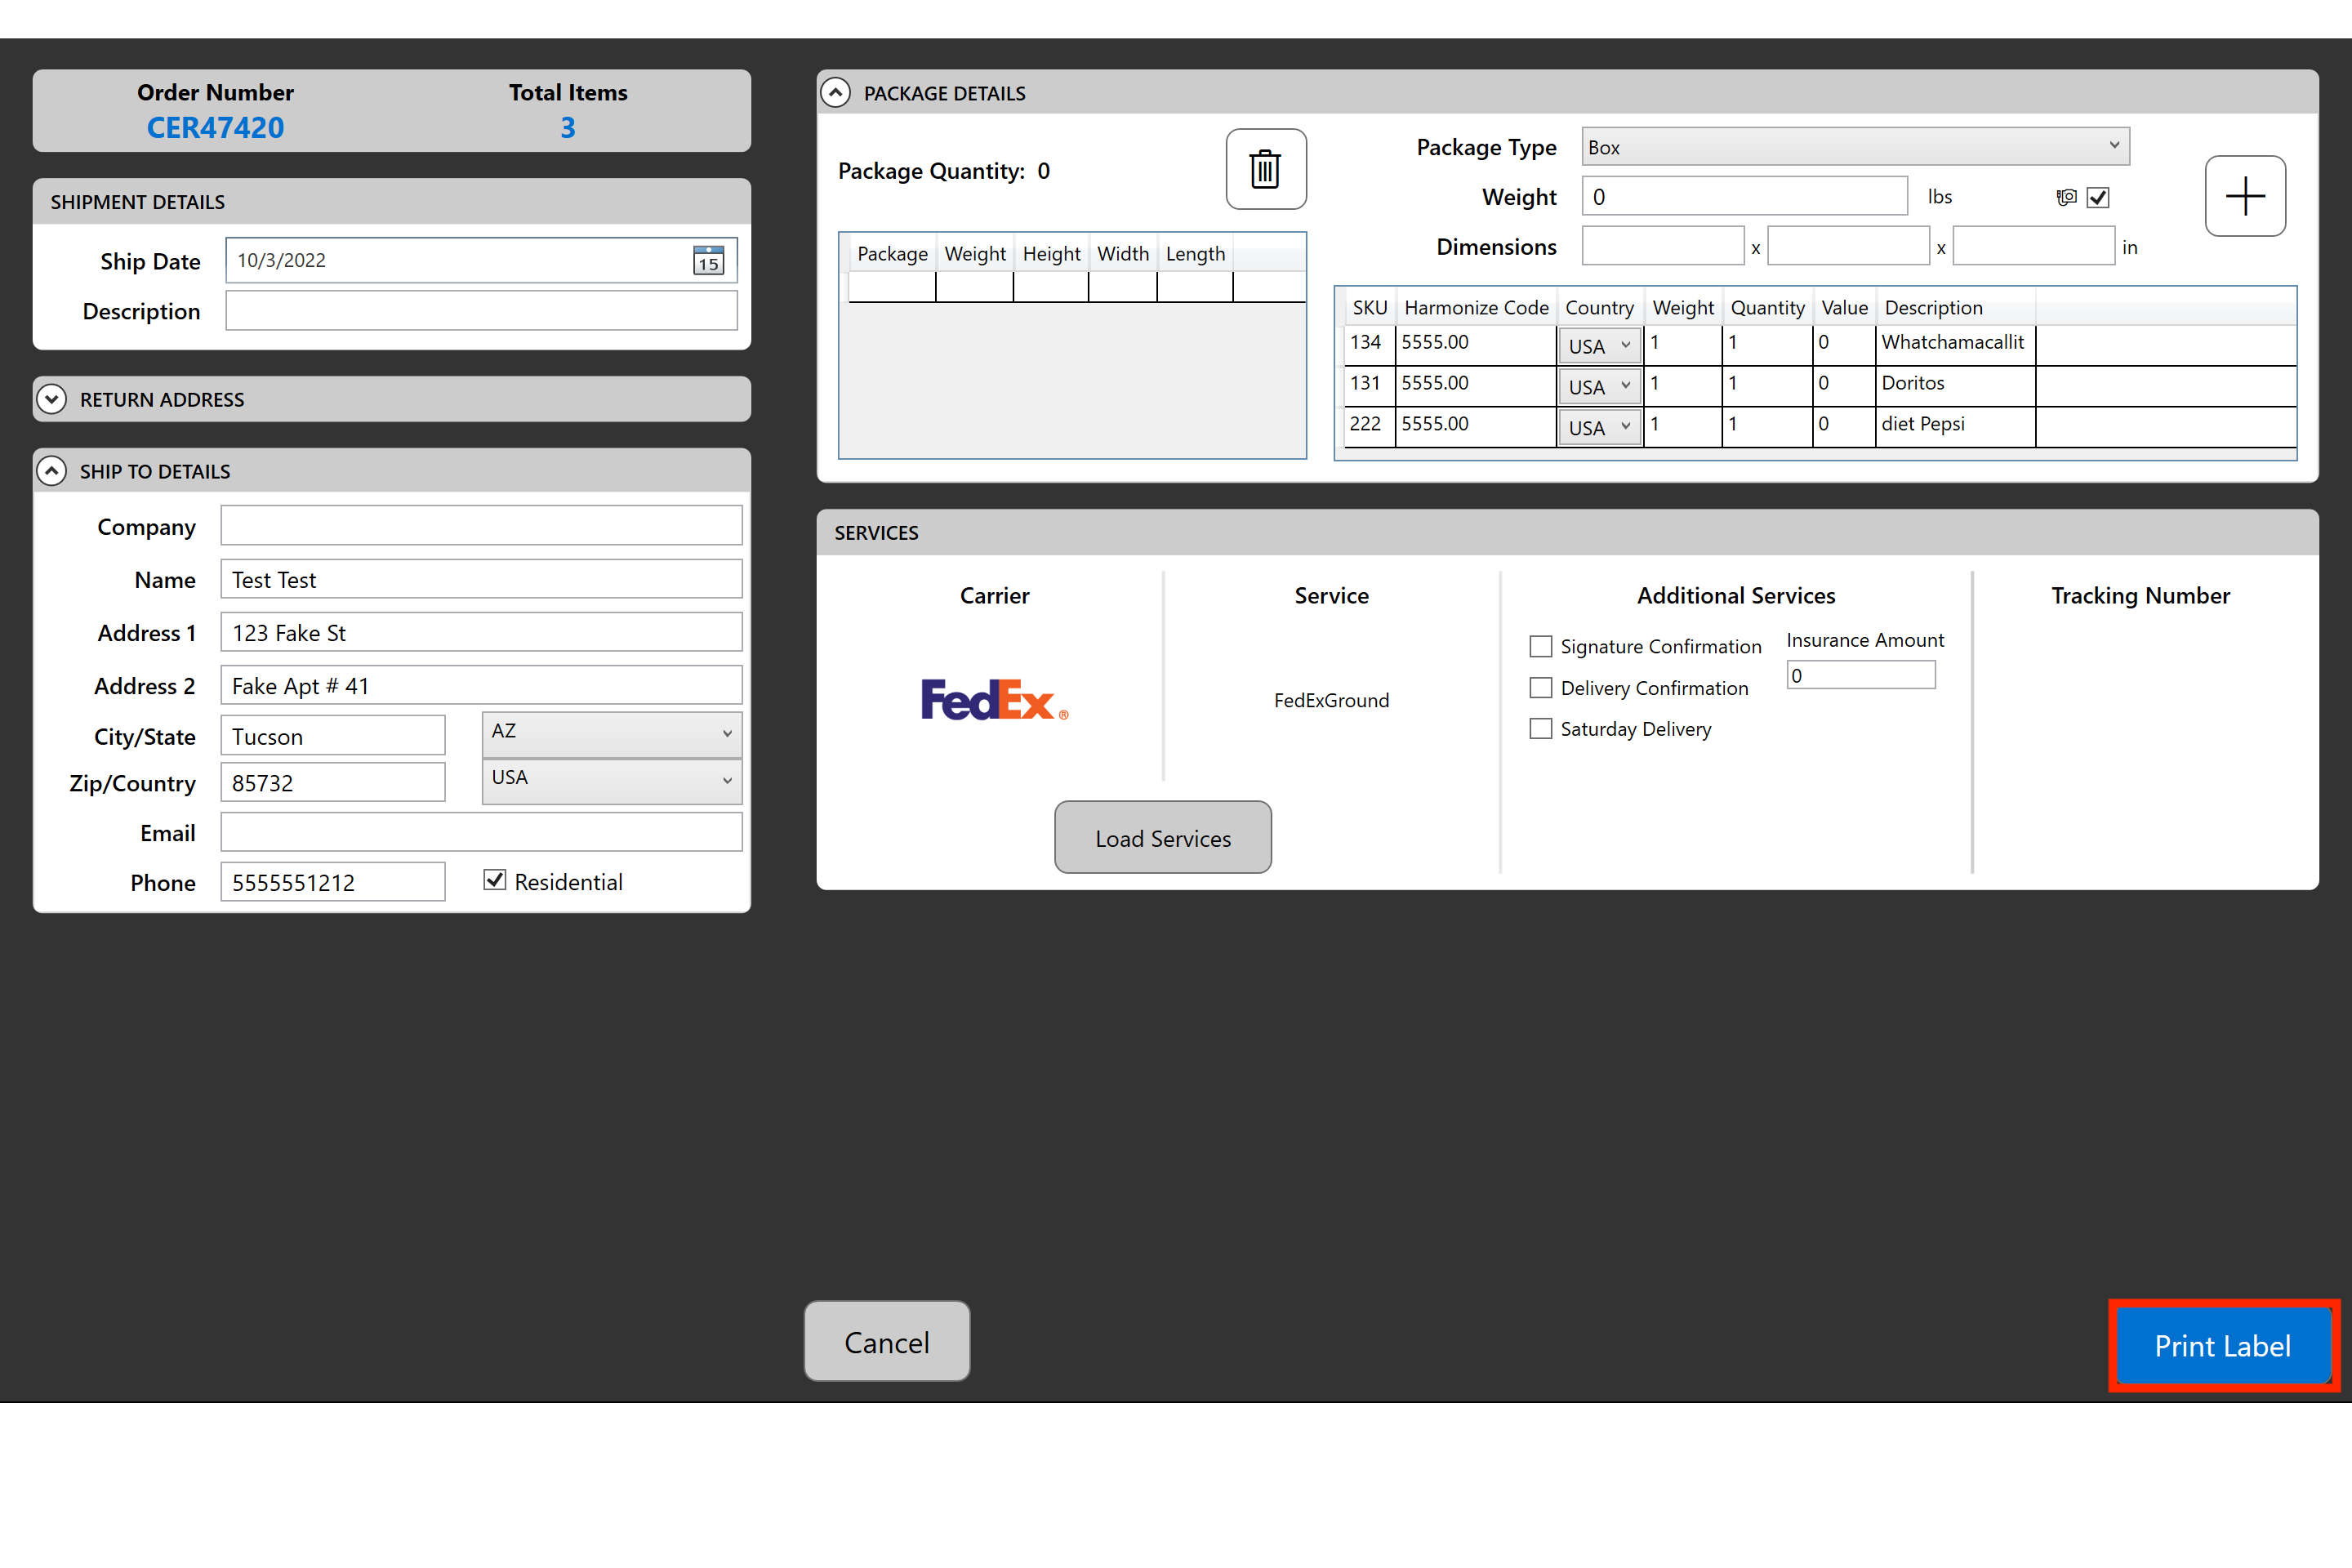
The application will then return the end-user to the "Scan order number" page or the "Pack Complete" button can be selected for the same action.
At any time, the end-user can return to the "Settings" menu to log out or to set up the system for a different use.
Force Override Service
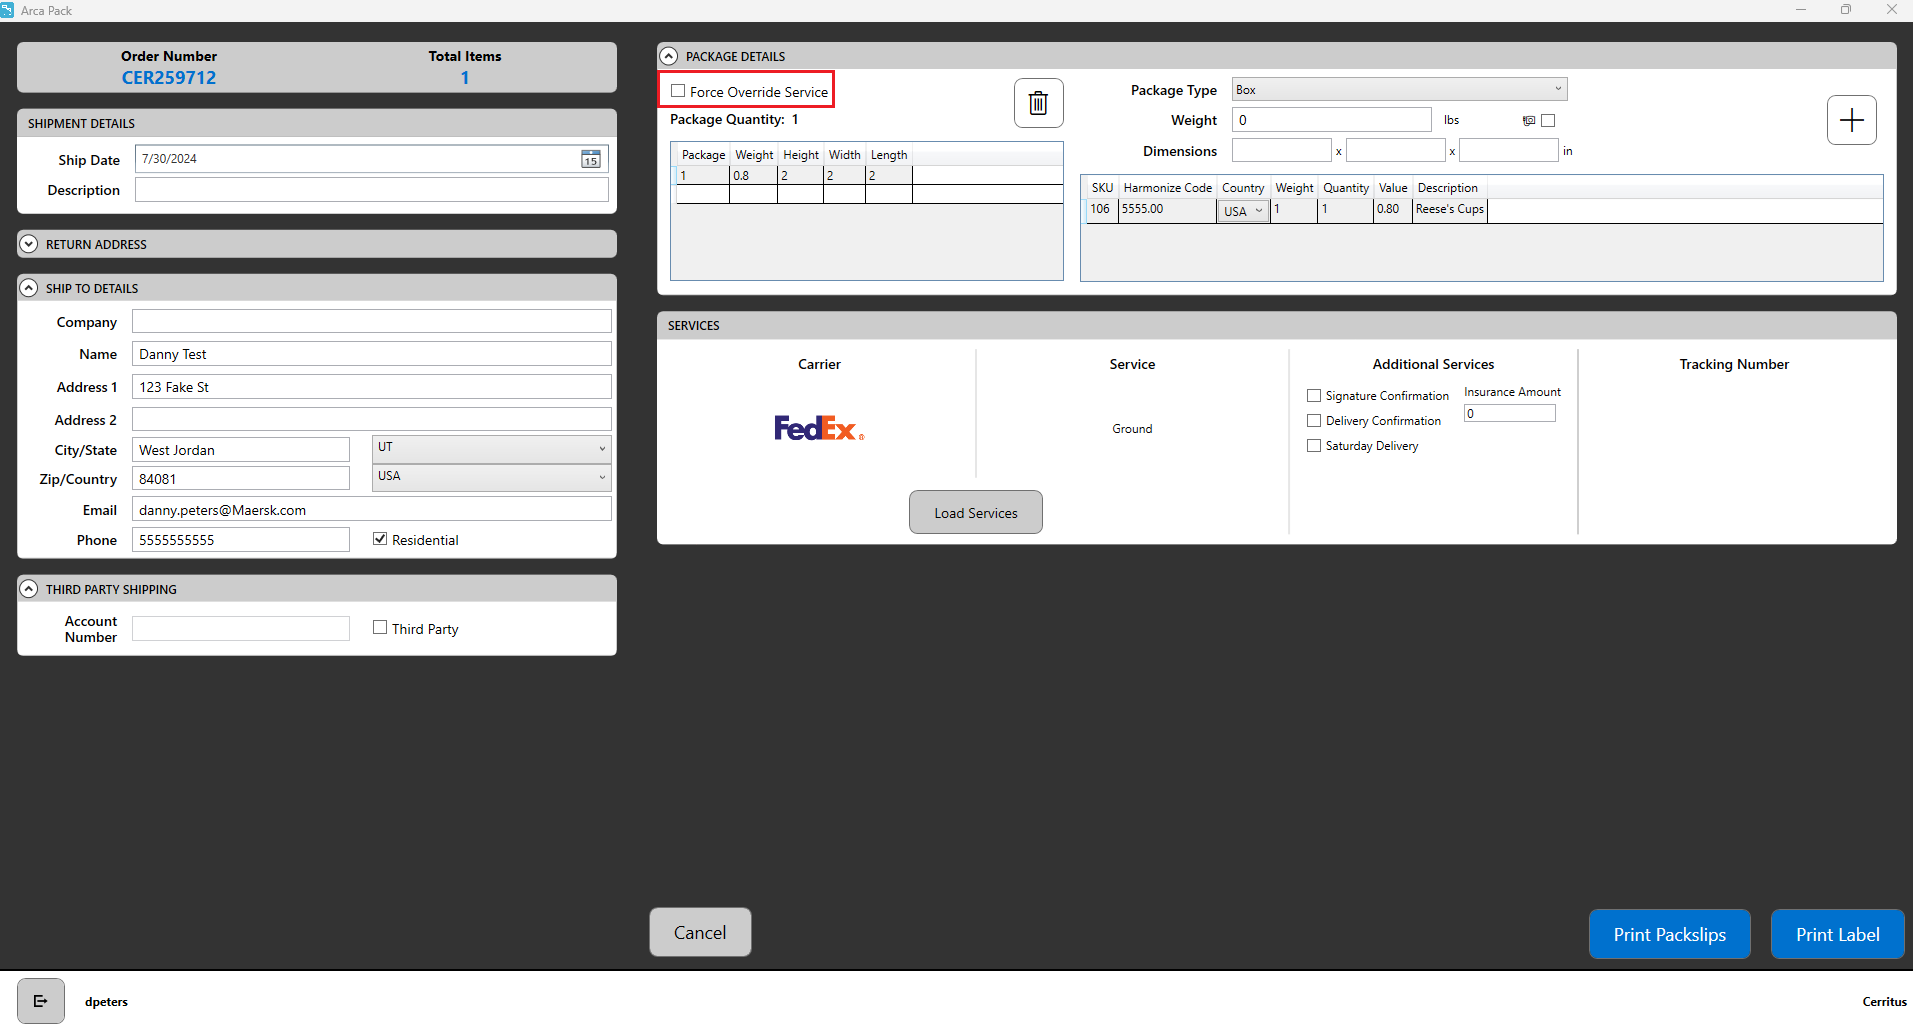
In the Package Details section of the screen, you will find a check box called Force Override Service. Selecting this option before clicking the Print Label button will force any changes you’ve made on the screen to be applied in the request for a shipping label.
If you are receiving an error message and have made edits on this screen to the item information, Ship To Address, or shipping carrier then check the force override box and click on print label to make the updated request.
Third Party Shipping
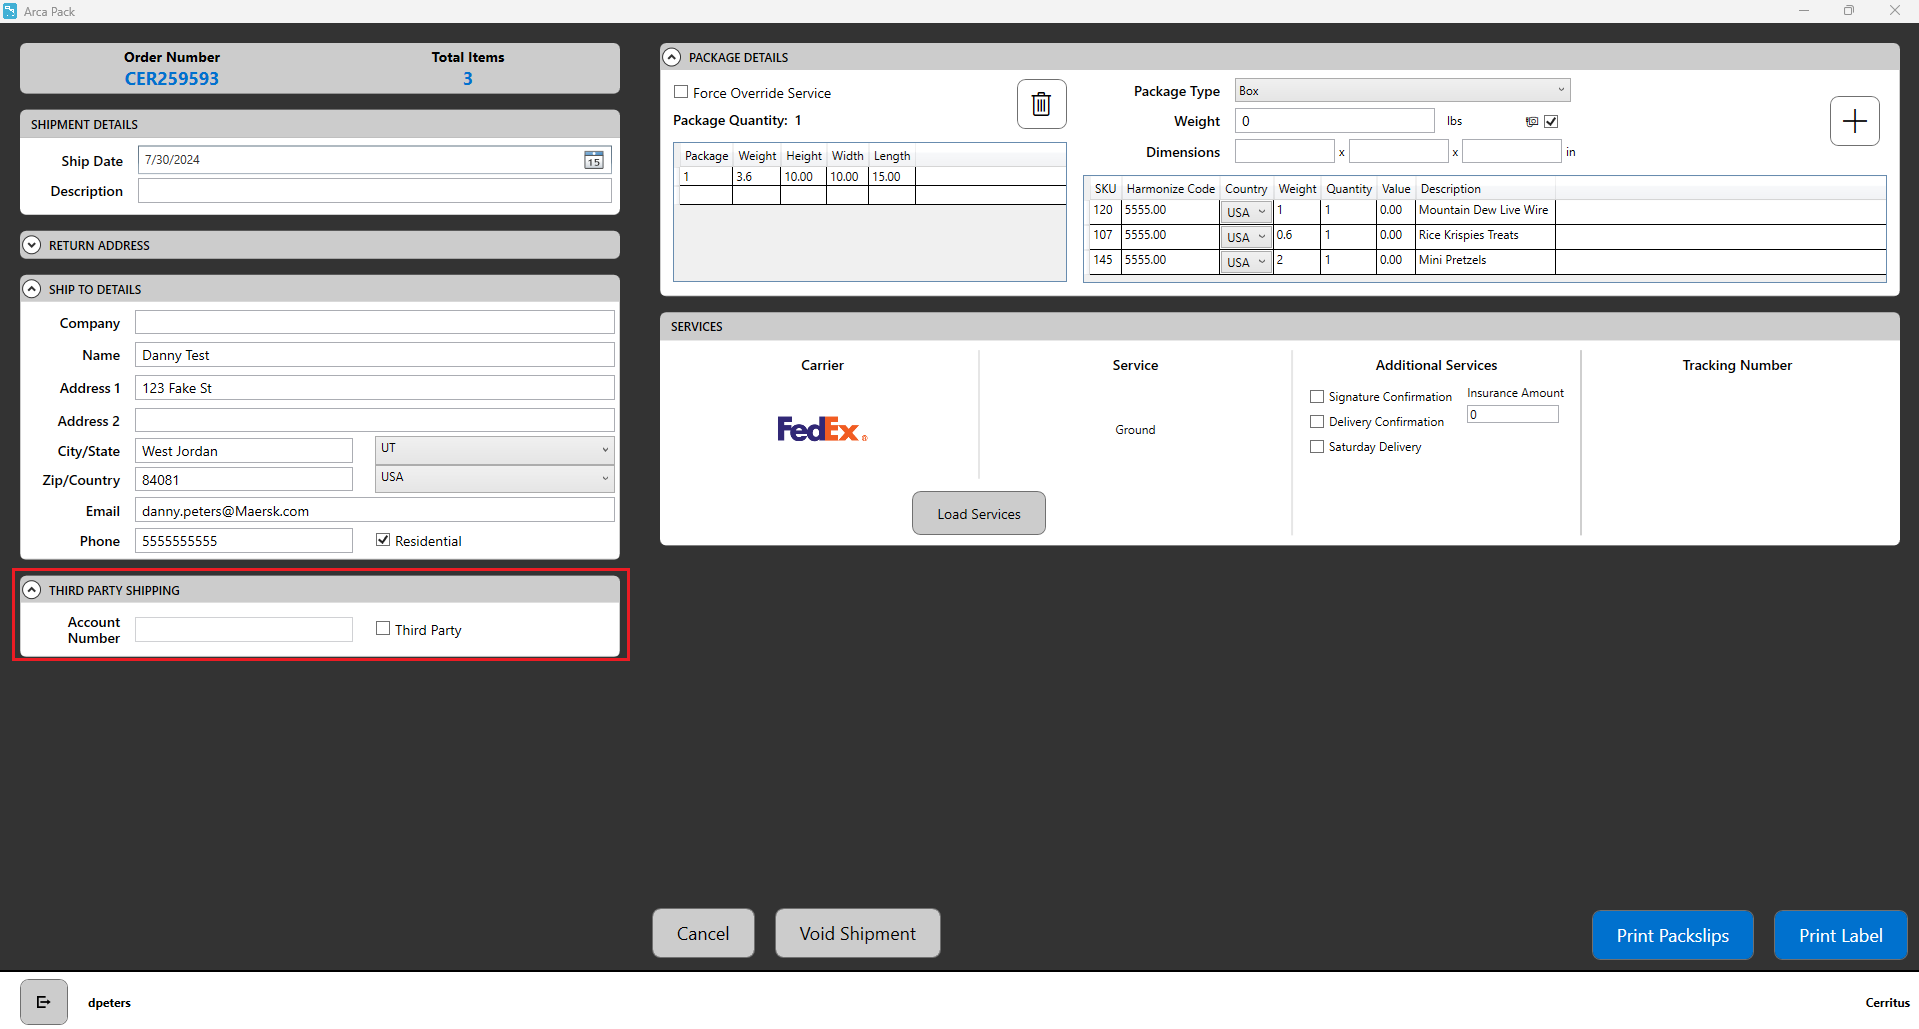
This is a per order option. We do not have an inbound mapping process. The clients will have their own account number given to them by the carrier. Enter the account number and check the box for Third Party before clicking on the Print Label button.
Return to Inventory
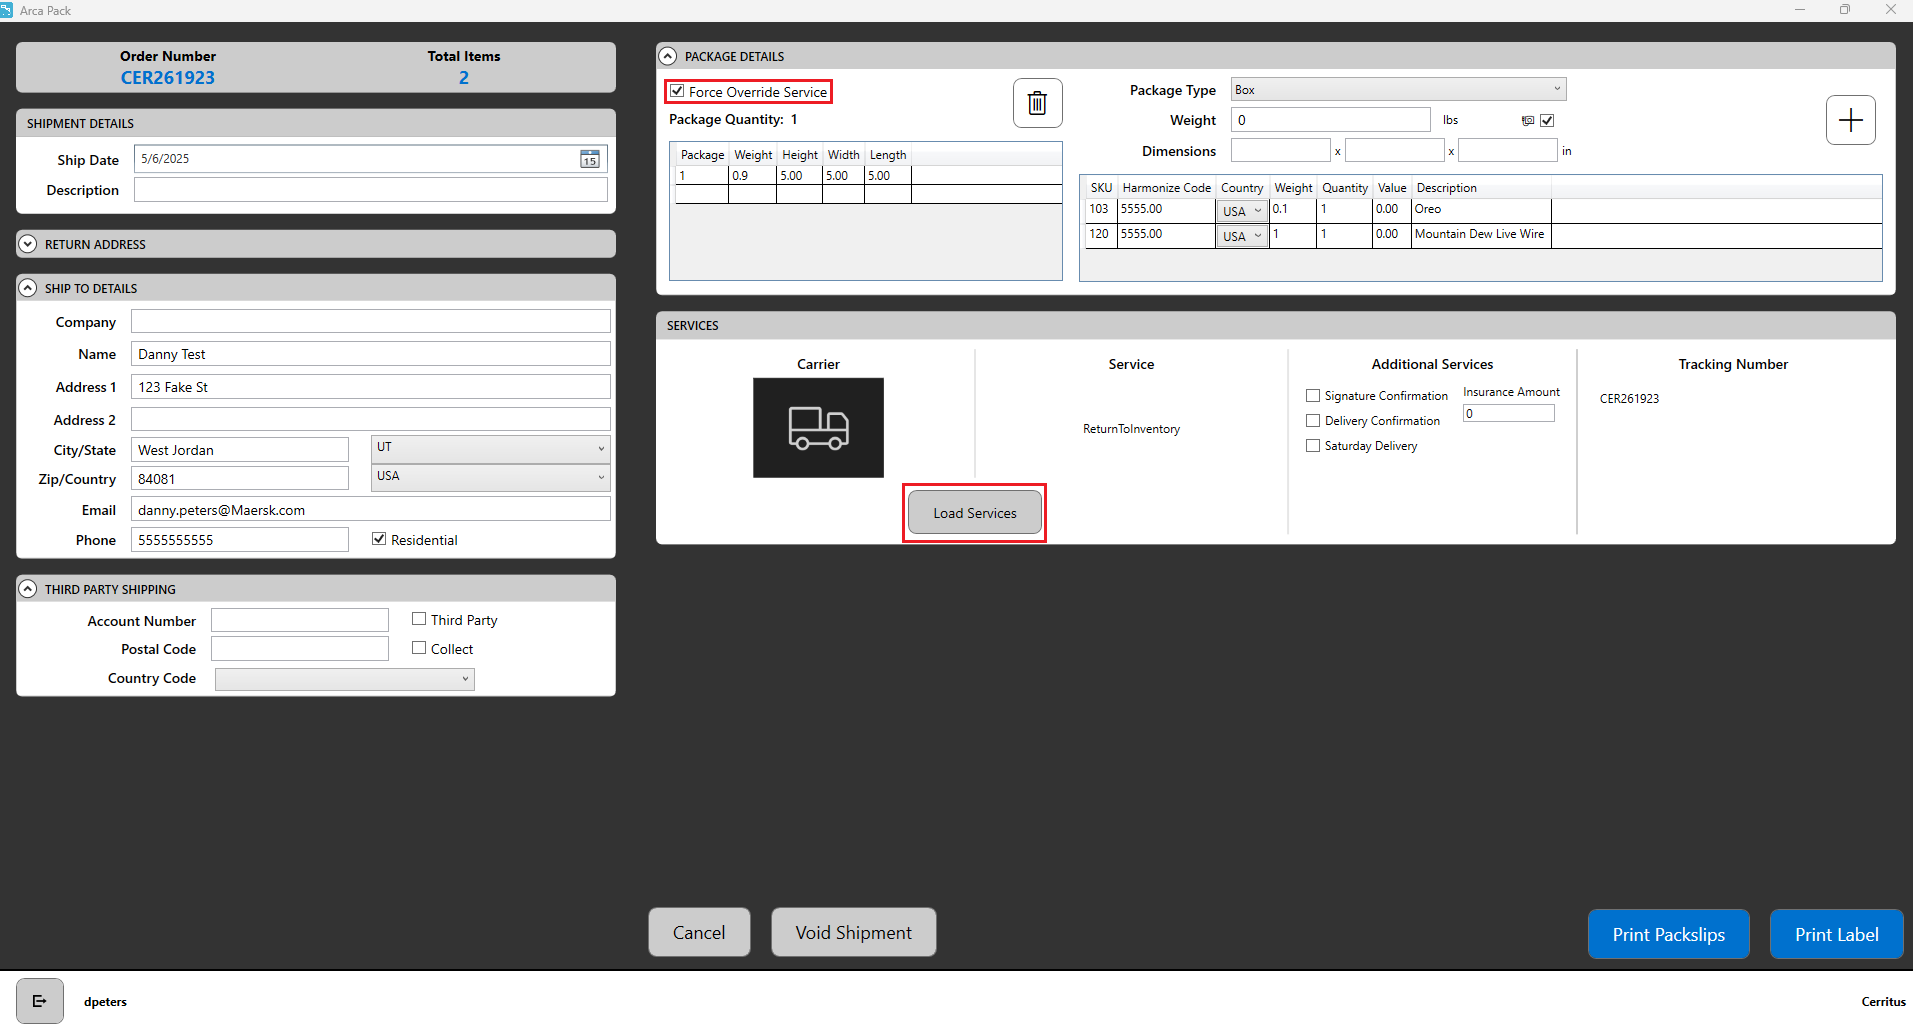
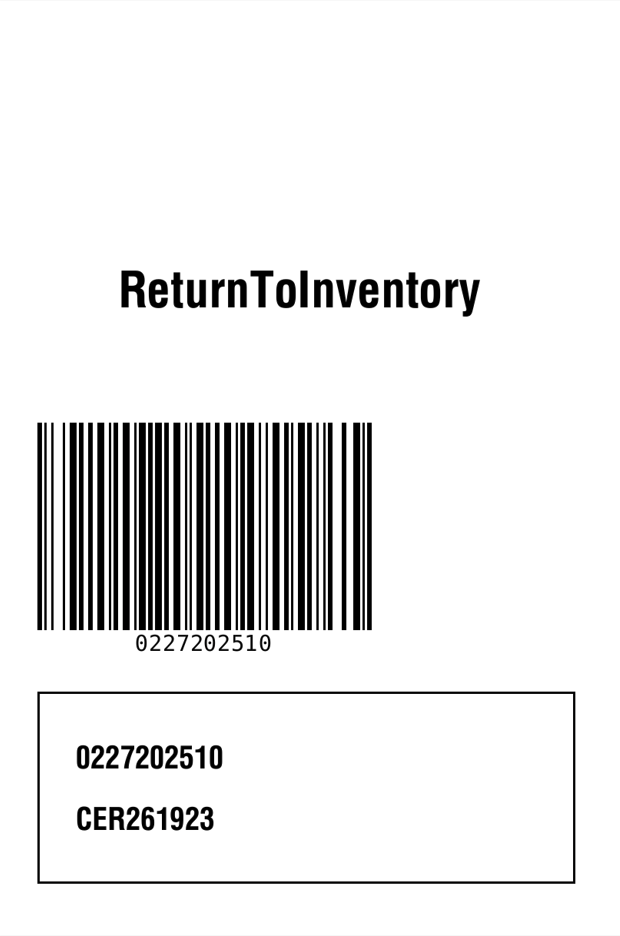
This ship carrier option will allow you to simulate the ship actions inside of the Pack app and close an order. It only prints a return barcode label that contains the customer order number. The order status will update to be closed but won’t return a shipping carrier label or tracking number. If you have an order that you are unable to cancel because of the business rule LastCancelableStatus, then you can select Return to Inventory as the carrier, check the force override service box and “ship” the order by clicking on print label. Once the order is closed, you will need to complete a return from the Arca Warehouse app to restore the inventory that was picked to that order.
Signature Required
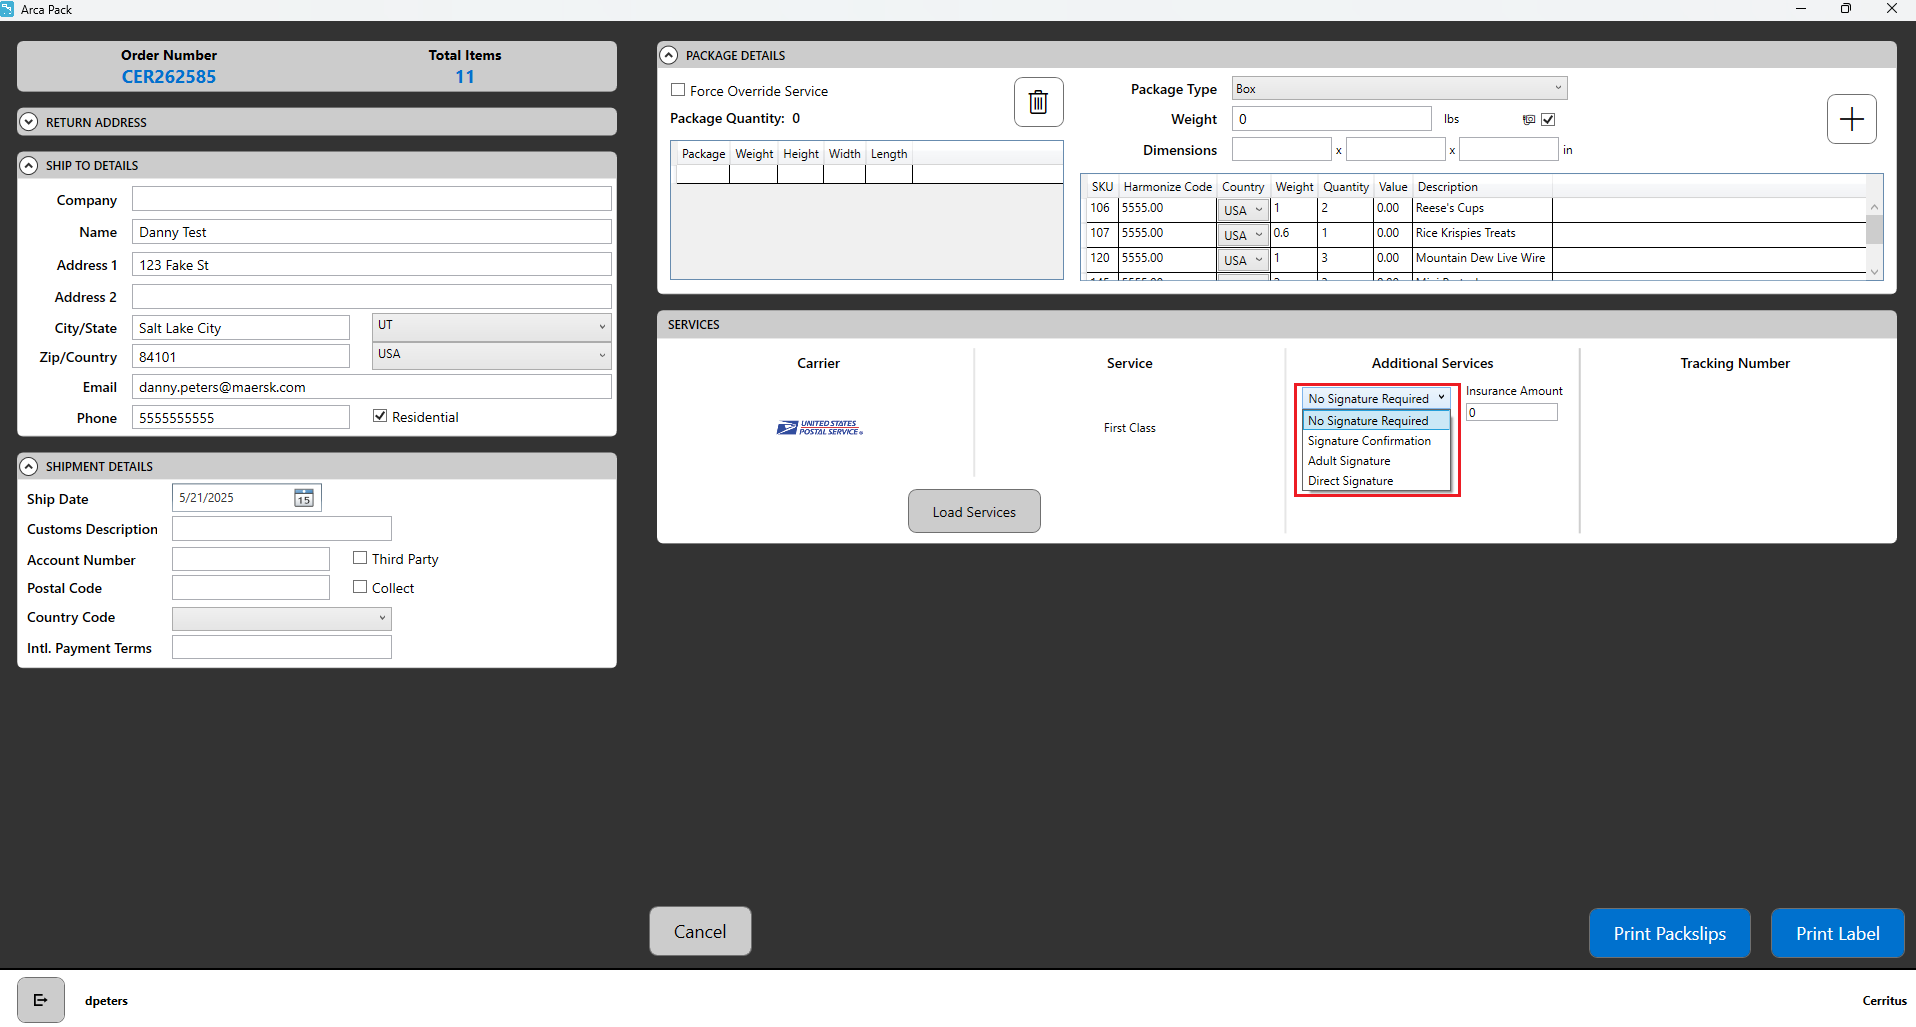
This option will allow the user to apply signature requirements to an individual order. These options are not available on every shipping carrier service. The carrier determines what service levels do or do not accept these signature requirements.
Troubleshooting
- No Tracking Labels were received from the server.
If weights are not printing correctly for first class, the box dimensions need to be changed. This is because the dimensions are out of scope for first class rating.
Wave Print
ARCA Pack has several different functions for fulfilling client orders. This section will cover the "Wave Print" module of the application.
The intent of the module is to:
- Provide information on how Pack configuration is set up.
- Explain how to wave print labels.
Settings
To fulfill orders properly, ARCA Pack must be set up correctly to validate that the orders being scanned in are associated with the respective warehouse and client.
Before you start packing the order, the Settings menu should be configured as follows:
REQUIRED SETTINGS
- Change "Select Station Type" to "Wave Print".
- Set the "Select Warehouse" to the correct value, which depends on the client.
- Set "Select Client" to correct client value.
- Set "Label Printer" to the correct value.
- Set "Document Printer" to the correct value.
- Print Mode: There are some new print mode options on the settings menu that will change how the wave print station will function. Standard, Print after generation and assisted print. Here's a breakdown of how those are going to work.
Standard: First you need to click on Generate Labels, once they are generated without problems and all shipments have passed to batch status Ready to Print, then we can print all the label by clicking Print Labels button.
PrintAfterGeneration: Clicking Generate Labels generates all labels it can, and prints all shipments that did not have an error when trying to generate their label automatically afterwards.
AssistedPrint: Clicking Generate Labels, it generates and prints labels shipment by shipment until an error appears in label generation, at that moment an error message appears indicating that the execution is paused and that the error must be solved to continue with it, after editing the shipment, the execution of generate-print continues where it had been left.

ADDITIONAL SETTINGS
- Set "Test Mode", optional. In some cases, ARCA Pack may need to be set up in a test mode. This is typically done for training purposes and should be coordinated through a supervisor. If the application does need to be set up for testing, select the this option.
Then "Save Settings".

Wave Print with Label
After the settings have been configured, end-users will need to scan their badge to log into ARCA Pack as well as enter in the Wave number.

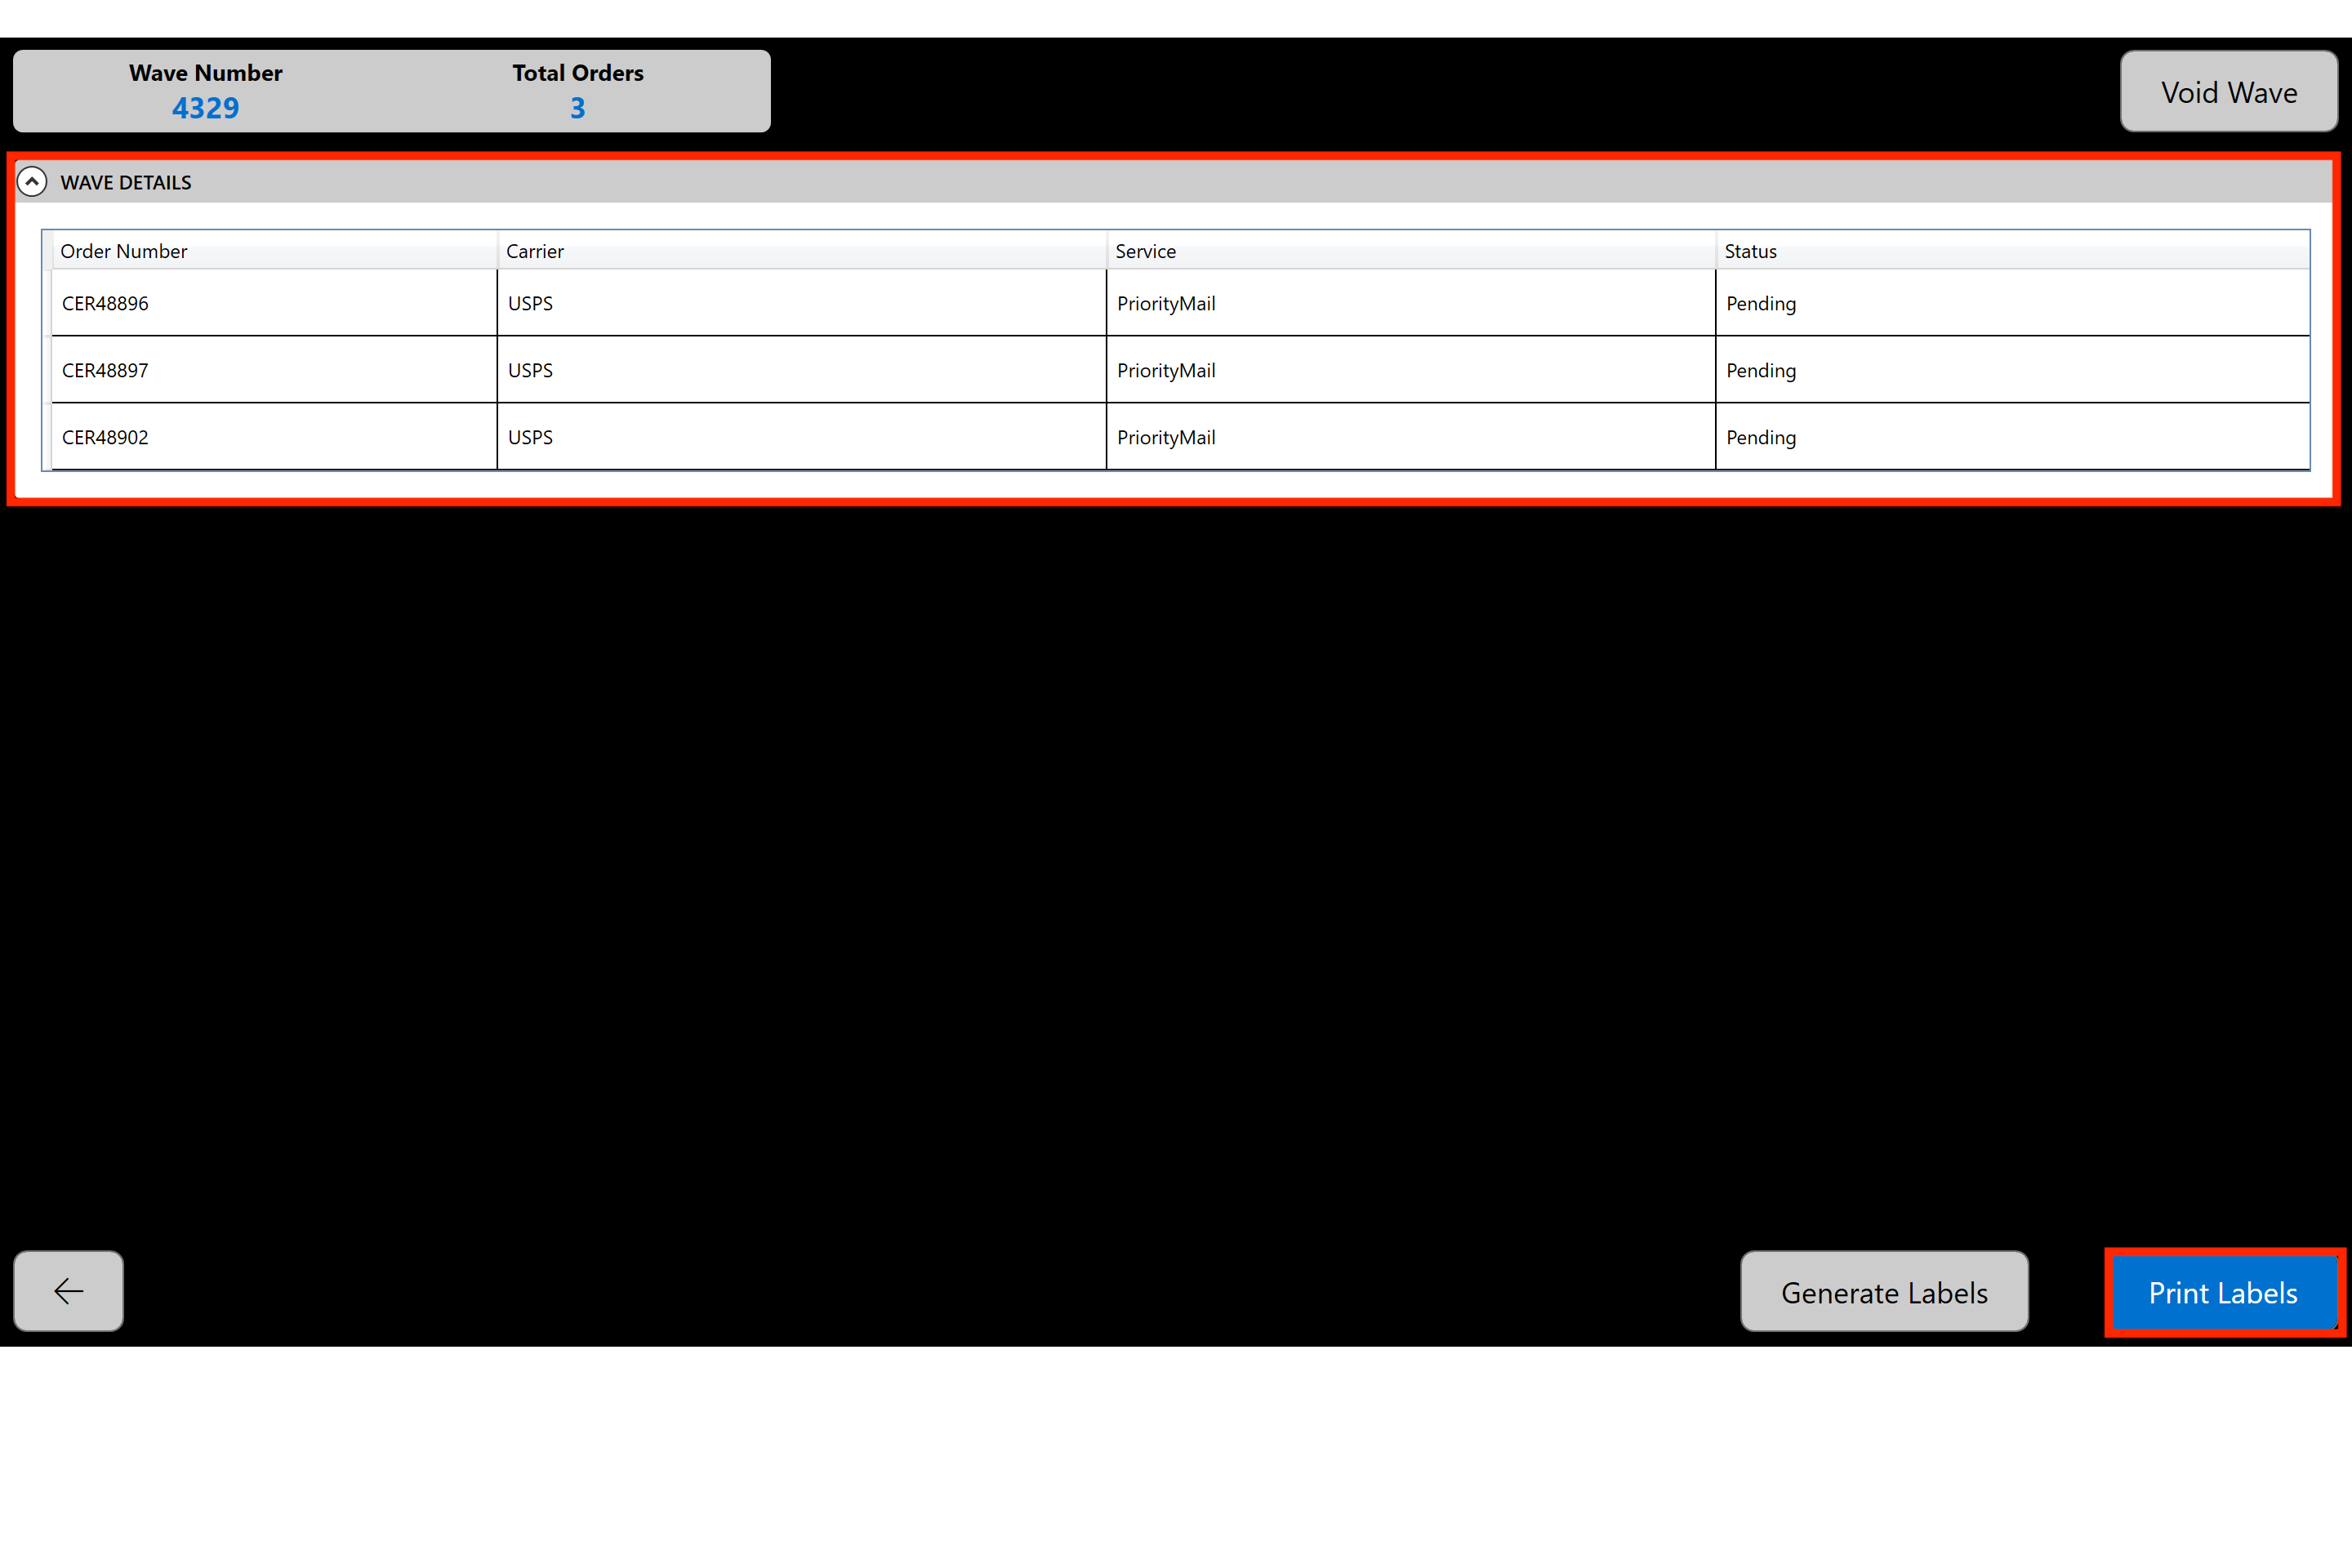
Once you have entered the wave number all orders in that wave will pull up and you will be able to generate/print labels.
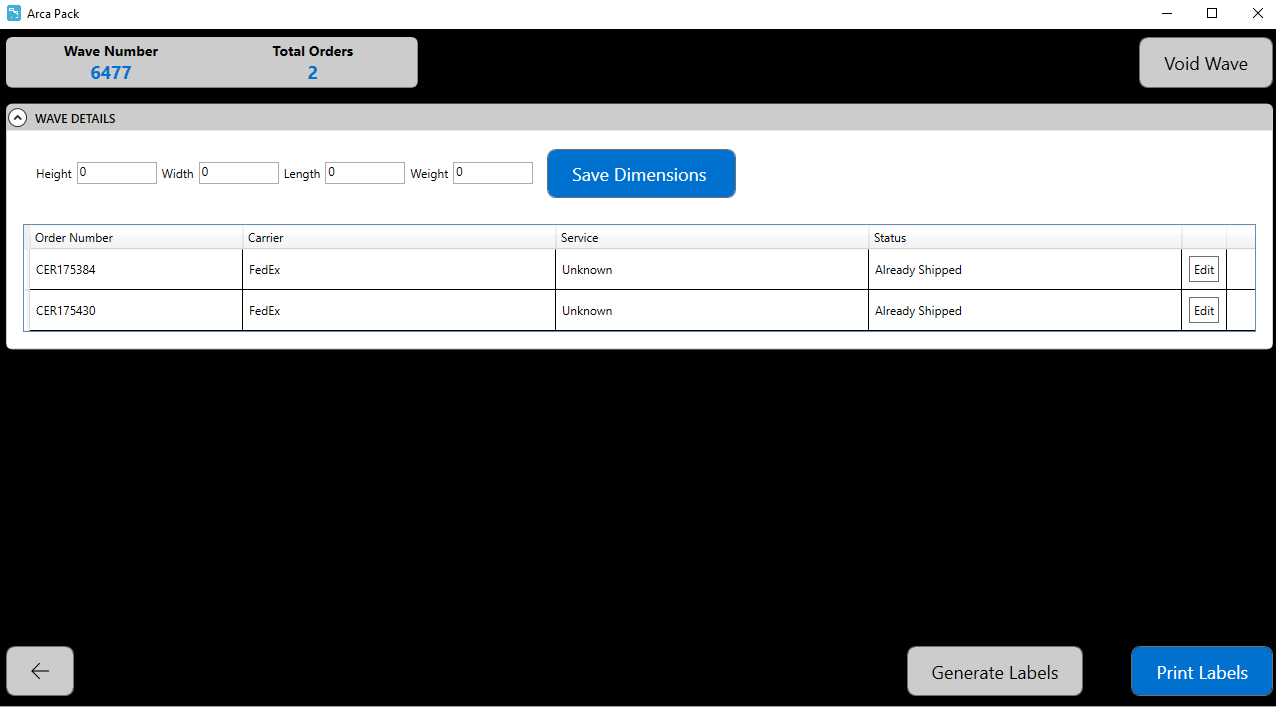
We have added a grid with weight, height, width and length to the Wave screen, so a user is able to update all the orders at once. This will not take the inputs from a scale or camera as I mentioned it is all physically entered values by the user.
Tote Pack
ARCA Pack has several different functions for fulfilling client orders. This section will cover the "Tote Pack" module of the application.
The intent of the module is to:
- Provide information on how Pack configuration is set up
- Explain how orders are packed
Settings
To fulfill orders properly, ARCA Pack must be set up correctly to validate that the orders being scanned in are associated with the respective warehouse and client.
Before you start packing the order, the Settings menu should be configured as follows:
REQUIRED SETTINGS
- Change "Select Station Type" to "Tote Pack".
- Set the "Select Warehouse" to the correct value, which depends on the client.
- Set "Select Client" to correct client value.
- Set "Label Printer" to the correct value.
- Set "Document Printer" to the correct value.
ADDITIONAL SETTINGS
- Set "Test Mode", optional. In some cases, ARCA Pack may need to be set up in a test mode. This is typically done for training purposes and should be coordinated through a supervisor. If the application does need to be set up for testing, select the this option.
Then "Save Settings".

Packing Items
After the settings have been configured, end-users will need to scan their badge to log into ARCA Pack and begin scanning orders to pack into boxes.
When the order has been scanned in, ARCA Pack will display the items to be packed:
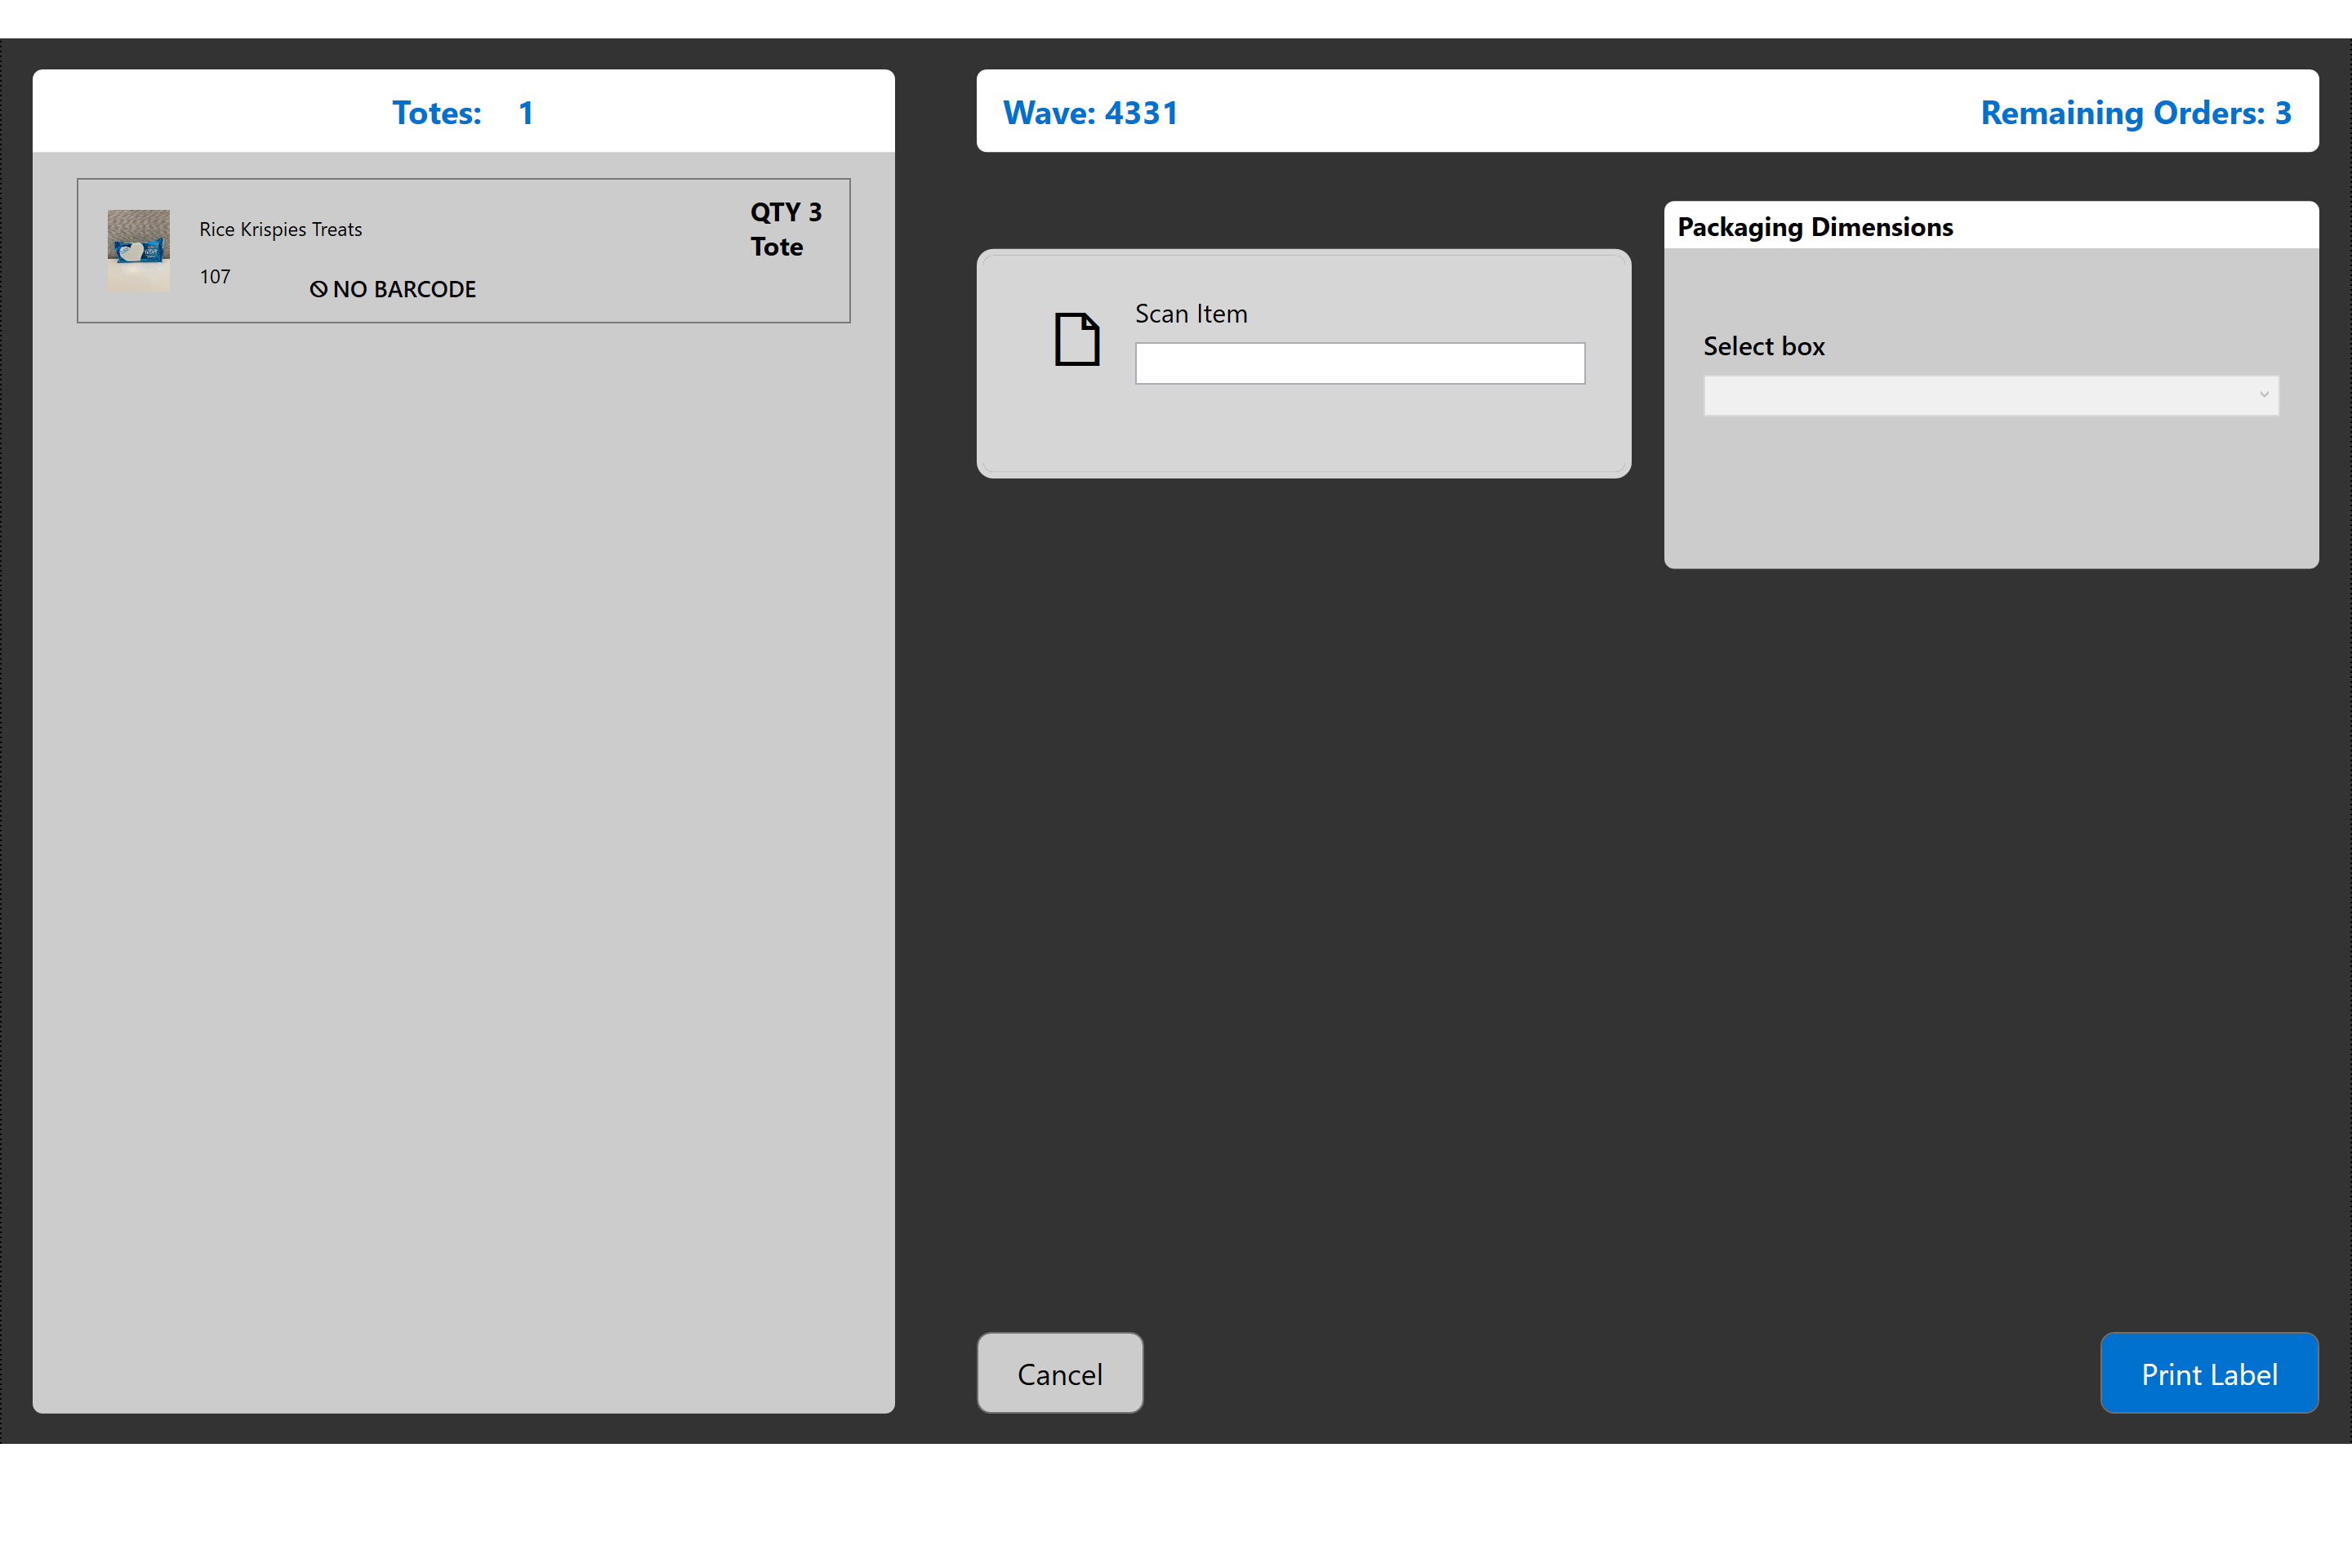
First, you will scan in the item(s).
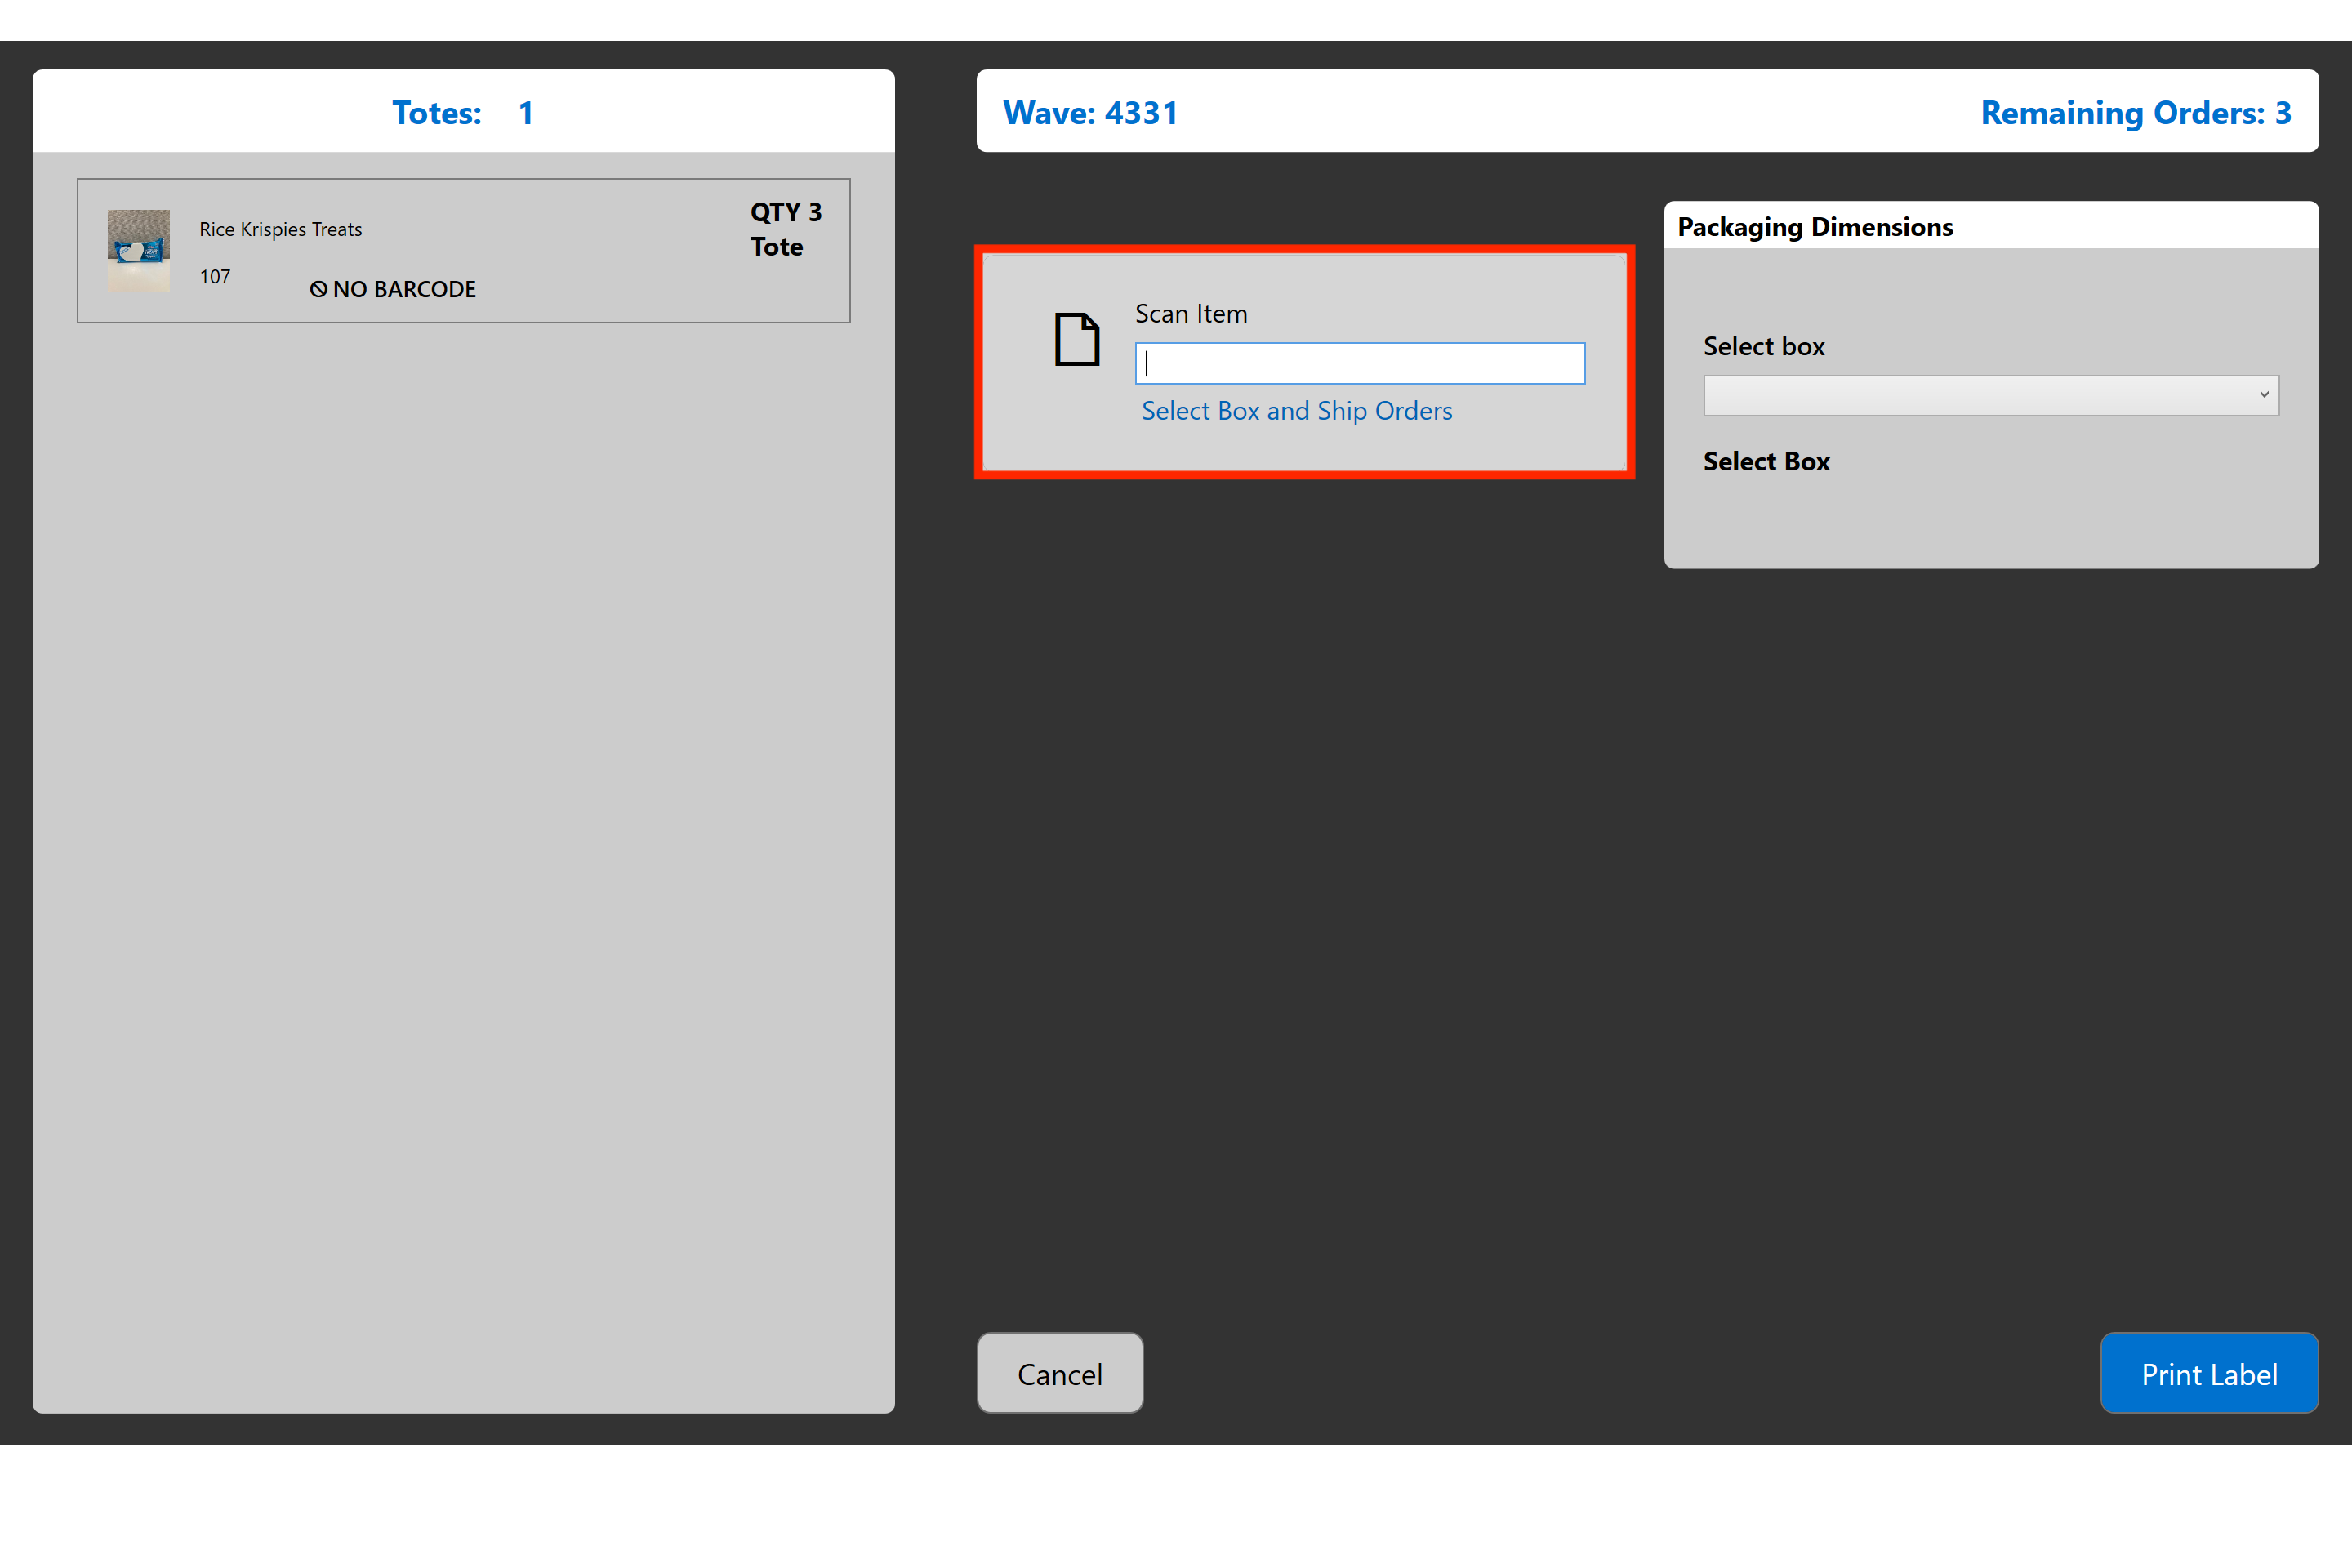
Next, you will choose which box you will be using.
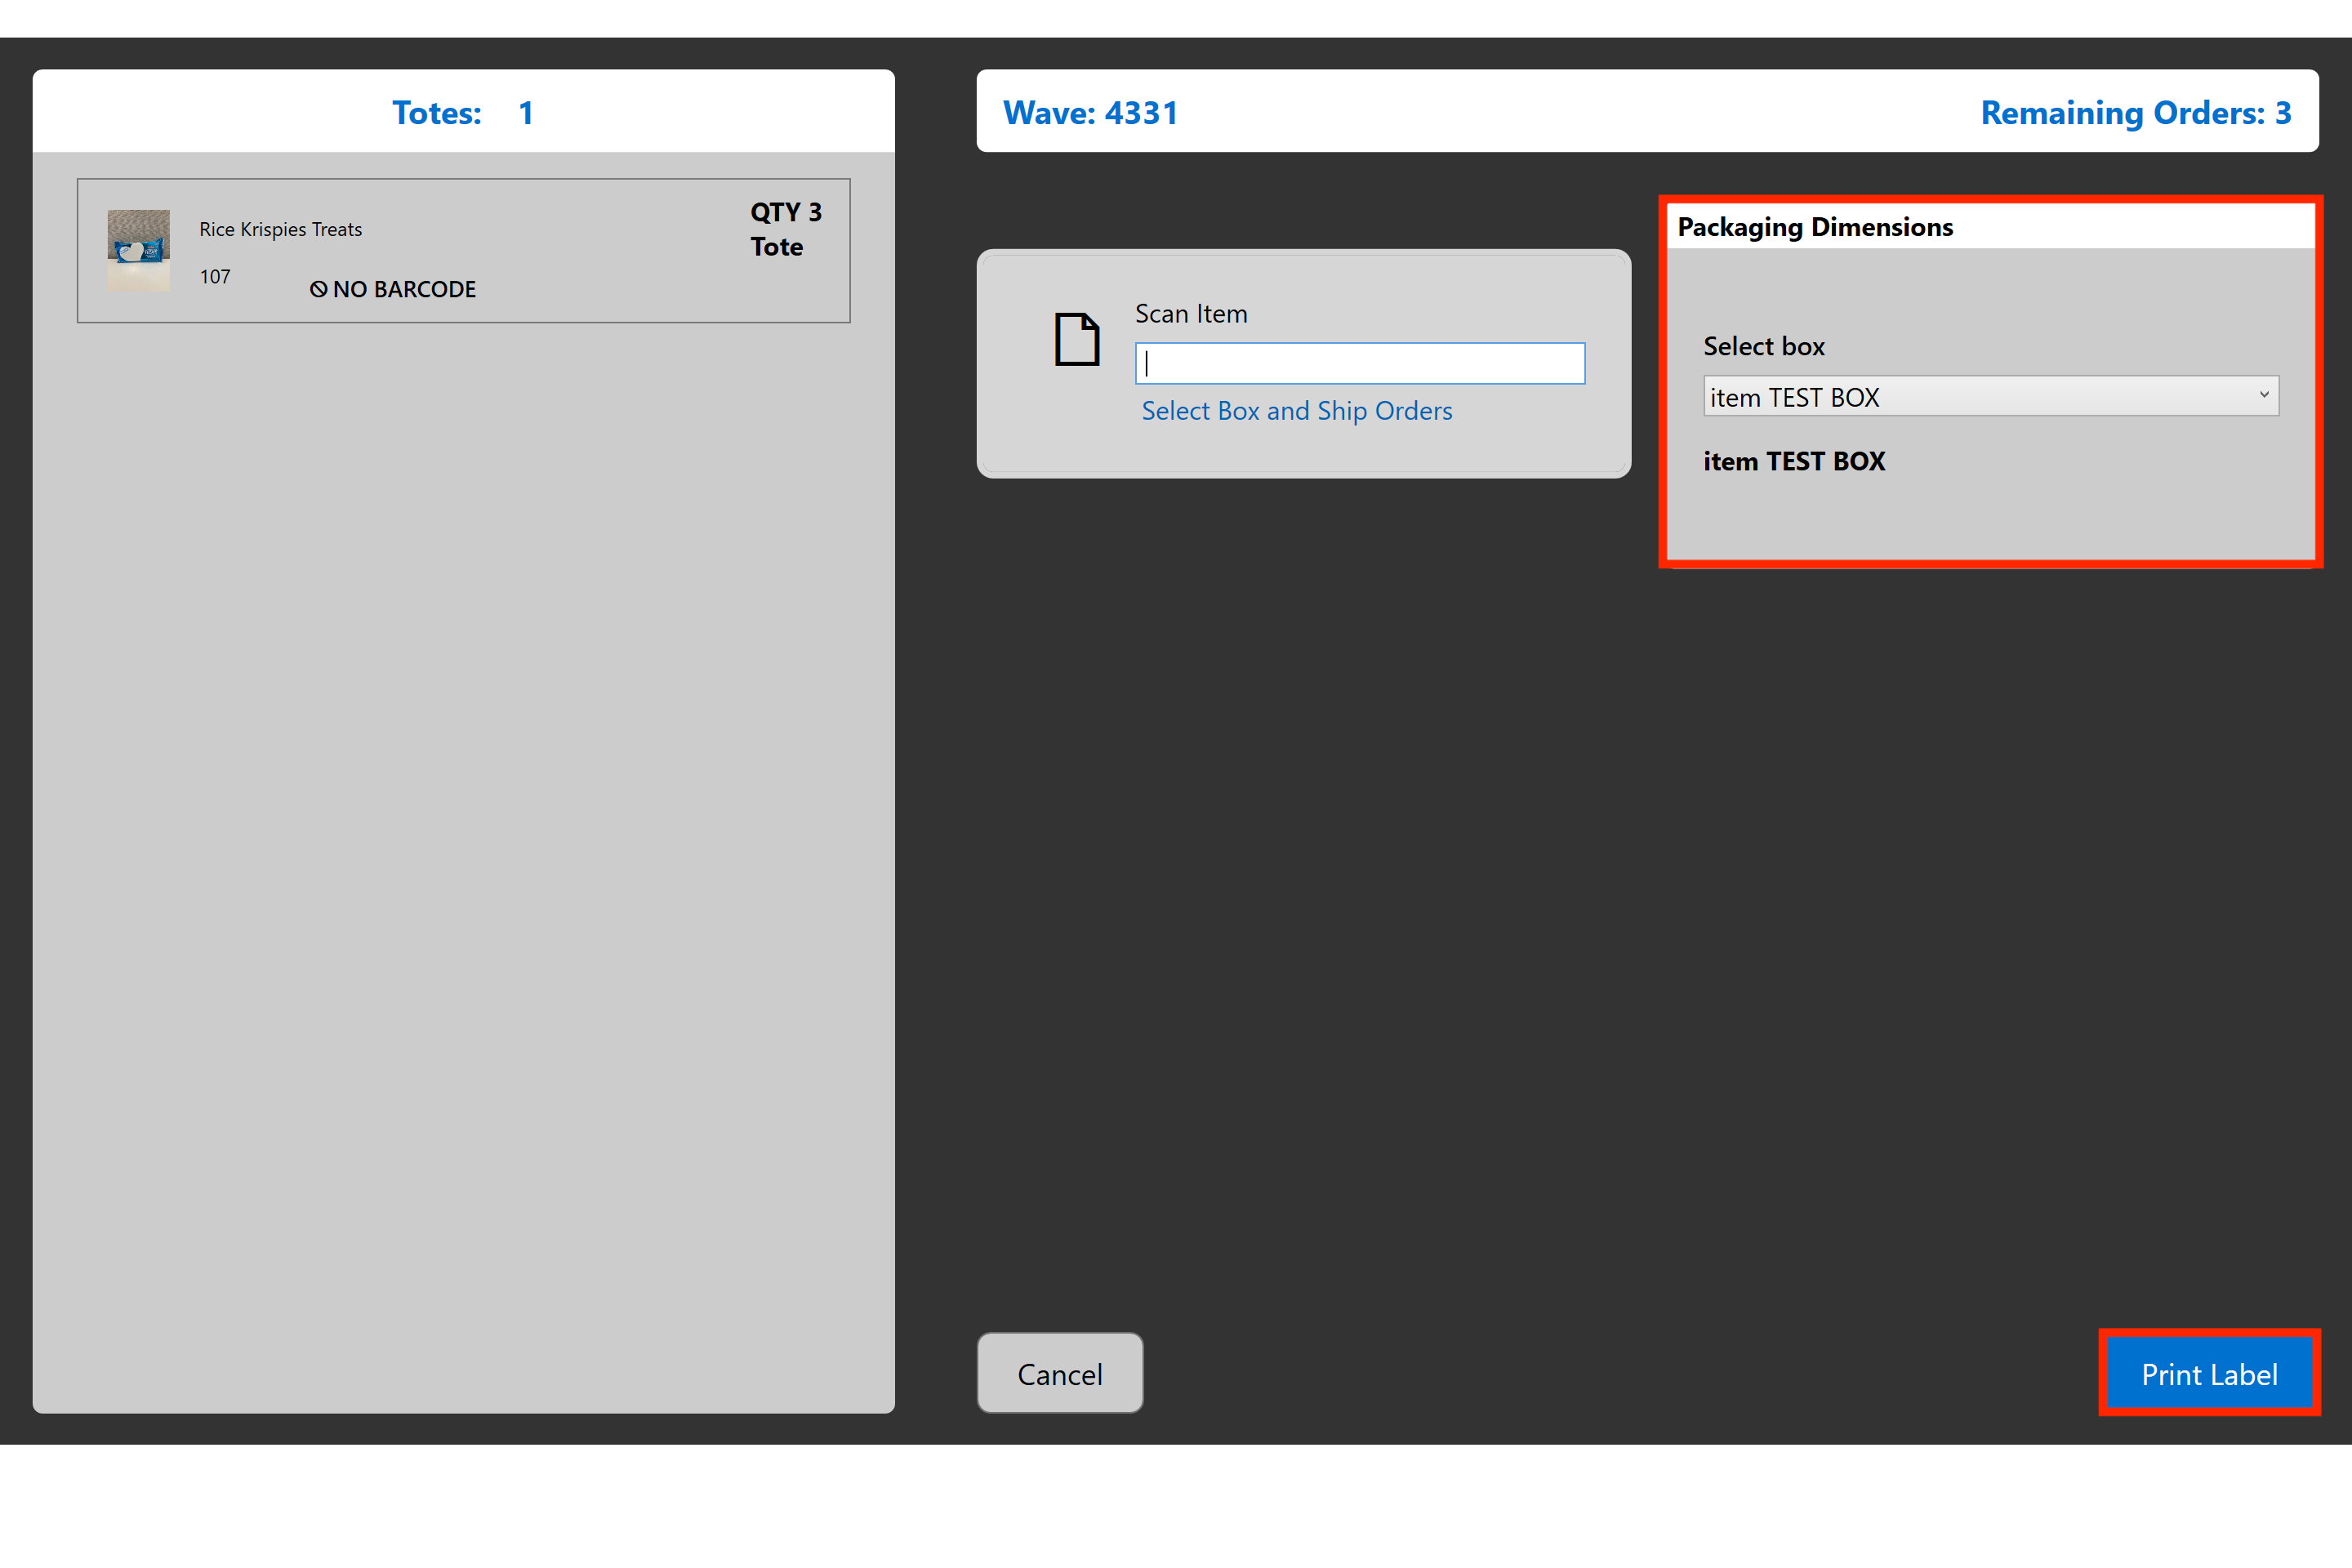
Once the dimensions and weight have been accepted, the end-user can then select "Print Label". ARCA Pack will display a message that states the label is being printed:
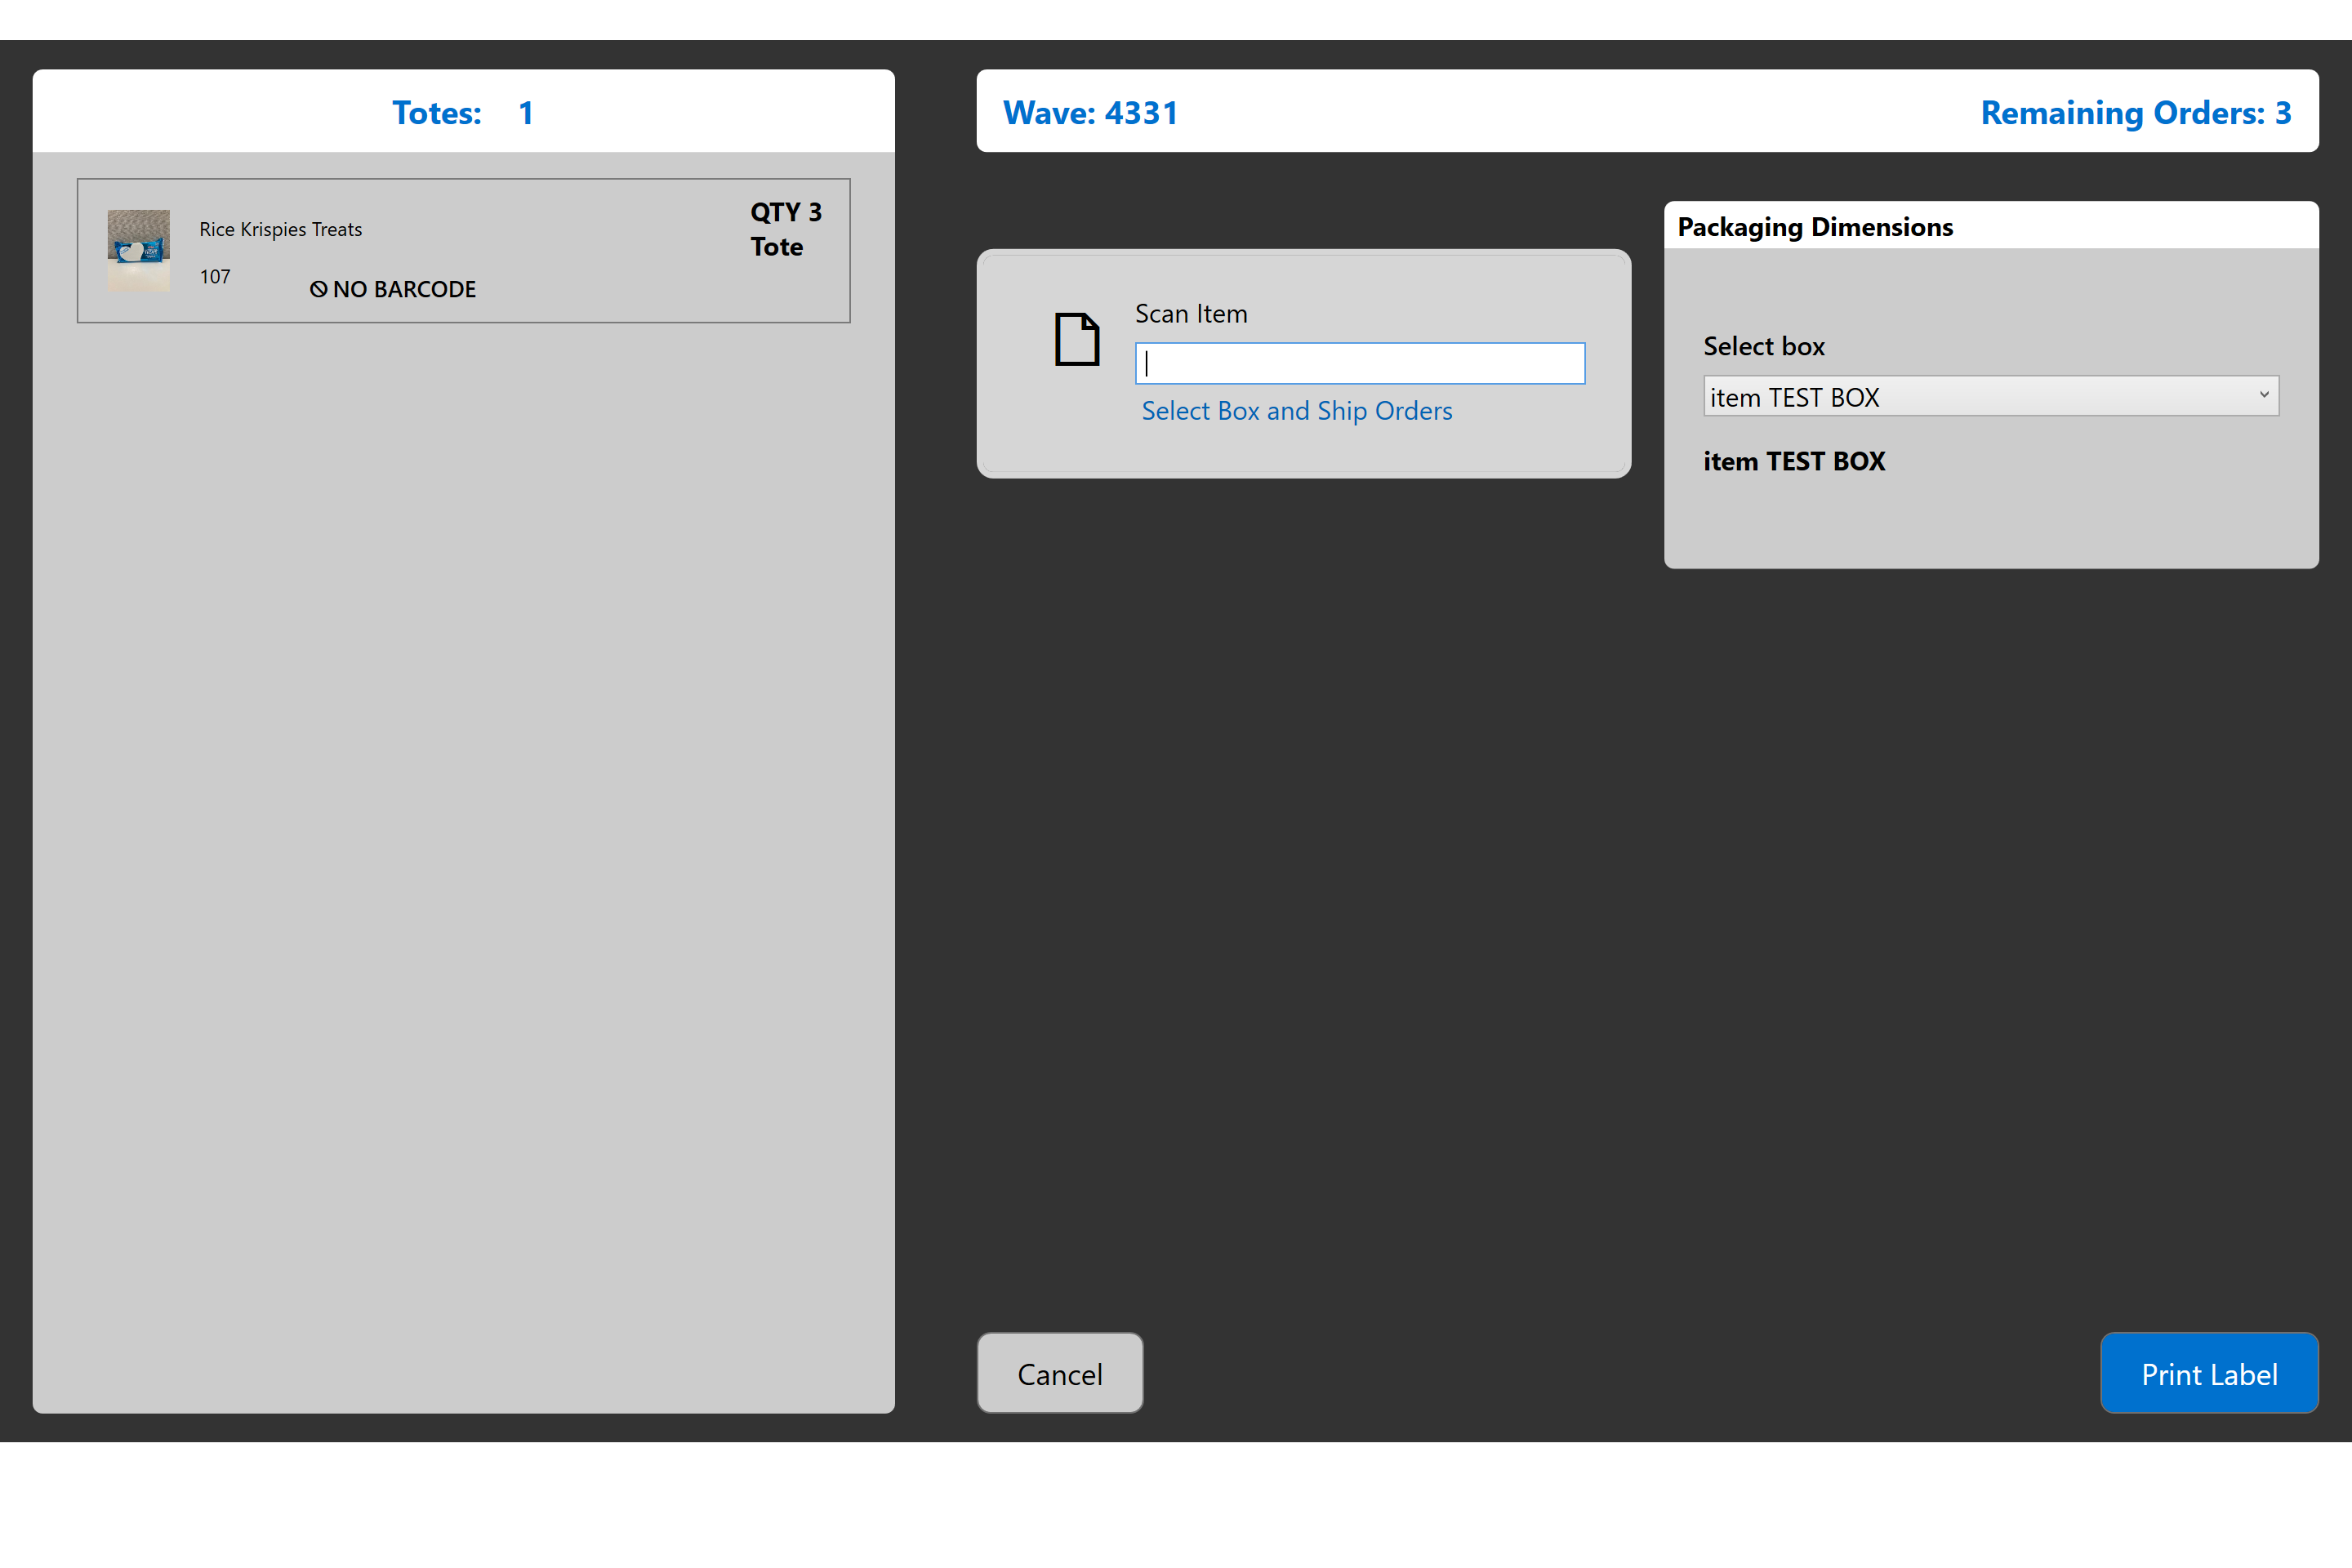
At any time, the end-user can return to the "Settings" menu to log out or to set up the system for a different use.
Troubleshooting
ARCA Pack will also notify end-users if order numbers have already been processed so that they are not shipped multiple times.
If this error displays on the screen, end-users should put the order aside and work with their manager or supervisor to research and resolve it. ARCA Pack will not allow orders to go through again. There isn't an override for this error because it is assumed that the order has been adjudicated.

Put Wall
ARCA Pack has several different functions for fulfilling client orders. This section will cover the "Put Wall" module of the application.
The intent of the module is to:
- Provide information on how Put Wall configuration is set up
- Explain how a wave is loaded and how all of the items are sorted for each order with the associated totes.
Settings
To fulfill orders properly, ARCA Put Wall must be set up correctly to validate that the orders being scanned in are associated with the respective warehouse and client.
Before you start packing the order, the Settings menu should be configured as follows:
REQUIRED SETTINGS
- Change "Select Station Type" to "Put Wall".
- Set the "Select Warehouse" to the correct value, which depends on the client.
- Set "Select Client" to correct client value.
- Set "Label Printer" to the correct value.
- Set "Document Printer" to the correct value.
Then "Save Settings".
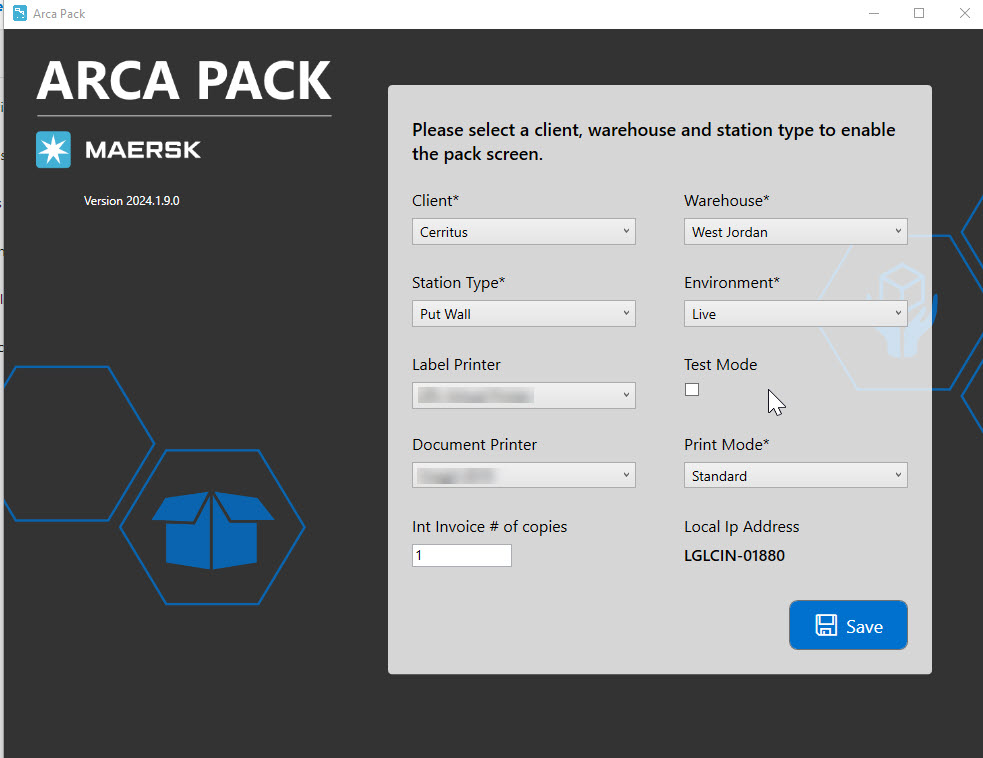
Put Wall Screen
After the settings have been configured, end-users will need to scan their badge to log into ARCA Put Wall.
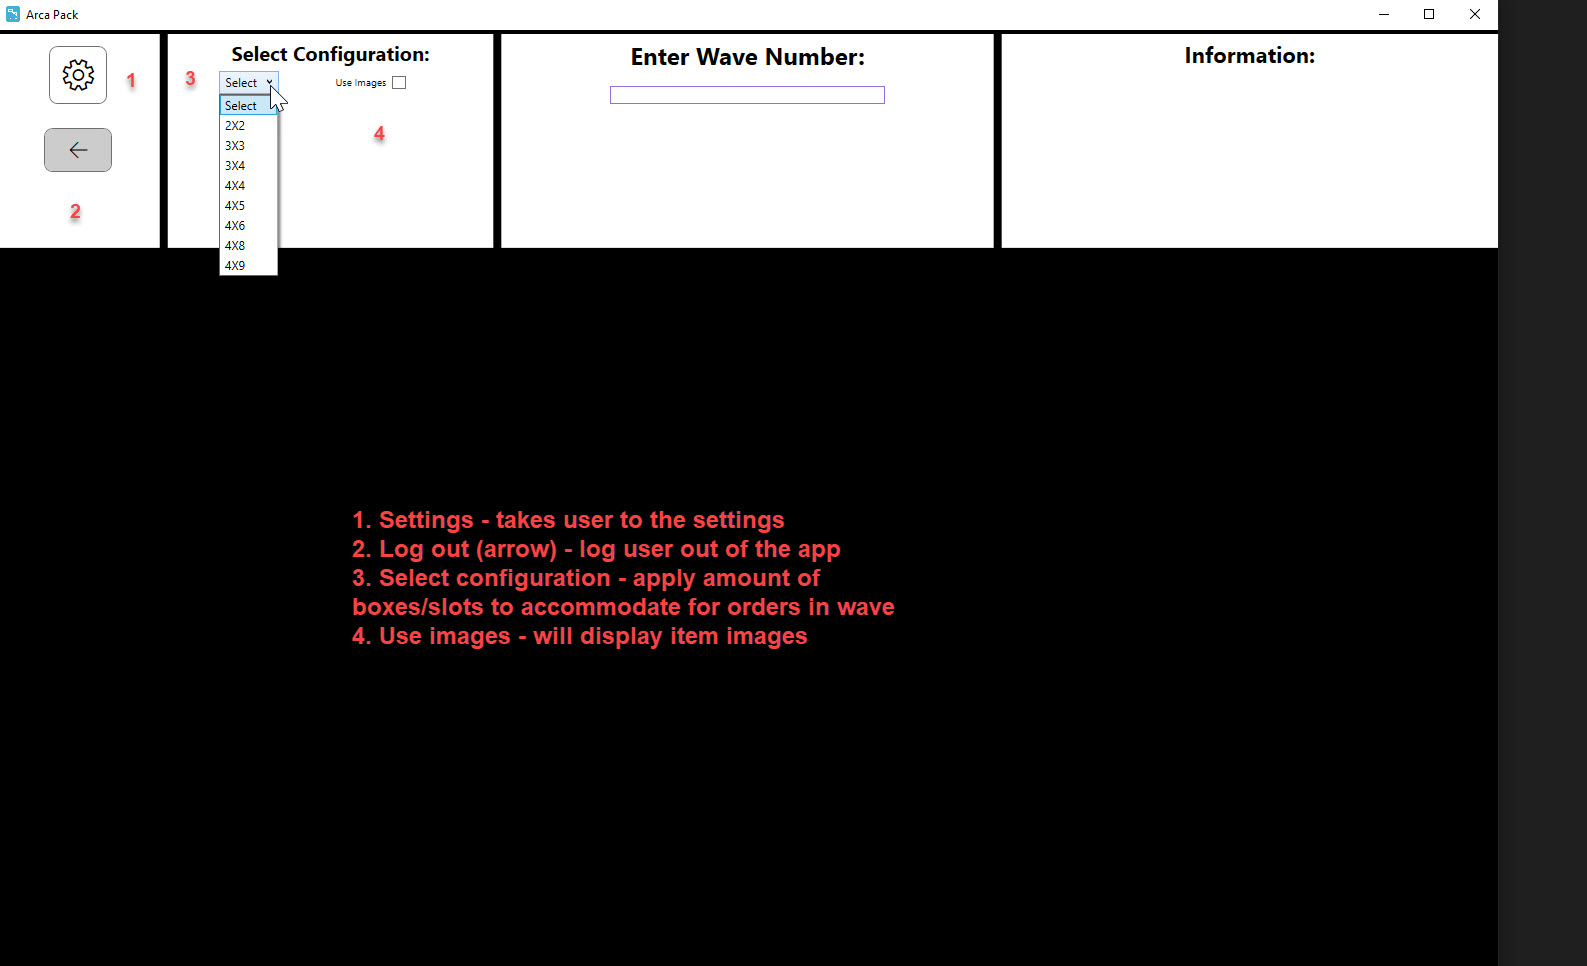
When you open the Put Wall page, you have the options to customize the experience and setup your preferences.
Settings, Log Out, Configuration and Image Options
- Settings - take user back to the settings page
- Log Out - take user back to the login screen
- Select Configuration - Packers will configure the put wall configuration based on the wave and the amount of orders associated to the wave and their totes. This is done by selecting the configuration from the drop-down menu.
- Use Images - This option will display item images if selected.
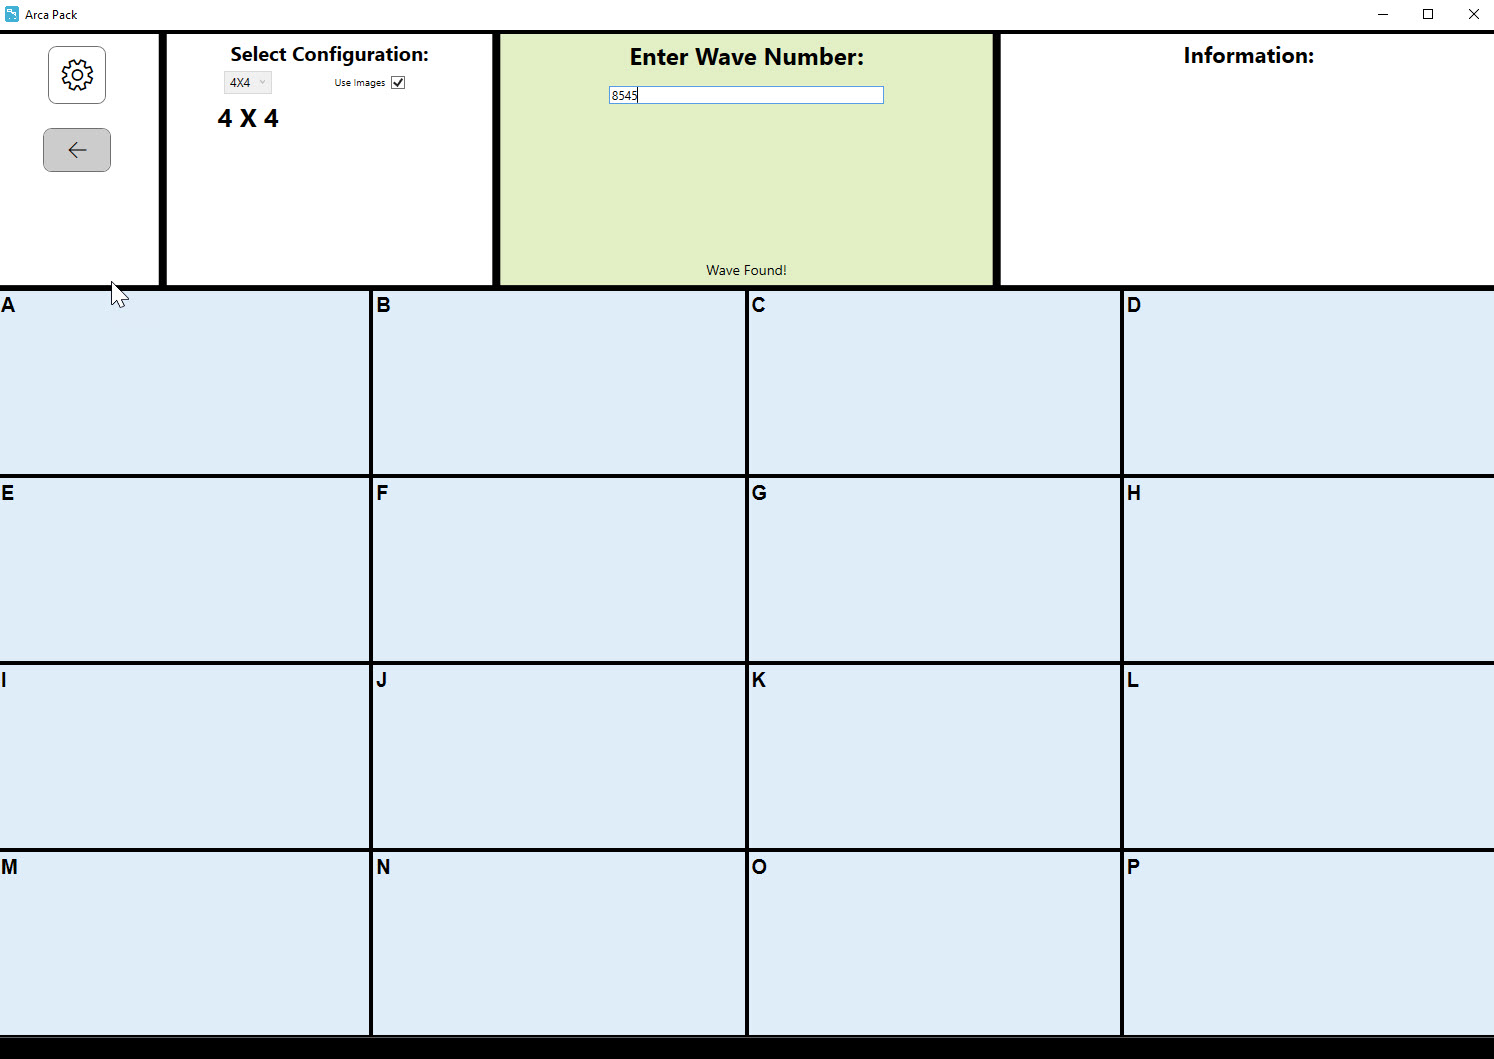
Enter Wave
Enter the wave number.
After the wave number has been entered, a message will be displayed: "Wave Found!".
Scan Orders
The next step is to scan all of the orders that are in that particular wave. As the orders load, it will calculate the total number of items that are in each order. It will also count the number of orders that have been loaded and how many are left for scanning. As the next order is ready to be scanned, the system will tell the user which box the order will be captured in. The tote label is also listed for reference.
Wave Information
- Item count - count of items on this order and none have been scanned at this point.
- Wave number.
- Total Orders - Displays the amount of orders that are included in the wave. As the orders are scanned, they are saved with the remaining orders left to scan.
- Current Box - Displays the box where the order will be scanned and saved.
- Totes - Display all of the totes for this wave which include the items for the orders.
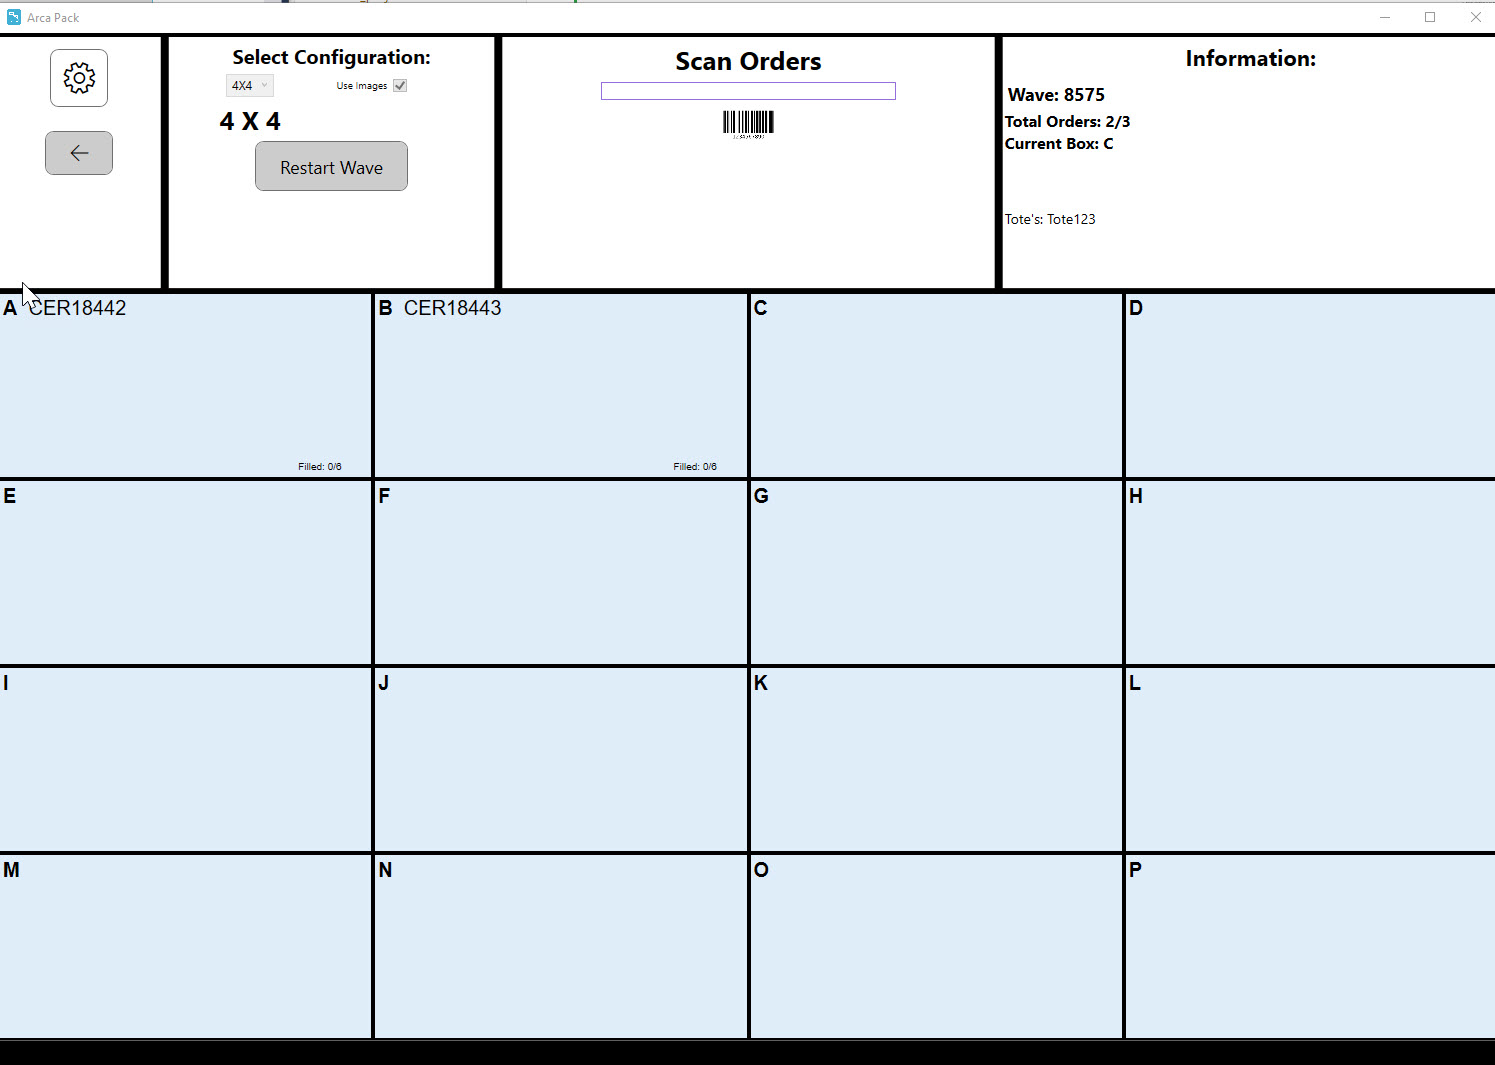
After all of the orders have been scanned for the wave, a message will be displayed: "Orders Setup".
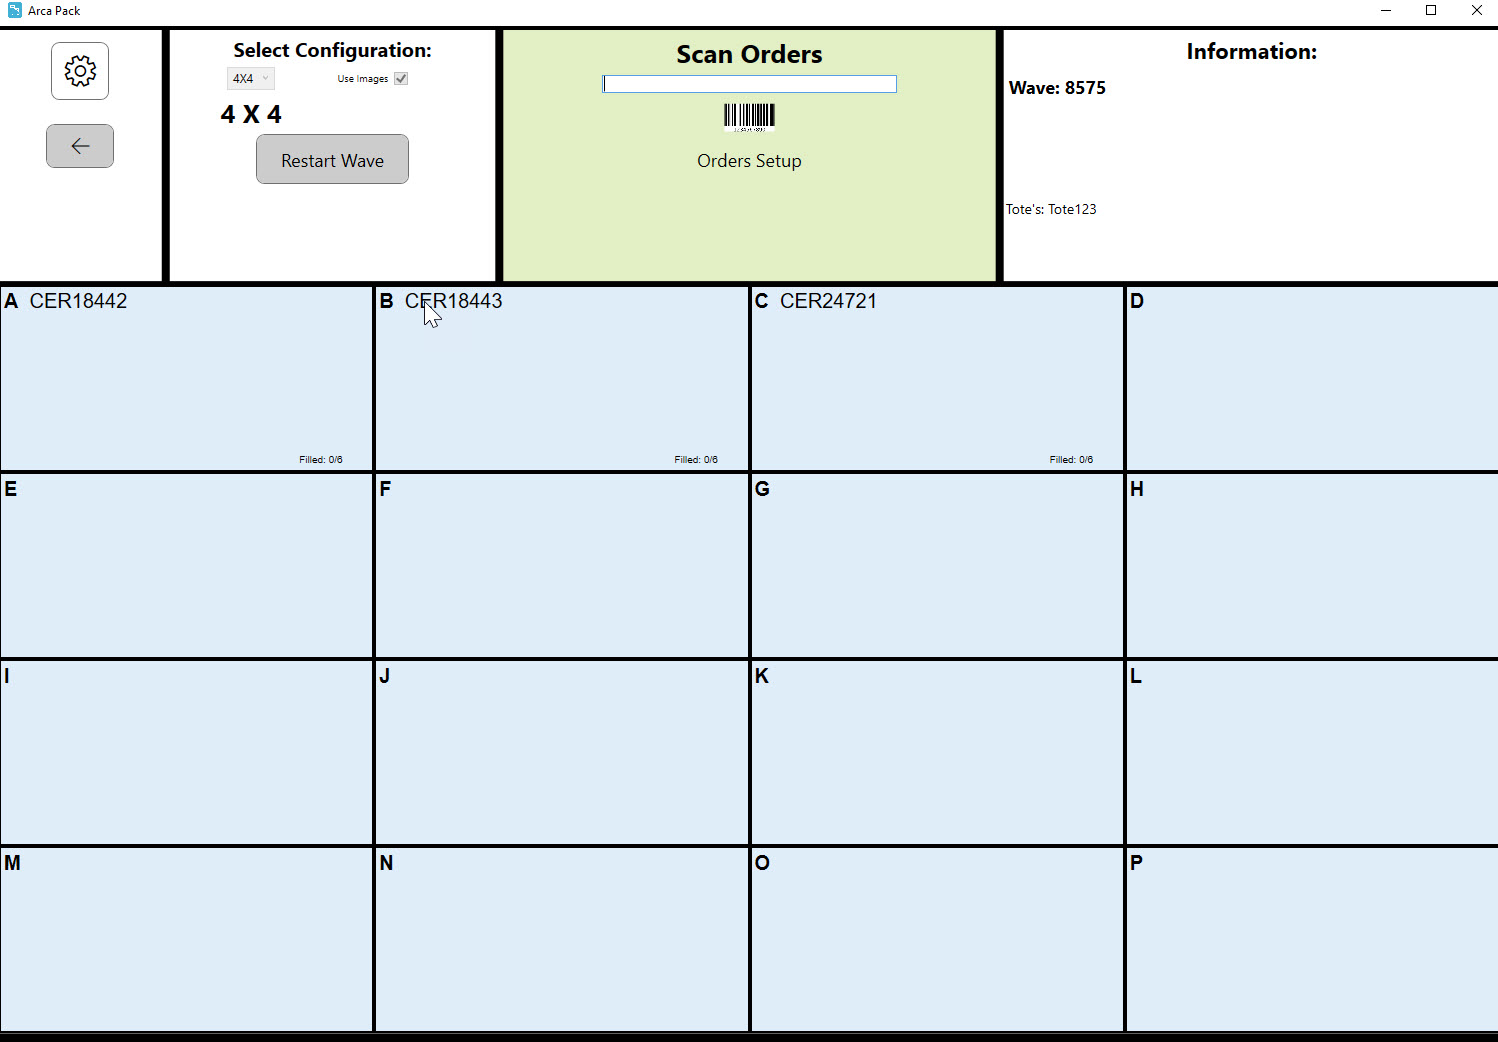
The next step is to start scanning the items in the totes. If an order has the same item as another order, it will start putting the item in the first order box. As the items are scanned, it will display how many have been filled for that order and the amount that is left.
The information will be displayed in the grid showing all of the item details. It lets the user know the item description, item code, UPC, and order.
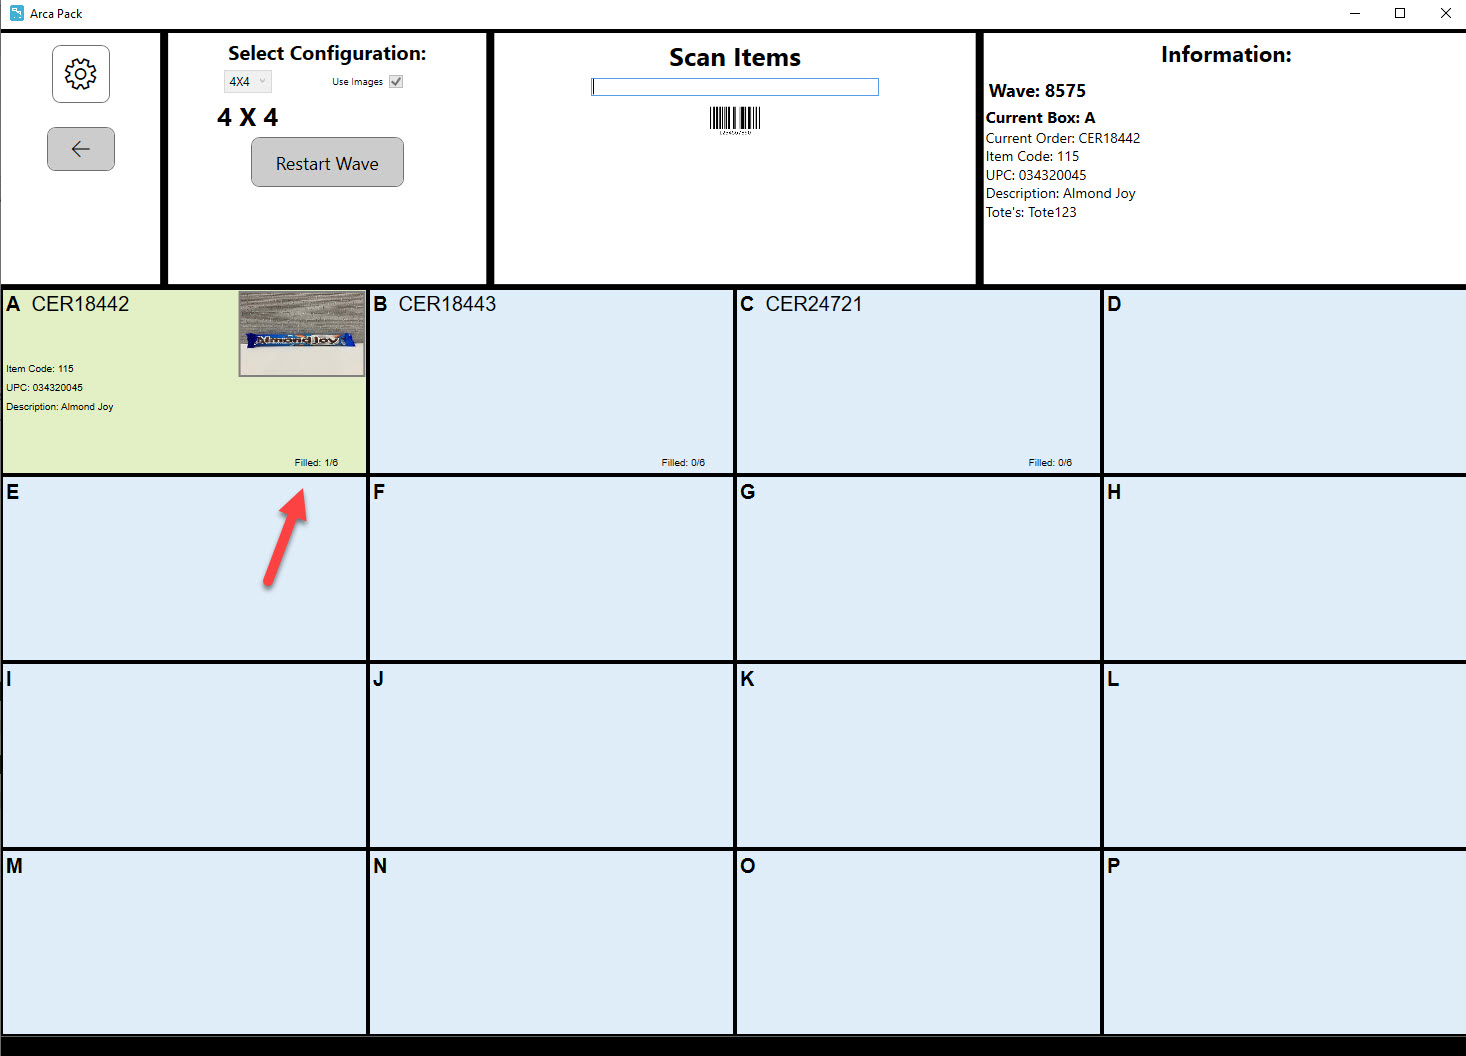
After all of the items for the order have been filled, a check mark will be displayed in the order box.

After all of the wave is completed, a user can click on "Start New Wave" button in order to enter a new wave.

If at any point in time, a user would like to restart the wave, they can do so by clicking on the "Restart Wave" button

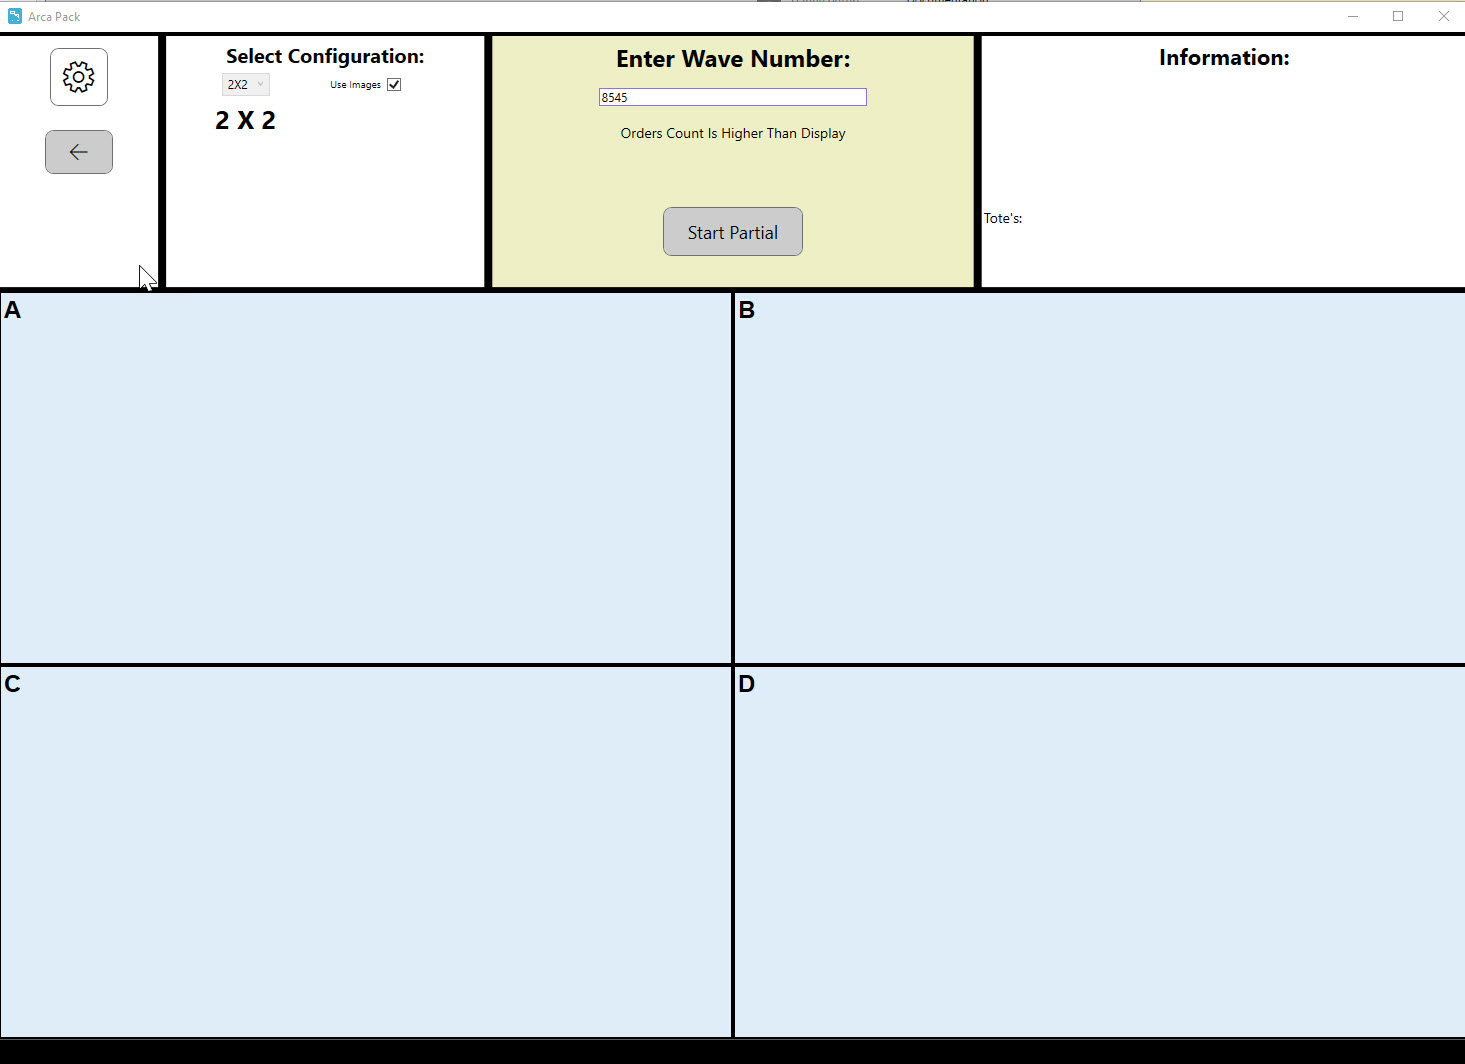
If a configuration has been setup that happens to be smaller than the amount of orders in the wave, user can still complete the wave.
A message is displayed to warn the user: "Orders Count is Higher Than Display" All the user then has to do is click on the "Start Partial" button.
The user will then scan all of the orders that the screen will allow.
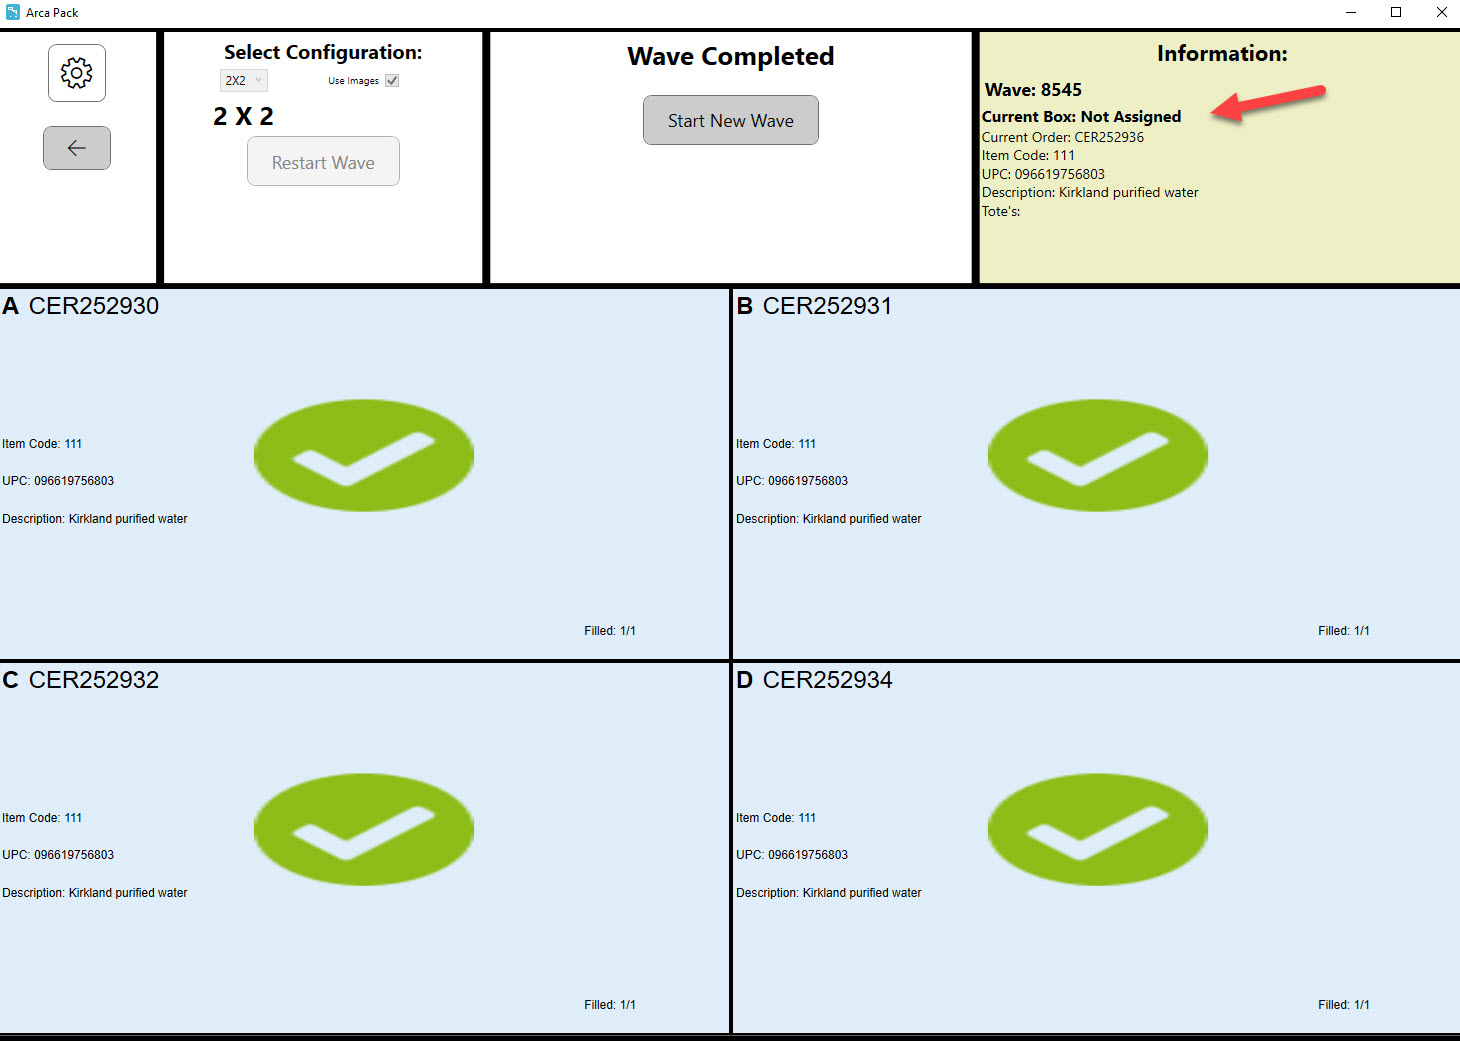
Once all of the orders in the screen have been completed, the put wall system will still recognize the orders in the wave that are not displayed on the screen. Once the items in the tote are scanned, it will recognize the order that needs to be fulfilled. The current box will read, not assigned and display the details in the information box.
Bulk Serial Scan
ARCA Pack has several different functions for fulfilling client orders. This section will cover the "Bulk Serial Scan" module of the application.
The intent of the module is to:
- Provide information on how Bulk Serial configuration is set up
- Explain how a user will scan individual item serial numbers.
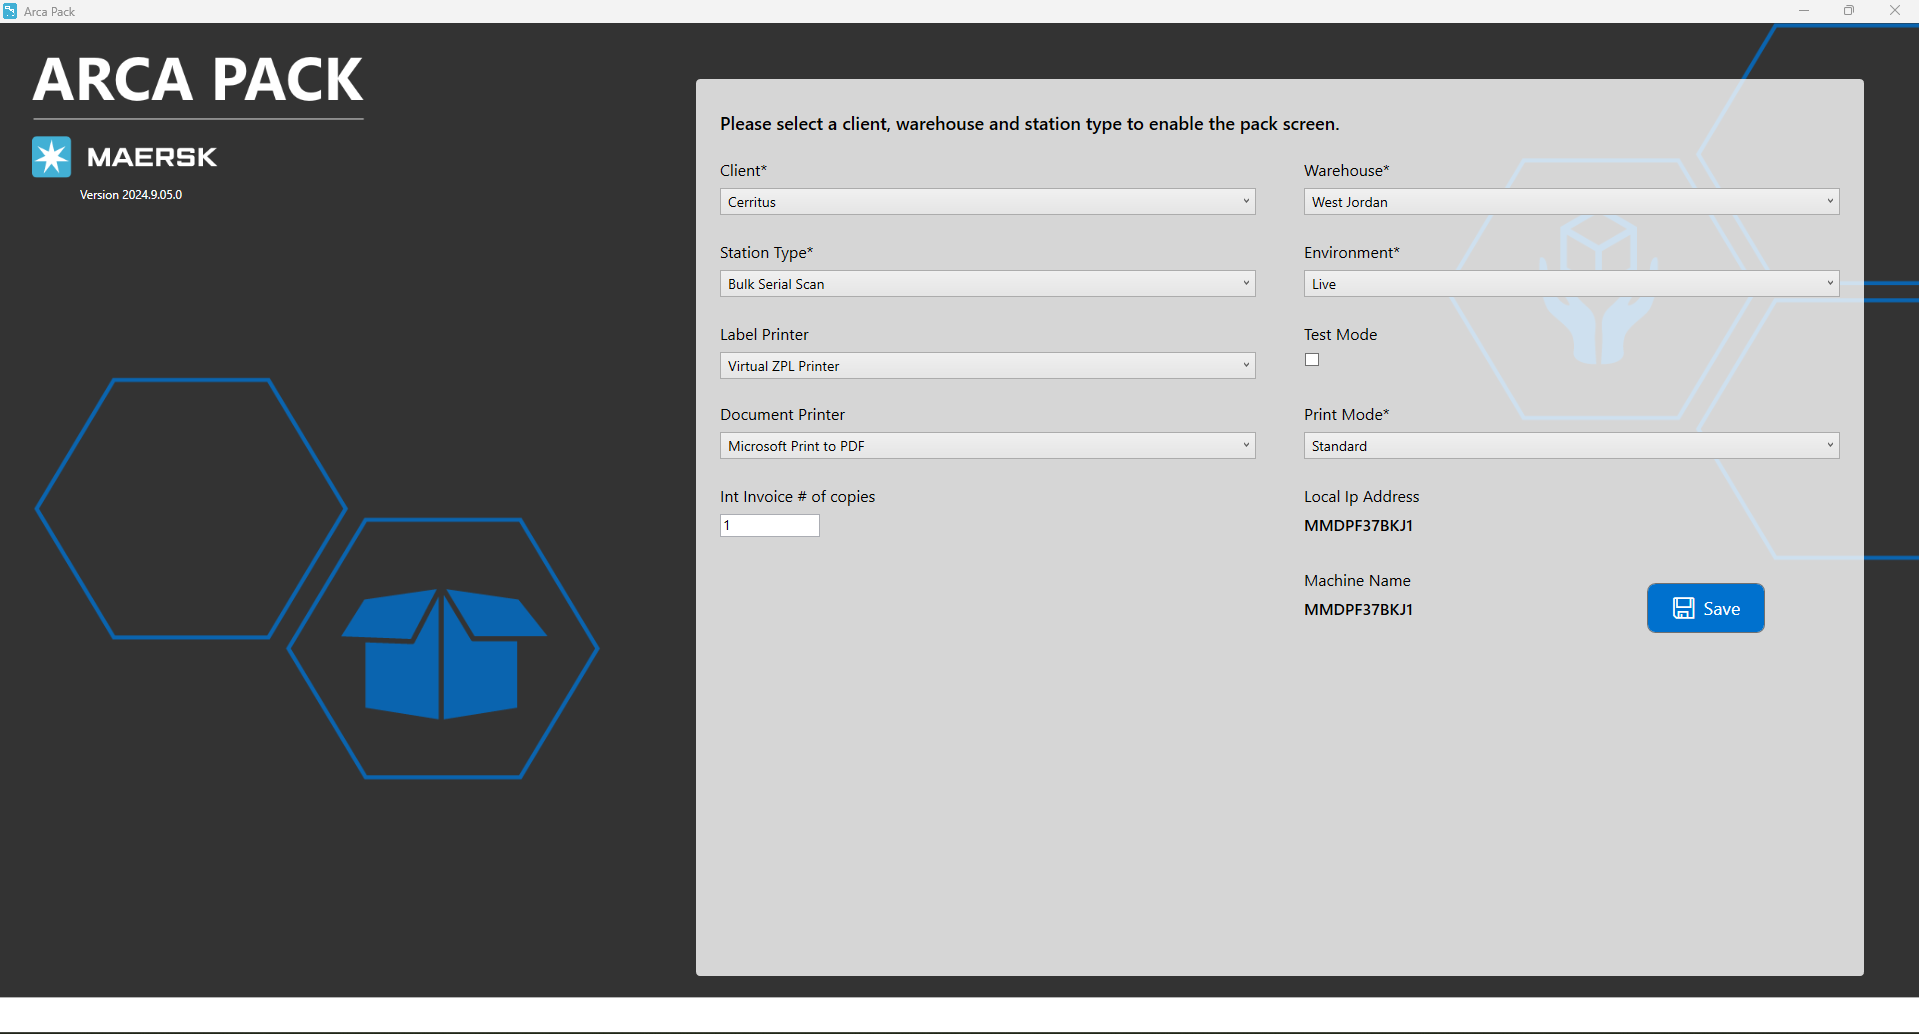
Settings
Before you start packing the order, the Settings menu should be configured as follows:
REQUIRED SETTINGS
- Change "Select Station Type" to "Bulk Serial Scan".
- Set the "Select Warehouse" to the correct value, which depends on the client.
- Set "Select Client" to correct client value.
- Set "Label Printer" to the correct value.
- Set "Document Printer" to the correct value.
Then "Save Settings".
Bulk Serial Scan
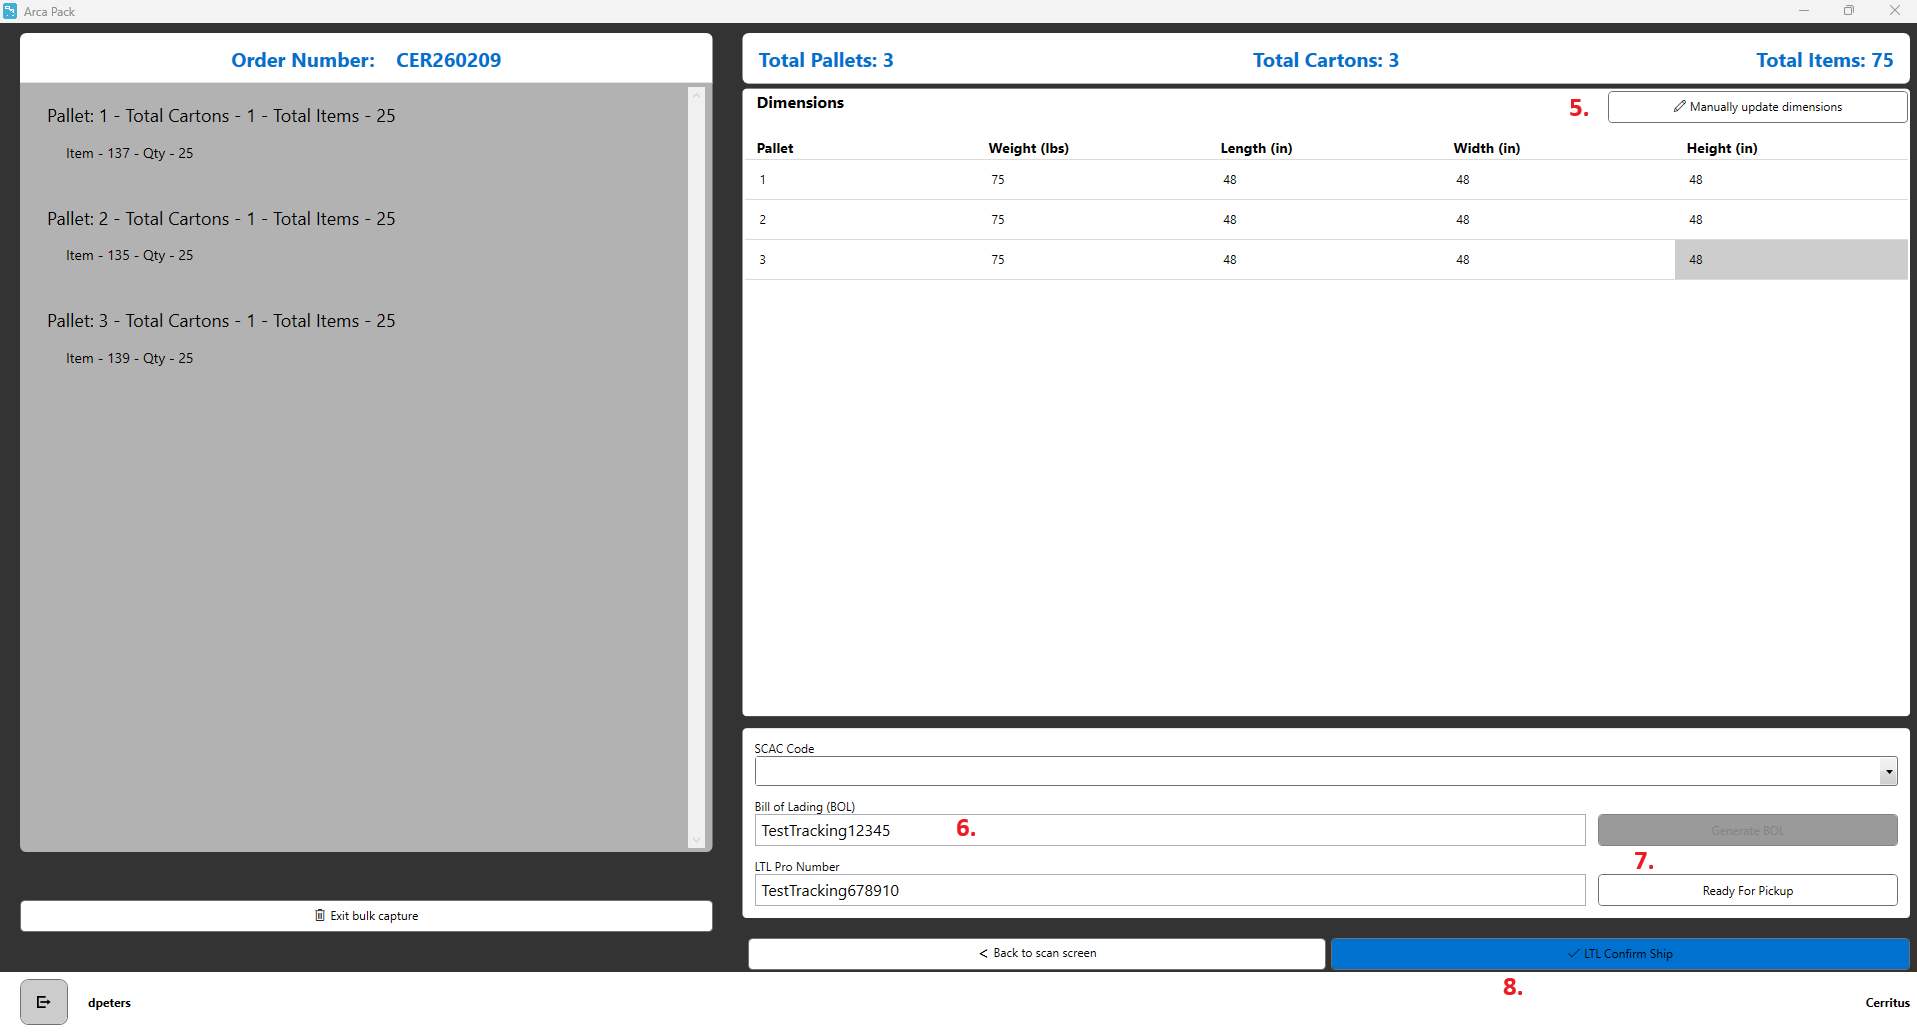
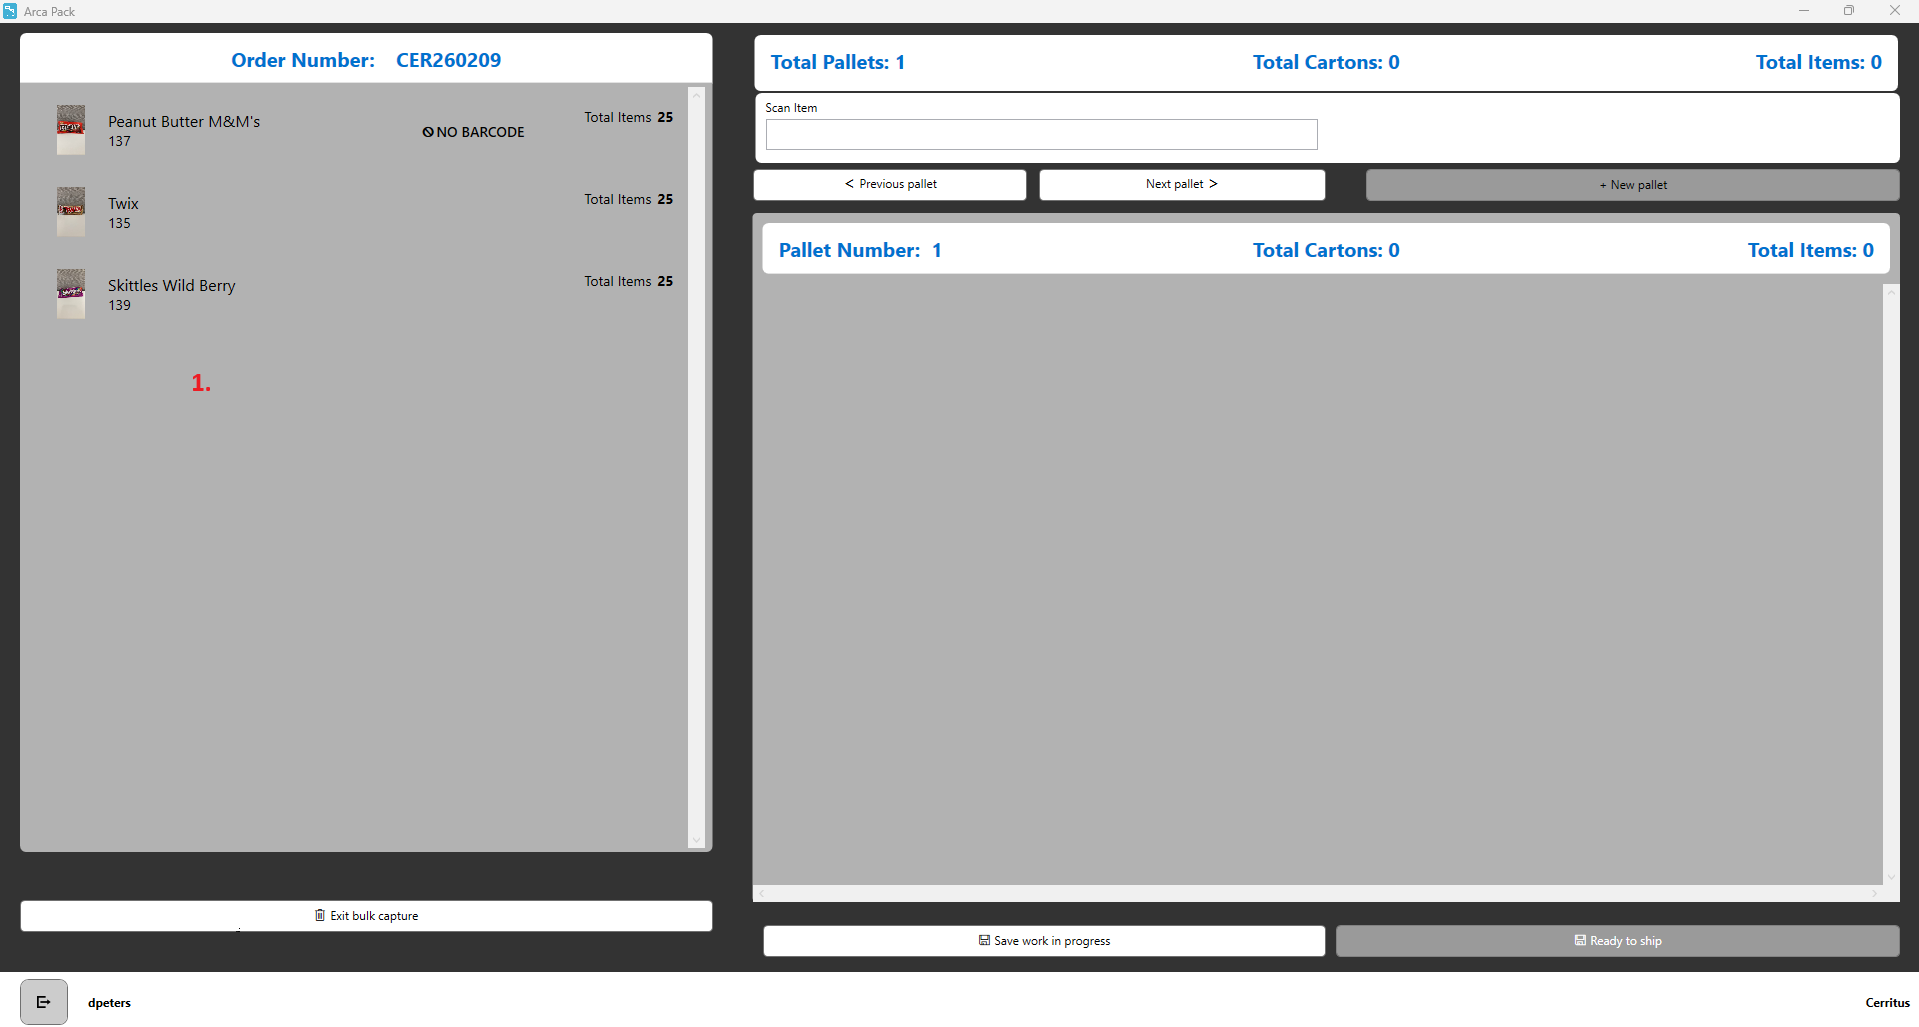
This feature will allow the user to build out pallets and cartons while scanning individual serial numbers during the pack out process. This screen will interact with business rules around serial uniqueness and item serial capture requirements so remember to verify your client’s setup. The order must be in a picked status to begin.
- Scan order number. Items and total quantity to be scanned will be shown on the left of the screen. Any existing packages on the order will be shown on the right. The user can scan items onto an existing pallet or start a new pallet.
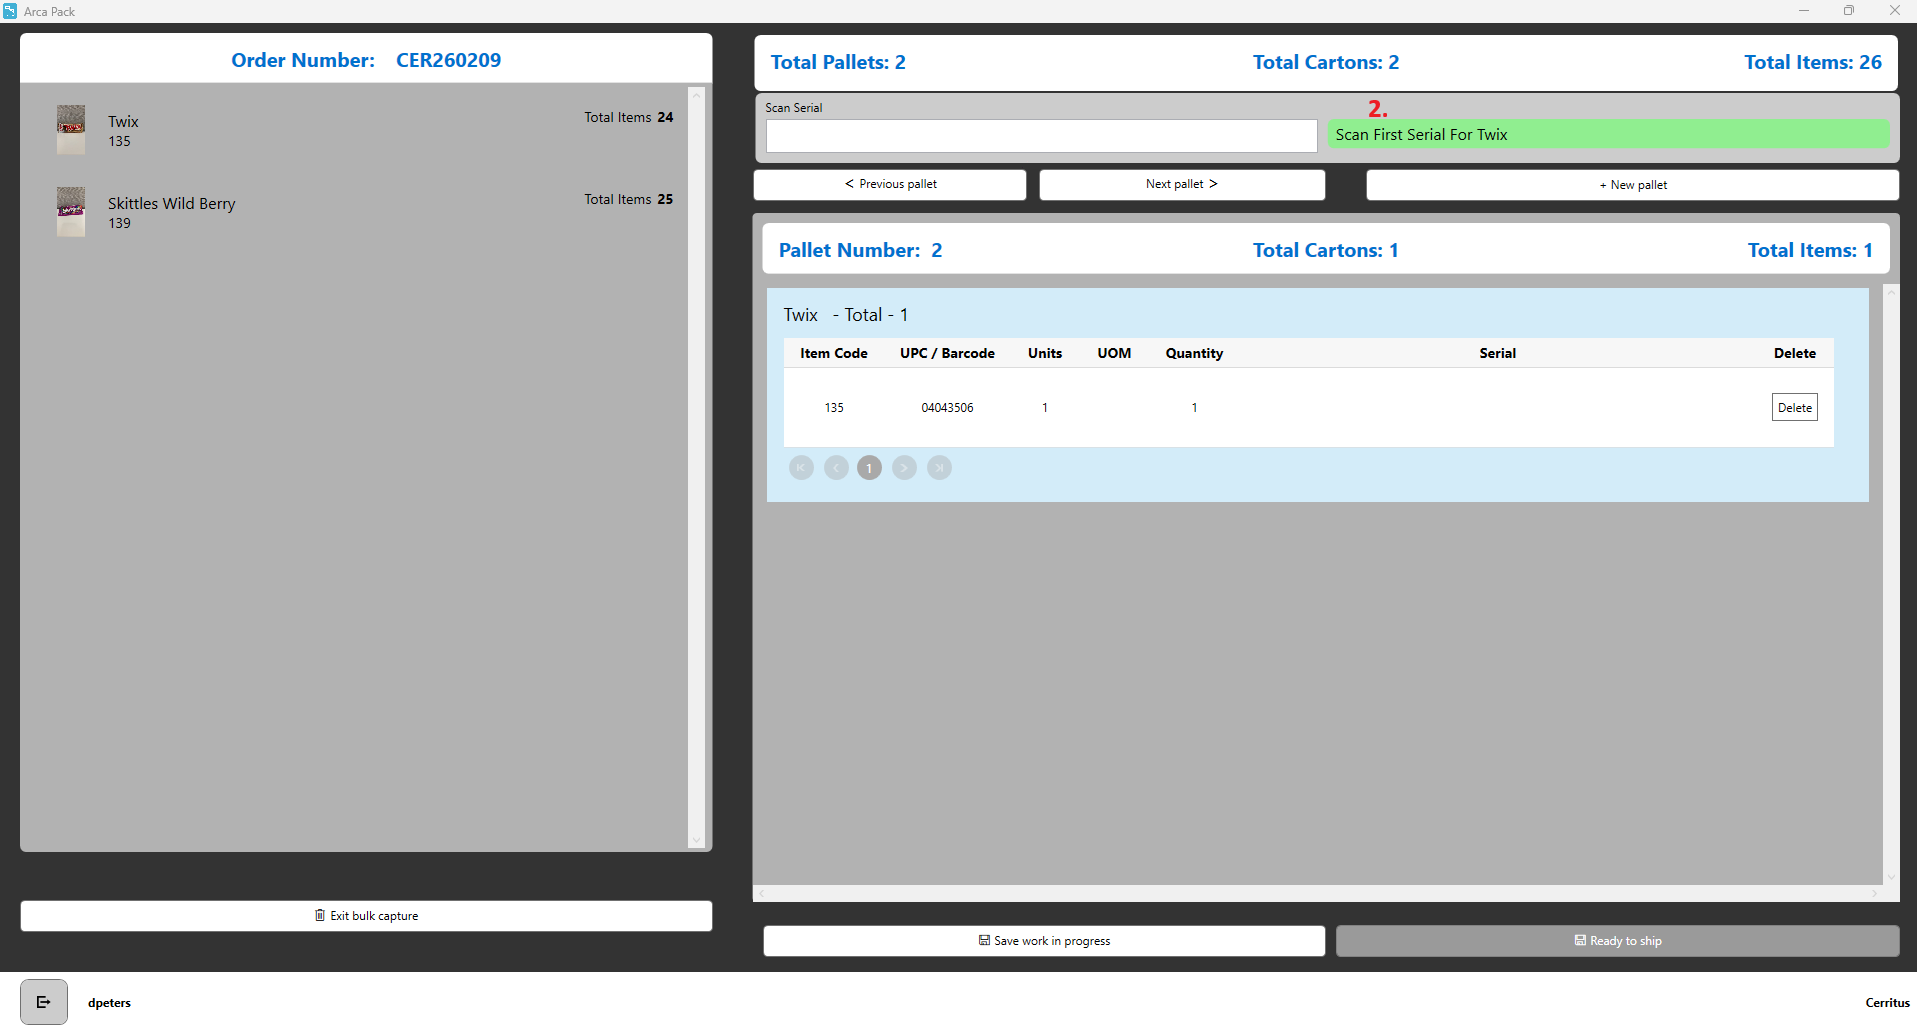
- Scan first item. If that item requires a serial number, user will be prompted to scan the first serial number for that item. If that item requires additional serial scans the user will receive prompts to scan second or third serials if applicable. When the final required serial numbers have been scanned a successful scan completed message will be shown.
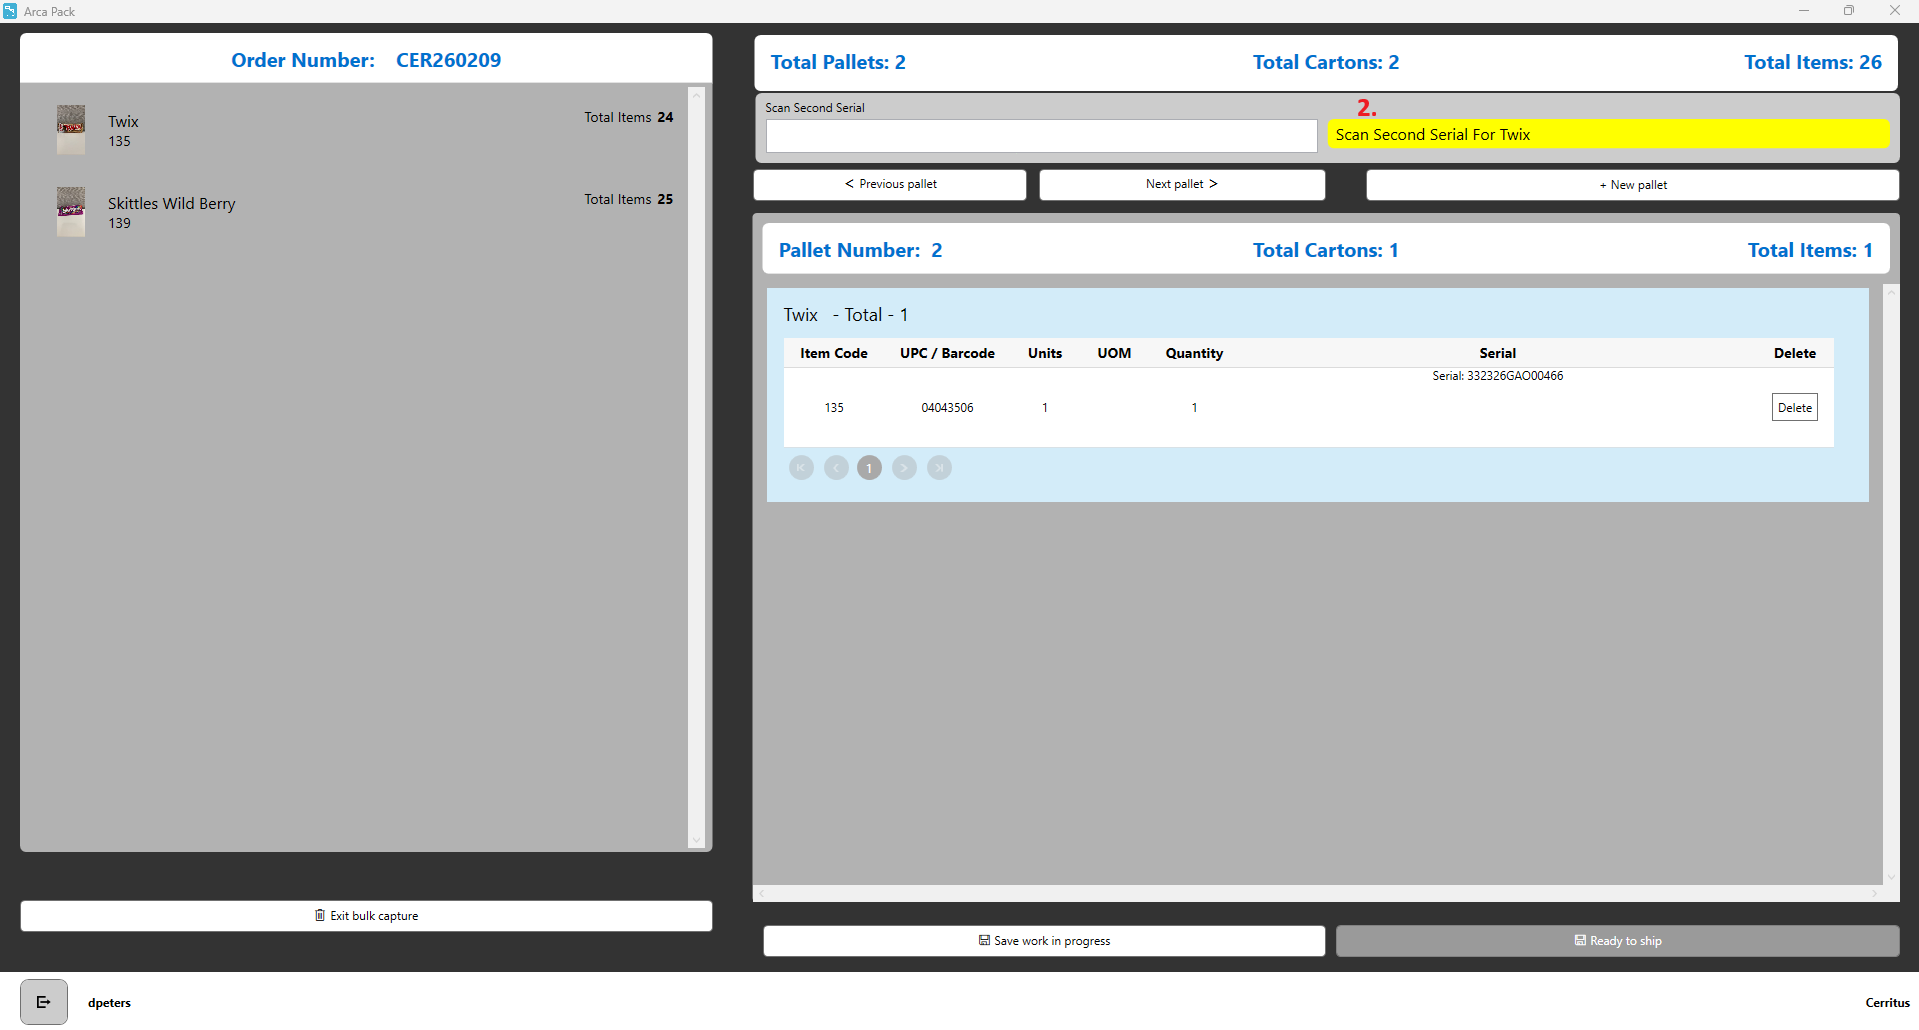
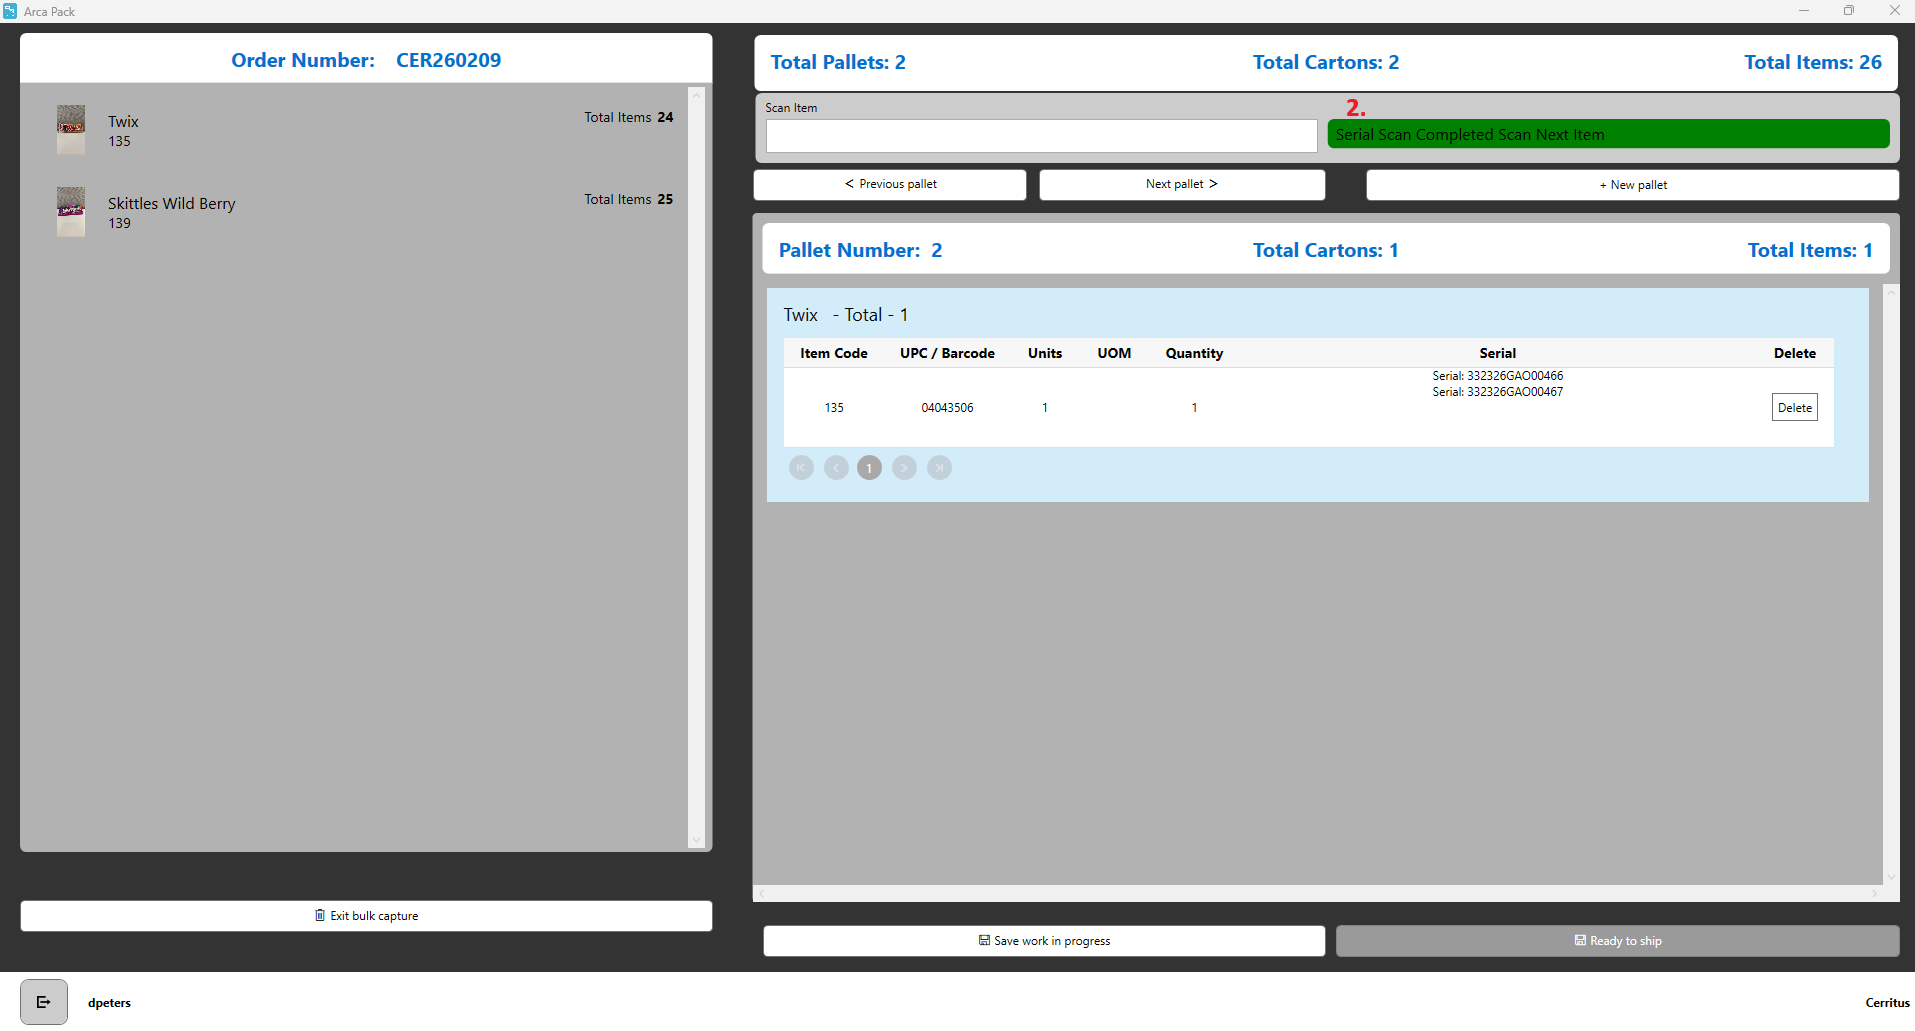
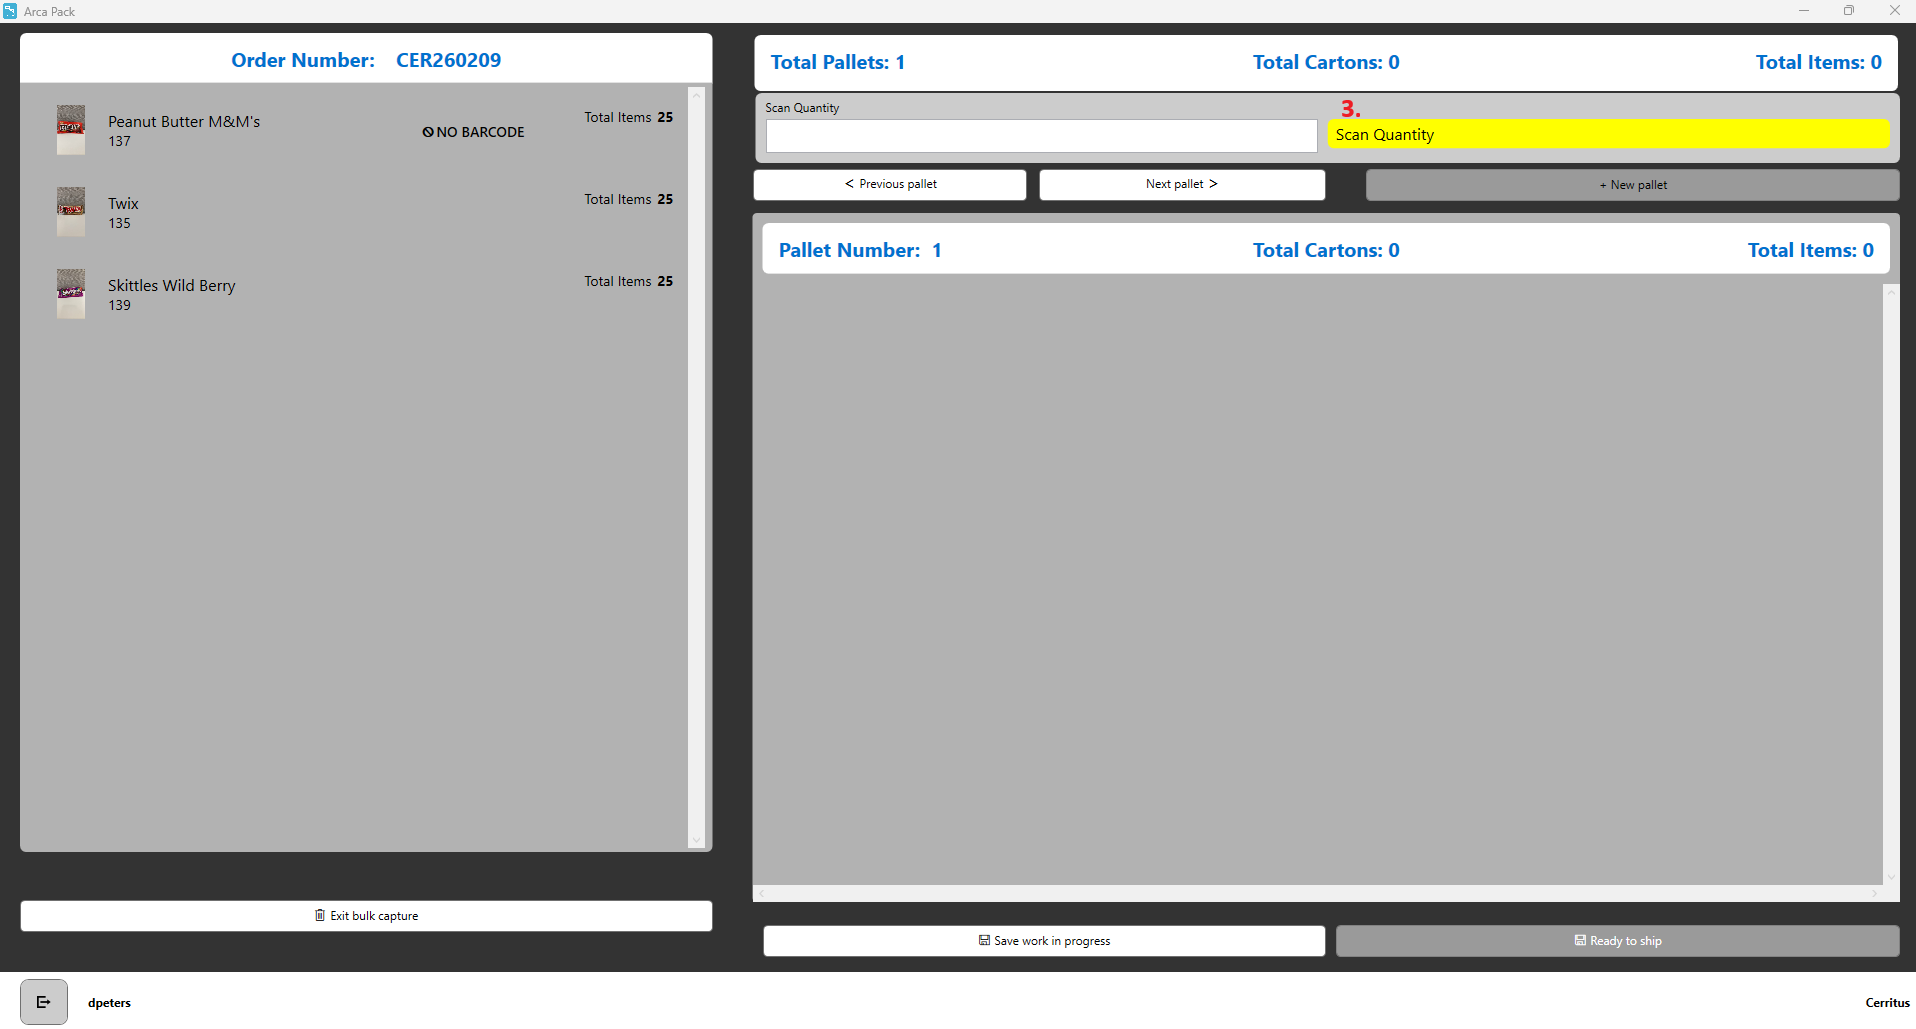
- Scan next item. If that item does not require a serial number, user will be prompted to scan the quantity for that item. The entire quantity entered will be added to a single carton on the current pallet.
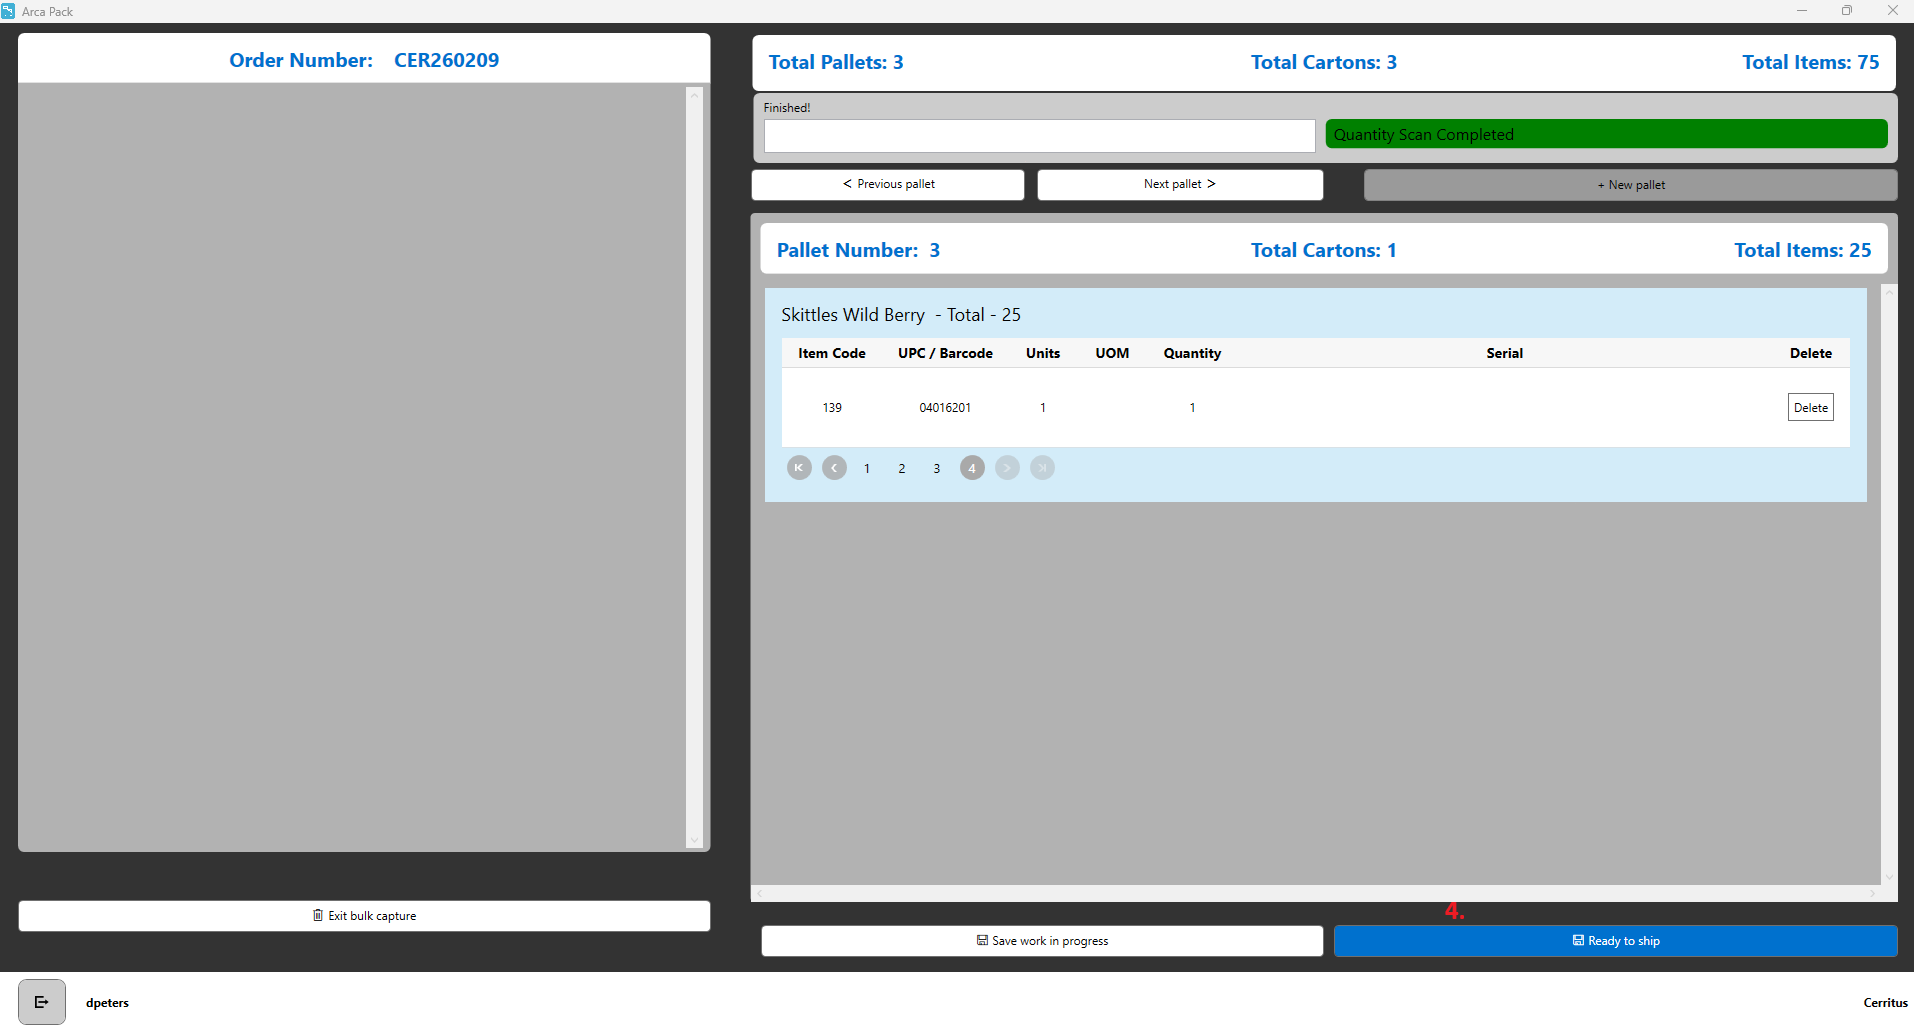
- When all the order items have been scanned onto pallets click on Ready to ship.
Click on manually update dimensions. Enter dimensions and weights for each pallet on the order.
Enter tracking numbers under BOL and LTL Pro number fields.
Click on Ready for pickup, this will change the order status from Picked to Packed.
Click on LTL Confirm Ship to ship and close out the order.
