ARCA Pick
Order Pick
When an order needs to be fulfilled by a warehouse worker, they will use their workstation to scan in the order ID.
The entire order will be picked within a pick and pack station.
All items on the order will be picked to completion, within the respective pick area.
If multiple pick zones are needed to complete the order, the manager will setup the order configurations as needed.
The intent of the module is to:
- Provide information on how an order is picked.
- Explain how a single order can be picked complete using a single end-user.
Session Setup
Badge Scan
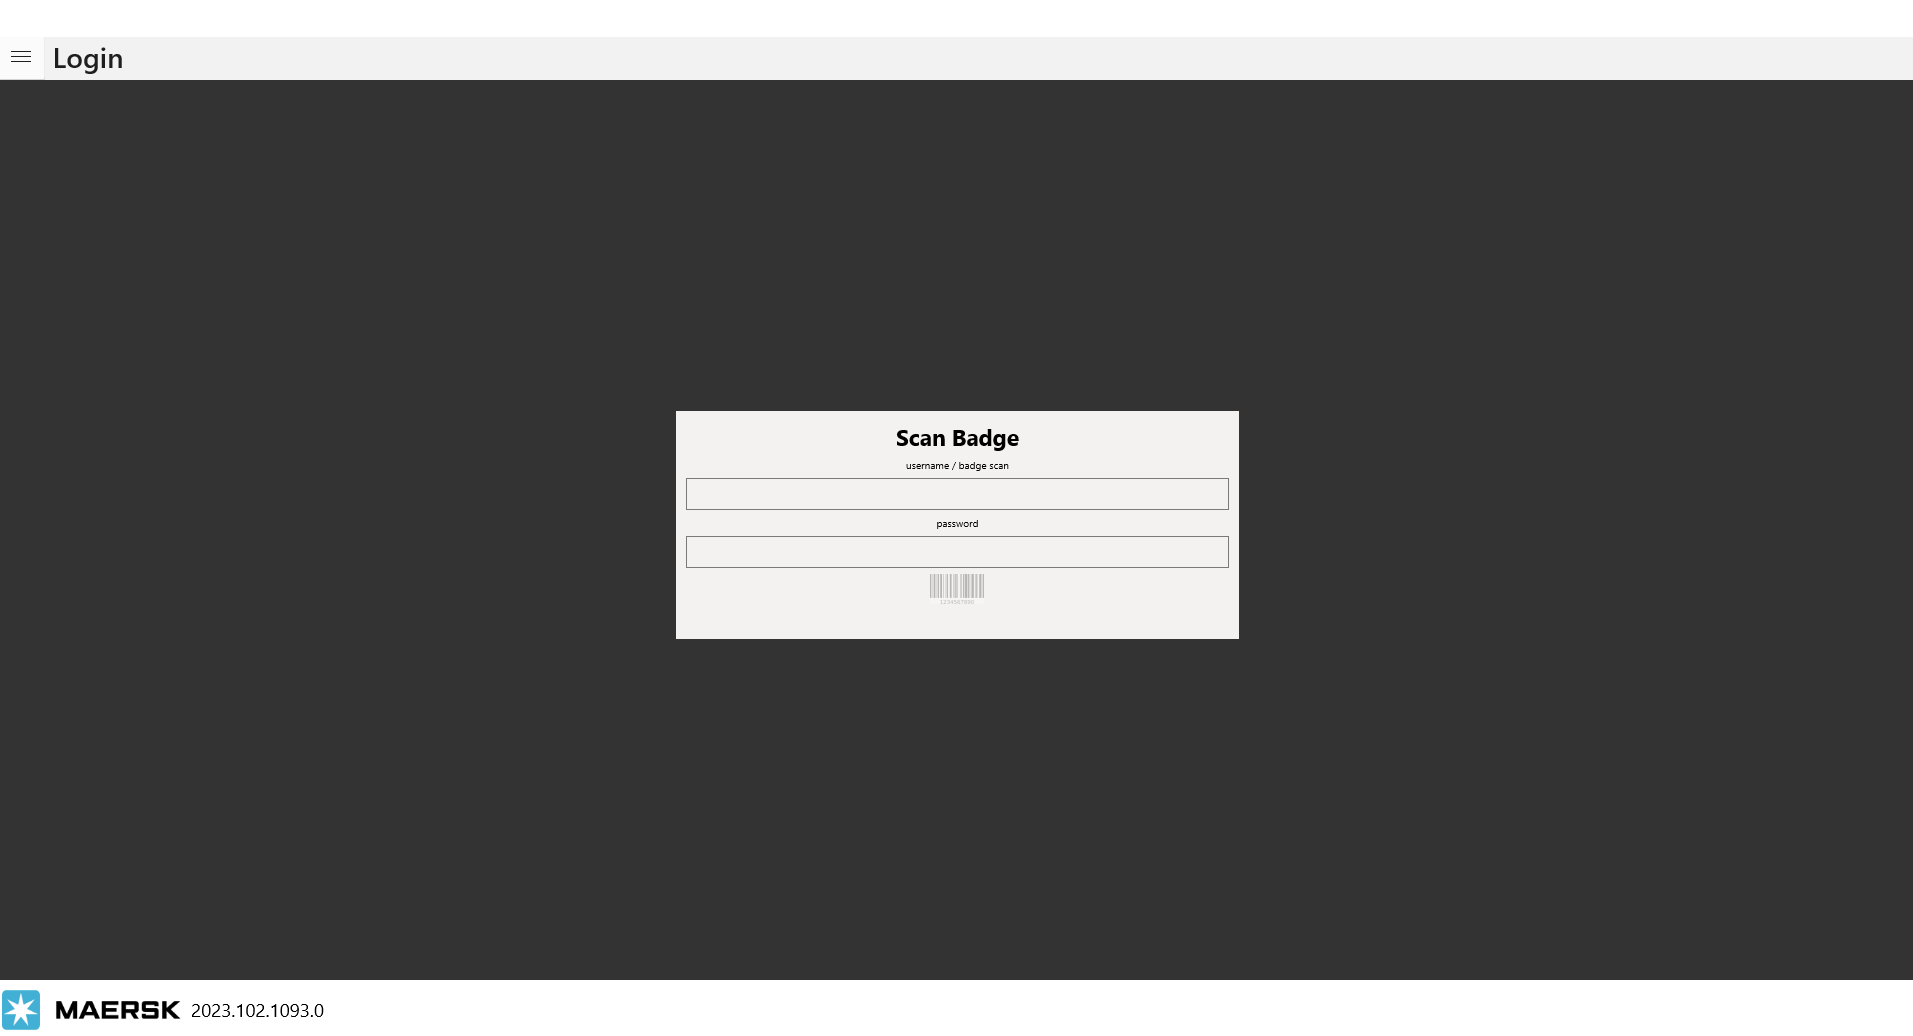
Log in screen has security changes, you will now need to have an Arca login to use the pick app. This would use the new badge printing screen that we rolled out in LOC. User will need to scan their badge barcode that contains their username and password to log into the app. You can scan the barcode or manually type in username in line 1 and password in line 2.
To fulfill orders properly, ARCA Pick - "Order Pick" must be set up correctly to validate that the orders being scanned in are associated with the warehouse, the client, but without the pick area or zones(s).
The difference between "Pick and Pass" and "Order Pick" is the use of the Pick Area and Pick Zone.
- Pick and Pass will utilize the pick area and pick zone.
- Order Pick will not utilize the pick area and pick zone.
Settings is a specific menu item that warehouse workers will not use but warehouse managers will. The manager may choose to use this information to gather information about specific orders across different pick areas and pick zones. This application assumes that the warehouse worker has been assigned a station, has been placed at said station, and is using the tool to fulfill the order.
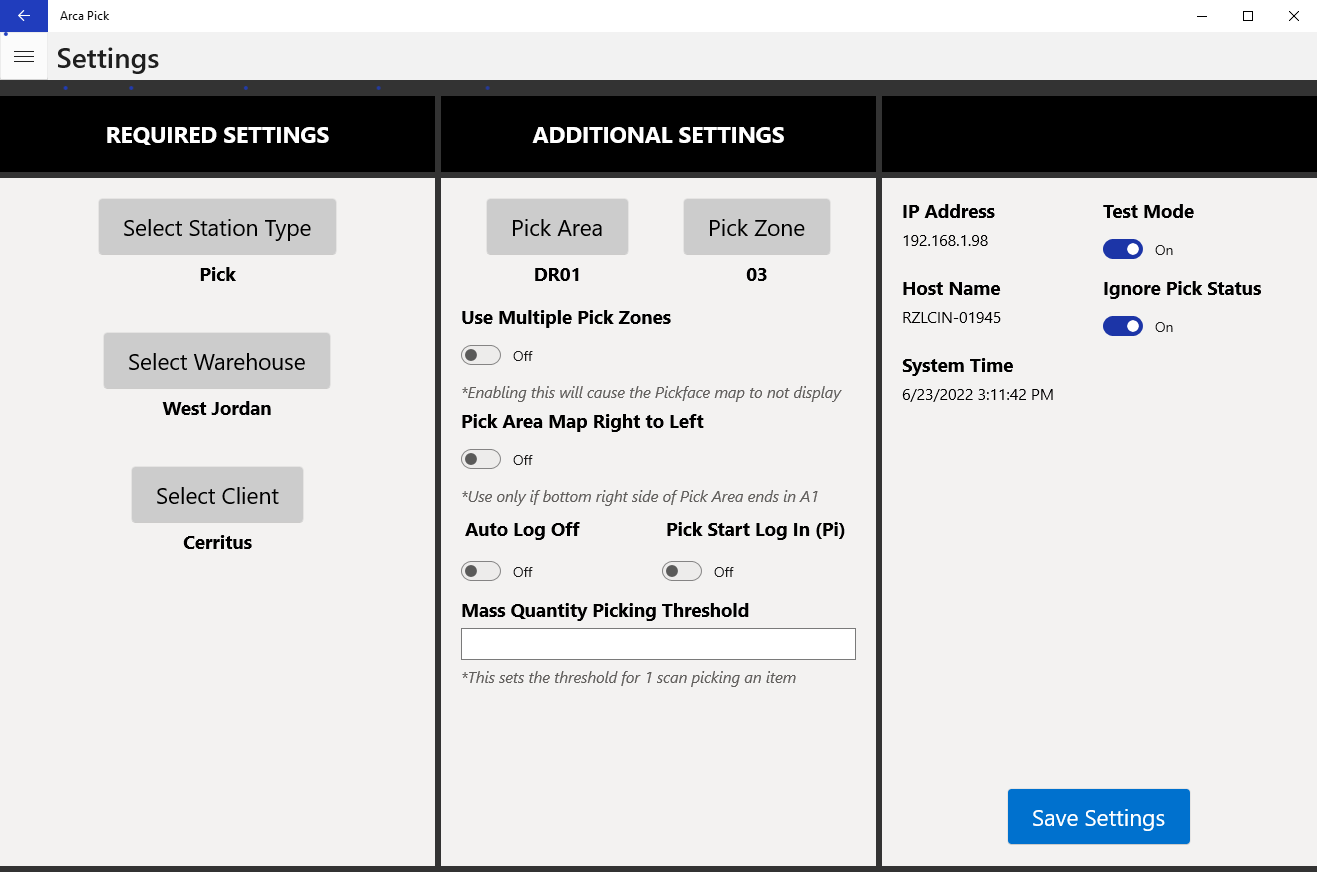
Before you start picking the order, the Settings menu should be configured as follows:
REQUIRED SETTINGS
- Change "Select Station Type" to "Pick".
- Set the "Select Warehouse" to the correct value, which depends on the client.
- Set "Select Client" to correct client value.
ADDITIONAL SETTINGS
- Set "Pick Area" (Do NOT set for Order Pick)
- Set "Pick Zone" (Do NOT set for Order Pick)
- The option "Use Multiple Pick Zones" is only used if there is a need to pick in more than one zone.
- The option "Pick Area Map Right to Left" is only used if the bottom right side of the Pick Area ends in A1. Confirm with a manager or supervisor that this should be selected. This will only be changed when the flow in the warehouse is set up to go left to right rather than the standard right to left.
- The option "Auto Log Off" will make you sign in (scan a badge) each time. So after you complete an order, instead of going back to the screen to scan a new order, you'll have to scan your badge again then scan the next order.
- The option "Pick Start Log In (Pi)" improves the performance of the pick app when running on a Raspberry pi, in that the order load screen doubles as the login screen.
- The option "Max Quantity Picking Threshold" sets the threshold for 1 scan picking an item. The figure inputted will determine ihe minimum quantity allowed to use this "scan-all" option.
Then "Save Settings"
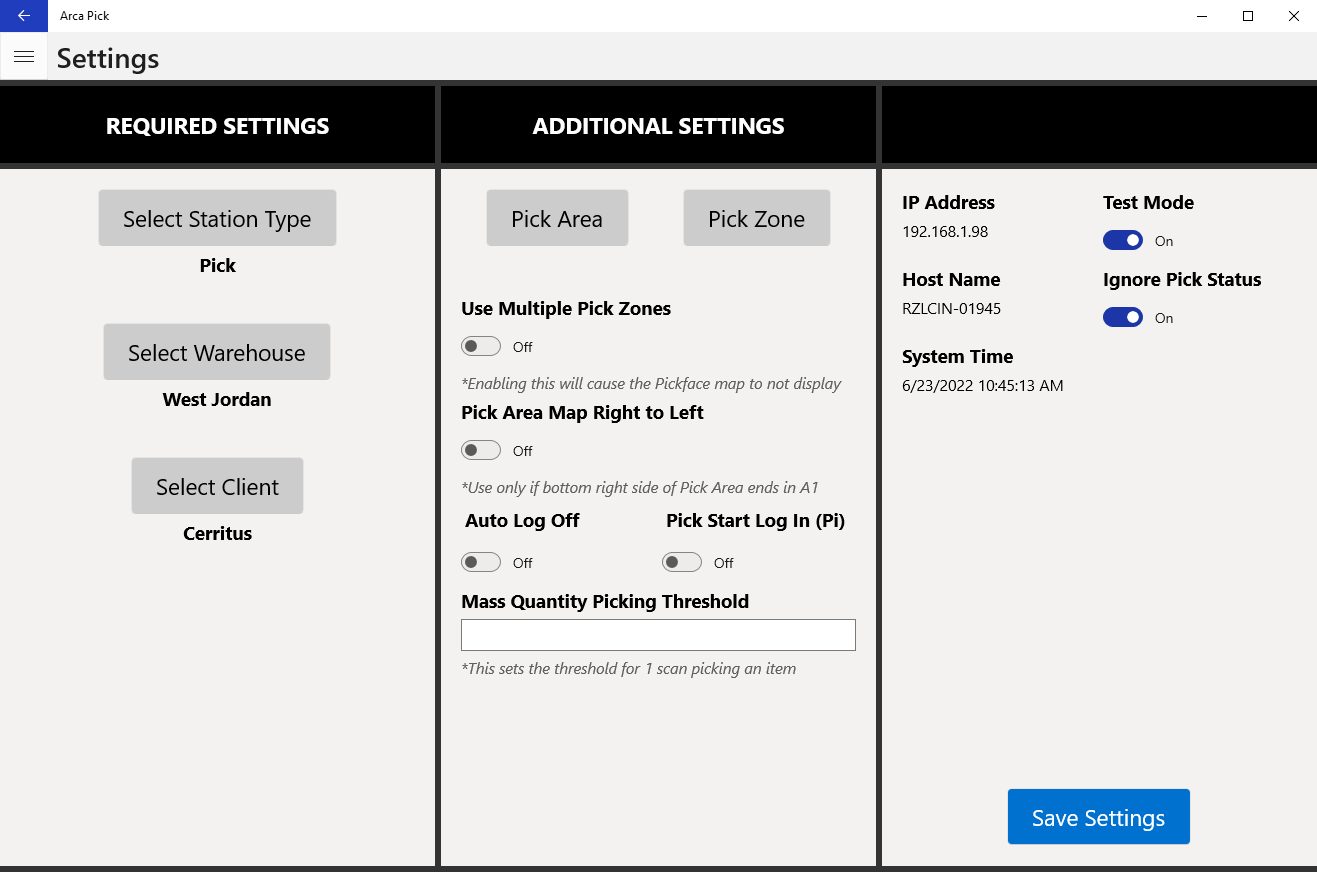
If testing needs to be done or an end-user is in training, both the "Test Mode" and "Ignore Pick Status" icons can be turned ON.
- "Test mode" will switch your session to the test/sandbox environment; which will not effect the live/production environment.
- "Ignore Pick Status" allows already picked line items to be used again; picks will not adjust inventory.
To begin the process, the pack order slip is scanned into the system and assigned to a designated bin. The bin is also scanned into the system and is automatically assigned to the pack order slip. It is then placed in the first zone for picking.
Warehouse Badge Scan
Log into the ARCA Pick application to be assigned a zone for picking.
![]()
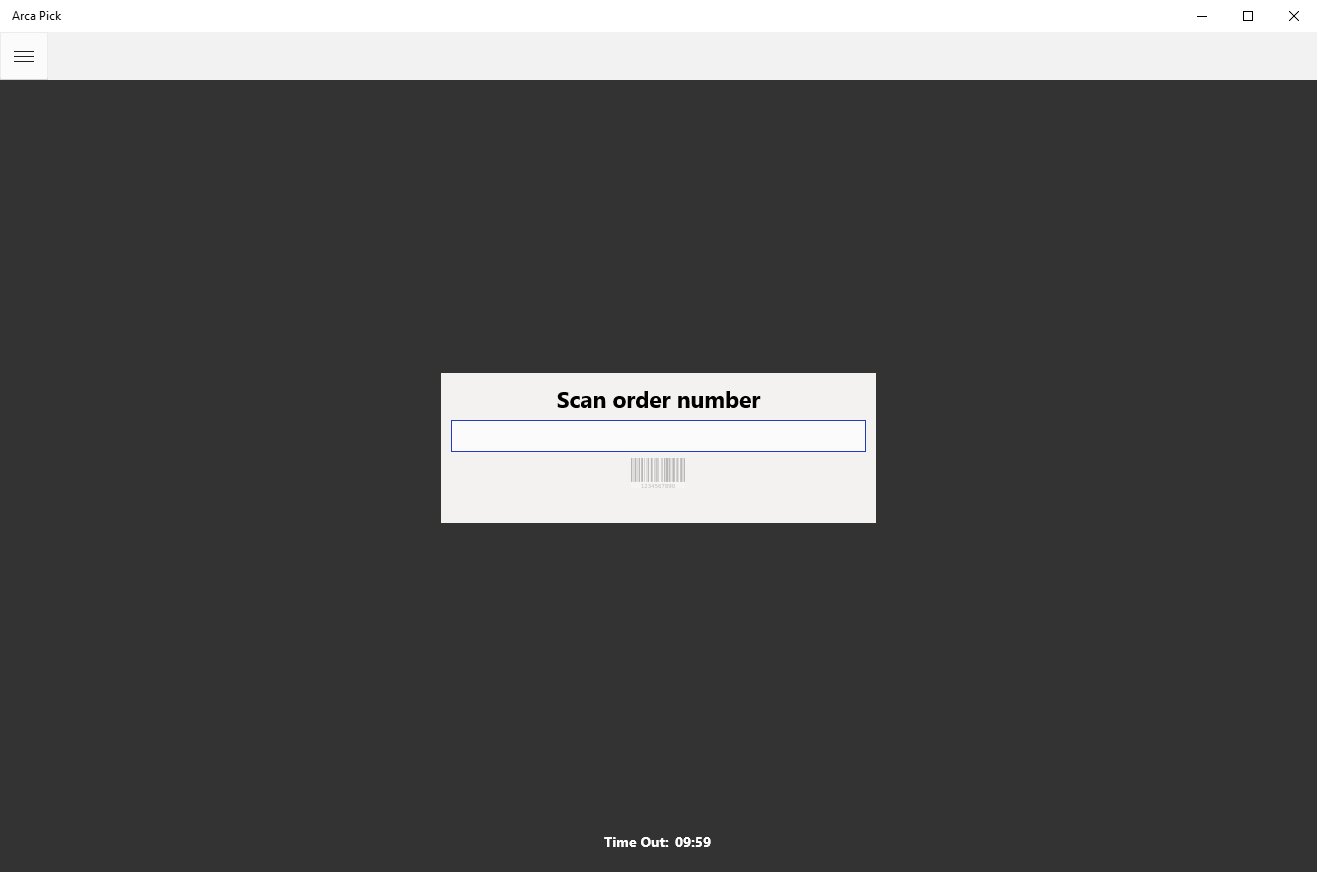
Scanning the Order
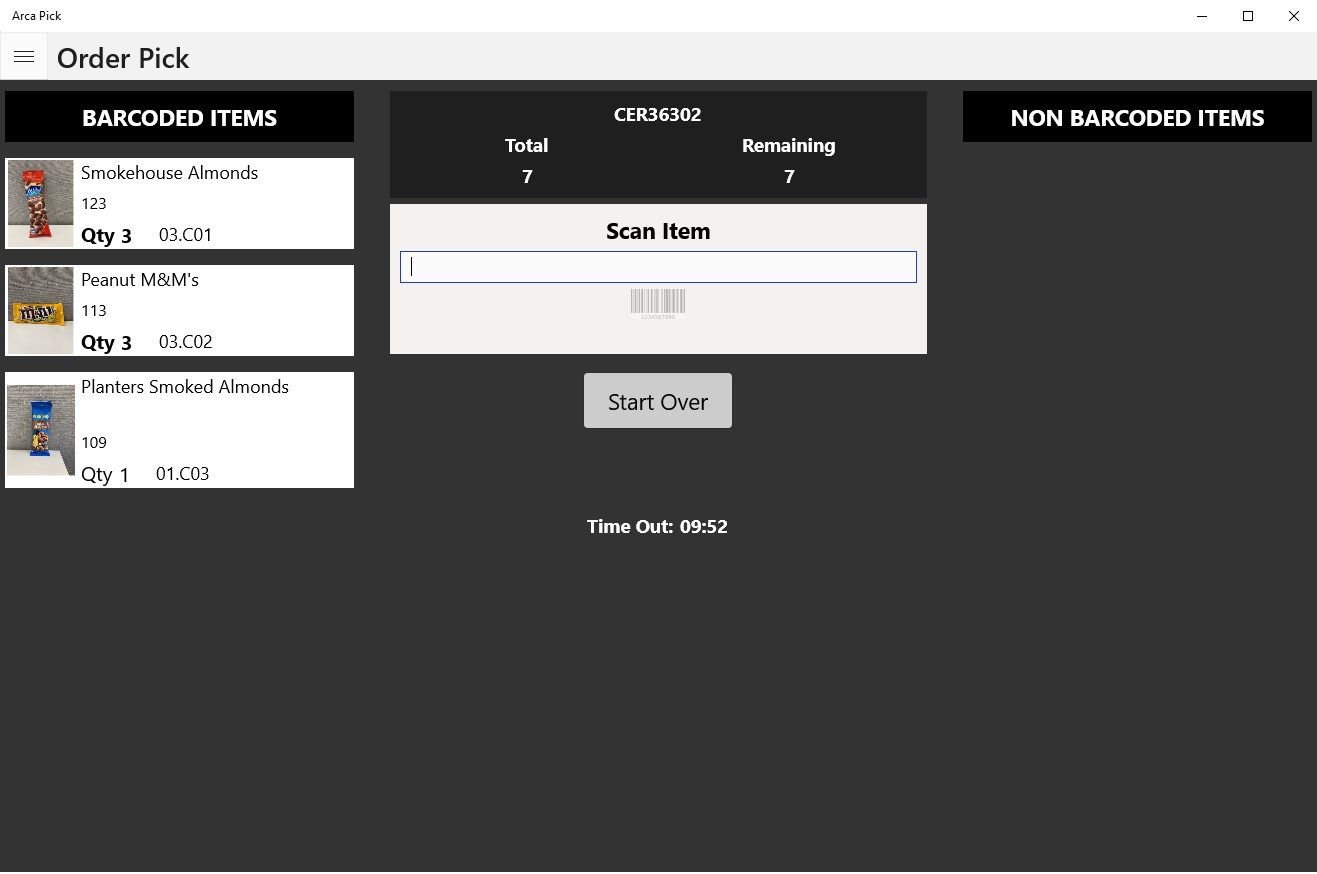
The next screen prompt will be for the Order number.

Order Pick Screen
As the bin goes down the pick zones, it will not require a barcode scanner to proceed to the next zone. The products needed to fulfill the order appear on the screen.

All items for this order may not all be in same zone.
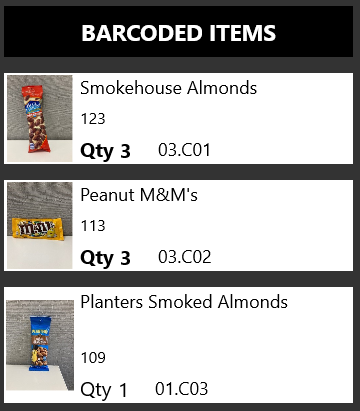
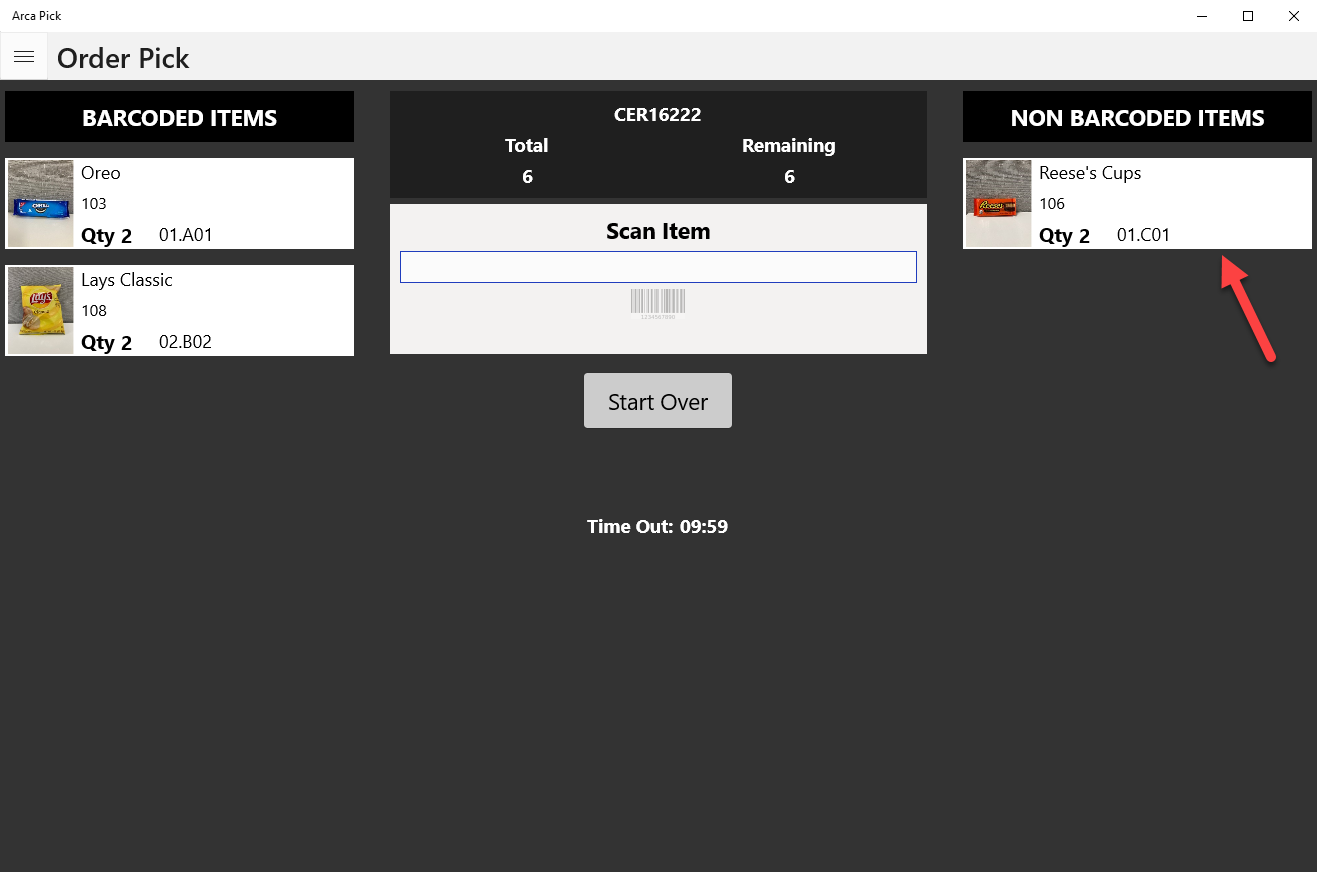
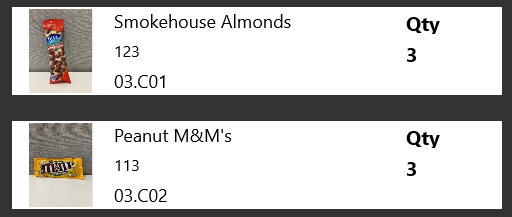
The product details are laid out on the screen providing the item name, pick location within the zone, the quantity to be picked, and image of the product, if available.
Pick Location Diagram
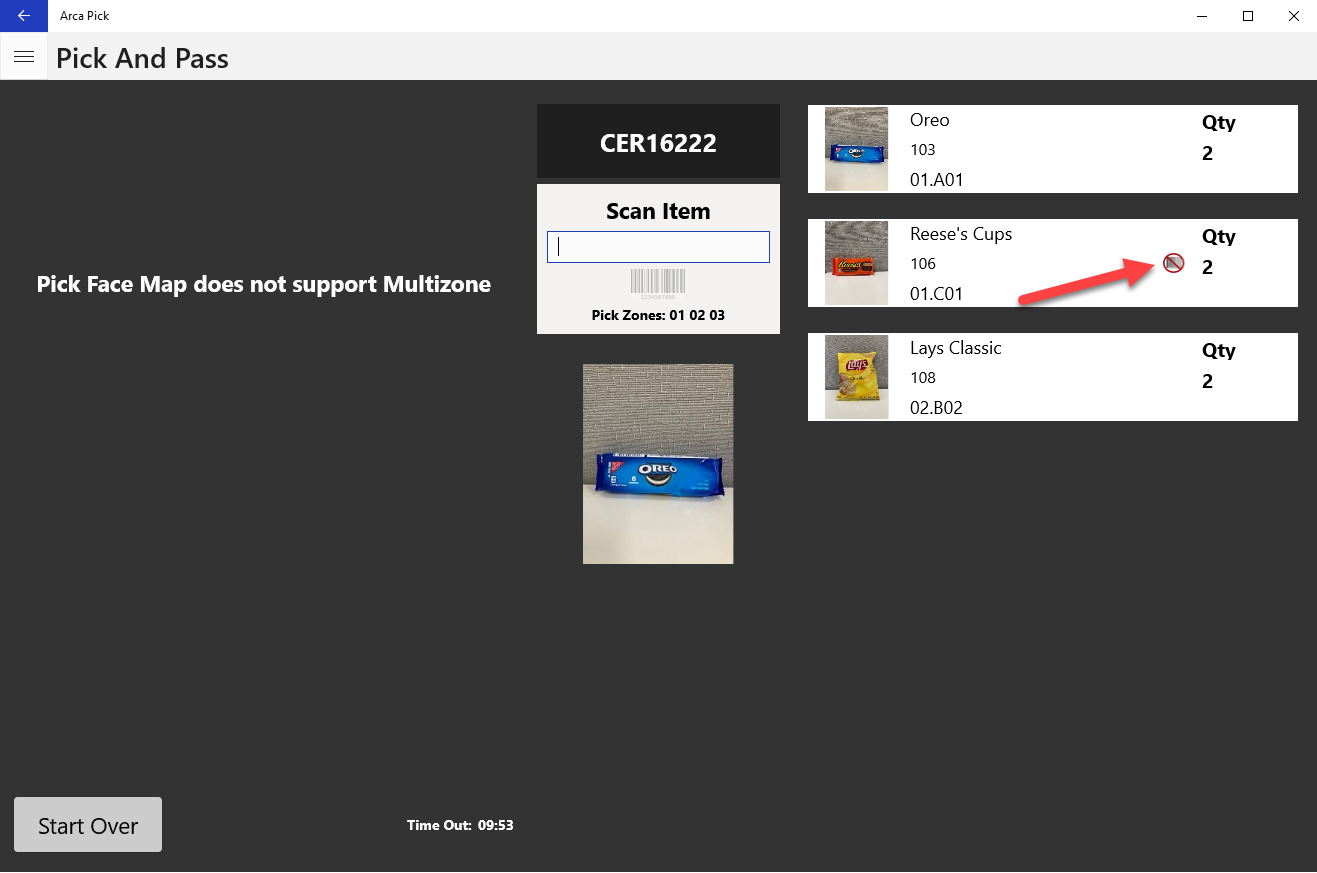
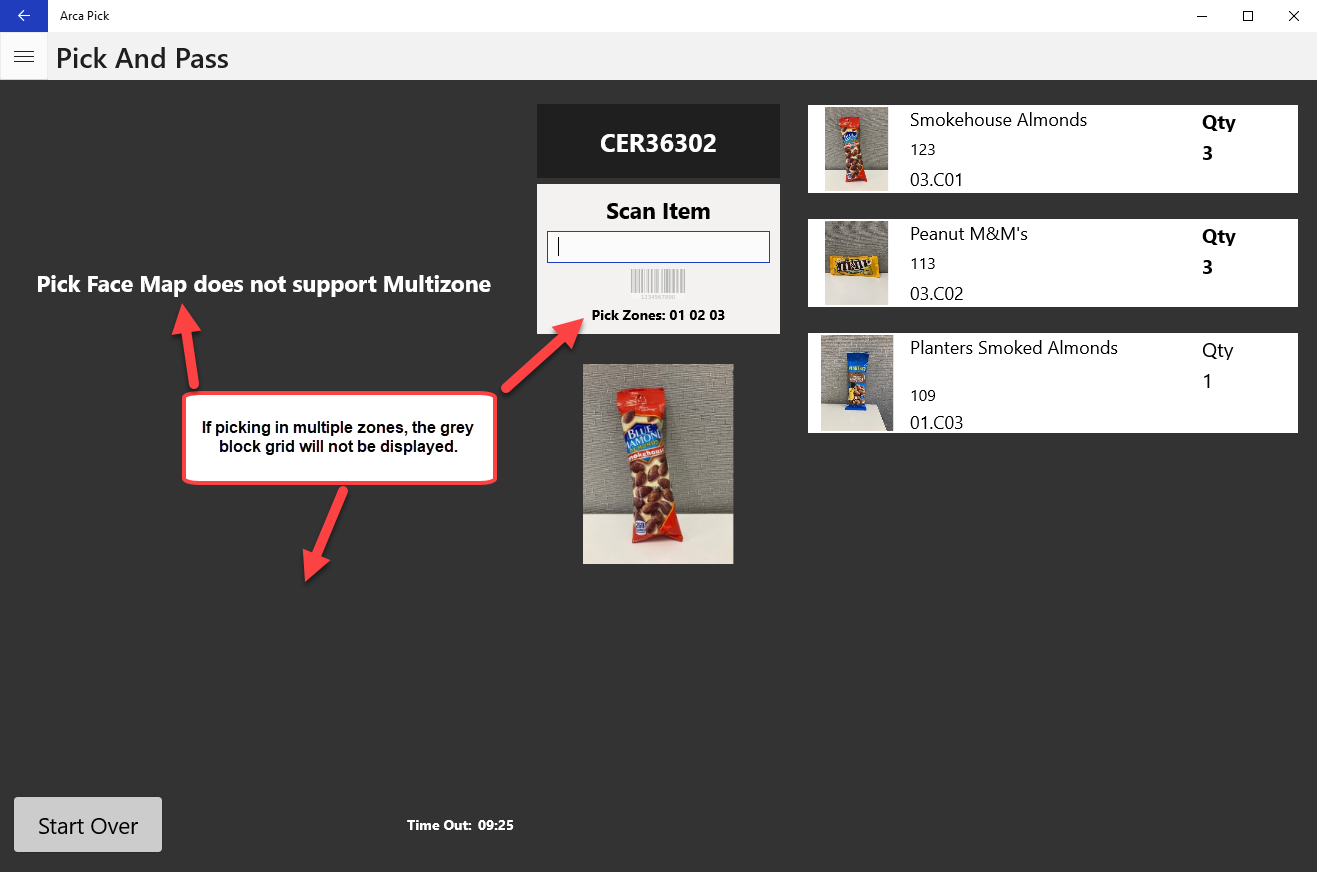
Unlike "Pick and Pass", the "Order Pick" screen will NOT display a diagram of the pick locations if the order's pick locations are spread out across multiple pick areas and/or zones.
Non-Barcoded Items
Items without a barcode are handled by placing the item in the assigned bin and touching the screen to confirm it has been picked.
Completed Order
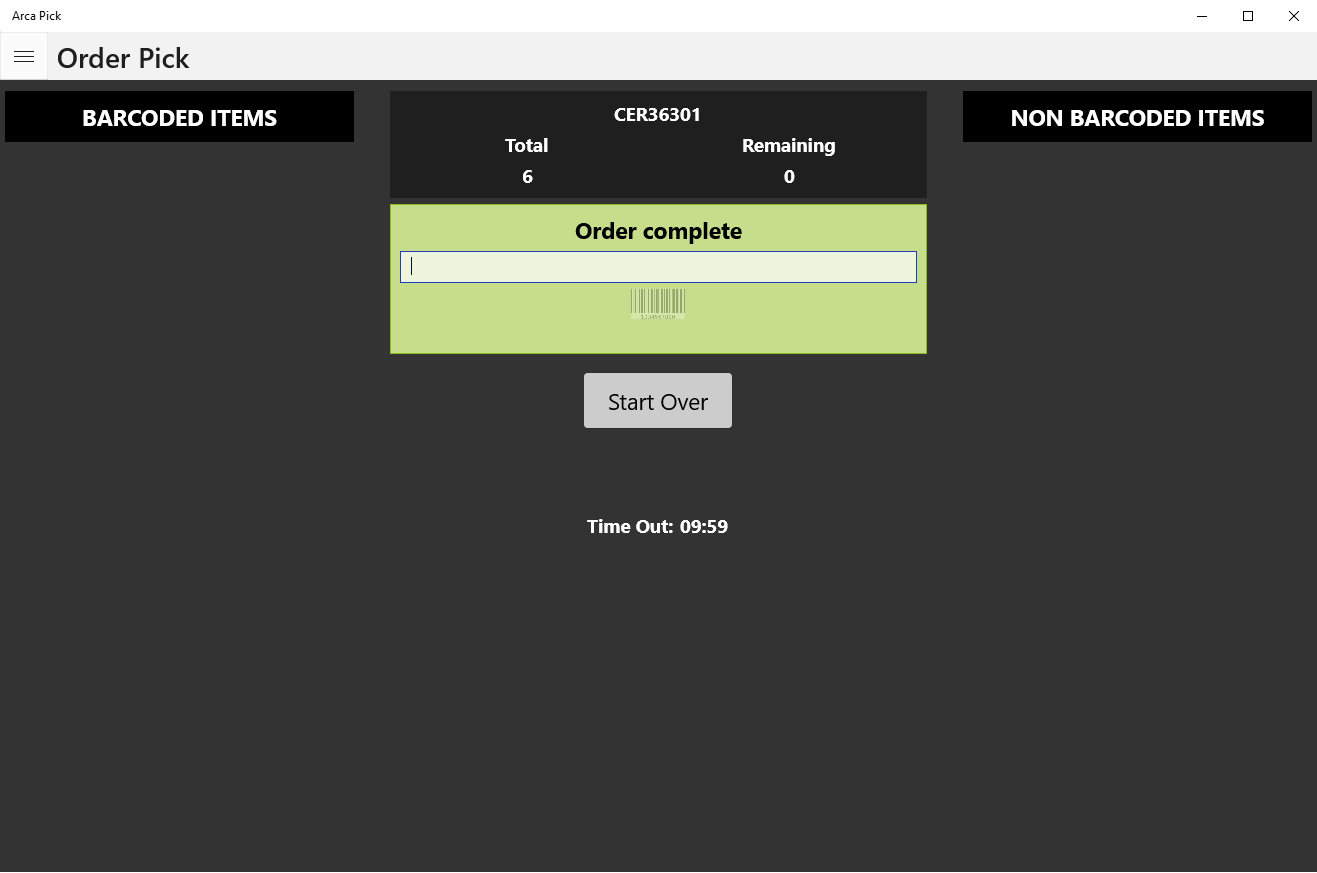
The screen will indicate when the order is complete. The container should be placed sideways on the belt and passed along the through the zones to the end of the line.
Screenshot examples
Starting Pick:
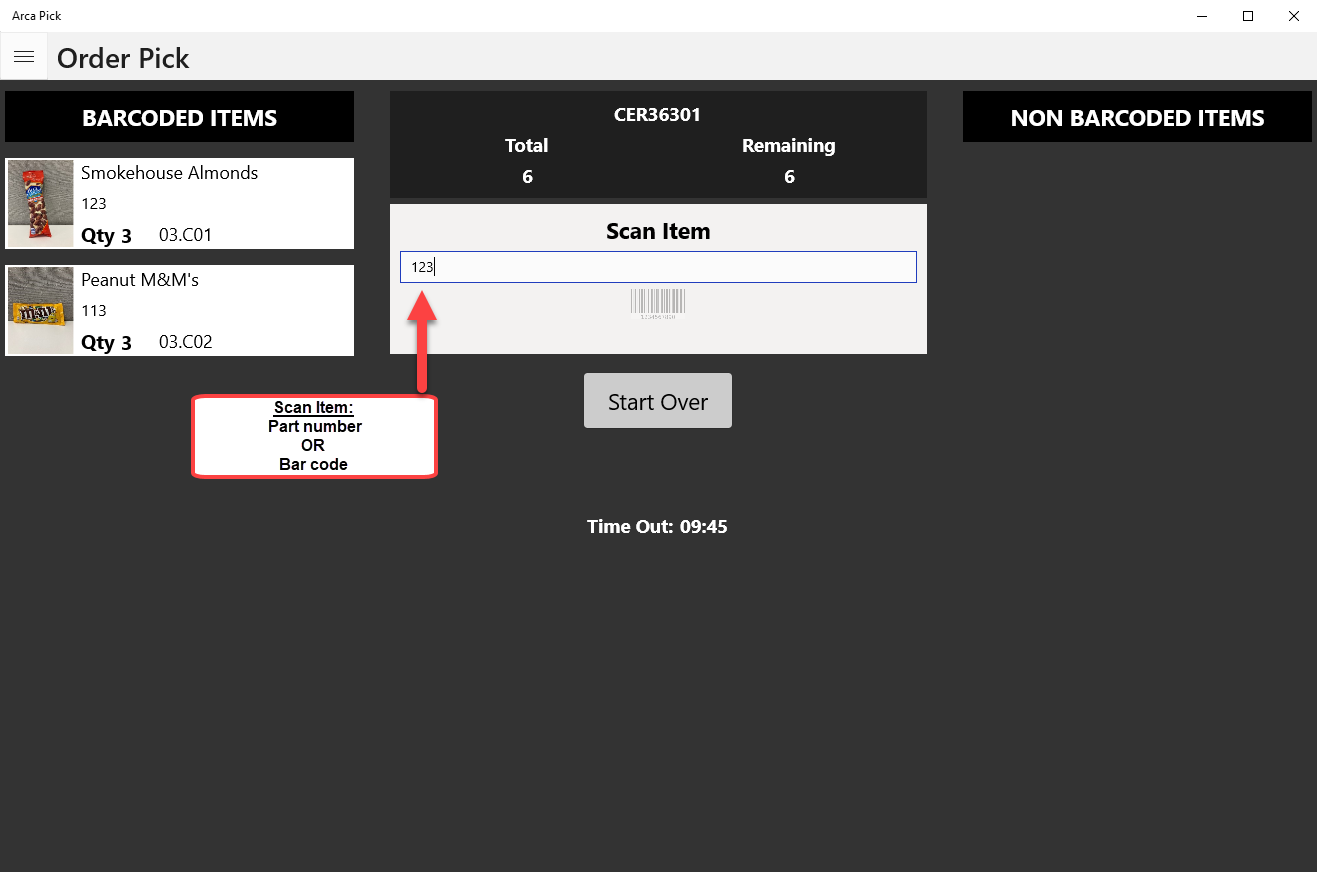
During Pick:

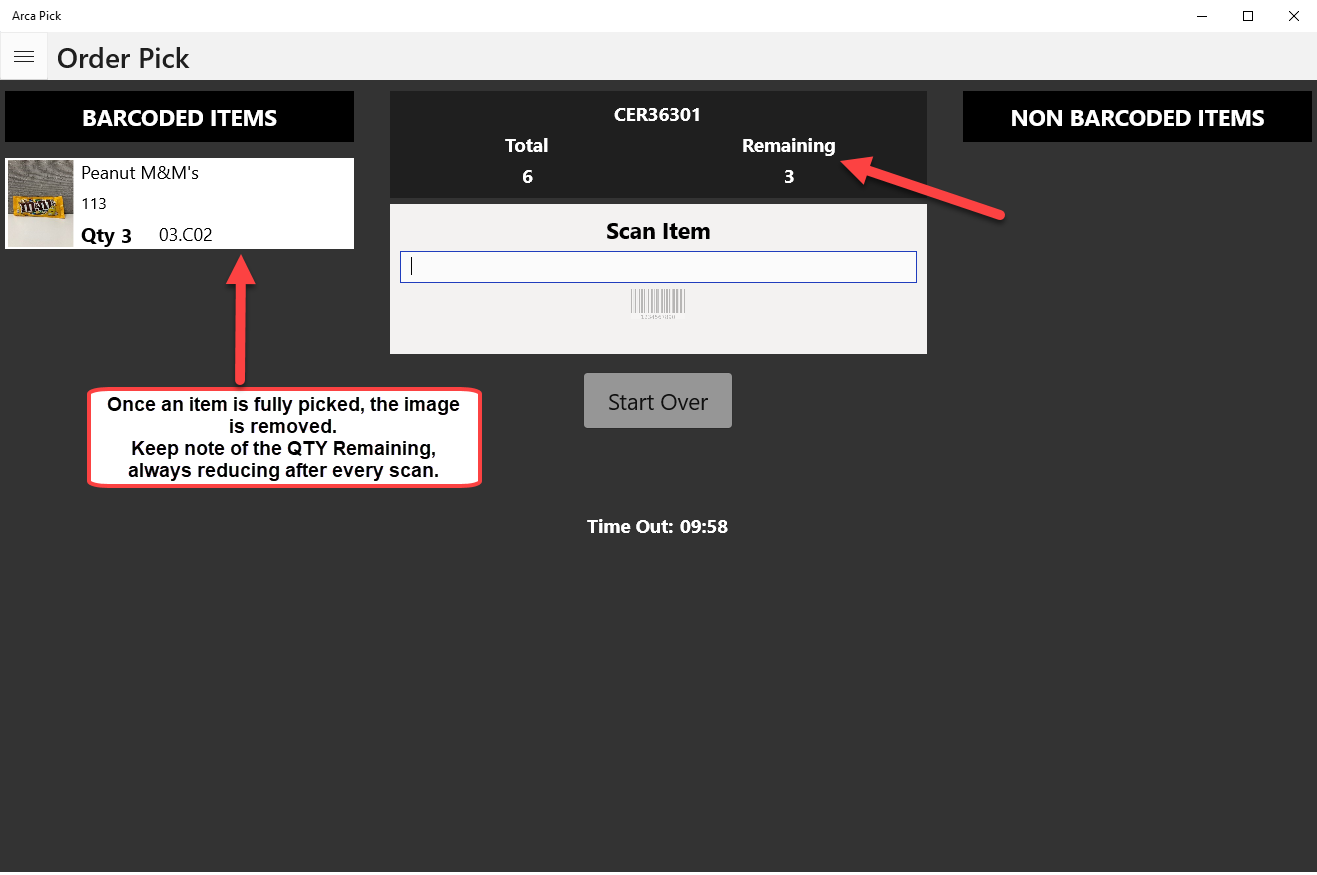
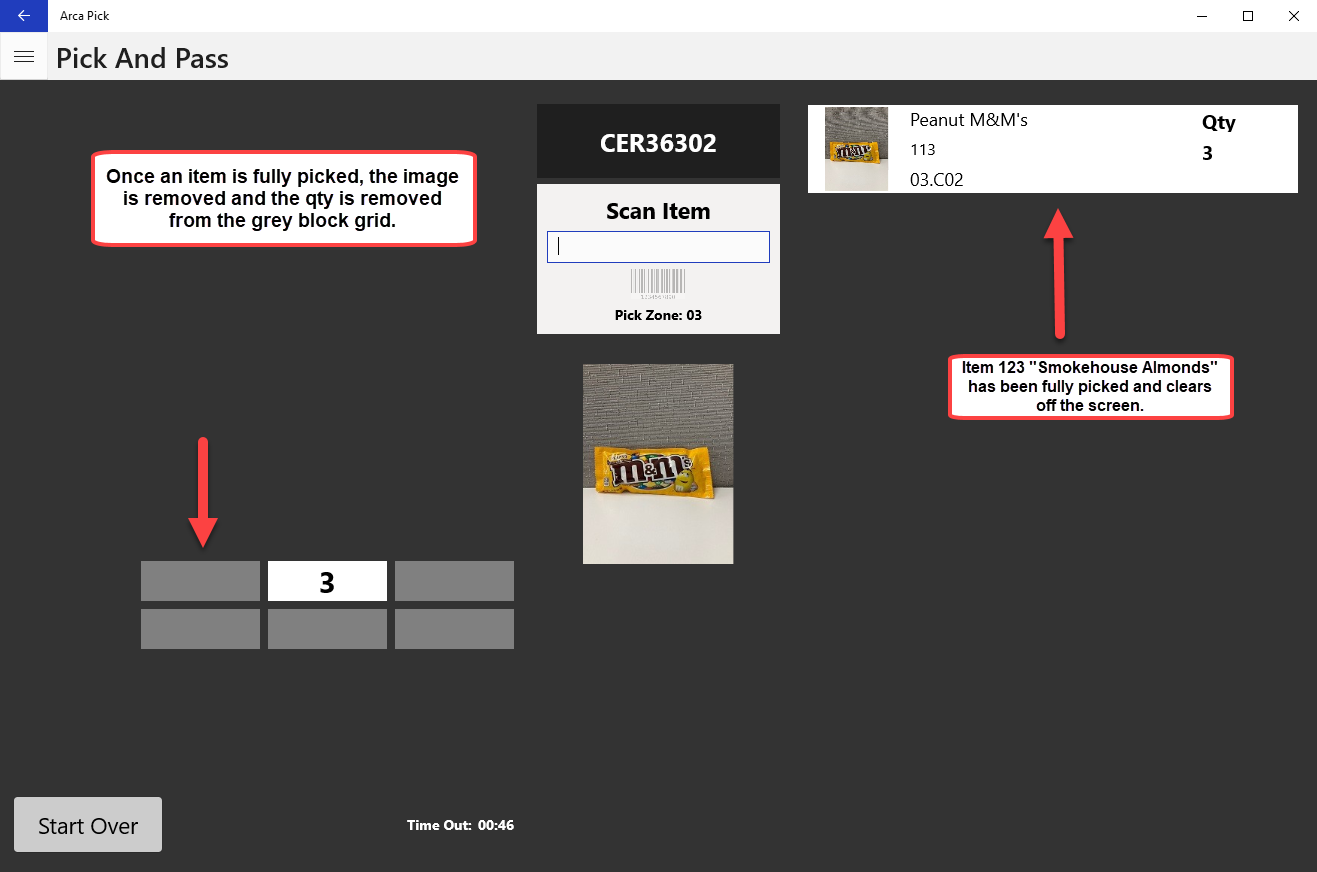
Item Complete
Order Complete
Pick and Pass
When an order needs to be fulfilled by a warehouse worker, they will use their workstation to scan in the order ID.
The order itself will be broken down by pick area and pick zone and will not be completely fulfilled by a single pick and pack station.
Only the items within the area/s and zone/s will be picked and the rest will the move down the line to be completed by another zone.
The intent of the module is to:
- Provide information on how an order is picked by pick zone and/or specific area(s).
- Explain how an order is fulfilled by picking specific items in a zone, and then passing it down to the next zone for the next items to get picked, etc until the order has been completed.
Session Setup
To fulfill orders properly, ARCA Pick - "Pick and Pass" must be set up correctly to validate that the orders being scanned in are associated with the warehouse, the client, and the pick area or zone(s).
The difference between "Pick and Pass" and "Order Pick" is the use of the Pick Area and Pick Zone.
- Pick and Pass will utilize the pick area and pick zone.
- Order Pick will not utilize the pick area and pick zone.
Settings is a specific menu item that warehouse workers will not use but warehouse managers will. The manager may choose to use this information to gather information about specific orders across different pick areas and pick zones. This application assumes that the warehouse worker has been assigned a station, has been placed at said station, and is using the tool to fulfill the order.
Before you start picking the order, the Settings menu should be configured as follows:
REQUIRED SETTINGS
- Change "Select Station Type" to "Pick".
- Set the "Select Warehouse" to the correct value, which depends on the client.
- Set "Select Client" to correct client value.
ADDITIONAL SETTINGS
- Set "Pick Area" (Required for Pick and Pass)
- Set "Pick Zone" (Required for Pick and Pass)
- The option "Use Multiple Pick Zones" is only used if there is a need to pick in more than one zone.
- The option "Pick Area Map Right to Left" is only used if the bottom right side of the Pick Area ends in A1. Confirm with a manager or supervisor that this should be selected. This will only be changed when the flow in the warehouse is set up to go left to right rather than the standard right to left.
- The option "Auto Log Off" will make you sign in (scan a badge) each time. So after you complete an order, instead of going back to the screen to scan a new order, you'll have to scan your badge again then scan the next order.
- The option "Pick Start Log In (Pi)" improves the performance of the pick app when running on a Raspberry pi, in that the order load screen doubles as the login screen.
- The option "Max Quantity Picking Threshold" sets the threshold for 1 scan picking an item. The figure inputted will determine ihe minimum quantity allowed to use this "scan-all" option.
Then "Save Settings".
If testing needs to be done or an end-user is in training, both the "Test Mode" and "Ignore Pick Status" icons can be turned ON.
- "Test mode" will switch your session to the test/sandbox environment; which will not effect the live/production environment.
- "Ignore Pick Status" allows already picked line items to be used again; picks will not adjust inventory.
To begin the process, the pack order slip is scanned into the system and assigned to a designated bin. The bin is also scanned into the system and is automatically assigned to the pack order slip. It is then placed in the first zone for picking.
Warehouse Badge Scan
Log into the ARCA Pick application to be assigned a zone for picking.
![]()
Scanning the Order
The next screen prompt will be for the Order number.
Order Pick Screen
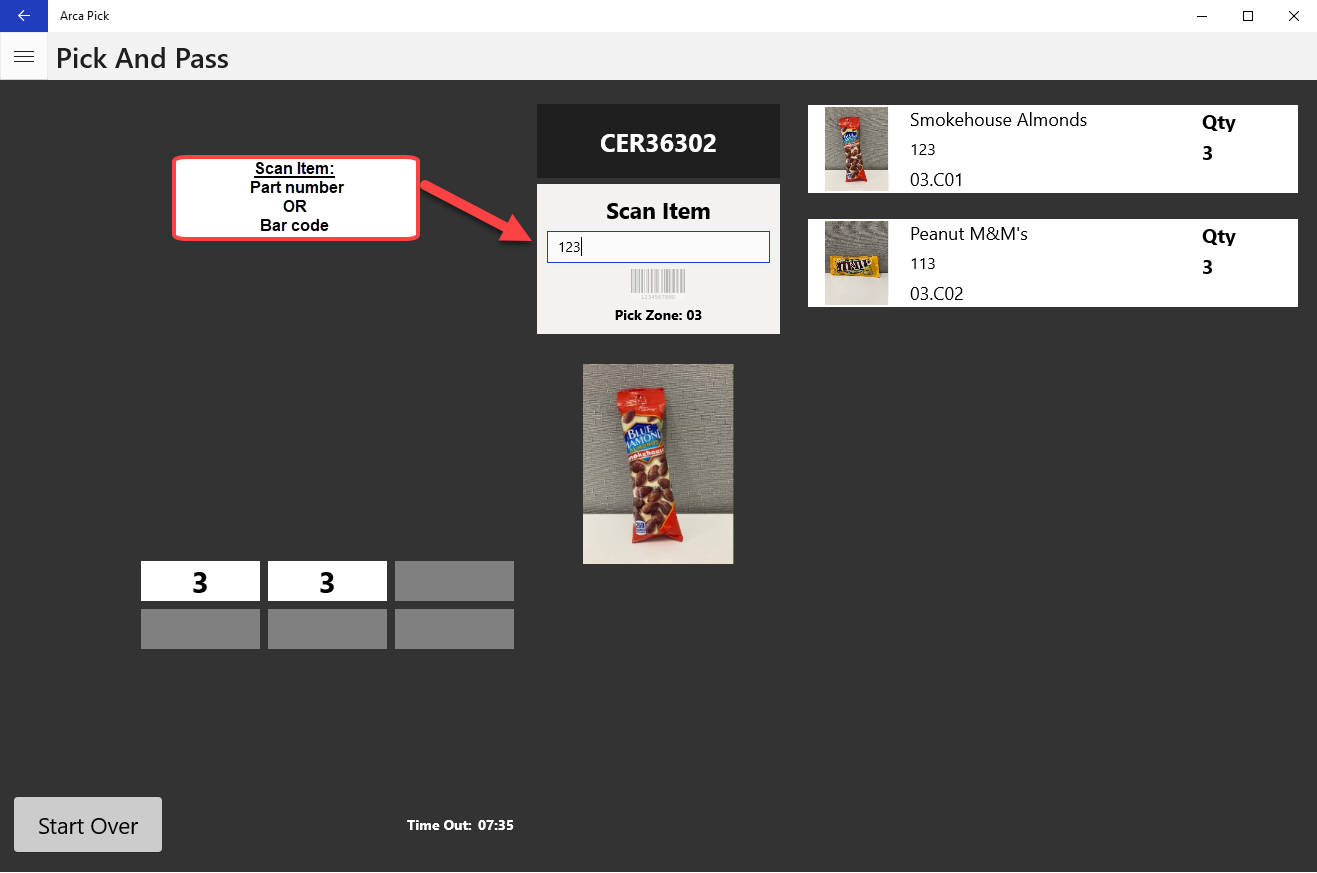
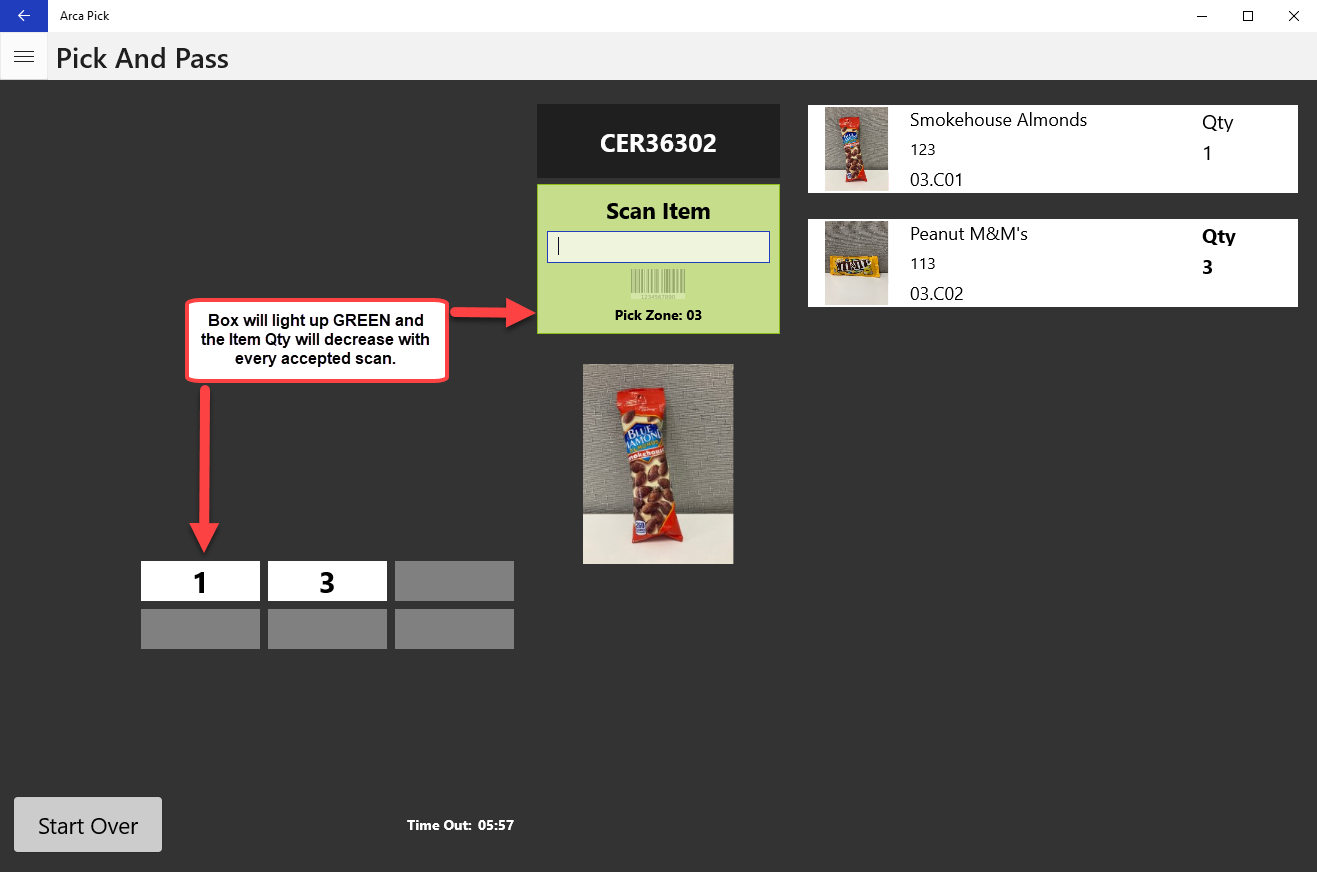
As the bin goes down the pick zones, it should be scanned in at the current zone by a barcode scanner. The products needed to fulfill the order appear on the screen.
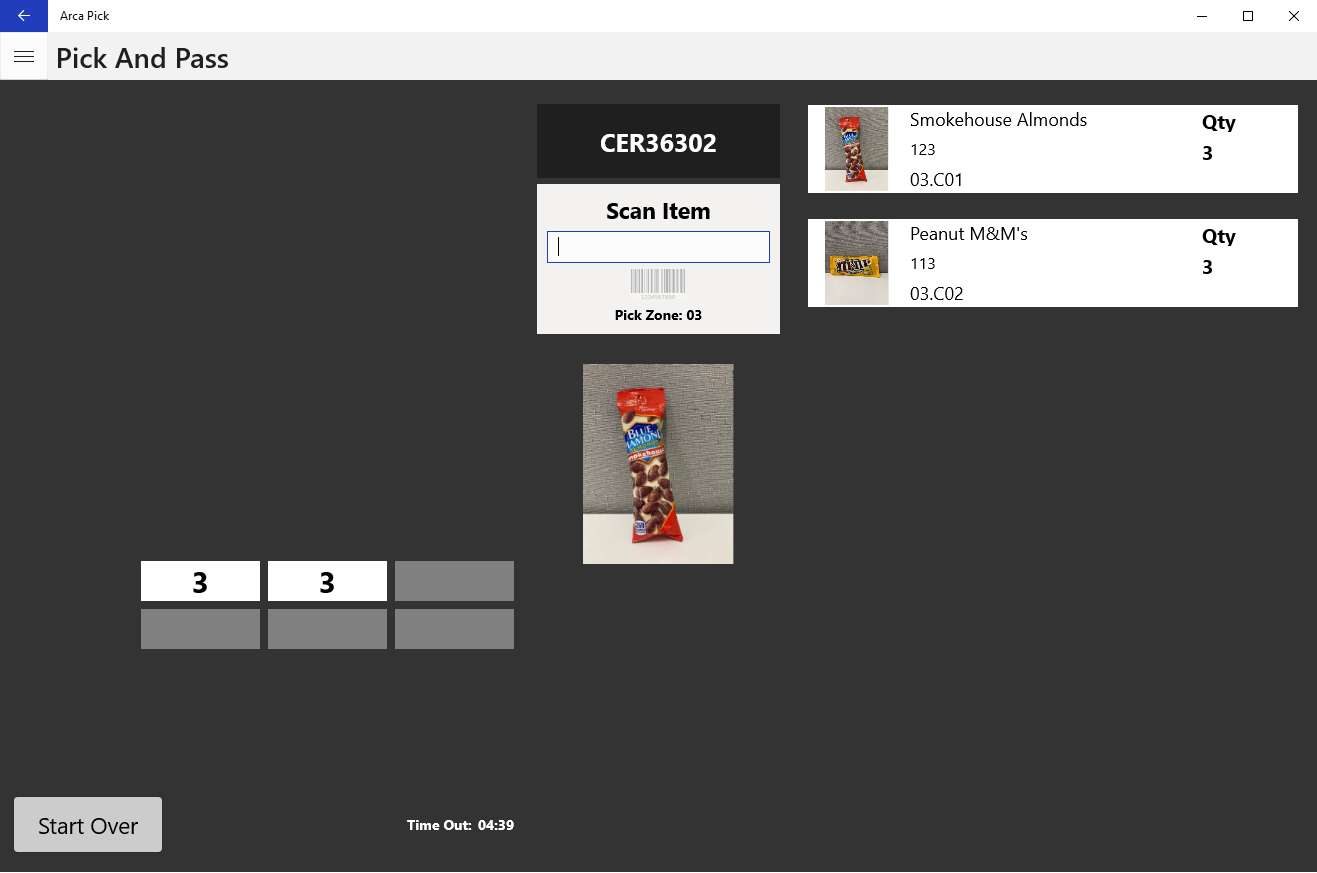
All items will for this pick will be in this zone only.
The product details are laid out on the screen providing the item name, pick location within the zone, the quantity to be picked, and image of the product, if available.
Pick Location Diagram
The screen will also display a diagram of the pick locations of the pick zone, where columns are always numbers and rows are always letters.
Non-Barcoded Items
Items without a barcode are handled by placing the item in the assigned bin and touching the screen to confirm it has been picked.
No Items in Pick Zone
If the pick zone does not have an item that needs to be picked, the screen will indicate this after scanning the assigned bin. In this case, the bin can simply be passed down the line to the next pick zone.

Completed Order
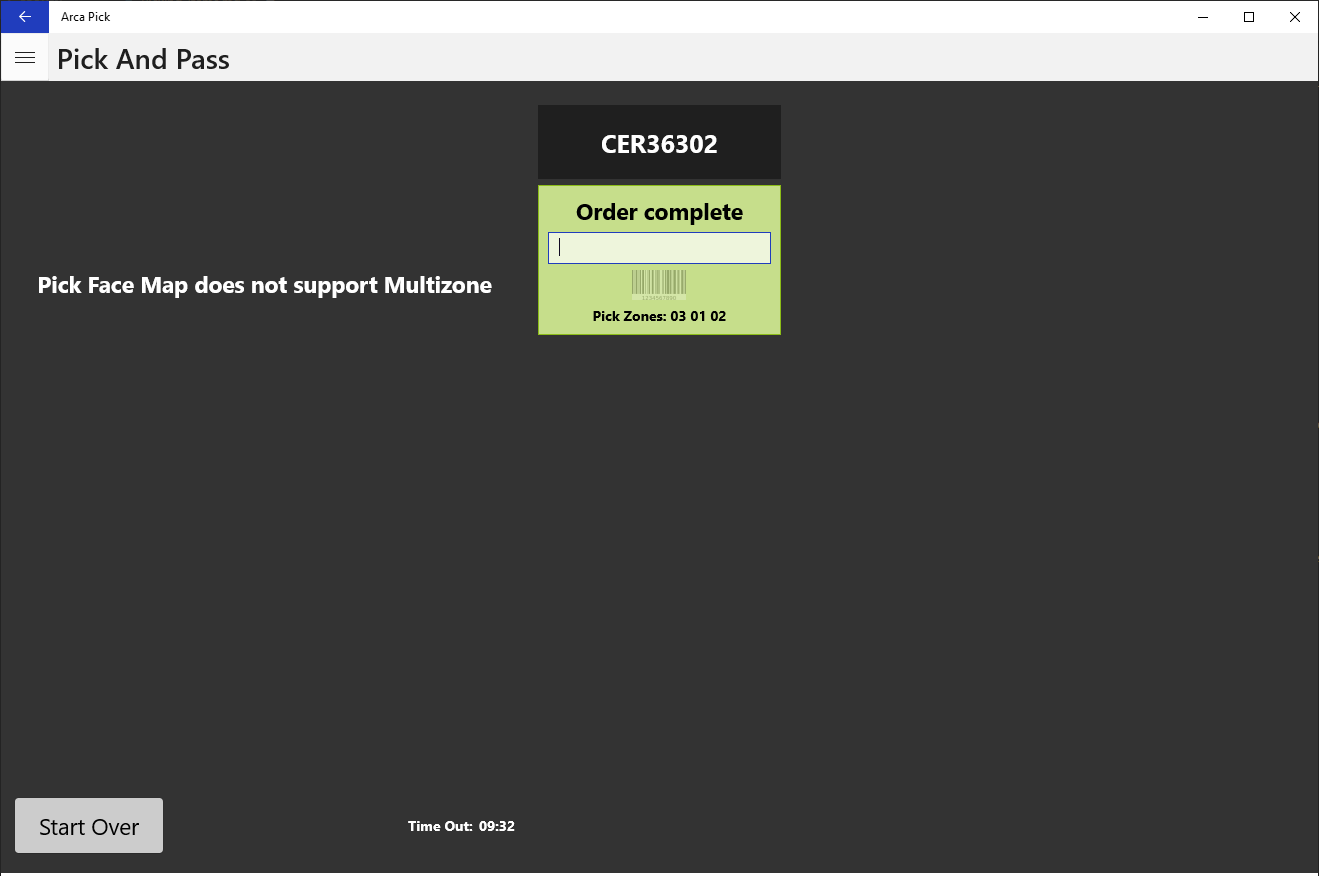
The screen will indicate if the order is complete regardless of position in the pick zones. The container should be placed sideways on the belt and passed along the through the zones to the end of the line.
Screenshot examples
Starting Pick:
During Pick:
Item Complete
Order Complete
Multiple Zone Picking
Cart Pick
When an order needs to be fulfilled by a warehouse worker, they will use their workstation to scan in the order ID.
Multiple orders will be scanned to a single cart.
All items on the order will be picked to completion, within the respective pick area.
If multiple pick zones are needed to complete the order, the manager will setup the order configurations as needed.
The intent of the module is to:
- Provide information on how Cart Configuration is set up
- Explain how multiple orders can be picked at once using a single cart
Session Setup
To fulfill orders properly, ARCA Pick must be set up correctly to validate that the orders being scanned in are associated with the warehouse, the client, and the pick area or areas.
Settings is a specific menu item that warehouse workers will not use but warehouse managers will. The manager may choose to use this information to gather information about specific orders across different pick areas and pick zones. This application assumes that the warehouse worker has been assigned a station, has been placed at said station, and is using the tool to fulfill the order.
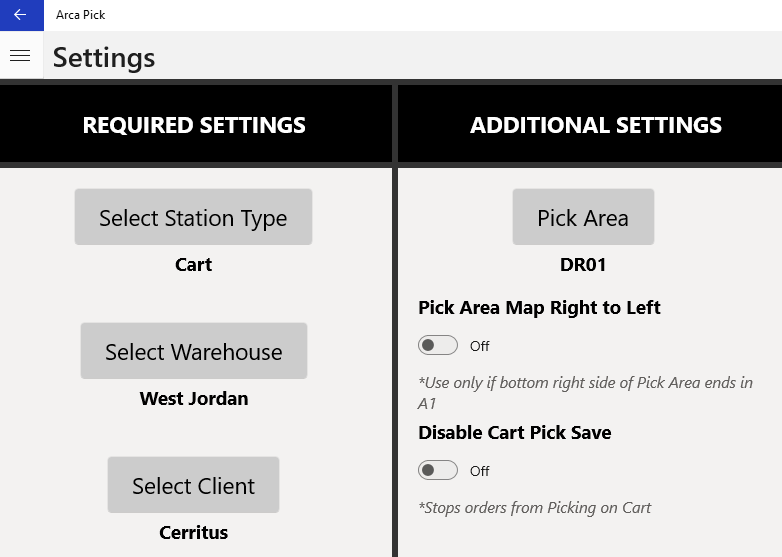
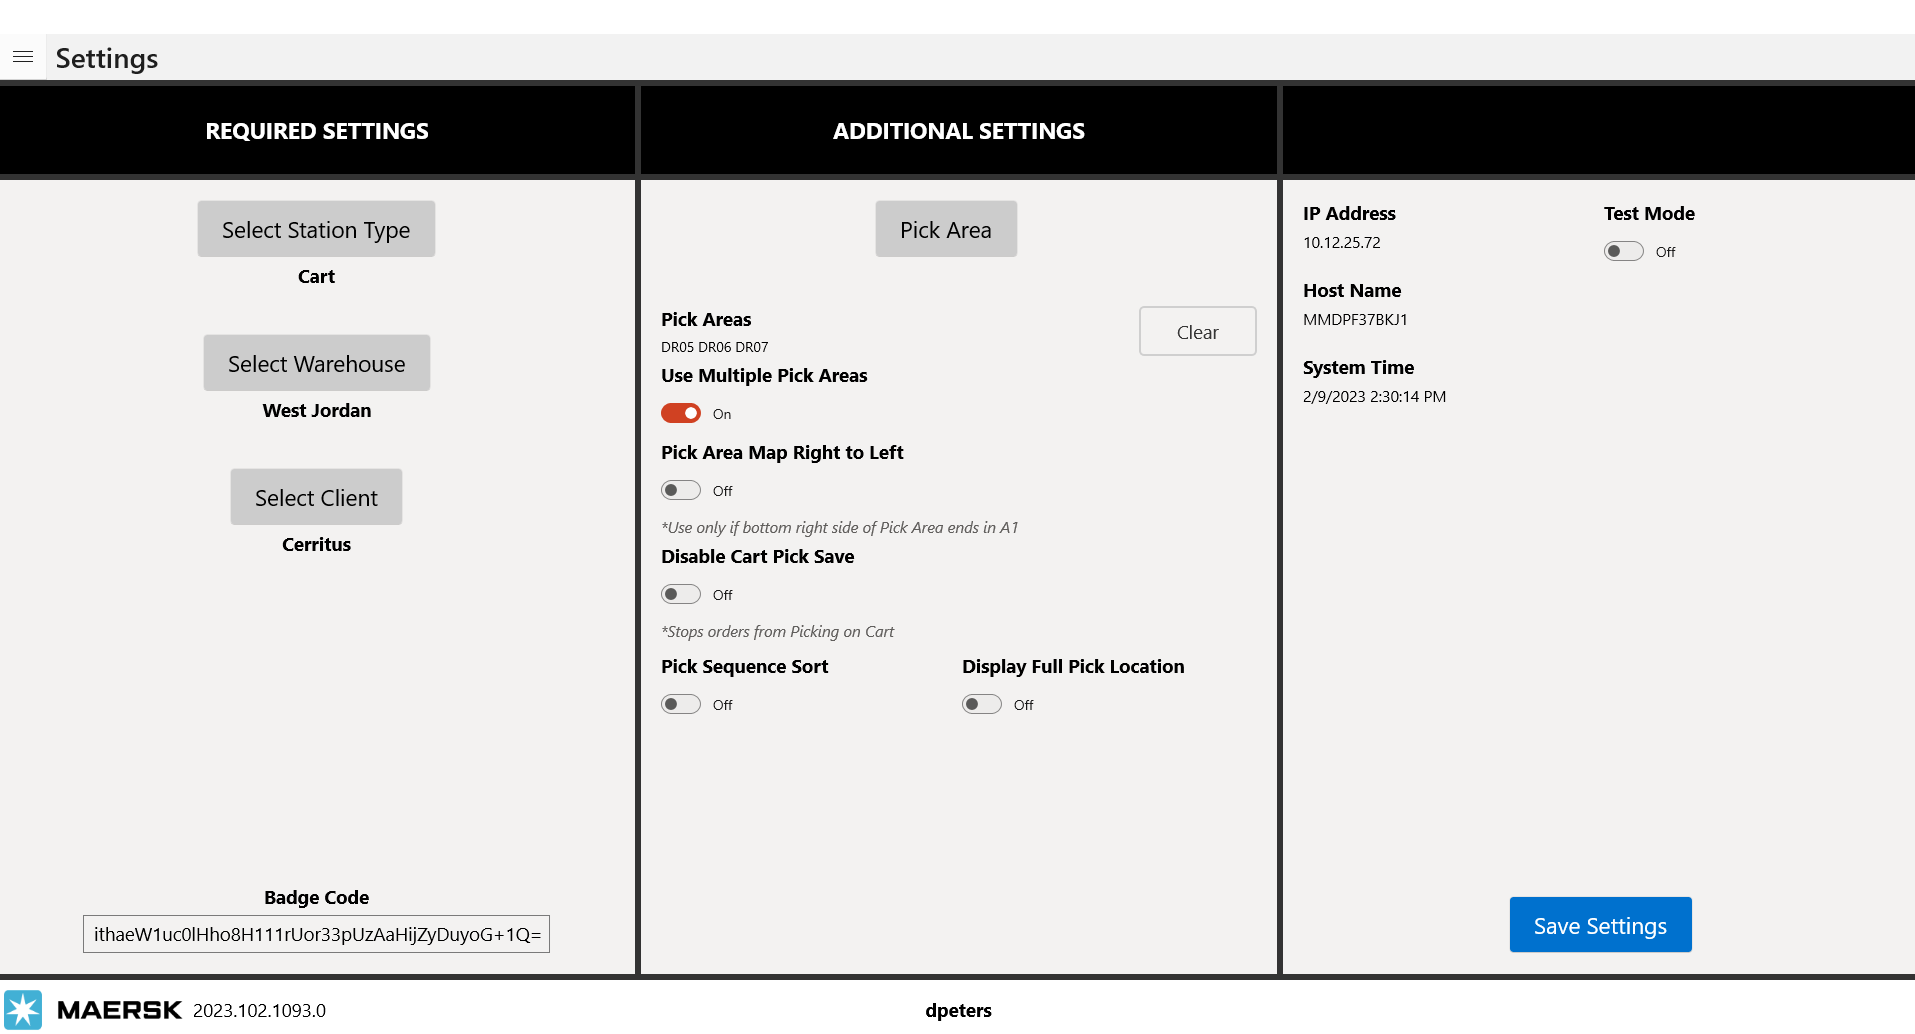
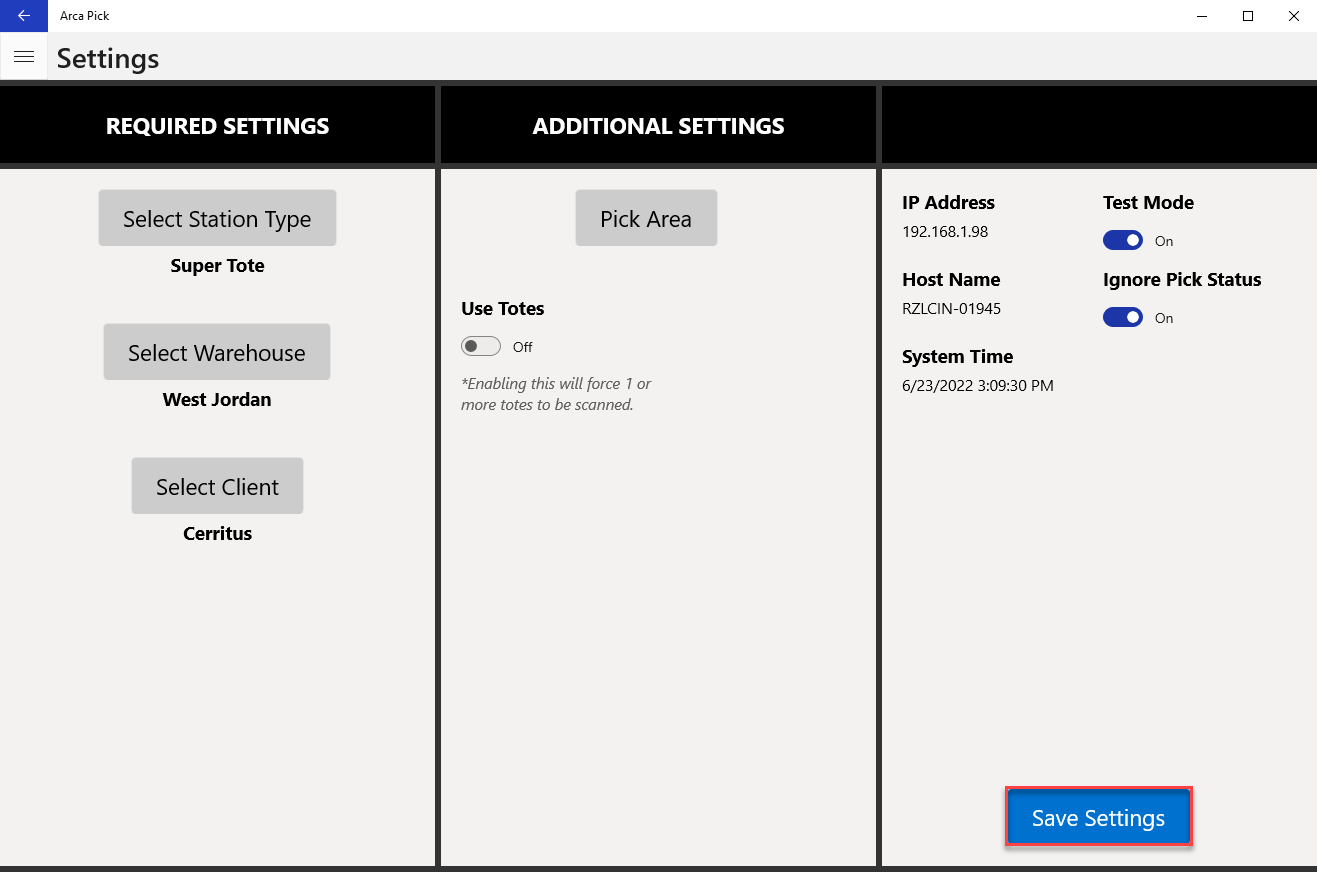
When setting up the cart, the Settings menu should be configured as follows:
- Change "Select Station Type" to "Cart".
- Set the "Select Warehouse" to the correct value, which depends on the client.
- Set "Select Client" to correct client value.
- Set "Pick Area".
- The option "Pick Area Map Right to Left" is only used if the bottom right side of the Pick Area ends in A1. Confirm with a manager or supervisor that this should be selected. This will only be changed when the flow in the warehouse is set up to go left to right rather than the standard right to left.
- The option "Disable Cart Pick Save" is client specific and may not be needed for your task. Ask a manager or supervisor how to proceed, but this option will most likely not be required.
- Then "Save Settings".
If testing needs to be done or an end-user is in training, both the "Test Mode" and "Ignore Pick Status" icons can be turned ON.
- "Test mode" will switch your session to the test/sandbox environment; which will not effect the live/production environment.
- "Ignore Pick Status" allows already picked line items to be used again; picks will not adjust inventory.
Cart Configuration
After the settings have been configured, end-users will need to scan their badge to log into ARCA Cart Configuration and begin setting up the cart for order fulfillment.
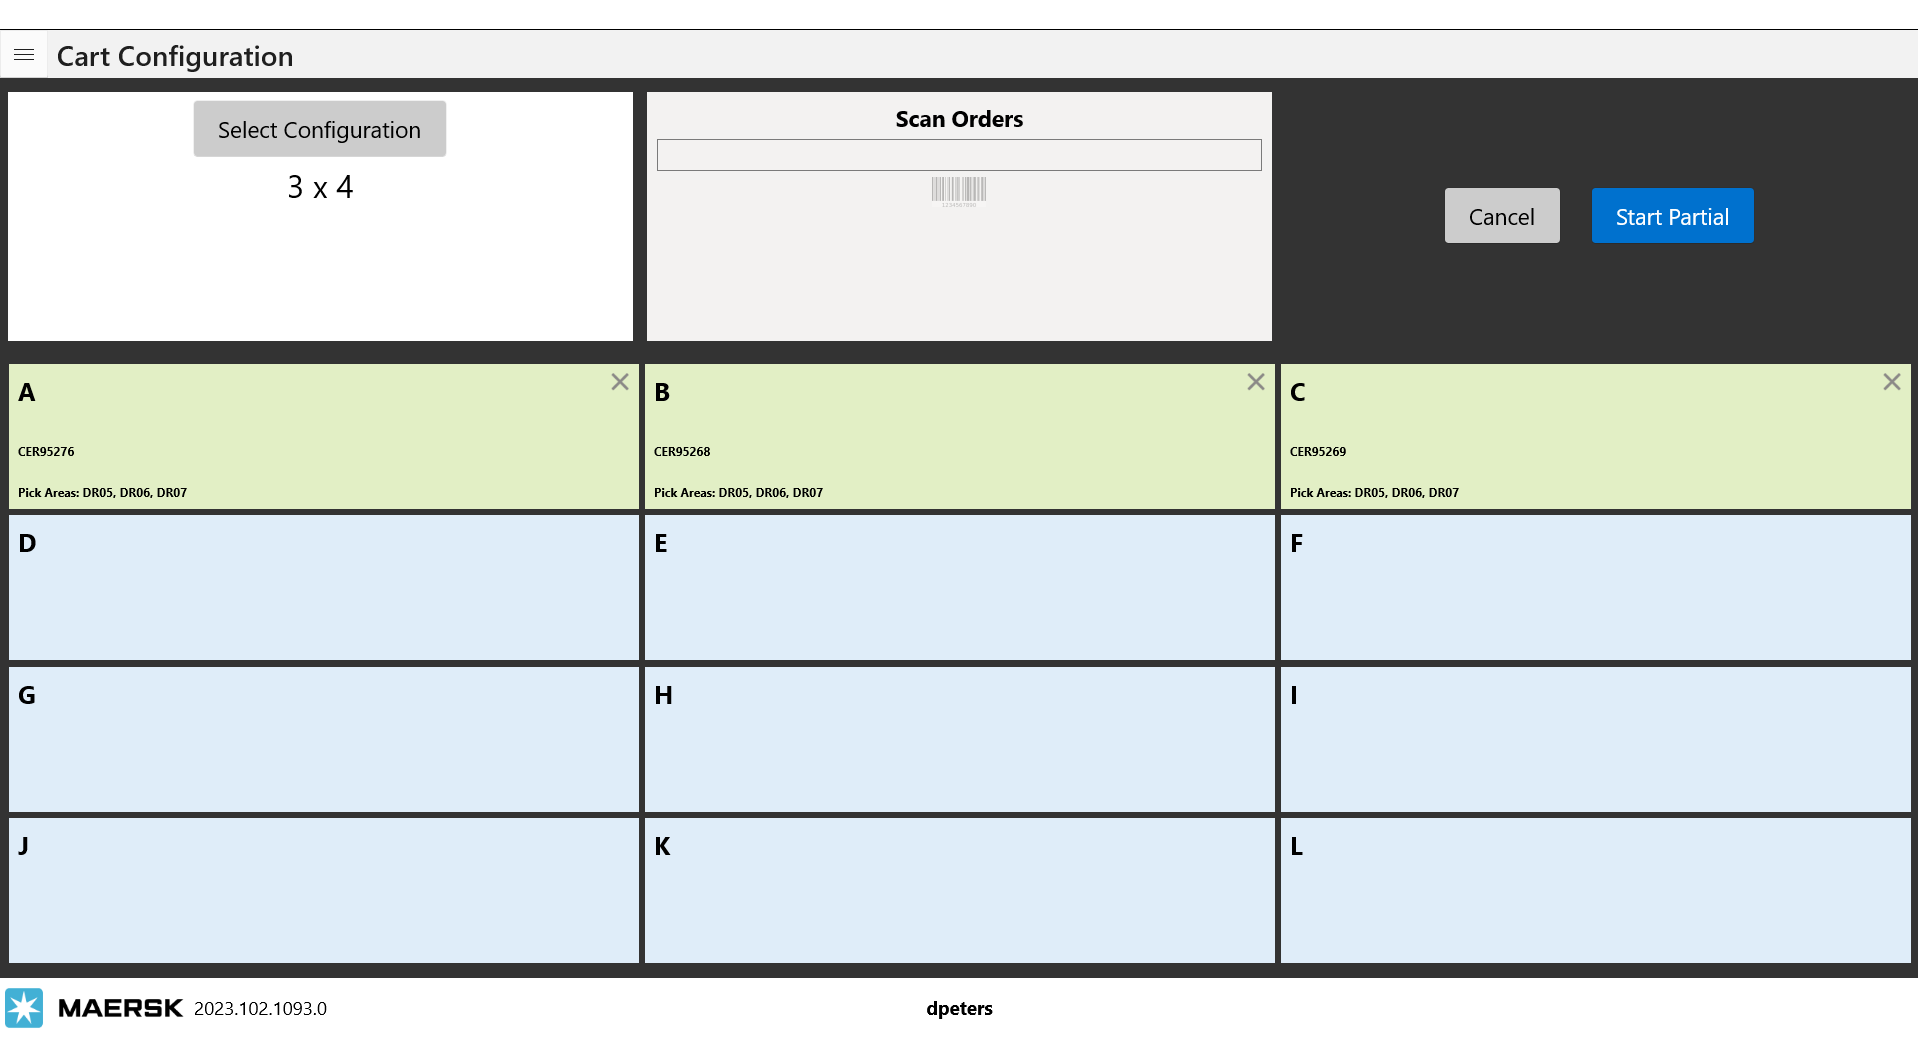
Pickers will configure the cart configuration based on the cart that has previously been set up and that has been designated for picking. This is done by choosing Select Configuration and selecting the configuration from the drop-down menu.
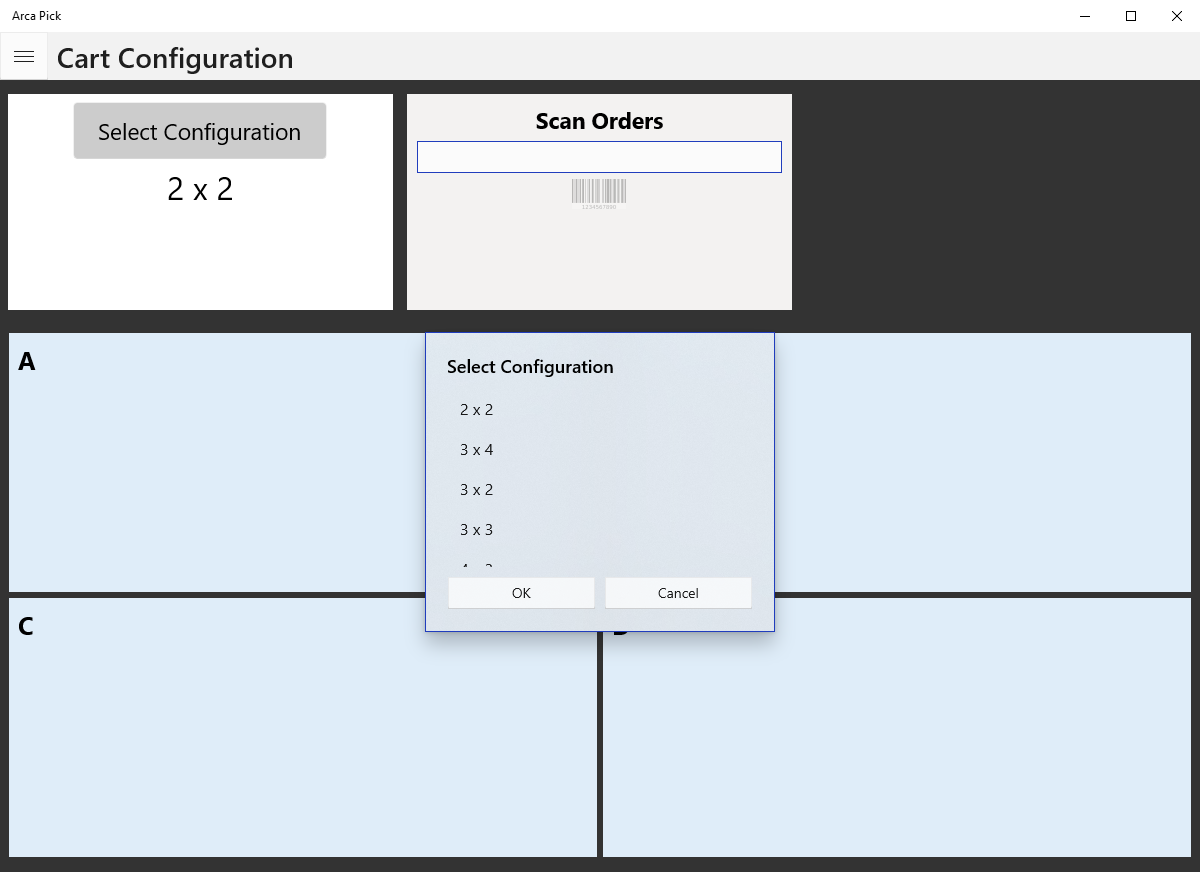
The most common configuration is 6x4, which is 6 bins by 4 bins but there are several options from which to choose based on how many orders are being fulfilled in one cart pick session.
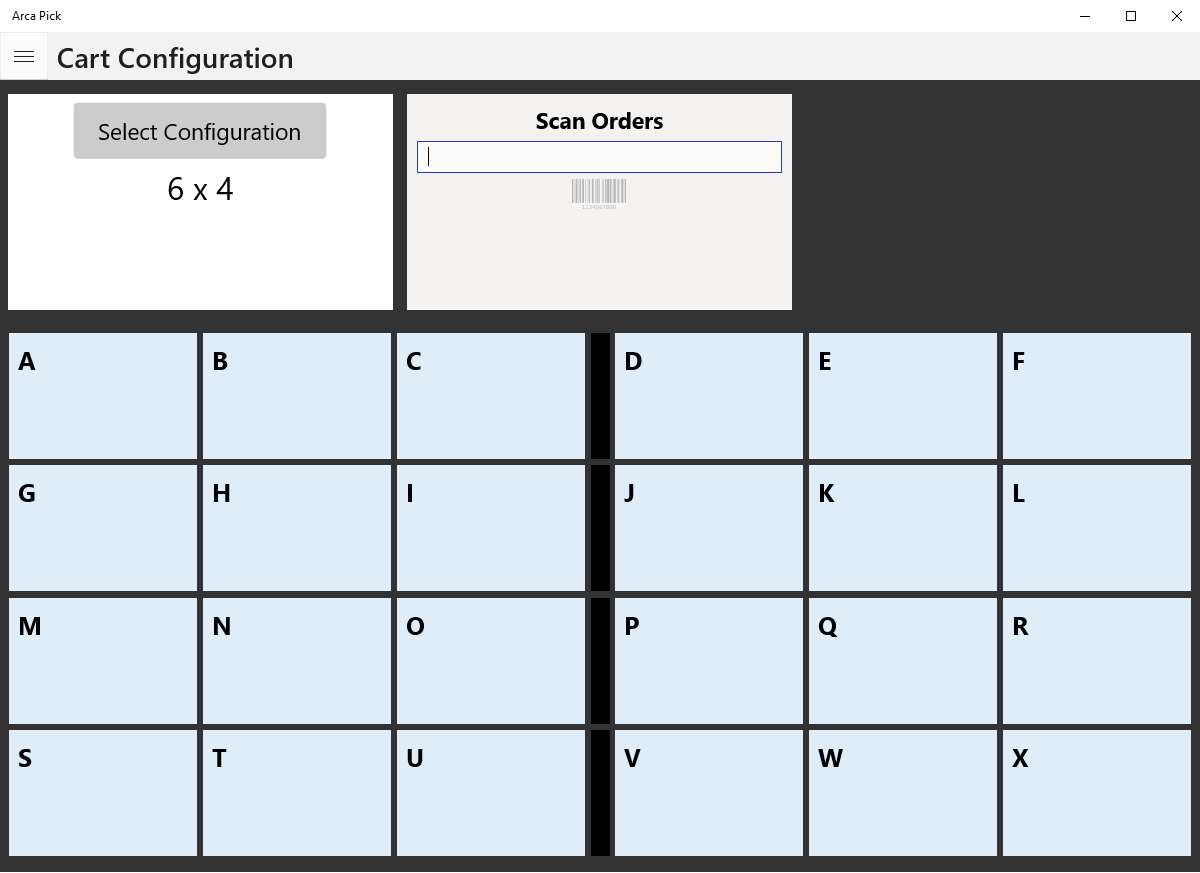
The picker will then scan in the orders to assign them to a bin. Items needed for the cart will then be placed in the corresponding bin.
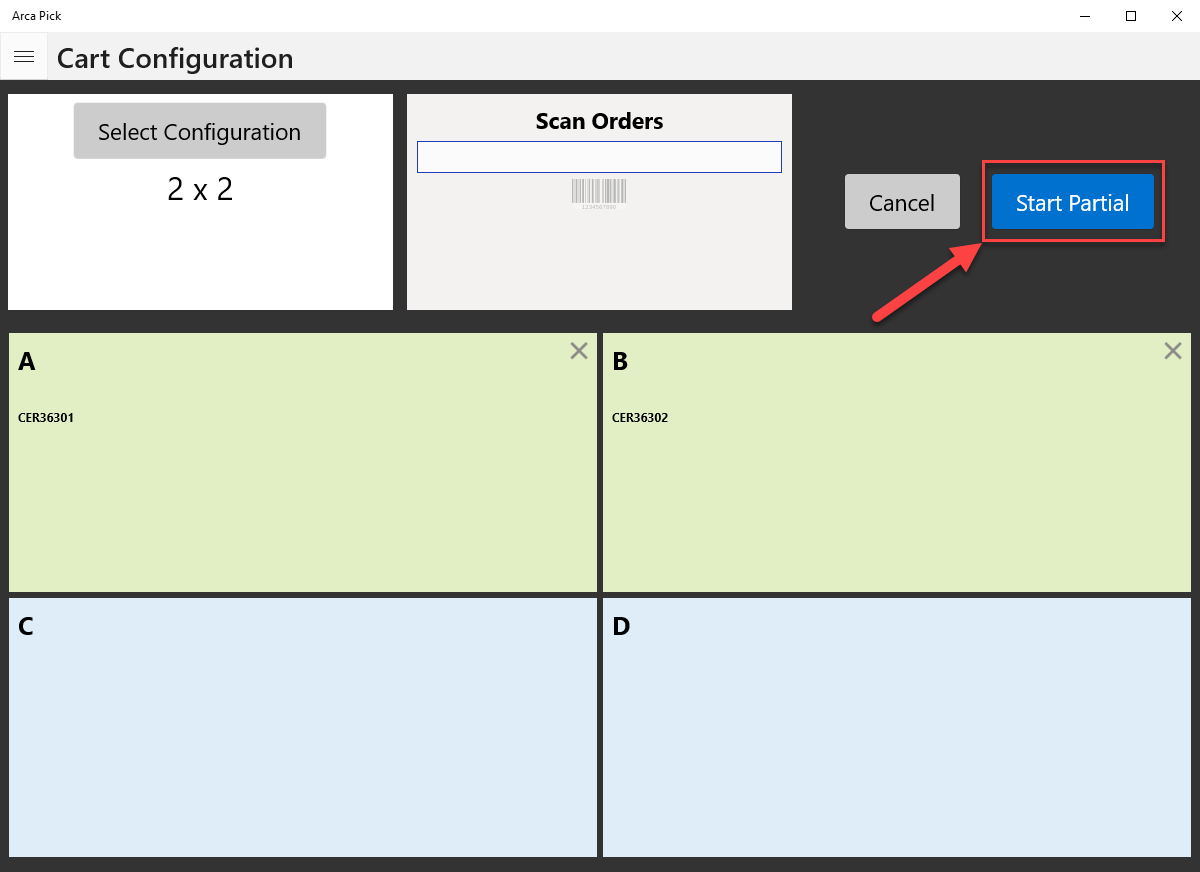
Partial Cart
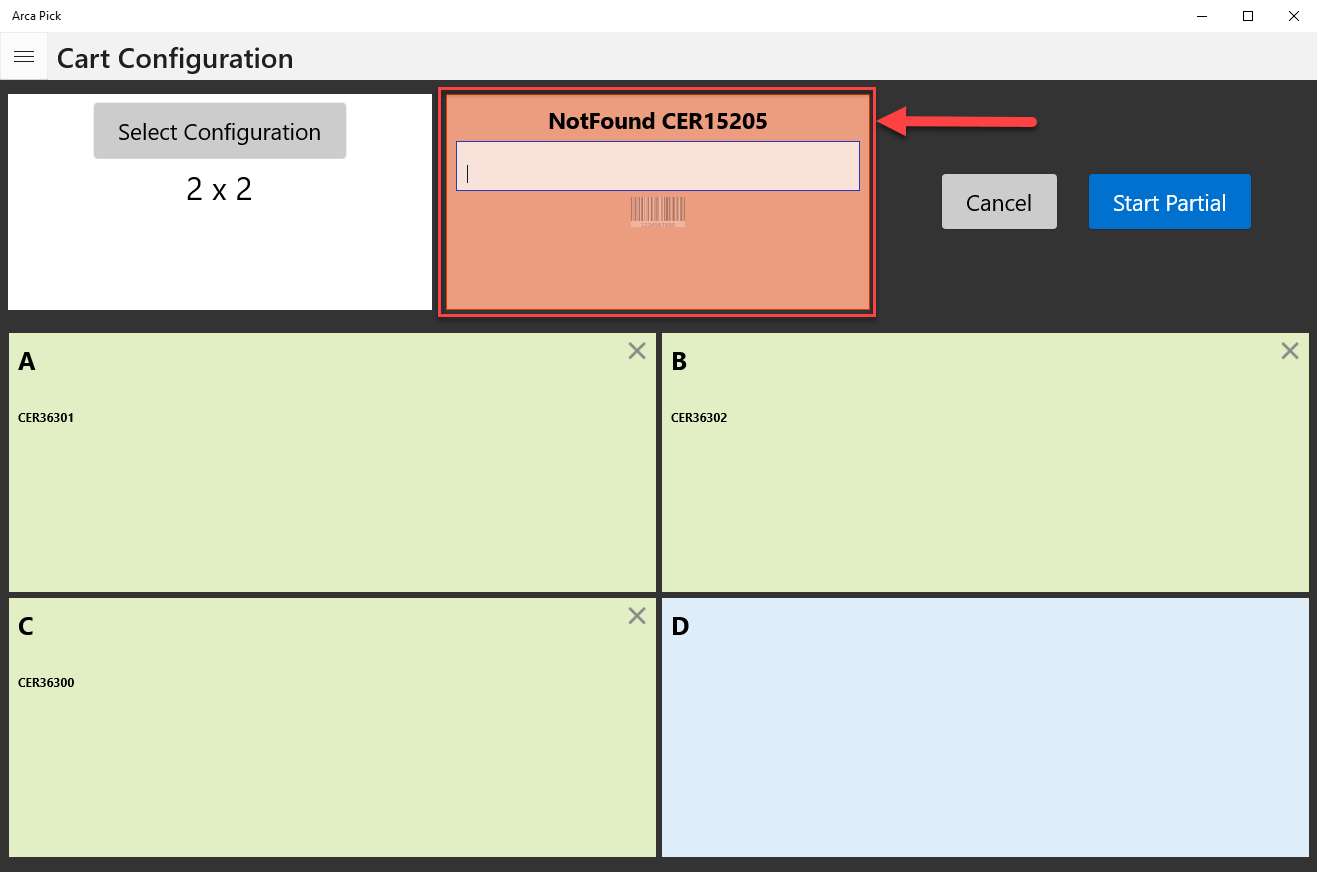
If the picker doesn't have all the orders, a pick a partial cart can be created by selecting Start Partial. This button only appears after the first order has been scanned in, allowing the picker to continue with the order rather than starting over with cart configuration.
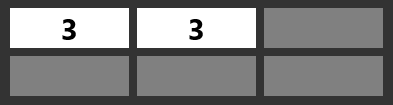
Picking will resume as normal for a partial cart with the exception being that not all the cart bins on the screen will have an order associated with them. When the order is marked as Complete, this bin will show as blank with no inventory.
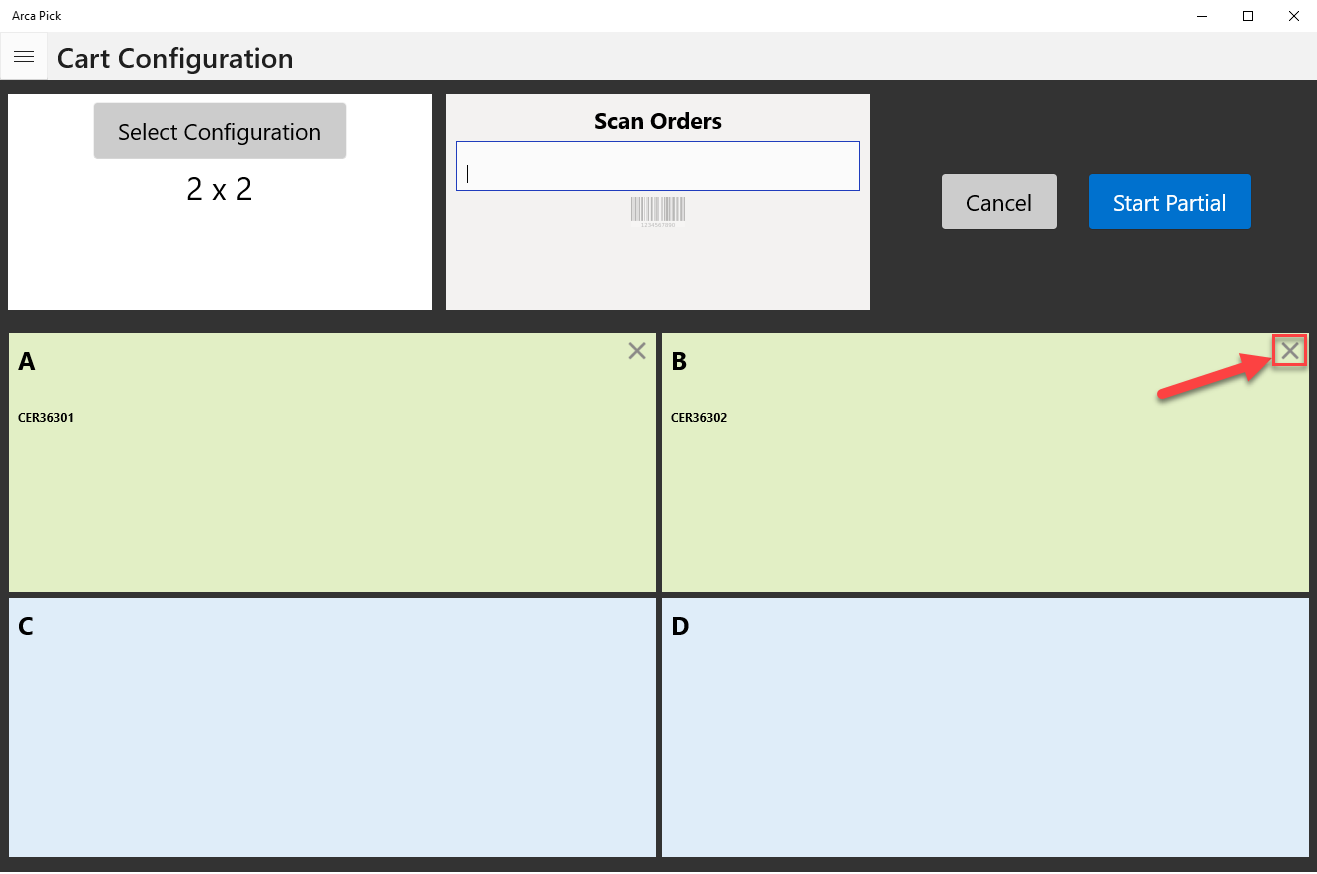
Removing Orders Scanned
If an order is scanned and it needs to be removed, pickers can check the X in the order box to remove it. The next order scanned will fill that bin on the screen.
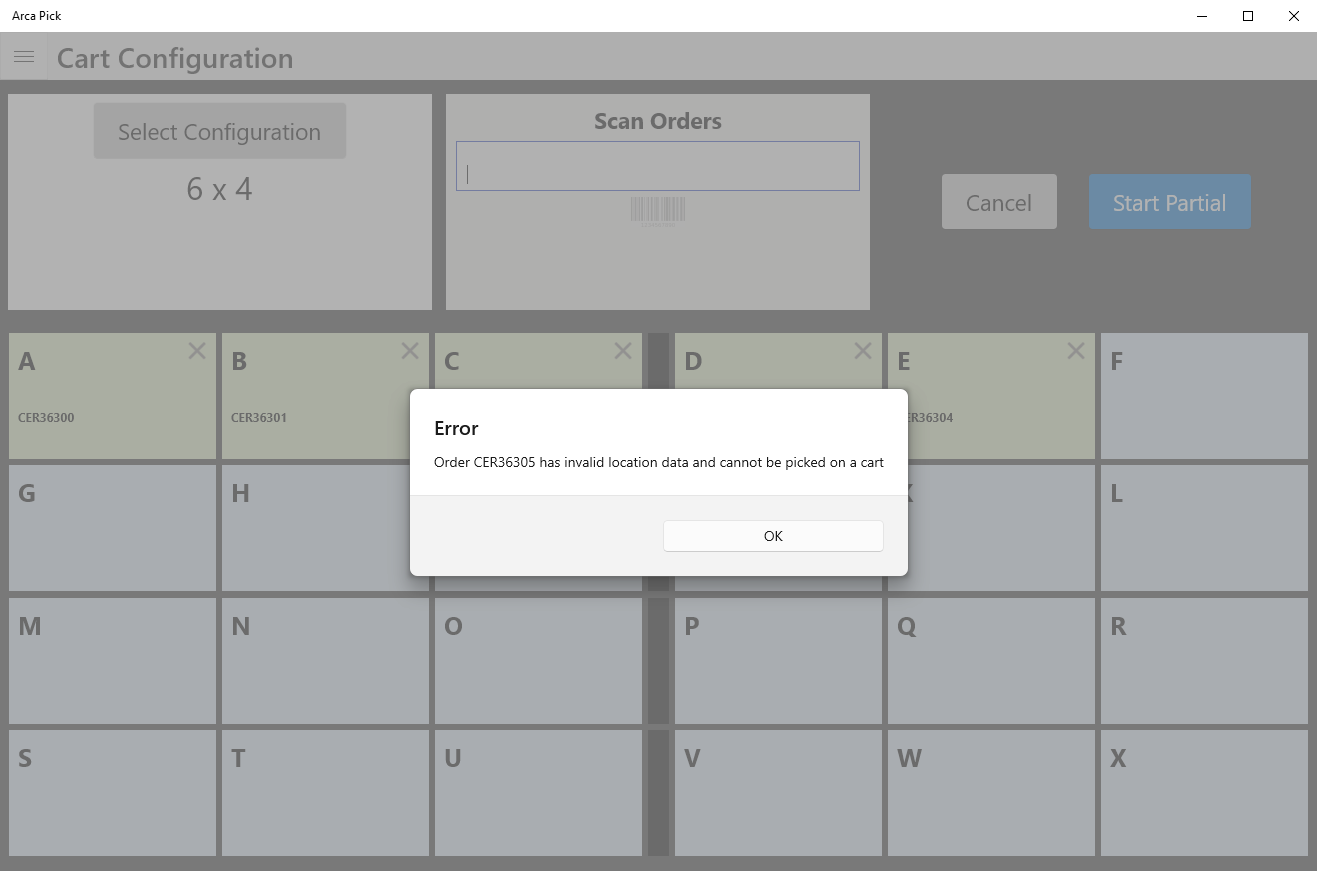
If an order fails to load, an error message will populate on the screen:
Picking Items
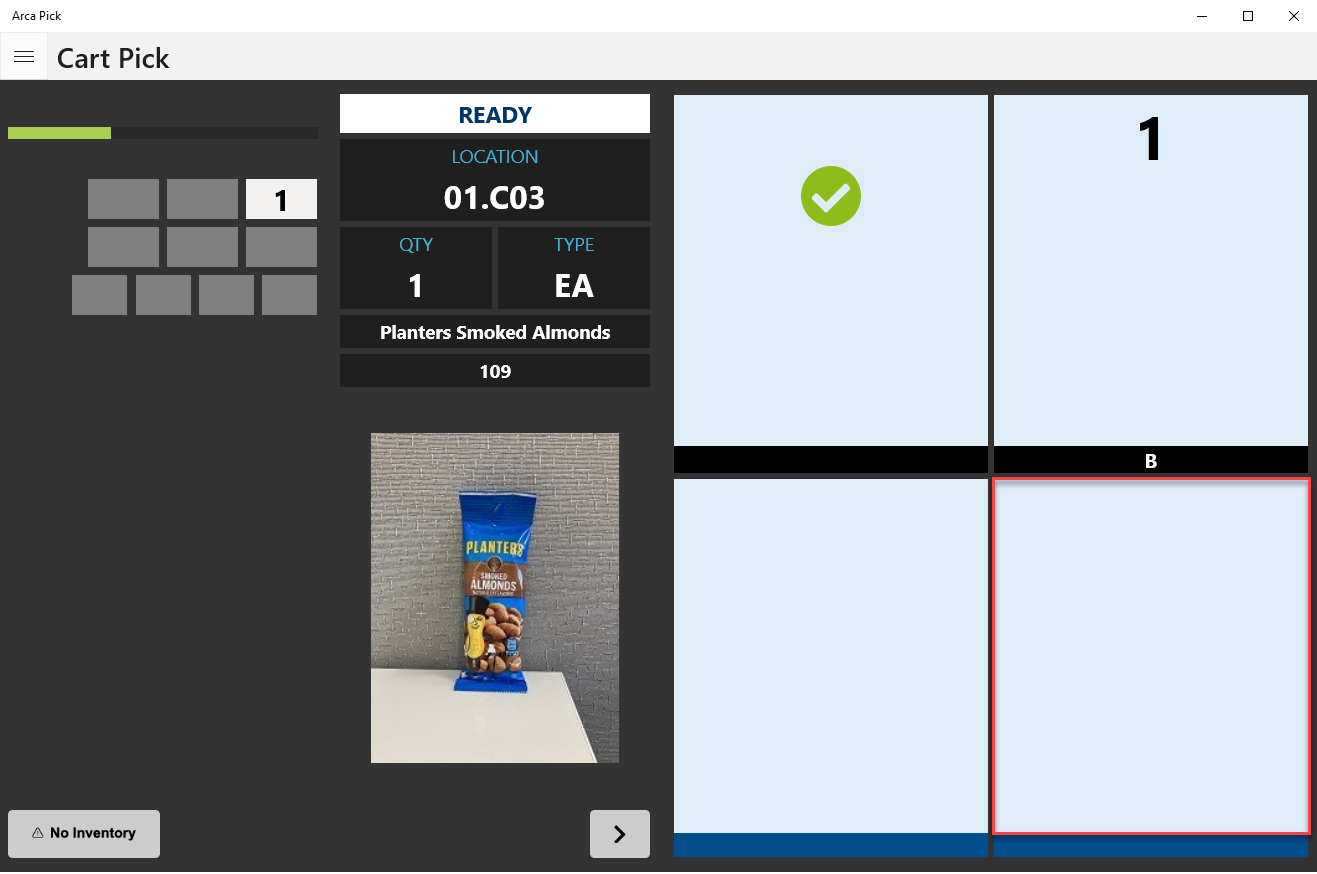
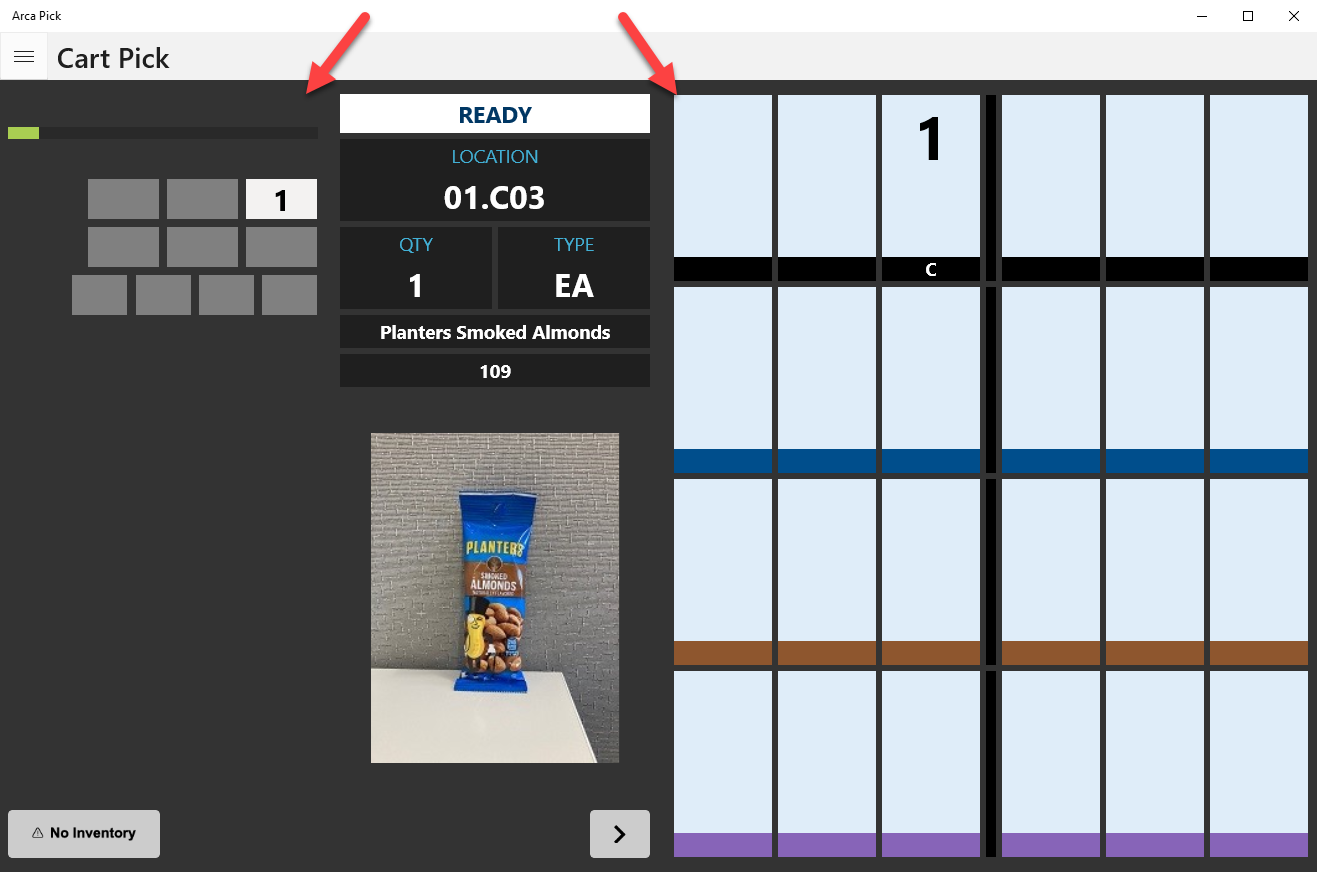
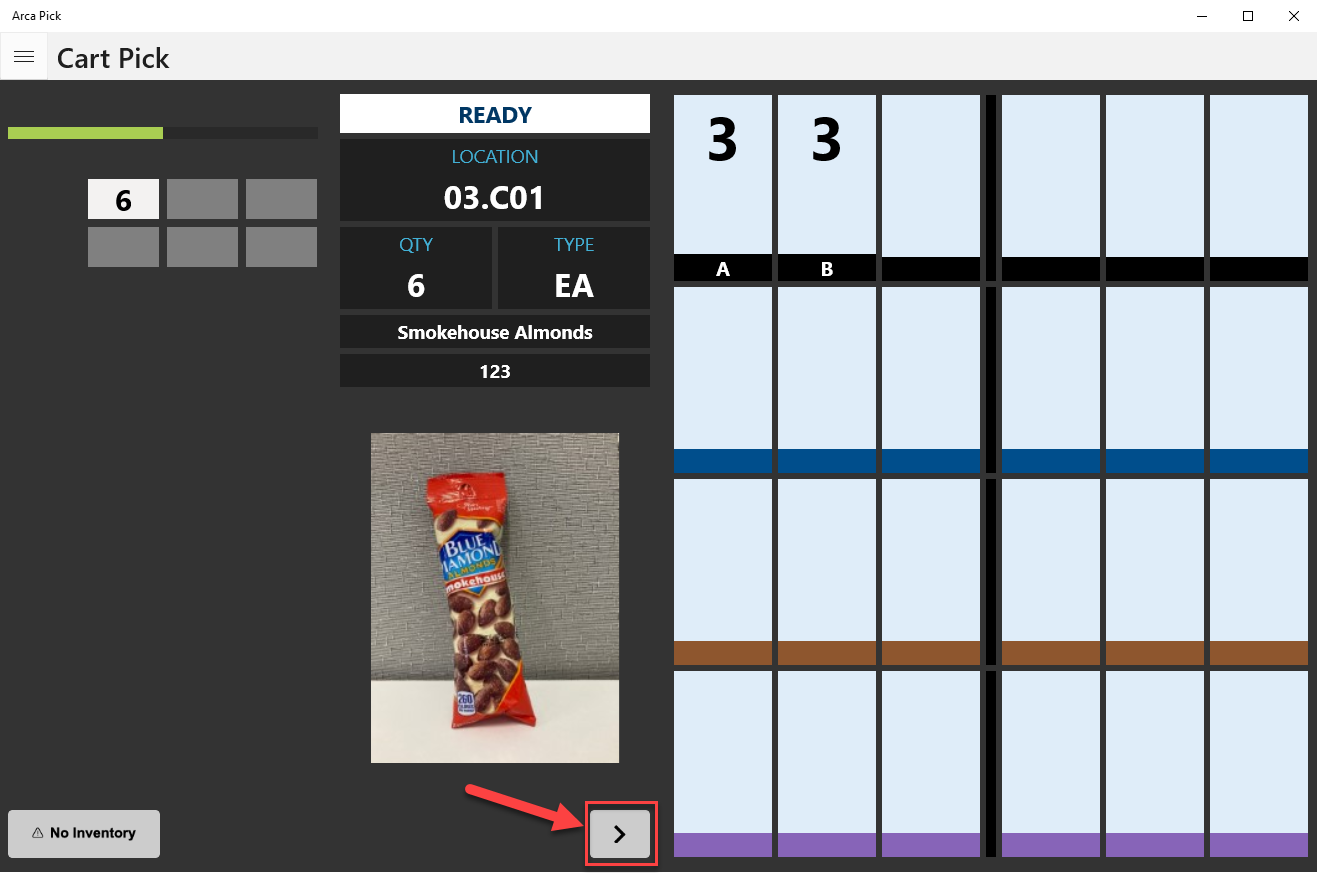
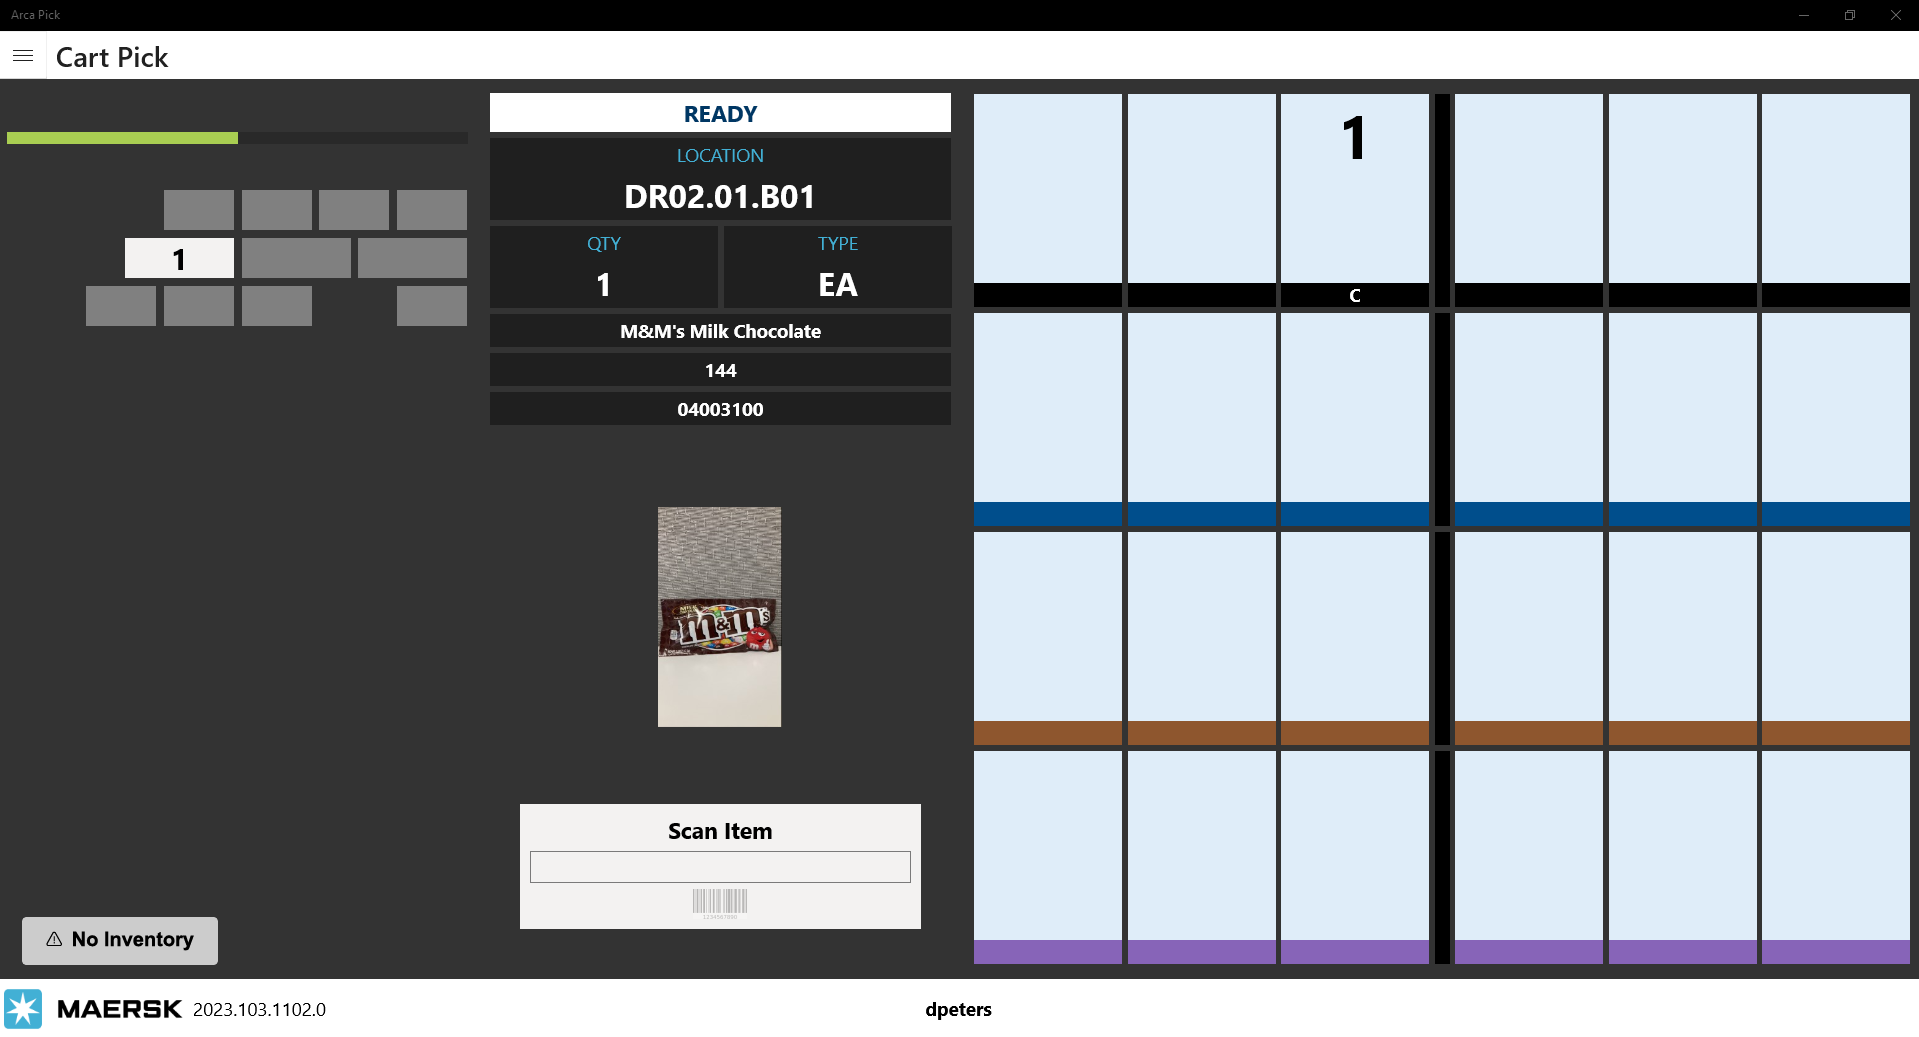
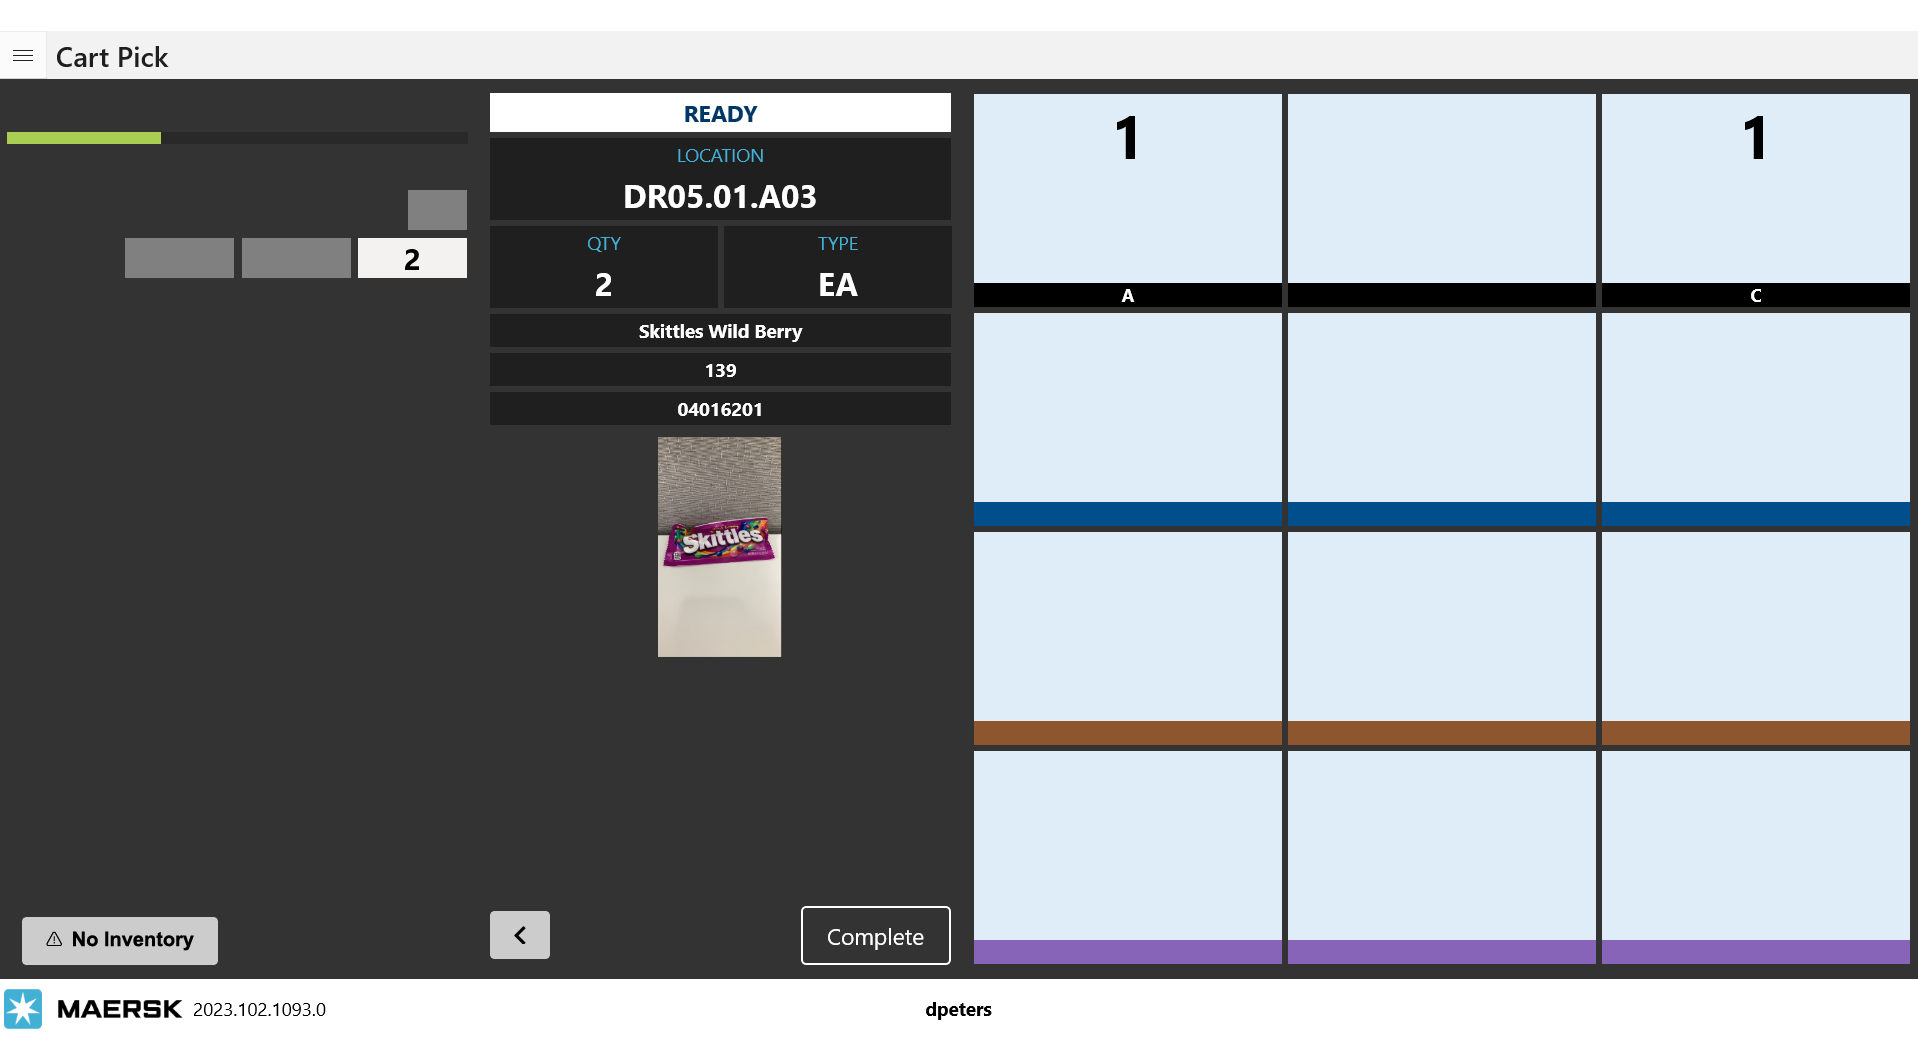
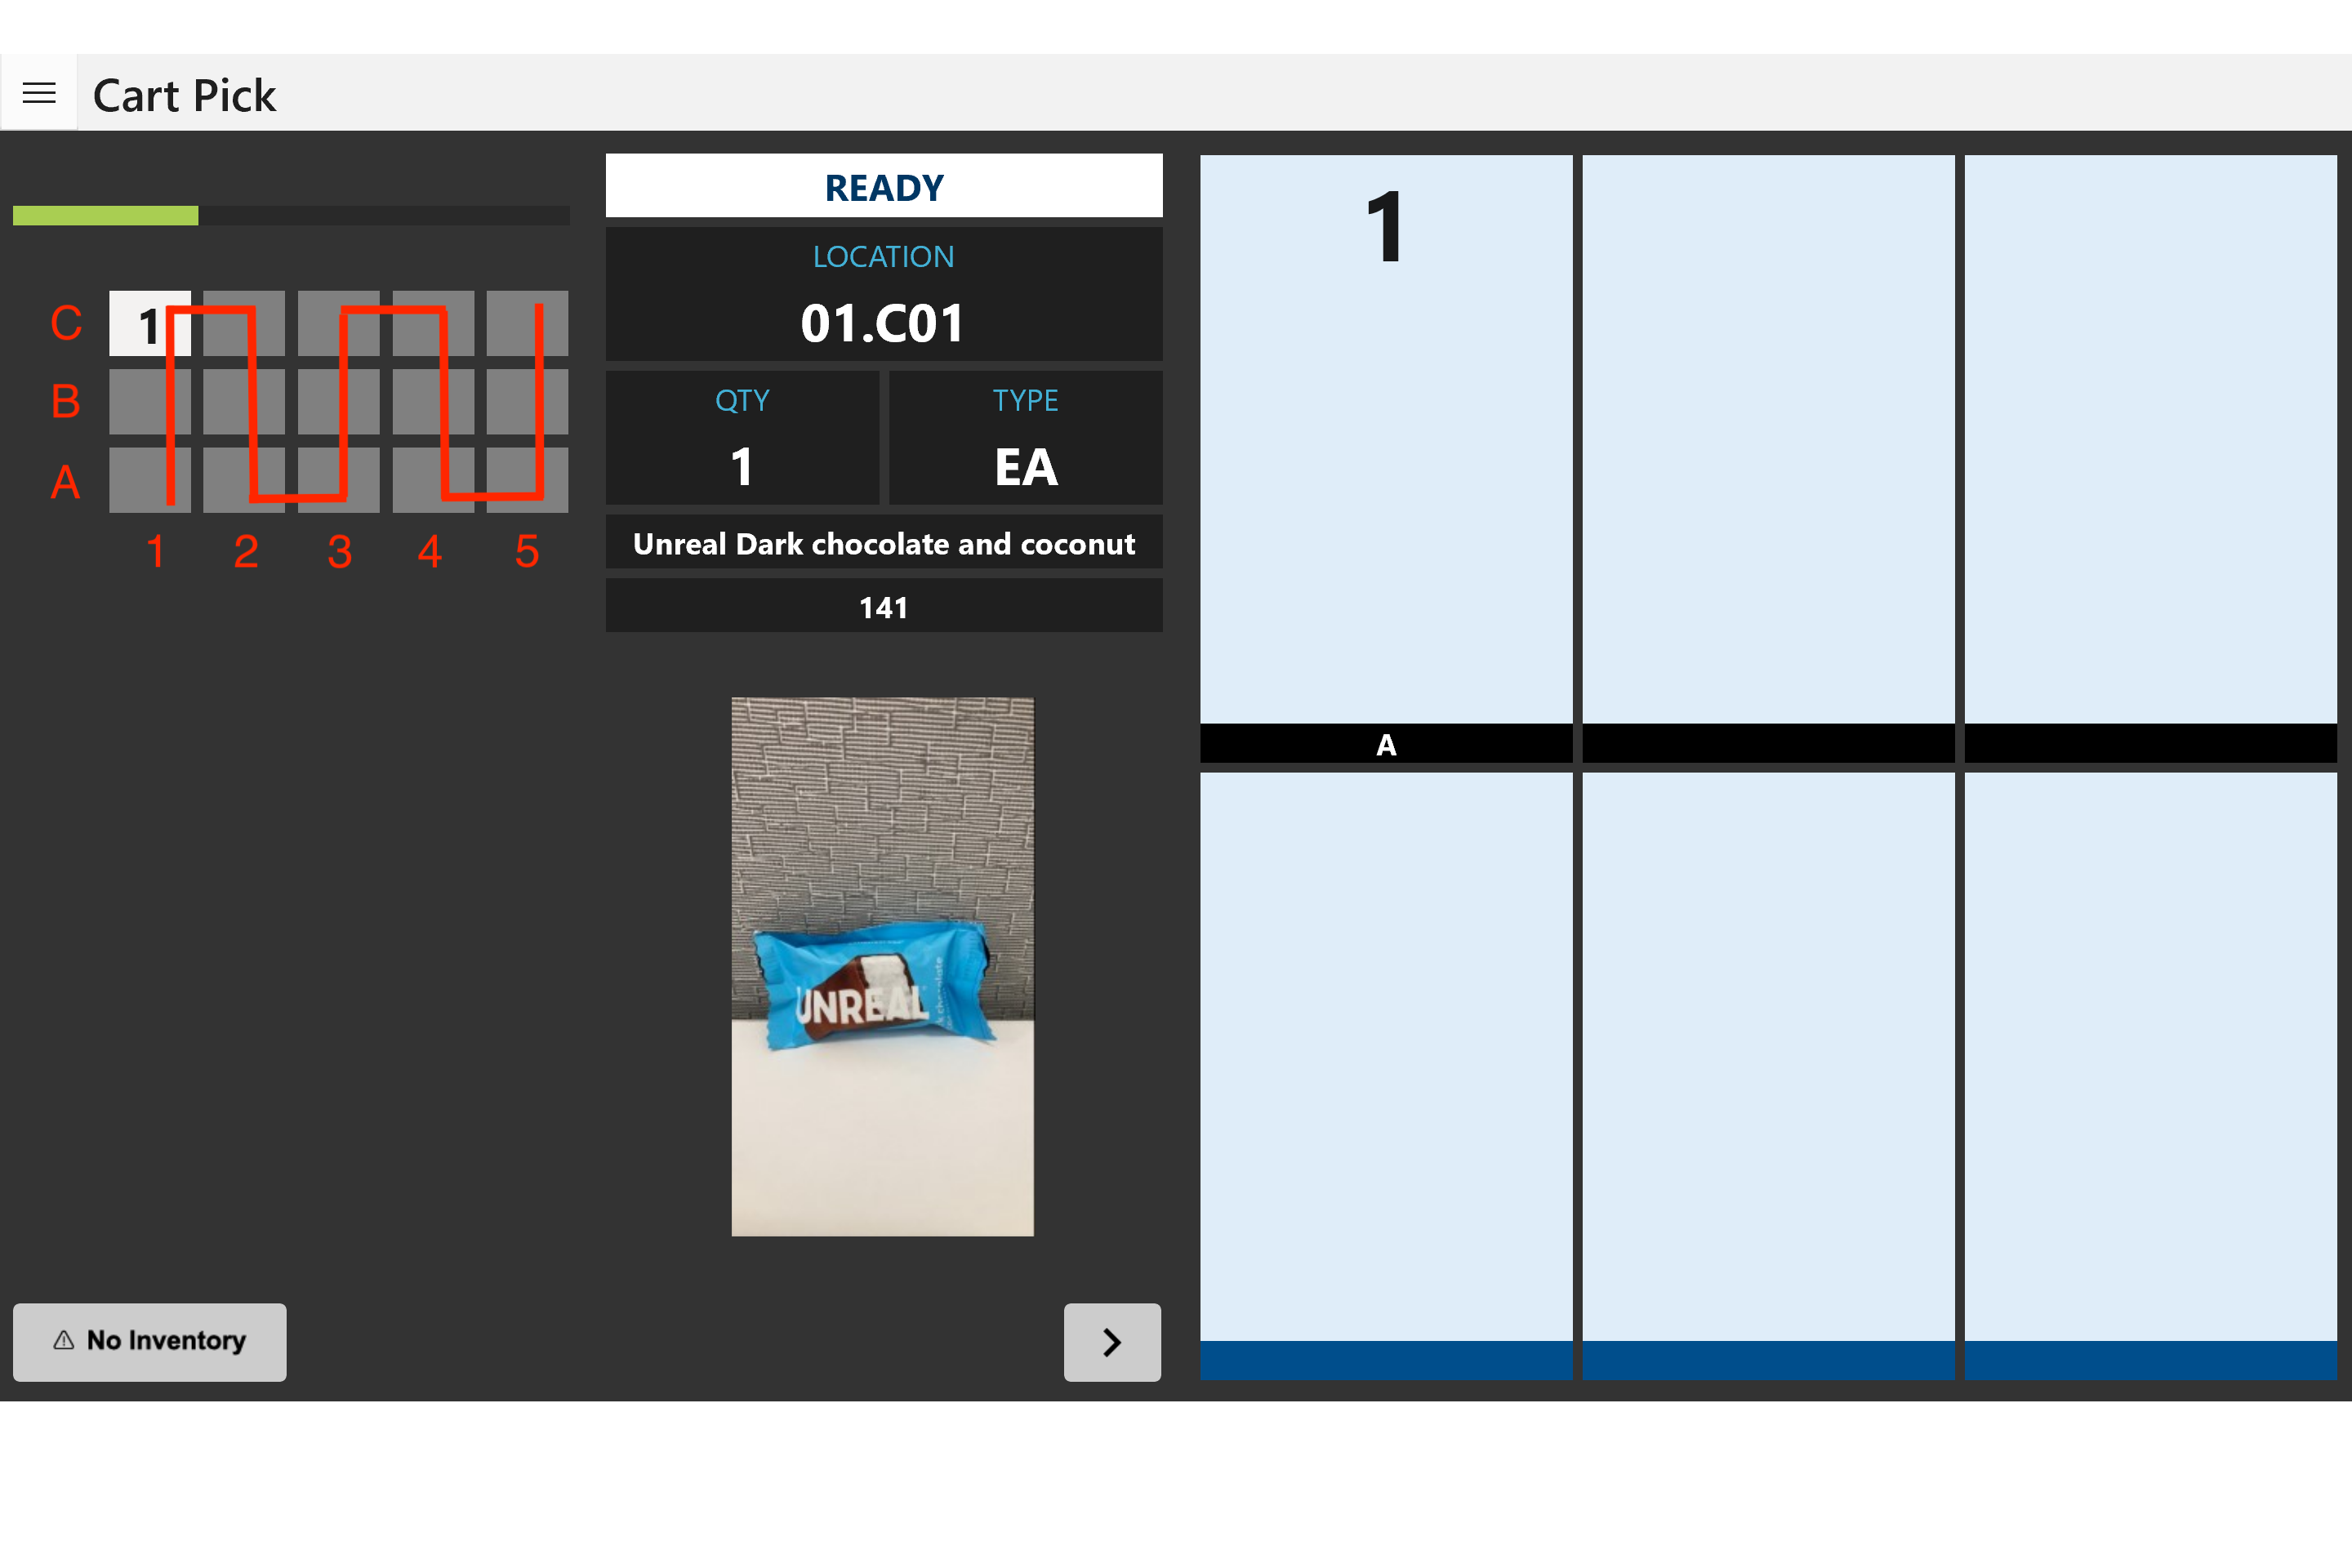
Since a picking zone and picking area have been set, the cart pick screen will display both the area for picking the items, which is on the left-hand side of the screen, and the cart, which is on the right.
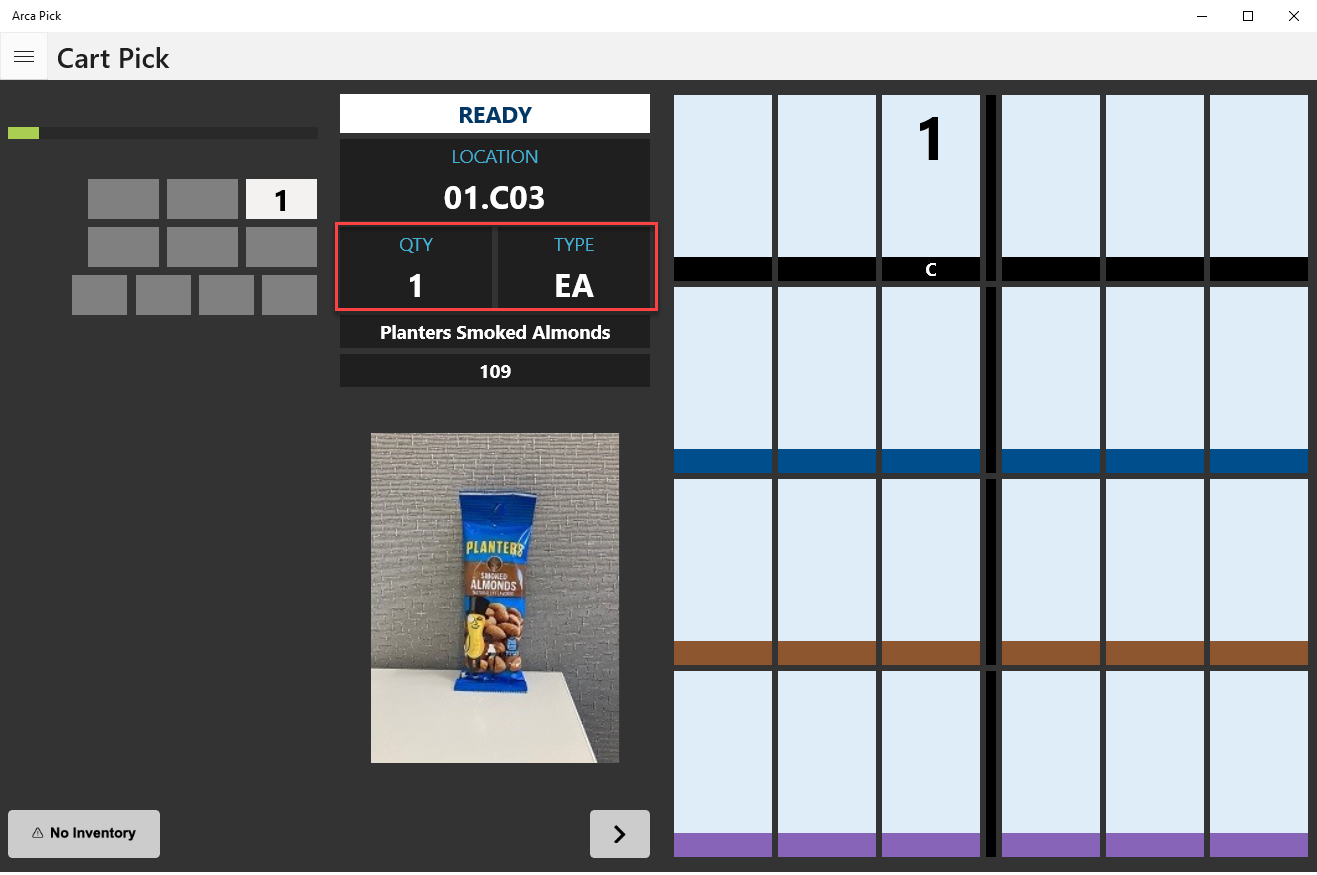
Pickers will identify the quantity of items by looking at the "QTY" (or quantity) box and place them in the bin associated with the order or orders. There is also an item type indicator specifying EA (each), etc. The total quantity of items picked will be placed in multiple bins.
Once the required items and amounts have been picked for each bin, the application will require the picker to select the forward arrow so that they can move on to the next order picks.
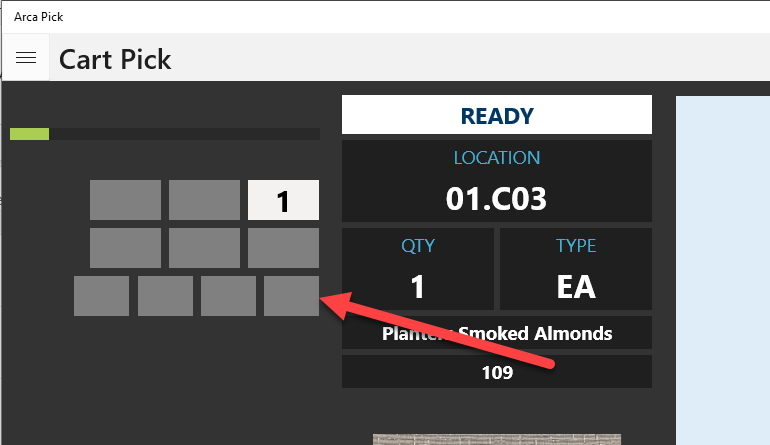
In some cases, the warehouse floor example shown in the screen will not have complete pick areas or pick zones. This is because the application mimics the real floor plan as much as possible. For example, in the following screenshot, ARCA Pick may display uneven shelving units in the pick area and zone because the warehouse is set up this way. In cases where only 1 shelf is displayed, it is possible that large inventory sits in this area or mass quantities of a single item.
It is also possible that when the pick zone has too many bins configured for the screen, an error message will display indicating this.

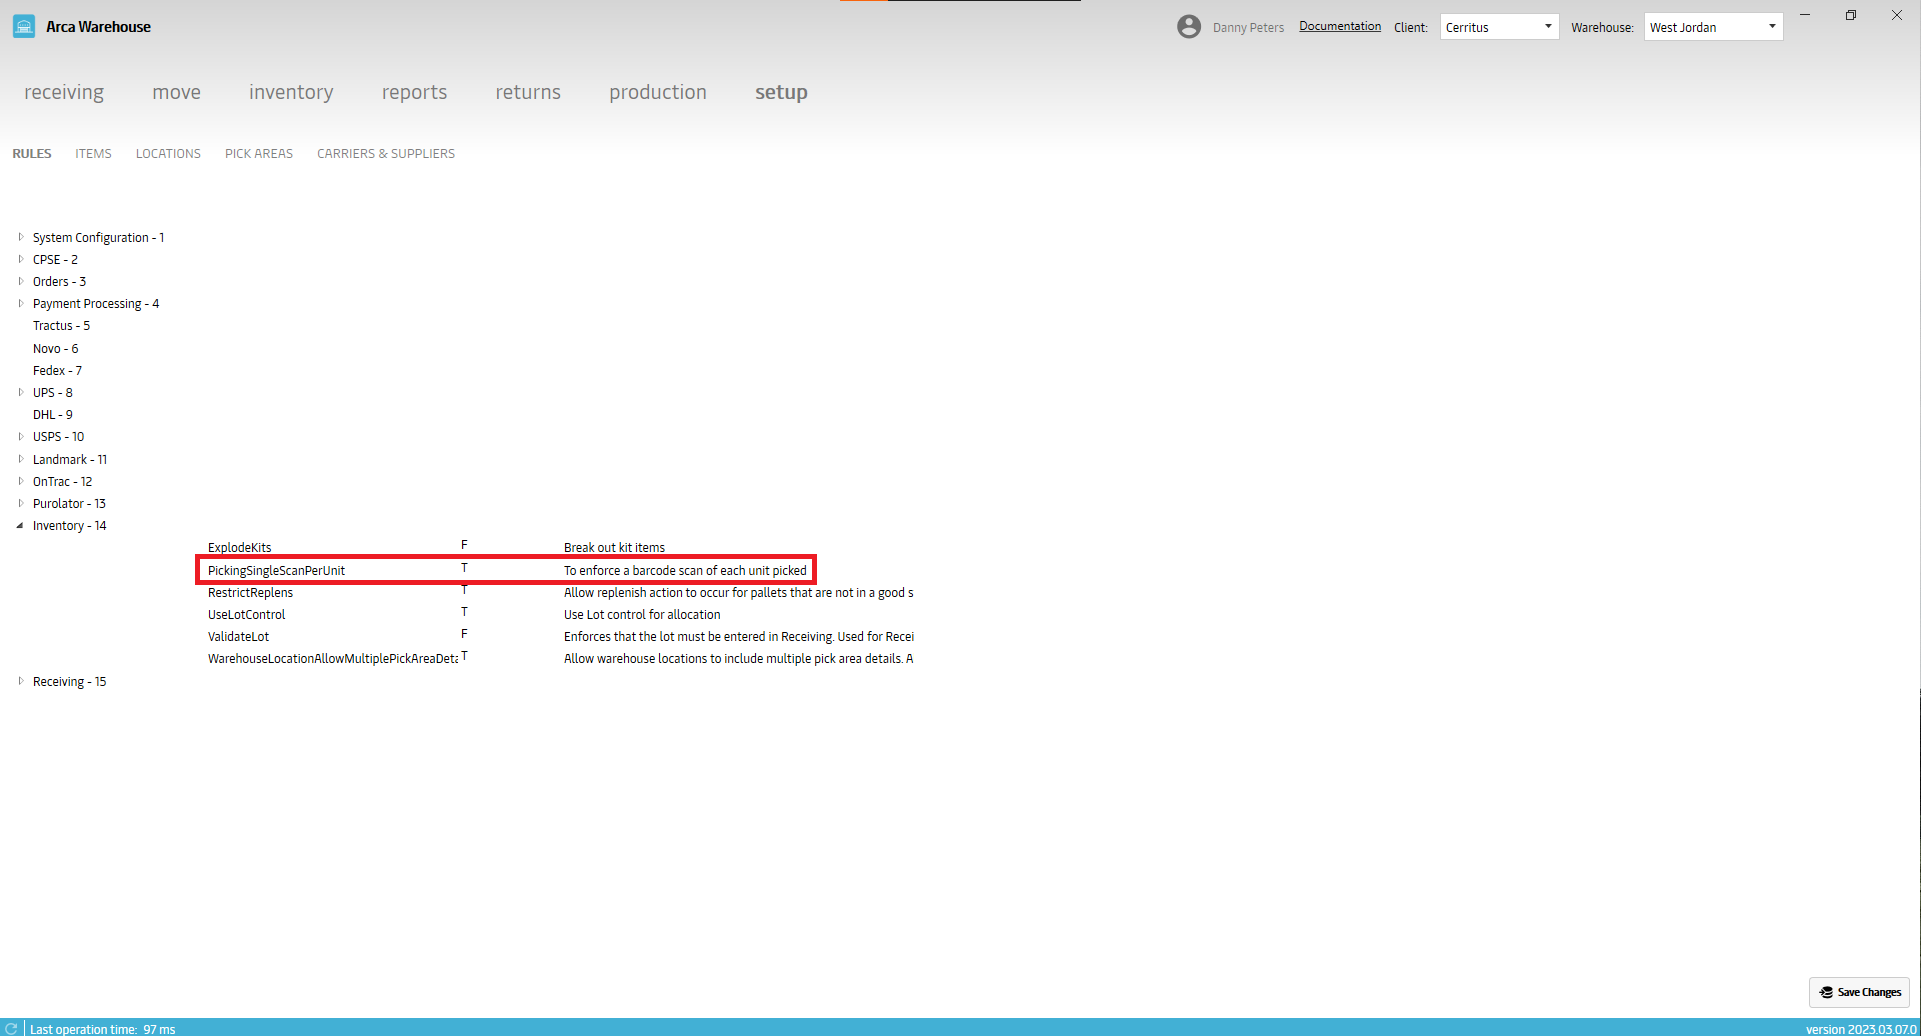
Single Scan Rule
The rule, PickingSingleScanPerUnit, is in the Inventory group on the Rules page. When that rule is turned on for a client, cart pick changes from tapping the screen or clicking the forward/next button to pick the item(s), to using barcode scans. They must be scanned individually. If you have a quantity of 5 for the item, then you have to scan 5 times.
Here is the original cart screen, when the rule is off.
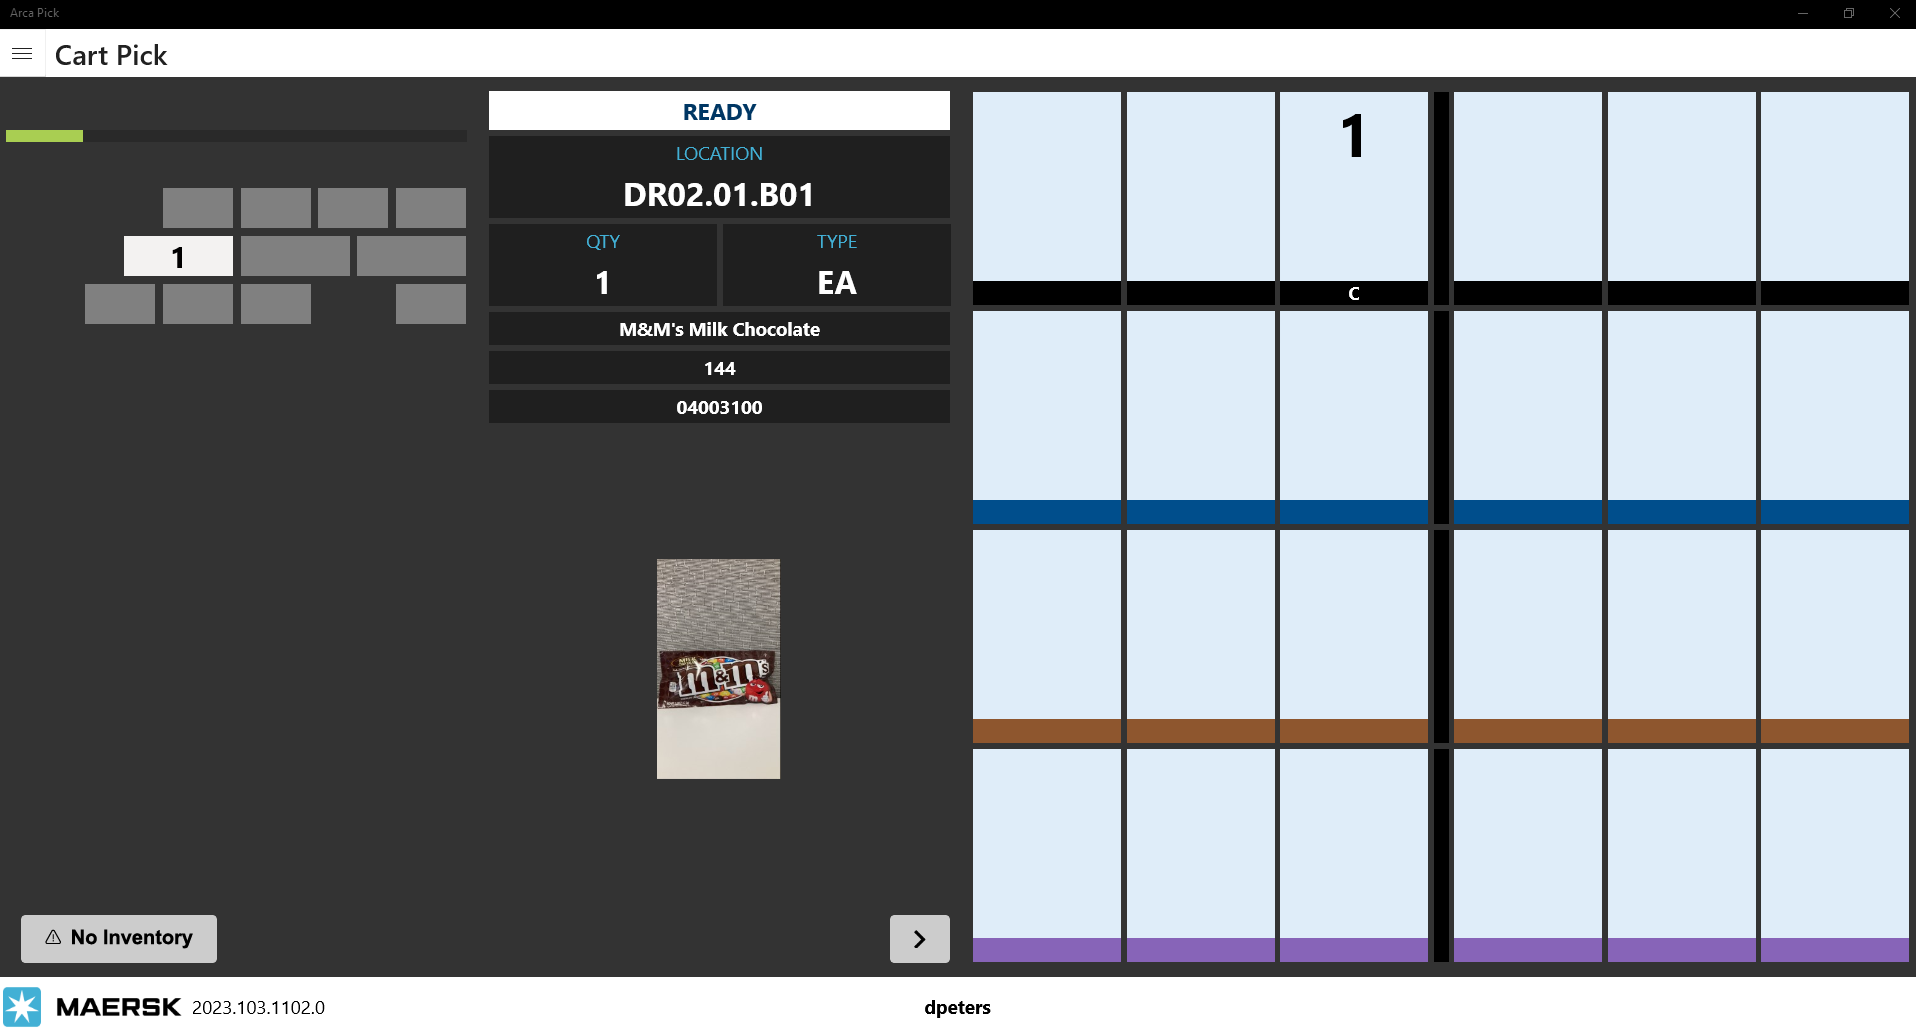
Here is the new cart screen when the rule on. The forward and back buttons are replaced with a scan box.
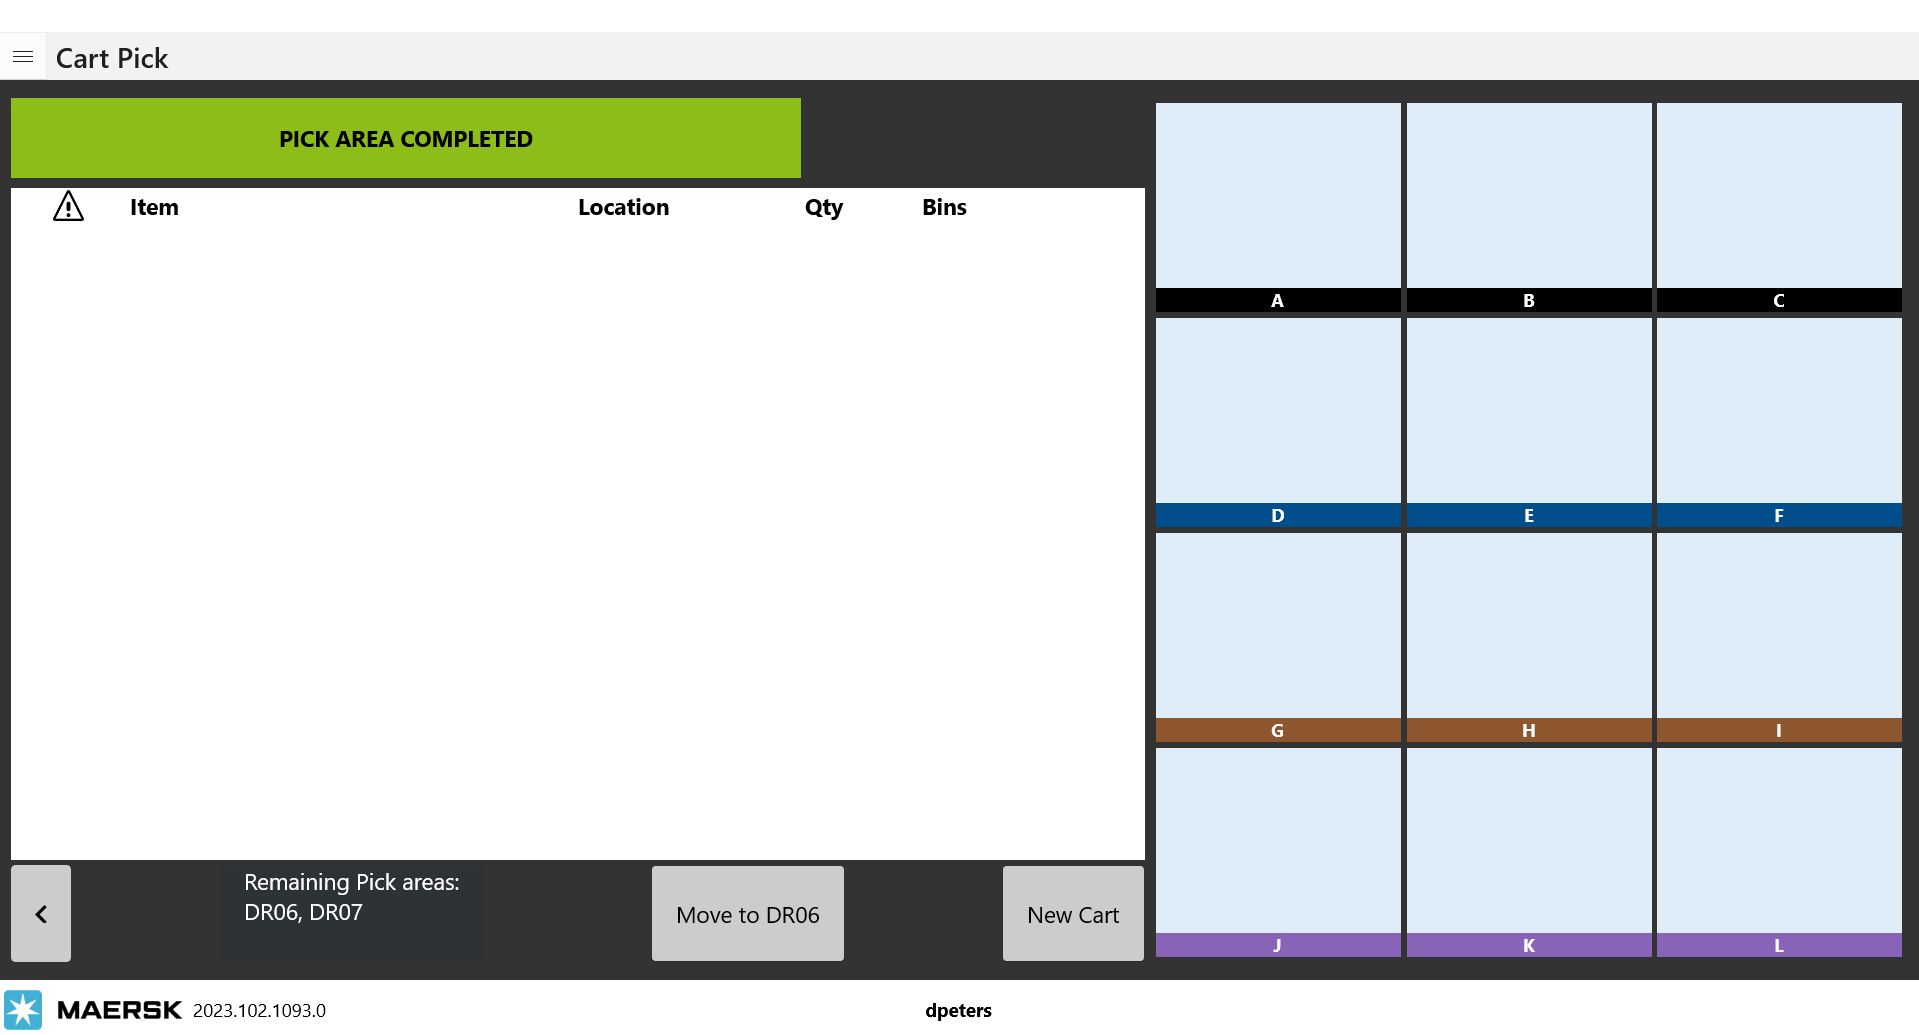
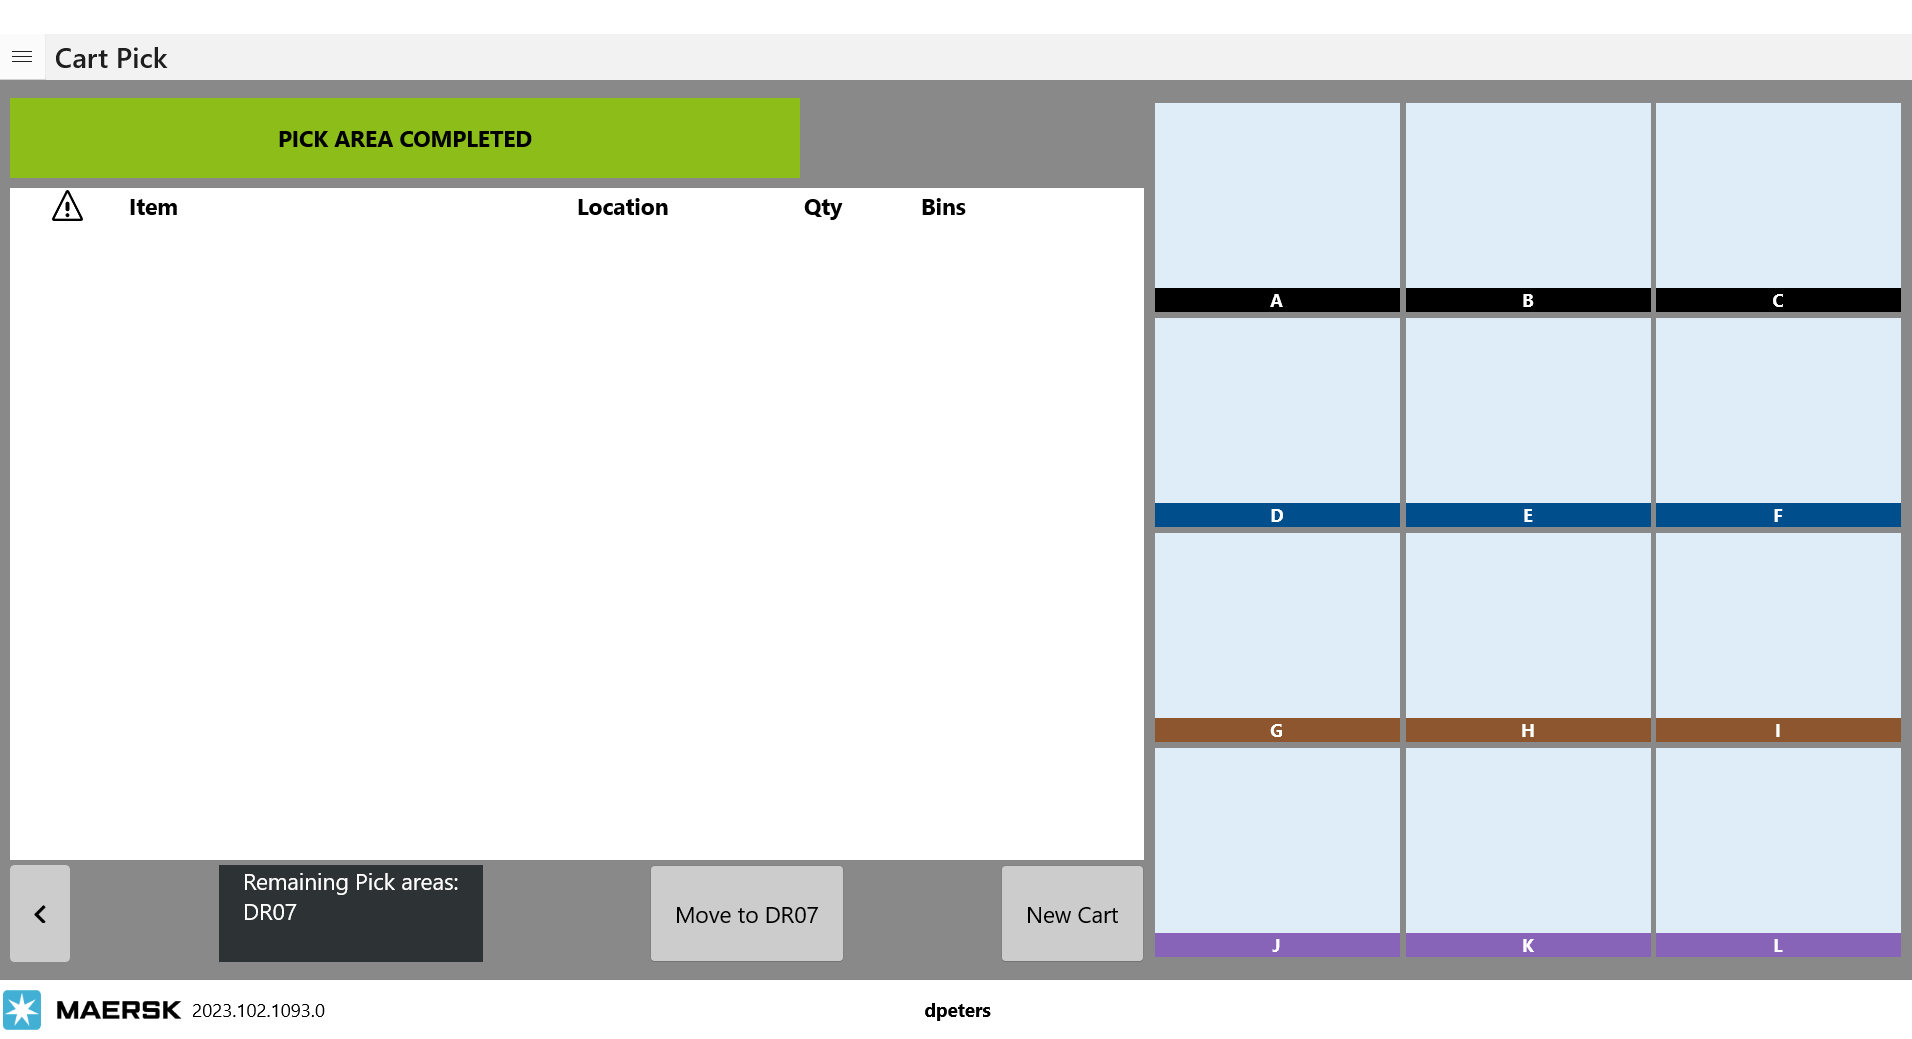
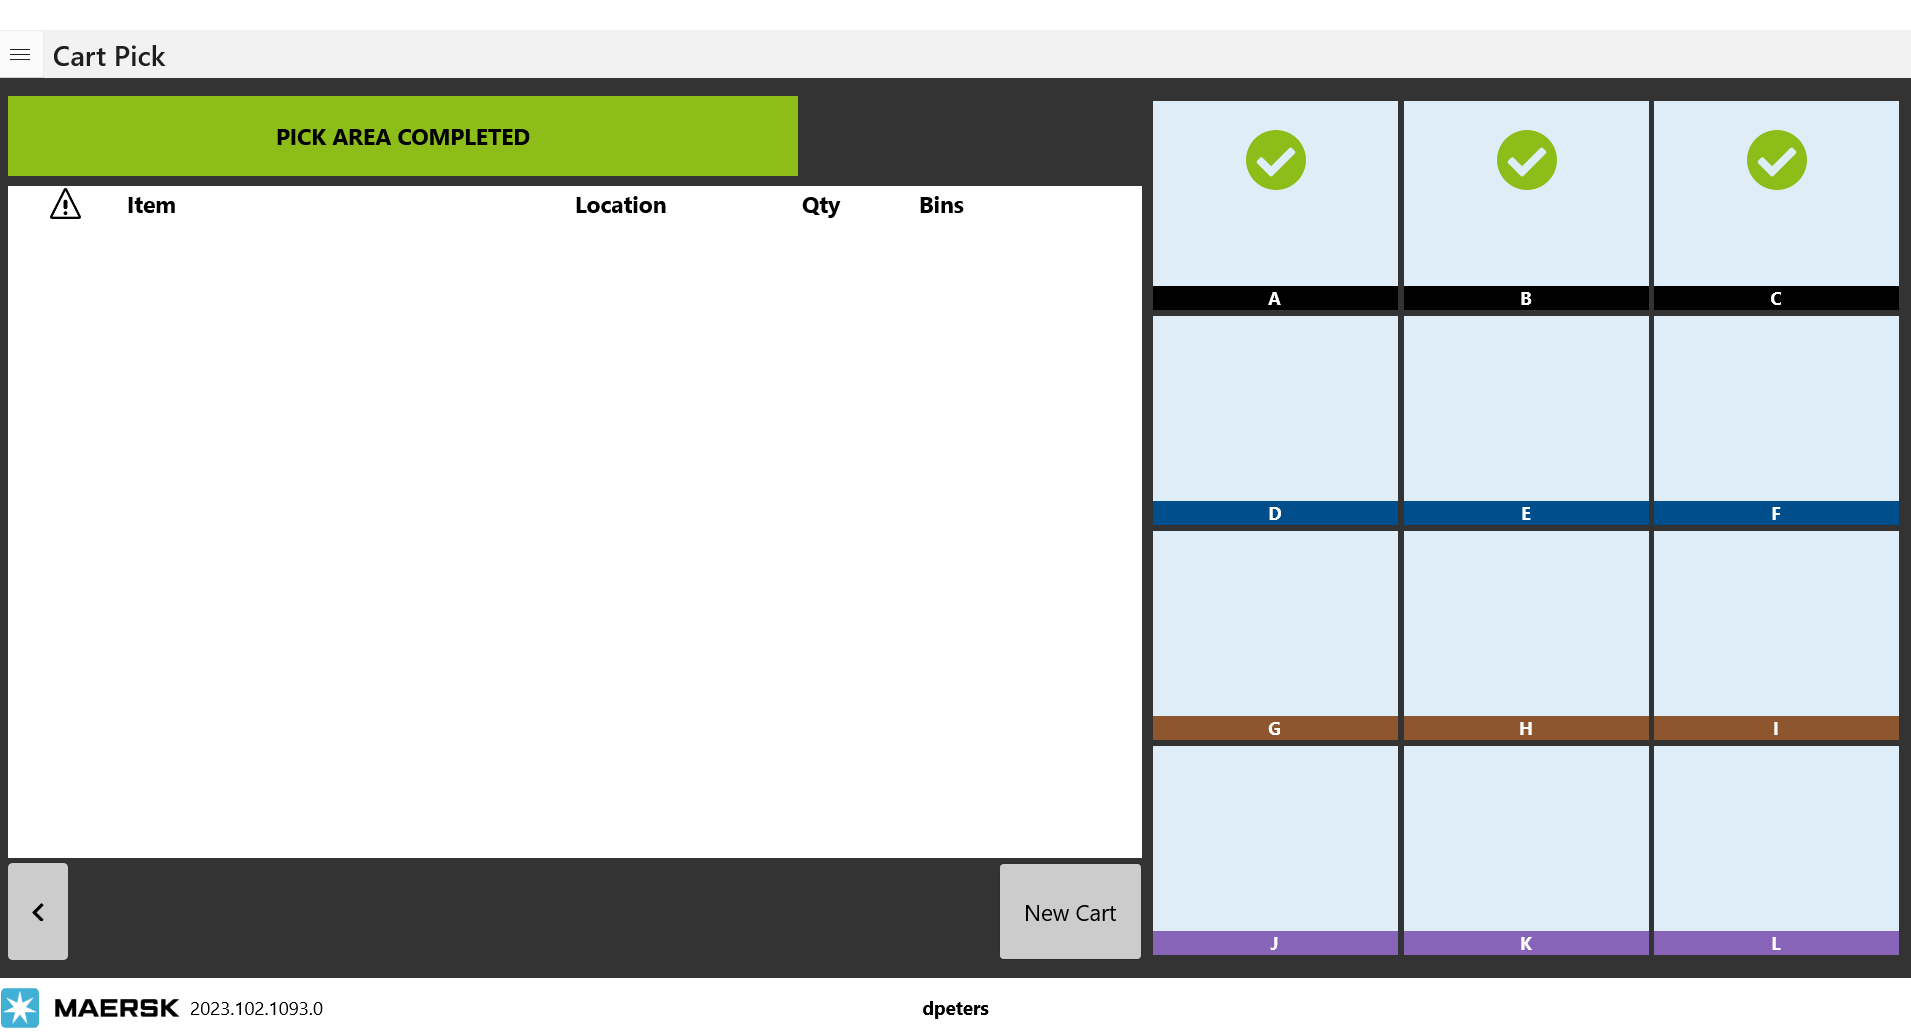
Cart Picking Across Multiple Pick Areas
You have the ability to cart pick orders that were allocated across multiple pick areas. When you turn on the setting you can now select the pick area button and chose a pick area to be added to the list. You can add as many as you need for the orders to be picked. Clear will wipe out the list and new pick areas can be selected. This is the same way that use multiple pick zones works for the pick station. Make your selections and save the settings. On the cart configuration screen as you’re scanning in orders you will now see they list the pick areas where the items are located. Picking is now done by pick areas (or zones in some warehouses terminology.) as you pick through the cart the first time the complete button is sown is just the completion of that pick area’s items and not the completion of the whole cart. After clicking complete for the first time, you will see it listing out the remaining pick areas to be complete and you must click on Move to next … button to begin picking in the next pick area. Once all the pick areas have been complete, the final complete button will take you to the cart complete screen where you will see the green validation check marks for complete orders and any item(s) that were selected as no inventory.
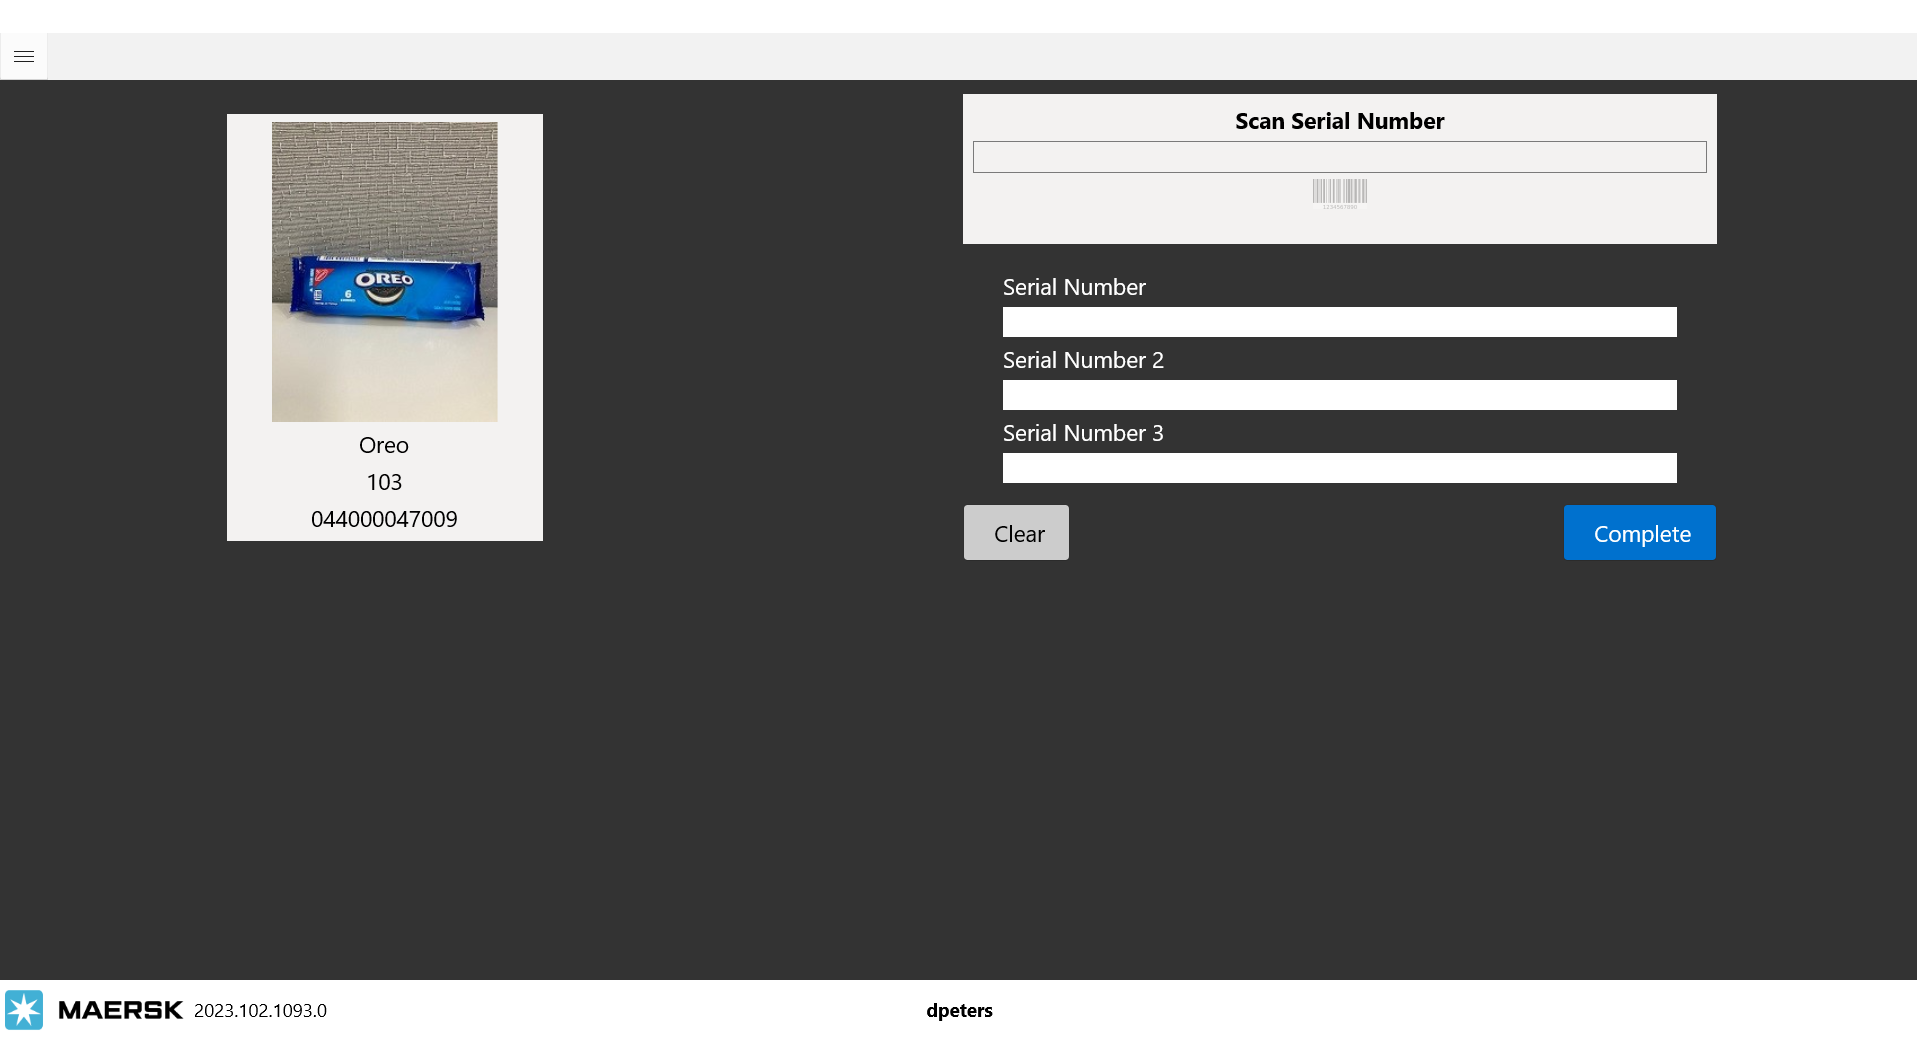
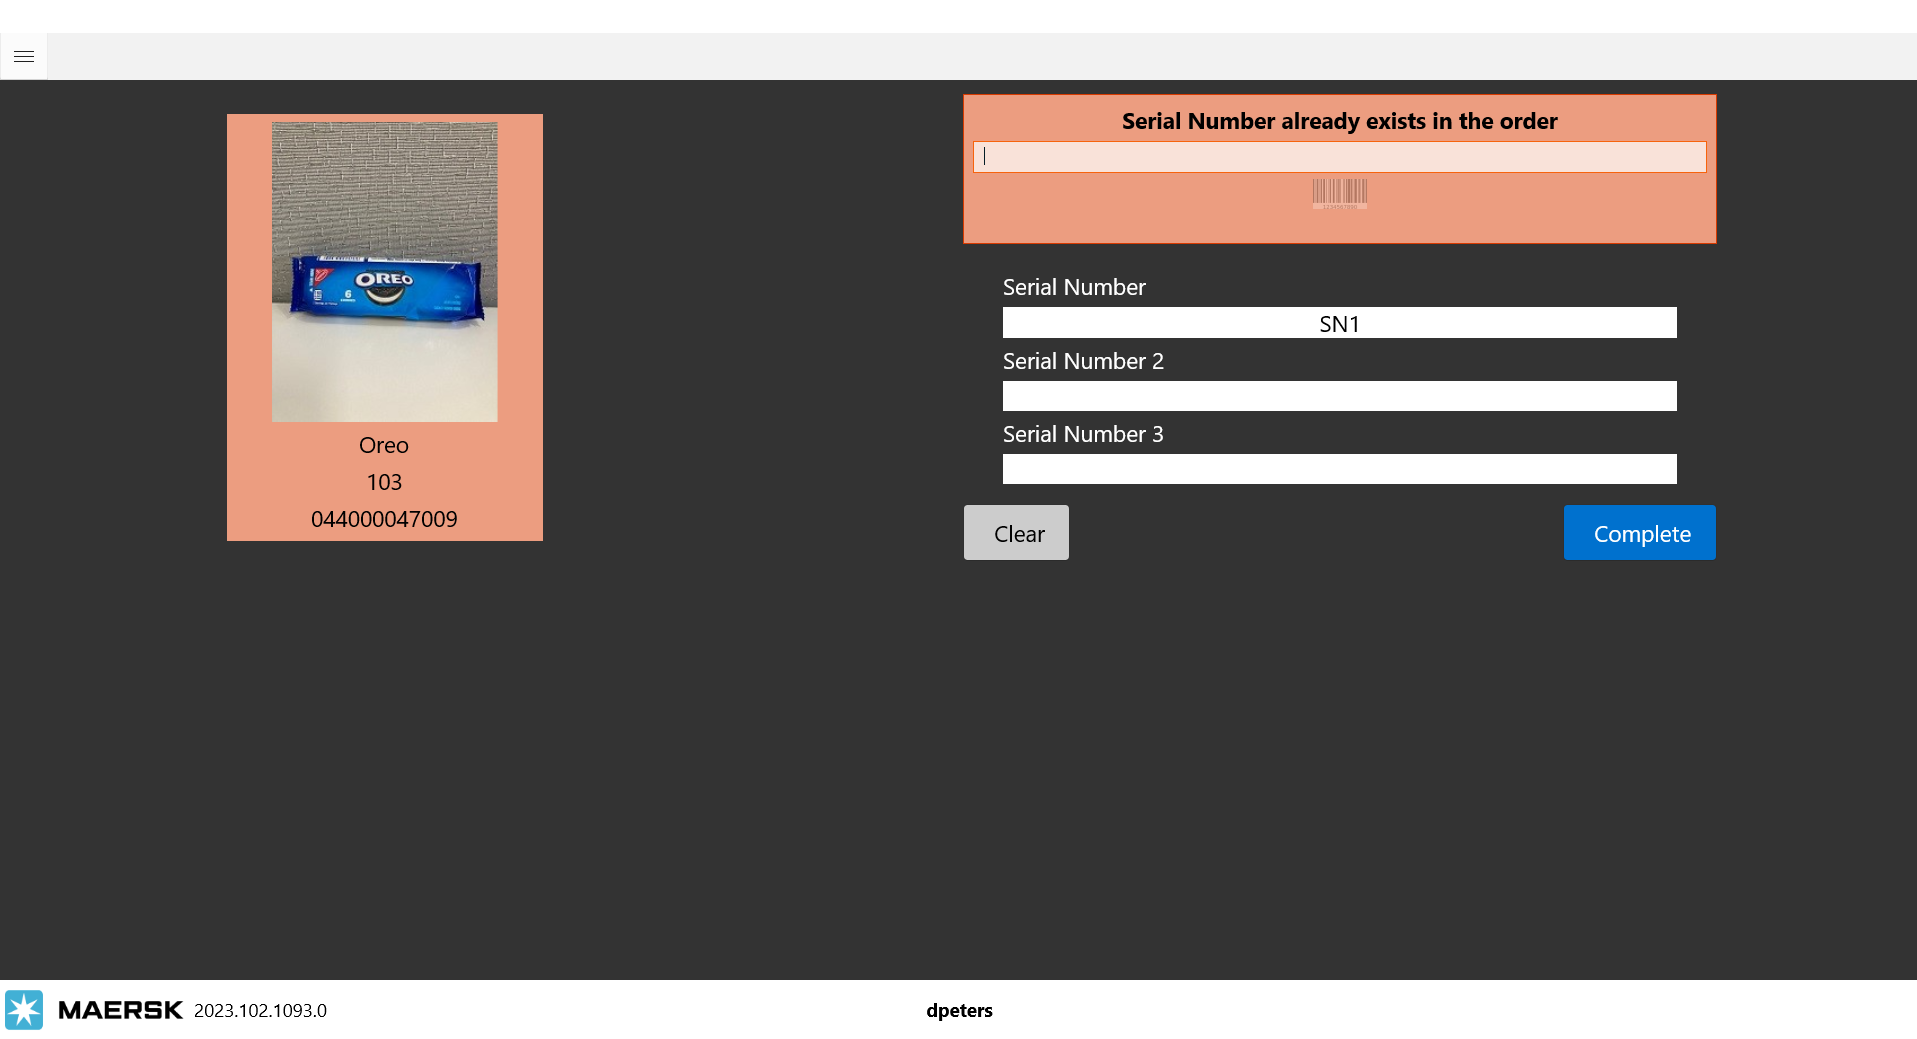
Serial Number 2 and Serial Number 3 Scans When Picking
This is not a setting to turn on/off in the app individual items must be set up in the database to allow for multiple serial scans. *Currently this is not exposed on the item set up screens in LOC or Warehouse apps. If needed support to work with IT on updating any items. If an item is set up to accept multiple serial scans the new UI will show additional scan boxes. Each of these serial numbers must be unique. If you enter SN1 for Serial number, then try to enter SN1 again for serial number 2 you will be shown an error. The actual numbers on the various items will be unique so we’re preventing a user from scanning the same one over again just to get past this screen. If you hit clear it will wipe out all of the entered scans and all numbers must be scanned in again.
Vertical Picking
The most efficient form of picking items for orders is called Vertical Picking, which means that when a picker is in front of the warehouse rack with the items in it, they will pick items vertically from the slots rather than go across it horizontally. The Cart Pick application forces the picker to pick in this method so that they move left to right in a Pick Zone.
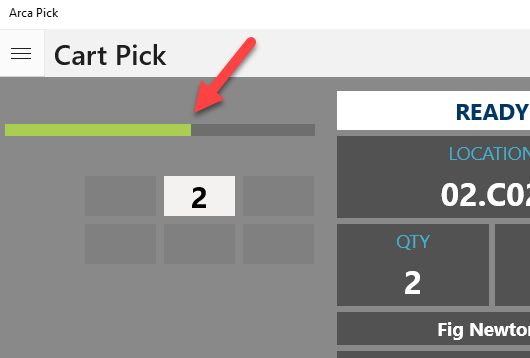
Status Bar
As pickers work through orders, the status bar at the top of the application will display a bar graph that represents a general estimate of how much of the cart pick has been completed.
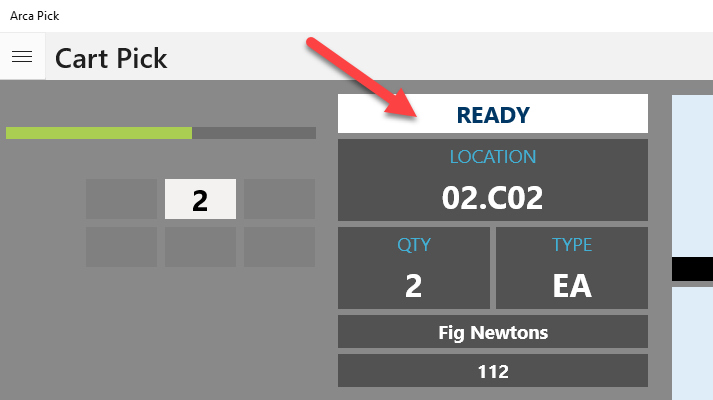
There is also an indicator that displays a status of either "Moving" or "Ready" where:
Moving represents that the forward arrow has been selected because the items for each order have been picked and placed in their respective bins, and
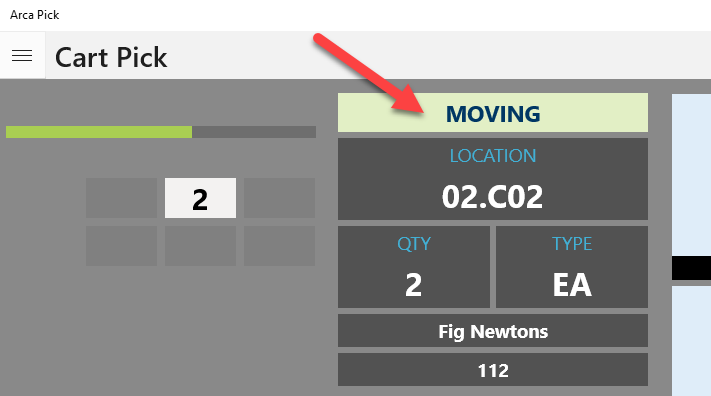
Ready represents that the new items are ready to be picked and placed in their respective bins.
No Inventory
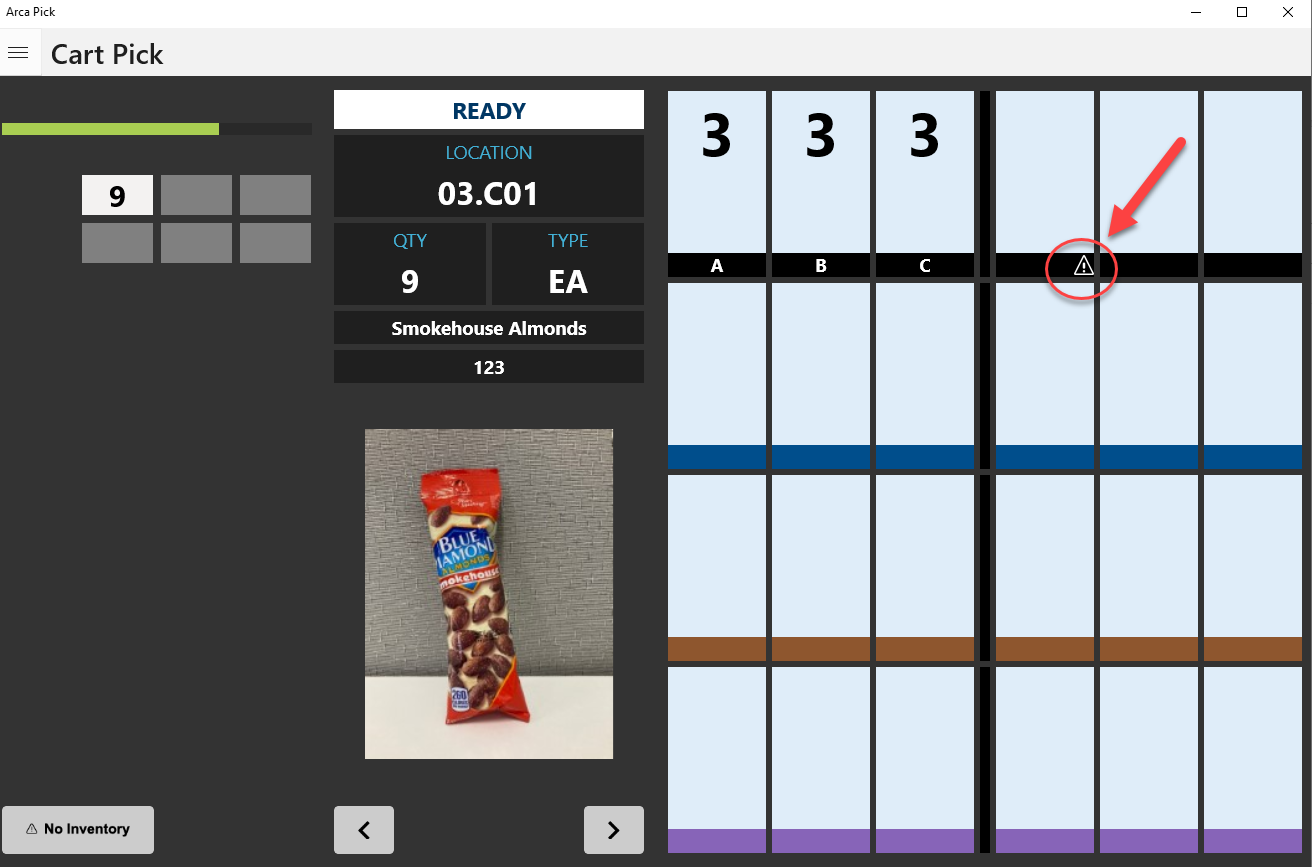
During a picking session, it is possible that the items needed to fulfill an order are not available in the slots. In this case, the picker can select the "No inventory" button to indicate that those items cannot be picked. If this is selected, the application will place a warning icon on the bins that need this item.
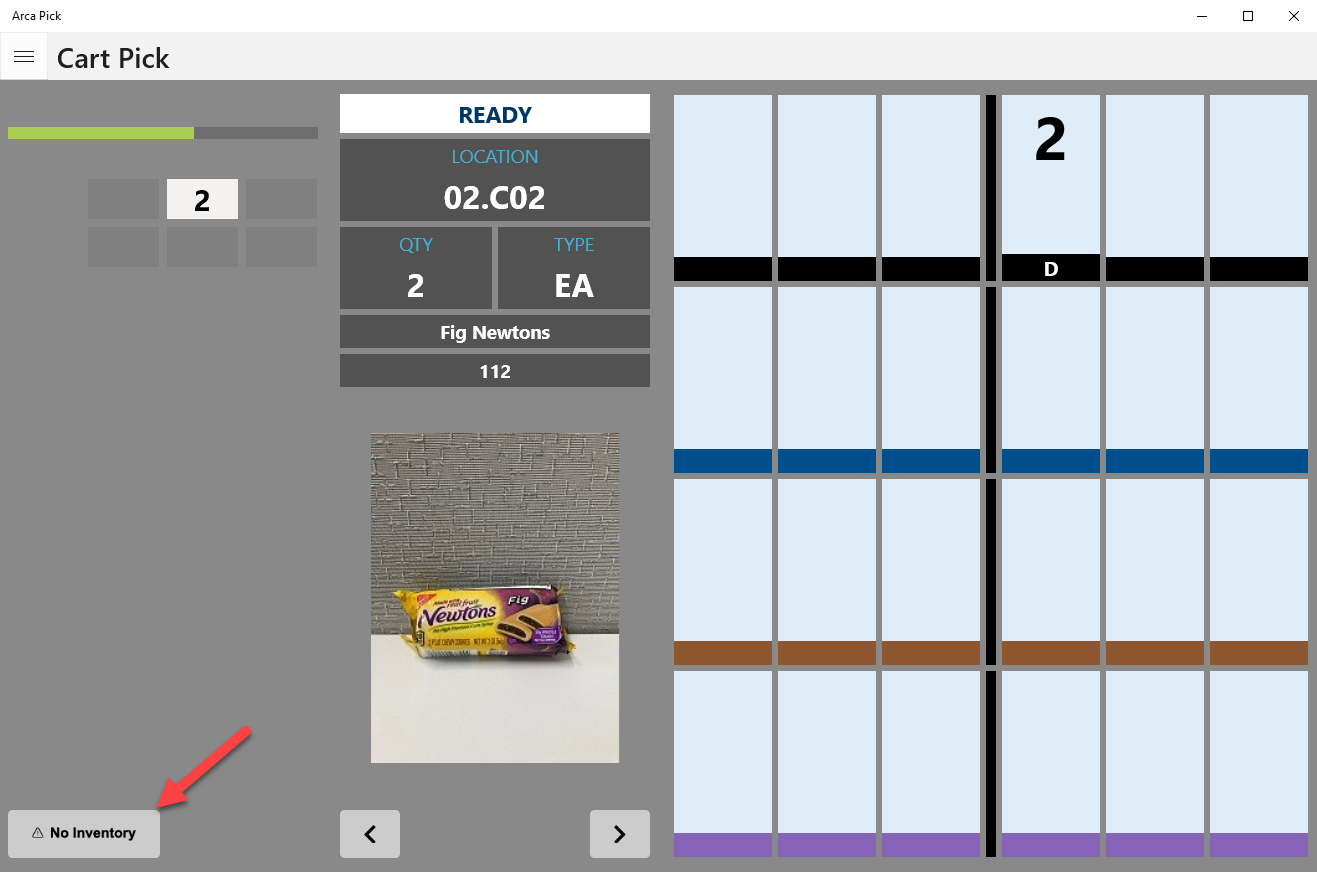
Once that is selected, the application then places a warning icon on the bins that need this item. This allows the picker to continue to move forward picking the rest of the items for the other orders.
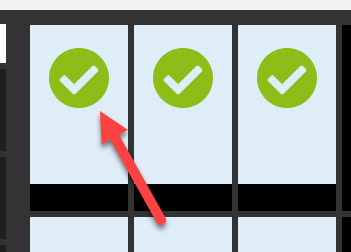
Completed Picks
When the order items are fully picked, a green checkbox will display in the bin on the cart. This indicates that the pick for that item is complete.
When items have been picked and the cart is completed, the system will decrement the picks from the locations.
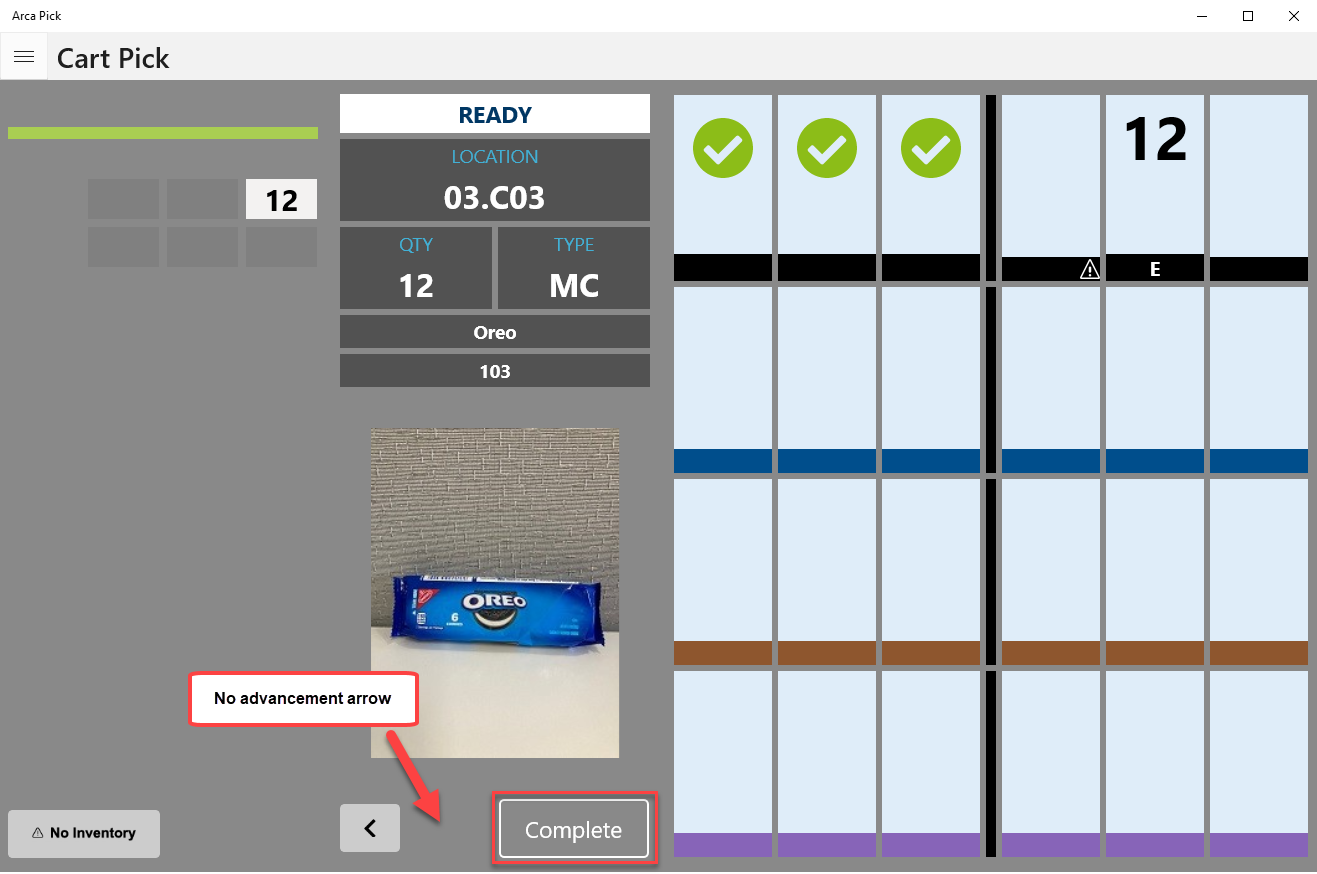
Completed Orders
Once orders for the cart have all been fulfilled, whether with or without inventory, the application responds as follows:
- The advance/forward arrow no longer displays
- The status bar is fully highlighted to indicate 100% completion
- A "Complete" button appears to complete the pick
After selecting "Complete", the screen provides information on the complete pick and offers a "New Cart" to be started.

The screen will be cleared of the past orders and the cart configuration screen will display the same information as used at the beginning of the session. Bins can
- be removed from the cart and sent for packing or,
- a new cart with that configuration can be used or,
- the cart can be "Reset" to start a new configuration.
Pick Sequence
Cart picking is designed to pick moving in vertical columns. In the warehouse it's all about trying to be efficient and make the pickers walk the least amount of distance. So it sorts by column first then bin. You would start in zone 1, pick A01, then B01 then move on to the next column. Once you're finished in zone 1, then you go on to zone 2. What we don't want is telling a picker go to zone 1 to get an item then go to zone 10 and get an item and then go back to zone 4 and get an item and make them run around.
The pick sequence is determined by the orders that are scanned into the first cart configuration screen. The pick sequence will be set up in the most efficient way possible for the picker, depending on the items location. Aisle is now taken into account for the pick sequence. The way the pick sequqnce is created is it first takes the aisle into account, then rack, level and bin.
Troubleshooting
Wrong Item Error Message
If an order cannot be loaded, check that the "Settings" are correct. This is typically due to the incorrect client being configured.
Getting Access
To request access, end-users must submit a Zendesk help ticket.
Split Shipments
Items cannot be split between warehouse sites. This causes issues with how the information is stored and rolled up in reporting and with financial records.
Barcode Installation
Barcodes can be installed via Zendesk help tickets. Requestors should include the barcode they need installed, the station location, and the warehouse location.
Valid IP Address at Station
Be sure that the IP address at the workstation follows the 169.x.x.x. format. All others will produce an error.
Super Tote
When an order needs to be fulfilled by a warehouse worker, they will use their workstation to scan in the order ID.
Multiple orders with the same item will be scanned to a batch.
The batch is then scanned to a super tote.
If multiple pick zones are needed to complete the order, the manager will setup the order configurations as needed.
The intent of the module is to:
- Provide information on how Super Tote is set up.
- Explain how multiple orders with the same item can be picked at once using a single tote.
Session Setup
To fulfill orders properly, ARCA Pick must be set up correctly to validate that the orders being scanned in are associated with the warehouse, the client, and the pick area(s).
Settings is a specific menu item that warehouse workers will not use but warehouse managers will. The manager may choose to use this information to gather information about specific orders across different pick areas and pick zones. This application assumes that the warehouse worker has been assigned a station, has been placed at said station, and is using the tool to fulfill the order.
Before you start picking the order, the Settings menu should be configured as follows:
REQUIRED SETTINGS
- Change "Select Station Type" to "Super Tote".
- Set the "Select Warehouse" to the correct value, which depends on the client.
- Set "Select Client" to correct client value.
ADDITIONAL SETTINGS
- Set "Pick Area" (Optional for Super Tote)
- If the option "Use Totes" is enabled it will force 1 or more totes to be scanned.
Then "Save Settings"
If testing needs to be done or an end-user is in training, both the "Test Mode" and "Ignore Pick Status" icons can be turned ON.
- "Test mode" will switch your session to the test/sandbox environment; which will not effect the live/production environment.
- "Ignore Pick Status" allows already picked line items to be used again; picks will not adjust inventory.
Warehouse Badge Scan
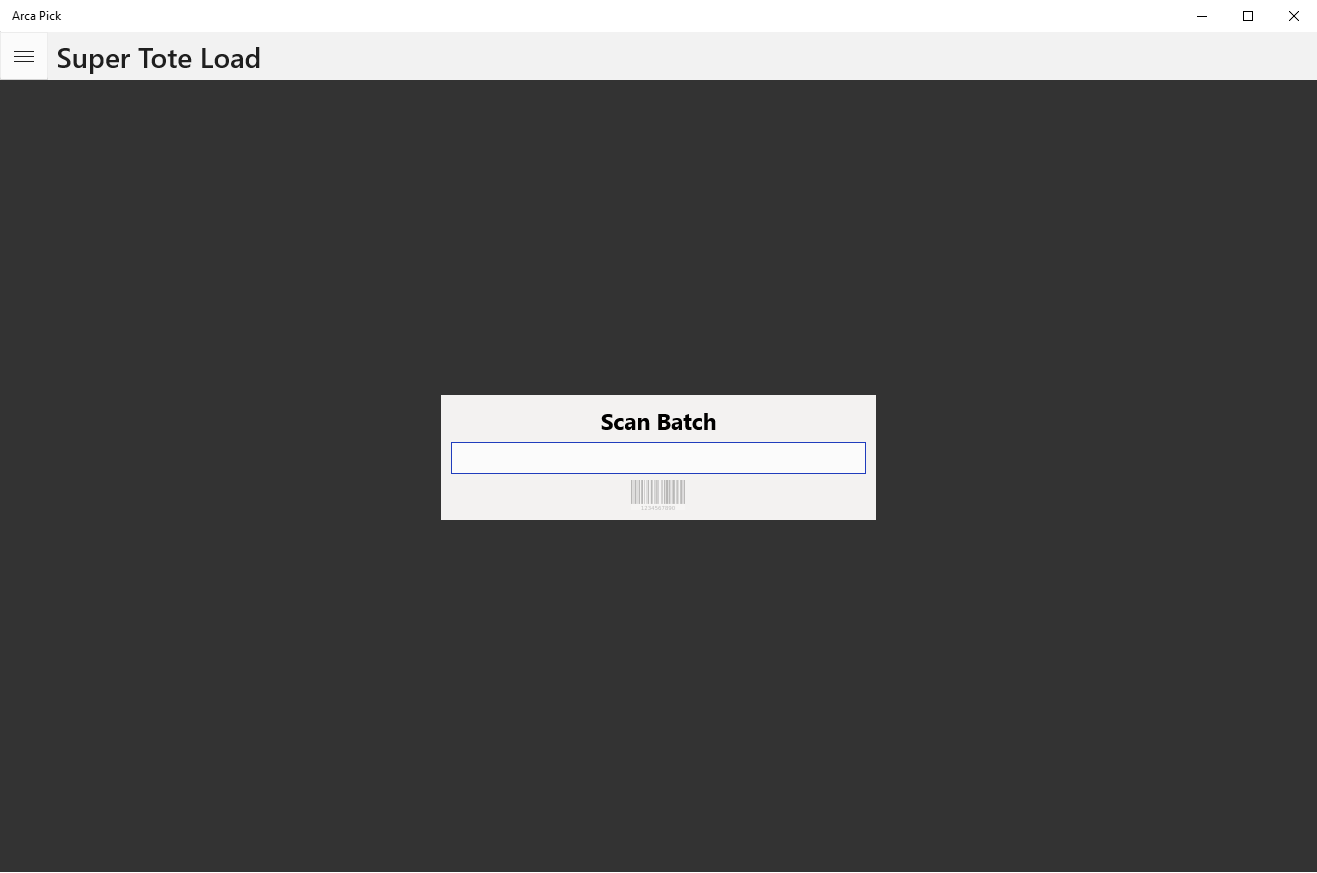
After the settings have been configured, end-users will need to scan their badge to log into ARCA Super Tote.
![]()
Scanning the Batch
The next screen prompt will be for the Batch number.
Order Pick Screen
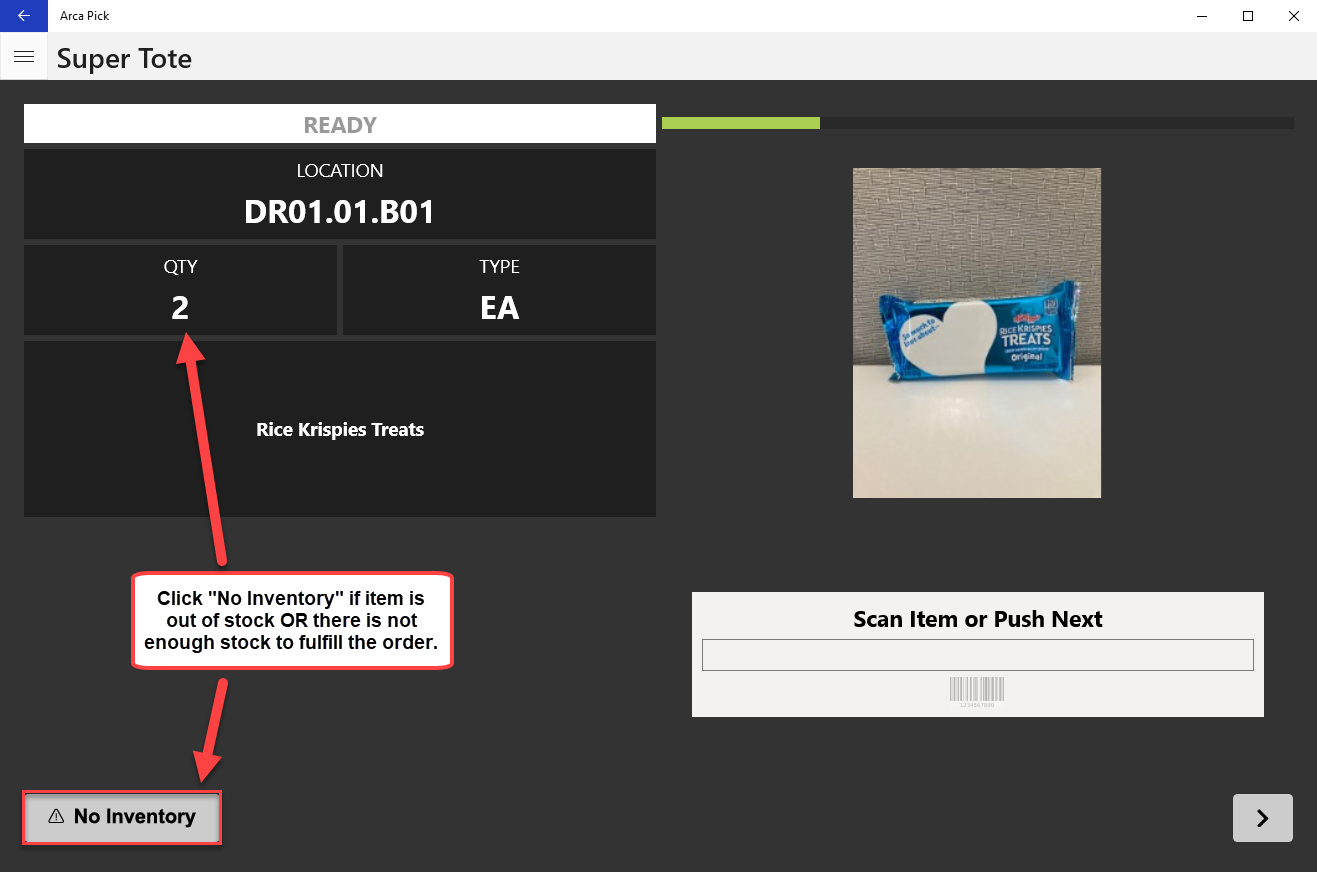
The product details are laid out on the screen providing the item name, pick location, the quantity to be picked, and image of the product, if available. The location will be a combination of the Pick Area, Pick Zone and Bin (from left to right).
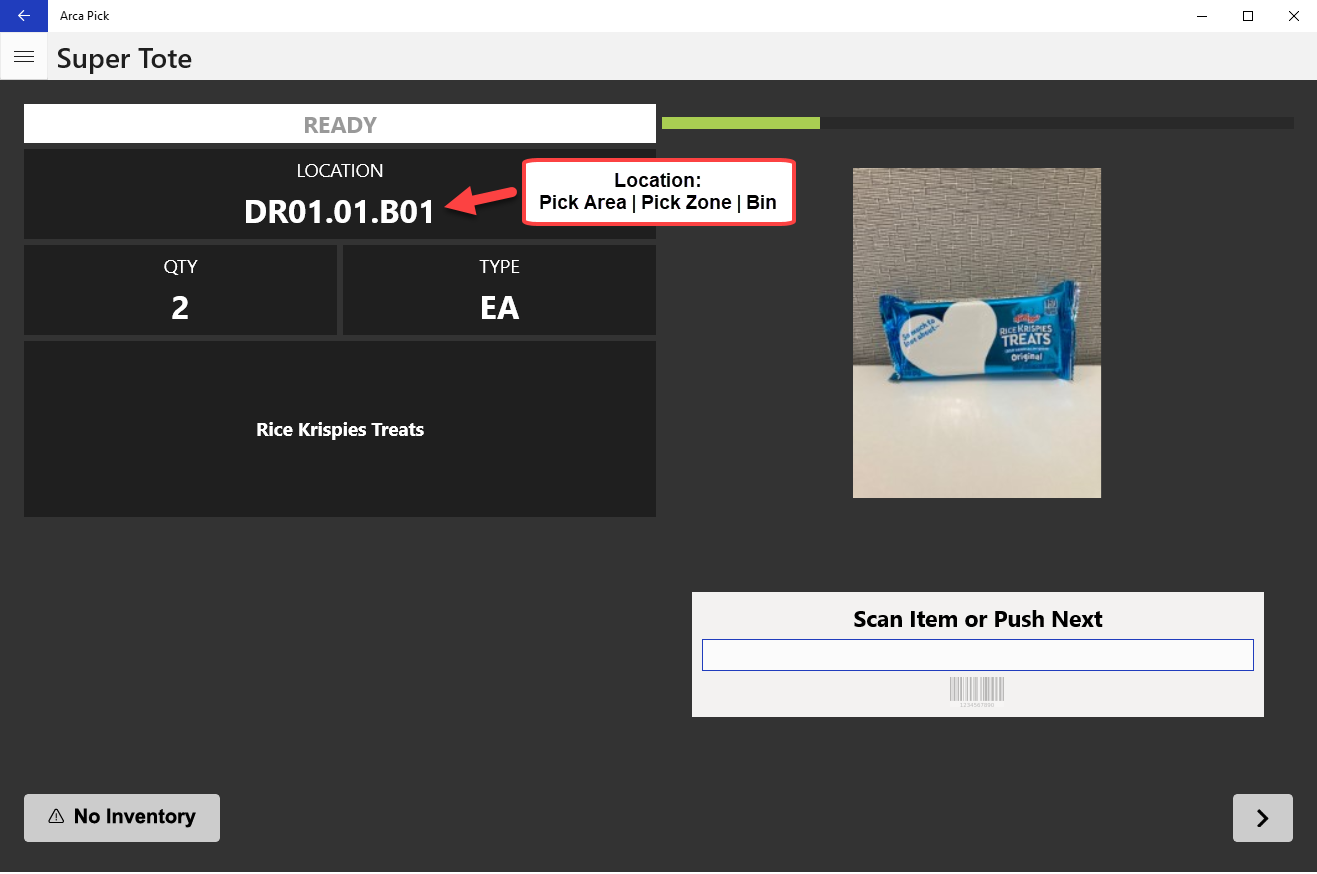
Items for this tote will likely span across multiple pick areas and zones UNLESS a specific Pick Area was set in Settings.
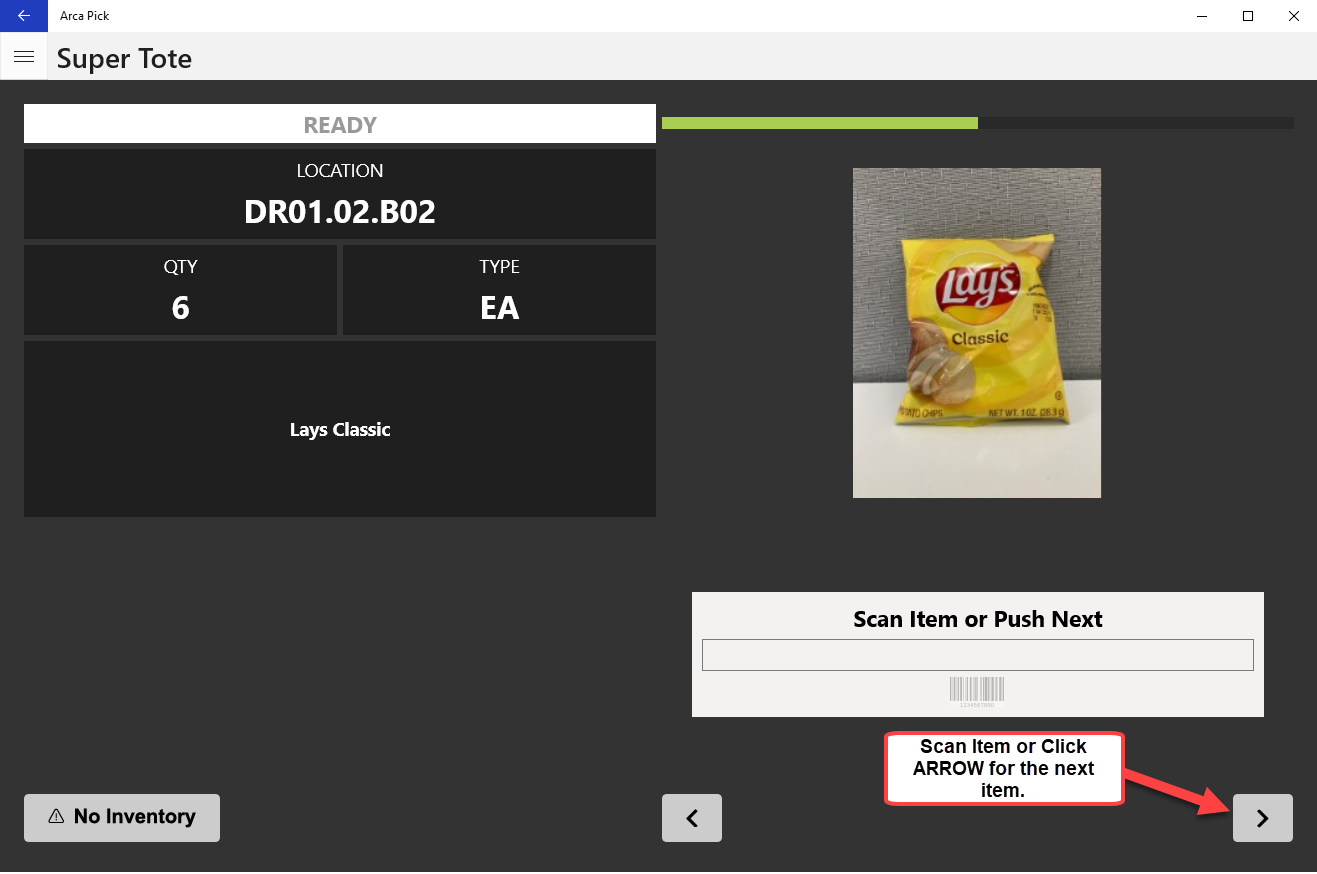
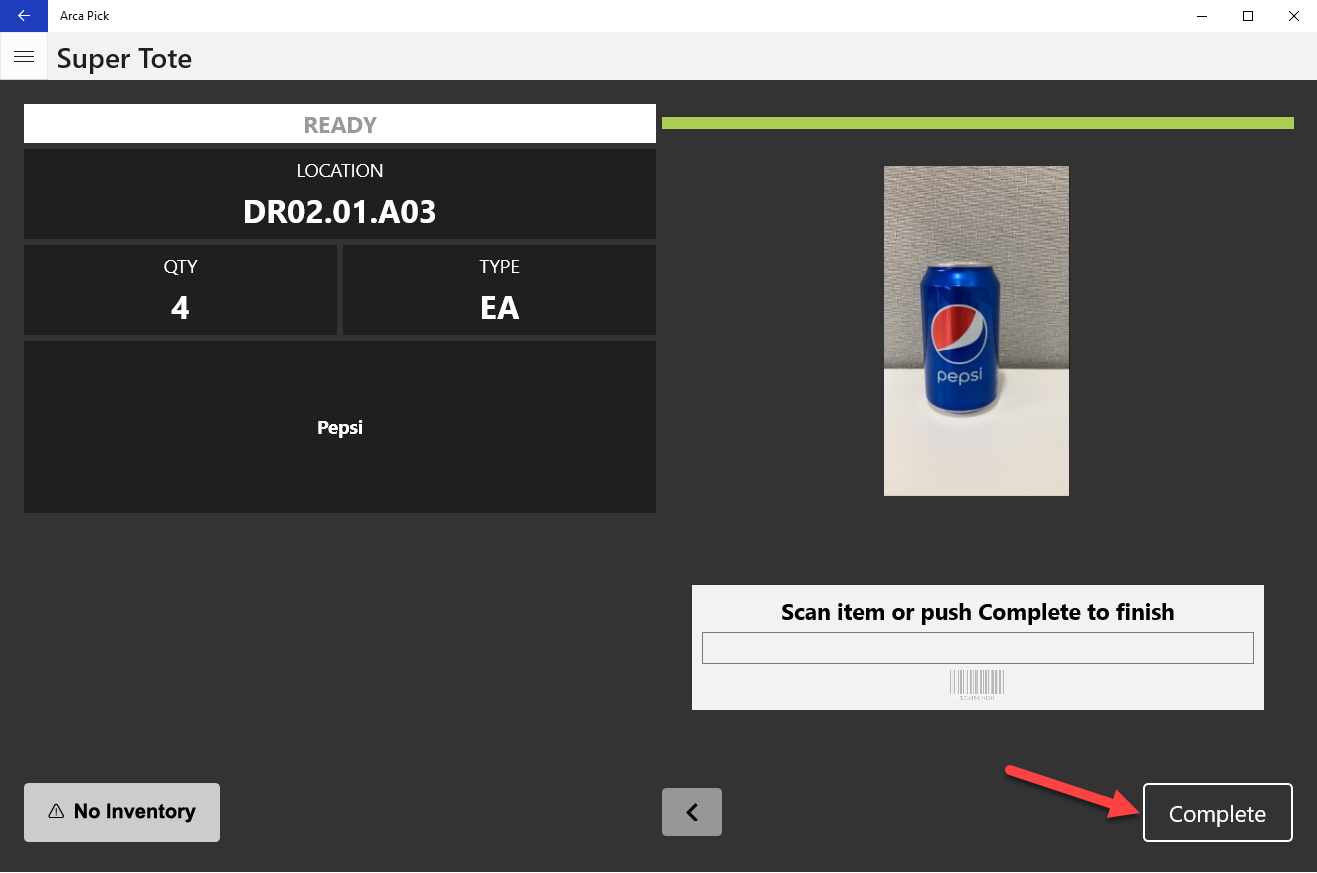
End-users will go through the batch and pick the quantity of items in the location displayed. Once the items have been placed inside the tote, end-users can then select the arrow at the bottom of the screen that advances them to the next item in the batch to fulfill.
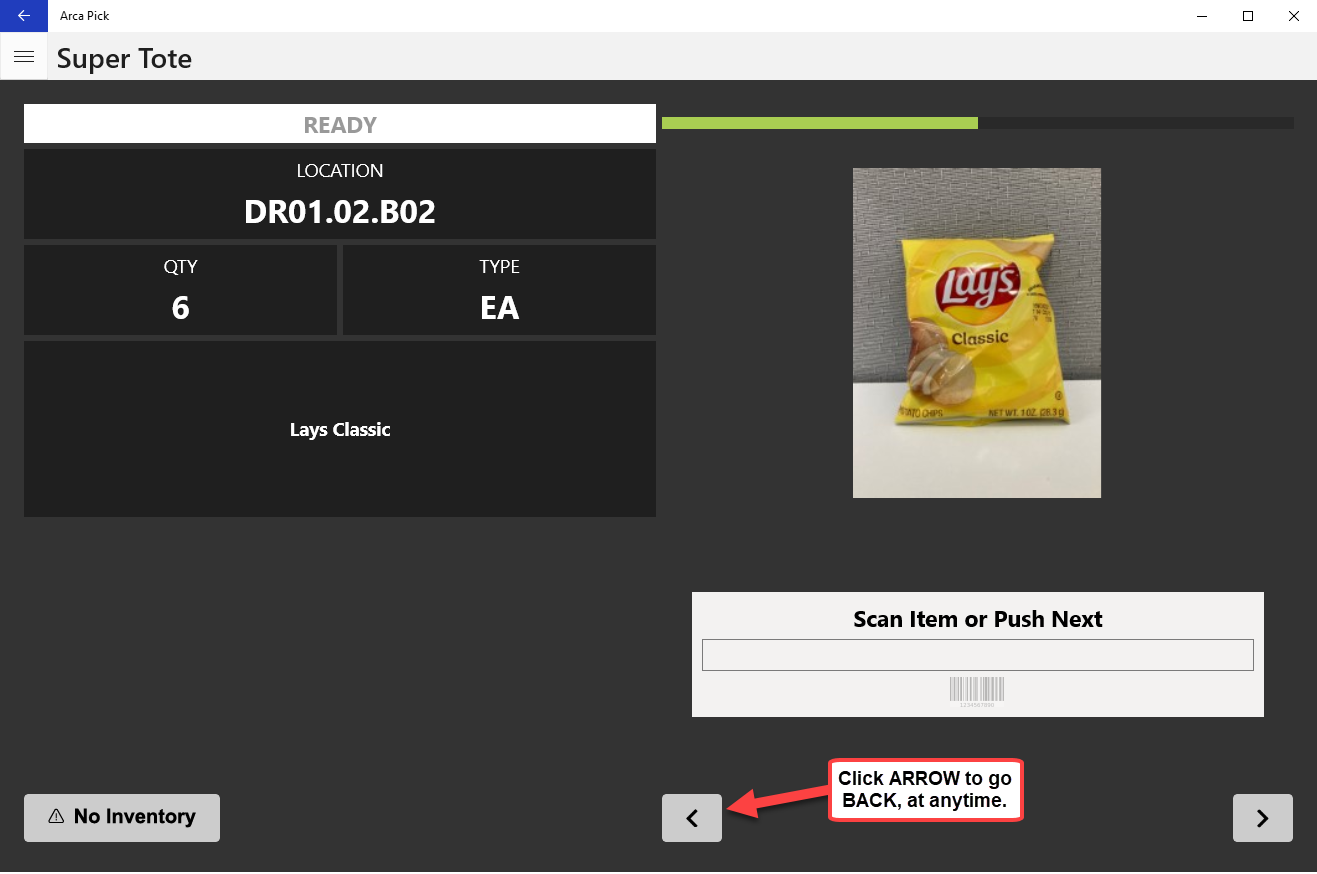
If at any time the end-user needs to go back to the previous item, they can choose the return arrow at the bottom of the screen.
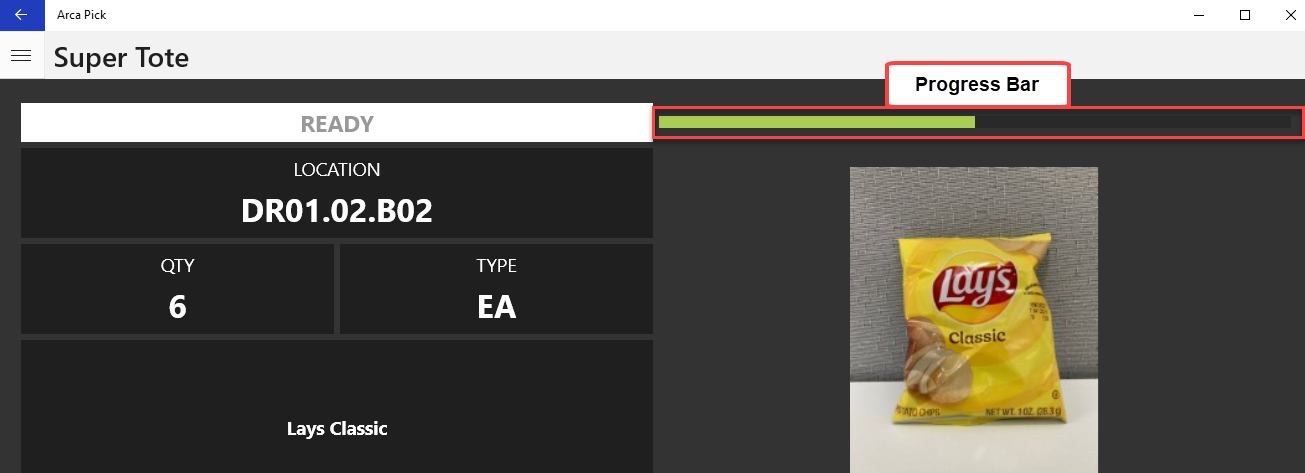
Progress Bar
During the end-user's session, there is a status bar at the top of the screen, which indicates how far along they are in fulfilling the items for the batched super tote items.
No Inventory
During a picking session, it is possible that the items needed to fulfill an order are not available in the slots. In this case, the picker can select the "No inventory" button to indicate that those items cannot be picked. For non-ASC clients in ARCA, this will not send the picks back. In all other cases, verification can still occur in order to allow shipping.
Completed Batch
Once items for the tote have all been fulfilled, whether with or without inventory, the application will display a "Complete" button that the end-user will select.
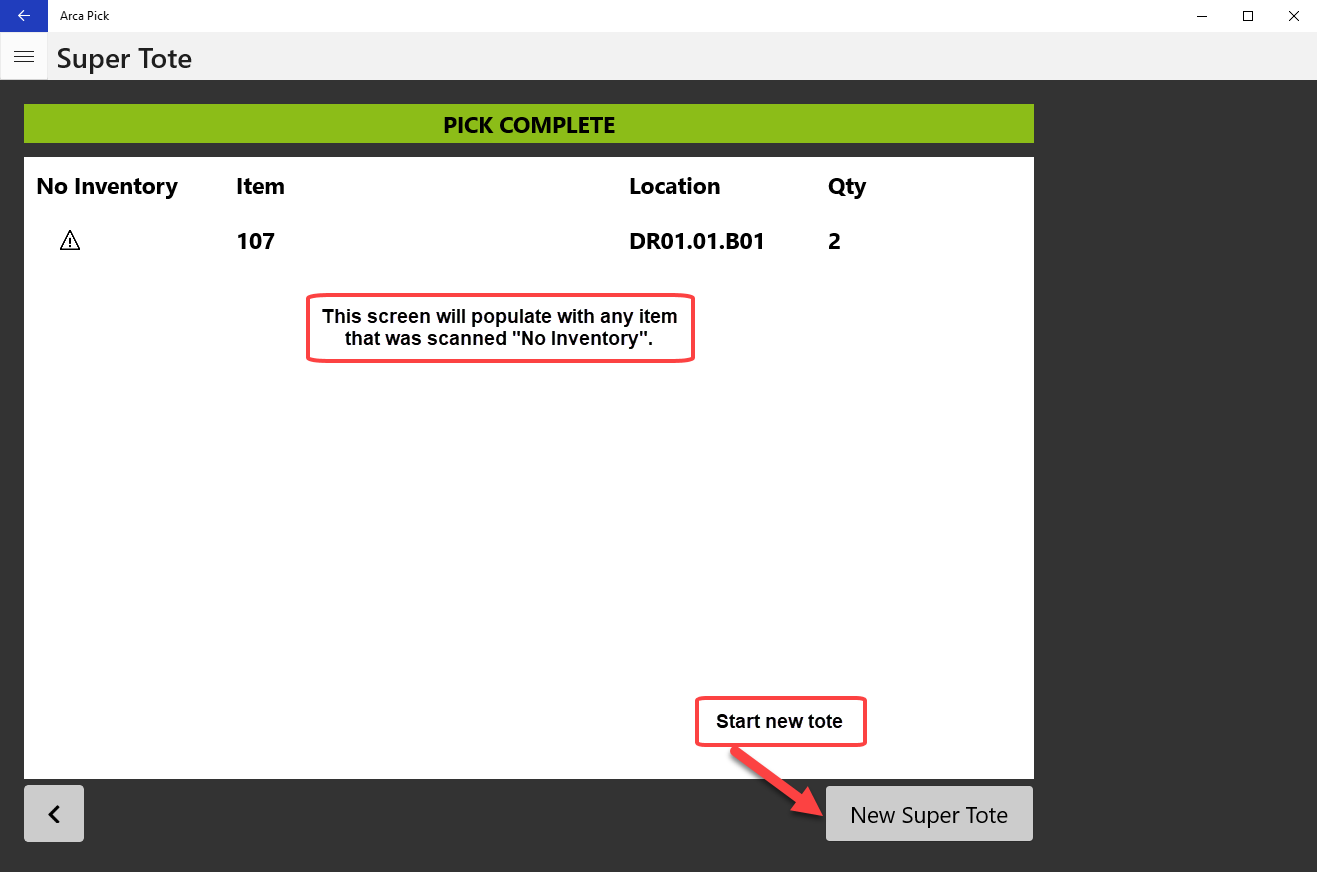
After selecting "Complete", the screen provides information on what had no inventory and offers a "New Super Tote" to be started.
Bulk Pick
The Bulk Pick station is intended to be used only with bulk and transfer type orders. Orders must be scheduled to the Bulk Pick zone and be in a pickable status to load at this station. Bulk and transfer type orders are not intended to be used in pick stations other than bulk. If a bulk or transfer order is loaded into the cart or normal pick station, an invalid order type error will be shown to the user.
Create and Schedule Bulk Order Flow
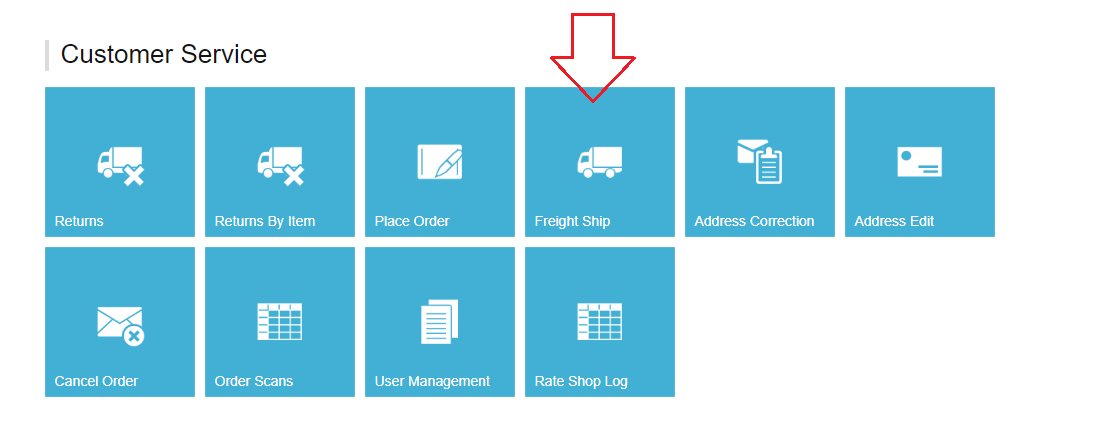
- Access the Freight Ship tile on the client portal to place a bulk or transfer type order. Make your selection using the order type drop-down menu. Add item(s) with quantity and click on confirm order.
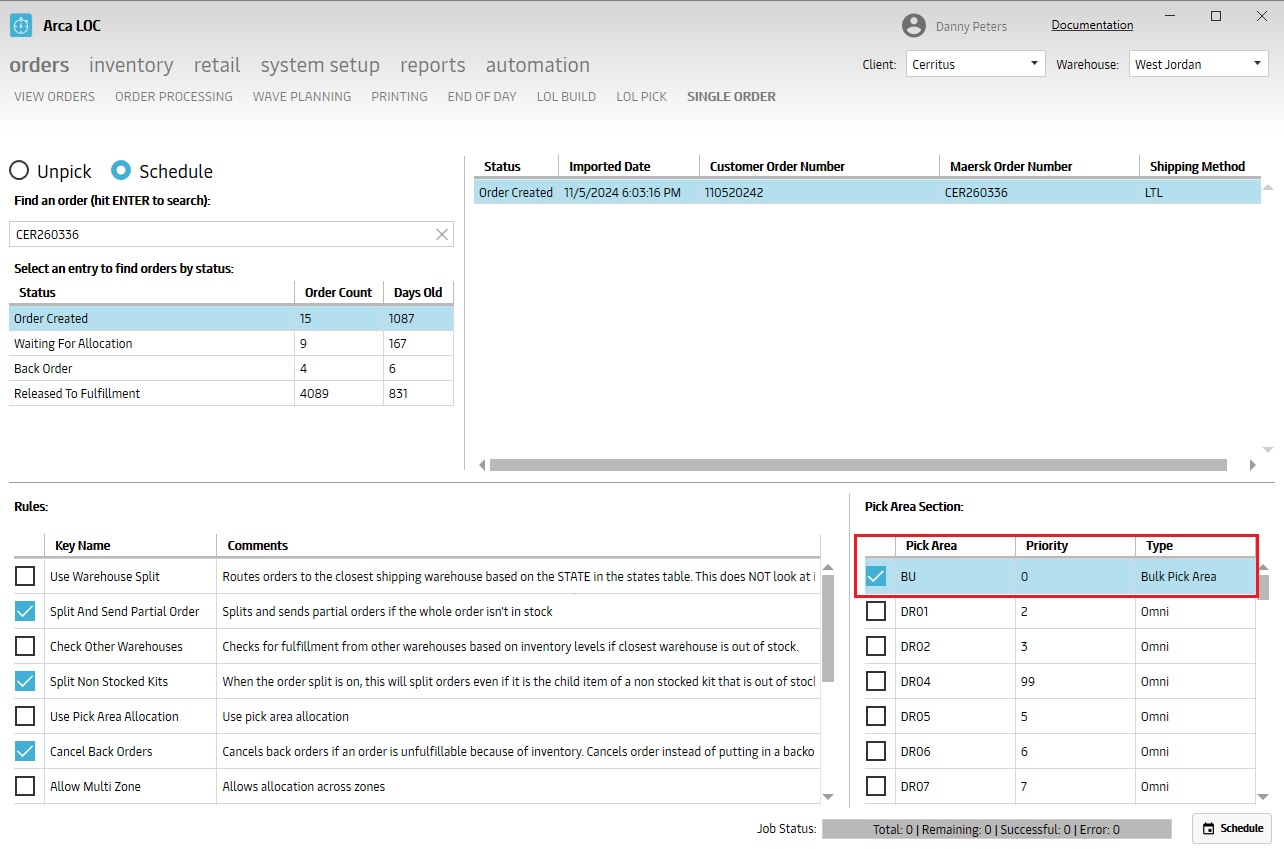
- Using the Single Order schedule screen in Arca LOC, schedule your bulk orders to the pick area called ‘BU’, this is the designated bulk picking area, and it will be displayed as an option for each client. All bulk and transfer type orders will be assigned using this generic bulk pick area.
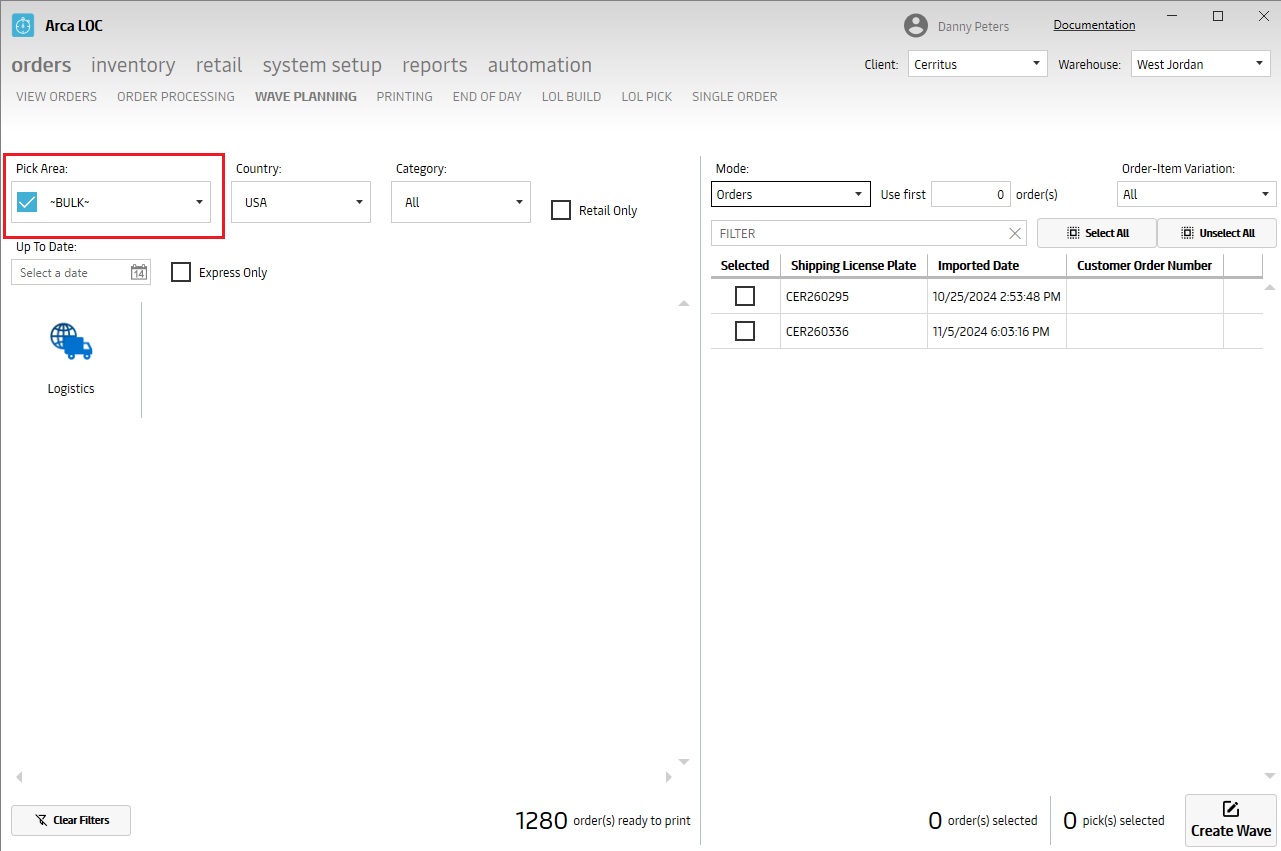
- Once your order has been processed it will need to be waved following the same process as normal order types. In Arca LOC, go to the wave planning screen. In the drop-down Pick Area menu, locate the Pick Arca called ~BULK~, select the orders you need to build the wave and click on create wave. You can now print the order pack slips from the printing screen.
- After creating the wave, the order is now in a pickable status. Proceed to the Arca Pick app.
Bulk Picking
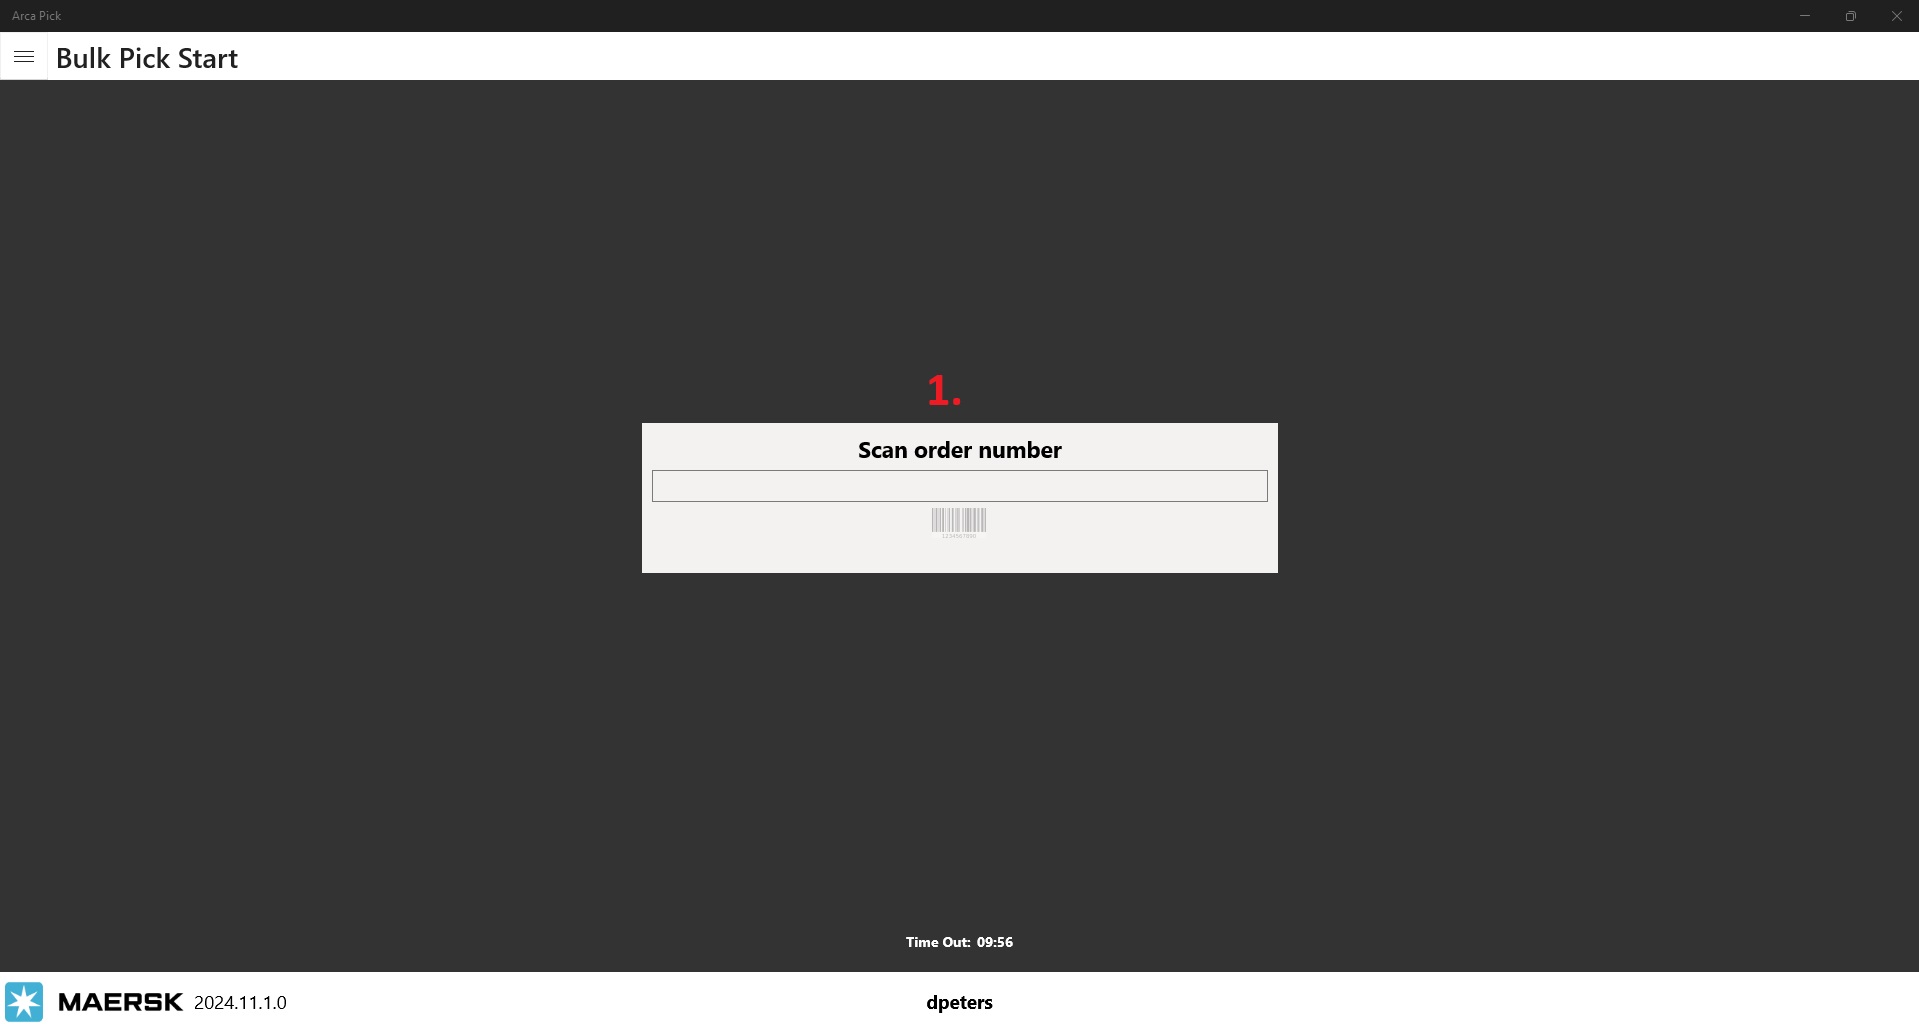
Scan order number. If the order isn’t in a pickable status, an error will be shown.
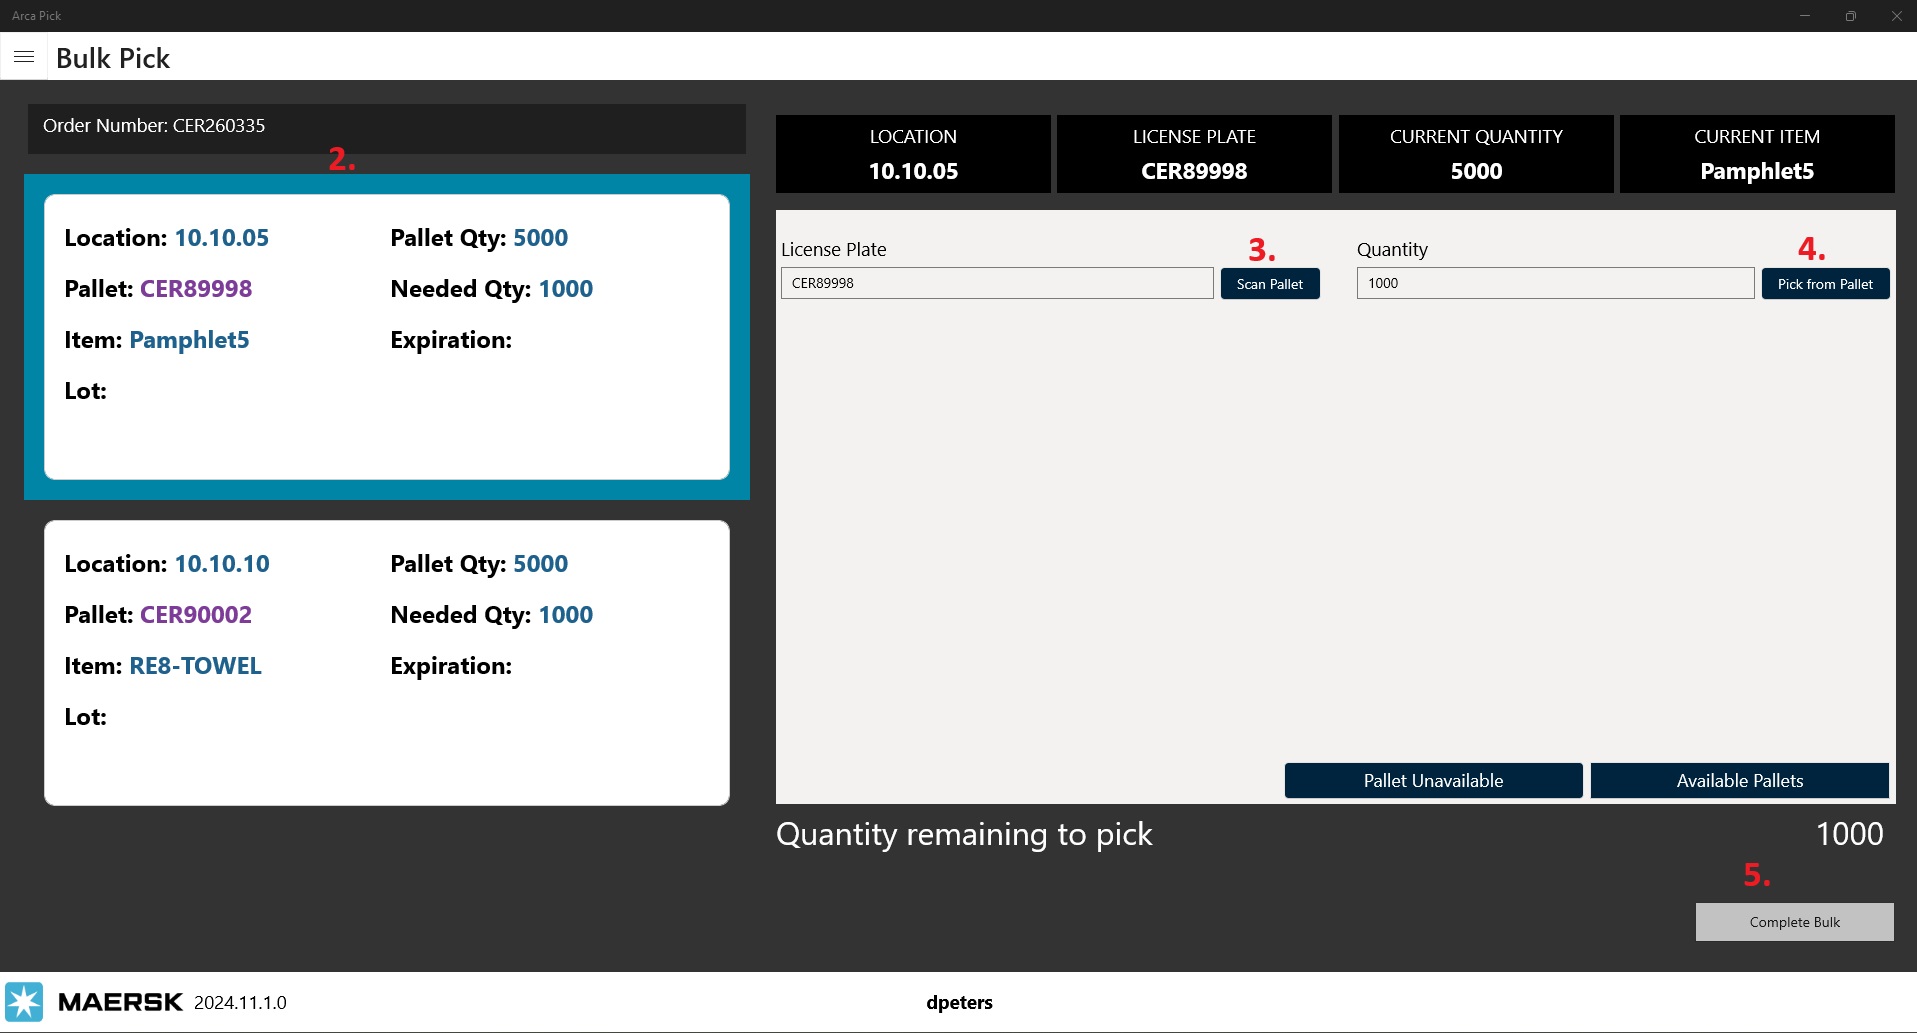
Select a pallet from the list on the left to start. Without selecting a pallet first, an error message will be shown informing the user that no pallet is selected.
Enter/Scan license plate to proceed with picking action. Green success notice is given to the user after scan. If you cannot pick from the selected pallet, then click on pallet unavailable and it will be replaced with the next available pallet in the list. Clicking on Available pallets will the display the list of what is next. Clicking on available pallets again, will hide the list. A user is allowed to override the list and scan any pallet from the available list to pick from.
Enter quantity to pick. With an acceptable quantity entered, clicking on Pick from Pallet will return a green success message to the user. If the entered quantity is greater than the pallets available quantity, an error is shown. If the entered quantity is greater than the quantity needed to fulfill the order, an error is shown. Once the total quantity needed for an item has been satisfied, no more pallets of that item will be shown in the list on the left.
Continue picking until the list has been completed, when finished click on complete bulk to return to the scan order screen.
EOD close out
Bulk and Transfer orders are not intended to be used in the Arca Pack application. Use the EOD (End of Day) process in Arca Loc to complete these orders.
Click on View CSV Template to open the excel template. Fill out the necessary fields for all the orders you want to complete. Note that bulk and transfer orders will use Logistics/LTL as the default ship carrier and ship carrier service. Use these to close out the order. Save the .csv file and then load into LOC. Fix and errors identified by the parse results, then click on save and finish. This will update the orders to completed status.
